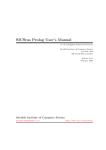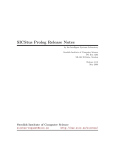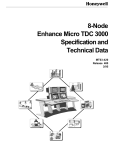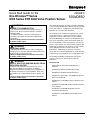
1
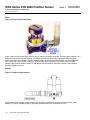
Quick Start Guide for the One Wireless™ Series WCX Series XYR 6000 Valve Position Sensor WARNING MISUSE OF DOCUMENTATION • The information presented in this product sheet is for reference only. Do not use this document as a product installation guide. • Complete installation, operation, and maintenance information is provided in the instructions supplied with each product. Failure to comply with these instructions could result in death or serious injury. WARNING PERSONAL INJURY • DO NOT USE these products as safety or emergency stop devices or in any other application where failure of the product could result in personal injury. Failure to comply with these instructions could result in death or serious injury. WARNING RISK OF DEATH OR SERIOUS INJURY FROM EXPLOSION OR FIRE. If sensor is to be returned to Honeywell for any reason, both batteries MUST be removed prior to shipping. Dispose of used batteries promptly per local regulations or the battery manufacturer’s recommendations. Keep away from children. Do not disassemble and do not dispose of in fire. Failure to comply with these instructions could result in death or serious injury. ISSUE 3 50040850 This document describes mounting, installation and wiring of the Honeywell OneWireless WCX Series valve position sensor and antennas. Configuration, authentication and operation are covered in other documents. Honeywell does not recommend using devices for critical control where there is a single point of failure or where single points of failure could result in unsafe conditions. Honeywell OneWireless solutions are designed for open loop control, supervisory control, and controls that do not have environmental or safety consequences. As with any process control solution, the customer must weigh the risks and benefits to determine if the products used are suitable for the application based on security, safety, and performance. Additionally, it is up to the customer to ensure that the control strategy defaults to a safe operating condition if any crucial segment of the control solution fails. The following list identifies all documents that may be sources of reference for material discussed in this publication. Document Title Getting Started with Honeywell OneWireless Solutions OneWireless Wireless Builder User’s Guide OneWireless Builder Parameter Reference OneWireless WCX Series XYR 6000 Valve Position Sensor User's Manual OneWireless XYR 6000 Pressure Transmitter User's Manual OneWireless XYR 6000 Temperature/DI Transmitter User's Manual OneWireless XYR 6000 SmartCET Corrosion Transmitter User's Manual OneWireless XYR 6000 HLAI Transmitter User's Manual Sensing and Control WCX Series XYR 6000 Position Sensor Issue 3 50040850 Symbol Definitions The following table lists those symbols used in this document to denote certain conditions. Symbol Definition ATTENTION: Identifies information that requires special consideration. TIP: Identifies advice or hints for the user, often in terms of performing a task. CAUTION Indicates a situation which, if not avoided, may result in equipment or work (data) on the system being damaged or lost, or may result in the inability to properly operate the process. CAUTION: Indicates a potentially hazardous situation which, if not avoided, may result in minor or moderate injury. It may also be used to alert against unsafe practices. CAUTION symbol on the equipment refers the user to the product manual for additional information. The symbol appears next to required information in the manual. WARNING: Indicates a potentially hazardous situation, which, if not avoided, could result in serious injury or death. WARNING symbol on the equipment refers the user to the product manual for additional information. The symbol appears next to required information in the manual. WARNING, Risk of electrical shock: Potential shock hazard where HAZARDOUS LIVE voltages greater than 30 Vrms, 42.4 Vpeak, or 60 Vdc may be accessible. ESD HAZARD: Danger of an electro-static discharge to which equipment may be sensitive. Observe precautions for handling electrostatic sensitive devices. Protective Earth (PE) terminal: Provided for connection of the protective earth (green or green/yellow) supply system conductor. Functional earth terminal: Used for non-safety purposes such as noise immunity improvement. NOTE: This connection shall be bonded to Protective Earth at the source of supply in accordance with national local electrical code requirements. Earth Ground: Functional earth connection. NOTE: This connection shall be bonded to Protective Earth at the source of supply in accordance with national and local electrical code requirements. Chassis Ground: Identifies a connection to the chassis or frame of the equipment shall be bonded to Protective Earth at the source of supply in accordance with national and local electrical code requirements. The Canadian Standards mark means the equipment has been tested and meets applicable standards for safety and/or performance. The Ex mark means the equipment complies with the requirements of the European standards that are harmonised with the 94/9/EC Directive (ATEX Directive, named after the French "ATmosphere EXplosible"). C-Tick Mark. The C-Tick Mark is a certification trade mark registered to ACMA (Australian Communications and Media Authority) in Australia under the Trade Marks Act 1995 and to RSM in New Zealand under section 47 of the NZ Trade Marks Act. The mark is only to be used in accordance with conditions laid down by ACMA and RSM. This mark is equal to the CE Mark used in the European Union. Notified Body. For radio equipment used in the European Union in accordance with the R&TTE Directive, the CE Mark and the notified body (NB) identification number is used when the NB is involved in the conformity assessment procedure. The alert sign must be used when a restriction on use (output power limit by a country at certain frequencies) applies to the equipment and must follow the CE marking. ii Honeywell • Sensing and Control WCX Series XYR 6000 Position Sensor 1. Issue 3 50040850 INTRODUCTION .................................................................................................... 1 1.1 Site preparation............................................................................................................................. 1 1.2 European Union Usage ................................................................................................................ 1 1.3 Certifications and approvals ....................................................................................................... 2 Hazardous location certifications ........................................................................................................................... 2 Radio certifications ................................................................................................................................................ 2 Ratings .................................................................................................................................................................. 2 2. SENSOR MOUNTING ............................................................................................ 3 2.1 Weight ............................................................................................................................................ 3 2.2 Dimensions.................................................................................................................................... 3 2.3 Actuator Dimensions .................................................................................................................... 6 2.4 Sensor location ........................................................................................................................... 11 WCX Series Valve Position Sensor models......................................................................................................... 11 2.5 Bracket mounting ....................................................................................................................... 11 Orientation ........................................................................................................................................................... 11 Attach sensor to valve ......................................................................................................................................... 11 3. PROCESS INSERTION ........................................................................................ 13 3.1 Basic Requirements ................................................................................................................... 13 Non-sparking considerations ............................................................................................................................... 13 Distance from multinode ...................................................................................................................................... 13 Angle to be measured ......................................................................................................................................... 13 Sensor update rate .............................................................................................................................................. 13 Access to cover for configuring sensor, changing batteries ................................................................................. 13 Proximity to high powered L-band transmitters.................................................................................................... 13 3.2 Linkage Alignment ...................................................................................................................... 14 Axis of valve and sensor input shaft .................................................................................................................... 14 Alignment of linkage ............................................................................................................................................ 14 If angle linearity is required .................................................................................................................................. 14 Coupling with pulleys ........................................................................................................................................... 15 If clockwise is to be translated into counter clockwise ......................................................................................... 15 3.3 Non-Valve Applications .............................................................................................................. 16 Door position sensing .......................................................................................................................................... 16 Air handler plenum door position sensing ............................................................................................................ 16 Linear displacement ............................................................................................................................................ 16 4. ANTENNA ADJUSTMENT AND MOUNTING ...................................................... 17 4.1 Requirements .............................................................................................................................. 17 Radio installation requirements ........................................................................................................................... 17 4.2 Integral antenna .......................................................................................................................... 17 Straight ................................................................................................................................................................ 18 WCX Series XYR 6000 Position Sensor 5. Issue 3 50040850 START UP ............................................................................................................19 5.1 Connect batteries ....................................................................................................................... 19 5.2 Display sequence ....................................................................................................................... 21 5.3 Authentication ............................................................................................................................. 21 5.4 Calibration ................................................................................................................................... 21 6. INSTALLATION DRAWINGS ...............................................................................23 6.1 iv Drawing Availability.................................................................................................................... 23 Honeywell • Sensing and Control WCX Series XYR 6000 Position Sensor Issue 3 50040850 Tables Table 1 Battery Connecting Procedure ....................................................................................................... 19 Honeywell • Sensing and Control v WCX Series XYR 6000 Position Sensor Issue 3 50040850 Figures Figure 1. WCX Series valve position sensor dimensions ............................................................................. 3 Figure 2. WCX Series valve position sensor right angle antenna dimensions ............................................. 4 Figure 3. WCX Series valve position sensor straight antenna dimensions .................................................. 5 Figure 4. Standard roller lever actuator ........................................................................................................ 6 Figure 5. Yoke Roller Lever ......................................................................................................................... 7 Figure 6. Offset Roller Lever ......................................................................................................................... 8 Figure 7. Adjustable Length Roller Lever ...................................................................................................... 9 Figure 8. Rod Lever .................................................................................................................................... 10 Figure 9. Short Lever ................................................................................................................................. 10 Figure 10. Direct coupling to valve .............................................................................................................. 11 Figure 11. Roller Lever ................................................................................................................................ 12 Figure 12. Sensor Mounted to Linear Valve ............................................................................................... 12 Figure 13. Axis parallel and linkage 90 degrees with shafts ....................................................................... 14 Figure 14. Parallelogram Formed by Linkage ............................................................................................. 15 Figure 15. Changing CW into CCW ............................................................................................................ 16 Figure 16. Elbow antenna adjustment ........................................................................................................ 18 Figure 17. Integral straight antenna ............................................................................................................ 18 Figure 18. Battery connecting ..................................................................................................................... 20 Figure 19. Battery connecting detail ........................................................................................................... 20 vi Honeywell • Sensing and Control WCX Series XYR 6000 Position Sensor Issue 3 50040850 1. Introduction 1.1 Site preparation Wireless devices require proper site preparation to ensure optimum performance and safety compliance. Do not proceed until you have done the proper planning described in the Wireless Planning Guide. 1.2 European Union Usage This product may be used in any of the following European Union nations. Country ISO 3166 2 letter code Country ISO 3166 2 letter code Austria AT Latvia LV Belgium BE Liechtenstein LI Bulgaria BG Lithuania LT Cyprus CY Malta MT Czech Republic CZ Netherlands NL Denmark DK Norway NO Estonia EE Poland PL Finland FI Portugal PT France FR Romania RO Germany DE Slovakia SK Greece GR Slovenia SI Hungary HU Spain ES Iceland IS Sweden SE Ireland IE Switzerland CH Italy IT United Kingdom BG Honeywell Sensing and Control 1 WCX Series XYR 6000 Position Sensor Issue 3 50040850 1. Introduction 1.3. Certifications and approvals 1.3 Certifications and approvals Hazardous location certifications Refer to product label for applicable approvals. Approval / Item Ratings / Description cCSAus explosion-proof with IS outputs CLASS I, DIV 1 GROUPS B, C, D, T6 CLASS II, DIV 1 GROUPS E, F, G CLASS III CLASS 1 ZONE 1 A/Ex d [ia] IIC T6 CLASS II ZONE 21 AEx tD [iaD] 21 T85C DIP A21 IP66 T85C Tamb -40°C to +70°C ATEX / IEC Ex flameproof Ex d [ia] IIC T6 Gb with IS outputs EX tb IIIC T85°C IP66/67 Db Tamb -40°C to +70°C NEMA enclosure type Types 1, 3, 4, 4X, 6, 6P, 13 and IP66/67 Class II and III installations and for Type 4X/IP66 applications require that all cable and unused entries be sealed with a Zone 1 certified seal fitting. Seal fittings are supplied by Honeywell. Radio certifications Agency Certification Description The WCX Series valve position sensors comply with part 15 of the FCC rules. Operation is subject to the following two conditions. (1) this device may not cause harmful interference, and (2) this device must accept any interference received, including interference that may cause undesired operation. The installer of this radio equipment must ensure that the antenna is located or pointed such that it does not emit RF fields in excess of Health Canada limits for the general population; consult Safety Code 6, obtainable from Health Canada’s web site http://www.hc-sc.gc.ca/rpb Federal Communications Commission (FCC) DSSS FCC ID: S5750025034 Industry Canada (IC) DSSS IC ID: 573I-50025034 Item Ratings/Description WCX Process connections Temperature limits n/a Max process temperature Ambient temperature limits cold: Ambient temperature limits hot: 3/4 NPT or M25 Conduit (explosion proof not required) Cable gland n/a n/a -40 °C 70 °C 1 n/a n/a Ratings Entry plugs Field wiring (supplied by others) 2 Honeywell • Sensing and Control WCX Series XYR 6000 Position Sensor Issue 3 50040850 2. Sensor Mounting 2.1. Weight 2. Sensor Mounting 2.1 Weight Sensor model Weight WCX1X1... Aluminum housing & antenna 2.04 kg [4.5 lb] WCX1X2... Bronze housing & stainless steel antenna 5.03 kg [11.1 lb] 2.2 Dimensions Figure 1. WCX Series valve position sensor dimensions Honeywell • Sensing and Control 3 WCX Series XYR 6000 Position Sensor 2. Sensor Mounting 2.2. Dimensions Figure 2. WCX Series valve position sensor right angle antenna dimensions 4 Honeywell • Sensing and Control Issue 3 50040850 WCX Series XYR 6000 Position Sensor Issue 3 50040850 2. Sensor Mounting 2.2. Dimensions Figure 3. WCX Series valve position sensor straight antenna dimensions Honeywell • Sensing and Control 5 WCX Series XYR 6000 Position Sensor Issue 3 50040850 2. Sensor Mounting 2.3. Actuator Dimensions 2.3 Actuator Dimensions The following actuators may be ordered separately. Figure 4. Standard roller lever actuator All dimensions for reference only. All screws are #8-32 with a 9/64 allen head socket. 6 Honeywell S&C Catalog Listing Honeywell Process Solutions Catalog Listing Roller Z Diameter Y Width LSZ51 50051124-002 None - - LSZ51A 50051124-003 Nylon 0.750 in 0.250 in LSZ51C 50051124-005 Nylon 0.750 in 0.250 in LSZ51F 50051124-007 Nylon 1.000 in 0.520 in LSZ51G 50051124-008 Nylon 1.500 in 0.250 in LSZ51J 50051124-009 Nylon 1.000 in 0.250 in LSZ51M 50051124-011 Nylon 0.750 in 1.250 in LSZ51P 50051124-012 Nylon 0.750 in 0.500 in Honeywell • Sensing and Control WCX Series XYR 6000 Position Sensor Issue 3 50040850 2. Sensor Mounting 2.3. Actuator Dimensions Figure 5. Yoke Roller Lever All dimensions for reference only. All screws are #8-32 with a 9/64 allen head socket. Honeywell S&C Honeywell Process Catalog Listing Solutions Catalog Roller Z Diameter Y Width Listing LSZ53 50051124-019 None – – LSZ53A 50051124-020 Nylon 0.750 in 0.250 in LSZ53E 50051124-023 Nylon 0.750 in 0.250 in LSZ53S 50051124-025 Nylon 0.750 in 0.250 in LSZ53M 50051124-027 Nylon 0.750 in 1.250 in Honeywell • Sensing and Control 7 WCX Series XYR 6000 Position Sensor Issue 3 50040850 2. Sensor Mounting 2.3. Actuator Dimensions Figure 6. Offset Roller Lever All dimensions for reference only. All screws are #8-32 with a 9/64 allen head socket. Honeywell S&C Catalog Listing Honeywell Process Solutions Catalog Listing Roller Z Diameter Y Width LSZ55 50051124-068 None – – 8 LSZ55A 50051124-069 Nylon 0.750 in 0.250 in LSZ55C 50051124-071 Nylon 0.750 in 0.250 in LSZ55E 50051124-073 Nylon 0.750 in 0.500 in LSZ55K 50051124-074 Nylon 0.750 in 0.250 in LSZ55F 50051124-075 Nylon 1.000 in 0.500 in Honeywell • Sensing and Control WCX Series XYR 6000 Position Sensor Issue 3 50040850 2. Sensor Mounting 2.3. Actuator Dimensions Figure 7. Adjustable Length Roller Lever All dimensions for reference only. All screws are #8-32 with a 9/64 allen head socket. Honeywell S&C Catalog Listing Honeywell Process Solutions Catalog Listing Roller Z Diameter Y Width LSZ52 50051124-028 None – – LSZ52A 50051124-029 Nylon 0.750 in 0.250 in LSZ52C 50051124-031 Nylon 0.750 in 0.250 in LSZ52J 50051124-033 Nylon 1.000 in 0.500 in LSZ52K 50051124-034 Nylon 1.500 in 0.250 in LSZ52M 50051124-035 Nylon 2.000 in 0.250 in LSZ52E 50051124-037 Nylon 0.750 in 1.300 in LSZ52N 50051124-038 Nylon 0.750 in 0.500 in Honeywell • Sensing and Control 9 WCX Series XYR 6000 Position Sensor Issue 3 50040850 2. Sensor Mounting 2.3. Actuator Dimensions Figure 8. Rod Lever All dimensions for reference only. All screws are #8-32 with a 9/64 allen head socket. Honeywell S&C Catalog Listing Honeywell Process Solutions Catalog Listing Actuator Diameter LSZ54 50051124-049 None (Hub Only) – LSZ54M 50051124-041 Aluminum Rod 0.125 in Figure 9. Short Lever All dimensions for reference only. All screws are #8-32 with a 9/64 allen head socket. Honeywell S&C Catalog Listing Honeywell Process Solutions Catalog Listing Roller Style Diameter LSZ59 50051124-053 None - - LSZ59A 50051124-054 Nylon Open 0.750 in LSZ59C 50051124-056 Nylon Closed 0.750 in 10 Honeywell • Sensing and Control WCX Series XYR 6000 Position Sensor Issue 3 50040850 2. Sensor Mounting 2.4. Sensor location 2.4 Sensor location WCX Series Valve Position Sensor models Process Gases Suggested location Above the gas line or gas valve Liquids • • Above but close to the elevation of the process valve or other control Level with the process valve or other control Explanation The condensate drains away from the sensor • The condensate drains away from the sensor • This facilitates a horizontal linkage between valve and sensor 2.5 Bracket mounting Orientation The WCX Series sensor may be mounted in any vertical, horizontal or angled orientation. The main consideration is to facilitate coupling of the valve or other device to the input shaft of the sensor. For best signal, it is generally recommended that the antenna be oriented vertically (see Section 4). A higher elevation may give better signal range than a lower elevation, depending on obstacles. Attach sensor to valve Figure 5 shows an "L" shaped mounting bracket specifically fabricated to allow mounting of the sensor above a valve. Connection of the sensor shaft to valve shaft is done via a “U” shaped bracket, permitting easy manual activation of the valve. Figure 10. Direct coupling to valve Honeywell • Sensing and Control 11 WCX Series XYR 6000 Position Sensor Issue 3 50040850 2. Sensor Mounting 2.5. Bracket mounting Figure 11 shows a roller lever attached to the sensor shaft that works in conjunction with the valve lever. Figure 11. Roller Lever Figure 12 shows sensor connected to a linear valve. Figure 12. Sensor Mounted to Linear Valve 12 Honeywell • Sensing and Control WCX Series XYR 6000 Position Sensor Issue 3 50040850 3. Process Insertion 3.1. Basic Requirements 3. Process Insertion 3.1 Basic Requirements Non-sparking considerations To maintain non-sparking characteristics, non-sparking linkages, actuators and hardware are required. Distance from multinode The maximum range of the WCX Series sensor system is 1000 ft [305 m], under ideal conditions, with a clear line of sight. This will be reduced if the signal has to pass through dense materials such as brick, concrete, or wood. Metal objects, tanks, pipes, or other structures, will not pass signals, however signals will tend to reflect off metallic objects, such that clear line of sight may not be essential. Angle to be measured The angle input to the sensor input shaft must be no greater than approximately 270 degrees. If the input linkage used applies an angular movement greater than this, proper calibration will not be possible. Angular motion beyond 270 degrees will engage the slip clutch within the product. Sensor update rate The maximum update rate possible is one measurement and update per second. Insure that the update rate chosen will capture all necessary events when the monitored device is moving at its fastest speed. The rate of data updates may be set through wireless builder. The update rate cannot be set locally using the IR port. If the factory default update rate is not suitable for the application, it should be changed through wireless builder. Note that the default refresh rate is factory set to one per 30 seconds to maximize battery life. Battery life will be affected by the update rate selected; faster rates will decrease battery life. Access to cover for configuring sensor, changing batteries Configuring and calibrating will require access to the top of the sensor. Allow room for cover removal and for a clear view of the IR sensing element (see WCX Series Sensor User's Manual). Replacement of internal batteries will require removing the cover, and partial removal of a battery assembly. Allow clearance for this (see WCX Series Sensor User's Manual). Honeywell recommends that the sensor be removed from service and moved to a clean area before servicing. Use care to avoid rotating the input shaft, causing the internal slip clutch to slip. Proximity to high powered L-band transmitters The WCX Series sensor system operates in the 2.4 Ghz. frequency band using an encrypted, spread-spectrum data modulation, with very high immunity to interference from other signals. Other devices using low powered signals in this frequency range are some cordless telephones, personal computer WI-FI links and routers, and video/audio remote transmission links. These are highly unlikely to cause any signal overloading problems and thus, de-sensitization of the data link (low signal). However, some high-powered microwave heating devices may operate with 1,000 watts or more, and may operated in nearby frequency bands. While likelihood of interference is very small, it is best to avoid locating sensors or multinodes in very close proximity to such devices. Honeywell • Sensing and Control 13 WCX Series XYR 6000 Position Sensor Issue 3 50040850 3. Process Insertion 3.2. Linkage Alignment 3.2 Linkage Alignment Axis of valve and sensor input shaft To allow smooth rotation, the axis of the valve or device must be parallel to the centerline of the sensor input shaft, unless a flexible form of linkage (cables or ball joints) is used. Alignment of linkage If cables or ball joint couplings are not used, the linkage used must form a 90 degree angle with the sensor input shaft and the valve shaft. Figure 13. Axis parallel and linkage 90 degrees with shafts If angle linearity is required If the angle measurement must be linear (end points and all points between must be measured accurately), then the sensor arm, valve arm, shaft-to-shaft spacing, and the linkage length must form a parallelogram (see Figure 14). 14 Honeywell • Sensing and Control WCX Series XYR 6000 Position Sensor Issue 3 50040850 3. Process Insertion 3.2. Linkage Alignment Figure 14. Parallelogram Formed by Linkage A second alternative method for achieving measurement linearity would be to mount the sensor directly above the valve shaft (see Section 2.4). Coupling with pulleys Instead of linkages, two small pulleys with steel cable could couple the two shafts. A means of maintaining cable tension would be needed. By using two different pulley diameters, angles of greater than 270 degrees could be measured, or a small angle could be measured to greater precision. With equal sized pulleys, the measured angle would be equal to the valve angle. With unequal sized pulleys, the measured angle would be as follows: MEASURED ANGLE = VALVE ANGLE * (VALVE PULLEY DIAMETER / SENSOR PULLEY DIAMETER) If clockwise is to be translated into counter clockwise If, due to measurement requirements, the clockwise rotation of an actuator or other device is to be sensed as counterclockwise rotation, the linkage may be configured to do so. Note that angle measurement linearity may be achieved if the dimensions are controlled as previously described. Honeywell • Sensing and Control 15 WCX Series XYR 6000 Position Sensor Issue 3 50040850 3. Process Insertion 3.3. Non-Valve Applications Figure 15. Changing CW into CCW If an angle greater than 270 degrees is to be measured, the length of the valve arm may be reduced. If a small angle is to be measured with greater precision, the length of the valve arm may be increased. Note that these two options will make actual angle measurements non-linear. 3.3 Non-Valve Applications Door position sensing By positioning the WCX Series sensor above a door with the shaft axis vertical, above the hinges, a short linkage could sense the amount of door opening. The low cal. position could be full closed and the high cal. position could be full open. Note that this would not be suitable for intrusion detection as a very fast open/close cycle could be shorter than the maximum update rate from the sensor (1 second intervals). Air handler plenum door position sensing Similar to door position sensing, the sensing of air handler status could be monitored. The sensor could be mounted with the sensor shaft directly coupled to the plenum valve shaft. Linear displacement Adding a lightweight pulley with thin wire rope to the sensor input shaft would allow conversion of linear displacement to a measured angle. The diameter of the pulley would determine the sensitivity and range of the measurement. Note that stops would be advised to prevent the sensor input shaft angle from exceeding the 270 degree limit. 16 Honeywell • Sensing and Control WCX Series XYR 6000 Position Sensor Issue 3 50040850 4. Antenna Adjustment and Mounting 4.1. Requirements 4. Antenna Adjustment and Mounting 4.1 Requirements Radio installation requirements ATTENTION Professional Installation is required to insure conformity with Federal Communications Commission (FCC) in the USA, Industry Canada (IC) in Canada and the Radio and Telecommunications Terminal Equipment Directive, 1999/5/EC (R&TTE), in the European Union (EU). Professional installation is required for the selection and installation of approved antennas and setup of the maximum allowable radiated power from the WCX Series Valve Position Sensor as configured for the particular installation site. The antennae used for this sensor must be installed to provide a separation distance of at least 20 cm (8 inches) from all persons and must not be co-located or operating in conjunction with any other antenna or transmitter. For remote antenna, see antenna installation requirements to satisfy FCC RF exposure requirements. ATTENTION Federal Communications Commission (FCC): The WCX Series Valve Position Sensors comply with part 15 of the FCC rules. Operation is subject to the following two conditions: (1) this device may not cause harmful interference, and (2) this device must accept any interference received, including interference that may cause undesired operation. Industry Canada (IC): The installer of this radio equipment must ensure that the antenna is located or pointed such that it does not emit RF fields in excess of Health Canada limits for the general population; consult Safety Code 6, obtainable from Health Canada’s web site www.hc-sc.gc.ca/rpb. 4.2 Integral antenna WARNING POTENTIAL ELECTROSTATIC CHARGING HAZARD The integrally mounted antenna shroud is made of Teflon® and has a surface resistance greater than 1Gohm per square. When the WCX Series Valve Position Sensor is installed in potentially hazardous locations care should be taken not to electrostatically charge the surface of the antenna shroud by rubbing the surface with a cloth, or cleaning the surface with a solvent. If electrostatically charged, discharge of the antenna shroud to a person or a tool could possibly ignite a surrounding hazardous atmosphere. Honeywell • Sensing and Control 17 WCX Series XYR 6000 Position Sensor Issue 3 50040850 4. Antenna Adjustment and Mounting 4.2. Integral antenna Elbow Figure 16. Elbow antenna adjustment If your model has the integral elbow antenna you can adjust it to improve reception. The least signal radiation is in a direction in line with the top (pointed end), so it is best to avoid having the antenna pointed directly toward, or directly away from, the multinode. Typically, pointed straight up gives best performance but your installation may vary. Loosen the 1,5mm [approx. 1/16 in] set screw located near the antenna base. Rotate antenna for best reception. Do not rotate antenna more than 180 degrees either direction or the internal antenna cable could be damaged. Tighten set screw. Straight Figure 17. Integral straight antenna If your model has the integral straight antenna you can adjust its position by rotating the sensor housing. (See Section 2). Typically, pointed straight up gives best performance but your installation may vary. 18 Honeywell • Sensing and Control WCX Series XYR 6000 Position Sensor Issue 3 50040850 5. Start Up 5.1. Connect batteries 5. Start Up 5.1 Connect batteries WARNING RISK OF DEATH OR SERIOUS INJURY FROM EXPLOSION OR FIRE Connection and disconnection of the batteries should only be performed in a non-hazardous area. Failure to comply with these instructions could result in death or serious injury. WARNING RISK OF DEATH OR SERIOUS INJURY FROM EXPLOSION OR FIRE If sensor is to be returned to Honeywell for any reason, both batteries MUST be removed prior to shipping. Dispose of used batteries promptly per local regulations or the battery manufacturer’s recommendations. Keep away from children. Do not disassemble and do not dispose of in fire. Failure to comply with these instructions could result in death or serious injury. ATTENTION Both batteries must be the same model from the same manufacturer. Mixing old and new batteries or different manufacturers is not permitted. Use only the following 3.6V lithium thionyl chloride (Li-SOCl2) batteries (nonrechargeable), size C. No other batteries are approved for use in WCX Series Valve Position Sensors. • Xeno Energy XL-145F • Tadiran TL-5920/S Table 1. Battery connecting procedure (For item numbers, refer to Figures 11 and 12) Step Action 1 If applicable, remove two T-15 TORX screws (1) and cover lock clamp (2). 2 If necessary, place a large screwdriver or other flat tool across the two tabs on the cover (3). Unscrew and remove the cover. 3 Using two fingers, press down slightly on both battery tops (4) and remove battery insulator (5). Insure that the batteries are properly seated and making good contact. 4 Replace cover, tightening hand tight. If applicable, replace cover lock clamp (2) and two T-15 TORX screws (1). Honeywell • Sensing and Control 19 WCX Series XYR 6000 Position Sensor 5. Start Up 5.1. Connect batteries Figure 18. Battery connecting Figure 19. Battery connecting detail 20 Honeywell • Sensing and Control Issue 3 50040850 WCX Series XYR 6000 Position Sensor Issue 3 50040850 5. Start Up 5.2. Display sequence 5.2 Display sequence After power up, the sensor does a brief self-test of the LCD display. Then it proceeds to power-on message, which is the model name of the sensor. The name is displayed for 2 seconds after which the sensor displays the process variables and associated status. 5.3 Authentication Before the sensor can be configured it must be unlocked with a security key so it can join the network. Use the Authentication Device Pocket PC software to receive security keys from the Key Server manager, then aim the Pocket PC at the sensor and transmit a key. See Getting Started with Honeywell OneWireless™ Solutions for more information. 5.4 Calibration See the WCX Series Sensor User's Manual for calibration procedures. Honeywell • Sensing and Control 21 WCX Series XYR 6000 Position Sensor Issue 3 50040850 6. Installation Drawings 6.1. Drawing Availability 6. Installation Drawings 6.1 Drawing Availability Complete installation drawings for each p/n of WCX Series sensor are available from Honeywell. 22 Honeywell • Sensing and Control WARRANTY/REMEDY Honeywell warrants goods of its manufacture as being free of defective materials and faulty workmanship. Honeywell’s standard product warranty applies unless agreed to otherwise by Honeywell in writing; please refer to your order acknowledgement or consult your local sales office for specific warranty details. If warranted goods are returned to Honeywell during the period of coverage, Honeywell will repair or replace, at its option, without charge those items it finds defective. The foregoing is buyer’s sole remedy and is in lieu of all other warranties, expressed or implied, including those of merchantability and fitness for a particular purpose. In no event shall Honeywell be liable for consequential, special, or indirect damages. While we provide application assistance personally, through our literature and the Honeywell web site, it is up to the customer to determine the suitability of the product in the application. SALES AND SERVICE Honeywell serves its customers through a worldwide network of sales offices, representatives and distributors. For application assistance, current specifications, pricing or name of the nearest Authorized Distributor, contact your local sales office or: E-mail: [email protected] Internet: www.honeywell.com/sensing Phone and Fax: Asia Pacific +65 6355-2828 +65 6445-3033 Fax Europe +44 (0) 1698 481481 +44 (0) 1698 481676 Fax Latin America +1-305-805-8188 +1-305-883-8257 Fax USA/Canada +1-800-537-6945 +1-815-235-6847 +1-815-235-6545 Fax Specifications may change without notice. The information we supply is believed to be accurate and reliable as of this printing. However, we assume no responsibility for its use. Sensing and Control Honeywell 1985 Douglas Drive North Golden Valley, MN 55422 www.honeywell.com 50040850-3-EN IL50 GLO Printed in USA April 2010 Copyright © 2010 Honeywell International Inc. All rights reserved. OneWireless™ is a registered trademarks of Honeywell International Inc. Other brand or product names are trademarks of their respective owners.