1
80649249AD.book Page 1 Wednesday, April 4, 2007 2:15 PM
GE Healthcare
Ettan DALTsix
Electrophoresis System
User Manual
80649249AD.book Page 2 Wednesday, April 4, 2007 2:15 PM
80649249AD.book Page 3 Wednesday, April 4, 2007 2:15 PM
Important user information
Safety standards
All users must read this entire manual to fully understand the safe use of
Ettan DALTsix Electrophoresis System.
This product meets the requirement of the Low Voltage Directive (LVD) 73/
23/EEC through the following harmonized standards:
Ettan DALTsix Electrophoresis System is intended for laboratory use only,
not for clinical or in vitro use, or for diagnostic purposes.
•
EN61010-1
•
IEC 61010-1
•
CAN/CSA-C22.2 No. 61010-1
•
UL61010-1
WARNING!
The WARNING! sign highlights instructions that must be followed
to avoid personal injury. Do not proceed until all stated conditions
are clearly understood and met.
WARNING! High Voltage
The High Voltage sign highlights an instruction that must be
strictly followed in order to avoid contact with lethal high voltage.
Be sure not to proceed until the instructions are clearly
understood and all stated conditions are met.
CAUTION!
The CAUTION! sign highlights instructions that must be followed
to avoid damage to the product or other equipment. Do not
proceed until all stated conditions are met and clearly
understood.
Note
The Note sign is used to indicate information important for
trouble-free and optimal use of the product.
CE Certifying
This product meets all requirements of applicable CE-directives. A copy of
the corresponding Declaration of Conformity is available on request.
The CE symbol and corresponding declaration of conformity, is valid for
the instrument when it is:
–
used as a stand-alone unit, or
–
connected to other CE-marked GE Healthcare instruments, or
–
connected to other products recommended or described in this
manual, and
–
used in the same state as it was delivered from GE Healthcare except
for alterations described in this manual.
Recycling
This symbol indicates that the waste of electrical and electronic
equipment must not be disposed as unsorted municipal waste
and must be collected separately. Please contact an authorized
representative of the manufacturer for information concerning
the decommissioning of equipment.
EMC
This device meets the requirements of the EMC Directive 89 336/EEC
through the following harmonized standard:
•
EN 55014
80649249AD.book Page 4 Wednesday, April 4, 2007 2:15 PM
80649249AD.book Page 5 Wednesday, April 4, 2007 2:15 PM
Content
1
System function and description .....................................................................................7
1.1 Electrophoresis System function and description .....................................................................................................7
1.1.1 Electrophoresis Unit ...................................................................................................................................................7
1.1.2 Gel Caster........................................................................................................................................................................7
1.1.3 Gel Casting Cassettes................................................................................................................................................8
1.1.4 Gradient Maker.............................................................................................................................................................9
1.2 Heat exchanger ..........................................................................................................................................................................9
2
Safety information ........................................................................................................... 11
2.1 Warnings .................................................................................................................................................................................... 11
2.2 Cautions ...................................................................................................................................................................................... 12
2.3 Emergency procedures ....................................................................................................................................................... 13
3
Specifications .................................................................................................................... 15
3.1 Electrophoresis Unit .............................................................................................................................................................. 15
3.2 Gel Caster ................................................................................................................................................................................... 16
4
Preparing the Gel Caster ................................................................................................ 17
5
Casting homogeneous gels ............................................................................................ 19
6
Casting gradient gels ...................................................................................................... 21
6.1 Preparation for gradient gel casting ............................................................................................................................. 21
6.2 Gradient casting setup ......................................................................................................................................................... 21
6.3 Pouring gel solutions for gradient gels ......................................................................................................................... 22
7
Unloading the gel caster ................................................................................................ 25
8
Electrophoresis ................................................................................................................. 27
8.1 Placement of the electrophoresis unit ......................................................................................................................... 27
8.2 Preparing second dimension gels. ................................................................................................................................. 27
8.2.1 Equilibration and loading...................................................................................................................................... 27
8.3 Preparing the electrophoresis unit ................................................................................................................................. 29
8.4 Recommended running conditions ................................................................................................................................ 31
8.5 Unloading the gels and cleaning the unit. .................................................................................................................. 31
9
Recipes ............................................................................................................................... 33
10 Troubleshooting ............................................................................................................... 37
10.1
10.2
10.3
10.4
Electrical and mechanical .................................................................................................................................................. 37
Gel casting ................................................................................................................................................................................. 37
Pre-cast gels ............................................................................................................................................................................. 38
Stained gels ............................................................................................................................................................................... 39
11 Care and maintenance ................................................................................................... 41
11.1
11.2
11.3
11.4
11.5
Unpacking, inventory, and set-up .................................................................................................................................. 41
Cleaning ...................................................................................................................................................................................... 41
Replacement of components ........................................................................................................................................... 41
Recycling .................................................................................................................................................................................... 41
Maintenance ............................................................................................................................................................................. 42
12 Customer service information ....................................................................................... 43
12.1 Technical service and repair ............................................................................................................................................. 43
12.2 Ordering information ............................................................................................................................................................ 43
Ettan DALTsix Electrophoresis System User Manual 80-6492-49 Edition AD
5
80649249AD.book Page 6 Wednesday, April 4, 2007 2:15 PM
6
Ettan DALTsix Electrophoresis System User Manual 80-6492-49 Edition AD
80649249AD.book Page 7 Wednesday, April 4, 2007 2:15 PM
System function and description 1
1
System function and description
1.1
Electrophoresis System function and description
In 2-D electrophoresis, proteins are separated according to isoelectric point by isoelectric focusing, most reliably
on Immobiline™ DryStrip immobilized pH gradient (IPG) gel strips using the IPGphor™ or Multiphor™ II IEF
Systems. The second-dimension electrophoresis separates the proteins on the basis of their molecular mass
using sodium dodecyl sulfate-polyacrylamide gel electrophoresis (SDS-PAGE). The Ettan™ DALTsix
Electrophoresis System is designed to handle large second-dimension gels in a simple, efficient, and
reproducible manner.
1.1.1
Electrophoresis Unit
The Ettan DALTsix Electrophoresis Unit accommodates up to six 25.5 × 20.5 cm slab gels, either 1 mm or 1.5 mm
thick, in a common tank under identical conditions. A sample, focused in an IPG strip, is placed on the cathodic
(upper) surface of a slab gel and sealed in place with agarose. Up to six gel cassettes are inserted into the
electrophoresis unit and any unused slots are filled with blank cassette inserts. The Upper Buffer Chamber/Buffer
Seal (UBC) is pushed down over the cassettes, holding the gel cassettes in slots flanked by a double rubber
gasket.
Use EPS 601 Power Supply for power supply. If any other power supply is used it must have similar specifications
as the EPS 601 Power Supply, such as a floating output, leakage current detection and be capable of handling
up to 600 V, 400 mA, or 100 W.
A pump mounted under the lower buffer chamber circulates the buffer, pumping it up into the chamber on the
right-hand side, between the cassettes, down the left side, and over the internal heat exchanger before returning
to the pump. The pump starts when it is plugged in. For temperature control, the heat exchanger located in the
bottom of the unit must be connected to a MultiTemp™ III or similar circulating water bath, that have earthed
water pipe and low pressure water circulation.
1.1.2
Gel Caster
The Ettan DALTsix Gel Caster holds up to six 1-mm or 1.5-mm gel cassettes, with separator sheets, for casting
homogenous or gradient gels. When desired, fewer gels can be cast at one time by using blank cassette inserts
to occupy any unneeded volume. The removable faceplate and separator sheets simplify loading and unloading
the casting unit. The groove in the back of the caster provides the channel through which the gel solution is
poured into the caster unless gradients are being the cast by displacement through the lower tubing fitting.
Ettan DALTsix System components
•
Six slot vertical slab electrophoresis unit
•
Gel caster
•
Gel casting cassettes
•
Gradient maker
Ettan DALTsix Electrophoresis System User Manual 80-6492-49 Edition AD
7
80649249AD.book Page 8 Wednesday, April 4, 2007 2:15 PM
1 System function and description
1.1 Electrophoresis System function and description
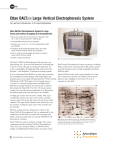
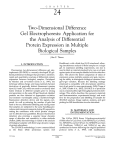
Lid with leads
Safety interlock
Upper buffer chamber
Anode assembly/
cassette carrier
Lower buffer chamber
Ceramic heat exchager
Buffer circulation pump
Fig 1-1. Exploded view of Ettan DALTsix Electrophoresis Unit.
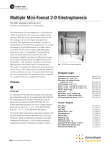
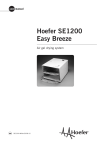
1.1.3
Fig 1-2. Ettan DALTsix Gel Caster for casting 1.0 and 1.5 mm large format gels.
Gel Casting Cassettes
The Ettan DALTsix Electrophoresis System uses the same cassettes as the Ettan DALTtwelve Electrophoresis
System (see Fig 1-3 ). The gel casting cassettes are pre assembled. Two glass plates are joined along one edge
by a hinge strip of silicone rubber, and the vinyl side spacers (1.0 mm or 1.5 mm thick) are glued in place. To
complete assembly, close the two plates like a book and press the plates together over the length of the spacer.
Gels are removed by opening the book after the run and carefully lifting out the gel slab. Care must be taken to
ensure that the gel does not adhere to the spacers and tear during removal. The cassette is cleaned as a unit and
can be stood upright to dry. The cassettes can be cleaned in an automatic dishwasher. Cassettes are 27 × 22 cm
and produce a gel about 25.5 × 20.5 cm. A 1.0-mm thick gel has a volume of approximately 52 ml and a 1.5-mm
thick gel has a volume of approximately 78 ml.
Fig 1-3. Gel Casting Cassettes.
8
Ettan DALTsix Electrophoresis System User Manual 80-6492-49 Edition AD
80649249AD.book Page 9 Wednesday, April 4, 2007 2:15 PM
System function and description 1
1.1.4
Gradient Maker
The Ettan DALTsix Gradient Maker is designed for producing linear gradients of aqueous solutions ranging in
volume from 200–2 000 ml. The gradient maker can be used to form convex and concave exponential gradients
with the addition of a one-holed rubber stopper, a piece of rigid tubing, and a piece of flexible tubing.
Fig 1-4. Ettan DALTsix Gradient Maker.
1.2
Heat exchanger
The heat exchanger is built into the base of the separation tank. The white alumina ceramic heat exchange
surface is fragile and the user should avoid dropping anything directly on surface.
When connected to a circulator bath, coolant passes through a serpentine chamber beneath the ceramic plate.
The thin ceramic permits rapid heat exchange between the coolant and the buffer in the electrophoresis tank.
The ceramic plate is attached with silicone rubber adhesive. The heat exchanger tubing connectors are 13-mm
o.d.
The heat exchanger is rated to a maximum of 0.8 atmospheres above ambient (12 psig). Do not connect it to a
water tap. Connect only to coolant sources with regulated pressure.
Fig 1-5. To connect the coolant tubing lines to the tank, remove the lid and the anode rack from the tank and lay the tank fill-label (front) side
down. Guide the free ends of the coolant tubes through the holes in the tank base and slip them onto the plastic connector fittings, then pull the
collector collar onto the tubing to lock it in place. The end of the tubing can be lubricated with glycerol or a mix of glycerol:water to ease the fit.
Ettan DALTsix Electrophoresis System User Manual 80-6492-49 Edition AD
9
80649249AD.book Page 10 Wednesday, April 4, 2007 2:15 PM
1 System function and description
1.2 Heat exchanger
10
Ettan DALTsix Electrophoresis System User Manual 80-6492-49 Edition AD
80649249AD.book Page 11 Wednesday, April 4, 2007 2:15 PM
Safety information 2
2
Safety information
•
This system is designed for indoor use only.
•
To avoid risk of injury, operation and user maintenance should be performed by properly trained personnel
only, and in accordance with the instructions.
•
Any equipment connected to the system should meet the requirements of the EN 61 010-1 or other
international safety standard. Within EU, connected equipment must be CE-labelled
2.1
Warnings
WARNING! Connect the instrument to a properly grounded electrical outlet.
WARNING! Use EPS 601 as power supply for Ettan DALTsix Electrophoresis System. If another power supply
is used it must have similar specifications as EPS 601, such as floating output and leakage current detection.
WARNING! The safety lid must be firmly in place before power can be applied.
WARNING! Always turn off the power to the gels before opening the safety lid.
WARNING! Only connect MultiTemp III, or a circulating water bath) with earthed water pipe and low pressure
water circulation. Do not connect the heat exchanger to a water tap or any other water source with
unregulated pressure that may exceed 82 kPa (12 PSI).
WARNING! Check electrical cables for damage and the electrophoresis unit for damage or leakage before
use. If damage and/or leakage is present, do NOT use the equipment. There is a risk for high voltage injuries.
WARNING! If electrical cables are damaged and/or any of the buffer chambers has a leakage do NOT use the
equipment. There is a risk for high voltage injuries!
WARNING! The power cord should be easily accessible to enable emergency disconnection of the current.
Ettan DALTsix Electrophoresis System User Manual 80-6492-49 Edition AD
11
80649249AD.book Page 12 Wednesday, April 4, 2007 2:15 PM
2 Safety information
2.2 Cautions
WARNING! Never connect the Ettan DALTsix Electrophoresis System to higher voltage, current or effect than
specified for that system.
WARNING! Always disconnect the power cord before draining the tank or before servicing the Ettan DALTsix
Electrophoresis System.
WARNING! Use care when lifting and moving the electrophoresis unit. It is best to move the unit when empty.
WARNING! The casting unit, when filled with glass plates and gel solutions, is very heavy. Use caution when
trying to move or lift the caster.
WARNING! Fire hazard, never use flammable liquids in the electrophoresis tank.
WARNING! The protection provided by the equipment may be impaired if this equipment is used in a manner
not specified by the manufacturer.
WARNING! Only accessories and parts approved or supplied by GE Healthcare may be used for operating,
maintaining and servicing this product.
2.2
Cautions
CAUTION! Rinse and flush the tank and pumping system with distilled or deionized water before and after
use.
CAUTION! Do not run the circulation pump if the electrophoresis tank is empty.
CAUTION! Do not operate with buffer temperature above 40ºC. All plastic parts are rated for 40ºC continuous
duty.
12
Ettan DALTsix Electrophoresis System User Manual 80-6492-49 Edition AD
80649249AD.book Page 13 Wednesday, April 4, 2007 2:15 PM
Safety information 2
CAUTION! Turn the buffer circulation pump on during electrophoresis to minimize uneven heating even if not
connected to a thermostatted circulator.
CAUTION! Connect the heat exchanger to an external thermostatted circulating bath. Overheating will cause
irreparable damage to the unit.
CAUTION! Do not autoclave or boil this unit or any of its parts.
2.3
Emergency procedures
Emergency shutdown
In a situation where there is a risk of injury, turn off the current by:
•
disconnecting the external power supply cable from its power outlet.
•
disconnecting the Ettan DALTsix from its power outlet.
Power failure routine
In the event of a power failure, the run is interrupted in an undefined state.
Ettan DALTsix Electrophoresis System User Manual 80-6492-49 Edition AD
13
80649249AD.book Page 14 Wednesday, April 4, 2007 2:15 PM
2 Safety information
2.3 Emergency procedures
14
Ettan DALTsix Electrophoresis System User Manual 80-6492-49 Edition AD
80649249AD.book Page 15 Wednesday, April 4, 2007 2:15 PM
Specifications 3
3
Specifications
3.1
Electrophoresis Unit
Maximum voltage (high voltage connection)
600 V
Maximum current (high voltage connection)
400 mA
Maximum power (high voltage connection)
100 W
Gel capacity
6 gels
Electrophoresis buffer volume
5.5 l
Dimensions (h × w × d)
40.3 × 54.2 × 16.0 cm
Weight (empty)
11.1 kg
Weight (filled)
16.8 kg
Maximum temperature
40ºC
Environmental operating conditions
Indoor use, 4–40ºC
Humidity up to 90%
Altitude to 2000 m
Installation category
II
Pollution degree
2
100 V~ model
100 V~, 50-60 Hz, 8 W (80649477)
115 V~ model
110–120 V~, 60 Hz, 8 W (80648508)
230 V~ model
220-240 V~, 50-60 Hz, 7 W (80648527)
Compliance with standards
The declaration of conformity is valid for the instrument
only if it is:
•
used in laboratory locations
•
used in the same state as it was delivered from GE
Healthcare except for alterations described in the User
Manual
•
connected to other CE labelled GE Healthcare modules
or other products as recommended.
Compliance with safety standards:
Ettan DALTsix Electrophoresis System User Manual 80-6492-49 Edition AD
•
IEC61010-1
•
EN61010-1
•
UL61010-1
•
CAN/CSA-C22.2 No. 61010-1
15
80649249AD.book Page 16 Wednesday, April 4, 2007 2:15 PM
3 Specifications
3.2 Gel Caster
3.2
Gel Caster
Gel capacity
6 gels, 1.0 mm or 1.5 mm thick
Acrylamide solution volume (total)
425 ml for 1.0 mm thick gels,
550 ml for 1.5 mm thick gels
Dimensions (h × w × d)
27 × 37 × 8 cm
Weight (empty)
3.6 kg
1.0 mm Gel Casting Cassette
Cassette dimensions (w × h × d)
27.6 × 21.7 × 0.70 cm
Slab gel dimensions (w × h × d)
25.5 × 20.5 × 0.10 cm
1.5 mm Gel Casting Cassette
Cassette dimensions (w × h × d)
27.6 × 21.7 × 0.75 cm
Slab gel dimensions (w × h × d)
25.5 × 20.5 × 0.15 cm
Ettan DALTsix Gradient Maker
16
Volume
1000 ml
Weight
0.73 kg
Ettan DALTsix Electrophoresis System User Manual 80-6492-49 Edition AD
80649249AD.book Page 17 Wednesday, April 4, 2007 2:15 PM
Preparing the Gel Caster 4
4
Preparing the Gel Caster
Set up the gel caster near a sink, in a tray, or on a drainboard so that any liquid that overflows, spills, or drains
out of the unit during pouring or disassembly can be easily contained.
The Ettan DALTsix Gel Caster accommodates up to six 1-mm or 1.5-mm gel cassettes with separator sheets
(0.5 mm) between them. If you are not planning to cast a full set of gels, use the blank cassette inserts (purchased
separately) with separator sheets between them to occupy the extra space.
Gel labels, for easy indexing of gels and samples, can be placed in the cassettes at any time during the assembly
of the caster.
1
Check that the caster is level. Remove the faceplate and lay the caster on its back. If casting gels by the
displacement method, remove the triangular wedge in the V-shaped base.
2
Fill the gel caster starting with a separator sheet against the back wall. The separator sheets make it easier
to remove the cassettes from the unit after polymerization. Fill the caster by alternating cassettes with
separator sheets. The rubber hinge should be on the left side of the caster, with the matching ends of the
cassette down. End with a separator sheet then use the thicker filler sheets (1.0 mm) to bring the level of the
stack of cassettes and spacers even with the edge of the caster.
3
Remove the gray foam seal from the groove in the faceplate and lubricate it with a light coating of GelSeal
compound to help ensure a liquid-tight seal. Place the gasket back in the groove on the faceplate. Avoid
stretching the gasket by seating it from the ends first, working toward the middle.
4
Turn two black knobbed screws into the two threaded holes across the bottom until they are well engaged
(two to three full turns). Carefully place the faceplate onto the caster with the bottom slots resting on their
respective screws. Clamp both sides of the faceplate with six spring clips and tighten the screws. Be sure the
sealing gasket is compressed evenly by the faceplate and forms a tight seal with the caster. Do not
overtighten the screws.
5
If casting using the filling channel in the back plate of the caster, be sure to plug the barbed fitting in the
faceplate. If casting using the displacement method, attach the tubing from the peristaltic pump to the
barbed fitting.
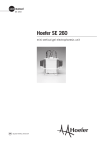
filler sheets
filling channel
separating sheets
gel cassette
faceplate and
sealing gasket
cassette hinge
spring clamp (6)
filler port
and cap
clamp screw
Fig 4-1. Gel caster with parts labelled.
Ettan DALTsix Electrophoresis System User Manual 80-6492-49 Edition AD
17
80649249AD.book Page 18 Wednesday, April 4, 2007 2:15 PM
4 Preparing the Gel Caster
18
Ettan DALTsix Electrophoresis System User Manual 80-6492-49 Edition AD
80649249AD.book Page 19 Wednesday, April 4, 2007 2:15 PM
Casting homogeneous gels 5
5
Casting homogeneous gels
WARNING! When using hazardous chemicals, take all suitable protective measures, such as wearing
protective glasses and gloves resistant to the chemicals used. Follow local regulations and instructions for
safe operation and maintenance of the system.
WARNING! Acrylamide is a neurotoxin. Never pipette by mouth and always wear protective gloves when
working with acrylamide solutions, IPG strips, or surfaces that come into contact with acrylamide solutions.
1
Be sure the entire gel casting system is clean, dry, and free from any polymerized acrylamide.
2
Prepare a sufficient volume of gel overlay solution (water-saturated n-butanol). You need 1.0 ml of overlay
for each 1-mm cassette and 1.5 ml for overlay for each 1.5-mm cassette. Mixing 1-mm and 1.5-mm
cassettes, in one casting is not advised.
Note: If using glass plates in stead of cassettes, ensure that the plates are properly aligned.
3
If casting using the displacement method, make up 200 ml of displacing solution (0.375 M Tris-Cl pH 8.8, 30%
(v/v) glycerol, bromophenol blue).
4
For a full 6-gel, 1.5-mm cassette set, make up 600 ml of acrylamide gel stock solution without ammonium
persulfate (APS) or N,N,N',N'-tetramethylethylenediamine (TEMED). For a full 6-gel, 1-mm cassette set, make
up 450 ml of acrylamide gel stock solution as above. This amount of gel solution will provide you with
sufficient volume to cast gels using either the filling channel or a peristaltic pump.
Note: For best result, the acrylamide gel stock solution should be 8°C when APS and TEMED is added.
5
Assemble the gel caster as described in the proceeding section; the caster should be placed on a level bench
or on a leveling table so that gel tops are level.
6
Add the appropriate volumes of APS and TEMED only when ready to pour the gels, not before. Once these
two components are added, polymerization begins and the gel solution should be completely poured within
10 min.
7
Pour the gel solution into the filling channel. If displacement casting is being used, the flow rate on the
peristaltic pump should be increased slowly to the desired speed to avoid introducing any air bubbles.
8
For displacement casting, pump the gel solution into the caster until it is about 7–11 cm below the final
desired gel height. Stop the flow of acrylamide and transfer the feed tube to the container holding the
displacement solution. Restart the pump to displace the gel solution in the tubing and the V-trough at the
bottom of the caster. The remaining acrylamide solution is forced into the cassettes to the final gel height.
When the final desired gel height is reached, stop the pump and clamp off the tubing near the barbed fitting
at the bottom of the caster.
For filling channel casting, pour the gel solution into the channel until the solution reaches the final desired
height, about 1 cm below the top edge of the short plate.
The amount of gel solution required in either case will be ~550 ml for six 1.5-mm gels and ~425 ml for six
1-mm gels.
Ettan DALTsix Electrophoresis System User Manual 80-6492-49 Edition AD
19
80649249AD.book Page 20 Wednesday, April 4, 2007 2:15 PM
5 Casting homogeneous gels
9
Immediately pipette the water-saturated n-butanol onto each gel. Avoid wetting adjacent plastic surfaces
of the caster with n-butanol.
OR
Spray (do not pipette) 0.1% (w/v) SDS solution on the edges of the cassettes, for example with a plant
sprayer, so the gels are covered. By doing this curved edges on the gels are prevented.
10 Allow the homogeneous gels to polymerize for at least one hour before disassembling the caster. If the
peristaltic pump outlet tubing was connected directly to the caster, it should not be removed until
polymerization is complete. Do not leave the water-saturated n-butanol on the gels overnight as long term
exposure of acrylic to butanol will damage the caster.
20
Ettan DALTsix Electrophoresis System User Manual 80-6492-49 Edition AD
80649249AD.book Page 21 Wednesday, April 4, 2007 2:15 PM
Casting gradient gels 6
6
Casting gradient gels
6.1
Preparation for gradient gel casting
Successful gradient gel casting requires planning, timing, and practice. A full cast with the Ettan DALTsix Gel
Caster requires 420–550 ml of acrylamide stock. Polymerization begins as soon as TEMED and APS are added to
the acrylamide stock. At this point there is no time to adjust the gradient maker, or the cassettes and separators
in the gel caster. To familiarize yourself with the gel caster and gradient maker before casting gels, you should
set up the unit and carry out a practice gradient cast, substituting water for the appropriate volume of light
solution, and a mixture of glycerol and water for the appropriate volume of heavy solution.
A pore gradient gel results from mixing varying proportions of two solutions of different acrylamide
concentrations and densities, a light solution and a heavy solution. The heavy gel solution contains glycerol and
a higher concentration of acrylamide. During the gradient pouring procedure, the mixing ratio of high
concentration acrylamide solution to low concentration solution gradually changes, with the heavier (high
concentration) solution sinking below the light solution. This generates a downward gradient of increasing
acrylamide (gel) percentage.
6.2
Gradient casting setup
WARNING! When using hazardous chemicals, take all suitable protective measures, such as wearing
protective glasses and gloves resistant to the chemicals used. Follow local regulations and instructions for
safe operation and maintenance of the system.
WARNING! Acrylamide is a neurotoxin. Never pipette by mouth and always wear protective gloves when
working with acrylamide solutions, IPG strips, or surfaces that come into contact with acrylamide solutions.
1
Be sure the entire gel casting system is clean, dry, and free from any polymerized acrylamide. Remove the
rubber insert from the base of the V-shaped feed channel of the caster. The caster should be placed on a
level bench to ensure that the gels and gradients are even and level.
2
Add a magnetic stir bar of the appropriate dimensions (20-30 mm long) to the mixing chamber and place
the unit on a magnetic stirrer. If volumes will be less than half the capacity of the unit, an identical stir bar
should be placed in the reservoir chamber as well to balance the displacement and prevent backflow into
the reservoir when the chambers are first connected.
3
Connect tubing to the outlet connector and pump, and adjust pump speed, if used. Connect the tubing to
the gel casting unit.
4
Close the connecting valve between the reservoir (heavy) and mixing (light) chambers and clamp off the exit
line.
5
Prepare a sufficient volume of gel overlay solution (water-saturated n-butanol). You need 1.0 ml of overlay
for each 1-mm cassette and 1.5 ml for each 1.5-mm cassette.
6
Make up 200 ml of displacing solution.
7
Make up the gel acrylamide solutions from the stock mixes, but do not add the 10% ammonium persulfate
(APS) and 10% N,N,N',N',-tetramethylethylenediamine (TEMED). See Section 6.3.
Ettan DALTsix Electrophoresis System User Manual 80-6492-49 Edition AD
21
80649249AD.book Page 22 Wednesday, April 4, 2007 2:15 PM
6 Casting gradient gels
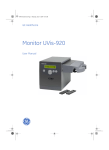
6.3 Pouring gel solutions for gradient gels
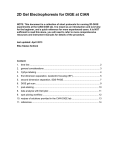
reservoir (back)
chamber
connector channel
mixing (front)
chamber
slide
stop
slide
valve
outlet
connector
Fig 6-1. DALTsix gradient maker.
6.3
Pouring gel solutions for gradient gels
1
Prepare the gel caster, as described in Section 4, and place identifying gel labels inside each cassette.
2
When you are ready to cast the gels, add the APS and TEMED and mix each gel solution thoroughly. Vary
the amount of TEMED added to control the rate of polymerization. Once these reagents are added,
polymerization begins. You have about 10 min to cast the gradient before the gels begin to solidify at the top.
Work rapidly and carefully.
3
Close the slide valve (out on side of white slide stop button, Fig 6-1 ). If the outlet tubing is not controlled by
a pump, clamp it off near the gradient former. Add the required volume of the final solution to the reservoir
(back) chamber.
4
Carefully open the slide valve (valve in on button side) and allow just enough solution to flow through the
connector channel to fill it to the edge of the mixing chamber, then close the valve. Be sure no large bubbles
remain to obstruct flow through the channel.
5
Add the required volume of the light solution to the mixing chamber and start the magnetic stirrer.
6
Simultaneously, open the outlet tubing if clamped off, and start the pump. Adjust the pump rate so that the
solution is not forced up in a “fountain” that mixes with the overlying solution.
7
Immediately open the connecting valve between the mixing and the reservoir chamber.
8
Watch the gradient solution enter the caster. It is important that no bubbles disturb the gradient-watch the
delivery carefully.
9
Just as the last of the gradient mix is pumped out of the mixing chamber, add 200 ml of displacement
solution to the mixing chamber and pump it through until almost all of the gradient mix has entered the
cassettes. It is convenient to include a dye in the displacement solution to visually track the boundary
between the gradient mix and the displacement solution.
10 When the gels have reached the desired height and before air is introduced, stop the peristaltic pump. It is
important that no air bubbles disturb the gradient.
22
Ettan DALTsix Electrophoresis System User Manual 80-6492-49 Edition AD
80649249AD.book Page 23 Wednesday, April 4, 2007 2:15 PM
Casting gradient gels 6
11 Immediately pipette the water saturated n-butanol onto each gel. Avoid wetting adjacent plastic surfaces
of the caster with n-butanol.
12 Allow the gradient gels to polymerize for 2 hours before disassembling the caster. Gradient gel
polymerization should proceed from the top down. If the peristaltic pump outlet tubing was connected
directly to the caster, it should not be removed until polymerization is complete. Do not leave the watersaturated n-butanol o the gels overnight as long term exposure of acrylic to butanol will damage the caster.
connector
channel
slide
stop
open
closed
Fig 6-2. Open and closed positions of slide valve.
Ettan DALTsix Electrophoresis System User Manual 80-6492-49 Edition AD
23
80649249AD.book Page 24 Wednesday, April 4, 2007 2:15 PM
6 Casting gradient gels
6.3 Pouring gel solutions for gradient gels
24
Ettan DALTsix Electrophoresis System User Manual 80-6492-49 Edition AD
80649249AD.book Page 25 Wednesday, April 4, 2007 2:15 PM
Unloading the gel caster 7
7
Unloading the gel caster
WARNING! When using hazardous chemicals, take all suitable protective measures, such as wearing
protective glasses and gloves resistant to the chemicals used. Follow local regulations and instructions for
safe operation and maintenance of the system.
1
Make sure the caster is either near a sink or on a tray so that any liquid leaking out can be contained.
2
Remove the front of the gel caster by loosening and removing the black-knobbed screws and spring clamps.
3
Carefully unload the cassettes from the unit by pulling forward on the separator sheets.
4
Rinse the top surface of each gel with distilled water to remove the n-butanol and any unpolymerized
acrylamide. Remove the separator sheet if still attached and rinse the glass cassettes with water to remove
any acrylamide adhering to the glass plates.
5
Examine the gels for polymerization defects and discard any unsatisfactory gels.
6
Store the acceptable gels in an airtight container at 4ºC with a small amount of gel storage solution to keep
the gels from drying out.
7
Rinse the gel caster and all tubing with mild detergent then rinse thoroughly with deionized water. Clean the
separator and spacer sheets with a mild detergent and rinse with deionized water.
Ettan DALTsix Electrophoresis System User Manual 80-6492-49 Edition AD
25
80649249AD.book Page 26 Wednesday, April 4, 2007 2:15 PM
7 Unloading the gel caster
26
Ettan DALTsix Electrophoresis System User Manual 80-6492-49 Edition AD
80649249AD.book Page 27 Wednesday, April 4, 2007 2:15 PM
Electrophoresis 8
8
Electrophoresis
8.1
Placement of the electrophoresis unit
The Ettan DALTsix electrophoresis unit should be placed close to a sink for easy rinsing and draining. The tubing
leading to and from the heat exchanger should be connected to a circulating water bath such as the MultiTemp
III; the heat exchanger should not be connected to a water tap or any other coolant supply that lacks pressure
regulation.
An EPS 601 or equivalent power supply should be placed conveniently near the electrophoresis unit in a dry place
without risk for liquid exposure
8.2
Preparing second dimension gels.
WARNING! When using hazardous chemicals, take all suitable protective measures, such as wearing
protective glasses and gloves resistant to the chemicals used. Follow local regulations and instructions for
safe operation and maintenance of the system.
8.2.1
Equilibration and loading
For a detailed description of the components of the SDS equilibration solution and the equilibration process,
please consult 2-D Electrophoresis: Using Immobilized pH Gradients (80-6429-60).
1
Prepare SDS equilibration buffer. Just prior to use, add DTT to the buffer to a concentration of 1% (w/v).
2
Place the IPG strips in individual tubes with the support film toward the wall.
3
Add 10–15 ml of the DTT-containing solution to each tube. Typically, two 18 cm strips can be equilibrated
with 10 ml of buffer or two 24 cm strips can be equilibrated with 15 ml of buffer.
4
Incubate the strips for 10-15 min with gentle agitation. Do not over-equilibrate, as proteins can diffuse out
of the strip during this step.
5
Second equilibration. Prepare SDS equilibration buffer with iodoacetamide added to 2.5% (w/v) and repeat
steps 3 and 4.
6
Before equilibration is completed, prepare the gel cassettes for loading by rinsing the top of the gel with
deionized water and draining. Before loading the IPG strips make sure that the gel surface and plates are dry.
7
Lay the prepared gel flat on a clean surface, short glass plate side up.
8
Using forceps, remove the equilibrated IPG strip from the equilibration solution and rinse with fresh SDS
electrophoresis buffer.
Ettan DALTsix Electrophoresis System User Manual 80-6492-49 Edition AD
27
80649249AD.book Page 28 Wednesday, April 4, 2007 2:15 PM
8 Electrophoresis
8.2 Preparing second dimension gels.
9
Holding one end of the IPG strip with forceps, carefully draw it across the exposed top part of the long gel
plate until the strip is completely on the glass plate and centered. Using a thin plastic spatula, ruler, or spacer
push against the plastic backing of the IPG strip, not the gel itself, and slide the strip between the two glass
plates and down into contact with the surface of the slab gel. The strip should just rest on the surface of the
gel. Avoid trapping air bubbles between strip and the slab gel or piercing the second dimension gel with the
strip. By convention, the acidic, or pointed, end of the IPG strip is on the left. The gel face of the strip should
not touch the opposite glass plate. (See Fig 8-1 ).
Fig 8-1. IPG strip are loaded onto cassette and slid into place.
10 Apply molecular weight marker proteins (optional). Apply the markers to a sample application piece in a
volume of 15-20 μl then cover the piece with 50 μl of agarose sealing solution. Pick up the application piece
with forceps and place next to one end of the IPG strip. The markers should contain 0.2-1.0 μg of each
component for Coomassie blue staining and about 10-50 ng of each component for silver staining.
11 Seal the IPG strip in place. For each IPG strip, melt an aliquot of agarose sealing solution in a heating block
or boiling water bath. (Tip: an ideal time to carry out this step is during IPG strip equilibration). Allow the
agarose to cool slightly and slowly pipette the solution across the length of the IPG strip taking care not to
introduce or trap bubbles. It will flow down between the glass plate and the support film and seal the IPG
strip in place (see Fig 8-2 ). Agarose should also be used to seal any gap between the side of the gel and a
side spacer. Allow a minimum of 1 min for the agarose to cool and solidify.
Fig 8-2. Adding agarose overlay.
28
Ettan DALTsix Electrophoresis System User Manual 80-6492-49 Edition AD
80649249AD.book Page 29 Wednesday, April 4, 2007 2:15 PM
Electrophoresis 8
8.3
Preparing the electrophoresis unit
Note: This Section describes the procedure for preparing the electrophoresis unit using the upper buffer chamber
(UBC) shown in Fig 8-3 . If another UBC is used follow instructions supplied together with that UBC.
Fig 8-3. Upper chamber to be used for this instruction.
The Ettan DALTsix electrophoresis unit requires a total volume of about 5.7 l of electrophoresis buffer to fill both
the UBC and the lower buffer chamber (LBC). For lab cast Laemmli gels, the LBC requires approximately 4.5 l of
1× SDS electrophoresis buffer while the UBC requires 1.2 l of buffer with a higher concentration. Prepare the
required buffers as described below.
Note: Do not overfill the upper and lower chambers by using more buffer than required.
Electrophoresis buffer for Ettan DALTsix with lab-cast Laemmli gels
Gel thickness
1.0 mm gels
1.5 mm gels
Anodic buffer
(LBC)
1×SDS
electrophoresis buffer
1×SDS
electrophoresis buffer
vol (l)
4.5
4.3
Cathodic buffer
(UBC)
2× SDS
electrophoresis buffer
3× SDS
electrophoresis buffer
vol (l)
1.2
1.2
For the DALT Pre-cast Gels and Buffer Kit, only half of the 100× anode (lower) buffer is used for each run; the
slightly reduced buffer concentration should not affect the run conditions. To prepare the anode buffer, dilute half
the contents of the 100× anode buffer into 4.5 l of water. For the cathodic buffer, a single bottle of 10× cathode
(upper) buffer should be diluted to a final volume of 1.2 l with deionized water and the full amount added to the
UBC. Please consult the user instructions for the DALT Pre-cast Gels for detailed technical information regarding
the assembly of gels in their cassettes.
WARNING! Check electrical cables for damage and the electrophoresis unit for damage or leakage before
use. If damage and/or leakage is present, do NOT use the equipment. There is a risk for high voltage injuries.
WARNING! The high voltage current MUST always be disconnected when the safety lid of the electrophoresis
unit is taken off. The high voltage current MUST never be switched on unless the safety lid is on the
electrophoresis unit.
WARNING! Handle the gels with care. The edges of the glass plates of the gels are sharp.
Ettan DALTsix Electrophoresis System User Manual 80-6492-49 Edition AD
29
80649249AD.book Page 30 Wednesday, April 4, 2007 2:15 PM
8 Electrophoresis
8.3 Preparing the electrophoresis unit
1
Fill the electrophoresis unit with 4.5 liters of 1× electrophoresis buffer or diluted anode buffer (when using
Ettan DALTsix Pre-cast gels) and turn the pump on (Fig 8-4 A).
2
Insert the anode assembly into the tank so that the circulation ports are properly aligned. The anode
assembly is keyed so that it may only be inserted in one orientation and the bottom edge of the assembly
should fit into the slot in the bottom of the tank (Fig 8-4 B).
3
Turn on the MultiTemp III, adjust the temperature to the desired setting.
4
Insert the prepared gels into the unit. Fill any unused slots with blank cassette inserts.
5
Wet the UBC sealings with 1× electrophoresis buffer or 0.1% SDS (immerse the sealings in solution or spray
the sealings of the UBC using a plant sprayer) and apply an even pressure on the UBC to carefully slide it
over the gel cassettes.
6
Fill the upper (cathode) chamber with 2× electrophoresis buffer or diluted cathode buffer to a level between
the fill lines (about 1.2 liters).
7
Fill the LBC with 1× electrophoresis buffer or water (when using Ettan DALTsix Pre-cast gels) to the same level
as the upper chamber (Fig 8-4 D).
8
Place the safety lid on the unit and begin electrophoresis.
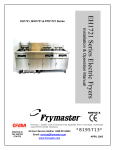
A
B
C
D
A
C
C
{
D
B
MAX fill line
MIN fill line
LBC start fill line
with cassettes
Fig 8-4. Filling the buffer chambers.
30
Ettan DALTsix Electrophoresis System User Manual 80-6492-49 Edition AD
80649249AD.book Page 31 Wednesday, April 4, 2007 2:15 PM
Electrophoresis 8
8.4
Recommended running conditions
Run conditions (Day run):
Applicable to 1 mm thick 12% PAA gel and Laemmli Buffer system. Set the MultiTemp temperature to 25ºC.
Step
mA/gel
Voltage (V)
W/gel
Time
(h:min)
1
101
80
1
1:00
2
401
500
13
4:30-6:002
1
For 1.5 mm gels, increase the current by 50%.
2
Continue the electrophoresis until the bromophenol blue reaches the end of the gel.
Run Conditions (Overnight):
Set the MultiTemp temperature to 30ºC.
Step
mA/gel
Voltage (V)
W/gel
Time (h)
1
101
80
1
1
2
121
150
2
15-172
1
For 1.5 mm gels, increase the current by 50%.
2
Continue the electrophoresis until the bromophenol blue reaches the end of the gel.
8.5
Unloading the gels and cleaning the unit .
WARNING! The HIGH VOLTAGE and power switch MUST be turned off before removing the safety lid,
unloading the gels, drain and cleaning the unit.
1
Carefully pull the UBC upward using the handles at each end.
2
As the UBC is pulled upward make sure that the cassettes remain in the anode assembly.
3
Take out the anode assembly.
4
Remove the gel cassettes from the anode assembly.
5
Open the gel cassettes using a Wonder Wedge (80-6127-88) to separate the plates on the side opposite the
hinge.
6
For lab cast gels, run an edge of the Wonder Wedge down each side of the cassette along the spacer and
carefully lift the gel out of the cassette. For pre-cast gels, lift the gel out by grasping the GelBond backing.
7
Tilt the entire electrophoresis unit on the side of the unit (do NOT tilt to front or back) to empty the buffer from
the LBC into a sink or a waste container. See Section 8.1 for instructions of how to place the unit for safe use.
WARNING! Ettan DALTsix electrophoresis unit is heavy, especially when filled with buffer. Handle the unit with
care to avoid personal damage.
8
Rinse all the components with distilled or deionized water. Flush the pump with distilled or deionized water
by filling the unit and turning the pump on.
Ettan DALTsix Electrophoresis System User Manual 80-6492-49 Edition AD
31
80649249AD.book Page 32 Wednesday, April 4, 2007 2:15 PM
8 Electrophoresis
8.5 Unloading the gels and cleaning the unit.
32
Ettan DALTsix Electrophoresis System User Manual 80-6492-49 Edition AD
80649249AD.book Page 33 Wednesday, April 4, 2007 2:15 PM
Recipes 9
9
Recipes
WARNING! When using hazardous chemicals, take all suitable protective measures, such as wearing
protective glasses and gloves resistant to the chemicals used.
Acrylamide stock (30.8%T)
WARNING! Acrylamide is a neurotoxin. Never pipette by mouth and always wear protective gloves when
working with acrylamide solutions, IPG strips, or surfaces that come into contact with acrylamide solutions
Acrylamide (MW 71.08)
Bis (N,N'-methylenebisacrylamide, MW 154.17)
Distilled or deionized water
final conc.
amount
30%
0.8%
900 g
24 g
to 3 000 ml
May need filtration. Weigh acrylamide and bis under a hood; avoid contact with dust. Filter and store at 4ºC.
1.5 M Tris-Cl, pH 8.8
Tris (MW 121.14)
6 M HCl to pH 8.8
Distilled or deionized water
final conc.
amount
1.5 M
545 g
about 150 ml
to 3 000 ml
final conc.
amount
10%
10 g
up to 100 ml
Adjust to pH 8.8 and store at 4ºC.
10% (w/v) SDS
Sodium dodecylsulfate (MW 288.38)
Distilled or deionized water
Store at room temperature.
10% (w/v) Ammonium persulfate
Ammonium persulfate (MW 71.08)
Distilled or deionized water
final conc.
amount
10%
2g
up to 20 ml
Prepare fresh.
10% (v/v) TEMED
TEMED (MW 116.2)
Distilled or deionized water
final conc.
amount
10%
0.5 ml
4.5 ml
Prepare fresh.
Ettan DALTsix Electrophoresis System User Manual 80-6492-49 Edition AD
33
80649249AD.book Page 34 Wednesday, April 4, 2007 2:15 PM
9 Recipes
Displacing solution
(0.375 M Tris-Cl, pH 8.8, 30% (v/v) glycerol, bromophenol blue, 200 ml)
amount
Tris-Cl (1.5 M, pH 8.8)
Glycerol
Bromophenol blue
Distilled or deionized water
50 ml
60 ml
2 mg
90 ml
Should be made fresh; stored solution may support microbial growth.
Water-saturated butanol
amount
n, i, or t-butanol
Distilled or deionized water
50 ml
10 ml
Combine in a bottle and shake. Use the top phase to overlay gels. Store at room temperature indefinitely.
Gel storage solution
(0.375 M Tris-Cl, pH 8.8, 0.1% (w/v) SDS, 2.0 l)
Tris-Cl (1.5 M, pH 8.8)
10% (w/v) SDS
Distilled or deionized water
final conc.
amount
0.375 M
0.1% (w/v)
500 ml
20 ml
to 2 000 ml
Store at 4ºC.
10× SDS electrophoresis buffer
(250 mM Tris, 1.92 M glycine, 1.0% (w/v) SDS, approximate pH 8.3, 20 l)
Tris (MW 121.14)
Glycine (MW 75.07)
SDS (MW 288.38)
Distilled or deionized water
final conc.
amount
250 mM
1.92 M
1.0% (w/v)
605.0 g
2882.0 g
200.0 g
to 20 l
Do not adjust the pH of this solution.
SDS equilibration buffer
(50 mM Tris-Cl, pH 8.8, 6 M urea, 30% (v/v) glycerol, 2% (w/v) SDS,
bromophenol blue, 200 ml)
Tris-Cl (1.5 M, pH 8.8)
Urea (MW 60.06)
Glycerol (87% [v/v], MW 92.09)
SDS (MW 288.38)
Bromophenol blue
Distilled or deionized water
final conc.
amount
50 mM
6M
30% (v/v)
2% (w/v)
trace
6.7 ml
72.07 g
69 ml
4.0 g
A few grains
to 200 ml
Store at -20ºC. This is a stock solution. Add DTT or iodoacetamide before using.
34
Ettan DALTsix Electrophoresis System User Manual 80-6492-49 Edition AD
80649249AD.book Page 35 Wednesday, April 4, 2007 2:15 PM
Recipes 9
Agarose sealing solution
(25 mM Tris, 192 mM glycine, 0.1% (w/v) SDS, bromophenol blue,
0.5% (w/v) agarose, 25 ml)
1× SDS electrophoresis buffer (see above)
Agarose (NA or M)
Bromophenol blue
final conc.
amount
trace
25 ml
125 mg
A few grains
Combine all ingredients in a 250 ml Erlenmeyer flask. Swirl to disperse. On a low setting, heat in a microwave oven until the agarose is completely melted, about 1 min. Do not allow the solution to boil over. Allow the agarose to cool slightly before using. Do not adjust pH.
Homogeneous gel solutions
600 ml
volume required for (ml)
12.5%
Final %
10%
Acrylamide stock
200
250
300
15%
1.5 M Tris-Cl, pH 8.8
150
150
150
Water
237
187
137
10% SDS
6.00
6.00
6.00
10% APS
6.00
6.00
6.00
10% TEMED
1.03
0.83
0.69
final %T
10%
volume required for (ml)
12.5%
Acrylamide stock
150
188
225
1.5 M Tris-Cl, pH 8.8
113
113
113
Water
178
140
103
10% SDS
4.5
4.5
4.5
10% APS
4.5
4.5
4.5
10% TEMED
0.77
0.62
0.52
450 ml
15%
Note: The amounts of TEMED (0.025-0.09% (v/v)) and APS (0.1% (w/v)) suggested here are based on our experience. You may want to
changes these volumes for your laboratory because of differences in temperature and reagent quality. Perform a small-scale test before
using a new composition to check that your solution polymerizes in about 10 min. The gel recipes are based on Laemmli, U.K. Nature
227,680-685 (1970).
Gradient gel solutions
For six 1 mm gels:
Light solution, 210 ml
final %T
8%
volume required for (ml)
10%
12%
Acrylamide stock
55
68
82
95
109
1.5 M Tris-Cl, pH 8.8
52.5
52.5
52.5
52.5
52.5
Water
98
85
71
58
44
10% SDS
2.1
2.1
2.1
2.1
2.1
Glycerol
0
0
0
0
0
14%
16%
10% APS
2.1
2.1
2.1
2.1
2.1
10% TEMED
0.45
0.36
0.30
0.25
0.22
Ettan DALTsix Electrophoresis System User Manual 80-6492-49 Edition AD
35
80649249AD.book Page 36 Wednesday, April 4, 2007 2:15 PM
9 Recipes
Heavy solution, 210 ml
final %T
12%
volume required for (ml)
14%
16%
Acrylamide stock
82
95
109
123
136
1.5 M Tris-Cl, pH 8.8
52.5
52.5
52.5
52.5
53
Water
55
41
27
14
0.0
10% SDS
2.1
2.1
2.1
2.1
2.1
Glycerol
18
18
18
18
18
10% APS
1.05
1.05
1.05
1.05
1.05
10% TEMED
0.09
0.08
0.07
0.06
0.06
14%
16%
18%
20%
For six 1.5 mm gels:
Light solution, 275 ml
final %T
8%
volume required for (ml)
10%
12%
Acrylamide stock
73
92
110
128
147
1.5 M Tris-Cl, pH 8.8
69
69
69
69
69
Water
127
109
91
73
54
10% SDS
2.75
2.75
2.75
2.75
2.75
Glycerol
0
0
0
0
0
10% APS
2.75
2.75
2.75
2.75
2.75
10% TEMED
0.59
0.47
0.39
0.34
0.29
final %T
12%
volume required for (ml)
14%
16%
18%
20%
Acrylamide stock
110
128
147
165
183
1.5 M Tris-Cl, pH 8.8
69
69
69
69
69
Water
73
55
37
18
0
10% SDS
2.75
2.75
2.75
2.75
2.75
Glycerol
19
19
19
19
19
10% APS
1.4
1.4
1.4
1.4
1.4
10% TEMED
0.13
0.11
0.10
0.09
0.08
Heavy solution, 275 ml
36
Ettan DALTsix Electrophoresis System User Manual 80-6492-49 Edition AD
80649249AD.book Page 37 Wednesday, April 4, 2007 2:15 PM
Troubleshooting 10
10 Troubleshooting
10.1 Electrical and mechanical
Symptom
Possible causes
Possible solutions
No current at start of run
Insufficient volume of buffer in upper reservoir.
Buffer not circulating
Pump is not primed.
Pump is off.
Ensure that the unit contains enough buffer to contact
the upper electrode.
Turn pump off and on to purge air bubbles.
Turn on pump by plugging in the connector in the mains
power outlet.
Service call.
Pump is broken.
10.2 Gel casting
Symptom
Possible solutions
Gel caster leaks
Apply a light film of GelSeal compound to the foam gasket on the front plate before clamping and casting.
Check the foam gasket for cracks or nicks and replace if necessary.
If the stack is too thick, the front plate may not seat firmly against the
gasket. Remove one or more of the filler sheets until the gasket seals.
Use only recent stocks of the highest quality reagents.
If the dry ammonium persulfate does not crackle when water is added to it, replace with fresh reagent.
Use fresh ammonium persulfate.
Solutions of extreme pH may not polymerize.
Degas the monomer solution. Oxygen inhibits polymerization.
Increase both ammonium persulfate and TEMED by 30–50%.
Adjust the gel solution temperature to a minimum of 20ºC.
Check and adjust crosslinker concentration. Standard SDS gels should have a crosslinker concentration of
2.6% (%C = (g bis × 100)/(g monomer + g bis)).
Make up fresh acrylamide stock solution.
If gel polymerized too fast (<10 min), reduce the concentration of catalyst (APS and TEMED) by 25%.
If gel polymerized too slowly (>50 min), increase the concentration of catalyst (APS and TEMED) by 50%.
Make up fresh acrylamide stock solution.
Check circulation of the buffer.
Pre-chill the buffer.
Decrease power, voltage, or current.
IPG strip not properly placed on gel surface. Make sure IPG strip contacts the gel surface uniformly along its
entire length. Avoid gouging the surface of the separating gel.
Include iodoacetamide equilibration step for IPG strip.
Allow the solution to settle, or reach equilibrium, before applying the overlay.
Apply equal amounts of overlay solution to each gel.
Apply overlay as quickly as possible.
Add sucrose [15% (w/v)] or glycerol (25% (v/v)) to the high-percent monomer solution.
Add a very small amount of bromophenol blue to the high-percent monomer solution to track gradient
formation. Excessive bromophenol blue will inhibit polymerization.
Gels run too fast – uneven migration. Run at a lower power setting. Use a two-step program: start at a low
power setting until the proteins enter the gel, then increase the power for the remainder of the run.
Uneven gel surface. Overlay the running gel with water-saturated butanol before polymerization begins to
avoid forming an uneven gel surface.
Uneven gel polymerization or gradient formation.
Use reagents of the highest purity, preferably electrophoresis grade.
Use deionized, double distilled water.
Check for leaks. All plates, spacers, and gaskets must be clean, dry, and free of grease.
Check the UBC. It should be free of nicks or tears.
Check the pH of the buffer. If the pH is wrong, make fresh buffer, do not back-titrate.
Check recipes, gel concentrations, and buffer dilutions. (For example, do not use Tris·HCl in place of Tris base
for the electrophoresis buffer.)
Discard older acrylamide solutions and use only reagents of highest quality.
Only use freshly deionized urea of highest quality.
Adjust power, current, or voltage.
Incomplete gel polymerization
Gel is too soft, too brittle, or white
Gel exhibits swirls
Dye front curves up (smiles)
Vertical protein streaks
Gels cast simultaneously are different sizes
Gradient gels-uneven layering
Spots skewed or distorted
Heavy background after silver staining
Unusually slow or fast run
Ettan DALTsix Electrophoresis System User Manual 80-6492-49 Edition AD
37
80649249AD.book Page 38 Wednesday, April 4, 2007 2:15 PM
10 Troubleshooting
10.3 Pre-cast gels
10.3 Pre-cast gels
Symptom
Second dimension electrophoresis
proceeds slowly with high current
Possible causes
Possible solutions
One of the slots in the upper buffer chamber is
open
All 6 slots in the UBC should be occupied by either a gel
cassette or a blank cassette.
The UBC is damaged.
Carefully fill both buffer chambers to the same level.
Anodic buffer has mixed with cathodic buffer
from overfilling of either the cathodic or the
anodic reservoir.
Ensure that the level of the anode (lower) buffer does not
come above level of the buffer in the UBC when the
electrophoresis unit is fully loaded.
The top surface of the gel has been damaged
during application of the IPG strip.
Take care during application of the IPG strip that neither gel
is damaged.
Bubbles between the gel and the glass plate.
Use the roller to remove any bubbles or excess liquid
between the gel and the glass plate. Ensure that no visible
bubbles remain and that the gel adheres firmly to the glass
and resists movement.
Liquid between the gel and the glass plate.
Ensure that no visible bubbles remain and that the gel
adheres firmly to the glass and resists movement.
Interfering substances in the first dimension.
Contaminants in the sample can cause distortions or
swollen regions in the IPG strip following IEF. Modify sample
preparation to limit these contaminants. See 2-D
Electrophoresis Using Immobilized pH Gradients-Principles
and Methods (80-6429-60).
Pronounced downward curving of the
dye front on one side of the gel
There is an unfilled gap between the gel and one
of the spacers.
When sealing the IPG strip into place, ensure that some of
the agarose sealing solution flows down any gap that may
exist between the gel and spacer.
Distortion in the 2-D pattern
Bubbles between the gel and the glass plate.
Use the roller to remove any bubbles or excess liquid
between the gel and the glass plate.
Liquid between the gel and the glass plate.
Ensure that no visible bubbles remain and that the gel
adheres firmly to the glass and resists movement.
Interfering substances in the first dimension.
Contaminants in the sample can cause distortions or
swollen regions in the IPG strip following IEF. These
distortions can result in turn in disturbances in the second
dimension.
Bubble between IPG strip and top surface of
second dimension gel.
Ensure that no bubbles are trapped between the IPG strip
and the top surface of second dimension gel.
Dye front is irregular
Vertical gap in the 2-D pattern
Vertical streaking
Incorrectly prepared equilibration solution.
Prepare equilibration solution according to instructions.
Poor transfer of protein from IPG strip to second
dimension gel.
Use low power for sample entry phase. Extend entry phase
if necessary.
Insufficient equilibration
Extend equilibration time.
Spots are vertically doubled, or
“twinned”
IPG strip is not placed properly.
Ensure that the plastic backing of the IPG strip is against the
glass plate of the second dimension cassette.
Poor representation of higher molecular
weight proteins
Incorrectly prepared equilibration solution.
Prepare equilibration solution according to instructions.
Poor transfer of protein from IPG strip to second
dimension gel.
Use low power for sample entry phase. Extend entry phase
if necessary.
38
Ettan DALTsix Electrophoresis System User Manual 80-6492-49 Edition AD
80649249AD.book Page 39 Wednesday, April 4, 2007 2:15 PM
Troubleshooting 10
10.4 Stained gels
Symptom
Possible solution
Protein spots are diffuse or
broader than usual
Use only highest quality reagents.
Make sure that polymerization is complete.
Check equilibration time of IPG strips. Too long can lead to diffusion and too short can lead to incomplete
equilibration.
Make sure the IPG strip rests on the slab gel surface without damaging it.
Problems with first dimension-see troubleshooting guides for IPGphor or Multiphor units, or 2-D
Electrophoresis: Principles and Methods.
Protein spots are poorly resolved
Allow gel to polymerize completely.
Begin electrophoresis as soon as the IPG strips are loaded to prevent diffusion of low molecular weight
proteins.
Running too fast. Reduce the power, current, or voltage.
Reduce the temperature setting.
Problems with the first dimension.
Smeared or comet shaped spots
Check pH of cathode buffer. Should be between 8.3 and 8.8.
Make sure that 2× Laemmli buffer is used in the upper (cathode) chamber.
Buffer or SDS depleted.
Protein spots are near the
buffer front
Buffer depleted. Check pH of upper (cathode) buffer. Should be below pH 8.3-8.8. Be sure that 2× Laemmli
buffer is being used in the upper (cathode) chamber.
Pore size of the gel is too large. Increase the %T.
Proteins degraded during sample preparation. Add protease inhibitors during sample preparation.
Check the pH of the 4× gel buffer. It should be pH 8.8. Proteins will migrate faster below pH 8.8.
Protein spots have not entered the
gel when buffer front has
reached the bottom of the gel
The gel pore size is too small. Decrease the %T.
Protein spots are at both extremes
but not in center
The molecular weight range of the sample requires an acrylamide concentration gradient to resolve the full
range of proteins.
Check the pH of the 4× gel buffer. It should be pH 8.8. Proteins will migrate
slower above pH 8.8.
Ettan DALTsix Electrophoresis System User Manual 80-6492-49 Edition AD
39
80649249AD.book Page 40 Wednesday, April 4, 2007 2:15 PM
10 Troubleshooting
10.4 Stained gels
40
Ettan DALTsix Electrophoresis System User Manual 80-6492-49 Edition AD
80649249AD.book Page 41 Wednesday, April 4, 2007 2:15 PM
Care and maintenance 11
11 Care and maintenance
11.1 Unpacking, inventory, and set-up
Unwrap all packages carefully and compare contents with the packing list, making sure all items arrived. If any
part is missing, contact your local sales office. Inspect all components for damage that may have occurred while
the unit was in transit. If any part appears damaged, contact the carrier immediately. Be sure to keep all packing
material for damage claims or to use should it become necessary to return the unit.
11.2 Cleaning
WARNING! When using hazardous chemicals, take all suitable protective measures, such as wearing
protective glasses and gloves resistant to the chemicals used. Follow local regulations and instructions for
safe operation and maintenance of the system.
For day-to-day operation of the unit, the cleaning procedure outlined in unit operation is sufficient, thoroughly
rinsing the electrophoresis tank with distilled or deionized water. If desired the unit can be periodically cleaned
with a dilute solution of a mild detergent.
Clean the Gel Casting Cassettes and Pre-cast Gel Cassettes with a dilute solution of a laboratory cleanser such
as RBS-35, from Pierce Chemical Company. Rinse the cassettes thoroughly with distilled or deionized water.
•
Do not autoclave or heat any part above 40ºC.
•
Do not expose the unit or its parts to organic solvents, including >20% ethanol.
•
If using radioactive reagents, decontaminate the unit with a cleaning agent such as CONTRAD 70 or Decon
90 from Decon Laboratories, Inc.
Note: Local security regulations must be followed when handling radioactive reagents.
11.3 Replacement of components
WARNING! Never use the equipment if any part cracked or broken. Risk for electric shock
If any of the components becomes cracked or broken it should be replaced. The upper buffer chamber (UBC)
should be replaced if any of the rubber flaps become cut or torn. To prevent damage to the flaps, ensure that all
sharp edges on glass plates are smoothed and exercise care when employing the cassette removal tool. With
normal use the UBC ribs may become bowed upward; this bowing should not affect the performance of the seal.
11.4 Recycling
Ettan Spot Handling Workstation contains the following materials:
•
Stainless steel
•
Aluminium
•
Glass
•
Plastic:
- Acetal (POM)
- Polyethylene Terephthalate Polyester (PETP)
Ettan DALTsix Electrophoresis System User Manual 80-6492-49 Edition AD
41
80649249AD.book Page 42 Wednesday, April 4, 2007 2:15 PM
11 Care and maintenance
11.5 Maintenance
- Polyurethane (PUR)
•
Electrical and electronic components
When taking Ettan Spot Handling Workstation out of service these different materials must be separated and
recycled according to local regulations.
This symbol indicates that the waste of electrical and electronic equipment must not be disposed as unsorted
municipal waste and must be collected separately. Please contact an authorized representative of the
manufacturer for information concerning the decommissioning of your equipment.
11.5 Maintenance
Check the following before each run on Ettan DALTsix:
42
•
all parts are clean, see Section 11.2.
•
all parts are intact and free of cracks and other damage. If a part is damaged replace the part or entire
instrument before use, see Section 11.3.
•
the power cord and high voltage cable is intact and free of cracks and other damage. If the cable is
damaged replace it before use.
•
there is no leakage from parts containing buffer or cooling water. Moist or liquid must be removed from the
equipment before use.
•
the circulation pump spins and that there is circulation of liquid.
Ettan DALTsix Electrophoresis System User Manual 80-6492-49 Edition AD
80649249AD.book Page 43 Wednesday, April 4, 2007 2:15 PM
Customer service information 12
12 Customer service information
12.1 Technical service and repair
GE Healthcare offers complete technical support for all our products. If you have any questions about how to
use this product, or would like to arrange to repair it, please contact your local GE Healthcare representative for
more information.
Note: Only use spare parts that GE Healthcare recommends for safety reasons. The warranty is not valid if parts
that are not recommended by GE Healthcare are used.
12.2 Ordering information
Product
Ettan DALTsix Electrophoresis Unit
code no.
100 V~
80-6494-77
110-120 V~
80-6485-08
220-240 V~
80-6485-27
Replacement Lid
80-6490-40
Replacement Upper Buffer Chamber
80-6490-78
Replacement Anode Assembly/Cassette Carrier
80-6491-35
Ettan DALTsix and DALT II Cassettes
Pre-Cast Gel Cassette
80-6466-65
Gel Casting Cassette, 1-mm
80-6466-84
Gel Casting Cassette, 1.5-mm
80-6488-69
Blank Cassette Insert
80-6467-03
Cassette Removal Tool (2/pkg)
80-6474-82
Ettan DALT II Pre-Cast Gels
Pre-Cast Gel 12.5% (6/pkg)
17-6002-36
Buffer Kit (one run of 12 gels)
17-6002-50
Ettan DALTsix Gel Caster
Complete with Separator Sheets (7 pcs) and Filler Sheets (6 pcs)
80-6485-46
Rubber Insert
80-6493-44
Small Black Knobbed Screws
80-6493-63
Ettan DALTsix Gradient Maker
80-6487-36
Ettan DALTtwelve Gel Caster
Complete with Separator Sheets (16 pcs) and Filler Sheets (6 pcs)
80-6467-22
Separator Sheets (16/pkg)
80-6467-41
Filler Sheets (6/pkg)
80-6467-60
Black-Knobbed Screws (4/pkg)
80-6437-58
Funnel Sponge
80-6474-06
Acrylic Feed Tube
80-6437-20
Foam Sealing Gasket
80-6023-76
Silicon Tubing Set, two pieces/pkg: 9 mm o.d., 178 mm long and
12.5 mm o.d., 16 mm long
80-6437-39
Replacement Tilt Leg with Nylon Screw
80-6474-25
Replacement Face Plate
80-6474-44
Ettan DALTsix Electrophoresis System User Manual 80-6492-49 Edition AD
43
80649249AD.book Page 44 Wednesday, April 4, 2007 2:15 PM
12 Customer service information
12.2 Ordering information
Product
Accessories
code no.
2-D Electrophoresis: Using Immobilized pH Gradients
80-6429-60
Cassette Rack (2/pkg)
80-6467-98
Equilibration Tubes (12/pkg)
80-6467-79
Stainless Steel Staining Tray Set
80-6468-17
GelSeal, 1/4 oz. tube
80-6421-43
Roller
80-1106-79
Fluorescent Rulers (2/pkg)
80-6223-83
Wonder Wedge
80-6127-88
PlusOne Electrophoresis Chemicals and Reagents
Urea, 500 g
17-1319-01
Dithiothreitol (DTT), 1 g
17-1318-01
Bromophenol Blue, 10 g
17-1329-01
Glycerol (87%), 1 l
17-1325-01
Acrylamide IEF (acrylic acid <0.002%), 1 kg
17-1300-02
Acrylamide IEF 40% solution, 1 l
17-1301-01
N,N',-Methylene bisacrylamide, 25 g
17-1304-01
N,N',-Methylene bisacrylamide 2% solution, 1 l
17-1306-01
Agarose NA, 10 g
17-0422-01
N,N,N',N', -tetramethylethylenediamine (TEMED), 25 ml
17-1312-01
Ammonium Persulfate (APS), 25 g
17-1311-01
Tris, 500 g
17-1321-01
Glycine, 500 g
17-1323-01
Sodium Dodecylsulfate (SDS), 100 g
17-1313-01
Silver Staining Kit, Protein
17-1150-01
Molecular Weight Markers
MW Range 2512-16949, 2 mg/vial, 1 vial
80-1129-83
MW Range 14400-94000, 575 (mg/vial, 10 vials
17-0446-01
MW Range 53000-212000, 175 (mg/vial, 10 vials
17-0615-01
Companion Products
44
EPS 601 Power Supply 6 - 600 V, 1- 400 mA, 1-100 W
18-1130-02
MultiTemp III Thermostatic Circulator, 230 V
18-1102-78
MultiTemp III Thermostatic Circulator, 115 V
18-1102-77
Ettan DALTsix Electrophoresis System User Manual 80-6492-49 Edition AD
80649249AD.book Page 45 Wednesday, April 4, 2007 2:15 PM
80649249AD.book Page 46 Wednesday, April 4, 2007 2:15 PM
www.gelifesciences.com
GE, imagination at work and GE monogram are trademarks of General Electric Company.
Ettan, Immobiline, IPGphor, Multiphor and MultiTemp are trademarks of GE Healthcare companies.
GE Healthcare Bio-Sciences AB
Björkgatan 30
751 84 Uppsala
Sweden
© 2006-2007 General Electric Company – All rights reserved.
First published Oct. 2006.
All goods and services are sold subject to the terms and conditions of sale of the company within GE Healthcare
which supplies them. A copy of these terms and conditions is available on request. Contact your local GE Healthcare representative for the most current information.
GE Healthcare Europe GmbH
Munzinger Strasse 5, D-79111 Freiburg, Germany
GE Healthcare UK Ltd
Amersham Place, Little Chalfont, Buckinghamshire, HP7 9NA, UK
GE Healthcare Bio-Sciences Corp
800 Centennial Avenue, P.O. Box 1327, Piscataway, NJ 08855-1327, USA
GE Healthcare Bio-Sciences KK
Sanken Bldg. 3-25-1, Hyakunincho, Shinjuku-ku, Tokyo 169-0073, Japan
Asia Pacific Tel: +85 65 62751830 Fax: +85 65 62751829 • Australasia Tel: +61 2 8820 8299 Fax: +61 2 8820 8200 • Austria Tel: 01 /57606 1613 Fax: 01 /57606 1614 • Belgium Tel: 0800 73 890 Fax: 02 416 8206 • Canada Tel: 1 800 463 5800
Fax: 1 800 567 1008 • Central, East, & South East Europe Tel: +43 1 972 720 Fax: +43 1 972 722 750 • Denmark Tel: +45 70 25 24 50 Fax: +45 45 16 2424 • Eire Tel: 1 800 709992 Fax +44 1494 542010 • Finland & Baltics Tel: +358 9 512 3940
Fax: +358 9 512 39439 • France Tel: 01 69 35 67 00 Fax: 01 69 41 98 77 • Germany Tel: 0800 9080 711 Fax: 0800 9080 712 • Greater China Tel: +852 2100 6300 Fax: +852 2100 6338 • Italy Tel: 02 26001 320 Fax: 02 26001 399 • Japan
Tel: 81 3 5331 9336 Fax: 81 3 5331 9370 • Korea Tel: 82 2 6201 3700 Fax: 82 2 6201 3803 • Latin America Tel: +55 11 3933 7300 Fax: +55 11 3933 7304 • Middle East & Africa Tel: +30 210 96 00 687 Fax: +30 210 96 00 693 • Netherlands
Tel: 0800-82 82 82 1 Fax: 0800-82 82 82 4 • Norway Tel: +47 815 65 777Fax: +47 815 65 666 • Portugal Tel: 21 417 7035 Fax: 21 417 3184 • Russia & other C.I.S. & N.I.S Tel: +7 495 956 5177 Fax: +7 495 956 5176 • Spain Tel: 902 11 72 65
Fax: 935 94 49 65 • Sweden Tel: 018 612 1900 Fax: 018 612 1910• Switzerland Tel: 0848 8028 10 Fax: 0848 8028 11• UK Tel: 0800 515 313 Fax: 0800 616 927• USA Tel: +1 800 526 3593 Fax: +1 877 295 8102
imagination at work
80-6492-49 AD 03/2007