1
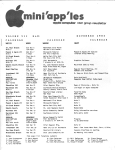
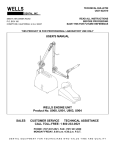
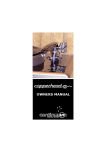
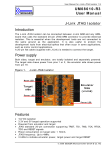
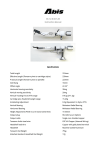
Caliburn Turntable
Installation Manual
REVISION ‘D’
Continuum Audio Laboratories – Caliburn Installation Manual
Welcome and congratulations on your purchase of the Caliburn turntable system. Your
Caliburn was hand-crafted and assembled by the team at Continuum Audio Laboratories, and
has been rigorously tested and is ready for your enjoyment.
We ask that you take the time to read this manual carefully to ensure that you not only enjoy
optimum sound quality from your Caliburn, but also understand the care and maintenance
procedures required to keep your Caliburn in as-new condition for many years to come.
If you have any questions in reference to any part of your Caliburn at any time in the
future, please feel free to contact your nearest Continuum Consultant for assistance.
Your Authorised Continuum Consultant is:
Serial Number:
Date of Manufacture
Written By: MDO
Approved By: PLO
Revision D – 01-JUN-08
Page 2 of 52
Continuum Audio Laboratories – Caliburn Installation Manual
TABLE OF CONTENTS
IMPORTANT INFORMATION AND NOTES...................................................................................5
WHO SHOULD READ THIS MANUAL ...........................................................................................5
HOW TO READ THIS MANUAL ......................................................................................................5
Standard Symbols and Safety Notifications ....................................................................................5
SAFETY PRECAUTIONS..........................................................................................................................6
CALIBURN SYSTEM COMPONENTS.............................................................................................7
CALIBURN TURNTABLE...............................................................................................................7
CALIBURN CONTROL UNIT ........................................................................................................7
CALIBURN VACUUM UNIT..........................................................................................................7
CASTELLON ISOLATION STAND.................................................................................................7
COBRA TONEARM ........................................................................................................................7
OVERVIEW OF BASIC INSTALLATION STEPS .........................................................................................9
PACKAGING ................................................................................................................................10
INSPECT PACKAGING PRIOR TO OPENING...........................................................................10
OPEN THE PACKAGING ............................................................................................................10
CASTELLON OVERVIEW ............................................................................................................11
CASTELLON LAYERS ..................................................................................................................12
INSTALL LOWER CERAMIC SHELF ..........................................................................................13
INSTALL UPPER CERAMIC SHELF GUIDE BOLTS.................................................................13
INSTALLING THE DAMPING & BALLAST LAYERS..................................................................16
CONTROL BOX............................................................................................................................18
VACUUM BOX .............................................................................................................................18
INFLATION OF THE HORIZONTAL STABILISER.....................................................................19
CALIBURN TURNTABLE .................................................................................................................20
OVERVIEW OF BASIC INSTALLATION STEPS..........................................................................21
PACKAGING CONTENTS ..............................................................................................................22
PLATTER ASSEMBLY ..................................................................................................................22
CHASSIS, BEARING, ARMBOARD ASSEMBLY..........................................................................23
MOTOR ASSEMBLY.....................................................................................................................25
CONTROL BOX ASSEMBLY........................................................................................................26
CONTROL BOX – FITTING OF SEALED BATTERIES ..............................................................27
VACUUM BOX ASSEMBLY .........................................................................................................28
SET - UP INSTRUCTIONS.................................................................................................................29
PREPARING THE CHASSIS BEFORE INSTALLATION.............................................................29
PLACING THE TURNTABLE CHASSIS ......................................................................................29
PLACING THE TURNTABLE CHASSIS ......................................................................................30
PREPARING THE BEARING FOR PLATTER INSTALL ..............................................................33
OUTER PLATTER INSTALLATION ..............................................................................................34
INSTALLING THE INNER PLATTER ............................................................................................35
INSTALLING THE BELT ................................................................................................................38
PLACING THE TOP COVER...........................................................................................................39
INSTALLING THE PERIPHERALS ................................................................................................40
INSTALLING THE ARM .................................................................................................................41
CALIBURN OPERATING INSTRUCTIONS ..................................................................................42
PLATTER CLAMP AND LIP SEAL OPERATION........................................................................42
RECORD PLAYING PROCEDURE ................................................................................................43
OPERATING THE VACUUM.......................................................................................................43
STARTING THE MOTOR .............................................................................................................43
REMOVING RECORD PROCEDURE .........................................................................................43
SPEED ADJUSTMENT ....................................................................................................................44
LOWERING THE SPEED.............................................................................................................44
RAISING THE SPEED..................................................................................................................44
CONFIRMING THE SET SPEED.................................................................................................44
OWNER CARE & MAINTENANCE ...............................................................................................45
CARING FOR METAL SURFACES..............................................................................................45
CLEANING THE PLATTER .........................................................................................................45
BEARING MAINTENANCE..........................................................................................................45
Written By: MDO
Approved By: PLO
Revision D – 01-JUN-08
Page 3 of 52
Continuum Audio Laboratories – Caliburn Installation Manual
MOTOR.........................................................................................................................................45
MOTOR BELT REPLACEMENT..................................................................................................45
FAULTS & TROUBLE SHOOTING ................................................................................................46
SPECIFICATIONS............................................................................................................................47
CALIBURN’S DESIGN HISTORY ..................................................................................................48
APPENDIX 1 – RECOMMENDED BATTERY DETAILS .........................................................................50
Written By: MDO
Approved By: PLO
Revision D – 01-JUN-08
Page 4 of 52
Continuum Audio Laboratories – Caliburn Installation Manual
IMPORTANT INFORMATION AND NOTES
ENGLISH
WE RECOMMEND YOU READ THIS DOCUMENT IN ITS ENTIRETY
BEFORE ATTEMPTING TO ASSEMBLE OR DISASSEMBLE YOUR NEW
TURNTABLE.
WHO SHOULD READ THIS MANUAL
This manual is designed for the owner, dealer, or dealer representative who will install the
Caliburn turntable. The reader should have a good general knowledge of mechanical devices
and be proficient with basic tools such as allen wrenches, spirit levels, and general assembly
techniques for machined components.
HOW TO READ THIS MANUAL
The User manual (this manual) contains important notes that need to be observed to operate
the Caliburn safely and correctly.
Throughout this manual there will be standard symbols denoting important
information.
Standard Symbols and Safety Notifications
For your safety and that of others, follow the guidelines provided on the following pages
concerning the use of the product.
Symbols are used throughout this manual. These are provided to emphasize important points
for your safety and that of others. The following are the symbols and their meanings:
Ignoring the instructions under this symbol when installing or dismantling the Caliburn may be
hazardous or even lethal.
Ignoring the instructions under this symbol when installing or dismantling the Caliburn may
lead to injuries as well as damage to the device or hardware options.
CAUTION
(CAUTION without the exclamation mark)
Ignoring the instructions under this symbol when using the Caliburn may lead to damage to
the device or hardware options.
Written By: MDO
Approved By: PLO
Revision D – 01-JUN-08
Page 5 of 52
Continuum Audio Laboratories – Caliburn Installation Manual
Safety Precautions
Category
Electric shock
and fire
Do not dismantle or modify this device in any other way than described in
this manual.
Do not place anything on top of this device. Doing so may cause fire, electric
shock or a malfunction.
Do not install this device in direct sunlight, near a heater, or in a humid or
dusty environment. Doing so may cause fire or electric shock. To prevent fire
or shock hazard, do not expose this unit to rain or moisture. Do not use or
allow any liquid cleaning solutions to enter the unit.
Do not obstruct the ventilation slots. This could cause overheating and fire.
Use only a certified safe AC adapter and power cable to connect to any IEC
connectors on the provided Power Entry Modules. Third-party adapters and
cables may cause fire, electric shock or malfunction.
In the event the device overheats, starts to smoke or smells strange,
immediately unplug the device completely from the AC power plug.
Contact the company where you purchased the device immediately. Using
the device in its current condition may cause fire or electric shock.
Do not damage or modify the power or other cables. Do not twist the cables
together, place anything on them or place them where someone may trip
over them. Doing so may cause fire or electric shock or personal injury.
The Power Supply contains voltages that can cause serious injury or death.
There are no user serviceable parts inside and no reason to open the control
box or the pump box. In situations of failure return to approved dealer or
agent. Should any solid object or liquid fall into the cabinet, unplug the unit
and have it checked by your Factory Authorized Dealer
To avoid electrical shock, do not open the cabinet. Refer servicing to qualified
personnel only.
Before operating the unit, check that the operating voltage is identical with
your local power supply. The operating voltage is indicated on the name
plate at the rear of the unit on the Power Entry Module.
The unit is not disconnected from the AC power source (mains) as long as it
is connected to the wall outlet, even if the unit itself has been turned off.
If you are not going to use the unit for a long time, be sure to disconnect the
unit from the wall outlet. To disconnect the AC power cord, grasp the plug
itself; never the cord.
AC power cord must be changed only at a qualified service shop.
Fitting
components
The components in the Caliburn are made to close tolerances with sliding fits
on most bearing surfaces. Never over tighten any of the provided fasteners
for assembling the platter. If you are in doubt request the assistance of a
trained dealer representative to ensure no forcing or misalignment of the
components during assembly.
Observe all instructions on placing your hands in the correct location when
installing the heavy platter on to the bearing. Failure to observe the
instructions and commonsense may result in injury.
Written By: MDO
Approved By: PLO
Revision D – 01-JUN-08
Page 6 of 52
Continuum Audio Laboratories – Caliburn Installation Manual
CALIBURN SYSTEM COMPONENTS
The Caliburn consists of separate subsystems that combine to create a most sophisicated
analogue playback system.
CALIBURN TURNTABLE
The Caliburn turntable is a precisely engineered piece of equipment designed to be a low
noise foundation for the record to sit, allowing the stylus to extract the maximum
information from the record’s groove.
CALIBURN CONTROL UNIT
The Caliburn Control Unit allows for platter speed selection, 33, 45 and 78, and speed
adjustment/memory settings. It also controls the vacuum unit for precise negative
pressure to hold the record down during playback.
CALIBURN VACUUM UNIT
The Caliburn Vacuum Unit is a super quiet pump with a “stealth-mode” operation during
playback. It is a computer controlled negative pressure mechanism that maintains correct
vacuum for record playback. It runs continuously during playback.
CASTELLON ISOLATION STAND
The Castellon Isolation Stand is specifically designed to support the Caliburn Turntable and
provide a suspension system that is tuned to the Caliburn. It contributes a significant
proportion to the sound of the system.
COBRA TONEARM
As the primary tonearm on the Caliburn System the Cobra offers unparalleled performance
even against very complicated linear mechanisms. It has been designed to work as part of
the overall system to deliver a complete sonic result.
Written By: MDO
Approved By: PLO
Revision D – 01-JUN-08
Page 7 of 52
Continuum Audio Laboratories – Caliburn Installation Manual
Castellon Stand
Written By: MDO
Approved By: PLO
Revision D – 01-JUN-08
Page 8 of 52
Continuum Audio Laboratories – Caliburn Installation Manual
Overview of Basic Installation Steps
Perform the steps below to install the Castellon. Details are contained in this manual.
1.
Read the User Manual (this manual)
↓
2.
Unpack and Check the contents of the packaging
↓
3.
Confirm location for Castellon installation
↓
6.
Position and place the Castellon. Level the Stand using the adjustable feet
↓
7.
Remove protective packing film
↓
8.
Remove Top Drawer
↓
9.
Install the Lower Ceramic Shelf and Upper Ceramic Shelf using Special Bolts
↓
10.
Install Pneumatic Buffer around Upper Ceramic Shelf
↓
11.
Place Damping Sheets onto Upper Ceramic Shelf
↓
12.
Place Top Timber Shelf on Damping Sheets
↓
13.
Install Caliburn
↓
14.
Release Installation Bolts
↓
15.
Secure Safety Bolt
↓
16.
Inflate Buffer
Written By: MDO
Approved By: PLO
Revision D – 01-JUN-08
Page 9 of 52
Continuum Audio Laboratories – Caliburn Installation Manual
PACKAGING
Please retain all the packaging in a safe dry place away from fire hazard and/or pests which
could damage the packaging materials.
Should you need to transport the turntable we strongly recommend you use the original
packaging to prevent damage during shipment.
Never transport the turntable with the platter assembled as this will potentially lead to serious
damage to the bearing and platter.
INSPECT PACKAGING PRIOR TO OPENING
The packaging has been especially designed so that all component parts are safe during
transportation by reputable shipping companies. Should the packaging appear damaged or
show signs of having been exposed to significant amounts of moisture (buckled cardboard
packaging or heavy water stains) please advise your dealer immediately as the contents may
have been exposed to undesirable events.
The packaging is designed to handle the majority of expected shipping conditions but there
may be instances where events beyond Continuum Audio Laboratories control have occurred in
shipping. To avoid complications with warranty claims we recommend you contact your dealer
for assistance in evaluating the packaging prior to unpacking and installation.
OPEN THE PACKAGING
The standard packaging consists of custom made roadcases and triple walled cardboard boxes
containing foam lining to protect the components.
Use a suitable protected cutting implement to carefully release the packaging tape holding the
protective boxes.
Then remove each component. Note: the parts are heavy and require a firm careful grip to
remove the items from their packaging. Be careful not to drop these components. Ask for
assistance before lifting heavy objects should you feel this is necessary.
Place each component in a safe place (i.e a soft surface such as a towel or soft blanket) before
opening the next component.
Written By: MDO
Approved By: PLO
Revision D – 01-JUN-08
Page 10 of 52
Continuum Audio Laboratories – Caliburn Installation Manual
CASTELLON OVERVIEW
The Castellon is a very specialised design incorporating the latest technology in vibration
control.
The stand contains a negative stiffness mechanism which works in harmony with the Caliburn
to produce unequalled sonic results. This spring mass damper system are hidden beneath the
attractive exterior.
Aircraft grade alloys are used throughout along with high tension turnbuckle systems to rigidly
brace the stand from any spurious movement.
Convenient features such as the drawer mechanism allow for storage of the usual collection of
tools and cleaning needs of quality analogue systems.
Custom Finish Top
High Tension
Turnbuckles
Custom Finish Drawer
Custom Middle
and Lower Shelf
Side Bracing Ring
Ceramic Adjustable Feet
Written By: MDO
Approved By: PLO
Revision D – 01-JUN-08
Page 11 of 52
Continuum Audio Laboratories – Caliburn Installation Manual
CASTELLON LAYERS
Once you have installed the stand in the correct location you need to insert the various shelf
components, ceramic levitating shelves, ballast metal sheets and damping material sheets.
Custom Finish Top
Damping Material Sheets
Horizontal Pneumatic
Stabiliser. Inflation valve
centered at rear.
Ballast 3MM
Metal Sheets
Upper Ceramic
Levitating Shelf
Lower Ceramic
Levitating Shelf
Main Safety
Bolt
Central Cutout
For Inflation
Valve
Written By: MDO
Approved By: PLO
Revision D – 01-JUN-08
4 x M10 Allthread
Assembly Clamping
Guide Bolts with
Plate Washers and
Wingnuts
Page 12 of 52
Continuum Audio Laboratories – Caliburn Installation Manual
INSTALL LOWER CERAMIC SHELF
Carefully lower the Bottom Ceramic Levitating Shelf into the recess in the top of the stand.
Secure at each corner with the supplied M6 x 20MM Socket Head Cap Screws.
Tighten all the bolts after ensuring each bolt has been started without crossthreading.
M6 X 20MM
SHCS Bolts
2 in each
corner
INSTALL UPPER CERAMIC SHELF GUIDE BOLTS
Thread the 4 x M10 Allthread Assembly Clamping Guide Bolts into the inside corners of the
UPPER Ceramic Shelf. Ensure these are flush with the top face of the Ceramic Shelf.
Lower into the stand allowing the Guide Bolts to locate the top shelf evenly through the
opposing holes in the LOWER Ceramic Shelf.
Written By: MDO
Approved By: PLO
Revision D – 01-JUN-08
Page 13 of 52
Continuum Audio Laboratories – Caliburn Installation Manual
Secure the flat plate washers and wingnuts as shown.
Install the Pneumatic Horizontal Stabilizer (do not inflate at this stage) by wrapping it around
the outer edge of the UPPER Ceramic Shelf.
Ensure the inflation valve is centered at the rear of the Castellon Stand inline with the cutout.
Tighten the allthreads in sequence to pull the UPPER Ceramic Shelf gradually and evenly into
the recess in the Castellon.
DO NOT REMOVE THESE BOLTS UNTIL THE CENTRAL SAFETY BOLT HAS BEEN INSTALLED.
Written By: MDO
Approved By: PLO
Revision D – 01-JUN-08
Page 14 of 52
Continuum Audio Laboratories – Caliburn Installation Manual
Install the Safety Bolt and tighten this until it is flush with the top surface.
Written By: MDO
Approved By: PLO
Revision D – 01-JUN-08
Page 15 of 52
Continuum Audio Laboratories – Caliburn Installation Manual
INSTALLING THE DAMPING & BALLAST LAYERS
Install the alternating layers of damping material and ballast metal sheets in the following
order:
After Ceramic UPPER Shelf Secured into stand
A.
B.
C.
D.
E.
F.
1
1
1
1
1
1
x
x
x
x
x
x
3MM Damping Sheet (EPDM Rubber)
3MM Ballast Metal Sheet .
3MM Damping Sheet (EPDM Rubber)
3MM Ballast Metal Sheet .
1.5MM Damping Sheet (EPDM Rubber)
Custom Finished Top Cap
Written By: MDO
Approved By: PLO
Revision D – 01-JUN-08
Page 16 of 52
Continuum Audio Laboratories – Caliburn Installation Manual
Remove the M10 Allthread Guide Bolts to allow clear room for the Drawer Mechanism:
YOU MUST ENSURE SAFETY BOLT REMAINS INSTALLED. THIS IS TO PREVENT THE
LEVITATION SYSTEM FROM RELEASING INADVERTENTLY SHOULD SOMEONE REMOVE THE
CALIBURN TURNTABLE OFF THE STAND WITHOUT FOLLOWING PROPER INSTRUCTIONS
INSTALL THE DRAWER MECHANISM
Written By: MDO
Approved By: PLO
Revision D – 01-JUN-08
Page 17 of 52
Continuum Audio Laboratories – Caliburn Installation Manual
CONTROL BOX
THE CONTROL BOX IS USED TO SET SPEEDS, TURN VACUUM AND LOGO LIGHT ON/OFF.
We recommend this is installed in the middle shelf of the Castellon
VACUUM BOX
THE VACUUM BOX IS USED TO DELIVER NEGATIVE PRESSURE FOR VACUUM HOLDDOWN.
We recommend this is installed in the lower shelf of the Castellon
Written By: MDO
Approved By: PLO
Revision D – 01-JUN-08
Page 18 of 52
Continuum Audio Laboratories – Caliburn Installation Manual
INFLATION OF THE HORIZONTAL STABILISER
Once the Caliburn has been fully installed on to the Castellon a settling procedure is
required to centralize and level the levitating ceramic shelves.
Use the supplied manual inflation pump to add about 5-6PSI of low pressure to provide a
“rolling” buffer to the UPPER Ceramic Shelf.
You may need to push repeatedly up and down on the shelf to equalize the pressure
around the periphery of the shelf.
Additional fine positioning of the Caliburn Motor and Chassis will help evenly distribute and
balance the suspension system.
Periodic checking of the pneumatic buffer is recommended (3-6month cycle). Add pressure
using the pump if required.
Written By: MDO
Approved By: PLO
Revision D – 01-JUN-08
Page 19 of 52
Continuum Audio Laboratories – Caliburn Installation Manual
Caliburn Turntable
Written By: MDO
Approved By: PLO
Revision D – 01-JUN-08
Page 20 of 52
Continuum Audio Laboratories – Caliburn Installation Manual
OVERVIEW OF BASIC INSTALLATION STEPS
Perform the steps below to install the Caliburn. Details are contained in this manual.
1.
Read the Caliburn Installation Manual (this manual)
↓
2.
Unpack and Check the contents of the packaging
↓
3.
Confirm location for installation
↓
4.
Confirm the location of the Control Box and Vacuum Box installation
↓
5.
Position and install the Castellon Stand
↓
6.
Position and place the Motor and Pucks for Mounting Feet
↓
7.
Position and place the Caliburn Chassis
↓
8.
Install the Outer Platter and Inner Platter
↓
9.
Install the Belt
↓
10.
Install the Top Plate
↓
11.
Connect the cables and vacuum hoses
↓
12.
Connect the AC power adapter (IEC Mains Plug)
↓
13.
Turn on the power
↓
14.
Test Operations
↓
15.
Install the Tonearm
↓
16.
Start Operations and Playback
Written By: MDO
Approved By: PLO
Revision D – 01-JUN-08
Page 21 of 52
Continuum Audio Laboratories – Caliburn Installation Manual
PACKAGING CONTENTS
THERE ARE 6 MAIN COMPONENTS WHICH COMPRISE THE CALIBURN TURNTABLE SYSTEM
Roadcase 1 –
Roadcase 2 –
Box 3 –
Box 4 –
Box 5 –
Box 6 -
Platter, Chassis, Bearing, Motor, Top Plate and assembly parts.
Castellon Stand Assembly and Shelving
Castellon Heavy Upper Ceramic Shelving
Castellon Heavy Lower Ceramic Shelving
Vacuum Box including Cables and Hoses
Control Box including Cables
PLATTER ASSEMBLY
1
1
4
1
1
1
x
x
x
x
x
x
Record Clamp
Record Vacuum Cap Seal
M5 x 20MM Inner Platter Bolts
Titanium Spindle Protector
Inner Platter with Lip Seal and O’ring installed
Outer Platter with O’ring installed
Written By: MDO
Approved By: PLO
Revision D – 01-JUN-08
Page 22 of 52
Continuum Audio Laboratories – Caliburn Installation Manual
CHASSIS, BEARING, ARMBOARD ASSEMBLY
1
4
1
3
3
x
x
x
x
x
Chassis with Bearing and Armboard Assembly
M4 x16MM Tonearm Mounting Bolts
Custom Veneer finished Top
Mounting Feet (must be threaded into chassis before placing chassis on stand)
Mounting Feet Pucks
TOP OF CHASSIS SHOWING LOCATION OF BEARING AND ARMBOARD
UNDERSIDE OF CHASSIS SHOWING LOCATION OF 3 ADJUSTABLE FEET
Written By: MDO
Approved By: PLO
Revision D – 01-JUN-08
Page 23 of 52
Continuum Audio Laboratories – Caliburn Installation Manual
TOP PLATE
3 x ADJUSTABLE MOUNTING FEET AND MATCHING PUCKS
NOTE: EACH ADJUSTABLE FOOT HAS A SMALL CONICAL CENTER UNDER EACH FOOT.
EACH PUCK HAS A CORRESPONDING CONE WHICH IS USED TO SUPPORT THE FOOT.
WHEN THE TWO COMPONENTS ARE INSTALLED CORRECTLY THE ADJUSTABLE FOOT IS ABLE
TO ROTATE ON THE CONE OF THE PUCK. THIS IS LIKE A REVERSE “SPIKE”.
The Chassis and Main Bearing come fully assembled with integral armboard pre-drilled for
Cobra Tonearm Installation.
Open Inner box and remove chassis from packaging. Carefully remove cling film protective
wrap.
Do not worry about fingerprints and other wrapping marks. These will be removed with a final
cleaning when fully assembled.
Unpack 3 x Adjustable Feet and install on the underside of the chassis.
Keep the 3 corresponding pucks free for placement on to the Castellon stand you will lower the
chassis onto later.
Written By: MDO
Approved By: PLO
Revision D – 01-JUN-08
Page 24 of 52
Continuum Audio Laboratories – Caliburn Installation Manual
MOTOR ASSEMBLY
D15 Connector to
Control Box J1
1 x Motor System
1 x Motor to Control Box Cable From Motor to Control Box (D15 Connector must be connected
before lowering chassis over motor)
2 x Pyrathane “O” Ring Belts
Written By: MDO
Approved By: PLO
Revision D – 01-JUN-08
Page 25 of 52
Continuum Audio Laboratories – Caliburn Installation Manual
CONTROL BOX ASSEMBLY
THE CONTROL BOX IS USED TO SET SPEEDS, TURN VACUUM AND LOGO LIGHT ON/OFF.
Front View
Logo Light Button –
Used to turn the turntable
illumination light on/off is
located on the side of box
VAC Button –
Used to select vacuum on/off
Speed Lower Button – Used to adjust or set speed
Speed Raise Button – Used to adjust or set speed
Rear View
FACTORY USE
ONLY
Speed Buttons - Used to select desired speed
Spare Connectors
Unused
On / Off
Note: Ensure
Correct
Voltage is set
before
operation!
J5 VAC
Cable to
Vacuum
Box J1
IEC Power
Entry Module
Note: Select
Voltage
correct
J4 TT
Cable to
Back of
Turntable
Earthing
Attach Point
J1 Platter Drive
Cable to Motor Base
1
1
1
1
x
x
x
x
Control Box
Link Cable Control Box to Vacuum Box (J5 to J1 Connector)
Link Cable Control Box to Turntable Chassis Rear Panel (J4 to Epic 12Pin Rear TT Chassis)
Link Cable Control Box to Motor Base (J1 to D15 Motor Connector)
Written By: MDO
Approved By: PLO
Revision D – 01-JUN-08
Page 26 of 52
Continuum Audio Laboratories – Caliburn Installation Manual
CONTROL BOX – FITTING OF SEALED BATTERIES
.
Ignoring the instructions under this symbol when installing or dismantling the Caliburn may be
hazardous or even lethal.
THIS CONTROL UNIT REQUIRES BATTERIES TO BE INSTALLED BEFORE OPERATION.
THE CONTROL BOX REQUIRES 2 x 12Volt Lead Acid Batteries of minimum 3AH rating to be
connected for 24Volts total DC output.
DO NOT OPERATE THIS UNIT WITHOUT CONTACTING YOUR AUTHORISED CONTINUUM
DEALER TO ENSURE THE CORRECT FITMENT OF BATTERIES HAS BEEN CARRIED OUT.
DO NOT ATTEMPT TO OPEN THE CONTROL BOX. THERE ARE NO USER SERVICEABLE PARTS
INSIDE. ONLY CONTINUUM FACTORY TRAINED AND AUTHORISED TECHNICIANS ARE
ALLOWED TO FIT BATTERIES.
ENSURE ALL STATIC DISCHARGE PRECAUTIONS ARE OBSERVED AS FAILURE TO PROTECT
THE DEVICE FROM STATIC CHARGES CAN DAMAGE SENSITIVE PARTS AND VOID WARRANTY.
1.
2.
3.
4.
5.
6.
7.
8.
Disconnect all Power from the rear of the Control Box
Remove the Control Box Lid
Locate Bolts and Clamps and secure batteries as shown
Procure 2 off 12Volt4.2AH/20HR Non-Spillable Sealed Rechargeable Batteries (Pb type)
with small terminals for easy fitment. Dimensions each battery no to exceed 90mm L x
70mm W x 110mm H. See Appendix 1 in this manual for Recommended Battery
details
Connect Terminal Leads Positive (White) and Negative (Black) and Central Jumper
Strap (12V + 12V=24V). Note: Depending on local battery supplier, the terminal leads
may need to be adjusted or lengthened to reach the attachment location. Remove any
cable ties which limit the length of the leads so as to extend reach of cables.
Resecure the lid and ensure correct voltage is eselected on the IEC power entry
module.
Connect all cables to Caliburn Chassis, Pump Box and Motor
Connect IEC Power source and test operation.
12V Sealed
Rechargeable
Batteries
Written By: MDO
Approved By: PLO
Revision D – 01-JUN-08
Page 27 of 52
Continuum Audio Laboratories – Caliburn Installation Manual
VACUUM BOX ASSEMBLY
Front View
Rear View
Earthing
Attach Point
Oil Recovery
6mm Tube to Rear of
TT Chassis
Blue Connector
Vacuum
6mm Tube to Rear of
TT Chassis Grey/Green
Connector
J1 Connector
to J5 On
Control Box
1 x Vacuum Box
2 x 6MM Vacuum and Oil Recovery Hose (2 meters)
THE VACUUM BOX IS USED TO DELIVER NEGATIVE PRESSURE FOR VACUUM HOLDDOWN
AND PROVIDE OIL PRESSURE FOR THE HYDROSTATIC MAIN PLATTER BEARING.
Written By: MDO
Approved By: PLO
Revision D – 01-JUN-08
Page 28 of 52
Continuum Audio Laboratories – Caliburn Installation Manual
SET - UP INSTRUCTIONS
The Caliburn should be installed on a firm level surface with a free space of 615mm x 500mm
for the best results. This surface must be capable of withstanding a load of 100Kg’s safely.
Please consult your dealer for recommendations on suitable stands.
PREPARING THE CHASSIS BEFORE INSTALLATION
Before placing the Caliburn onto the stand a few steps must be carried out to prepare the
bearing.
1.
2.
3.
Remove any blanking plugs
Check Oil Level
Insert Bearing Shaft into Bronze Bush
Remove 25MM Rubber
Bung from Bearing Bush.
Remove 2 x 6MM Blanking
Plugs from Rear of Chassis Oil
Recovery and Vacuum Fittings
Note: Store these plugs in a
safe place for future shipping
Note: Store this rubber
bung in a safe place for
future shipping
Blanking Plug
Main Bearing Shaft
25 MM Rubber Bung
Tapered
BEARING INSTALLATION
Unwrap and inspect the Main Bearing Shaft
Ensure all bearing surfaces are free of
contamination. Use a clean lint free cloth (TekWipes
recommended) to wipe mating surfaces clean.
Check inside the well of the Bronze Bush to ensure
the Chrome Thrust ball is installed at the bottom.
Carefully align the shaft and the bearing and lower
the main shaft into the bearing bush keeping the
shaft parallel and concentric.
CAUTION These close tolerance surfaces should
Main Bronze Bush
not be forced together. Use a gentle twisting motion
to “feel” or “tickle” the bearing into place. If you feel
a jamming force immediately stop and undo your
action.
Push down once the shaft starts to slide smoothly
into the bearing well. Any air and oil will gradually
displace with firm downward pressure.
Written By: MDO
Approved By: PLO
Revision D – 01-JUN-08
Page 29 of 52
Continuum Audio Laboratories – Caliburn Installation Manual
PLACING THE TURNTABLE CHASSIS
Procedure for placing the turntable:
1.
Place the motor and 3 Pucks as shown below. Ensure the motor cable is pointing to the
rear of the intended position for the turntable chassis.
Rear of
Chassis this
way.
Ensure D15
Cable is
attached
and secured
prior to
lowering
chassis over
motor
Written By: MDO
Approved By: PLO
Revision D – 01-JUN-08
Page 30 of 52
Continuum Audio Laboratories – Caliburn Installation Manual
CAUTION
2.
Connect the 6MM Vacuum Hose (Black) to the pneumatic fitting on the rear of the
chassis. This is a swivel fitting with a simple push connect fitting. Firmly push the hose
into the fitting for sealing.
In the event that you need to remove the hose, push the small locking collar in whilst
simultaneously pulling on the hose to free it from the fitting. Never pull on the hose
without depressing the collar first as the connector is designed to resist this force.
12 Pin Epic
Connector TT
to Control Box
J4
6mm Oil Recovery Hose
Connector to Pump Box
Blue Fitting
Written By: MDO
6mm Vacuum Hose
Connector to Pump Box
Grey/Green Fitting
Approved By: PLO
Revision D – 01-JUN-08
Page 31 of 52
Continuum Audio Laboratories – Caliburn Installation Manual
3.
Request the assistance of an able bodied helper to lift and place the turntable chassis
over motor and feet as shown. Take care to avoid knocking the motor housing when
lowering the chassis over the motor housing.
Motor Installed
correctly. Ensure all
sides are not
touching any part of
the chassis
4.
Move the pucks under the 3 adjustable feet to locate the centre “spike” on each puck
into the matching recess under each adjustable foot. The “spike” will leave a few
millimetres of space between the foot and the puck when correctly installed.
5.
Level the turntable chassis with a suitable spirit level. Be careful not to mark or scratch
any external finishes. Use a small circular bubble level for best results.
Written By: MDO
Approved By: PLO
Revision D – 01-JUN-08
Page 32 of 52
Continuum Audio Laboratories – Caliburn Installation Manual
PREPARING THE BEARING FOR PLATTER INSTALL
6.
Ensure O’Rings are installed and undamaged.
7.
Prepare bearing for platter installation by applying supplied silicon grease to the
bearing shaft. The supplied grease is designed to ease the lowering of the larger outer
platter onto the bearing shaft and shaft seals. Use a soft cloth or paper towel to scoop
a teaspoon amount of grease and smear this over the shaft as shown (see picture
below).
Indicated area to
coat Bearing
Shaft and twin
o-ring seals
evenly with
approx 1
teaspoon of
supplied Silicon
grease
Twin o-ring
Bearing Seals
Greasing the bearing shaft
8.
Wash your hands to ensure they are free from oil and grease before continuing with
platter installation.
Written By: MDO
Approved By: PLO
Revision D – 01-JUN-08
Page 33 of 52
Continuum Audio Laboratories – Caliburn Installation Manual
OUTER PLATTER INSTALLATION
Failure to place your hands in an area with clearance may result in personal injury.
9.
Lift the heavy outer platter (34Kg) and whilst holding the platter as flat and parallel to
the chassis base as possible, gently place over the bearing shaft as shown. You must
place your hands diagonally in the empty areas near the front and rear of the chassis
(as shown in picture below) to ensure your fingers have clearance to lower the platter.
10. Carefully move your hands away from the underside of the platter to retain your grip
on the side s. This will protect your fingers as the platter is lowered against the bearing
base.
11. Gently push down to seat the platter over the two o-ring seals on the bearing
shaft. These seals will give a little resistance at first but the platter weight will
quickly “pop” past these seals when pushed from above. Make sure you keep
your fingers in the clear areas shown.
Written By: MDO
Approved By: PLO
Revision D – 01-JUN-08
Page 34 of 52
Continuum Audio Laboratories – Caliburn Installation Manual
INSTALLING THE INNER PLATTER
12. Check underside of the inner platter to ensure o-ring seal is in place (this can
sometimes dislodge during shipping)
Check to ensure O’Ring is
Installed
13. Check top seal of the outer platter to ensure o-ring seal is in place. This was installed
at the factory. Ensure it is in place. If replacement is required install a spare seal as
shown (seals are available from your factory authorised dealer or service agent).
Check to ensure O’Ring is
Installed
Written By: MDO
Approved By: PLO
Revision D – 01-JUN-08
Page 35 of 52
Continuum Audio Laboratories – Caliburn Installation Manual
14. Remove the small 7MM titanium spindle protector and screw the supplied Record
Clamp in its place. This Record Clamp will allow you to lift and lower the inner platter
on to the outer platter safely.
7MM Titanium Spindle
Protector
Record
Clamp
Written By: MDO
Approved By: PLO
Revision D – 01-JUN-08
Page 36 of 52
Continuum Audio Laboratories – Caliburn Installation Manual
15. The inner platter can now be placed over the outer platter and located on the centre
“boss”. Push the inner platter down firmly and rotate the four central holes to align
with the matching threads in the main bearing.
16. Next, remove the Record Clamp to expose the four central platter to bearing mounting
(M5) holes. Check the alignment of the holes and rotate the inner platter by placing
your palms on top of the platter surface and then moving your hands in a circular
motion until the holes line up.
Align these holes with
bearing mounting (M5)
holes
Holes lined up
Written By: MDO
Approved By: PLO
Revision D – 01-JUN-08
Page 37 of 52
Continuum Audio Laboratories – Caliburn Installation Manual
17. Locate 4 x M5 x 20mm platter bolts and place them into the matching holes near the
centre of the inner platter.
18. Gently align these bolts and start the threads being careful not to cross thread.
19. Tighten these bolts by criss-crossing the bolt pattern and evenly tightening each
opposing bolt. We recommend you use the short end of the hexagonal allen wrench
first to avoid over torquing each screw during the initial tightening procedure. Then
use the long end of the allen wrench to apply final tightening torque.
INSTALLING THE BELT
20. Locate one of the supplied pyrathane belts and loop this around the outer platter and
once around the opposing motor pulley. Keep one hand on the pulley as you guide the
belt down the grooves of the platter until the pulley groove and platter groove are in
alignment. You may have to adjust the height of the feet under the chassis to ensure
groove alignment is complete. The Caliburn design is quite forgiving of minor
misalignments but your endeavour to get this as true and parallel will assist with
accurate motion control.
Written By: MDO
Approved By: PLO
Revision D – 01-JUN-08
Page 38 of 52
Continuum Audio Laboratories – Caliburn Installation Manual
PLACING THE TOP COVER
21. Locate the top plate. Whilst holding the top plate, position the cutout for the tonearm
to align with the armboard position. Gently lower the top plate over the platter being
careful not to touch the platter edges. Align the edges to fit in the chassis rebate and
lower the top plate down into the rebate. No further attachments are necessary as the
plate is designed to “float” in the chassis. It provides a shield for the armboard.
Written By: MDO
Approved By: PLO
Revision D – 01-JUN-08
Page 39 of 52
Continuum Audio Laboratories – Caliburn Installation Manual
INSTALLING THE PERIPHERALS
22. Locate and install the Control Box and Pump Box in the Castellon stand to suit your
location of a phono stage or preamplifier.
23. Locate the dedicated cabling and 6MM Vacuum Hoses and connect the cabling and
hoses according to the labelled connectors found on the rear of each box. Each cable
connection is unique to prevent misconnections. Ensure Vacuum Hose connections
follow labelled pathway.
24. Connect IEC AC mains power cable once all other connections are in place.
25. Turn Mains Power on.
26. Check for operation by pressing the logo light button on the front panel of the Control
Box. The Caliburn Chassis Light should be on or off depending on toggle status.
Written By: MDO
Approved By: PLO
Revision D – 01-JUN-08
Page 40 of 52
Continuum Audio Laboratories – Caliburn Installation Manual
INSTALLING THE ARM
27. Locate and install the tonearm base (depending on your choice of tonearm). Align the
tonearm to ensure all mounting parameters are correct. See separate Cobra tonearm
manual for details.
Written By: MDO
Approved By: PLO
Revision D – 01-JUN-08
Page 41 of 52
Continuum Audio Laboratories – Caliburn Installation Manual
CALIBURN OPERATING INSTRUCTIONS
Now that your Caliburn turntable has been installed and fully optimized it is now ready for
you to enjoy. Please take a moment to familiarize yourself with the basic controls for
operating your Caliburn. These are located on the front of the Control Box
PLATTER CLAMP AND LIP SEAL OPERATION
The Caliburn Platter system offers both vacuum and manual clamping options to secure
the LP evenly onto the platter surface.
Provided Record Clamp and Spindle Seal can be used alone or in combination to secure the
LP before and during playback.
Additionally there is a Titanium Record Spindle Hole Protector. This is for playing very
special collector edition vinyl records where resale values may be affected if the hole in the
centre of the LP record is marked. To protect this hole use the Titanium Record Spindle
Hole Protector before placing the LP on the surface of the platter. Unscrew the protector
before using the Record Clamp or leave it in place if you only want to use the Spindle Seal
on its own.
The Record Clamp is a threaded clamp. Threaded clamps can exert significantly more
pressure than a vacuum alone on an LP. Never over-tighten the Record Clamp as damage
to the LP may occur. A light pressure is all that is required to press the LP against the
platter surface.
Never try to undo the seal whilst the LP is playing as this may lead to damage to the
spindle thread and other bearing and motor related components.
Record Clamp
Titanium
Record
Spindle Hole
Protector
Record Center
Spindle Seal for
Vacuum
Outer Record Lip
Seal for Vacuum
Inner Platter for
LP support
Written By: MDO
Main Outer Platter
Approved By: PLO
Revision D – 01-JUN-08
Page 42 of 52
Continuum Audio Laboratories – Caliburn Installation Manual
RECORD PLAYING PROCEDURE
Note: Clean equipment and clean media is a necessary prerequisite to ensure the
Caliburn will give you the best performance every time.
Set the master amplifier volume control close to its minimum setting to avoid damaging
your speakers.
Ensure that the platter surface on the turntable is clean and dust free, and clean the
record to be played on both sides, using a suitable dust remover.
Place the record on the platter, ensuring the black outer sealing rubber ring is evenly
placed around the rim of the record so as to create optimum negative pressure when the
vacuum is turned on. Place the record spindle seal and clamp over the center of the record
to ensure the label is sealed.
OPERATING THE VACUUM
Press the Vacuum button on the Caliburn Control Unit to the “ON “ position. The LED will
light up. The record is drawn down to the platter within a few seconds. Use the supplied
vacuum spindle seal to secure the record to the spindle.
Vacuum Button
STARTING THE MOTOR
Next, select the required play speed by pressing the corresponding button on the Control
Unit - 33, 45 or 78. The LED will light up. The motor will start and the platter will start to
spin at the selected speed.
Wait about ten seconds for the platter speed to stabilize, then place the stylus arm gently
on the record and enjoy the programme.
REMOVING RECORD PROCEDURE
Set the master amplifier volume control close to its minimum setting to avoid any
damaging your speakers.
Gently remove the stylus arm from the record and place it on its rest position.
Press the selected speed button (LED will be on) on the Control Unit to stop the motor and
platter from spinning (LED will turn off).
Press the Vacuum button on the Control Unit to turn the vacuum off (LED will turn off).
The record slowly rises up away from the platter within a few seconds.
Wait about ten seconds, then remove clamp and spindle seal. The record can now be
removed from the platter.
Written By: MDO
Approved By: PLO
Revision D – 01-JUN-08
Page 43 of 52
Continuum Audio Laboratories – Caliburn Installation Manual
SPEED ADJUSTMENT
The Caliburn turntable has one of the most advanced motion control systems that today’s
technology can provide. The turntable is fitted with a drive motor fully integrated with
electronic control to maintain the speed to preset values within a Micro controller.
To adjust or set the turntable playing speeds via “SPEED LOWER & SPEED RAISE” push
buttons.
Speed Lower
Speed Raise
Place a speed calibration strobe disk (available from quality hi-fi suppliers) on the platter,
following the previously mentioned record playing procedure, and select the platter speed
button of the desired speed to be adjusted i.e. 33, 45 or 78.
Simultaneously press “Speed Lower” and “Speed Raise” push buttons on the Control Unit
and hold down for more than 5 seconds. Both LED’s will flash once to show the Speed
Control Computer is now in adjustment mode.
Release the push buttons and begin lowering or raising the speed as described below.
LOWERING THE SPEED
To lower the speed of the Platter, push the “Speed Lower” button. This will cause the
platter speed to reduce by 0.1 r.p.m. each time it is pressed. Holding down the Speed
Lower button continuously will cause a more rapid adjustment.
Once you have set the desired speed, you must wait 45 seconds, with no further
adjustments to store the setting into the Control Box memory as the new user default.
Should you wish to make further speed changes, repeat the Speed Adjustment procedure.
RAISING THE SPEED
To Raise the speed of the platter push the “Speed Raise” push button
on the Control
Unit. This will cause the platter speed to increase by 0.1 r.p.m. each time it is pressed.
Holding down the Speed Raise button continuously will cause a more rapid adjustment.
Once you have set the desired speed, you must wait 45 seconds, with no further
adjustments to store the setting into the Control Box memory as the new user default.
Should you wish to make further speed changes, repeat the Speed Adjustment procedure.
CONFIRMING THE SET SPEED
Once you have set the desired speed, you must wait 45 seconds, with no further
adjustments to store the setting into the Control Box memory as the new user default.
Should you wish to make further speed changes, repeat the Speed Adjustment procedure.
Written By: MDO
Approved By: PLO
Revision D – 01-JUN-08
Page 44 of 52
Continuum Audio Laboratories – Caliburn Installation Manual
OWNER CARE & MAINTENANCE
Your Caliburn turntable is a delicate piece of equipment, and care needs to be taken when
using and cleaning it. Below are recommendations for keeping your Caliburn at its
optimum performance.
CARING FOR METAL SURFACES
The metals chosen because of their superior sound qualities are soft, and care should be
taken when using your Caliburn. Make sure there are no sharp objects on or near that
could scratch the metal surfaces. Clean with a soft camera-lens-quality cleaning chamois.
Do not use any window cleaning solutions, silicon based polish, abrasive pads,
scouring powder or solvents such as alcohol or benzene to clean your Caliburn.
Your Continuum Consultant can advise you on what products available in your
area are suitable to use for cleaning.
CLEANING THE PLATTER
The platter can be cleaned using a soft, camera-lens-quality, cleaning chamois.
BEARING MAINTENANCE
The bearing is fully enclosed and requires no owner maintenance under normal operating
conditions for temperature and humidity.
If you hear any unfamiliar noise coming from your Caliburn, turn the unit off immediately
and contact your Continuum Consultant.
Note: The Nested Platter design isolates the Platter surface from the bearing and will help
prevent rumble from transmitting to the LP surface.
MOTOR
The motor is sealed and can only be serviced by an Authorised Continuum Agent. Warranty
will be void if seal is broken.
MOTOR BELT REPLACEMENT
Replacement belts are available. We recommend you contact your Continuum Consultant
if you need an additional belt. 2 belts are supplied with your Caliburn.
Written By: MDO
Approved By: PLO
Revision D – 01-JUN-08
Page 45 of 52
Continuum Audio Laboratories – Caliburn Installation Manual
FAULTS & TROUBLE SHOOTING
Before reporting any faults please ensure the following items are checked.
1. Have you connected all the hoses and cables securely?
2. Have you connected the power and turned the switch on the back of the
Pump Box on?
3. Have you checked that the belt is installed (and has not slipped off)
4. Have you leveled the unit correctly?
5. Is the motor clear of the chassis and platter?
6. Have you adjusted the speeds using the calibration procedure?
7. Is the surface of the platter free of debris and dust?
8. Is the rubber seal clean?
The Caliburn is designed for robust operation and should be fault free for the life
of the unit. If the bearing has been damaged during installation by incorrected
platter install then problems may occur. These out of the norm issues are the
responsibility of the user and will not by our Warranty.
Written By: MDO
Approved By: PLO
Revision D – 01-JUN-08
Page 46 of 52
Continuum Audio Laboratories – Caliburn Installation Manual
SPECIFICATIONS
CALIBURN TURNTABLE
• 33, 45, 78 RPM Selectable from Control Box
• Ability to support 2 tonearms simultaneously
• Unique Magnetically Isolated Armboard Technology
• Integrated Castellon Isolation Stand with Unique Magnetic Damping
• 350 kg fully assembled
PLATTER
• 38 kg Nested Platter Design for Ultra Low Noise Operation.
BEARING
• Unique Oil Pressurised Hydrostatic Bearing for highly damped super stable operation.
• Solid one-piece, centre ground steel alloy with high pressure bearing outer using
ceramic coatings such silicon nitride and tungsten bisulpide in nano-technology
lubricants
VACUUM
• Super quiet pump mechanism with “absolute stealth-mode” operation during playback.
• Computer controlled, negative pressure mechanism to maintain minimum vacuum for
record playback.
MOTOR
• Computer-controlled high-torque with TRUE ZERO cogging DC Brushless Sinusoidally
Commutated Motor configured for 3 Phase AC Synchronous operation.
• Integrated Optical Encoder with high line count for quadrature encoding.
• 600 oz-in. peak torque
• High efficiency
• 12–48 VDC
Written By: MDO
Approved By: PLO
Revision D – 01-JUN-08
Page 47 of 52
Continuum Audio Laboratories – Caliburn Installation Manual
CALIBURN’S DESIGN HISTORY
Passion is a powerful force; shared passion is twice as powerful.
Mark Doehmann, Caliburn’s designer, believed his passion for analogue sound was
unmatched, until he met David Payes.
Mark Doehmann has been building custom turntables for a select clientele since 1982.
These turntables aimed to solve the particular problems of each system, by trading off
advantage against disadvantage in an attempt to create a balance Mark knew, to his
frustration, was ultimately a compromised solution. Compromise he accepted as inevitable
in his quest for the purest analogue sound possible.
David Payes is a well-respected Australian businessman and a passionate audiophile.
During the installation of a highly regarded turntable onto David’s system and the
subsequent evaluation of the results, David asked Mark, if money was no object, what
would he do to improve the turntable. Thinking in terms of this being a theoretical
conversation, Mark nominated the platter as the first thing he would change. David
response was ”Ok, do it”.
So began the first step in the long and challenging process of developing the critically
acclaimed Caliburn Cobra Castellon system.
Mark’s ultimate aim when imagining the perfect platter was to create a silent foundation
for the record to sit, to allow the stylus to extract the maximum information from the
record’s groove.
Mark realized to create his vision would require some very sophisticated engineering. With
his background in aeronautical engineering, Mark called upon the expertise of some of his
colleagues from this field.
A unique alloy formula to address the stiffness and damping of the platter was developed
with the help of materials engineer John Vietz. Using the most advanced shape
optimization computer technology Dr. Neil McLachlan developed the optimum shape for
the first prototype of the Caliburn to reduce vibration to an absolute minimum.
After months of complex computer modelling, Mark returned to David Payes with the
Caliburn’s nested platter design and rather nervously replaced the existing platter and sat
back with David to listen to the results.
It was obvious to both of them that there was a marked improvement in the sound they
were hearing. The nested platter design matched the predicted computer modelling
results, and was delivering real-world results. David then asked, if this was possible with a
re-design of the platter alone, what could be achieved if this same rigorous design process
was applied to all the components of a turntable?
This same process of development was now applied to every aspect of a turntable. The
chassis, the bearing, the motor were all designed with a back-to-the-drawing-board
approach.
Written By: MDO
Approved By: PLO
Revision D – 01-JUN-08
Page 48 of 52
Continuum Audio Laboratories – Caliburn Installation Manual
THE CALIBURN IS THE FRUIT OF COLLABORATION
Many very intelligent minds were brought together to push the envelope of what was imagined
possible for turntable technology, and we would like acknowledge each one of them now.
Mark Doehmann – Director Engineering and Development
Marks’ passion for analogue sound reproduction combined with his background in aeronautical and
advanced software engineering and materials fabrication techniques was used to transform his vision
from the “virtual world” to the end product.
David Payes - Chairman, Continuum Audio Labs
David was the catalyst for the development of the Caliburn, and created the financial and creative
freedom to push the envelope. David is a passionate audiophile and has had extensive input with
technical design issues.
Dr Murali Murugasu MB.ChB. MBA – CEO
Murali is part of the core design team at Continuum Audio Labs. His day to day involvement ensures
that our products meet various regional market requirements and ensures that they works in harmony
with other high quality components to deliver a complete solution.
Joe Persico - Bachelor of Engineering (Electrical), Advanced Vacuum & Logic Control.
Joe developed the Caliburn’s unique vacuum control mechanism and computer controlled subsystems.
Arthur Rappos - Bachelor of Engineering (Electrical), Advanced Motor & RF circuit design
Arthur’s understanding of RF circuit design and noise control was used to extract maximum
performance from several new technologies used in the Caliburn’s design.
John Loton - Bachelor of Engineering (Aeronautical) Physics & Structures Design.
John was instrumental in the “challenging process” where original “seed ideas” were subjected to an
intense peer review process.
John Vietz - Bachelor of Engineering (Metallurgical) –
A recognized leader in his field, John developed Caliburn’s unique magnesium alloy which gives
Caliburn it’s high damping characteristics.
Dr. Neil McLachlan – Associate Professor of Engineering at Melbourne University
Neil worked closely with Mark on the reshaping and acoustic modelling and design, and developed
new and innovative solutions to the some very old problems associated with analogue sound
reproduction.
Michail Barabasz - Bachelor of Engineering (Electrical), Advanced Magnetic Design. –
An expert in magnetic circuit design and voice coil engineering, Michail developed the unique magnetic
propulsion system to levitate and drive the platter.
Dr. Nigel Ricketts - Principal Research Scientist CSIRO Manufacturing & Infrastructure
Technology, Brisbane. Nigel was consulted to resolve various metallurgical casting issues to ensure
the magnesium properties we specified were transferred to the end product.
Prof. Josef Tomas - Reshape Software and Mechanical Engineering Design. –
Josef created the Reshape™ software that allowed us to move resonances inherent in the Caliburn’s
shape into regions where they could be controlled and managed.
Dr. Glen Wolff - Advanced Systems Engineering.
Glen expertise was sought to deal with the complex use of organic materials and their application on
the Cobra.
Written By: MDO
Approved By: PLO
Revision D – 01-JUN-08
Page 49 of 52
Continuum Audio Laboratories – Caliburn Installation Manual
APPENDIX 1 – Recommended Battery Details
We recommend the YUASA brand of Sealed Lead Acid Batteries for use in the Caliburn
Control Box. Please use the NP4-12 Type battery with the Type “A” Terminal size for ease
of installation. Please procure 2 of these NP4-12 batteries to create the necessary 24Volts
of DC power (i.e 12V + 12V = 24V)
Specifications are shown below:
Written By: MDO
Approved By: PLO
Revision D – 01-JUN-08
Page 50 of 52
Continuum Audio Laboratories – Caliburn Installation Manual
Written By: MDO
Approved By: PLO
Revision D – 01-JUN-08
Page 51 of 52
Continuum Audio Laboratories – Caliburn Installation Manual
Written By: MDO
Approved By: PLO
Revision D – 01-JUN-08
Page 52 of 52