1
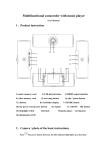
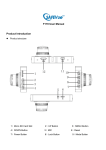
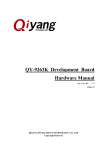
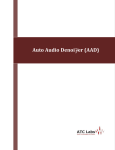
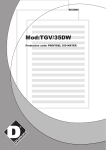
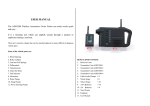
USER MANUAL
Introduction
Thank you for purchasing this driving recorder. Your driving recorder can be expanded to 32 GB
to make your driving recorder to develop maximum performance so please firstly read manual.
Product structure
1. On / off key,
2. Five direction key (up/down key, left/right key, OK key),
3. Display screen,
4. Charging indicator,
5. Power-on indicator,
6. Lens,
7. Support opening,
8. Reset key,
9. Loudspeaker hole,
10. HD/USB Connector/TF card trough,
11. Microphone.
Come into use driving recorder
1. Power on: press power button once and blue indicator light will turn on.
2. Power off: press power button once again and blue indicator light will turn off.
Notice: when battery runs low, driving recorder will power off automatically after indicating low
battery.
Battery charging
There are three ways to charge battery; red indicator light is bright during charging. It takes an
hour to charge and red charging indicator will power off automatically after finishing charging.
1. Use power DCSV outlet to charge
2. Use USB to charge
3. Use auto power to charge
Place storage card
Propel Micro SD storage card to card trough straightly according to direction of body until you
hear the sound of “click”.
Remove card
Push Micro SD card forward and then card will be removed after popup.
Notice: this machine requires to use high-speed Micro SD card and above CLASS 4.
Basic operation of driving recorder
I.
How to switch camera shooting/ photograph/system setting
Press right key to change to camera shooting/ photograph/ system setting
II. How to shoot and set shooting option
A. Shooting
Open the camera and picture recording will automatically start; press OK key to stop picture
recording and press again to restart picture recording.
B. Set shooting option
Under the condition of video recording mode, press left key to enter the option of “menu setting”;
the column is yellow at that time.
Resolution ratio: 1080P (FHD)/720 (HD).
Repeat to video recording: turn off/ 3 minutes/ 5 minutes/ 10 minutes;
Motion detection: open/close;
Date label: open/close;
III. How to take a photo
A. Take a photo
Press right key to switch to the mode of photograph
Press OK key to take a picture
B. Set photo option
Under the condition of photograph, press MENU key to enter the option of “menu setting”; the
column is yellow at that time.
Resolution ratio: 12M (4032*3024)/8M (3264*2448)/5M (2560*1920)/3M (2048*1536)
Picture quality: optimum, relative good, just so-so.
White balance: (automatic/sunlight/cloudy sky/ fluorescent lamp /osram lamp/)
Digital special efficiency: normal, white and black, nostalgic
Time of self timer: Close/10 minutes/20 minutes
Continuous shooting: Turn on/ off
Date label: Turn on/ off
Exposure compensation:(-2.0~+2.0)
IV. System setting
Press right key to switch to system setting of main menu
Enter the option of “main menu setting” and the column is yellow at that time.
Key sound: open and close key sound;
Frequency of light source: set 50Hz/60Hz (current frequency);
Formatting: OK/Cancel;
Default setting: select to recover factory settings (OK/Cancel);
Language set: set necessary language menu;
Date/time: set date/time;
TV output: Pal/Ntsc
Version: version number of software.
V.
Playback/ files management
Under the modes of shooting/photograph, press up key to enter playback mode.
Interface can conduct files management on video recording and photograph.
A. Video playback
Press left and right key to select necessary AVI for playback.
Press OK key to play and suspend AVI and press right key to adjust volume of sound.
Files on screen display are the last operative playback.
B. Photo playback
Press left and right key to select files necessary to check.
Files on screen display are the last operative playback.
Connecting computer
Download image and photo information
1. After USB is connected to computer, press power key to start; red indicator light will be bright
and computer will automatically recognize Micro SD card disk.
Notice: computer operating system: Windows 2000/XP/Vista/Windows 7, MAC OS x 10.3.6
above.
2. Use computer browser and files management.
3. Remove USB to close driving recorder
Notice: if downtime arises because of disoperation, you can press reset key and then power on so
the computer will recover normally.
Product features
- Perfect composite design of display screen with super mini size, 132 degree A+ high resolution
and bugeye lens and 180 degrees lens turn, which is more convenient for video shooting at various
occasions and multi-angle and high resolution.
- Built-in 1/3.2 COMS with low noisiness and high quality makes you to catch clear picture at
relatively dark occasions.
- Built-in lithium battery for you to charge and record at the same time.
- Built-in microphone/loudspeaker.
- Support Micro SD card with high power capacity.
- Function of move, detection and video recording.
- Circulating video recording function for automatically deleting old files and recording new ones.
- Anti-shake function
- Auto power-on video recording function when starting auto-mobile.
- Delayed start function to prevent automobile’s pulse current from damaging machine instantly.
Technical specifications
Size of LCD screen
2.0LTPS(4:3)
Lens
Language options
132 degree A+ high resolution and bugeye lens
English/German/French/Spanish/Italian/Portuguese/TC/SC/Japanese/Russian
Video
Video format
SD storage trough
Microphone/loudspe
aker
Frequency
of light
TV
out put
source
USB connector
Power interface
Battery
System requirement
1080p(FHD)/720p(HD)
MP4
Micro SD
Built-in
50Hz/60Hz
NTSC/PAL
USB2.0
5V 1A
Built-in lithium battery
Windows 2000/XP/Vista/Windows 7,MAC OS x 10.3.6 以上
Notice: The product reserves on design and specification without further notice; if there is
any difference, material prevails.
Chart of accessories
1. Vehicle-mounted supply;
2. Vehicle-mounted supports;
3. Description.
。