1
3xVision User Guide
1. System Description
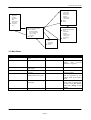
The 3xVision kit consists of the splitter unit (1U 19” rackmount unit), 9 cables and a power cord.
On the front panel you can find, looking from the left to the right, the RS232 connector, three keys, two BNC (CVBS
input 1 and 2), a minidin connector (S-Video) and a 15 D – Sub connector, for RGB inputs.
On the back panel you will find the VDE connector with the power switch and two fuses (one per AC Phase), and the 9
output DB9 connectors.
Note that with RGB input no OSD functions are enabled and it’s not possible to choose it as default input on power up.
RGB
RS232
SVHS
Keys
CVBS1
CVBS2
(Front View)
Out 1
Out 9
(Rear View)
Power connector
and switch
2. Keys functions
The three multifunction keys on the front panel can be used to control all of the device’s parameters as well as to select
the video source. The three keys are used as Up, Enter and Down, so in every situation, the two peripheral button serve
to increase/decrease a parameter, while the center button is used to confirm the changes/select a parameter.
In normal mode, when there is no On Screen Display, the Up and Down keys, have two functions: if pressed briefly
they select the video source, which is indicated by the associated LED, while if pressed for about one second, the
magnification is changed between 1x1, 2x2 and 3x3.
Note that if the LED blinks regularly, it means that no video signal is detected, while if the LED is lit or blinks with a
very short off time, the video signal is properly detected; in the latter case, the blink simply notifies that the 75 ohm
termination has been switched off.
Pressing the Enter key recalls the On Screen Display, showing a menu with the most important image settings such as
color, contrast, brightness, hue etc.
In the On Screen Display mode, the Up and Down keys serve to choose the parameter to change then, pressing the
Enter key, the parameter is selected (the parameter changes color) and the Up and Down keys can be used to
increment/decrement the value.
Once the parameter is correctly set, you can confirm the change by simply pressing the Enter key again.
The only exception to this description is for the Y/N choices, for which the Enter key directly toggles between Yes and
No, without the need to use the Up and Down keys to change the parameter value and also without the need to deselect
the parameter by pressing the Enter key.
3. OSD Functions
Here follows a description of the menu tree as well as of the menu functions.
Euvision S.r.l. Via C. Zucchi, 15 – 00165 Rome – Italy – Tel. +39 06 6623564 Fax +39 06 66018467
Page 3