1
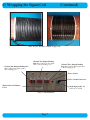
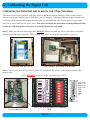
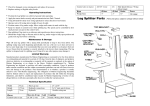
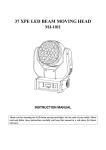
C) Wrapping the Signal Coil
Wrapping the Signal Cable Around the Pipe
Included with the unit is one roll of black, 3-conductor signal cable whose length is based on the size and
composition of the pipe selected for installation.
1.) Carefully strip off 2" (51mm) of the outer rubber shield from the end of the signal cable. Next, strip off 2" (51mm)
of the insulation from each of the three conductor wires (black, white and green). Splice the three wires together
tightly (see Photo 3, below).
2.) Unscrew the first of the two receptacle posts for that coil (see Photo 5, next page) by turning it counter-clockwise
to create an opening. Then, with the spliced wires of the signal cable completely threaded through the opening,
tighten the receptacle post as much as possible (see Photo 3, below).
3.) Route the signal cable from the control box to the inlet pipe. Hold the cable parallel and against the pipe and then
secure the cable to the pipe with one of the nylon cables ties. Make sure that the tie is pulled tightly so that the cable
is well-attached to the pipe. Remove excess cable tie with scissors.
4.) Using finger pressure to keep the signal cable and tie from moving, begin wrapping the signal cable securely
around the pipe in any direction. The correct number of wraps depends on pipe size and composition. For proper
product performance, it is imperative to wrap the correct number of times. To determine the number of wraps for
ferrous pipe, consult Table 1 (below). For non-ferrous pipe, please call ClearWater Enviro Technologies, Inc. to get
this information.
5.) MAKE SURE THAT THE WRAPS ARE FLUSH AGAINST ONE ANOTHER–NEVER OVERLAPPING
(see Photo 4a & 4b, next page).
NOTE: As previously indicated, make sure that the control box is mounted as close as possible to where the signal
cable is wrapped on the pipe.
Pipe
Size
12" / (30.48cm)
14" / (35.56cm)
16" / (40.64cm)
18" / (45.72cm)
20" / (50.8 cm)
24" / (60.96cm)
Nominal
Pipe OD
13" / (31.75cm)
15" / (36.83cm)
17" / (43.18cm)
19" / (48.26cm)
21" / (53.34cm)
25" / (63.5 cm)
Circumference
39.27" / (99.74cm)
45.55" / (115.7 cm)
53.41" / (135.65cm)
59.69" / (151.61cm)
65.97" / (167.57cm)
78.54" / (199.49cm)
Number
of Wraps
37
34
31
28
25
22
Total Length
Coil Only
121' / (307.54cm)
129' / (327.82cm)
138' / (350.43cm)
139' / (353.75cm)
137' / (349.1 cm)
144' / (365.72cm)
Total Length
w/ 15' Coil Leads
151' / ( 384cm)
159' / ( 404cm)
168' / ( 427cm)
169' / ( 430cm)
167' / ( 425cm)
174' / ( 442cm)
Table 1 - Ferrous Pipe: Number of Wraps by Pipe Size
6.) Once the wrapping is complete, secure the signal cable
to the pipe using another cable tie. Remove the excess cable
tie with scissors.
7.) Route the loose end of the signal cable back to the
control box. Trim the cable to length.
Photo 3 - Signal coil end with three wires stripped and
braided together
Page 6