1
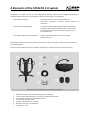
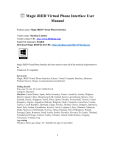
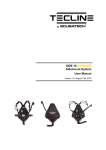
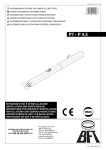
STEALTH 2.0 Side Mount System
User manual
English
1 Introduction
Congratulations!
You have purchased a perfect product in which, without any compromise, we have connected the best existing
materials made in Europe and in the USA, with both our technical and recreational diving experience. While
designing it, we have also consulted a considerable number of divers who use various configurations of
equipment from many various producers.
We hope that our product meets your expectations, regardless of whether you are a recreational diver or an
experienced tech diver.
Pre-use guidelines
Before you use any of the products described in this manual, carefully read all the information contained
herein with comprehension. Becoming familiar with this information is a prerequisite for safe and long-term
use of the products described in this document.
This manual is intended as a guide for correctly trained divers, and so a number of matters related to diving are
described here only roughly. In no way can this manual act as a substitute for professional diver training or
course. Therefore, before you start using any of the products described in this manual, make sure that you
have relevant qualifications issued by a registered diving organization.
If any of the information contained in this manual or if any information label placed on the Buoyancy
Compensation Device is not clear, contact the manufacturer for explanation:
WRECKANDREEF Piotr Czernik
Ul.Ogrodników 3, 43-227 Góra
Poland
Phone: +48 12 44 66 998
e-mail: [email protected]
Important!
This manual includes two types of designation, which you should pay special attention to. They indicate
warnings or other information which may be crucial for health and life of the user or other people. You should
read them with special attention:
Danger!
Indicates an imminently hazardous situation which, if not avoided, will result in a serious accident which
may cause death or serious injury.
Warning!
Indicates a potentially hazardous situation which, if not avoided, could cause damage to the product or
serious injury. It may also indicate wrong and dangerous practices.
2 CE certification
The products described in the following instruction have been a subject of certification in a recognized unit and
meet the requirements of 89/686/EWG directive and of the norm EN1809:2001, synchronized with this
directive, in its full extent; and of EN 250:2003 covering scuba harness.
The compatibility assessment of STEALTH Compensator type 36 and STEALTH side mount harness has been
conducted by:
Polski Rejestr Statków S.A.,
Recognised certification unit nr 1463
Al.Gen.Józefa Hallera 126
80-416 Gdańsk
Poland
STEALTH 2.0 Buoyancy compensator type 36 has been certified as compatible with 89/686/EWG directive, as
far as it contains air compatible with EN 12021 norm. Regarding the lack of EN norms for safety requirements
while the use of it takes place with mixtures of higher oxygen content, the above mentioned buoyancy
compensator cannot be regarded as one which has been a subject of CE certification with gas mixtures with
oxygen level higher than 21% (+/- 2%) as stated in 89/686/EWG directive.
Warning!
In non-EU countries additional conditions, law requirements and buoyancy compensator norms may exist.
Double check the current requirements in the country in which you intend to use it.
Warning!
The buoyancy compensator is not a safety jacket: it does not guarantee a proper head-up position on the
surface.
3 Safety rules
Danger!
STEALTH 2.0 BC is designed to provide the user with safety and comfort. Improper use may result in an
accident, therefore it is necessary to comply with ALL of the following rules.
1.
Before every dive, carefully inspect all elements of the equipment, including the BC. For further
information on the subject, read: “Pre-dive inspection”.
2.
Do not dive with the BC if there are signs of defective operation, damage or wear, such a BC should be
withdrawn from use until it is repaired by an authorized WreckAndReef distributor.
3.
During diving, perform mutual buddy-check, visually inspecting the BC against any leakages or other
irregularities. Arrange checkout procedures with your buddy and practice relevant diving signs once again
before diving.
4.
In case of an uncontrolled ascent, you should immediately start releasing air from the BC in order to stop
or slow down the rate of ascent.
5.
In order not to drown as a result of an uncontrolled descent, in all cases you should be able to use an
emergency source of buoyancy or remove the weight. The BC CANNOT be the only source of buoyancy!
6.
Do not use your BC to lift or bring heavy objects to the surface. Doing so may result in a serious accident
due to damage done to the BC or an uncontrolled ascent. For bringing objects heavier than 2kg, use
appropriate equipment, such as a lift bag.
7.
To prevent the BC from damage, avoid prolonged exposure of your BC to direct sunlight or extreme heat
and keep it away from sharp objects.
8.
Do not inhale air from the BC. It may contain harmful contaminants, gases, or dangerous bacteria which
evolve in damp places.
9.
A BC is not a lifejacket and does not guarantee a head-up position of the user on the surface. Therefore,
you should always dive with a buddy in case of losing consciousness on the surface.
10. Do not lift or move the BC by pulling the inflator hose. Such practice may result in irreparable damage to
the BC.
11. When diving in cold water (below 10 degrees Celsius), you should take into account that the inflator may
freeze, as a result of which, it may supply air in an uncontrolled way, or other irregularities in its operation
may appear. Before diving in cold water, it is necessary that you practice emergency procedures should the
inflator freeze!
4 Elements of the STEALTH 2.0 system
The Stealth 2.0 system consists of a few independent elements, which may be configured depending on
individual preferences and on the specification of the type of diving you are engaged in.
• The Stealth 2.0 Harness
Allows adjustment to any size, and thanks to its
anatomical construction provides perfect freedom
movement.
• The Stealth 2.0 Weight System
The unique modular weight system allows total flexibility,
regardless of the exposure protection worn, and provides
for weight placement around the center of gravity which
ensures ideal trim.
• The Stealth 2.0 Buoyancy Compensator
Independent double-shell construction provides
16kg of buoyancy.
We have described the particular elements of the system as well as the way to configure and adjust them in
the following pages.
When you order STEALTH 2.0 set in a standard configuration, you will receive the following elements:
1
2
6
3
4
6
5
Fig.1. The contents of STEALTH set in the standard configuration
1.
2.
3.
4.
5.
6.
7.
STEALTH 2.0 harness with the central weight pocket installed;
A metal adapter which allows you to lower the central weight pocket;
A metal plate to attach the light battery canister;
Ten meters of “bungee” cord;
A double ended bolt snap – 2 pieces;
STEALTH 2.0 buoyancy compensator;
Trim pockets – 2 pcs.
of
5 STEALTH 2.0 Harness
The STEALTH harness has been designed for side-mount diving and can be used with or without the integrated
weight system.
The picture below shows the harness in its basic configuration, with the weight system installed:
1
6
3
2
5
4
7
Fig. 2. Harness STEALTH 2.0
1.
2.
3.
4.
5.
6.
7.
Upper node(partly under the weight pocket)
Lower node (under the weight pocket);
Central weight pocket;
Trim pockets;
Waist strap;
Shoulder straps;
Crotch strap.
6 The harness adjustment 1/2
Ordering the complete STEALTH 2.0 harness, you will receive all the elements assembled and ready to use. To
ensure comfort and safety of use, you should make some final adjustments.
The STEALTH 2.0 harness is offered in one universal size. The adjustment system makes it simple to fit either a
very small or very large person by the adjustment of shoulder straps, a waist strap, and a crotch strap, as well
as by the adjustment of the distance between the lower and the upper node to accommodate the height of the
diver.
The picture below shows the length adjustment points of the particular straps (to make it clear, the harness has
been configured without the weight system):
1
2
2
3
3
4
Fig. 3. The points of adjustment of the particular straps
1.
Central strap adjustment points – height adjustment;
2.
Shoulder straps adjustment points;
3.
Waist straps adjustment points;
4.
Crotch strap adjustment point.
7 The harness adjustment 2/2
The STEALTH 2.0 provides great comfort and full freedom of movement, providing the lower and upper nodes
are placed in the right spot on the back. The lower node should be in such a place so that the waist strap is
exactly on the waistline, and the upper node of the harness should be in such a place so that the metal element
is between the shoulder blades.
Placing the upper node too high may result in the harness sticking out from the back after you assume an
“arched back” position in water.
We begin the harness adjustment process by finding the right spot for the lower harness node. It should be
exactly on the lumbar curve of the spine. The picture below shows the right placement of the lower node on
the diver's body:
The middle of the upper node (indicated with the
dotted line) should be placed at the level of the
shoulder blades.
The middle of the lower node (also indicated with the
dotted line) should be placed exactly on the waist.
Note: For ease of viewing, the harness has been
configured without the central weight pocket. When
using the harness with the central weight pocket
attached, the rule remains the same.
Fig.4. Correct placement of the harness’ nodes
After adjusting the lower node in the proper place, we adjust the length of the central strap in such a way so
that the upper node gets into the right place.
Warning!
Incorrectly adjusted length of the central harness strap may result in decreased freedom of movement or
by protruding of the harness.
After you have finished the height adjustment , you need to adjust the length of the shoulder and waist straps.
The properly adjusted harness should cling closely to the body without limiting any movements.
8 Mounting of the bungee cord
The characteristic feature of the side mount configuration are the bungee cords which route around the
cylinders valve and draw the cylinder tight into the divers body, creating a very clean and streamlined profile.
There are several different methods of mounting the bungee cord:
1. One continuous length of bungee cord run behind the back (between the metal adaptor plate and
upper node),and connected to both the left and right shoulder D-rings with a bolt snap ;
2. Two individual lengths of bungee cord attached to the upper node, and attached directly above the
left and right shoulder D-rings;
3. Two individual lengths of bungee cord attached to the upper node, and attached to the left and right
shoulder straps by a “floating” loop.
Although the first method is very popular, it does have the disadvantage of trapping the D-rings against the
chest. This is why we suggest either of the other two methods.
The bungee cord is attached to the harness at the
adaptor plate on the upper node.
The mounting is achieved by passing the bungee cord
through the holes in the adaptor plate and fixing with
a knot. This allows for possible adjustment under
water by a partner.
If the single bungee cord configuration is desired, it
will need to be run between the metal adaptor plate
and upper node to avoid instability.
Fig.5. Attachment of bungee cord to the upper node.
The pictures below show the two alternative methods of bungee configuration:
Fig.7. Bungee connected with “floating” loop
Fig.6. Bungee connected above the D-ring
Danger!
Improperly installed or worn out bungee cords may cause the separation of the cylinder from the harness.
It is important to check the bungees condition and attachment prior to each dive.
9 Central Weight Pocket 1/3
The STEALTH 2.0 weight system in the basic configuration consists of the central weight pocket placed on the
back, and in the optional trim pockets which allow for an increase in the total weight capacity of the system as
well as improved trim adjustment.
Depending on personal needs, the user may configure the harness by mounting or removing the various pocket
versions. It allows you to adjust the capacity of the weighting system both for diving done in the tropics in a
lightweight wetsuit, and also for diving in cold water with the use of a dry-suit and thick undergarments.
The harness is delivered in the standard configuration, in which the central weight pocket is located in the
highest place. The central weight pocket may be mounted at various heights, which allows you to precisely
establish your exact center of gravity, and at the same time the ideal trim.
Fig. 8. Central weight pocket in the extreme positions and placement of the center of the gravity
The element which serves to adjust the central weight pocket is a metal adaptor, which is provided with the
harness. It is mounted on a strap which connects the lower and upper nodes and allows the screwing in of the
central weight pocket. The picture below shows how to attach the adaptor on the strap:
Fig.9. The adapter and it’s bolt attachment to the strap
10 Central Weight Pocket 2/3
In order to change the position of the central weight pocket follow the steps below:
1. Unscrew the nut placed inside the weight pocket in its upper part;
Fig.10. Adjustment of the central weight pocket – step 1
2. Turn the harness in a way that the central harness strap, connecting the lower and the upper node, is
on top and remove the end of the strap from the lower tri-glide;
Fig. 11. Adjustment of the central weight pocket – step 2
3. Pull the lower node downwards and remove the strap from the weight pocket.
Fig.12. Adjustment of the central weight pocket – step 3
4. Remove the central weight pocket and remove the backing screw from the adaptor plate at the upper
node.
11 Central Weight Pocket 3/3
5. Adjust the metal adaptor plate to the desired height for the central weight pocket, remember to attach
the backing screw. The backing screw should be on the same side as the logo on the upper harness
node.
Fig.13. Adjustment of the central weight pocket – step 5
6. Place the central weight pocket on the harness in the same way in which it was mounted before. The
central harness strap should run under the straps at the bottom of the pocket;
7. Move the central strap through the tri-glide integrated with the lower node and remember to adjust
the harness to your height, and next secure the loose end of the strap with the stopper in the same
way as seen in point 2;
8. Screw the central weight pocket to the adaptor plate.
For people of short statue, after moving the central weight pocket downwards, the lower end of the weight
pocket may end below the lower harness node. In such a case the crotch strap needs to be passed through the
straps at the bottom of the pocket.
12 Trim Pockets
The STEALTH 2.0 harness enables you to mount additional weight pockets practically anywhere, allowing for
optimal placement of the weight, regardless of the type of exposure suit used.
The pockets are mounted on the straps using two attached tri-glides.
Fig.14. The trim pocket installed on the harness’ webbing
The typical places for trim pocket mounting are shown in the picture below:
Fig. 15. The typical places for trim pockets
13 Optional droppable weight pockets
The STEALTH 2.0 harness enables the installation of the xDEEP two weight pocket with capacity of 2x3kg or
2x6kg of weight on your waist strap, which were originally designed to be used with back-mount systems.
The pockets are mounted with screws to the flat D-rings located on the waist strap:
Fig.16. The way in which the two weight pockets are mounted
In order to mount the pocket:
1. Remove the buckle and the remaining elements (the rubber D-rings) from the waist strap;
2. Eject the strap partially through the slot of the metal D-ring in such a way that it would be possible to
insert the screws into the square hole of the D-ring. The head of the screw should be located between
the strap and the tin;
3. Remove the strap again through the slot in the metal D-ring;
4. Place the pocket on the strap and insert the screw in the hole located on the pocket strap;
5. Screw the cap, remembering to use a washer.
14 Other components
Mounting of the light canister
Together with the STEALTH 2.0 harness you will receive an accessory plate enabling you to attach the light
canister to your crotch, waist or shoulder strap.
The canister can be attached with bungee cords which hold it securely, and at the same time enable its easy
and quick removal during movement through narrow spaces and then its re-attachment.
Fig.17. An accessory plate used to attach the battery canister, and method of bungee attachment
An optional “butt-plate” for steel cylinders
The harness can be equipped with an optional plate, commonly called a “butt-plate”, to provide additional
comfort when using steel cylinders. The plate is equipped with large and easy to reach D-rings, which may also
be used to transport reels, spools, buoys etc.
It is attached to the lower harness node with two screws, in such a way that the plate is UNDER the lower
harness node. The crotch strap needs to be placed under the straps located in the plate.
Fig. 18. Way of attaching the pad to the harness
15 Stealth 2.0 BC 1/2
Independent STEALTH 2.0 buoyancy compensator is designed to be used with most of the SM harnesses in
configuration with one, two, or more cylinders.
The basic elements of the compensator
3
2
8
5
1
4
Fig.19. STEALTH 2.0 BC (front view)
•
•
•
•
•
•
•
•
6
7
Fig.20. STEALTH 2.0 BC (back view)
Outer shell;
K-Type inflator;
Corrugated hose;
Over pressure relief valve;
Upper mounting points (for overhead diving);
Lower mounting points (for recreational diving);
Crotch loop mounting point;
Zipper providing access to the inner bladder.
K-Type inflator
A K-type inflator is a reliable device made of shockproof techno-polymer which is resistant to
environmental conditions. The inflator valve is made
of metal, which makes the inflator more resistant to
freezing and it can be operated much longer than
inflators made entirely of plastic.
The inflator is equipped with an inflator button (1) to
inflate the BC with air, a purge button (2) to deflate
the BC or inflate it orally, and a mouthpiece (3) to
release the air that is deflated or inflate the BC orally.
2
3
1
Fig. 21. K-type inflator
16 BC configuration and adjustment 1/2
The STEALTH 2.0 compensator harness consists of 5 loops made of a 6mm bungee cord, where one of the ends
is connected to the mounting points on the BC outer shell, and the loose ends fastened by double ended bolt
snaps.
The compensator is equipped with two sets of mounting loops, a lower and an upper one. In recreational diving
in open waters it is advised to use the lower band since this compensator configuration provides greater
comfort at the price of a slightly larger profile from the diver's back. In case of overhead diving (caves and
wrecks), it is advised to use the upper mounting points, as such a configuration provides the diver with a more
streamlined profile, and minimises the risk of catching on cave or wreck protrusions.
1
2
Fig. 22. Side mounting points
3
Fig. 23. Crotch loop mounting point
1. Upper mounting points;
2. Lower mounting points;
3. Crotch loop mounting point.
When you order the STEALTH 2.0 compensator, you will receive a 10m length of bungee cord, which needs to
be cut into appropriate lengths and connected by yourself to the mounting points to form five mounting loops.
To do this you need to:
1. Measure appropriate lengths of the bungee cord, remembering that the cord needs to form a loop
with a knot;
2. Run the cord through the appropriate mounting point;
3. Tie both ends of the cord with a knot in such a place that when you put on the compensator and
connect the ends of two opposite loops with bolt snaps, the compensator is securely fastened.
4. Repeat the above steps for all four mounting points;
5. Put a longer loop on the crotch loop mounting point. Remember that the loop needs to be long
enough to run parallel to the crotch strap from back to front, and connect to the lower front loop.
17 BC configuration and adjustment 2/2
The picture below shows the STEALTH 2.0 Compensator ready to dive:
Fig.24. A properly configured BC
A properly adjusted compensator harness secures the compensator from shifting and protruding from the
divers’ back, without causing any discomfort. The length of the crotch loop should be chosen by trial, after
having placed the compensator in a place which will ensure proper trim.
The compensator harness sizing is achieved by lengthening or shortening of the bungee loops (a double
fisherman’s knot is advised).
Danger!
Improperly tied harness knots may cause an uncontrolled separation of the compensator from the diver's
body that may lead to an immediate loss of buoyancy. Before each dive, carefully examine every knot and
condition of bungee cord.
Danger!
Jumping into the water with an unfastened compensator crotch loop may cause shifting of the
compensator and even an uncontrolled separation of the compensator from the diver. Never jump into
the water with an unfastened crotch loop and double check if it is fastened properly, before each entry.
18 Connecting the LP hose
To allow for proper operation of the inflator it must be connected to the LP port of the 1st stage of the
regulator using the LP hose supplied with the BC.
Danger!
st
LP hose connection using the 1 stage of the regulator must be made to the low pressure (LP) port only.
Connection to the HP port may result in serious injuries as well as damage to the equipment.
In order to connect the LP hose to the inflator you should gently pull at the sleeve of the LP hose’s nozzle (step
1), and then put the nozzle onto the quick connector (step 2), as presented in the pictures below:
Fig. 25. LP hose connection (step 1)
Fig. 26. LP hose connection (step 2)
Warning!
The inflator supply pressure value should be between 6 and 15 bar. Before connecting the inflator to the
LP hose, make sure that the pressure from the regulator is within this range.
19 Wearing the compensator
The STEALTH 2.0 compensator can be put on after the harness. In order to mount the compensator you need
to shift it to your lumbar curve and then fasten the loops with double ended bolt snaps in front. The crotch
loop of the compensator should be passed through the rear D-ring on the crotch strap and fastened to the
lower front bolt snap.
The picture below shows a properly mounted compensator:
Fig.27. Properly mounted compensator
In order to wear the compensator, follow the directions below:
1.
Put the compensator on your back and hold in place;
2.
Fasten the upper loops with the use of a double ended bolt snap;
3.
Adjust height of compensator for both comfort and correct trim;
4.
Fasten the lower loops with the use of a double ended bolt snap;
5.
Run the crotch loop through the rear D-ring, and parallel to your harness crotch strap;
6.
Fasten the loose end of the crotch loop to the lower front bolt snap.
20 Achieving ideal trim
Thanks to the adjustment possibilities of the STEALTH 2.0 System, you can achieve ideal trim by moving the
center of gravity in a manner similar to the way a double-tank diver does with a V-weight, allowing for a
balanced profile regardless of whether you dive a wetsuit or dry-suit.
If trimmed properly, STEALTH 2.0 allows you to enjoy the ideal position, regardless of the gas volume in the
cylinders, and without the need to manage trim with the use of a dry-suit.
Consider these two issues before you start trimming:
I.
Ideal trim is reached by locating the weight in such a position that ideal trim is achieved with near
empty cylinders;
II. The compensator shouldn’t be used for trimming, but only to compensate for shifting gas weight in
the cylinders. The compensator should be mounted around the body’s center of gravity.
The trimming procedure is as follows:
1.
First stage – placement of the weight:
You should have 50bar of gas in each cylinder and the compensator should remain empty. Put the harness
on with a weighting system and the compensator; next walk into shallow water and balance yourself
properly.
Check the trim. If it turns you head down, it means that the center of gravity is too high. The central
weighting pocket needs to be lowered or the trim pockets need to be mounted closer to your legs. In case
it pulls you up (legs down), it means that the center of gravity is too low. Move the central weighting
pocket up. If it is already in the maximum top position, move the trim pockets towards your head. In
extreme cases the trim pockets may need to be mounted on the arm straps above the upper harness
band.
Note: If you use a dry-suit, the air trapped inside significantly influences trim. During the trimming process
you should not have too much air in your suit and it should be balanced neutrally, as much as possible.
2.
Second stage – adjustment of the compensator:
The cylinders should be full and the compensator's crotch loop long enough to enable maneuver of the
compensator.
Put the compensator on and assume a neutral position. If it turns you head down, you should move the
compensator towards your head until you reach an ideal trim. And the other way round, if it pulls your
legs down, move the compensator towards your feet. After you reach the ideal trim, tie a knot in the
crotch loop at the desired length.
21 Pre-dive Inspection
Before every dive it is necessary to follow the inspection procedures for checking the correct operation of all BC
elements. Even if on a given day you have already dived using your BC, before diving again make sure that all of
its elements are working correctly.
1.
Check that no element of the BC show any signs of wear, paying particular attention to the condition
of webbing, buckles, the outer shell and the LP hose.
2.
Check whether all detachable elements are tightened correctly; those are: bolts, valves, hose adapter
and single tank adapter (if applicable).
3.
Check the BC’s oral inflation putting the inflator’s mouthpiece into your mouth and pressing the purge
button while breathing out. Using this method, inflate the BC to at least half of its volume.
4.
Press the inflator button until the automatic dump valve is activated. The automatic dump valve
should open with a characteristic sound. The air supply should stop immediately after release of the
inflator button.
5.
Check the correctness of manual operation (opening) of the dump valve by pulling on its string. By
doing so you should release air.
6.
Inflate the BC using the inflator button and then press the purge button, checking whether air is being
released from the oral inflator’s hole. Repeat this step a couple of times.
7.
Inflate the BC using the inflator button and leave it fully inflated for 15 minutes. After the 15 minutes
the BC should remain full. If it is not, do not use it until the defect is removed by an authorized
WreckAndReef service center.
8.
During descent, stop at three meters at the most and perform mutual buddy-check, visually inspecting
the BC against any leakages. Caution: Air bubbles appearing on the outer shell do not necessarily mean
leakage. They may result from air being stuck in the structure of the fabric or under the inner shell.
22 Operation
Buoyancy on the surface
In order to ensure maximum buoyancy on the surface, before getting into the water (or directly after
ascending) inflate the BC using inflator button. Stop inflating the BC when the automatic dump valve activates.
Danger!
Before jumping into deep water from a boat or a bank inflate the BC using the inflator button. Getting into
water with the BC not fully inflated may result in drowning!
Descent
In order to descend, press the purge button holding the inflator over your head. Use the purge button with
care, as releasing too much air may result in an uncontrolled descent.
Neutral buoyancy
Maintain neutral buoyancy for a given depth during the dive, using the inflator and purge buttons as needed.
In order to ensure precise control over buoyancy you should press the inflator button for a short moment. If
more air needs to be added to the BC, press the inflator button for a short moment several times.
During release of air from the BC hold the inflator over your head, so the air may escape freely.
Ascent
Ascending too quickly may result in decompression sickness. Therefore you must control the rate of ascent by
gradually releasing the expanding air from the BC with the purge button.
Danger!
Ascending or reducing the depth level too quickly may result in decompression sickness (DCS). Always pay
adequate attention to buoyancy control and respect the ascent rate limits.
23 Post-dive maintenance
Disconnecting
After diving, take out the weight from the weight pockets (if applicable), disconnect the LP hose from the
inflator, and then disconnect the tank.
Draining
Inflate the BC orally using the purge button of the inflator. Next turn the BC to keep the automatic dump valve
at the lowest point of the BC. Pull the valve string, at the same time pressing the BC with your hands to make
water flow out by the open dump valve. Repeat the procedure until all water is removed from the BC.
Rinsing
Every time you use the BC in salt or chlorinated water, it should be rinsed thoroughly inside and out with fresh
water. Never use hot water for rinsing!
To rinse the BC inside, press the purge button of the inflator and fill the BC approximately ¼ full with water by
means of a garden hose spout or other source of fresh water. Rotate the BC several times, and next drain it
according to the above procedure.
Warning!
Do not press the inflator button when rinsing your BC! This may make damp and other contaminants enter
the inflator valve, which may cause subsequent damage to the valve.
Drying
After every use, you should dry the BC thoroughly. When drying, the BC should be fully inflated and hung in a
dry, airy and dark place. When drying, do not expose your BC to direct sunlight or extreme heat!
Storing
Store your BC partially inflated and hung in a dry and dark place away from sharp objects, lubricants, fuels or
solvents.
Warning!
To prevent your BC from damage, you should never keep it wet for a longer period than a dozen or so
hours.
24 Repair and maintenance
STEALTH 2.0 BC does not contain any elements which can be repaired by the user, and so all repairs (including
lubrication or replacement of worn-out elements) should be performed only by trained technicians holding
certificates issued by the producer (authorized service center).
For repair of STEALTH 2.0 BC, only elements and spare parts supplied by the producer must be used. Elements
and spare parts from other sources, although identical by all appearances, may have slightly different
properties, which may negatively affect the working life of the BC.
The only maintenance procedure which may be performed by the user is rinsing the BC in fresh water. It is
recommended after diving in salt or chlorinated water. On no account should detergents, cleaning agents or
solvents be used for cleaning the BC. In case of heavy soil, contact the producer for additional information.
Warning!
For safety reasons, the BC should be overhauled after every 200 dives, however not less frequently than
once a year. Such overhaul should be performed by an authorised WreckAndReef service centre.
25 Troubleshooting
The STEALTH 2.0 System gives huge possibilities for configuration adjustment to your own needs. Sometimes it
happens that divers make “rookie” mistakes as far as the harness or compensator configuration are concerned.
Here are some basic problems and solutions to them:
The harness sticks out from your back when you arch your body
It is a typical situation, since the harness is improperly adjusted to your height. The upper node is then
placed too high.
Solution: According to the description in “Adjustment of the harness” chapter, adjust the length of the
central harness strap (the one running across the spine) so that the upper node is located in the right
position.
The compensator sticks too far out from your back.
If you use lower “recreational” mounting points it will not be as flat as if using the upper “overhead
diving” mounting points, it does not however make much difference in recreational diving. If you use the
upper points and the compensator still sticks out, it means that the loops are just too long.
Solution: Check if the length of the loops is accurate. If you use lower mounting points and you dive in
wrecks and caves, change the mounting points to the upper ones.
The compensator sticks out from your back at the bottom.
The compensator works best when the crotch loop is property fastened and has the right length. If the
loop is too long, the compensator, when it is full may stick out slightly from the back after assuming a
vertical position.
Solution: Accurately adjust the length of the crotch loop.
The compensator covers the back D-rings on the waist strap.
The compensator has been designed to provide high buoyancy force (16kg) and to be, at the same time,
small enough to be used by even 155cm tall persons. The typical mistake is mounting the compensator too
low which results in covering the D-rings placed on the waist strap, near the lower harness node.
Solution: Trim yourself accurately, according to advice given in “Reaching the ideal trim” chapter which
will allow you to place the compensator in the right place. If need be, lengthen the compensator crotch
loop.
26 Technical specification of the BC
Basic parameters
Type
Independent side mount buoyancy compensator, mounted to the diver’s
body using its own five point mounting harness.
Buoyancy
16 L
Outer shell fabric
Cordura 1100 dTEX
Inner bladder fabric
Nylon 440 dTEX
Weight of the dry compensator
(without harness).
1 kg
Inflator
Type
K-Type inflator
Supply pressure
Minimum: 6 bar
Maximum: 17.23 bar (250 PSI)
Permissible tank parameters
Tank type
Side Mount configuration
Maximum size
2x 15 liters
Operating temperature
Water temperature
Between -2°C and 40°C
Air temperature
Between -20°C and 60°C
WRECKANDREEF Piotr Czernik
Ul.Ogrodników 3
43-227 Góra
Polska
Tel: +48 12 44 66 998
e-mail: [email protected]