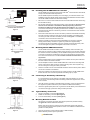
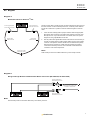
1
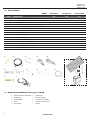
®
powered by
GP-FLEX-100
GP-FLEX-200
GP-FLEX-100E
Solar Flex
User’s Manual
MC4 Branch
Connectors
Solar Controller
Solar Kit
GP-FLEX-100
Solar Expansion Kit
GP-FLEX-100E
GP-FLEX-100
GP-FLEX-200
GP-FLEX-100E
Table of Contents
1.0 General Information.................................................................................................................................................................................. 3
1.1 How Does a Go Power! Solar Charging Kit Work?.................................................................................................................................. 3
1.2Warnings................................................................................................................................................................................................... 3
1.3 Parts Checklist.......................................................................................................................................................................................... 4
1.4 Required Tools (Additional tools may be required)................................................................................................................................... 4
2.0 Wiring Modules with MC4 Cables............................................................................................................................................................ 5
2.1 Installing your 100 watt Solar FlexTM Kit (GP-FLEX-100).......................................................................................................................... 5
2.2 Installing your 200 watt Solar FlexTM Kit (GP-FLEX-200)....................................................................................................................... 5
2.3 Adding a 100 watt Solar FlexTM Expansion Kit (GP-FLEX-100E)............................................................................................................. 5
3.0 Routing Power Cable through the Fridge Vent......................................................................................................................................... 5
3.1 Method 1 – Hole in Side of Vent............................................................................................................................................................... 5
3.2 Method 2 – Through Screen Grid............................................................................................................................................................. 5
4.0 Mounting the Solar Module ...................................................................................................................................................................... 5
5.0 Installing The GP-PWM-30 Solar Controller............................................................................................................................................ 5
5.1 Mounting The GP-PWM-30 Controller..................................................................................................................................................... 6
6.0 Connecting to the Battery & Solar Array.................................................................................................................................................. 6
6.1 Typical Battery Connection....................................................................................................................................................................... 6
7.0 Warranty Return Procedure...................................................................................................................................................................... 6
8.0Diagrams................................................................................................................................................................................................... 7
2
gpelectric.com
GP-FLEX-100
GP-FLEX-200
GP-FLEX-100E
1.0
General Information
Congratulations on purchasing your Go Power! Solar FlexTM Kit. You have chosen a clean, quiet and sustainable power source. Go Power!
Solar Charging Kits allow you to enjoy the luxuries that electricity provides, without hooking up to shore power, by keeping your batteries
charged. For simple battery maintenance to full-time live-aboard power, Go Power! Solar Kits are available in a variety of sizes and can be
installed on RVs, boats, campers, trailers, fifth wheels, motor homes, cottages/cabins, long-haul trucks and industrial applications. This
manual is geared towards RV installation and usability. For other applications, please consult a certified electrician or contact Go Power!
Technical Support. Information in this manual is subject to change, please visit gpelectric.com for the most current version of this manual.
Notes:
• Solar Flex Modules have a 30° maximum recommended bend - 2.7” / 69mm bend (100 watt module)
• This installation guide does not list all possible variations of available solar modules. This installation guide will address the assembly of Go
Power! Solar FlexTM Kits, which contain one, or more solar modules connected in parallel for a 12 volt system. Expansion Kits are available
to add solar modules to an existing system.
1.1
How Does a Go Power! Solar Charging Kit Work?
The solar module converts the sun’s energy into DC electricity and this electricity charges the battery. The battery stores the electricity,
similar to a water tank storing water. The battery power may be used at any time to operate devices connected to the battery. To stop the
battery from being overcharged by the solar module, a solar controller is connected in between the solar module and the battery. The GPPWM-30 controller will disconnect power from the solar module when the battery is fully charged.
Please read and understand all instructions before installing your new product for the easiest and safest installation. Before installing the
kit, please review all diagrams included in this manual. If you have any doubts as to this kit’s compatibility with your RV, please contact your
authorized Go Power! Dealer. It is advisable to retain this manual for future reference.
1.2Warnings
Disconnect all power
sources before
attempting installation
Electricity can be very dangerous. Installation should be performed only by a
licensed electrician or qualified personnel.
Photovoltaic modules generate DC electricity when exposed to sunlight or other
light sources. Contact with the electrically active parts of the module, such as
terminals, can result in burns, sparks and lethal shock whether the module is
connected or disconnected.
Solar module saftey
Battery and wiring
safety
When modules are connected in parallel, amperages are additive. Consequently,
a system assembled from photovoltaic modules can produce high amperages,
which constitute an increased hazard. Do not touch terminals while module is
exposed to light. Cover the module face completely with opaque material to halt
the production of electricity when installing or working with modules or wiring.
Observe all safety precautions of the battery manufacturer when handling or
working around batteries. When charging, batteries produce hydrogen gas, which
is highly explosive. Work in a well ventilated area and use caution when making or
removing electrical connections. Ensure wires are disconnected from their power
sources when wiring. Do not expose battery to open flame, cigarettes or sparks.
Shield skin and eyes from battery acid.
Ensure all connections are tight and secure. Loose connections may generate
sparks and heat. Be sure to check connections one week after installation to
ensure they are still tight.
Work safely
Wear protective eyewear and appropriate clothing during installation. Use extreme
caution when working with electricity and when handling and working around
batteries. Use properly insulated tools only.
Observe correct
polarity at all times
Reverse polarity of the battery terminals will cause the controller to give a warning
tone. Reverse connection of the array will not cause an alarm but the controller will
not function. Failure to correct this fault could damage the controller.
Do not exceed the
voltage and current
ratings of the
GP-PWM-30 Controller
The total current of the solar system is the sum of the short circuit current of the
solar modules in parallel, multiplied by a safety factor of 1.25. The resulting system
current is not to exceed the amperage rating of the controller. The voltage of the
array is the rated open circuit voltage of the solar modules and is not to exceed 28
volts for a 12 volt system.
The current rating of the solar system is the sum of the Maximum Power Current
(Imp) of the solar PV strings in parallel. The resulting system Imp current is not to
exceed 30A. If your solar system exceeds these ratings, contact your dealer for a
suitable controller alternative.
gpelectric.com
3
GP-FLEX-100
GP-FLEX-200
GP-FLEX-100E
1.3 Parts Checklist
MODEL:
ITEM#
GP-FLEX-100
GP-FLEX-200
GP-FLEX-100E
QTY
QTY
QTY
01
DESCRIPTION
Ring Terminal Battery Connector
2
2
0
02
50’ MC4 Cable with Male and Female MC4 Connectors
1
1
0
03
Tie Wrap
6
6
6
04
Male (positive) MC4 Parallel Branch Connector
0
1
1
05
Female (negative) MC4 Parallel Branch Connector
0
1
1
06
#10 x 1” Wood Screws
6
12
6
07
#10 x 1.5” Machine Screws
6
12
6
08
#10 Well Nuts
6
12
6
09
#10 Lock Washers
6
12
6
10
#10 Flat Washers
6
12
6
11
3/8” Plastic Cable Clamps
6
12
6
12
#8 x 1” Screws for Cable Clamps
6
12
6
13
Fuse Holder Inline with 30A Fuse
1
2
1
14
Solar Flex Module
1
2
1
15
GP-PWM-30 Controller
1
1
0
01
02
04
03
05
14
15
06
07
12
13
08
09
10
Battery (not included)
30
1.4 Required Tools (Additional tools may be required)
4
11
a.
Phillips / Robertson Screwdriver
f.
Wire Crimpers
b.
Keyhole Saw
g.
Electric Hand Drill
c.
Pencil or Marker
h.
1/16 and 3/8 inch Drill Bit
d.
Pliers
i.
5/16 and 7/16 inch Wrench
e.
Wire Strippers
j.
Sealant
gpelectric.com
GP-FLEX-100
GP-FLEX-200
GP-FLEX-100E
2.0 Wiring Modules with MC4 Cables
2.1
Solar Kits with MC4 cables contain a potted or sealed junction box with a positive and negative MC4 connector. This is referred to as an MC4
junction box. MC4 connectors are either positive or negative and each connector has its polarity symbol embossed close to the connection
point. To extend a cable from an MC4 junction box, a polarity opposite connector must be used. E.G. a negative connector must plug into
a positive connector in order to extend it. Please remember, the polarity of an MC4 cable wire run is the polarity symbol on the connector
closest to the MC4 junction box. It is advisable to attach a polarity sticker to the positive extension cable in order to avoid confusion during
installation.
Installing your 100 watt Solar FlexTM Kit (GP-FLEX-100)
Solar Kits containing a single module with MC4 cables will be equipped with a single 50’ MC4 power cable that has both a male and female
MC4 connection. This cable is meant to be cut in half leaving you with a 25’ cable with a male MC4 and a 25’ cable with a female MC4
connection. Refer to Diagram-1, “MC4 Power Cabels For Solar Flex™ Kits”.
2.2 Installing your 200 watt Solar FlexTM Kit (GP-FLEX-200)
Solar Kits containing two modules with MC4 cables will be equipped with a 50’ MC4 power cable, a negative MC4 parallel branch connector
and a positive MC4 parallel branch connector. Refer to Diagram-2, “Wiring Parallel (2) Modules with MC4 Parallel Branch Connectors
(GP-FLEX-200, GP-FLEX-100E)”.
2.3 Adding a 100 watt Solar FlexTM Expansion Kit (GP-FLEX-100E)
Solar Expansion Kits containing a single module with MC4 cables will be equipped with a 50’ MC4 power cable, a negative MC4 parallel
connector and a positive MC4 parallel connector. Refer to Diagram-2, “Wiring Parallel Modules with MC4 Cables.”
3.0 Routing Power Cable through the Fridge Vent
3.1
Locate the refrigerator vent on the roof of the RV. Remove vent cover to gain access to the duct
opening. Refer to Figure 1. Retain vent-fastening hardware.
Refrigerator Vent
Cover
Solar
Module
Method 1 – Hole in Side of Vent
Drill a hole through the side of the vent (5/8” hole). Insert a rubber grommet (not included)
into the hole. Insert the power cable (already wired to the solar module) through the hole and
carefully route it to the battery. Be certain to leave enough slack to allow cable routing from
module to vent along desired path.
3.2 Method 2 – Through Screen Grid
Method 2
1.
Thread power cable (already wired to solar module) carefully through the screen and into
opening. Enlarge screen grid hole if necessary.
2.
Avoid strapping the power cable to existing wire between the module and the battery. Allowing a
few inches of space between the power cable and existing wire will lessen the chance of voltage
loss through thermal conduction. Use cable clamps with the #8 self-tapping screws and/or tie
wraps every few feet along RV roof and interior route to battery.
3.
Ensure all penetrations into the RV roof are watertight. Use an appropriate sealant as
recommended by your RV Dealer to seal holes wherever necessary.
4.
Replace vent cover.
Cable
Clamps
Method 1
Vent Screen
Figure 1
Caution:
The vent screen may have sharp
edges or burrs.
4.0 Mounting the Solar Module
The solar modules may be horizontally mounted to the roof using the included screws or an adhesive sealant. Please contact your RV
manufacturer for specifications on an appropriate adhesive. Panels are not recommended to bend beyond 30° (for 100 watt modules 30° =
2.7” / 69mm bend)
Warning: Using an adhesive can create a permanent mounting situation. It is strongly advised that placement is well thought out and that
panel function has been tested before mounting. Go Power! and Carmanah Technologies is not responsible for damage caused the by
removal of Solar FlexTM modules.
gpelectric.com
5
GP-FLEX-100
GP-FLEX-200
GP-FLEX-100E
5.0 Installing The GP-PWM-30 Solar Controller
Solar
Controller
Fuse
Positive
Connection
Negative
Connection
The GP-PWM-30 is included in all Go Power! Solar FlexTM Kits mentioned in this manual,
except for the GP-FLEX-100E Expansion Kit.
The GP-PWM-30 protects the battery from overcharging. A condensed version of the
installation instructions appear below. Please read the full installation manual included
with the GP-PWM-30 Solar Controller before installing.
1.
Disconnect or cover the solar modules and disconnect the batteries before commencing
the GP-PWM-30 wiring.
2.
Run the solar module power cable to the location of The GP-PWM-30. Do not connect
the wires to the controller or the batteries. Identify the polarity of the wires
located on the battery and solar module (positive and negative). Use coloured tape
or mark wire ends with tags. Contacting the leads of the controller in reverse polarity,
however brief, will cause the controller to go into lock out mode and the solar controller
will need to be reset.
3.
Kits include a fuse holder with an inline 30A fuse to protect the wire between the battery
and solar controller. Install your inline fuse as close to the battery as possible before
connecting the solar controller to the battery terminal. See Figure 2: “12 Volt Battery
Connected to Solar Controller with Inline Fuse”.
4.
Wire the controller according to the terminal identification on the back of controller,
starting with the battery connections. Tighten the positive and negative battery
connections and then set the battery type (see controller manual for instruction). Then,
connect and tighten the positive and negative solar module connections.
12 Volt Battery Connected to Solar
Controller with Inline Fuse
Figure 2
Solar
Controller
Positive
Connection
Negative
Connection
5.1
Single 12 Volt Battery
12 Volt Configuration
Figure 3
Solar
Controller
Positive
Connection
Mounting The GP-PWM-30 Controller
The GP-PWM-30 should be mounted in a location relatively close to the battery, but
easily seen for monitoring system operation. Wires must be run from the solar module to
the controller and then to the battery. The GP-PWM-30 is designed to be flush mounted
on the side of a cabinet or wall where the wiring can be accessed from the back. Allow
two to three inches behind the unit. The controller should be mounted indoors, in a
dry location.
1.
Select a suitable location for the installation of the controller. Run the power cable from
the solar module to the location selected.
2.
Use the template included in the GP-PWM-30 Manual to mark the four mounting holes
and the “cutting line for flush mounting”. Drill the mounting holes. Use a keyhole or jig
saw to cut along the rectangular outline you marked.
3.
Wire the controller as shown in the GP-PWM-30 Manual. Use the leftover power cable to
connect the controller to the batteries.
4.
Mount the controller to the wall using the four screws provided in the GP-PWM-30 box.
Ensure the back of the controller is protected from damage by any object.
Negative
Connection
Two 12 Volt Batteries
12 Volt Parallel Configuation
6.0 Connecting to the Battery & Solar Array
It is recommended to connect directly to the battery wherever possible. You can also
connect to the converter/charger where the battery positive and negative wires connect
to the converter.
1.
Clean all corrosion from battery terminals before proceeding. Crimp ring terminals onto
the negative and positive wires of the power cable to be attached to the battery.
2.
Attach the negative (black) wire’s 3/8” ring terminal to the RV battery. Check all electrical
connections and apply a protective coating to battery terminals.
Figure 4
Solar
Controller
6.1
Positive
Connection
1.
2.
3.
Negative
Connection
7.0
Two 6 Volt Batteries
12 Volt Series Configuation
Figure 5
6
Typical Battery Connection
Single 12 Volt battery connection (See Figure 3)
Parallel 12 Volt battery connection (See Figure 4)
2 x 6 Volt series battery connection (See Figure 5)
Warranty Return Procedure
This product is covered by Carmanah Technologies (Go Power!) standard warranty.
Visit gpelectric.com for additional information.
Before contacting Go Power!’s customer service department, please visit gpelectric.
com to read the “frequently asked questions” section of our website to troubleshoot the
problem. If trouble persists:
1.
2.
Call your Go Power!™ Technical Support team (1-866-247-6527)
Return defective product to place of purchase.
gpelectric.com
GP-FLEX-100
GP-FLEX-200
GP-FLEX-100E
8.0Diagrams
Diagram 1:
MC4 Power Cabels For Solar FlexTM Kits
JUNCTION BOX
Male (positive) MC4
Junction Box Connection
Female (negative) MC4
Junction Box Connection
Negative MC4
Cable Conductor
Positive MC4
Cable Conductor
Cut 50’ wire in half to
make two 25’ cables
The MC4 power cable is usually the final connection between the solar array and
the solar controller. If it has not already been done, cut the MC power cable into
two pieces so that there is a positive conductor cable and negative conductor
cable.
1.
Cover the solar module(s) with an opaque material. Attach the appropriate
MC4 power cable conductor to the positive and negative connectors of the
MC4 junction box. If you have more than one module, refer to the specific
diagram for wiring a parallel MC4 connection.
2.
Run the positive and negative MC4 cable conductors from the solar array to
the solar controller. Attach a positive polarity label to the end of the positive
conductor. If the positive conductor needs to be shortened and the polarity
label is removed, remember to re-label it as both positive and negative
conductors look exactly the same. Leave a few feet of cable at the solar
controller in case of future adjustment.
Note:
Solar module junction box and MC4 cables many not be exactly as shown.
Diagram 2:
Wiring Parallel (2) Modules with MC4 Parallel Branch Connectors (GP-FLEX-200, GP-FLEX-100E)
Female (negative) MC4
Parallel Branch Connector
MC4 Extension Cable to Solar
Controller or Combiner Box
JUNCTION BOX
JUNCTION BOX
Male (positive) MC4
Parallel Branch Connector
Note:
Solar module junction box and MC4 cables many not be exactly as shown.
gpelectric.com
7
GP-FLEX-100
GP-FLEX-200
GP-FLEX-100E
®
powered by
© 2014 Go Power! By Carmanah Technologies
Document: GP_MAN_GP-SOLAR-FELX_ 100_200_100E_RevB
8
gpelectric.com