1
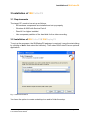
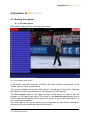
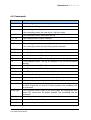
User Manual
ISUCutterFS
User Manual_ISUCutterFS_V1.5.doc
© ST INNOVATION GmbH
Page 1 of 17
Document Control
Created by:
ST INNOVATION GmbH
Wiesenring 11
04159 Leipzig-Stahmeln
Germany
Stefan Thomas / Manja Richter
Version History
Version Date
Modified by
Modifications
1.0
10/06/04
Stefan Mauksch
Initial version
1.1
09/02/05
Manja Richter
Partitioning req. added, hardware reqs.
modified
1.2
17/01/05
Stefan Thomas
Version 1.08
1.3
27/10/06
Manja Richter
Layout modification
1.3
22/08/07
C. Albrecht
New Copy feature
1.5
18/08/08
Manja Richter
VISTA version, full-screen mode
User Manual_ISUCutterFS_V1.5.doc
© ST INNOVATION GmbH
Page 2 of 17
Table of Contents
1 INTRODUCTION...................................................................................5
1.1 This document .................................................................................................. 5
2 SYSTEM REQUIREMENTS..................................................................6
2.1 Hardware Requirements ................................................................................... 6
2.2 Recommended Hardware ................................................................................. 6
2.3 Tested Hardware .............................................................................................. 7
3 INSTALLATION OF ISUCUTTERFS.....................................................8
3.1 Requirements.................................................................................................... 8
3.2 Installation of ISUCutterFS / ISUReplayFS ....................................................... 8
4 OPERATION OF ISUCUTTERFS .........................................................9
4.1 Starting the system ........................................................................................... 9
4.1.1 The main menu........................................................................................... 9
4.2 Recording........................................................................................................ 10
4.3 Video Cutting .................................................................................................. 11
4.3.1 Changing clip in and clip out marks .......................................................... 12
4.3.2 Insert a clip ............................................................................................... 12
4.3.3 Split a clip ................................................................................................. 13
4.3.4 Copy a clip................................................................................................ 13
4.3.5 Delete a clip.............................................................................................. 13
4.4 Commands...................................................................................................... 14
5 PROGRAM CONFIGURATION...........................................................15
6 FAQ AND TROUBLESHOOTING .......................................................17
6.1 The video screen of ISUCutterFS is grey........................................................ 17
6.2 The video is frozen.......................................................................................... 17
6.3 The video image is hitching or is not indicated properly.................................. 17
6.4 ISUCutterFS cannot be connected to the Scoring System.............................. 17
6.5 Video incomplete or only a still picture available............................................. 17
User Manual_ISUCutterFS_V1.5.doc
© ST INNOVATION GmbH
Page 3 of 17
Copyright
Entire content © by ST INNOVATION.
All rights reserved.
This documentation may not be copied, translated, or reduced to any electronic
medium or machine-readable form without ST INNOVATION’s prior written consent.
Documentation Updates
ST INNOVATION reserves the right to make improvements in the products described
in this manual at any time without prior notice. Furthermore, ST INNOVATION
reserves the right to revise this manual and to make changes in its content without
obligation to notify any person or organization of such revision or change.
Disclaimer
The information provided herein has been obtained from sources believed to be
reliable. However, ST INNOVATION makes no representation or warranties with
respect to the contents hereof and specifically disclaims any implied warranties of
merchantability or fitness for any particular purpose.
User Manual_ISUCutterFS_V1.5.doc
© ST INNOVATION GmbH
Page 4 of 17
1 Introduction
1.1 This document
This document describes the operation of ISUCutterFS.
This application is an optional module that provides a Video Replay feature in the
Scoring system. This application processes the video signal of a DV camera and
saves the complete performance of a Skater. Supported by the Caller, the operator
sets the Trim In / Trim Out marks for the individual elements. These marks are then
sent to the Judges terminals.
This application provides an easy to handle option to review and replay the
performance elements. Trim In and Trim Out marks can be modified, replaced and
deleted as desired.
User Manual_ISUCutterFS_V1.5.doc
© ST INNOVATION GmbH
Page 5 of 17
System Requirements
2 System Requirements
2.1 Hardware Requirements
-
Pentium III (1 GHz) or better, AMD processor 1 GHz), Pentium-M processor
1.4 GHz or better, AMD-M processor
-
Microsoft® Windows® 2000 or higher
-
256 MB RAM or more
-
VGA 1024x768 - DirectX9 installed
-
20 GB Hard Drive or more - split, i.e. 8GB for the system, 12GB (NTFS
formatted video)
-
at least 1 GB free hard disk space for 5min video capture
-
100 Mbit Network Connection
-
Fire wire (onboard or via PCMCIA card)
We have tested systems with Transmeta processor. These systems had problems
displaying the video correctly without dropped frames.
For the capturing of the video signal, we recommend at least a consumer DV camera
with a video out. However, we rather recommend a semi professional or professional
camera with a monitor on the camera to easily follow the competitor. In addition, it is
necessary to split the video signal of the camera, because at least the cutter and the
caller are working with a video signal. Furthermore, devices are needed to convert
the video signal to a Fire wire signal.
We recommend using a separate NTFS formatted partition for the video capturing, as
the required DirectX9 is not supported by Windows 95 or NT. The system is not
tested on Windows 98. We recommend using Windows 2000 or higher.
Although the cutting and caller application can be controlled with keyboard, we
recommend using a mouse and a big screen.
2.2 Recommended Hardware
Notebook or PC with a Pentium IV or Pentium-M or AMD processor
Our tests with the Transmeta processor showed, that the performance is insufficient
to support video replay.
The system is tested on Windows 2000 and Windows XP operating systems. The
program is optimized to work at a resolution of 1024x768 pixels. The buttons are
specifically made to support touch screens. For the cutting application as well as for
the caller, we recommend using notebooks with a big screen instead of touch
screens. It is easier, faster and more reliable to hit the buttons with the mouse. In
most cases, screen size of touch screens is only approx. 10 to 12" instead of 14-15"
of a normal notebook screen or 17" for a normal desktop monitor.
Video distributor (one video input to several video outputs); e.g. Kramer or ST
User Manual_ISUCutterFS_V1.5.doc
© ST INNOVATION GmbH
Page 6 of 17
System Requirements
INNOVATION in-house solution
Converter Video - Fire wire / IEEE1394
Canopus ADVC110
Basically any stable running FBAS > DV converter can be used.
2.3 Tested Hardware
ISU Judging System (with replay - no touch screen)
-
HP, Compaq notebooks
-
Sony Vaio notebooks
-
DELL notebooks
ISU Judging System (with replay - with touch screen)
The following models can be operated like touch screens:
-
Panasonic Toughbook (CF-18)
-
Paceblade
-
ELO
The following model can be operated with specific pens:
-
Fujitsu Stylistics (ST4121)
User Manual_ISUCutterFS_V1.5.doc
© ST INNOVATION GmbH
Page 7 of 17
Installation of ISUCutterFS
3 Installation of ISUCutterFS
3.1 Requirements
The target PC needs to be set up as follows:
-
All hardware components are installed and set up properly
-
Windows ® 2000 with Service Pack 2
-
DirectX 9 or higher installed
-
Use a separate partition of the hard disk for the video recording.
3.2 Installation of ISUCutterFS / ISUReplayFS
To set up the programs, the ISUReplayFS package is required. Leave the start dialog
by clicking on Next. Now select the directory. Then select ISUCutterFS as an optional
application:
Fig. 1 Install ISUCutterFS
You have the option to create a desktop icon and to finish the setup.
User Manual_ISUCutterFS_V1.5.doc
© ST INNOVATION GmbH
Page 8 of 17
Operation of ISUCutterFS
4 Operation of ISUCutterFS
4.1 Starting the system
4.1.1 The main menu
ISUCutterFS starts with the following main screen:
Fig. 2 ISUCutterFS Main screen
If the screen resolution exceeds 1024x768, the user interface is centered on the
screen, and the frame remains black.
This screen indicates the current video picture. The left part of the screen indicates
the element list with clip information. It can contain up to 20 elements.
The Exit Program button in the upper left part of the screen is used to exit the
program. In the upper right part of the screen is the Start Recording button that is
used to start the Recording. In the center of the screen is the current video status, i.e.
live, recording or playback.
The lower part of the screen contains the time passed by and further information,
including the version and build date of ISUCutterFS.
User Manual_ISUCutterFS_V1.5.doc
© ST INNOVATION GmbH
Page 9 of 17
Operation of ISUCutterFS
4.2 Recording
In order to start the recording, click the Start Recording button in the right upper
corner of the screen.
Fig. 3 Recording
The button switches its color from red to green, and the headline indicates
“Recording”.
When the recording is started, the time (lower right part of the screen) is reset to
0:00,0.
Note: ISUCutterFS only records videos until the Recording status is changed again
(button in the upper right corner), or if the hard disk is full. If a Scoring System is
connected (see upper line in the screen that indicates the IP address), the Scoring
System filters all commands. If this application does not respond, ISUCutterFS
becomes inoperable and needs to be closed.
If a Scoring System is connected, the left field beside the clip marks is filled with the
elements sent by the Expert. The red element box indicates a review request of the
Technical Panel.
In order to create individual clips from the video material recorded, click the Start /
End button. The current time (clip in mark) is automatically entered in the list on the
left part of the screen, when Start is selected. When clicking this button again, the clip
User Manual_ISUCutterFS_V1.5.doc
© ST INNOVATION GmbH
Page 10 of 17
Operation of ISUCutterFS
is stopped, and the second time (clip out mark) is entered in the list. Use the Undo
button to reset the last clip in or clip out mark. If a clip mark has been set too early or
too late, the mark can be corrected in the video cutting mode after the end of the
skaters’ performance.
Click the Duplicate button to copy clip in and clip out marks from the current element
to the next element.
The record can be stopped with the Stop Recording button. A dialog box is opened to
confirm your selection. Press Enter for Yes or ESC for No. If you confirm, the
application automatically switches to the cutting mode.
4.3 Video Cutting
Switch to the cutting mode by clicking the Stop Recording button.
Fig. 4 Video Cutting
The lower part of the screen now provides buttons to insert, split, copy, and delete
clips as well as change clip in and out marks. Below are the time bar and the
available clips.
Elements marked with a Review Request by the Expert are highlighted in red
allowing the video cut system operator to edit marked elements with high priority.
The Playback is started clicking on one of the clips in the list. The screen switches to
User Manual_ISUCutterFS_V1.5.doc
© ST INNOVATION GmbH
Page 11 of 17
Operation of ISUCutterFS
the Playback mode:
Fig. 5 Playback mode
4.3.1 Changing clip in and clip out marks
The cutting marks are called clip in and clip out marks. Clip in defines the start of the
clip and clip out the end of the clip. The cutting marks of a clip can be changed at any
time in the cutting mode.
In order to change the start of the clip, select the clip from the left list. The clip is
shown in the window. Select the desired start point of the clip in the time bar and
click the TRIM IN button.
In order to change the end of the clip, select the clip in the left list. The clip is shown
in the window. Select the desired finish point of the clip in the time bar and click the
TRIM OUT button.
4.3.2 Insert a clip
In order to insert a clip, first select a position in the element list. Then define the time
by clicking on the time bar. The application now switches from the current video
picture to the indicated time in the video. The video is stopped. Now click on the Ins
Elem button. The clip is now created. This clip now consists only of the still picture
(clip in = clip out mark). Use the TRIM IN and TRIM OUT functionality to define the
correct start and finish point of the clip.
User Manual_ISUCutterFS_V1.5.doc
© ST INNOVATION GmbH
Page 12 of 17
Operation of ISUCutterFS
4.3.3 Split a clip
The Technical Panel can decide to separate a jump sequence into two single jumps.
The first jump remains in the original position in the element list, while the second
jump is added to the end of the element list. The video cut operator should separate
the clip.
In order to split a clip, first select the element from the list. The clip is shown in the
window. Select the desired split point of the clip in the time bar and click the SPLIT
ELM button. The split point is the new clip out mark of the clip. The remaining part is
copied to the end of the element list.
4.3.4 Copy a clip
A clip can be copied from one element to another in the element list.
Select the source element in the element list and click the COPY ELEM button. Then
select the destination element and press the INS ELEM button. A message box
provides three options: Insert, Overwrite and Cancel.
Insert copies the cutting marks to the destination element and shifts down the
existing clips of this and all following elements by one box.
Overwrite assigns the copied cutting marks to the destination element. Existing
cutting marks are overwritten.
4.3.5 Delete a clip
In order to delete a clip, select the desired clip from the element list. Click the Del
Elem button. A dialog box is opened in which you have to confirm that you really want
to delete the clip.
All following clips are shifted up in the element list.
Note: The list of elements remains the same. This information can be changed by
the Expert only.
User Manual_ISUCutterFS_V1.5.doc
© ST INNOVATION GmbH
Page 13 of 17
Operation of ISUCutterFS
4.4 Commands
Button
Action
Esc
Exits the program or exits a dialog box
Enter
Confirmation of dialog box
Space
In the cutting mode: replays the selected clip
In the recording mode: set new clip in / clip out marks
D
In the recording mode: duplicates the clip
F1 / Ins
In the cutting mode: a clip is inserted
F2
In the cutting mode: the current clip is cut at the current position.
F3 / Del
In the cutting mode: the current clip is deleted.
In the recording mode: the last cutting mark is deleted.
F4 / Pos1
In the Playback mode: A new In point is set.
F5 / End
In the Playback mode: A new Out point is set.
F6
In the Playback mode: The clip is stopped or continued.
F7
In the Playback mode: The clip is replayed in normal speed (rewind)
F8
In the Playback mode: The clip is replayed in half the normal speed
(rewind)
F9
In the Playback mode: The clip is replayed in half the normal speed.
F10
In the Playback mode: The clip is replayed in the normal speed.
F11
In the Playback mode: back to the live picture
F12 / Break
Switch from the cutting to the recording mode and back.
Arrow up
In the cutting mode: selects the previous clip from the clip list.
Arrow down
In the cutting mode: selects the next clip of the clip list
Arrow left
In the Playback mode: switches to the previous screen. By keeping
the Shift or/and Ctrl or/ and ALT button pushed, the scrubbing can
be quickened.
Arrow right
In the Playback mode: jumps to the next image. By keeping the Shift
or/and Ctrl or/and the Alt button pushed, the scrubbing can be
quickened.
Ctrl + I
Re-initialize video
Ctrl + E
Connect / Disconnect to Expert
Ctrl + Q
Reset recording
User Manual_ISUCutterFS_V1.5.doc
© ST INNOVATION GmbH
Page 14 of 17
Program Configuration
5 Program Configuration
The ISUCutterFS folder contains the configuration file dvcutter.ini:
[dv]
recframes = 50
playframes = 50
playdelay = 100
file = temp.dv
input = 0
deinterlace = false
[gui]
onesetbutton = false
fullscreen = false
widevideo = false
[isu]
ip = 127.0.0.1
port = 1111
In the dv section, all necessary parameters for the video processing can be set.
Make sure you enter a different folder than the current program folder.
The partition or drive indicated in the file line needs to have at least 1GB of free disk
space available.
In the example indicated above, the video file is automatically saved on the partition
with the most disk space available. If no partition with at least 1 GB of free disk space
is available, a dialog box appears to inform the operator accordingly.
Use input to enter “1“ for the second device found instead of “0“ for the first DV
device. This setting is only of importance, if more than one DV is connected.
The corresponding video storage buffers are set in recframes and playframes. For
the normal European video standard, 144Kb RAM are reserved per frame.
If the individual frames in PAL/NTSC are interlaced, activate Deinterlacing. However,
the quality suffers considerably. The parameter is called deinterlace and is either set
true (for active) or false (for inactive).
Use the gui section to modify the appearance of the ISUCutterFS screen. Use option
onsetbutton to replace the start and stop button for cutting the elements with an
automatic button. If full-screen mode is activated, the Cutter screen always uses the
User Manual_ISUCutterFS_V1.5.doc
© ST INNOVATION GmbH
Page 15 of 17
Operation of ISUCutterFS
full screen. The video has the same ratio as the screen resolution. The widevideo
option cuts 4:3 video to 16:9, i.e. black parts of the screen on the upper and lower
side are cut.
The connection to the Scoring system is entered under isu. Our example shows the
Scoring system (Expert) on the local PC with port 1111. For further setting details,
please refer to the Quick Reference Guide.
The file dvlib2.ini contains data entries with the same name for the ISUReplayFS
configuration.
User Manual_ISUCutterFS_V1.5.doc
© ST INNOVATION GmbH
Page 16 of 17
Program Configuration
6 FAQ and Troubleshooting
6.1 The video screen of ISUCutterFS is grey
ISUCutterFS does not receive data from the first DV device.
-
Check if the DV device is active.
Is the device properly connected?
Does it work properly?
Is more than 1 DV device connected?
Reconnect the device(s) with the PC. Restart ISUCutterFS or re-initialize the
setup by pressing I.
6.2 The video is frozen
Re-connect all devices with the PC. Re-start ISUCutterFS or re-initialize the setup by
pressing I.
6.3 The video image is hitching or is not indicated properly
This issue may be caused by performance problems:
-
Hard disk may be full or fragmented
Processor too slow; other applications may impact the performance.
The graphics card cannot show the video picture in real time.
No DirectX 8.1 or higher installed
Mouse cursor shadow activated
6.4 ISUCutterFS cannot be connected to the Scoring System
Check if:
-
All network components are connected and working properly
The network has been set up correctly, i.e. if the Scoring PC is connected to
the network
If the Scoring System is running properly
If the ISUCutterFS contains the correct IP address and the correct port
6.5 Video incomplete or only a still picture available
Check if:
-
Hard disk full or fragmented (You need at least 1GB free disk space)
User Manual_ISUCutterFS_V1.5.doc
© ST INNOVATION GmbH
Page 17 of 17