1
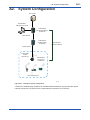
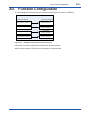
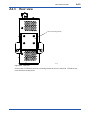
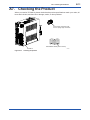
User’s Manual YFGW610 Field Wireless Media Converter IM 01W02D02-01EN IM 01W02D02-01EN 1st Edition Blank Page Toc-i YFGW610 Field Wireless Media Converter IM 01W02D02-01EN This document contains important information for using YFGW610 Field Wireless Media Converter properly and safely. Please read this document thoroughly before using this product. The configuration of the field wireless system is described in the User’s Manual of YFGW410 Field Wireless Management Station (IM 01W02D01-01EN); read that document first. CONTENTS Introduction...............................................................................................................i Safety Precautions...................................................................................................ii Copyright and Trademark Notices.........................................................................v Information of User’s Manual Revision................................................................vi Part-A. FUNCTIONS OF YFGW610 A1. Introduction..............................................................................................A1-1 A2. System Configuration.............................................................................A2-1 A3. Function Configuration..........................................................................A3-1 A4. Names of Parts........................................................................................A4-1 A4.1 Front view........................................................................................................ A4-1 A4.2 Side view.......................................................................................................... A4-1 A4.3 Rear view.......................................................................................................... A4-2 A4.4 Top view........................................................................................................... A4-3 A5. LED Indications.......................................................................................A5-1 A6. Operational Element...............................................................................A6-1 A7. Checking the Product.............................................................................A7-1 IM 01W02D02-01EN Toc-ii Part-B. Installation B1. System Installation Specifications........................................................B1-1 B2. Power Supply and Grounding...............................................................B2-1 B3. B4. B2.1 Power Supply.................................................................................................. B2-1 B2.2 Grounding........................................................................................................ B2-2 Mounting..................................................................................................B3-1 B3.1 Mounting Direction......................................................................................... B3-1 B3.2 Mounting of DIN Rails..................................................................................... B3-2 B3.3 Installation of YFGW610................................................................................. B3-3 Power, ground, and network cable connection...................................B4-1 B4.1 Connection Terminals and Communication Interface................................ B4-1 B4.2 Power Supply Cable Connection.................................................................. B4-2 B4.3 Grounding........................................................................................................ B4-6 B4.4 Network Cable Connection............................................................................ B4-9 B5. Explosion-Proof Wiring..........................................................................B5-1 B6. Settings....................................................................................................B6-1 Part-C. Maintenance C1. Routine Maintenance..............................................................................C1-1 C2. Adding and replacing devices...............................................................C2-1 C3. Maintenance in Hazardous Area............................................................C3-1 C4. Parts with Defined Life Spans................................................................C4-1 Part-D. Troubleshooting Part-E. Specifications E1. Standard Specification...........................................................................E1-1 E2. Model and Suffix Codes..........................................................................E2-1 E3. External Dimensions...............................................................................E3-1 IM 01W02D02-01EN i <Read Me First> Introduction n Regarding This User’s Manual l This manual should be provided to the end user. Please recommend end users to keep this manual at hand and refer to it as needed. l Before use, read this manual thoroughly to comprehend its contents. l The purpose of the User’s Manual is to describe details of functions provided in this product, not to warrant the product’s suitability to the specific purposes of customers. l No part of this manual may be reproduced in any form without Yokogawa’s written permission. l The contents of this manual may be changed without prior notice. l All reasonable effort has been made to ensure the accuracy of the contents of this manual. However, if any errors or omissions are found, please inform any of sales offices listed on the back cover or your local distributor. l Special specifications are not described. l Please note that this User’s Manual may not be revised for any specification changes, construction changes or operating part changes that are not considered to affect function or performance. IM 01W02D02-01EN ii <Read Me First> Safety Precautions n Safety, Protection, and Modification of the Product l In order to protect the operator, product, and system controlled by the product, observe the safety precautions described in this User’s Manual. If users handle contrary to these instructions, we can not guarantee the safety. l If this instrument is used in a manner not specified in this User’s Manual, the protection provided by this instrument may be impaired. l Modification of the product is strictly prohibited. l If the user attempts to repair or modify explosion-proof type products and fails to return them to their original state, the explosion-proof structure of this product will be lost, resulting in a hazardous state. All repairs and modifications of the product must be consulted with Yokogawa. l If any protection or safety circuit is required for the system controlled by the product or for the product itself, prepare it separately. l Be sure to use the spare parts approved by Yokogawa Electric Corporation (hereafter simply referred to as Yokogawa) when replacing parts or consumables. l The following symbols are used in the product and User’s Manual to indicate that there are precautions for safety: CAUTION Indicates that caution is required for operation. This symbol is placed on the parts necessary to refer to the User’s Manual for protecting the operator and equipment. In the User’s Manuals you will find precautions to avoid physical injury or death of the operator, including electrical shocks, Injuries of human body, and so on. WARNING Indicates instructions that must be observed in order to prevent the software or hardware from being damaged or the system from becoming faulty. IM 01W02D02-01EN iii <Read Me First> IMPORTANT Indicates important information required to understand operations or functions. NOTE Draws attention to information essential for understanding the operation and features. TIP SEE ALSO Indicates additional information.Indicates additional information. Indicates a reference source. Indicates a protective grounding terminal. Before using the product, ground the terminal. Indicates a functional grounding terminal. Before using the product, ground the terminal. Indicates a DC supply n Warranty l The warranty terms of this instrument are described in the quotation. We will make any repairs that may become necessary during the guarantee period free of charge. l Please contact our sales office or your local distributor if this instrument requires repair. l If the instrument is faulty, contact us with complete details about the problem and the length of time it has been faulty, and state the model and serial number. We would appreciate the inclusion of drawings or additional information. l The results of our examination will determine whether the product will be repaired free of charge or on an at-cost basis. n The guarantee will not apply in the following cases: l Damage due to negligence or insufficient maintenance on the part of the cus tomer. l Problems or damage resulting from handling, operation or storage that violates the intended use and specifications. IM 01W02D02-01EN iv <Read Me First> l Problems resulting from using or performing maintenance on the instrument in a location that does not comply with the installation location specified by Yokogawa. l Problems or damage resulting from repairs or modifications not performed by Yokogawa or someone authorized by Yokogawa. l Problems or damage resulting from inappropriate installation after delivery. l Problems or damage resulting from disasters such as fires, earthquakes, storms, floods, or lightning strikes and external causes. n Warranty and Disclaimer l Yokogawa assumes no responsibilities for this product except as stated in the warranty. l Yokogawa shall have neither liability nor responsibility to any person or entity with respect to any direct or indirect loss or damage arising from using the product or any defect of the product that Yokogawa can not predict in advance. n Notes on Hardware l Appearance and Accessories Check the following when you receive the product: • Appearance • Standard accessories Contact our sales representative or your local distributor if the product’s coating has come off or any accessories are missing. l Model and Suffix Codes The name plate on the product states the model and suffix codes. Compare them with those in the general specification to make sure the product is the correct one. If you have any questions, contact our sales office or your local distributor. n Cautions for Safely Using the Device l EMC Conformity Standards EN61326-1 Class A, Table 2 (for use in industrial locations), EN61000-6-2, EN55011 Class A, Group 1 * This instrument is a Class A product, and is designed for use in industrial environments. Please use this instrument in industrial environments only. IM 01W02D02-01EN v <Read Me First> Copyright and Trademark Notices n All Rights Reserved The copyrights of the media and this manual are reserved. No part of this manual may be transferred, sold, distributed (including delivery via a commercial PC network or the like), or registered or recorded on video tape or other media. n Trademark Acknowledgments • CENTUM, PRM, FieldMate, STARDOM and VigilantPlant are either trademarks or registered trademarks of Yokogawa. • Ethernet is a registered trademark of XEROX Corporation. • All other company and product names mentioned in this User’s Manual are trademarks or registered trademarks of their respective companies. • We do not use TM and ® to indicate trademarks or registered trademarks in this User’s Manual. IM 01W02D02-01EN vi <Read Me First> Information of User’s Manual Revision Material Name : YFGW610 Field Wireless Media Converter Material Number : IM 01W02D02-01EN Edition 1st Edition Date September 2012 Page Revised Item New Issue IM 01W02D02-01EN Part-A. <A1. Introduction> A1-1 FUNCTIONS OF YFGW610 A1. Introduction Read the User’s Manual (IM 01W02D01-01EN) of YFGW410 Field Wireless Management Station (hereafter simply referred to as YFGW410) before this manual. YFGW610 Field Wireless Media Converter (hereafter simply referred to as YFGW610) converts the signals between 100BASE-TX (metal network cable) and 100BASE-FX (optical network cable) and is used when the wiring between the Field Wireless Management Station and the Field Wireless Access Point is placed outdoors or covers a long distance. YFGW610, installed near of YFGW410, converts the optical network connection of YFGW510 Field Wireless Access Point (hereafter simply referred to as YFGW510) to the metal network connection. For detail of YFGW510 specifications, refer to GS01W02E01-01EN. IM 01W02D02-01EN <A2. System Configuration> A2-1 A2. System Configuration Host system Field Wireless Management Console Field Wireless Management Station (YFGW410) Metal network Field Wireless Media Converter (YFGW610) Field Wireless Backbone Network Optical network Field wireless network (ISA100.11a) Field Wireless Access Point (YFGW510) Field wireless device FA0201 Figure A2-1 Example of system configuration YFGW610 is installed near YFGW410 in the field wireless backbone, and converts the optical network connection of YFGW510 to the metal network connection for YFGW410. IM 01W02D02-01EN A3-1 <A3. Function Configuration> A3. Function Configuration The block diagram below describes the communication interface functions of YFGW610. Communication function Connect to YFGW510 Connect to YFGW410 Optical network interface 1 Field wireless backbone interface 1 Optical network interface 2 Field wireless backbone interface 2 Optical network interface 3 Field wireless backbone interface 3 Optical network interface 4 Field wireless backbone interface 4 FA0301 Figure A3-1 YFGW610 communication interface functions Conversion is carried out between interfaces with the same number. When install or replace, YFGW610 is unnecessary to configure itself. IM 01W02D02-01EN A4-1 <A4. Names of Parts> A4. Names of Parts A4.1 Front view Status indicator LED Optical network interface Up RX TX Power supply connector Optical network interface 1 Field wireless backbone interface Optical network interface 2 Field wireless backbone interface 1 Optical network interface 3 Field wireless backbone interface 2 Link/ACT Speed Field wireless backbone interface 3 Optical network interface 4 Field wireless backbone interface 4 FA0401 Figure A4-1 Front view There are 13 LEDs on the front face: one status indicator LED and four status indicator LEDs for the optical network interface are on the top, and four pairs of status indicator LEDs (for Link/ACT and Speed status) are incorporated in the field wireless backbone interface. A4.2 Side view Power supply connector DIN rail mounting bracket Name plate FA0402 Figure A4-2 Side view There are no terminals or parts to operate on either side except for the air inlets for cooling. Place the product at a sufficient distance from other devices so that these inlets are not blocked. For details, see B3 Installation. IM 01W02D02-01EN <A4. Names of Parts> A4-2 A4.3 Rear view DIN rail mounting bracket FA0403 Figure A4-3 Rear view On the back of YFGW610, there is a mounting bracket to mount to a DIN rail. YFGW610 supports DIN rail mounting alone. IM 01W02D02-01EN A4.4 <A4. Names of Parts> A4-3 Top view Ground terminal Power supply connector FA0404 Figure A4-4 Top view There are power supply connectors and a ground terminal on the top of YFGW610. The spring terminals, which are the main components of the power supply connector to connect external wiring, are fixed by fastening the two screws of the terminals in the sockets of the housing. IM 01W02D02-01EN A5-1 <A5. LED Indications> A5. LED Indications The LED indications are as follows. Table A5-1 LED indications RDY LED LINK Link/ACT Speed (RJ-45 connector) 1 2 3 4 1 2 3 4 Function Indicates the status of YFGW610 Indicates the status of optical network interface 1 Indicates the status of optical network interface 2 Indicates the status of optical network interface 3 Indicates the status of optical network interface 4 Indicates the status of field wireless backbone interface 1 Indicates the status of field wireless backbone interface 2 Indicates the status of field wireless backbone interface 3 Indicates the status of field wireless backbone interface 4 The meanings of respective indications of the status indicator LED are as follows. Table A5-2 Status indicator LED Orange Green Red Indication Status Booting Normal operation Abnormal operation Description Abnormal hardware operation The meanings of respective indications of the status indicator LED for the optical network interface are as follows. Table A5-3 Status indicator LED for optical network interface Green OFF Indication Status Enable optical communication No signals detected The meanings of respective indications of the status indicator LED for the field wireless backbone interface are as follows. Table A5-4 Status indicator LED for field wireless backbone network interface Link/ACT Speed Indication Green Green blink OFF Green OFF Status Link up Communicating Link down 100BASE-TX communicating 10BASE-T communicating IM 01W02D02-01EN <A6. Operational Element> A6-1 A6. Operational Element YFGW610 does not have any switches or buttons that can be mechanically operated from the outside of the housing. IM 01W02D02-01EN <A7. Checking the Product> A7-1 A7. Checking the Product When you receive YFGW610, please check that the product specifications match your order, all items are included, and there is no damage, stains, or other problems. Power supply connectors with Push-in spring-cage connection IM01W02D02-01EN (user's manual) YFGW610 FA0701 Figure A7-1 Checking the product IM 01W02D02-01EN B1-1 <B1. System Installation Specifications> Part-B. Installation This section describes the installation of YFGW610. Use YFGW610 in the following procedure. 1. Installation of YFGW610 2. Wiring of the power supply, ground and network cable B1. System Installation Specifications The system must be installed in an appropriate environment to ensure stable system operation. The following defines the detailed specifications of YFGW610 installation environment. Table B1-1 System installation specifications Item Ambient temperature Ambient humidity Temperature gradient Protection class Operating Transport /storage Operating Transport /storage Operating Transport /storage Vibration resistance Impact resistance Altitude Noise level Electric field Electrostatic discharge Grounding Cooling Mounting Power supply Power consumption Voltage range Rated voltage Allowable ripple Specifications -40 to 65°C (at altitude below 2000 meters) -40 to 55°C (at altitude between 2000 and 3000 meters) -40 to 85°C 5 to 95% relative (without condensing) 5 to 95% relative (without condensing) Within +/-10°C per hour Within +/-20°C per hour IP20 0.15 mm P-P (5 to 58 Hz) 1 G (58 to 150 Hz) 15 G, 11 msec (no conductive, and 3-direction half sine waves) Up to 3000 meters (due to restricted ambient temperature) 3 V/m or less (80 MHz to 1 GHz) 4 kV or less (contact discharge), 8 kV or less (aerial discharge) Class D grounding (100 ohms or less) Natural cooling Mounted on DIN rails 10.8 to 26.4 V DC 24 V DC Less than 1% p-p 10 W Applicable standards JEIDA 29 Class B IEC529 IEC68-2-6 IEC68-2-27 IM 01W02D02-01EN <B1. System Installation Specifications> B1-2 IMPORTANT • The temperature specification during operation indicates the criterion of the temperature at the air intake of the bottom portion of modules. Do not block ventilation holes, as it may hinder the air-cooling capabilities of the unit. When installing YFGW610 in a cabinet, note that the temperature specification is not in respect to the ambient temperature of the cabinet. Provide cooling fans in the cabinet if needed. • Avoid exposing YFGW610 to direct sunlight. • Prevent condensation under any circumstance. • The dust level of the room should not exceed 0.3 mg/m3 . Under any circumstance, avoid iron flakes, carbon particles, or any other type of dust that are conductive. • Avoid existence of corrosive gases such as hydrogen sulfide, sulfurous acid gas, chlorine, and ammonia. n YFGW610 Vibration Criteria Ensure that if the frequency of vibration at the installation location is 58 Hz or less, the total amplitude is maintained less than 0.15 mm. If the vibration frequency is greater than 58 Hz, find alocation that will meet the following condition: Acceleration (m/s2) = 2π2 x A x F2 x 10-3 < 9.8 (=1G) where A : Total amplitude (mm) F : Frequency (Hz) The range of allowable total amplitudes is shown below. Total amplitude mm 0.2 0.15 0.1 Allowable range 0.05 0 10 30 50 70 90 110 130 150Hz Vibration frequency n Radio Device Noise to YFGW610 The following shows general requirements when using a radio device such as transceivers; however, as a general rule, close the cabinet door when using a radio device: • Transceivers that have 3 W of output power or less should be at least 1 m away. Transceivers that have 10 W of output power or less should be at least 2 m away. • Radio devices that have 1 W of output power or less including cellular phones and cordless phones should be at least 1 m away. • The field wireless device radio output is about 10 mW. There is no impact for YFGW610, but keep to 1m than the same way as the 1 W output radio device. IM 01W02D02-01EN <B2. Power Supply and Grounding> B2-1 B2. Power Supply and Grounding A reliable power supply is required to ensure stable YFGW610 operations. Mount YFGW610 on the DIN rails being secured to the general-purpose instrumentation board or others. No other type of mounting is allowed. B2.1 Power Supply Connect the power source to the power supply connector on the top of YFGW610. SEE ALSO For power supply and current consumption of YFGW610, also see “GS 01W02D02-01EN”. n Inrush current When the power is turned on, inrush current may run into the device. As shown in the table below, this current is, even though short-lived, significantly larger (10 times or more) than the steady state current. Make sure that the power supply and protector can endure the inrush current. Item Inrush current SEE ALSO Specifications 30 A, 2 msec or less Remarks At 26.4 V DC For wiring of the power supply, see “B4.2 Power Supply Cable Connection.” WARNING • If the power fails when downloading the system configuration data from YFGW410 or YFGW510 to field wireless devices by using the Field Wireless Management Console, the configuration data may be destroyed. (However, the system configuration data will not be destroyed even if the power fails during normal system operation.) • To avoid such a problem, supply the power source from the permanent power supply unit. IMPORTANT • YFGW610 does not have a power switch. Provide a breaker or switch for the external power line to turn on/off the device. • The overcurrent protection circuit of the power supply, it is recommended to use the automatic-recover type with the reverse L-shaped. IM 01W02D02-01EN <B2. Power Supply and Grounding> B2-2 B2.2 Grounding Appropriate grounding is necessary for the stable operation of YFGW610. Class D grounding (the third class grounding) with the ground resistance of 100 ohms or less is necessary. To connect the ground cable to YFGW610 directly, use the frame ground (FG) terminal on the top side of the housing. SEE ALSO For grounding of YFGW610, see “B4.3 Grounding.” IM 01W02D02-01EN <B3. Mounting> B3-1 B3. Mounting Mount YFGW610 on the DIN rails being secured to the general-purpose instrumentation board or others. No other type of mounting is allowed. B3.1 Mounting Direction YFGW610 is cooled down by natural air flow. Install it correctly. Up Air flow Air flow Down FB0301 Figure B3-1 Mounting direction IMPORTANT • Before installing or removing YFGW610, be sure to turn its power supply off. • Install the device to allow smooth air flow through the ventilation holes. • To allow smooth air flow for natural cooling, secure at least 150 mm between the device’s top panel and other devices. Be also sure to leave at least 100 mm between the device’s bottom and other devices. • To allow smooth routing of power supply and network cables and to avoid heat from adjacent devices, leave at least 50 mm between the device’s each side and other devices. • Keep YFGW610 away from direct sunlight. IM 01W02D02-01EN <B3. Mounting> B3-2 B3.2 Mounting of DIN Rails First, install the DIN rails on the general-purpose instrumentation board or the cabinet wall. Secure the DIN rails by tightening the appropriate number of screws. Be careful that the rails do not get bent or deformed due to the weight of YFGW610 or cable tension. To securely ground YFGW610, insert an insulation bushing between the DIN rails and mounting panel and tighten the screws. Insulate the DIN rails from the metal surface of the mounting panel. Insulated bushing DIN rail Insulated bushing IM 01W02D02-01EN <B3. Mounting> B3-3 B3.3 Installation of YFGW610 1. Loosen the screws at both sides of the DIN rail mounting bracket (located on the rear panel), by rotating these screws in the reverse direction from the “Lock” position. The screws do not drop even when fully loosened. 2. As shown in Figure B3-2, hook the top edge of the DIN rail mounting bracket onto the top of the DIN rail, and return YFGW610 back to the horizontal position. Then, hook the bottom edge of the mounting bracket onto the bottom of the DIN rail. 3. Tighten the screws at both ends of the DIN rail mounting bracket, by rotating them toward the “Lock” position. Tighten screws securely to ensure there is no clearance between YFGW610 and the DIN rails. 4. To remove YFGW610, follow the procedure described above in reverse. Loosen the screws by three turns. FB0302 Figure B3-2 Mounting of YFGW610 on DIN rail FB0303 Figure B3-3 Mounting example of YFGW610 on DIN rail IM 01W02D02-01EN B4-1 <B4. Power, ground, and signal cable connection> B4. Power, ground, and network cable connection This section explains the power, ground, and network cable connection to YFGW610. B4.1 Connection Terminals and Communication Interface Connect cables as follows; Power supply cable: to the spring terminals of YFGW610 Ground cable (with a ring-type crimp terminal): to the ground terminal by using the screw Metal network cable conforming to the 100BASE-TX standard, terminated with an RJ-45 connector: to the field wireless backbone interface Optical network cable conforming to the 100BASE-FX standard, terminated with an SC connector: to the optical network interface Power supply connector Optical network interface Field wireless backbone interface FB0401 Figure B4-1 Connection terminals and communication interfaces IM 01W02D02-01EN <B4. Power, ground, and signal cable connection> B4-2 B4.2 Power Supply Cable Connection YFGW610 has a 4-pin power connector (with a spring terminal; Phoenix Contact’s FKC 2.5/4STF) and the socket on the device itself. The spring terminal is secured by two screws at both ends. You can separate the terminal from the socket by loosening these screws. If you have enough space for cabling at the top and side panels of YFGW610, leave the spring terminals on YFGW610 (as shown in Figure B4-2) and connect the positive and negative power lines as indicated. If there is insufficient space, separate the spring terminals from the socket, route the cables, and put it back to the housing. IMPORTANT • Be careful to connect the power supply cable with correct polarity • YFGW610 does not have a power switch, so add a power switch or a circuit breaker to the external power line. 1 3 2 4 FB0402 Figure B4-2 Power supply cable connection procedure IM 01W02D02-01EN <B4. Power, ground, and signal cable connection> B4-3 To disconnect the power supply cable from the spring terminal, push down the orange areas around the cable inlet and pull out the power supply cable from the socket. FB0403 Figure B4-3 Disconnecting the power supply cable l Applicable cables Insulated cables for industrial equipment such as; • 600 V polyvinyl chloride insulated wires (IV); JIS C3307 • Polyvinyl chloride insulated wires for electrical apparatus (KIV); JIS C3316 • 600 V grade heat-resistant polyvinyl chloride insulated wires (HIV); JIS C3317 • Heatproof vinyl insulated wires VW-1 (UL1015/UL1007) • Control cables (vinyl insulated vinyl sheath cable) (CVV); JIS C3401 l Wire Size • Without sleeve: 0.2 mm2 to 2.5 mm2 (AWG24 to 14) • With sleeve: 0.2 mm2 to 2.5 mm2 (AWG24 to 14) IM 01W02D02-01EN B4-4 <B4. Power, ground, and signal cable connection> l Wiring to spring terminals: 1 (without sleeve) • When using a solid conductor, strip the insulated cover and connect it. Strip the solid conductor by 10 mm. • When using a stranded conductor, strip the insulated cover and twist and connect it. Strip the stranded conductor for 10 mm. Never solder the stranded conductor when connecting cables. Be careful not to cause the loosely stranded conductor to come in contact with adjacent terminals or others. Insert the cable leads into the terminal block securely. Cable Core wire Length of exposed wire l Wiring to spring terminals: 2 (with sleeve) The sleeve can prevent cable leads from untwist when you connect the cable. Select a sleeve to match the cable size. If the length of cable leads does not match the length of sleeve (I2), strip the cable to the correct length. Strip the cable for a length so that the core wire slightly extends from the metal tube of the sleeve. If this causes the length of the metal tube of the sleeve to be slightly shorter than the stripping length, this is no problem. The wiring cables and applicable sleeves are listed in the table below. Use the same manufacturer for sleeves and tools. Example of tool: Phoenix Contact’s CRIMPFOX 6 For details on sleeves and crimp tools, contact to Phoenix Contact Inc. l1 d1 s2 s1 d1 l2 IM 01W02D02-01EN B4-5 <B4. Power, ground, and signal cable connection> Table B4-1 List of power supply cables Section area (mm2) 0.25 Cable AWG 24 0.34 22 0.5 20 0.75 20 1.0 18 1.5 16 2.5 14 Strip length (mm) 10 10 10 10 10 10 10 10 10 10 10 10 10 10 10 10 10 Dimensions (mm) I1 I2 d1 S1 d2 S2 10.5 10.5 12.5 12.0 14.0 16.0 12.0 14.0 16.0 12.0 14.0 16.0 12.0 14.0 18.0 14.0 16.0 6.0 6.0 8.0 6.0 8.0 10.0 6.0 8.0 10.0 6.0 8.0 10.0 6.0 8.0 10.0 8.0 10.0 0.8 0.8 0.8 1.1 1.1 1.1 1.3 1.3 1.3 1.5 1.5 1.5 1.8 1.8 1.8 2.3 2.3 0.15 0.15 0.15 0.15 0.15 0.15 0.15 0.15 0.15 0.15 0.15 0.15 0.15 0.15 0.15 0.15 0.15 2.0 2.0 2.0 2.5 2.5 2.5 2.8 2.8 2.8 3.0 3.0 3.0 3.4 3.4 3.4 4.2 4.2 0.25 0.25 0.25 0.25 0.25 0.25 0.25 0.25 0.25 0.3 0.3 0.3 0.3 0.3 0.3 0.3 0.3 Phoenix Contact's type AI 0.25-6 BU AI 0.34-6 TQ AI 0.34-8 TQ AI 0.5-6 WH AI 0.5-8 WH AI 0.5-10 WH AI 0.75-6 GY AI 0.75-8 GY AI 0.75-10 GY AI 1-6 RD AI 1-8 RD AI 1-10 RD AI 1.5-6 BK AI 1.5-8 BK AI 1.5-10 BK AI 2.5-8 BU AI 2.5-10 BU IMPORTANT • Use the same manufacturer for sleeves and tools. • Use sleeve tools that match the wire thickness. • Insert the wire to be connected completely into the pressure clamp terminal and attach it securely. • Secure the cable to cable clamps, etc. so that the weight of the cable applied to the terminal is minimized. IM 01W02D02-01EN <B4. Power, ground, and signal cable connection> B4-6 B4.3 Grounding Secure grounding is required to ensure stable YFGW610 operations. YFGW610 has two ground terminals: the frame ground (FG) terminal secured by the M4 screw at the side of the power connector, and the ground terminal at the power supply spring terminal. Connect the ground leads from the frame ground (FG) terminal to the ground. Connect the cable shield or others to the power supply spring terminal.The internal wiring of YFGW610 housing is connected as shown in the following fi gure. Ground terminal YFGW610 Housing + NC Power supply connector FB0404 Figure B4-4 Internal connection of the ground terminal To ensure stable grounding, use the insulation bushings or others and functionally insulate the entire board or DIN rails with the device from the metal surface of external cabinet, rack and others. Then, connect the leads from TFGW610 to the ground. Directly connect the leads from the FG terminal screw to the Class D grounding with the 100 ohms or less grounding resistance. Do not share the ground leads with other devices. IM 01W02D02-01EN <B4. Power, ground, and signal cable connection> B4-7 FB0405 Figure B4-5 Grounding terminal connection procedure IM 01W02D02-01EN <B4. Power, ground, and signal cable connection> B4-8 l Applicable cables Insulated wires for industrial equipment Examples: • 600 V polyvinyl chloride insulated wires (IV): JIS C3307 • Polyvinyl chloride insulated wires for electrical apparatus (KIV): JIS C3316 • 600 V grade heat-resistant polyvinyl chloride insulated wires (HIV): JIS C3317 • Heatproof vinyl insulated wires VW-1 (UL1015/UL1007) l Wire Size Core: 2 mm2 to 2.6 mm2 (AWG14 to 13) l Termination Use a ring tongue terminal for M4 terminals: with an insulation sleeve IM 01W02D02-01EN <B4. Power, ground, and signal cable connection> B4-9 B4.4 Network Cable Connection n Field wireless backbone (YFGW410 side) wiring Connect the 100BASE-TX conforming to metal network cable, terminated with an RJ-45 connector, to the field wireless backbone interface (YFGW410 side) on the right side of the front panel of YFGW610. FB0406 Figure B4-6 Metal network wiring n Optical network (YFGW510 side) wiring To the optical network interface (YFGW510 side) on the left side of the front face of YFGW610, connect an optical network cable conforming to the 100BASE-FX standard, terminated with a SC connector. FB0407 Figure B4-7 Optical network wiring IM 01W02D02-01EN <B5. Explosion-Proof Wiring> B5-1 B5. Explosion-Proof Wiring - Application pending (Left blank intentionally) IM 01W02D02-01EN <B6. Settings> B6-1 B6. Settings There are no setting elements in YFGW610. After properly wiring the power supply, ground and network cable, turn on YFGW610. If the RDY display does not turn green, see C. Maintenance. IM 01W02D02-01EN Part-C. C1-1 <C1. Routine Maintenance> Maintenance Details of routine maintenance, addition, or replacement of YFGW610 are described in “E. Maintenance” of the User’s Manual of YFGW410 (IM 01W02D01-01EN); read that document first. C1. Routine Maintenance Check whether there are any alarms or abnormal information in any host sytem that monitors the status of field wireless devices, and if any information on device errors is displayed on the Field Wireless Management Console. Although the device information of YFGW610 is not displayed on the console, communication errors in other devices may be due to malfunction of YFGW610. For checking procedures or troubleshooting, see “E. Maintenance” of the User’s Manual of YFGW410 (IM 01W02D01-01EN). For YFGW610 maintenance, check the device installation status as well as the operation status of field wireless system components. Check the installation status of YFGW610, power supply cable and network cable connection status, and stain status. If YFGW610 becomes dirty or dusty, wipe with a soft cloth moistened with water or mild soap. IM 01W02D02-01EN <C2. Adding and replacing devices> C2-1 C2. Adding and replacing devices For details on how to add or replace devices, see “E. Maintenance” of the User’s Manual of YFGW410 (IM 01W02D01-01EN). IM 01W02D02-01EN <C3. Maintenance in Hazardous Area> C3-1 C3. Maintenance in Hazardous Area To carry out maintenance, check the power supply, ground and network cable for looseness. Explosion-proof instruments must retain their intended properties before and after maintenance. Otherwise, hazardous conditions can arise. Be sure to consult with Yokogawa for any repair and alteration. For other field wireless network components, see the User’s Manual of the relevant device. IM 01W02D02-01EN C4-1 <C4. Parts with Defined Life Spans> C4. Parts with Defined Life Spans YFGW610 does not include any parts with defined life spans, which need to be replaced. Read the following descriptions of parts with defined life spans. IMPORTANT Notes regarding parts with defined life spans • The term “Parts with defined life spans” refers to parts that are expected to wear out or break down within 10 years from the initial use under normal use and storage. Therefore, parts with expected life spans of 10 or more years are excluded here. • The recommended replacement cycle is the cycle indicated for preventive maintenance. It provides no guarantee against the accidental failures. • The recommended replacement cycle is merely a guideline. The actual replacement cycle depends on the usage status (ambient temperature, ambient atmosphere). • The recommended replacement cycle is subject to change according to the actual results in the field and other factors. IM 01W02D02-01EN D1-1 <D1. Troubleshooting> Part-D. Troubleshooting This section describes the troubleshooting procedures to follow when a malfunction is identified in YFGW610 by the investigation described in “F1. Field Wireless System” in YFGW410 User’s Manual (IM 01W02D01-01EN). On the front face of YFGW610, there are five status indicator LEDs (RDY, LINK-1, LINK-2, LINK3, and LINK-4), and four pairs of LEDs (Link/ACT and Speed) in RJ-45 connectors. Displaying the status of YFGW610 The relation between the status of the RDY LED and the status of YFGW610 is as follows. Table D-1 Relation between the status of RDY LED and the status of YFGW610 LED RDY Power off OFF Starting up Orange Normal Green Abnormal Red If this LED is lit in red or off while energizing, YFGW610 may be broken. Replace the product. Communication status Other LEDs indicate the status of each communication interface. If any LED indicates abnormal status, check the wiring and the housing. If there is any problem in YFGW610, replace it. IM 01W02D02-01EN E1-1 <E1. Standard Specification> Part-E. Specifications E1. Standard Specification n Communication interface Standard Transmission Speed Connector Field Wireless Backbone Specifications 100BASE-TX *1 100Mbps RJ-45 Cable Type Category 5 Center Wavelength Maximum Length Number of Ports Port Name Protection Port Connection – 100m 4 ports B1, B2, B3, B4 Surge B1-1, B2-2, B3-3, B4-4 (fixed) ITEM Communication Interface Optical Network Specifications 100BASE-FX *2 100Mbps SC connector [1pole x 2] Multi-Mode Fiber 50/125 or 62.5/125μm (2 cores) 1300nm 2000m 4 ports 1, 2, 3, 4 – *1: Connect to YFGW410 *2:Connect to YFGW510. In outdoor wiring, use optical fiber cables with a nonmetallic tension member. n Installation Environment Temperature Range: Operating: -40 to +65°C (altitude : up to 2000m) -40 to +55°C (altitude : more than 2000m, up to 3000m) Storage: -40 to +85°C Humidity Range: Operating: 5 to 95 %RH (non-condensation) Storage: 5 to 95 %RH (non-condensation) Temperature gradient: Operating: ±10°C/h or less Storage: ±20°C/h or less Power Supply: Voltage Range : 10.8~26.4 V DC Rated Power Supply : 24 V DC Momentary Power Failure : Instant Disconnection DC Power Supply Ripple Ratio : 1%p-p or less Power Consumption: Max. 10 W Grounding: Class-D grounding (no sharing ground with others) Cooling: Natural Air Cooling n Regulatory Compliance Statements EMC Conformity Standards: EN61326-1 Class A, Table 2 (for industrial use), EN55011 Class A group1, EN61000-6-2 Safety Requirements: EN61010-1, CSA C22.2 No. 61010-1 Indoor use only Explosion-Proof Types: FM, ATEX, CSA, IECEx (approvals under pending) Degrees of Protection: n Physical Specifications Vibration resistance: Housing Material: IP20 0.15 mm P-P (5~58 Hz), 1 G (58~150 Hz) Shock resistance: 15 G 11 ms Noise resistance: Electric field : 3 V/m or less (80MHz~1GHz) Electrostatic discharges: 4 kV or less (contact discharge), 8 kV or less (aerial discharge) Aluminum alloy plate with polyester, mint-green paint (Munsell 5.6BG 3.3/2.9 or its equivalent) External Dimension: 150 x 60 x 140 mm (not include projection) Weight: Approx. 1.0 kg Mounting: DIN RAIL Mounting IM 01W02D02-01EN E2-1 <E2. Model and Suffix Codes> E2. Model and Suffix Codes n Suffix code Model YFGW610 General Specifications Option Codes Suffix Code Descriptions ������������������������������������������������������������������������ Field Wireless Media Converter Output signal -B············································· 100 BASE-FX (Optical network) Manual 0······································· Japanese Languange 1······································· English Mounting Bracket D······························· DIN RAIL Mounting — A······················· Always A — A··············· Always A / Optional Specifications n Option code Item Factory Mutual (FM) ATEX Canadian Standards Association (CSA) IECEx *1: *2: Specification Nonincendive Approval *1 Type n Declaration *2 Nonincendive Approval *1 Type n Approval *2 Code – – – – To be compliant with these standards, the YFGW610 hardware needs to be installed in a lockable metal cabinet. To be compliant with these standards, the YFGW610 hardware needs to be installed in a lockable metal cabinet of IP54 or higher protection rating. IM 01W02D02-01EN <E3. External Dimensions> E3-1 E3. External Dimensions 70 Unit; mm 70 DIN rail mounting center 60 80 150 24 F04.ai IM 01W02D02-01EN