1
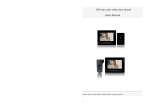
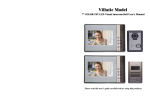
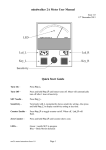
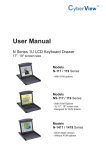
R TFT LCD VIDEO DOOR PHONE
8/9
8/9”” COLO
COLOR
INSTRUCTIONS MANUAL
-----------------------------------------------------------------------------------------------Before attempting to operate this product please read this manual carefully and
completely.
TABLE OF CONTENTS
Product introduction……………………………….. (一)
Parts introduction……………………………….. ….(一)
Operation……………………………………………..(二)
Installation……………………………………………(三)
Technical Specifications……………………………...(四)
Work environment…………………………………....(五)
Maintenance………………………………………….(六)
Cautions………………………………………………(七)
Accessories……………………………………………(八)
Technical support……………………………………...(九)
8inch Video operation………………………………… (十)
Warranty………………………………………………(十一)
Note: This manual is used for introducing operation, the real item maybe
different due to version upgrades and production of different batches. If any
difference, please take the machine as the standard.
Product introduce
1.
2.
8/9inch color monitor with ultra-slim design and full-touch screen,
nice and luxurious
Weather proof, oxidation proof, durable alloy outdoor door station,
3.
4.
supporting embedded and hanging installation.
High sensitive touch technology(with voice hint)
No radiation, low consumption and high resolution
5.
6.
7.
Monitor, intercom, unlock, hand-free and multi-melody.
Able to connect with 2 electronic lock.
Volume, brightness and contrast adjustable..
8.
9.
10.
Easy to install.
Max: 1camera+6 monitors; 2 cameras+6 monitors.
Photo model, video recording available.
11.
12.
Support 4CH video in, 1CH video out.
4CH can switch by manually/automatically. Video out can connect
to the PC with the video capture card.
13.
The indoor unit can connect either of our outdoor station.
Specifications
Outdoor Station
Indoor Unit
Input:
Power
power
AC
100-240V
50/60Hz
output:DC 15V/1.2A
Camera
CMOS 30M pixels
LCD
7”TFT 960×480
LED
6pcs
Valid area
154.08(H) ×86.58(V)
Consumption
Standby:0.5W;work:8W
Consumption
Standby:0.1W
work:12W
Valid distance
80m (4*0.5MM2)
Angle
92 degree
Work
temperature
Size
-10℃ -
;
Calling
duration time
Monitor time
+50℃
125×52×30MM
Work
temperature
Size
120s±10%
60s±10%
-10℃ -
+50℃
292×205×32MM
Description of indoor & outdoor unit
1. Indoor unit
Front:
Back:
Side
Side:
2. Outdoor Station
Front:
Back:
Connection
Note: disconnect the socket 1,
2 if you connect to the 4P
Outdoor station, others are
the same.
Operation instruction:
Connect cable, E-lock and power supply as this menu,
Then press monitor button and open outdoor monitor screen, enter function menu to adjust the
brightness/contrast for best effect.
Visitors Calls
The visitor presses the CALL button on the outdoor door station, the internal monitor will ring and the
visitor will be seen, the host can talk to the visitor by pressing the TALK button once and the
conversation can last 120s. The host can press the UNLOCK button to open the door, and then press the
MONITOR/TALK button to end current conversation and enter standby mode automatically.
Viewing the outside (60 seconds duration)
Pressing MOINTOR from the installed monitor will switch on the outdoor door station 1 and view of the
outside will be seen on the screen, keep pressing the MONITOR for 1s, and then shift for outdoor station
2. Pressing MONITOR again will cancel the outdoor monitoring.
Choosing melody
Press MELODY button under monitor state to select prefer melody.
Indoor units intercom
Press the INTERCOM in the standby state and other indoor monitors will ring, others press the TALK to
talk, and the talk can last 120s. Press the MONITOR/INTERCOM to cancel.
Monitor
Press the MONITOR SWITCH to begin the monitor; press the SHIFT to change the Channel from C1 to C4.
Keep pressing SHIFT for 1s and the 4channels will shift automatically every 5s, you can press the SHIFT
again to cancel the autumnally state. Press MONITOR SWITCH to cancel the monitor state.
Note: in the monitor state, the outdoor camera can call the monitor also, and after the talking it will back to
the monitor state again.
The video out can connect with the video capture card/DVR for recording or photo.
8inch video recording model operation (optional):
It will begin the 5s recording automatically when the outdoor station calling,
others functions keep the same with the common models.
Side buttons of the indoor unit:
Do as the following instruction after you enter the monitor state
PHOTO/DEL button:
Under video display Normal Mode, press the button to take picture; when enter
menu, can select menu when press this pushbutton; it can delete picture when
you browse picture, or playback video recording, press this pushbutton.
CHECK/QUIT button:
Under enter into menu, playback video recording, photograph mode, it will
force back to Normal Mode when you press this pushbutton.
-/REC button:
Under video display Normal Mode, it start to record a video into SD card when
you press this pushbutton, recording time’s length depend on setup, and display
time on the left corner. Under the video recording playback mode, it will
choose the newer slip than current clip , it will display the earliest clip if it
reach to the newest clip.
MENU/PLAY button:
Under video display Normal Mode, press this pushbutton first time, it will
display OSD menu on the screen. Press this pushbutton again, follow in turn
choose option on OSD, relevant OSD option will change to red. When you
adjust option, use +/CHECK and -/REC separate for up 、 down operation. It
will auto back to Normal Mode when any operation over 15 seconds.
OSD menu description:
1. DATA Setting Year, Month, Day. It memory automatically while power off.
2. TIME Setting Hours, Minutes. It memory automatically while power off.
3. REC TIME(0S――120S):setting recording time for each video recording.
4. BRIGHNESS Image brightness adjustment.
5. CONTRASE Image contrast adjustment.
6. STAUACTION The color of image adjustment.
7. EXIT Exit and store the setting .
Under video recording playback mode. It will play the current clip when user
press the button .
+/CHECK button:
Under video display Normal Mode, it will enter into playback video recording
mode when press this button.
Under video recording playback mode, it will choose earliest clip than current
clip when press this pushbutton. it will display the newest clip if it reach to the
earliest clip.
Under display OSD menu, it will make “add” operation for relevant option
when press this button.
Installation
Indoor Unit Installation:
Outdoor Station Installation:
Cautions
1. Do not mount the indoor unit near any location
of high temperature
televisions.
or
humidity
including
2. Do not allow the unit to be in contact with water
including touching with wet hands.
3.
When cleaning do not use aggressive
chemicals or corrosive liquids use only a soft cloth.
4. Avoid sudden shocks to the units.
5. Avoid positioning the camera in strong sunlight;
otherwise the image will be faint.
Package
□indoor unit
□outdoor station
□adaptor (15V/1.2A)
□5m cable
□manual
□mount plate
□small parts
□gift box
□rain proof