1
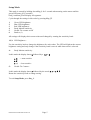
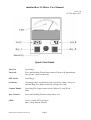
mindwalker 2A Meter User Manual
Issue 1.0
15 December 2013
th
Quick Start Guide
Turn On –
Press Key_L
Turn Off –
Press and hold Key_R until meter turns off. Meter will automatically
turn off after 1 hour of inactivity.
SET Needle –
Press Key_L.
Sensitivity –
Turn knob, Lcd_L momentarily shows sensitivity setting. Also press
and hold Key_L to display sensitivity setting at any time.
Counter Enable –
Press Key_R to toggle counter on/off. When off, Lcd_R will
flash.
Zero Counter –
Press and hold Key_R until counter shows zero.
LEDs –
Green = needle SET in progress
Blue = Body Motion detected
mw2A meter instructions Issue 1.0
Page 1
Detailed Operation
Turn on sequence
Press Key_L. The green LED illuminates and the firmware version is shown (F on left, version
number on right). After 2 seconds the green LED will turn off and the needle will SET. The Lcd_L
will briefly show sensitivity setting and then TA position. The Lcd_R shows the TA counter. The
flashing display indicates that the counter has not been enabled.
Turn on options:
Holding down Key_L more than 2 seconds at turn on (until the green LED turns off) will cause the
meter to enter Setup Mode (see details in later section).
If Key_R is held down while turning on the meter, automatic needle SET will be disabled and the
needle must always be SET manually.
Turn off
Hold down Key_R for 5 seconds. The red LED will illuminate briefly and the meter turns off. The
meter will also turn itself off after 1 hour of inactivity.
Needle SET
The needle can be manually SET at any time by pressing Key_L.
In automatic SET mode, the needle will SET whenever it goes off the dial. There is a deliberate
delay before this happens on the right hand side of the dial.
A needle SET is accompanied by the green LED (or blue LED, see TA Counter section).
Automatic needle SET can be disabled by holding down Key_R when turning on the meter.
Sensitivity
The rotary knob adjusts the sensitivity from 1 to 40.
Turning the knob will cause Lcd_L to show the sensitivity setting, which can also be shown at any
time by holding down Key_L. It will revert back to displaying TA when the button is released.
mw2A meter instructions Issue 1.0
Page 2
TA Counter
A flashing display indicates that the counter is disabled. The counter enable/disable can be toggled
by pressing Key_R.
To zero the counter, hold down Key_R for 2 seconds.
Counting is inhibited by the Body Motion Detector. If Body Motion occurs causing the needle to
go off the right hand side of the dial, the counter will be disabled during the next needle SET. A
needle SET is usually accompanied by the green LED, however a needle SET with counter
inhibited is accompanied instead by the blue LED.
Needle TA Counter
The counter can optionally work continuously, not just when a needle SET occurs. It will however
only accumulate counts when the TA changes by 0.1 divisions or more, so small changes will be
disregarded.
See instructions for Setup Mode on how to enable this feature.
LED
The LED can display red, green or blue. See relevant sections in this document for the meaning of
these LED colours.
Note that the brightness of each colour can be adjusted, see Setup Mode.
Body Motion Detector
Unnaturally sharp changes in the needle motion are detected as body motion. This is indicated by
the blue LED. This feature is useful on automatic SET meters since the counter is then able to
reject body motion, see TA Counter section.
Note that a good gentle can squeeze will not trigger the detector, and it can be used as a training
excercise for this.
For those who find the blue LED irritating (such as during training drills with coach simulated
reads) it can be turned off in Setup Mode.
Three levels of detection can be chosen, see Setup Mode. It is recommended to use the highest
level unless it causes problems with triggering on heartbeat etc.
mw2A meter instructions Issue 1.0
Page 3
Batteries
The meter runs on 2 AA alkaline batteries. A low battery condition is indicated at turn on by the
red LED illuminating and L o appearing on Lcd_L. To continue using the meter, press Key_L,
and replace the batteries at the next opportunity.
Batteries should be inserted with positive end towards the removable cap. Always use a suitable
sized coin to release the cap, a screwdriver can damage the plastic.
Note that most meter problems are caused by leaking batteries. It is advisable to remove them if
the meter is stored for long periods, or change them at least every 2 years. Battery life is over 500
hours.
Firmware Upgrade
Like most modern electronic devices, the meter is controlled by a computer chip. This can be reprogrammed to change features or operation of the meter. The program is called firmware and the
version number installed in the meter is shown on Lcd_R at turn on, while F is shown on Lcd_L.
Firmware can be upgraded via a USB cable connected to a computer running Windows operating
system. A separate instruction document provides details.
mw2A meter instructions Issue 1.0
Page 4
Setup Mode
This mode is entered by holding down Key_L for 2 seconds when turning on the meter until the
green LED turns off (2 seconds)
Lcd_L and Lcd_R will display all segments.
Cycle through the settings in this order by pressing Key_R.
1
2
3
4
5
6
Green LED brightness
Blue LED brightness
Red LED brightness
Body Motion sensitivity
Needle TA counter on/off
Back to (1)
All settings will display their current value until changed by rotating the sensitivity knob.
1,2,3: LED Brighness Use the sensitivity knob to change the brightness for each colour. The LED will light at the current
brightness setting and only change if the sensitivity knob is moved while that colour is selected.
4:
Body Motion sensitivity -
In this mode the display shows b followed by a 1, 2 or 3.
b 3
b 2
b 1
5:
= most sensitive
= least sensitive
Needle TA Counter -
In this mode the display shows n followed by the words o n or o F F.
Rotate the sensitivity knob to change setting.
To exit Setup Mode, press Key_L.
mw2A meter instructions Issue 1.0
Page 5
Specifications
Dimensions
14 cm x 11 cm x 6 cm
Weight
525 gm
Connectors
Standard 1/4” 2 pole Jack Socket for electrodes
USB Socket for computer connection (future option)
3.5mm 3 pole Jack Socket ( future options yet to be documented)
Batteries
2 x AA 1.5V
Battery life 500 to 1000 hours
Dial Scale
Graduations correspond to 1/4” on larger
sized dials
Optional Extras
Optional Simple Scale available
Single and two hand electrodes, 43mm diameter, integral cable
mw2A meter instructions Issue 1.0
Page 6