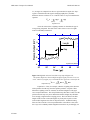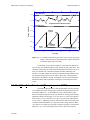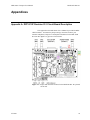
1
Digital X-ray Processor
User’s Manual
$Rev: 12013 $
Model DXP Saturn USB2
Revision: C
With
ProSpect
version 0.1.x
XIA, LLC
31057 Genstar Road
Hayward, CA 94544 USA
Tel: (510) 401-5760; Fax: (510) 401-5761
http://www.xia.com/
Information furnished by XIA LLC is believed to be accurate and reliable. However, no
responsibility is assumed by XIA LLC for its use, nor for any infringements of patents or other
rights of third parties which may result from its use. No license is granted by implication or
otherwise under any patent or patent rights of XIA LLC. XIA LLC reserves the right to change
specifications at any time without notice. Patents have been applied for to cover various aspects
of the design of the DXP Digital X-ray Processor (DXP).
DXP Saturn / ProSpect User Manual
MAN-SAT-PRO-0.1
Safety .............................................................................................................................. v
Symbols.................................................................................................................. v
Specific Precautions ............................................................................................... v
Power Source .................................................................................................. v
Use the Proper Fuse........................................................................................ v
User Adjustments/Disassembly ....................................................................... v
Servicing and Cleaning ................................................................................... vi
End Users Agreement ................................................................................................. vii
Contact Information: ............................................................................................. vii
5/5/2009
1
Introduction.............................................................................................................. 1
1.1 DXP Saturn Features:......................................................................................1
1.2 Saturn Sub-Types ............................................................................................1
1.2.1 SCA Timing Option (TM0) ..................................................................2
1.2.2 Extended Memory Timing Option (TM4).............................................2
1.2.3 ROI Output Option (ROI) ....................................................................2
1.2.4 40MHz ADC Clock Option (40)...........................................................2
1.2.5 40MHz, ROI, Extended Memory Timing (ALL) ...................................2
1.3 System Requirements:.....................................................................................2
1.3.1 Host Computer....................................................................................2
1.3.2 Detector: .............................................................................................3
1.3.3 Preamplifier:........................................................................................3
1.3.4 AC Power:...........................................................................................4
1.3.5 Environment:.......................................................................................4
1.4 Software Overview...........................................................................................4
1.4.1 User Interface: ProSpect ....................................................................4
1.4.2 Device Drivers: Handel/Xerxes...........................................................5
1.4.3 Firmware and FDD Files .....................................................................5
1.5 Support ............................................................................................................5
1.5.1 Software and Firmware Updates ........................................................6
1.5.2 Related Documentation ......................................................................6
1.5.3 E-mail and Phone Support..................................................................6
1.5.4 Feedback ............................................................................................7
1.5.5 The Accelerated DevelOPmenT (ADOPT) Program ..........................7
1.6 Manual Conventions ........................................................................................8
2
Installation.............................................................................................................. 10
2.1 Software Installation.......................................................................................10
2.1.1 Running the Installer .........................................................................10
2.1.2 File Locations....................................................................................11
2.1.3 Support .............................................................................................11
2.2 Line Voltage Selection and Fusing ................................................................12
2.3 Configuring the Analog Signal Conditioner....................................................12
2.3.1 Input Signal Connection (BNC or DSUB9): JP9 and JP10...............12
2.3.2 Input amplifier configuration: JP100 and JP101 ...............................12
2.3.3 Preamplifier Type—(RC-type vs Reset-type): JP104 .......................12
2.3.4 Input Attenuation: JP102 ..................................................................13
2.4 Detector Bias Voltage Settings ......................................................................13
2.4.1 Bias Voltage Polarity: PCB Key ........................................................14
2.4.2 Bias Voltage Ramp Rate: JP1 (Power Supply Board)......................14
2.4.3 Setting the L/N Sensor Inhibit Mode: JP20 and JP21 ......................14
2.4.4 Setting the Bias Voltage ...................................................................15
2.5 Making Connections ......................................................................................15
i
DXP Saturn / ProSpect User Manual
2.5.1
2.5.2
5/5/2009
MAN-SAT-PRO-0.1
Connecting to the Detector/Preamplifier...........................................15
Connecting to the Computer.............................................................16
3
System Configuration ........................................................................................... 18
3.1 Initialization Files............................................................................................18
3.1.1 Starting ProSpect without an INI File................................................18
3.2 The Configuration Wizard ..............................................................................19
3.2.1 General Settings ...............................................................................19
3.3 Loading and Saving Initialization Files...........................................................21
3.3.1 Loading an INI file .............................................................................21
3.3.2 Saving an INI file...............................................................................21
4
Using ProSpect with the DXP Saturn .................................................................. 22
4.1 A Quick Tour of ProSpect ..............................................................................22
4.1.1 Settings Sidebar................................................................................23
4.1.2 Data Display Panel ...........................................................................23
4.2 Detector and Preamplifier Settings ................................................................24
4.2.1 Preamplifier Type..............................................................................25
4.2.2 Pre-Amplifier Polarity ........................................................................25
4.2.3 Reset Interval....................................................................................25
4.2.4 Preamp Gain.....................................................................................25
4.2.5 Preamp Risetime ..............................................................................26
4.3 Spectrum Acquisition and Display .................................................................26
4.3.1 Starting a Run ...................................................................................26
4.3.2 Peaking Time (Energy Filter) ............................................................27
4.3.3 Setting Thresholds ............................................................................28
4.3.4 MCA Bins and Bin Width ..................................................................29
4.3.5 Baseline Settings ..............................................................................29
4.3.6 Dynamic Range / Energy Data .........................................................30
4.3.7 Calibrating the Saturn Hardware Gain..............................................30
4.3.8 Saving and Loading INI Files............................................................33
4.3.9 Output Statistics................................................................................33
4.3.10
Display Controls.............................................................................34
4.3.11
Saving, Loading and Printing Data ................................................34
4.4 Run Control....................................................................................................35
4.4.1 Preset Runs ......................................................................................35
4.4.2 The GATE Function ..........................................................................35
4.4.3 Auto Update Interval .........................................................................35
4.4.4 Clear or Retain MCA Data ................................................................35
4.5 Optimizations .................................................................................................35
4.5.1 Throughput (OCR) ............................................................................36
4.5.2 Pileup Rejection ................................................................................38
4.5.3 Energy Resolution.............................................................................39
4.6 Diagnostics ....................................................................................................41
4.6.1 The ADC Panel (Oscilloscope) .........................................................41
4.6.2 The Baseline Panel...........................................................................44
4.6.3 DSP Parameters ...............................................................................48
4.6.4 Submitting a problem report: ............................................................49
5
Digital Filtering: Theory of Operation and Implementation Methods .............. 51
5.1 X-ray Detection and Preamplifier Operation: .................................................51
5.1.1 Reset-Type Preamplifiers .................................................................51
5.1.2 RC-Type Preamplifiers......................................................................52
5.2 X-ray Energy Measurement & Noise Filtering: ..............................................53
5.2.1 Digital Filtering Theory ......................................................................53
ii
DXP Saturn / ProSpect User Manual
MAN-SAT-PRO-0.1
5.2.2 Trapezoidal Filtering .........................................................................55
5.3 Trapezoidal Filtering in the DXP: ...................................................................56
5.3.1 Comparing DXP Performance ..........................................................56
5.3.2 Decimation and Peaking Time Ranges ............................................56
5.3.3 Time Domain Benefits of Trapezoids................................................57
5.4 Baseline Issues:.............................................................................................58
5.4.1 The Need for Baseline Averaging.....................................................58
5.4.2 Raw Baseline Measurement.............................................................60
5.4.3 Baseline Average Settings and Recommendations .........................60
5.4.4 Why Use a Finite Averaging Length? ...............................................61
5.5 X-ray Detection & Threshold Setting: ............................................................61
5.6 Peak Capture Methods ..................................................................................62
5.6.1 Setting the Gap Length.....................................................................63
5.6.2 Peak Sampling vs. Peak Finding ......................................................63
5.7 Energy Measurement with Resistive Feedback Preamplifiers ......................65
5.8 Pile-up Inspection: .........................................................................................68
5.9 Input Count Rate (ICR) and Output Count Rate (OCR): ...............................70
5.10
Throughput: .............................................................................................71
5.11
Dead Time Corrections: ..........................................................................73
5/5/2009
6
DXP Saturn Hardware Description ...................................................................... 74
6.1 Organizational Overview:...............................................................................74
6.2 The Analog Signal Conditioner (ASC): ..........................................................74
6.3 The Filter, Pulse Detector, & Pile-up Inspector (FiPPI): ................................76
6.3.1 FiPPI Variants ...................................................................................77
6.3.2 FiPPI Decimation ..............................................................................77
6.4 The Digital Signal Processor (DSP):..............................................................78
6.4.1 Code Variants ...................................................................................78
6.5 Interface to the Host Computer:.....................................................................79
7
DXP Saturn DSP Code Description ..................................................................... 81
7.1 Introduction and Program Overview ..............................................................81
7.2 Program Flow.................................................................................................82
7.3 Initialization ....................................................................................................84
7.4 Event Processing ...........................................................................................84
7.4.1 Run Start...........................................................................................84
7.4.2 Event Interrupt ..................................................................................85
7.4.3 Event Loop........................................................................................85
7.4.4 Spectrum Binning..............................................................................85
7.4.5 SCA Mapping....................................................................................86
7.5 Baseline Measurement ..................................................................................86
7.5.1 IIR (Infinite Impulse Response) Filter ...............................................86
7.5.2 FIR (Finite Impulse Response) Filter ................................................87
7.5.3 Baseline Histogram...........................................................................87
7.5.4 Residual Baseline .............................................................................88
7.5.5 Baseline Cut......................................................................................88
7.6 Interrupt Routines ..........................................................................................88
7.6.1 ASC Monitoring.................................................................................89
7.6.2 Timer Interrupt ..................................................................................89
7.7 Error Handling................................................................................................90
7.8 Specifying Data Acquisition Tasks (RUNTASKS): ........................................90
7.9 Special Tasks (WHICHTEST)........................................................................91
iii
DXP Saturn / ProSpect User Manual
MAN-SAT-PRO-0.1
7.10
DSP Parameter Descriptions ..................................................................92
7.10.1
Specifying fixed run lengths (PRESET, PRESETLEN0,1): ...........94
7.10.2
Setting the slow filter parameters (SLOWLEN, SLOWGAP).........94
7.10.3
Setting the fast filter parameters(FASTLEN, FASTGAP) ..............94
7.10.4
Setting the pulse detection parameters (THRESHOLD,
MINWIDTH, BASETHRESH, BASETHRADJ, SLOWTHRESH,
FIPCONTROL) ........................................................................................95
7.10.5
Setting the Pile-up inspection parameters (MAXWIDTH,
PEAKINT) ................................................................................................96
7.10.6
Setting the Analog Gain (GAINDAC).............................................96
7.11
Standard Program Variants.....................................................................97
7.11.1
MCA acquisition with reset-type preamplifiers ..............................97
7.11.2
MCA acquisition with RC-type preamplifiers .................................98
Appendices................................................................................................................... 99
Appendix A. DPP-X10P Revision D.2 Circuit Board Description .........................99
A.1. Jumper Settings....................................................................................100
A.2. LED Indicators ......................................................................................100
A.3. Connectors ...........................................................................................101
A.4. Power Consumption: ............................................................................102
Appendix B. PWR-OEM (PWR-X10P) Revision E.1 - Preliminary.....................103
B.1. Switches and Controls..........................................................................103
B.2. Jumper Settings....................................................................................104
B.3. LED Indicators and LCD Display..........................................................104
B.4. Connectors ...........................................................................................105
B.5. Power Consumption: ............................................................................106
Appendix C. Sample INI File(s) ..........................................................................107
Appendix D. Firmware File Formats...................................................................109
D.1. Firmware and FDD Files ......................................................................109
D.1.1. Code Variants....................................................................................109
D.2. DSP Code ............................................................................................110
D.3. FiPPI Code ...........................................................................................111
5/5/2009
iv
DXP Saturn / ProSpect User Manual
MAN-SAT-PRO-0.1
Safety
Please take a moment to review these safety precautions. They are
provided both for your protection and to prevent damage to the Digital X-ray
Processor (DXP) and connected equipment. This safety information applies to
all operators and service personnel.
Symbols
These symbols appear on equipment, as required for safety:
DANGER
High Voltage
Protective
ground (earth)
Terminal
ATTENTION
Refer to the
manual
Specific Precautions
Observe all of these precautions to ensure your personal safety and to
prevent damage to either the DXP Saturn or equipment connected to it.
Power Source
The DXP Saturn is intended to operate from a mains supply voltage of
either 115V or 230V at 50-60Hz: THE REAR PANEL LINE VOLTAGE
SELECTION SWITCH MUST BE SET before the system is powered on. Refer
to the “Getting Started” section of the user manual for instructions on supply
selection. Supply voltage fluctuations are not to exceed 10% of the nominal
value. A protective ground connection, through the grounding conductor in the
power cord, is essential for safe system operation.
Use the Proper Fuse
To avoid a fire hazard use only Time Lag 5mm x 20mm (IEC
127-2/III), 250mA fuses rated for 250V. A spare fuse is provided in the fuse
drawer located at the power entry point.
User Adjustments/Disassembly
All user adjustments are accessible via the top panel. Do not
attempt to remove any other panels or components. To avoid personal injury,
and/or damage to the DXP Saturn, always disconnect power before removing
the top panel.
5/5/2009
v
DXP Saturn / ProSpect User Manual
MAN-SAT-PRO-0.1
Servicing and Cleaning
To avoid personal injury, and/or damage to the DXP Saturn, do not
attempt to repair or clean the unit. The DXP hardware is warranted against all
defects for 1 year. Please contact the factory or your distributor before returning
items for service.To avoid personal injury, and/or damage to the DXP Saturn, do
not attempt to repair or clean the unit. The DXP hardware is warranted against
all defects for 1 year. Please contact the factory or your distributor before
returning items for service.
5/5/2009
vi
DXP Saturn / ProSpect User Manual
MAN-SAT-PRO-0.1
End Users Agreement
XIA LLC warrants that this product will be free from defects in
materials and workmanship for a period of one (1) year from the date of
shipment. If any such product proves defective during this warranty period,
XIA LLC, at its option, will either repair the defective products without charge
for parts and labor, or will provide a replacement in exchange for the defective
product.
In order to obtain service under this warranty, Customer must notify
XIA LLC of the defect before the expiration of the warranty period and make
suitable arrangements for the performance of the service.
This warranty shall not apply to any defect, failure or damage caused
by improper uses or inadequate care. XIA LLC shall not be obligated to furnish
service under this warranty a) to repair damage resulting from attempts by
personnel other than XIA LLC representatives to repair or service the product;
or b) to repair damage resulting from improper use or connection to
incompatible equipment.
THIS WARRANTY IS GIVEN BY XIA LLC WITH RESPECT TO
THIS PRODUCT IN LIEU OF ANY OTHER WARRANTIES, EXPRESSED
OR IMPLIED. XIA LLC AND ITS VENDORS DISCLAIM ANY IMPLIED
WARRANTIES OF MERCHANTABILITYOR FITNESS FOR A
PARTICULAR PURPOSE. XIA’S RESPONSIBILITY TO REPAIR OR
REPLACE DEFECTIVE PRODUCTS IS THE SOLE AND EXCLUSIVE
REMEDY PROVIDED TO THE CUSTOMER FOR BREACH OF THIS
WARRANTY. XIA LLC AND ITS VENDORS WILL NOT BE LIABLE FOR
ANY INDIRECT, SPECIAL, INCIDENTAL, OR CONSEQUENTIAL
DAMAGES IRRESPECTIVE OF WHETHER XIA LLC OR THE VENDOR
HAS ADVANCE NOTICE OF THE POSSIBILITY OF SUCH DAMAGES.
Contact Information:
XIA LLC
31057 Genstar Rd.
Hayward, CA 94544 USA
Telephone:
Downloads:
Hardware Support:
Software Support:
5/5/2009
(510) 401-5760
http://xia.com/DXP_Saturn_Download.html
[email protected]
[email protected]
vii
DXP Saturn / ProSpect User Manual
5/5/2009
MAN-SAT-PRO-0.1
viii
DXP Saturn / ProSpect User Manual
MAN-SAT-PRO-0.1
1 Introduction
The Saturn Digital X-ray Processor (DXP) is a high rate, digitallybased, multi-channel analysis spectrometer designed for energy dispersive x-ray
or γ-ray measurements. The Saturn offers complete computer control over all
amplifier and spectrometer controls including gain, filter peaking time, and
pileup inspection criteria. The digital filter typically increases throughput by a
factor of two or more over available analog systems at comparable energy
resolution but at a lower cost. The Saturn is easily configured to operate with a
wide range of common detector/preamplifier systems, including pulsed optical
reset, transistor reset, and resistive feedback preamplifiers. The Saturn is
controlled via the Universal Serial Bus (USB 2.0).
1.1 DXP Saturn Features:
•
Single unit replaces spectroscopy amplifier, shaping amplifier, multichannel analyzer and detector bias HV supply at significantly reduced
cost.
•
Operates with a wide variety of x-ray or γ-ray detectors using
preamplifiers of pulsed optical reset, transistor reset or resistor
feedback types.
•
Instantaneous throughput up to 500,000 counts/second.
•
Digital trapezoidal filtering, with programmable peaking times between
0.25 and 80 μsec.
•
High precision internal gain control.
•
Sophisticated pileup inspection criteria under computer control,
including fast channel peaking time, threshold, and rejection criterion.
•
Accurate ICR and live-time reporting for precise dead-time corrections.
•
Multi-channel analysis with up to 8K bins, allowing for optimal use of
data to separate fluorescence signal from backgrounds.
•
Supplies preamplifier power on a NIM standard DB-9 connector.
•
Supplies detector bias HV up to ± 1000V, with LN sensor HV inhibit
input.
•
External Gate and Sync signals synchronize data acquisition with
external setup, for x-ray mapping and other specialized applications.
•
Auxiliary bus with up to 24 digital I/O lines for custom applications.
1.2 Saturn Sub-Types
There are several hardware and firmware variants available for the
Saturn, each with different combinations of the available options.
5/5/2009
1
DXP Saturn / ProSpect User Manual
MAN-SAT-PRO-0.1
Name / Part#
SATURN
SATURN-TM0
SATURN-TM4
SATURN-ROI
SATURN-40
SATURN-ALL
Timing
No
Yes
Yes
No
No
Yes
Extended Memory
No
No
Yes
No
No
Yes
ROI
No
No
No
Yes
No
Yes
ADC Clock
20 MHz
20 MHz
20 MHz
20 MHz
40 MHz
40 MHz
Table 1.1: Saturn hardware/firmware variants.
1.2.1
SCA Timing Option (TM0)
This is a firmware option that allows for time-resolved single channel
analyzer (SCA) data acquisition, or SCA Mapping. The GATE and/or SYNC
inputs are used to increment the pixel and corresponding SCA table.
1.2.2
Extended Memory Timing Option (TM4)
The addition of 4 Mbytes of external memory allows for time-resolved
full multi-channel analyzer (MCA) acquisition.
1.2.3
ROI Output Option (ROI)
The Auxiliary port is configured as a region-of-interest (ROI) output,
with 16 digital output lines, each corresponding to a user selected ROI.
1.2.4
40MHz ADC Clock Option (40)
Doubling the ADC clock speed allows for shorter peaking times and
thus higher maximum output count rates.
1.2.5
40MHz, ROI, Extended Memory Timing (ALL)
This deluxe variant includes all of the above hardware and firmware
options.
1.3 System Requirements:
The digital spectroscopy system considered here includes a host
computer, a DXP Saturn and an x-ray detector with a preamplifier. Please
review this section to verify the compatibility of other system components with
the DXP Saturn.
1.3.1
Windows 98/XP/NT/2000
computer with an available
EPP port...
The DXP Saturn communicates with a host computer via USB 2.0.
The USB 2.0 interface is described further in section 6.5. The host computer
that runs XIA LLC’s ProSpect software must have the following minimum
capabilities:
9 300 MHz or greater processor speed running most Microsoft Windows
Operating systems (2000, XP).
9
5/5/2009
Host Computer
At least one available USB 2.0 port.
2
DXP Saturn / ProSpect User Manual
MAN-SAT-PRO-0.1
1.3.2
Low current, high voltage
devices can be powered by
the DXP Saturn.
Detector:
The DXP Saturn includes a high voltage supply for biasing solid-state
and gas detectors, with the following specifications:
Parameter
Bias voltage range*
Output impedance
Current Derating**
Maximum turn-on/off rate (fast mode - default)
Maximum turn-on/off rate (slow mode)
Value
+/-1000V
1.1MegΩ
1.10V/μA
100V/s
20V/s
Table 1.2: Detector bias voltage supply specifications.
*Up to +/-5,000V with specially ordered assemblies.
** The supply’s load regulation does not include the output filter. The actual
output bias voltage must be derated from the front panel displayed voltage by
1.10V for each microampere drawn.
The detector bias voltage exits via a rear panel SHV connector. The
adjacent ‘Inhibit’ BNC input accepts most liquid nitrogen (LN) sensor signals,
and shuts down the bias supply when the detector is warm. Please refer to
Appendix A section A.1 for further details.
1.3.3
Preamplifier signal and
power specifications must
be verified.
Preamplifier:
The DXP Saturn accommodates nearly all preamplifier signals, and
provides power for NIM-standard preamplifiers. The two primary capacitordischarge topologies, pulsed-reset and resistive-feedback, are both supported.
The input voltage range of the DXP analog circuitry results in the following
constraints:
Parameter
X-ray pulse-height
(w/ input attenuator)
Input voltage range
(w/ input attenuator)
Table 1.3:
Maximum
375 mV
(1.50 V)
+/-10 V
(+/-40 V)
Typical
25 mV
(100 mV)
+/-5 V
(+/-20 V)
Analog input signal constraints for pulsed-reset preamplifiers.
Parameter
X-ray pulse-height
(w/ input attenuator)
Input voltage range
(w/ input attenuator)
Decay time τ
Table 1.4:
Minimum
250 μV
(1 mV)
-
Minimum
250 μV
(1 mV)
100 ns
Maximum
625 mV
(2.50 V)
+/-3 V
(+/-12 V)
infinity
Typical
100 mV
(400 mV)
+/-3 V
(+/-12 V)
50 μs
Analog input signal constraints for resistive-feedback
preamplifiers. Note that the maximum input range is less than for
pulsed-reset preamplifiers.
The DXP Saturn provides preamplifier power on a NIM standard DB-9
connector:
5/5/2009
3
DXP Saturn / ProSpect User Manual
MAN-SAT-PRO-0.1
Pin
#
1
2
3
4
5
6
7
8
9
Name
Supply
Current
GND
-
GND
-
IN_ALT
-
+12V_OUT
100mA
NC
-
-24V_OUT
+24V_OUT
100mA
100mA
REF_ALT
-
-12V_OUT
100mA
Description
Internal signal ground connection
– NOT chassis ground
Internal signal ground connection
– NOT chassis ground
Alternate signal input, selected
with jumper JP10 (BNC default)
+12V (+5V solder option) DC for
preamplifier
No connection –- solder option
+5V connection
-24V DC for preamplifier
+24V DC for preamplifier
Alternate signal reference,
selected with jumper JP9 (BNC
default)
-12V (-5V solder option) DC for
preamplifier
Table 1.5: NIM standard DSUB9 preamplifier pin-out detail.
1.3.4
AC Power:
User may select either US or European/Int’l line voltage at the rear
panel of the unit. Use the provided IEC certified power cable to connect the line
voltage source to the DXP Saturn.
AC Line Voltage/Frequency:
Maximum Current Draw:
115 V/60 Hz
200 mA
230 V/50 Hz
100 mA
Supply voltage fluctuations are not to exceed 10% of the nominal value. All DC
voltages necessary for operation are generated internally.
1.3.5
Environment:
Temperature Range:
Maximum Relative Humidity:
Maximum Altitude:
Pollution degree 2
Installation Category II
0° C - 50° C
75%
3,000 meters
1.4 Software Overview
Three levels of ‘software’ are required to operate the DXP Saturn: a
user interface for data acquisition and control, a driver layer that communicates
between the host software and the USB 2.0 port, and firmware code that is
downloaded to and runs on the DXP Saturn itself.
1.4.1
User Interface: ProSpect
The user interface communicates with and directs the DXP Saturn via
the driver layer, and displays and analyzes data as it is received. As such XIA
provides ProSpect as a general-purpose data acquisition application. ProSpect
features full control over the DXP Saturn, intuitive data visualization, unlimited
5/5/2009
4
DXP Saturn / ProSpect User Manual
MAN-SAT-PRO-0.1
ROI’s (regions of interest) Gaussian fitting algorithms and the exporting of
collected spectra for additional analysis. Please refer to Chapter 3 of this
manual for instructions on using ProSpect with the DXP Saturn. Some users
may decide instead to develop their own software to communicate via the driver
layer with the DXP Saturn. XIA offers the Accelerated DevelOPmenT
(ADOPT) support option at an additional fee to such users. ADOPT is
described in section 1.5.5.
1.4.2
Device Drivers: Handel/Xerxes
XIA provides source code for both high-level (Handel) and low-level
(Xerxes) driver layers to advanced users who wish to develop their own
software interface. XIA recommends using Handel for almost all advanced
applications. Handel is a high-level device driver that provides an interface to
the DXP hardware in spectroscopic units (eV, microseconds, etc...) while still
allowing for safe, direct-access to the DSP. The trade-off for this ease of use is
an increase in size. Handel is built on top of the Xerxes driver libraries. Xerxes
is a more compact low-level driver library made available to expert users who
need more flexibility than the Handel driver can provide. ProSpect uses the
Handel driver, and thus also serves as a development example. Installation files
and user manuals for Handel and Xerxes are available online at
http://xia.com/DXP_Saturn_Download.html.
1.4.3
Firmware and FDD Files
Firmware refers to the DSP (digital signal processor) and FiPPI (FPGA
= Field Programmable Gate Array) configuration code that is downloaded to,
and runs on, the DXP Saturn itself. Typically one DSP file and four FiPPI files
are necessary to acquire spectra across the full range of peaking times with a
given detector/preamplifier. For simplicity XIA provides complete firmware
sets in files of the form “firmware_name.fdd”. This file format is supported by
Handel, XIA’s digital spectrometer device driver, and is the standard firmware
format used in ProSpect. The FiPPI and DSP are discussed in Chapters 5 and 7.
Firmware file formats are further described in Appendix D.
1.5 Support
A unique benefit of dealing with a small company like XIA is that the
technical support for our sophisticated instruments is often provided by the same
people who designed them. Our customers are thus able to get in-depth technical
advice on how to fully utilize our products within the context of their particular
applications. Please read through this brief chapter before contacting us.
XIA LLC
31057 Genstar Rd.
Hayward, CA 94544 USA
Telephone:
Downloads:
Hardware Support:
Software Support:
5/5/2009
(510) 401-5760
http://xia.com/DXP_Saturn_Download.html
[email protected]
[email protected]
5
DXP Saturn / ProSpect User Manual
MAN-SAT-PRO-0.1
1.5.1
Check for firmware and
software updates at:
http://www.xia.com/DXP_
Resources.html
Software and Firmware Updates
It is important that your DXP unit is using the most recent
software/firmware combination, since most problems are actually solved at the
software level. Please check http://xia.com/DXP_Saturn_Download.html for the
most up to date standard versions of the DXP software and firmware. Please
contact XIA at [email protected] if you are running semi-custom or proprietary
firmware code. (Note: It a good practice to make backup copies of your existing
software and firmware before you update).
1.5.2
Related Documentation
As a first step in diagnosing a problem, it is sometimes helpful to
consult most recent data sheets and user manuals for a given DXP product,
available in PDF format from the XIA web site. Since these documents may
have been updated since the DXP unit has been purchased, they may contain
information that may actually help solving your particular problem. All manuals,
datasheets, and application notes, as well as software and firmware downloads
can be found at http://xia.com/DXP_Saturn_Download.html. In order to request
printed copies, please send an e-mail to [email protected], or call the company
directly. In particular, we recommend that you download the following user
manuals:
9
ProSpect User Manual – All users
9
Handel User Manual – Users who wish to develop their own user
interface
1.5.3
E-mail and Phone Support
The DXP Saturn comes with one year of e-mail and phone support.
Support can be renewed for a nominal fee. Please call XIA LLC if your support
agreement has expired.
The XIA Digital Processors (DGF & DXP) are digitally controlled,
high performance products for X-ray and gamma-ray spectroscopy. All settings
can be changed under computer control, including gains, peaking times, pileup
inspection criteria, and ADC conversion gain. The hardware itself is very
reliable. Most problems are not related to hardware failures, but rather to setup
procedures and to parameter settings. XIA's DXP software includes several
consistency checks to help select the best parameter values. However, due to the
large number of possible combinations, the user may occasionally request
parameter values which conflict among themselves. This can cause the DXP unit
to report data which apparently make no sense (such as bad peak resolution or
even empty spectra). Each time a problem is reported to us, we diagnose it and
include necessary modifications in the new versions of our DXP control
programs, as well as adding the problem description to the FAQ list on our web
site.
Submitting a problem report:
XIA encourages customers to report any problems encountered using
any of our software. Unfortunately, due to limited resources XIA is unable to
handle bug reports over the phone. In most cases, the XIA engineering team will
5/5/2009
6
DXP Saturn / ProSpect User Manual
MAN-SAT-PRO-0.1
need to review bug information and run tests on local hardware before being
able to respond.
All software-related bug reports should be e-mailed to
[email protected] and should contain the following information, which
will be used by our technical support personnel to diagnose and solve the
problem:
9 Your name and organization
9
Brief description of the application (type of detector, relevant
experimental conditions...etc.)
9
XIA hardware name and serial number
9
Version of the library (if applicable)
9
OS
9
Description of the problem; steps taken to re-create the bug
9
Supporting data:
The most important are digital settings of the spectrometer unit, i.e., the
values of the DSP parameters such as the decimation, filter length, etc.
The values of these parameters can be captured into an ASCII file in
ProSpect. Please attach a copy of this file if possible. Also attach
related spectrum files. Capturing an oscilloscope image of the preamp
output will also be extremely helpful, which can be done with the
diagnostic tool included in ProSpect.
For general questions and DXP hardware issues please e-mail:
[email protected].
1.5.4
Feedback
XIA LLC strives to keep up with the needs of our users. Please send us
your feedback regarding the functionality and usability of the DXP Saturn and
ProSpect software. In particular, we are considering the following development
issues:
1.5.4.1 Export File Formats
We would like to directly support as many spectrum file formats as
possible. If we do not yet support it, please send your specification to
[email protected].
1.5.4.2 Calibration
Currently the hardware gain of the DXP Saturn is modified during
energy calibration. This approach produces a calibrated spectrum directly from
the hardware. The drawback is that the calibration process often takes several
iterations to settle. The other approach to calibration is re-binning of the
spectrum data. This is not difficult to do, but may produce confusion for the
novice user. We are considering supporting this feature in future ProSpect
releases.
1.5.5
The Accelerated DevelOPmenT (ADOPT) Program
The ADOPT program is a support plan for users developing custom
software using any of our driver libraries. It is intended for those who wish to
5/5/2009
7
DXP Saturn / ProSpect User Manual
MAN-SAT-PRO-0.1
get direct access to the XIA software team and obtain hands-on training in the
use of XIA software tools as a method of reducing overall software development
time.
The standard ADOPT package provides 12 months of support divided
as follows:
•
1 month: on-site support and priority phone/e-mail support.
•
11 months: priority phone/e-mail support.
The specific number of hours for on-site support and priority phone/email support depend on the driver library being used. Typically, the person who
will be doing the majority of the development will visit XIA LLC for a hands-on
tutorial with the XIA LLC software team. The visitor will be encouraged to
work at XIA LLC for anywhere from a few days to two weeks, depending on the
specific situation and complexity of the project. By working on-site, visitors will
have access to live experimental setups on which they will be able to test their
software. Furthermore, the XIA LLC software team will be available to provide
assistance and help immediately without the limitations of either e-mail or
phone.
For situations where more time is required, additional hours of support
may be purchased at XIA LLC's standard consulting rate.
This program supports both our Handel and Xerxes driver libraries as
well as custom driver development. Please contact XIA LLC to determine which
driver library is right for your application ([email protected]).
1.6 Manual Conventions
Through out this manual we will use the following conventions:
Convention
»
Description
The » symbol leads you
through nested menu
items and dialog box
options.
Bold
Bold text denotes items
that you must select or
click on in the software,
such as menu items,
and dialog box options.
Bold text within [ ]
denotes a command
button.
Items in this font
denote text or
[Bold]
monospace
5/5/2009
Example
The sequence
File»Page Setup»Options
directs you to pull down the
File menu, select the Page
Setup item, and choose
Options from the sub menu.
...expand the Run Control
section of the DAQExplorer
to access the run presets.
[Start Run] indicates the
command button labeled
Start Run.
Setup.exe refers to a file
called “setup.exe” on the host
8
DXP Saturn / ProSpect User Manual
MAN-SAT-PRO-0.1
“window”
Italics
<Key>
<Shift-Alt-Delete>
or <Ctrl+D>
Bold italic
CAPITALS
5/5/2009
characters that you
enter from the
keyboard, sections of
code, file contents, html
links and syntax
examples.
Text in quotation refers
to window titles,
filenames and
quotations from other
sources
Italic text denotes a new
term being introduced ,
or simply emphasis
Angle brackets denote a
key on the keybord (not
case sensitive).
A hyphen or plus
between two or more
key names denotes that
the keys should be
pressed simultaneously
(not case sensitive).
Warnings and
cautionary text.
CAPITALS denote
DSP parameter names
computer.
“Options” indicates the
window accessed via
Tools»Options.
peaking time refers to the
length of the slow filter.
...it is important first to set
the energy filter Gap so that
SLOWGAP to at least one
unit greater than the
preamplifier risetime...
<W> indicates the W key
<Ctrl+W> represents holding
the control key while pressing
the W key on the keyboard
CAUTION: Improper
connections or settings can
result in damage to system
components.
SLOWLEN is the length of
the slow energy filter
9
DXP Saturn / ProSpect User Manual
MAN-SAT-PRO-0.1
2 Installation
CAUTION: Improper
connections or settings can
result in damage to system
components. Such damage
is not covered under the
Saturn warranty.
Please carefully follow these instructions. It is possible to damage your
detector and/or preamplifier if the connections and settings described below are
not made properly. The term ‘jumper’ is used throughout this section. Jumpers
short two adjacent pins of a PCB header, and are employed in the DXP Saturn to
achieve certain digital and analog settings. For the most part jumpers are placed
on 3-pin headers, connecting the center pin to one or the other peripheral pin,
similar to a single-pole-double-throw (SPDT) switch. In several cases two
adjacent headers are used to achieve a dual-pole-dual-throw (DPDT) switch. In
such cases jumper placements that span the two 3-pin headers are not allowed:
Figure 2.1: The header at left is empty. The second header includes jumpers selecting the ‘DSUB9’
connection, while the third is set to ‘BNC’. The header at right has jumpers in a disallowed
position.
Do not attempt to change jumper settings while the DXP Saturn is
powered on. All jumper settings are accessed by first removing the top
clamshell panel of the chassis. Refer to Figure 2.2 for jumper locations on the
DXP Saturn. Appendix A describes the jumper settings, LED indicators and
connector locations and part numbers in more detail.
2.1 Software Installation
Do not attempt to install the Saturn hardware until after the software
and drivers have been installed. ProSpect operates on Windows XP and 2000
machines. Note that ProSpect also operates with the DXP Mercury. Firmware
and libraries for both the Saturn and Mercury are installed. Updates to ProSpect
are available online at:
http://www.xia.com/DXP_Saturn_Download.html
The update installation file is an executable, or .EXE file.
2.1.1
Running the Installer
1) Please close all applications that are currently running.
2) Insert the CD into the CD-ROM drive or, if your copy was delivered
electronically, double-click the setup.exe program. If the CD
installation does not start immediately, follow the instructions in steps
(3) and (4).
3) Click the Start button and select the Run command.
5/5/2009
10
DXP Saturn / ProSpect User Manual
MAN-SAT-PRO-0.1
4) Type X:\Setup.exe and click [OK], where X is the letter of your
CD-ROM drive.
5) After setup has completed, shut down your computer and complete the
hardware configuration described in sections 2.2 through 2.5 before
restarting.
•
The ProSpect installation will create a new directory:
C:\Program Files\XIA\ProSpect 0.1
•
A new Start Menu » Program group will be created.
•
A shortcut to the ProSpect executable is created on your desktop.
•
The hardware driver file ”xia_saturn_usb2.inf" is installed in:
C:\WINNT\inf
for Windows 2000, or
C:\Windows\inf
for Windows XP.
2.1.2
File Locations
After installation, ProSpect, by default, is located in:
C:\Program Files\XIA\ProSpect 0.1
This directory contains a sample INI file “saturn_usb2_reset.ini” that can serve
as a starting point. After configuration and calibration the user should save to a
unique INI file. Configuration code that is downloaded to the hardware, or
firmware, is located in the “firmware” directory:
~ \Firmware\Saturn
This directory contains firmware, or FDD, files (see section 1.4.3):
File Name
saturn_reset_revc.fdd
saturn_reset_revc_40MHz.fdd
saturn_rc_revc.fdd
saturn_rc_revc_40MHz.fdd
Preamplifier Type
Pulsed Reset
Pulsed Reset
RC Feedback
RC Feedback
ADC Clock Speed
20 MHz
40 MHz
20 MHz
40 MHz
Table 2.1: Standard Firmware files.
Updates to the firmware are available online:
http://www.xia.com/DXP_Saturn_Download.html
2.1.3
Support
For the latest documentation, please refer to XIA’s website at
http://www.xia.com/DXP_Saturn_Download.html
XIA LLC values feedback from customers. This feedback is an important
component of the development cycle and XIA LLC looks to use this feedback to
improve the software. All bug fixes and feature suggestions should be directed
to [email protected]. Please be sure to include as much information as
5/5/2009
11
DXP Saturn / ProSpect User Manual
MAN-SAT-PRO-0.1
possible when submitting a bug report. For further instructions please refer to
section 1.5.
2.2 Line Voltage Selection and Fusing
CAUTION: Failure to
properly set the Line Select
switch before powering the
unit can result in damage
to the DXP Saturn and
connected equipment
The DXP Saturn can be set up to run on either 115 VAC or 230 VAC at
50/60 Hz. The recessed Line Select switch on the rear panel must be set to the
appropriate position prior to powering the unit. The line voltage fuse can be
replaced without opening the chassis. Use only ‘Time Lag’ 5mm x 20mm (IEC
127-2/III), 250mA fuses rated for 250V. A spare fuse is provided in the fuse
drawer located at the power entry point. The power supply employs full-wave
rectification and linear regulation to achieve the analog and digital DC voltage
supplies. Each secondary AC voltage is also protected using a thermally
resetting polymer fuse. Nonetheless, failure to properly set the Line Select
switch before powering the unit can result in damage to the DXP Saturn and
connected equipment.
2.3 Configuring the Analog Signal Conditioner
2.3.1
Input Signal Connection (BNC or DSUB9): JP9 and
JP10
In a typical system power for the detector preamplifier will be supplied
by the DXP Saturn via the NIM standard DSUB-9 ‘Preamplifier Power’
connector. The output signal and its reference return via BNC coaxial cable to
the DXP. Some manufacturers instead route the signal back through the
preamplifier power cable in order to save space. The DXP Saturn
accommodates either configuration. Jumpers JP9 and JP10 connect pins 8 and 3
of the DSUB9 connector to the BNC shield and BNC inner conductor,
respectively. These jumpers are not stuffed by default, which is equivalent to
stuffing the jumpers in the ‘BNC’ position.
Refer to Figure 2.2 for
jumper locations.
2.3.2
JP100 and JP101 determine the topology of the input amplifier stage,
either single-ended or differential. Single-ended mode should be used in almost
all cases. Differential mode should be selected only if the preamplifier has a
differential output and a balanced line is used, i.e. the signal and reference are
carried on a twisted-pair in the DSUB9 cable.
2.3.3
RAMP for reset-type,
OFFSET for RC feedback
preamplifiers
5/5/2009
Input amplifier configuration: JP100 and JP101
Preamplifier Type—(RC-type vs Reset-type): JP104
The DXP employs different methods of analog signal conditioning,
depending on the preamplifier type. Preamplifier types are described in detail in
section 5.1. Briefly, RC-type refers to preamplifiers having resistive feedback,
whose output signals thus exponentially decay after each x-ray pulse. Resettype preamplifiers employ a feedback switch, resulting in a staircase waveform
with periodic resets. The position of jumper JP104 determines which
preamplifier type the Saturn will operate correctly with. The default position
12
DXP Saturn / ProSpect User Manual
MAN-SAT-PRO-0.1
labeled “RAMP” should be used for reset-type preamplifiers. The position
labeled “OFFSET” should be used for RC-type preamplifiers.
2.3.4
Input Attenuation: JP102
Attenuation may be necessary if the preamplifier gain is excessive
and/or high-energy x-rays are to be processed. X-ray pulses under 300 mV in
size can be accommodated without attenuation. The default position for JP102,
labeled ‘0dB ATTEN’, passes the signal directly. If larger signals must be
processed, set JP102 to the ‘-12dB ATTEN.’ position to reduce the signal by a
factor of four.
Figure 2.2: Diagram for the DPPX10P Revision D.2 printed circuit board.
2.4 Detector Bias Voltage Settings
CAUTION: Applying
high-voltage of the wrong
polarity or magnitude will
almost certainly damage
your detector.
5/5/2009
The DXP Saturn provides a detector bias voltage of up to ± 1,000 V.
The output impedance is 1.1MegΩ due to low pass filtering. The bias
regulation circuitry and LCD display monitor the voltage before the series
resistance, thus the actual output voltage must be derated by the output current
flowing across 1.1MegΩ.
13
DXP Saturn / ProSpect User Manual
2.4.1
Note: Do not confuse
detector bias polarity with
the polarity of the
preamplifier signal; which
may be different. To
change the high voltage
polarity, the power must be
turned off, and the top
panel of the DXP Saturn
removed.
Check the polarity LEDs
BEFORE attaching your
detector.
Note: Once enabled, the
bias voltage ramps slowly
to its set value at the userdefined rate. When
disabled, the bias voltage
ramps at the same rate
back towards ground.
Note: Many types of L/N
sensors are commercially
available, and XIA cannot
guarantee proper
performance with all types.
It is strongly recommended
that the functionality of the
chosen configuration be
tested prior to making the
HV bias connection.
MAN-SAT-PRO-0.1
Bias Voltage Polarity: PCB Key
The polarity of the high voltage is indicated by LEDs in the lower
right of the front panel; the LED corresponding to the chosen polarity will glow
when the unit is turned on: Yellow indicates that the high voltage is disabled;
red indicates the supply is enabled and high voltage is appearing on the SHV
output connector.
The polarity is set using the ‘HV Control Key’, the small printed circuit
card with a finger hole that extends down through a slot in the top printed circuit
board (PCB) to a card-edge connector in the bottom PCB. Align the proper
polarity on the card with the arrow on the surface of the top board. As shipped,
the units are set to –500V (negative). If you need to change the polarity, you
should observe the front panel LEDs to confirm that you have completed the
operation successfully before attaching the detector.
2.4.2
Bias Voltage Ramp Rate: JP1 (Power Supply Board)
The HV detector bias supply ramps up/down when enabled/disabled to
prevent excessive power dissipation in the detector due to charging currents.
Shorting jumper JP1 sets the ramping rate. JP1 is located on the power-supply
printed-circuit board mounted below the DPP board. With some care it can be
set using a pair of tweezers without removing the DPP board. Text adjacent to
the jumper indicates either the “Slow” or “Fast” mode. The slow mode results
in a 50-second ramp duration, with a maximum 20V/second at the 1,000V bias
setting. The fast mode results in 10-second ramp duration, yielding a maximum
100V/second at 1,000V bias setting. The unit is shipped in fast mode, which is
recommended for most x-ray applications.
2.4.3
Setting the L/N Sensor Inhibit Mode: JP20 and JP21
The Inhibit function disables the detector bias voltage under a userdefined condition. The TTL/CMOS compatible input is typically connected to
an external liquid nitrogen sensor that monitors the temperature of the detector
and outputs a logic level, or presents a temperature-variable resistance,
indicating whether the detector is ready for the bias voltage. The Inhibit input is
asserted when the detector is warm, causing the Saturn to disable the HV
supply.
The polarity of the asserted Inhibit signal is set with dual-pole jumper
JP20. The two positions are labeled '0' and '1', corresponding to the logic level
at which the bias supply is disabled, e.g. As in Figure 2.3(c) and (d), set JP20 to
the '1' position if your L/N sensor asserts a high logic signal or presents a high
resistance, i.e. open-circuit, when the detector is warm.
Figure 2.3: HV inhibit jumper connection examples:
(a) Inhibit asserts low (0) if detector is warm; HV is not disabled if Inhibit is open-circuit.
5/5/2009
14
DXP Saturn / ProSpect User Manual
MAN-SAT-PRO-0.1
(b) Inhibit asserts low (0) if detector is warm; HV is disabled if Inhibit is open-circuit.
(c) Inhibit asserts high (1) if detector is warm; HV is not disabled if Inhibit is open-circuit.
(d) Inhibit asserts high (1) if detector is warm; HV is disabled if Inhibit is open-circuit.
Default operation for the open-circuit condition is selected w/ JP21.
The open-circuit condition arises when a temperature-variable resistor sensor is
in the warm state, and also applies to systems where the Inhibit input is simply
not used. It is essentially a pull-up or pull-down resistor for the Inhibit logic
input. Again, the two positions are labeled '0' and '1', corresponding to the
default logic level applied, e.g. As shown in Figure 2.3(d) set JP21 to the '1'
position if you want to disable the HV supply if the Inhibit input is open-circuit.
The DXP Saturn is shipped as shown in Figure 2.3(a) and will thus supply
high voltage without an attached L/N sensor.
Note: You will need a small
flat-blade screwdriver to
modify the bias voltage
setting, accessible via the
front panel.
2.4.4
Setting the Bias Voltage
The DXP Saturn power must be turned on in order to set the bias
voltage magnitude, which is set with a potentiometer accessible through the
front panel using a small screwdriver. The front panel LCD display indicates
the set value of the bias voltage, in Volts.
Once the displayed value is set properly, the supply may be turned on
by pressing the recessed front panel “Enable” button. The front panel LED
indicator should turn from yellow to red and the LCD should show the bias
voltage as it ramps up to the prescribed voltage.
2.5 Making Connections
CAUTION: Do not power
the DXP Saturn until the
line voltage has been
properly selected, all
internal settings have been
made, and the top panel
has be re-installed.
CAUTION: ALSO do not
power the DXP Saturn
until the high voltage
polarity and value have
been properly set has be
re-installed.
All electronic connections are made at the rear panel of the DXP
Saturn. We recommend using cables under three meters in length for
connections to the detector and preamplifier.
2.5.1
Connecting to the Detector/Preamplifier
The detector bias voltage connection uses standard SHV cable. If your
detector uses either MHV or BNC for this connection, an adapter will be
required. The bias voltage inhibit connection is made using standard a BNC
cable. Preamplifier power is supplied via the NIM standard DSUB-9
‘Preamplifier Power’ interface. The preamplifier output signal is connected
either through a BNC cable or through the DSUB-9 cable used to supply
preamplifier power. CAUTION: The DSUB-9 pinout, detailed in Table 2.2
below, is widely used in this industry. However, not all manufacturers adhere to
it. Verify the pinout for your detector/preamplifier before making the
connection.
P1 - Preamplifier Power: Connector: Output DC voltages to preamplifier:
DSUB-9 Female (AMP P/N: 745781-4).
Pin #
Name
Description
1
GND
Internal signal ground connection – NOT chassis
ground
2
GND
Internal signal ground connection – NOT chassis
ground
3
IN_ALT
Alternate signal input, selected with jumper
5/5/2009
15
DXP Saturn / ProSpect User Manual
MAN-SAT-PRO-0.1
4
5
6
7
8
+12V_OUT
NC
-24V_OUT
+24V_OUT
REF_ALT
9
-12V_OUT
JP10 (set to DSUB)
+12V (+5V solder option) DC for preamplifier
No connection –- solder option +5V connection
-24V DC for preamplifier
+24V DC for preamplifier
Alternate signal reference, selected with jumper
JP9 (set to DSUB)
-12V (-5V solder option) DC for preamplifier
Table 2.2: Pin-out detail for the DSUB-9 preamplifier power connector.
2.5.2
Connecting to the Computer
The DXP Saturn communicates via the Universal Serial Bus (USB 2.0).
Do not connect the USB cable until after the software has been installed.
Windows should open the “Found New Hardware Wizard”, which guides you
through the process of installing the USB driver.
Figure 2.4: Select “No, not this time” and press [Next].
Figure 2.5: Select “Install the software automatically (Recommended)” and
press [Next].
5/5/2009
16
DXP Saturn / ProSpect User Manual
MAN-SAT-PRO-0.1
Figure 2.6: A warning about Windows Logo testing will pop up…
Figure 2.7: Press [Continue Anyway].
Figure 2.8: Press [Finish] to complete the driver installation.
5/5/2009
17
DXP Saturn / ProSpect User Manual
MAN-SAT-PRO-0.1
3 System Configuration
At this point the ProSpect software and drivers should have been
installed, and the Saturn hardware should be powered on and identified by
Windows. This chapter will guide you in using the ProSpect Configuration
Wizard utility.
3.1 Initialization Files
After power up the Saturn's DSP and programmable logic are in an
unknown state. Program code, or firmware, for these devices must first be
downloaded via the PCI bus before data can be acquired. After the devices are
operational, user settings are downloaded.
Handel (and thus ProSpect) uses an initialization (INI) file to store all
necessary configuration information, including the path and filename of the
firmware file on the host computer, number and slot location of Saturn modules
in the system, detector characteristics and spectrometer settings, and timing and
synchronization logic functions used. In order to start properly, ProSpect needs
to have the following information:
9
The location of the Saturn FDD firmware files (DSP and FPGA code
that runs on the board, included in the installation package).
9
Various properties of the detector preamplifier including type, polarity
and gain.
INI files can be updated at any time, i.e. after the spectrometer settings
have been optimized, and existing INI files can be loaded at any time. If you
have previously run with ProSpect, your registry settings will point to the most
recently used INI file, and ProSpect will automatically run with these settings
upon startup.
3.1.1
Starting ProSpect without an INI File
Start ProSpect via the Start menu: Start > Programs > ProSpect 0.1 >
ProSpect. The first time ProSpect starts up, the ProSpect Configuration File
Error panel will appear, as shown in below.
5/5/2009
18
DXP Saturn / ProSpect User Manual
To open the Configuration
Wizard: Select
"Configuration Wizard"
from the "Tools" menu
MAN-SAT-PRO-0.1
Figure 3.1: The Configuration File Error appears the first time you run ProSpect
because a valid INI file has not been selected.
Press the [Cancel] button. The next section describes how to generate
a customized INI file using the Configuration Wizard utility.
3.2 The Configuration Wizard
The Configuration Wizard utility can be launched at any time from the
"Tools" menu in ProSpect.
3.2.1
General Settings
These basic settings are the bare minimum necessary to run the Saturn
in normal single-spectrum mode.
1) Welcome to the Prospect Configuration Wizard
The first panel of the Configuration Wizard is simply a welcome screen
with some information about the utility. Press [Next].
2) Module Interface
Select the communications interface. For Saturn Revision C or later,
select USB2 for USB 2.0. For Saturn Revision A or B, select USB1 for
USB 1.0. For old DXP-X10P hardware, select EPP for extended
parallel port interface.
3) Detector Configuration
Select the appropriate detector type. For Reset type, enter the Reset
Interval. This is the time in microseconds that the preamplifier takes
to reset and settle, and should be set conservatively to prevent
associated voltage transients from entering the spectrum. If you don't
know the reset time enter 10 (microseconds). For RC Feedback enter
the RC Decay Time in microseconds. Click in the Polarity field to
change the signal polarity (+ means a detector pulse has a rising-edge).
Enter the Gain in milli-Volts per kilo-electron-Volt. Press [Next].
5/5/2009
19
DXP Saturn / ProSpect User Manual
MAN-SAT-PRO-0.1
Figure 3.2: The Detector Configuration settings.
4) Verify Preamp Type Jumper
A reminder to set the hardware jumper according to the selected
preamplifier type. See section 2.3.3.
5) Firmware
The firmware file contains all code for the programmable devices on
the Saturn. Press the [FDD File…] button to browse to the appropriate
FDD file and press [Next]. If you have updated your firmware since
ProSpect was installed, be sure to select the new file. Note that
different firmware files are required for pulsed-reset and RC-feedback
type preamplifiers, and for 20MHz and 40MHz ADC clock rates (see
section 2.1.2). Updates to the firmware are available online at:
www.xia.com/DXP_Resources.html.
5/5/2009
20
DXP Saturn / ProSpect User Manual
MAN-SAT-PRO-0.1
Figure 3.3: The firmware file contains program code for the Saturn's
programmable devices.
6) Save Completed Configuration
The INI file you have created can now be saved. Select a unique name
for the file, e.g. "saturn_vortex.ini". Press [Finish] to save the INI file
and exit the Configuration Wizard. Note you must load the INI file to
enact your changes.
3.3 Loading and Saving Initialization Files
INI files can be updated at any time, e.g. after spectrometer settings
have been optimized, and existing INI files can be loaded at any time. If you
have previously run with ProSpect, your registry settings will point to the most
recently used INI file, and ProSpect will automatically run with these settings
upon startup.
3.3.1
Loading an INI file
Select "Load Configuration…" from the File menu. Browse to and
select an INI file that you just created and press "Open". ProSpect will
download firmware and initialize the Saturn module.
3.3.2
Saving an INI file
INI files can be updated at any time by selecting "Save Configuration”
or “Save Configuration As…” from the "File menu. You may find it useful to
maintain several INI files, e.g. for operating with different detectors, or with
different spectrometer settings.
5/5/2009
21
DXP Saturn / ProSpect User Manual
MAN-SAT-PRO-0.1
4 Using ProSpect with the DXP Saturn
ProSpect is a PC-based application used with XIA’s digital
spectrometer products. ProSpect provides for the setup, optimization and failure
diagnosis of the instrument, and allows for the reading out, displaying, analyzing
and exporting of acquired energy spectra. A complete description of ProSpect
can be found in the ProSpect User Manual. For the latest documentation, please
refer to XIA’s website at http://www.xia.com/DXP_Saturn_Download.html.
4.1 A Quick Tour of ProSpect
The installer should have created a shortcut for ProSpect on your
Desktop in addition to a menu item for running and uninstalling ProSpect.
When you start the program, the ProSpect main window should be displayed as
in Figure 4.1. The Settings sidebar provides easy access to detector and
acquisition settings. It is intended to be the primary interface for setup and
optimization. Nearly all settings can also be accessed through the standard
menus. The tabbed Data Display panel contains the MCA, Baseline, and ADC
panels. The Status Indicators along the bottom display information about the
state of the hardware and software. Zooming and panning can be customized
using the Display Controls in conjunction with mouse operations both on the
axes and in the data display area itself.
5/5/2009
22
DXP Saturn / ProSpect User Manual
MAN-SAT-PRO-0.1
Figure 4.1: The ProSpect main window upon startup, after hardware initialization.
4.1.1
Settings Sidebar
The tabbed Settings sidebar provides easy access to hardware and
firmware settings. It is intended to be the primary interface for setup and
optimization. The Acquisition tab contains spectrometer settings such as
peaking time and thresholds. The Detector tab contains detector and
preamplifier settings such as polarity and gain.
4.1.2
Data Display Panel
The tabbed Data Display panel contains the MCA, Baseline, and ADC
oscilloscope tool. The MCA tab is used for normal mode spectrum acquisition.
Global MCA Statistics are displayed along the top. The ROI Table displays
statistics for user specified spectral regions of interest. The Baseline tab
displays the baseline histogram and history. The ADC tab contains the
oscilloscope tool for displaying the digitized preamplifier signal. The MCA tab
is used for normal mode spectrum acquisition.
5/5/2009
23
DXP Saturn / ProSpect User Manual
MAN-SAT-PRO-0.1
4.2 Detector and Preamplifier Settings
If the Configuration Wizard was followed correctly as described in
section 3.2, the system should be nearly ready for data acquisition. Before
taking a spectrum, however, we recommend verifying the Detector and
Preamplifier settings.
Figure 4.2: An ADC trace displayed in the ADC tab oscilloscope tool. Notice
that the displayed x-ray events are voltage steps with rising edges,
thus the polarity is set correctly.
Select the ADC tab in the data display panel to display the oscilloscope
tool (see Figure 4.2). Set the Sampling Interval to "1.000" μs and press the
Get Trace button to display an 8000-point raw ADC data set.
Figure 4.3: The Detector tab of the Settings panel.
Select the Detector tab of the Settings panel. The Polarity setting
enables or disables a digital inverter depending on the signal polarity of the
5/5/2009
24
DXP Saturn / ProSpect User Manual
MAN-SAT-PRO-0.1
preamplifier. The Reset Interval is the settling time, in microseconds, of the
preamplifier reset. The Preamp Gain is the gain, in milli-Volts per kiloelectron-Volt of the charge sensitive preamplifier. The Apply button downloads
the adjusted setting(s) to the Saturn hardware. For a thorough discussion of
oscilloscope diagnostic tool, please review section 4.6.1.
4.2.1
Preamplifier Type
The type of preamplifier is determined by code contained in the FDD
(firmware) file. To change the preamplifier Type, create and/or select an INI
file that points to the appropriate FDD file.
Note: Do not confuse
detector bias polarity with
the polarity of the
preamplifier signal; they
are not necessarily related.
4.2.2
Pre-Amplifier Polarity
Preamplifier polarity denotes the polarity of the raw preamplifier
signal, NOT the detector bias voltage polarity. A positive polarity preamplifier
produces a positive step, defined as a voltage step with a rising edge, response to
an incident x-ray. The digital filters in the Saturn expect an input signal with
positive steps. An optional input inverter is employed to correct the signal
polarity for negative polarity preamplifiers. If the polarity has been set
correctly, the ADC oscilloscope trace should display positive steps.
If the ADC trace displays positive steps (as in Figure 4.2), the polarity
has been set correctly. If not, change the Polarity setting and press the Apply
button. Acquire a new trace to verify that the polarity setting is correct.
Please read through section 4.6.1 for a thorough description and figures
relating to the preamplifier signal polarity.
4.2.3
Reset Interval
The Reset Interval is the period of time after each preamplifier reset
that the Saturn waits before re-enabling data acquisition. The delay is set based
on the settling time of the preamplifier reset transient waveform, typically
ranging from hundreds of nanoseconds to hundreds of microseconds. If you are
unsure, enter "10" μs. Setting the delay shorter than the transient settling time
may introduce ‘reset artifact’ events into the spectrum. Setting the delay longer
than necessary introduces additional processor dead time, which will reduce the
data throughput at high count rates.
4.2.4
Preamp Gain
The Preamp Gain setting, in combination with the Calibration
Energy and ADC Percent Rule, controls the Saturn’s variable gain amplifier
such that the input requirements of the ADC are satisfied, given the gain of the
preamplifier. If you know the gain of your preamplifier, enter that value.
Otherwise we recommend using the default value of 3mV/keV. This
preliminary setting can then be adjusted automatically during energy calibration.
In cases of extremely low or high preamplifier gain, it may be necessary to
adjust the nominal gain before taking a spectrum. If the displayed x-ray steps
are less than 20 ADC units in height, reduce the Preamp Gain setting. If the
displayed x-ray steps are greater than 200 ADC units in height, increase the
Preamp Gain setting.
5/5/2009
25
DXP Saturn / ProSpect User Manual
4.2.5
MAN-SAT-PRO-0.1
Preamp Risetime
This is an advanced setting, accessible by pressing the [Edit Filter
Parameters] in the Acquisition settings tab. The preamplifier risetime should
be measured and the Minimum Gap Time set accordingly. This setting is
described in detail in section 4.5.1.2. See section 4.6.1.2 for details on using
ProSpect to measure the risetime for your system and section 5.3 for a
theoretical discussion of the issues involved in trapezoidal filtering.
4.3 Spectrum Acquisition and Display
4.3.1
To begin data collection:
•
Press the Start Run
button in the main
spectrum window, or
•
Saturn»Run
Control»Start Run
Starting a Run
Once the detector/preamplifier settings have been verified you are
ready to collect a sample spectrum. Place a known X-ray source, for example an
55Fe source that produces Mn K line at 5899 eV, such that x-rays impinge on
α
the detector’s active area at a moderate to low rate, i.e. less than 10,000 x-rays
absorbed per second.
Select the MCA tab and press the [Start Run] button in the data
display panel to begin data collection. An uncalibrated energy spectrum should
appear. Figure 4.4 shows a sample uncalibrated 55Fe spectrum. Proceed to
section 0 if a spectrum is displayed.
No spectrum?
Check your hardware
setup, e.g. x-rays present?
9 Check your
initialization
settings, e.g.
preamplifier type
and polarity
correct?
9
Troubleshoot the
signal using the
Oscilloscope tool,
as described in
§4.6.1.
Figure 4.4: An uncalibrated 55Fe spectrum.
Press the [Refresh] button to manually read out the MCA data, or
check the Continuous checkbox to automatically refresh the spectrum. A
horizontal line at zero on the y-axis indicates that no output events have been
acquired, although the run is active. This can result from a hardware setup
problem, e.g. x-rays not hitting detector; detector not powered, etc. Or it can
5/5/2009
26
DXP Saturn / ProSpect User Manual
MAN-SAT-PRO-0.1
result from incorrect configuration settings. The most common problem is
incorrect detector/preamplifier settings. To troubleshoot these settings please
refer to the Diagnostics section 4.6.
4.3.2
Peaking Time (Energy Filter)
Figure 4.5: The Acquisition tab of the Settings panel.
Note: The energy filter
peaking time is widely
referred to as “peaking
time”, whereas the fast
filter peaking time is
referred to as “fast
peaking time”
5/5/2009
The energy filter peaking time is one of the primary user controls.
Generally speaking, a longer peaking time produces better energy resolution at
the cost of increased dead time, and thus lower output count rate. In practice,
the user may set the peaking time to a shorter than optimal value in order to
increase data throughput, making up for degraded energy resolution with
improved statistics. Most detectors also have an upper limit above which the
energy resolution gets worse. HPGe detectors typically have optimal peaking
times between 16μs and 32μs. Silicon drift detectors often produce the best
resolution at 10μs or less. On the other hand some SiLi detectors show
resolution improvements out to 80μs or longer peaking times.
27
DXP Saturn / ProSpect User Manual
Making a plot of energy
resolution versus peaking
time provides a useful
future reference.
Making a plot of energy
resolution versus peaking
time provides a useful
future reference.
MAN-SAT-PRO-0.1
The default parameter settings relating to data acquisition, i.e.
thresholds, baseline acquisition and pileup inspection criteria, reflect a
compromise between robustness and performance. Energy resolution for a
given peaking time can often be improved significantly if these settings are
optimized. Optimization is described in section 4.5.
You will generally find it useful, after making a first attempt to
optimize settings, to capture a set of spectra over a wide range of peaking times,
preferably over the full range that the Saturn supports and generate a plot of
energy resolution versus peaking time. This will serve two purposes: first to
serve as a standard of comparison, so that you can tell if further parameter
adjustments are helping or not; and second, to provide you with some feedback
about whether your spectroscopy system is behaving properly. Later, when
everything is optimized and all the noise sources have been suppressed, you can
go back and repeat these measurements to provide hard data for use in making
the energy resolution versus count rate tradeoff described above.
The [Edit Filter Parameters] button accesses additional filter
parameters, including the energy gap time, the fast, or trigger, filter settings and
pileup rejection parameters. The default filter settings reflect a compromise
between robustness and performance and typically do not need to be changed.
In some cases energy resolution for a given peaking time can be improved
significantly if these settings are optimized as described in section 4.5.
4.3.3
Setting Thresholds
Proper settings for the filter output thresholds are critical to achieving
the best performance.
4.3.3.1 Trigger Threshold
The trigger, or fast, filter threshold sets the low-energy limit for the fast
filter, which is used primarily for pileup inspection. If the baseline threshold is
employed, the detection of x-rays actually extends to energies significantly
below the trigger threshold (see section 4.3.3.2). For this reason it is not
necessary to set the trigger threshold aggressively, i.e. setting the threshold as
low as possible will derive little benefit. If set too low, the trigger threshold will
introduce a zero energy noise peak into the spectrum. In extreme cases it will
halt data throughput entirely.
To optimize the fast filter threshold, set the Baseline Threshold to zero
(so that output events are generated by fast filter triggers only), edit the Trigger
Threshold value and press [Apply]. Typical values range from 600eV to
1500eV. A good procedure is to initially set the value too high, reduce it until
the zero energy noise peak starts to become significant, and then raise it again
until the noise peak is eliminated.
The fast filter length is independent of the energy filter length, or
peaking time, thus the trigger threshold does NOT need to be optimized every
time the peaking time is changed. All thresholds must be readjusted if the gain
changes significantly.
5/5/2009
28
DXP Saturn / ProSpect User Manual
MAN-SAT-PRO-0.1
4.3.3.2 Baseline Threshold
Note: The baseline threshold is not available for decimation 0, i.e.
peaking times less than or equal to 500 ns.
The baseline threshold sets the low-energy limit for the intermediate, or
baseline, filter, which is used for both baseline acquisition and low-energy x-ray
detection. To optimize the baseline filter threshold, first optimize the trigger
threshold as described above, then edit the Baseline Threshold value and press
[Apply]. Typical values range from 150 eV to 1000 eV.
The baseline filter length is linked to the energy filter length, or
peaking time, thus the baseline threshold should be optimized every time the
peaking time is changed. All thresholds must be readjusted if the gain changes
significantly.
Please review section Error! Reference source not found. for a
detailed description of baseline acquisition and averaging. Section 4.6.2.1
describes the empirical optimization of the baseline threshold
4.3.3.3 Energy Threshold
CAUTION: In almost all
cases the Energy
Threshold should be set to
zero. An error term in the
counting statistics is
introduced when the
Energy Threshold is
enabled. For this reason it
should only be enabled at
low data rates.
The energy threshold sets the low-energy limit for the slow, or energy,
filter, which is used primarily for measuring the pulse-height, i.e. energy, of xray voltage steps. Triggering on the energy (slowest) filter can extend the
detection range down to the lowest energies for a given detector, however, in
most cases we recommend setting the Energy Threshold to zero. This is
because the dead time associated with x-rays detected by the energy filter can
not be directly measured. It remains available primarily for two special cases:
•
A non-zero energy threshold is appropriate for ultra-soft x-ray detection
at very low input count rates.
•
A non-zero energy threshold may be used to extend the detection range
for decimation 0, i.e. peaking times under 500 ns. Dead time and count
rate statistics will however be distorted.
4.3.4
MCA Bins and Bin Width
The size and granularity of the spectrum can be easily adjusted. The
number of spectrum bins sets the granularity of the acquired spectrum. The
eV/Bin setting determines the size of each MCA bin in electron Volts.
Together, these settings determine the dynamic range of the MCA: The
resulting energy spectrum ranges from zero to a maximum equal to the number
of spectrum bins multiplied by the set value of eV/Bin (e.g. a 40keV spectrum
results from 2048 bins at 20eV per bin).
Note that these digital spectrum controls are independent of the analog
signal gain control (more later), and it is possible to display an energy range far
in excess of the detector, amplifier chain and/or ADC’s capabilities (i.e. just
because a 100keV spectrum is displayed doesn’t mean that 80keV x-rays will
show up).
4.3.5
Baseline Settings
Baseline selection and averaging is critical to optimum spectrum
acquisition.
5/5/2009
29
DXP Saturn / ProSpect User Manual
MAN-SAT-PRO-0.1
4.3.5.1 Baseline Cut
Often there are nonlinearities in the preamplifier signal, e.g. subsequent
to the reset step, that result in spurious baseline samples. These samples will
pollute the baseline average and thus degrade energy resolution. The DSP can
inspect incoming baseline samples versus the statistical distribution, or
histogram, of such samples and reject outliers prior to computing the running
average. The Baseline Cut is the percentage of the peak of the histogram
beyond which instantaneous baseline samples are rejected. We recommend
enabling the cut, with a Baseline Cut value of 5.
4.3.5.2 Baseline Average
The baseline is the output of the energy filter in the absence of x-rays.
A running average of baseline samples, acquired between x-ray events, is
subtracted from the x-ray peak samples to arrive at the true energy of incident xrays. A perfect detector and preamplifier would produce a constant baseline,
however, in the real world the actual baseline varies. The number of Baseline
Average samples can strongly affect performance. More samples improve noise
reduction but slow the reaction time to actual changes in the baseline. In most
cases a value between 64 and 512 will produce the best results.
Please review section 5.4 for a detailed description of baseline
acquisition and averaging. Section 4.6.2.2 describes the empirical optimization
of the number of samples in the baseline average.
4.3.6
Dynamic Range / Energy Data
The Calibration Energy and ADC Percent Rule combined with the
Preamp Gain setting determine the Saturn hardware variable gain setting.
Given the Preamp Gain, the DSP calculates the pulse amplitude of an x-ray
with energy equal to the Calibration Energy. It then sets the variable gain such
that this amplitude spans the percentage of the ADC input range defined by the
ADC Percent Rule.
Output count rate is attenuated for pulse amplitudes greater than 20%
of the ADC range. The recommendation is therefore to set Calibration Energy
equal to the spectrum maximum energy, and set ADC Percent Rule to 20%.
4.3.7
Calibrating the Saturn Hardware Gain
If the spectrum looks reasonably good at this point, we can calibrate
and proceed with data optimization. This process modifies the hardware gain of
the DXP Saturn, and refines the Preamplifier Gain setting that was entered in
Detector tab. Once calibration is completed we will save the modified settings
to an INI file so that they will be retrieved the next time ProSpect is started.
Due to the analog nature of the variable gain amplifier that is used, the precise
analog gain following a hardware gain modification is unknown until it is
measured. For this reason, calibration is an iterative process that must be
executed any time acquisition values are changed that require a hardware gain
modification, e.g. if the spectrum size is increased. What is more important is
the stability of the gain at a fixed setting.
5/5/2009
30
DXP Saturn / ProSpect User Manual
MAN-SAT-PRO-0.1
4.3.7.1 Adding ROIs
The Region Of Interest (ROI) table is located below the spectrum. A
single ROI is displayed by default. If you cannot see the ROI table, slide the
panel separator up. If the ROI table is empty, click in the first cell to create an
ROI row. The first column indicates which ROI is active—only one ROI can be
active at a time. Note that each ROI can be locked and the region is set by
default to fill. The Lower and Upper bounds of the ROI can be set manually,
but it is easier to use the Auto ROI function described below.
Figure 4.6: The full spectrum window ‘right-click’ menu is displayed.
Context sensitive menus are available if the mouse pointer is
located over the x-axis or y-axis, or over the cursor.
4.3.7.2 Auto ROI
Place the mouse pointer over the spectrum peak you wish to calibrate.
Right-click and select “Place Cursor”. Move the cursor to the center of the
calibration peak, right click on the cursor and select “Auto ROI”. A region of
interest should automatically appear on the peak. In some cases, where few
events have been collected, the Auto ROI feature will not properly enclose the
peak. In these cases, the ROI can be adjusted directly in the Spectrum Window.
5/5/2009
31
DXP Saturn / ProSpect User Manual
MAN-SAT-PRO-0.1
Figure 4.7: The Auto ROI function (cursor context menu) automatically
defines a region of interest around the peak selected with the active
cursor. The cursor context menu is displayed by right-clicking on
a cursor.
4.3.7.3 Calibration Energy
Once and ROI has been defined, the table displays the number of
events enclosed in the region, and the calculated mean energy and FWHM (fullwidth-half-maximum) in electron-Volts.
To calibrate: First make sure the ROI containing the selected peak is
active, by clicking in the leftmost column. Enter the peak’s known energy into
the Calib. (keV) field then press the [Calibrate ROI] button. You should hear
the Saturn hardware emit a few audible clicks as it carries out the calibration.
The spectrum should now re-appear, with the peak properly calibrated. For the
best calibration it is often necessary to run a few iterations. If the initial
spectrum was badly out of calibration, the resulting change in gain may cause
the peak to jump partially or fully out of its ROI. In this case, readjust the ROI
so that it centers on the peak before repeating the calibration.
Note that the calibration routine can be executed during a data
acquisition run. The run will automatically restart once the calibration is
complete.
Figure 4.8: A calibrated 55Fe spectrum with four regions of interest (ROIs).
5/5/2009
32
DXP Saturn / ProSpect User Manual
4.3.8
MAN-SAT-PRO-0.1
Saving and Loading INI Files
Completion of the gain calibration is the final step in the verification of
basic settings. Note: Calibration is also typically executed any time acquisition
values are changed, prior to data acquisition (see section 4.3.5 above). The
settings should now be saved to an INI file such that they will automatically
reload whenever ProSpect is started. In general the goal is to store an
approximate value for the Preamplifier Gain. The computed Preamplifier
Gain will change slightly each time the calibration is executed, thus there is
little benefit derived from saving the INI file every time, because the next time
you change an acquisition value, e.g. Peaking Time, the gain will again be
slightly off. However if you intend to run with all the same Acquisition Values
in the future, then do save the INI file. In this limited case, the spectrum will be
calibrated upon startup.
Select File»Save Configuration to save your current settings to the
currently loaded INI file, or select File»Save Configuration As… to create a
new INI file. Select File»Load Configuration to retrieve settings that were
previously saved.
4.3.9
Output Statistics
Global statistics, such as ICR, OCR and Dead Time fraction are
displayed along the top of the main window. Statistics for defined regions of
interest are displayed in the ROI table.
4.3.9.1 Real Time
This is simply the time elapsed between the Start Run and Stop Run
operations, measured in the DSP itself every 500μs with 800 ns accuracy.
Intermediate values read out during the run will therefore have the lower
accuracy, but the value reported at the end of the run will be fully accurate
Note: The displayed Live
Time does not express a
relationship between the
OCR and ICR. The Dead
Time Percentage display
does relate OCR to ICR.
4.3.9.2 (Baseline/Trigger) Live Time
This is the time that the Baseline or Trigger filter remains under its
threshold. This is not to be confused with the Energy Filter live time.
4.3.9.3 Events
This is the total number of events passed from the FiPPI to the DSP.
This number includes overflows (events with energy greater than the spectrum
maximum) and underflows (events below the spectrum minimum) as well as
events displayed in the MCA.
4.3.9.4 Input Count Rate (ICR)
The measured input count rate (ICR) is displayed in units of thousands
of counts per second [kcps]. The DSP applies internal correction procedures so
that the measured ICR is very close to the true ICR, especially for longer
peaking time settings. Please see section 0 for a discussion of this issue.
5/5/2009
33
DXP Saturn / ProSpect User Manual
MAN-SAT-PRO-0.1
4.3.9.5 Output Count Rate (OCR)
The output count rate is also displayed in units of thousands of counts
per second [kcps]. The OCR is simply the total number of detected events that
did not pile up divided by the real time elapsed. Detected events that do not pile
up, but whose measured energy falls outside the spectrum upper and lower
limits, are called overflows and underflows, respectively. Both overflows and
underflows are included in the OCR.
4.3.9.6 Dead Time Percentage
This high-level output is computed by ProSpect as the percentage of
time that the energy filter is busy processing x-rays, calculated as:
Dead Time = (1 – OCR/ICR)*100%
4.3.9.7 ROI Statistics
The ROI table displays the number of events enclosed in each defined
ROI, and the calculated mean energy and FWHM (full-width-half-maximum) in
electron-Volts.
4.3.10 Display Controls
ProSpect features a wide array of display controls. Most of these
controls can be accessed by right-clicking in the display area. X and Y axis
scaling controls are accessible in the drop-down menus at the upper left of the
data display panel.
4.3.11 Saving, Loading and Printing Data
4.3.11.1 Spectrum Files
MCA data can be saved for later display in ProSpect or for analysis in
another program. Select File»Save MCA Data… to create an ASCII file. The
default format includes bin scaling and other basic operating parameters and is
date/time stamped. We would like to directly support as many formats as
possible—please let us know if your format is not yet supported.
4.3.11.2 Diagnostic Files
The ADC, Baseline and DSP Parameters diagnostic tools allow for
the export of displayed data to a file. Simply select File» Save “X”, where X
refers to the desired data.
4.3.11.3 References
Data references are accessible via the mouse context menu in ProSpect.
References are used for comparing different data sets in various acquisition and
system modes. Right click in the data display panel and select Set As
Reference to store the active data. When new data is acquired the reference
data persists in the display.
5/5/2009
34
DXP Saturn / ProSpect User Manual
MAN-SAT-PRO-0.1
4.4 Run Control
These settings determine the duration and display refresh rate of the
data acquisition run and whether previous MCA data are cleared or retained at
the start of a new run. The DXP Saturn can end the run when a specified preset
real or live time has elapsed, or when a specified number of events have been
detected or processed.
Figure 4.9: The run control area of the MCA panel.
4.4.1
Preset Runs
Select the Preset Run type:
•
None - run ends when user presses “Stop” button
•
Fixed Real Time – run ends after specified real time elapses
•
Fixed Energy Live Time – run ends after specified real time
elapses
•
Fixed MCA Counts – run ends after specified number of events
have been processed.
•
Fixed Input Triggers – run ends after specified number of
events have been detected.
4.4.2
The GATE Function
The external GATE (BNC) input can be configured to halt data
acquisition in real time according to an external logic signal. The GATE
function supports TTL/CMOS levels.
4.4.3
Auto Update Interval
The spectrum display can be set to automatically refresh with a user
specified interval. Select Tools»Options then select the Handel tab of the
Prospect Options panel. Enter the desired update interval in milliseconds.
4.4.4
Clear or Retain MCA Data
When a new run is started the data from the previous run can either be
cleared or retained. This setting is accessed in the MCA panel via the Resume
checkbox. When checked, data from the previous run will be retained.
4.5 Optimizations
5/5/2009
35
DXP Saturn / ProSpect User Manual
4.5.1
MAN-SAT-PRO-0.1
Throughput (OCR)
The OCR depends only on the ICR and the dead time per event τd:
OCR = ICRt * exp -
(ICRt τd)
,where τd = 2*(tp + tg).
To increase the OCR at a given ICR, the dead time per event must be
reduced. The obvious first step is to reduce the energy peaking time tp. Further
improvements can be made by reducing the gap time tg.
4.5.1.1 Peaking Time (Energy Filter)
Making a plot of energy
resolution versus peaking
time provides a useful
future reference.
The peaking time is the energy filter length, or integration time, i.e. the
ramping interval of the trapezoid. It is the primary setting in determining the
balance between count rate performance and energy resolution.
Figure 4.10: The output response of the Energy Filter with peaking time
(ramping time) = 20.16μs and gap time (flattop time) = 0.96μs.
The trapezoid is the response to an x-ray.
You will generally find it useful, after making a first attempt to
optimize settings, to capture a set of spectra over a wide range of peaking times,
preferably over the full range that the Saturn supports and generate a plot of
energy resolution versus peaking time. This will serve two purposes: first to
serve as a standard of comparison, so that you can tell if further parameter
adjustments are helping or not; and second, to provide you with some feedback
about whether your spectroscopy system is behaving properly. Later, when
everything is optimized and all the noise sources have been suppressed, you can
go back and repeat these measurements to provide hard data for use in selecting
the best peaking time for a given input count rate.
Reducing the gap time can
significantly increase the
data throughput at a given
peaking time.
5/5/2009
4.5.1.2 Gap Time (Energy Filter)
The gap time of the energy filter sets the flattop length of the output
trapezoid. Because the gap time directly affects the dead time, it is
36
DXP Saturn / ProSpect User Manual
MAN-SAT-PRO-0.1
advantageous to set the gap time as short as possible. The gap time is subject to
several constraints.
Generally the gap time should be set to a value that exceeds the 0 – 100
% preamplifier risetime in response to a detected x-ray. As long as this
constraint is met, the trapezoid peak is tolerant of variations of the x-ray arrival
time relative to the ADC clock. The digital filter architecture further constrains
the gap time to an integer between 3 and 64 decimated clock intervals. In
ProSpect, the user sets the Minimum Gap Time slightly larger than the the
measured preamplifier risetime, and ProSpect automatically maintains the gap
time based on the decimation-dependent filter constraints. Pleaser refer to
section 4.6.1.2 for details on using ProSpect to measure the risetime for your
system, and section 6.3.2 for a discussion of decimation and decimated clock
periods.
Figure 4.11: The Edit Filter Parameters panel.
To edit the Minimum Gap Time press the Edit Filter Parameters
button in the Acquisition settings panel to open a dialog. Enter the desired
value for Minimum Gap Time and press [OK].
5/5/2009
37
DXP Saturn / ProSpect User Manual
MAN-SAT-PRO-0.1
Normally the Minimum Gap Time should be set to a value that
exceeds the preamplifier risetime in response to a detected x-ray, however, there
is one exception. At very high count rates, where resolution is less of a concern,
it can be advantageous to set the Minimum Gap Time to a smaller value, even
to zero. This setting will only have an effect for decimation 0, i.e. for peaking
times less than 0.50μs. For other decimations the gap time will be set to the
minimum value of 3 decimated clock cycles. Note that you may have to adjust
other settings as a result:
1. Peak Sampling Time – Because you are reducing or even
eliminating the flattop section of the trapezoid, performance
becomes more sensitive to the energy sampling time. Refer to
section 4.5.3.6.
2. Gain Calibration – A consequence of setting the gap time less
than the preamplifier risetime is ballistic deficit: The peak value of
the trapezoid is reduced. As a result you will almost certainly have
to increase the gain after the gap time has been changed. See
section 4.3.6.
4.5.2
Pileup Rejection
Pileup inspection is described in detail in section 5.8. These settings
should only be modified by users with a good understanding of the principles of
pileup inspection.
Figure 4.12: Slow, or Energy, filter output waveform diagram.
CAUTION: When set too
low, the MAXWIDTH
criterion can reject nonpiled-up x-rays, resulting
in attenuation at higher
energies.
5/5/2009
4.5.2.1 Maximum Width Constraint
The DSP parameter MAXWIDTH sets the maximum acceptable time
that the fast trigger output can stay above threshold for a single event. Properly
set, this constraint detects fast pileup (event separation on the order of 100ns).
See section 5.8 for more information. The Max Width setting is accessible in
the Edit Filter Parameters panel. By default it is set to 400ns, allowing for a
38
DXP Saturn / ProSpect User Manual
MAN-SAT-PRO-0.1
preamplifier risetime up to 200ns. MAXWIDTH should be at least twice the
fast peaking time plus the preamplifier’s 1% settling time:
Max Width > 2*Fast Peaking Time + Preamp Risetime
4.5.2.2 Peak Interval
The DSP parameter PEAKINT sets the minimum acceptable time that
the slow energy filter needs to process a single event, i.e. the interval between
peaks that can be properly sampled. This constraint detects slow pileup (event
separation on the order of the energy peaking time). See section Error!
Reference source not found. for more information.
The optimum peak interval is usually fixed relative to the sum of the
peaking time and gap time. The Peak Interval Offset is measured forwards in
time from this sum, i.e. measured forwards from the end of the flattop period
(see Figure 4.12):
Peak Interval = Peaking Time + Gap Time + Peak Interval Offset
The Peak Interval setting is accessible in the Edit Filter Parameters panel.
In most cases it should be left at zero. Larger values will result in a more
conservative pileup inspection at the cost of increased dead-time-per-event.
4.5.2.3 Reducing the Fast Peaking Time
At very high rates the fast
filter peaking time may be
reduced, to maintain good
pileup inspection.
The default fast peaking time of 100 ns should be used in most cases.
Generally speaking, a longer fast filter peaking time produces a lower pileup
inspection threshold at the cost of a longer pileup inspection time interval. Little
if any real benefit is derived from increasing the fast peaking time unless the
preamplifier signal is extremely noisy. For good pileup rejection, the fast filter
peaking time should be much shorter than the energy filter, which becomes a
problem when the shortest energy filter peaking times are used. In these cases,
some improvements in pileup rejection may be possible if the fast filter peaking
time is reduced, e.g. to 60ns. We don’t recommend using a fast gap time other
than zero.
Open the Edit Filter Parameters panel and enter a new value for the
Fast Trigger Filter Peaking Time and press [Apply]. Note that you may have
to adjust other settings as a result:
1. Trigger Threshold – Because of the zero gap time, the Fast
Trigger Filter normally produces some ballistic deficit. Reducing
the trigger peaking time can heighten this effect. For best results
the threshold be checked, as described in section 4.3.3.
2. Max Width – The time over threshold is directly related to the
filter length. If you previously optimized Max Width, i.e. the
maximum time over threshold, you may need to re-optimize. See
section 4.5.2.1.
4.5.3
Energy Resolution
There are many possible reasons for poor energy resolution. This
section points to the most common issues.
5/5/2009
39
DXP Saturn / ProSpect User Manual
MAN-SAT-PRO-0.1
4.5.3.1 Proper Peaking Time Selection
The first step in improving energy resolution is, of course, to optimize
the Peaking Time. Use your plot of energy resolution versus peaking time to
select a peaking time where you get good energy resolution before making these
adjustments.
4.5.3.2 Baseline Acquisition
Capturing good baseline values and proper averaging are vital to
achieving good energy resolution. The Baseline Threshold and Baseline
Average Samples settings must be set properly for a given peaking time. See
section 4.6.2 for making adjustments in ProSpect, and section 5.4 for more
detailed explanations of baseline issues.
4.5.3.3 Eliminate Noise Pickup
Noise pickup can destroy performance. It is very important to identify
and eliminate excess noise in the hardware. Typically this involves eliminating
ground loops, removing switching power supplies in close proximity and
improving shielding. Please refer to section 4.6.1 below for a brief introduction
to using the Trace panel to identify noise issues.
4.5.3.4 Sufficient Gain to Sample Noise
If the signal gain is such that noise is not properly digitized at the ADC,
energy resolution will not be optimal. This would result from a Preamp Gain
setting that is too high (resulting in a Saturn variable gain setting that is tool
low). Set the gain so that the noise is sufficiently digitized – see section 4.6.1.1.
4.5.3.5 Sufficient Gap Time
If the gap time is too short, the trapezoid peak sample (the energy
sample) becomes dependent on the arrival time of the x-ray relative to the ADC
clock. Make sure that the Minimum Gap Time is longer than the preamplifier
risetime as described above in section 4.5.1.2.
4.5.3.6 Peak Sampling Time
The optimum sampling time of the energy filter is usually fixed relative
to the sum of the peaking time and gap time. The Peak Sample Offset is
measured backwards in time from this sum, i.e. measured backwards from the
end of the flattop period (see Figure 4.12):
Sampling Time = Peaking Time + Gap Time – Peak Sample Offset
The Peak Sample Offset setting is accessible in the Edit Filter Parameters
panel. In most cases it should not be edited. An exception is when running
with a very short gap time at decimation 0 (see section 4.5.1.2 above). In this
case the Peak Sample Offset should be reduced empirically. Please see section
5.6.2 for a full discussion before attempting this procedure.
5/5/2009
40
DXP Saturn / ProSpect User Manual
MAN-SAT-PRO-0.1
4.6 Diagnostics
The Saturn and ProSpect provide several diagnostic tools for
identifying and resolving functional and performance issues.
To open the Traces panel,
click on the Traces tab in
the main window.
4.6.1
The ADC Panel (Oscilloscope)
The ADC panel displays waveforms captured at the input of the digital
filter, i.e. the preamplifier signal as seen at the Saturn’s analog-to-digitalconverter (ADC). The most significant 10 bits of the 12-bit ADC signal is
plotted over 8000 sample points, with a user settable sampling interval. It can
be a useful diagnostic tool for checking preamplifier polarity and gain,
measuring the risetime, and for tracking down noise pickup.
To acquire and view a waveform select the ADC tab in the data display
panel. Enter the Sampling Interval per sample point in microseconds and press
the [Get Trace] button.
Figure 4.13: The ADC panel is a useful diagnostic tool.
The preamplifier Gain and
Polarity settings are
accessed in the Detector
tab of the Settings panel:
5/5/2009
4.6.1.1 Determining the Preamplifier Polarity and Gain
A common configuration error involves setting either the preamplifier
signal polarity or gain incorrectly. Note: The preamplifier type, i.e. pulsed-reset
or RC-feedback, is determined by the firmware file that is downloaded to the
hardware (see section 3.2.1)
The Preamplifier Polarity configuration setting determines whether the
ADC code is inverted prior to the digital filter pipeline, which expects x-ray
pulses with a rising edge. The Trace panel displays the digital signal after this
optional inversion. If the x-ray pulses are displayed with a falling edge, as
shown in Figure 4.14, then the polarity setting is incorrect; if pulses are
displayed with a rising edge, as in Figure 4.15, then the polarity setting is
correct.
41
DXP Saturn / ProSpect User Manual
For best results the noise
should span 20 or more
vertical units in the
Oscilloscope Panel display.
MAN-SAT-PRO-0.1
The Preamp Gain setting in the Detector panel, in combination with
the Dynamic Range setting in the Configuration panel, determines the Saturn
analog variable gain setting. The variable gain is set such that an x-ray with
energy equal to the dynamic range value produces a voltage step of the
maximum allowable amplitude at the ADC input. X-rays with energies
exceeding the dynamic range value cannot be processed correctly. The
Dynamic Range setting should thus be set above the largest x-ray energy
present in the system.
In order to get the best energy resolution the gain must be set such that
electronic noise is digitized sufficiently that it can be properly filtered. In
practice this means that the noise should span 20 or more vertical units in the
display. In Figure 4.14 the noise is contained in less than 10 displayed vertical
units, indicating that the hardware gain setting is too low. This could be due
either to a Preamp Gain configuration setting that is too high or to the
Dynamic Range being set too large. The noise displayed in Figure 4.15 spans
approximately 40 vertical display units, indicating that the Preamplifier Gain is
set correctly and the spectrum is properly sized.
To adjust your own system, first select the Trace tab in the main
window and acquire a few traces, until you have recognizable x-ray events
displayed. Compare the polarity and noise amplitude to the figures. If
necessary, change the Polarity and Preamp Gain. You may also need to
modify the ADC Rule (see section 4.3.6).
Figure 4.14: An ADC trace of a reset-type detector with the Saturn configured
with the wrong polarity and a gain setting that is too low. X-ray
steps displayed in this panel should have a rising edge, and noise
should span 20 or more vertical units.
5/5/2009
42
DXP Saturn / ProSpect User Manual
MAN-SAT-PRO-0.1
Figure 4.15: An ADC trace with correct polarity and a typical gain. Note that
the noise is well digitized at roughly 40 vertical units.
4.6.1.2 Measuring the Preamplifier Risetime
The ADC panel is also useful for measuring the preamplifier signal
risetime, which should be done before modifying the Minimum Gap Time as
described in section 4.5.1.2.
As mentioned earlier, the minimum sampling interval in the display is
20ns—the actual ADC sampling period. Acquire an ADC trace at the minimum
sampling interval of 0.10μs that includes at least one well separated x-ray event.
Use the zoom tool (accessed via the right click menu or through the display
controls at the graph’s upper left) to expand the horizontal axis about the
selected event. Place a cursor by right-clicking in the display area and selecting
Place Cursor, immediately before the x-ray pulse. Place a second cursor
immediately after the signal has settled following the pulse. The dX field of the
cursor data area in the upper right hand corner should now display the 0 – 100%
preamplifier risetime in μs.
5/5/2009
43
DXP Saturn / ProSpect User Manual
MAN-SAT-PRO-0.1
Figure 4.16: Use the zoom function and cursors to measure the preamplifier
risetime. The risetime is approximately 400ns.
4.6.1.3 Measuring the RC Decay Time τ (RC-Feedback Preamplifiers
only)
The Trace panel is also useful for measuring the decay time for RCfeedback preamplifiers.
Acquire an ADC trace that includes at least one well separated x-ray
event. Use the zoom tool (accessed via the right click menu or through the
display controls at the graph’s upper left) if necessary to expand the horizontal
axis about the selected event such that the entire decay time is displayed. Place
a cursor by right-clicking in the display area and selecting Place Cursor at the
peak value of the x-ray pulse. Place a second cursor mmediately before the xray pulse such that a baseline value is selected. Record the dY value from the
cursor data display—this is the pulse height. Now move the second cursor to
the point on the decay curve that produces a new dY value that is 1/e times the
measured pulse height:
dY’ = (1/e) · dY ~ 0.37 · dY
The cursors should now be separated by the time constant τ, displayed in μs in
the dX field.
To open the Baseline
panel, click on the Baseline
tab in the main window.
5/5/2009
4.6.2
The Baseline Panel
Baseline measurements are continually updated samplings of the output
of the energy filter when no event is being processed. A running average of
these baseline samples is then made to reduce the noise in this measurement and
the result is subtracted from instantaneous raw pulse-height measurements to
determine their true amplitudes. Please first review section 5.4 for a thorough
discussion of baseline acquisition.
44
DXP Saturn / ProSpect User Manual
MAN-SAT-PRO-0.1
The Baseline panel displays a statistical distribution or Histogram of
the instantaneous baseline samples and a History of the running average of
those samples. The baseline histogram and history are powerful tools for
diagnosing electronic noise and common nonlinearities in the detector and
preamplifier.
Select the Baseline tab, select Histogram and press [Get Baseline] to
acquire a baseline histogram. You should see a Gaussian peak with few, if any,
outliers, as in Figure 4.17. If there are many outliers to the right of the peak, as
in Figure 4.18, the threshold is set too high. If the right side of the peak is
attenuated, non-Gaussian as in Figure 4.19, the threshold is set too low.
Figure 4.17: A good baseline histogram: the shape of the noise peak is
Gaussian with no outlying data points.
4.6.2.1 The Baseline Threshold
Section 4.3.3 includes a discussion about setting thresholds based on
visual feedback in the MCA panel. Threshold settings also affect baseline
acquisition: Baseline acquisition is enabled only when the fast Trigger filter
output is below Trigger threshold and the intermediate Baseline filter output is
below the Baseline threshold. It is assumed that the Trigger threshold is set
conservatively, so that baseline acquisition is dominated by the Baseline
threshold. Note: The baseline threshold is not available for decimation 0, i.e.
peaking times less than or equal to 500 ns.
Edit the Baseline threshold value in the Acquisition tab and press
[Apply]. Typical values range from 150 eV to 1000 eV. The baseline filter
length is linked to the energy filter length, or peaking time, thus the baseline
threshold should be optimized every time the peaking time is changed. All
thresholds must be readjusted if the gain changes significantly. For this reason it
is useful to save INI files for commonly used peaking times after optimizations
are complete.
5/5/2009
45
DXP Saturn / ProSpect User Manual
MAN-SAT-PRO-0.1
Figure 4.18: A baseline histogram with the threshold too low. Notice that the
right side of the noise peak is attenuated. The rest of the noise
peak will show up in the energy spectrum.
Figure 4.19: A baseline histogram with the threshold too high. The baseline
samples to the right of the noise peak are partial energy events that
should be in the energy spectrum.
5/5/2009
46
DXP Saturn / ProSpect User Manual
MAN-SAT-PRO-0.1
4.6.2.2 Optimizing the Baseline Average Length
The Baseline panel is also useful for optimizing the number of samples
in the baseline average. Please first review section 5.4 for a thorough discussion
of baseline acquisition.
The baseline average length refers to the number of samples of the
Baseline Filter raw output in the running average of baseline samples, which
should be:
•
Large enough to average out electronic noise at the higher frequencies.
•
Small enough to track low frequency fluctuations in the front end, i.e.
detector dark current.
The precise noise distribution and the low-frequency signal
characteristics of the detector and preamplifier together yield an optimum
number of samples in the average. Too small a value will not allow for proper
filtering of electronic noise. Too large a value will not allow proper tracking of
low frequency signals, e.g. due to EMI, that can be cancelled out with double
correlation.
Select History and press [Get Baseline] to view the baseline running
average. You want to achieve a waveform similar to that shown in Figure 4.21,
where noise is filtered out but the average still tracks real variations. If you see
something more like Figure 4.20 or Error! Reference source not found.,
adjust the Baseline Average Samples setting in the Configuration panel and
press [Apply]. Acquire another trace and adjust as necessary. In most cases the
values 128 and 256 yield the best results. At high rates it may be advantageous
to reduce the number of samples as low as 16. For near perfect preamplifiers the
average can be increased to 1024 or more. In any case the optimization is not
complete until you acquire a spectrum and verify the energy resolution has
improved.
5/5/2009
47
DXP Saturn / ProSpect User Manual
MAN-SAT-PRO-0.1
Figure 4.20: The baseline average with the number of samples set too low (16
samples in the average). Notice that there is still a lot of noise, as
well as some real variations in the baseline.
Figure 4.21: The baseline average with the number of samples set properly (128
samples in the average). Notice that there is very little noise, but
that real baseline variations are tracked. In this case the downward
variation is due to some curvature in the preamplifier output
following a reset.
Warning: Changing DSP
parameters without
understanding them is
discouraged..
4.6.3
DSP Parameters
The DSP Parameters panel, accessible via the Tools menu, provides a
diagnostic display of all DSP's internal parameters. The Hex and Decimal radio
buttons determine whether parameters are displayed in hexadecimal or decimal
format. Press the [Update] button to refresh the display. Note that various
active parameters will change every time the [Update] button is pressed.
4.6.3.1 Generating a Diagnostic DSP Parameters File
The [Export to File…] button generates a ASCII text file containing
all of the parameters for the currently selected processing channel. You may be
asked to generate this file by technical support.
5/5/2009
48
DXP Saturn / ProSpect User Manual
MAN-SAT-PRO-0.1
Figure 4.22: The DSP Parameters panel. Do not modify these values unless as
instructed by XIA support staff.
4.6.3.2 Modifying DSP Parameters
In some cases, as directed by the XIA support staff, it may be necessary
to modify the DSP’s operating parameters directly. To edit a parameter select
the field using the mouse, enter the new value and press [Return]. If you do not
press [Return] the parameter will return to its unmodified value when another
item is selected. Changing parameters in this panel without a deep
understanding of XIA’s DSP processors may produce exotic and unpredictable
results. We recommend doing so only under the guidance of XIA support staff.
4.6.4
Submitting a problem report:
XIA encourages customers to report any problems encountered using
any of our software via email. In most cases, the XIA engineering team will
need to review bug information and run tests on local hardware before being
able to respond.
All software-related bug reports should be e-mailed to
[email protected] and should contain the following information, which
will be used by our technical support personnel to diagnose and solve the
problem:
9 Your name and organization
5/5/2009
9
Brief description of the application (type of detector, relevant
experimental conditions...etc.)
9
XIA hardware name and serial number
9
Version of the library (if applicable)
9
OS
9
Description of the problem; steps taken to re-create the bug
49
DXP Saturn / ProSpect User Manual
MAN-SAT-PRO-0.1
9
Additional data:
o
Saved MCA data, if relevant (see section 4.6.4.1)
o
Saved Baseline data, if relevant (see section 4.6.4.2)
o Saved Trace data, if relevant (see section 4.6.4.3)
Please compress the Error Report into a ZIP archive and attach the support
request email.
4.6.4.1 Saving MCA Data
If you are having difficulty acquiring a spectrum, or the spectrum looks
strange, please save and submit a sample MCA file with the Error Report. In
the MCA tab, acquire a spectrum, and then pres select File>>Save MCA
Data…. Save the file in the "ProSpect_xxxxxx_Rpt" sub-directory in the
ProSpect installation directory.
4.6.4.2 Saving Baseline Data
If you are having difficulty acquiring a good baseline histogram, or the
spectrum looks strange, please save and submit a sample baseline histogram file
with the Error Report. In the Baseline tab, acquire a histogram, and then pres
select File>>Save Baseline…. Save the file in the "ProSpect_xxxxxx_Rpt"
sub-directory in the ProSpect installation directory.
4.6.4.3 Saving Trace Data
If your ADC or filter output traces look strange, please save and submit
a sample trace file with the Error Report. In the Trace tab, acquire a trace, and
then pres select File>>Save Trace…. Save the file in the
"ProSpect_xxxxxx_Rpt" sub-directory in the ProSpect installation directory.
5/5/2009
50
DXP Saturn / ProSpect User Manual
MAN-SAT-PRO-0.1
5 Digital Filtering: Theory of Operation and
Implementation Methods
This chapter provides an in-depth discussion of x-ray pulse-processing
theory both generally and as implemented in the DXP Saturn. The topics
include x-ray detection how, digital trapezoidal filter basics, thresholds,
baselines, peak sampling, pileup inspection, and input and output count rates.
Topics are covered to illustrate the theoretical issues, practical implementation,
and how to adjust parameters to obtain best performance.
The acronym DXP stands for “Digital X-ray Processor” and refers to a
digital processing technology, for which XIA has received several US and
International patents.
5.1 X-ray Detection and Preamplifier Operation:
Energy dispersive detectors, which include such solid state detectors as
Si(Li), HPGe, HgI2, CdTe and CZT detectors, are generally operated with
charge sensitive preamplifiers. When an x-ray is absorbed in the detector
material it releases an electric charge Qx = Ex/ε, where the material constant ε is
the amount of energy needed to form an electron-hole pair. Qx is integrated onto
the preamplifier’s feedback capacitor Cf, to produce the voltage Vx = Qx/Cf =
Ex/(εCf). Measuring the energy Ex of the x-ray therefore requires a
measurement of the voltage step Vx in the presence of the amplifier’s noise σ.
Figure 5.1 and Figure 5.3 depict reset-type and RC-type charge sensitive
amplifiers, respectively. In both figures the detector D is biased by voltage
source HV (either positive or negative) and connected to the input of amplifier
A. Note that the signal polarity must be distinguished from the bias voltage
polarity. The signal polarity is positive if the voltage step Vx is a rising edge, as
displayed in Figure 5.1. Whether signal polarity is positive or negative depends
upon the preamplifier’s design and does not depend upon bias voltage polarity,
which is specified on the detector and is determined by its design.
5.1.1
Reset-Type Preamplifiers
Figure 5.1a is a simplified schematic of a reset-type preamplifier,
wherein Cf is discharged through the switch S from time to time when the
amplifier’s output voltage gets so large that it behaves nonlinearly. Switch S
may be an actual transistor switch, or may operate equivalently by another
mechanism. In pulsed optical reset preamps light is directed at amplifier A’s
input FET causing it to discharge Cf. In transistor reset preamps, the input FET
may have an additional electrode which can be pulsed to discharge Cf. The
output of a reset-type preamplifier following the absorption of an x-ray of
energy Ex in detector D is a voltage step of amplitude Vx. Two x-ray steps are
shown in Figure 5.3b as a step.
5/5/2009
51
DXP Saturn / ProSpect User Manual
MAN-SAT-PRO-0.1
Figure 5.1: a) Reset-type charge sensitive preamplifier with a negatively biased detector; b) Output on
absorption of x-ray rays. Note that the steps have a rising edge, so that the signal polarity is
positive.
Figure 5.2 depicts the large-signal sawtooth waveform that results from
successive x-ray steps followed by the reset. Note that the units here are Volts
and milliseconds vs. millivolts and microseconds in the previous figure.
Figure 5.2: The large-signal reset waveform for a reset-type preamplifier with positive signal polarity, as
displayed on a real oscilloscope. Note that the large signal character of the DXP Saturn
diagnostic ADC readout, used in ProSpect’s ADC panel, looks quite different because of the
dynamic range reduction carried out in the ASC, as described in section 6.2.
5.1.2
RC-Type Preamplifiers
Figure 5.3a is a simplified schematic of an RC-type preamplifier,
wherein Cf is discharged continuously through feedback resistor Rf. The output
of an RC-type preamplifier following the absorption of an x-ray of energy Ex in
detector D is, again, a voltage step of amplitude Vx. The continuous discharge
of Cf through Rf results in an exponential voltage decay after the x-ray step, with
decay constant τ, where:
5/5/2009
52
DXP Saturn / ProSpect User Manual
MAN-SAT-PRO-0.1
τ = Rf Cf
Equation 5-1
In practice the decay time may depend on subsequent circuitry, i.e. if a
pole-zero cancellation circuit is used, thus τ may not be directly related to the
feedback elements of the front-end. The point of this simplified model is that
the resulting waveform is a single-pole RC decay. The discussion in section 5.2
through section 5.6.2 assumes a reset-type preamplifier, but is mostly applicable
to RC-type preamplifiers. section 5.7 describes the few key differences in the
processing of RC-type preamplifier signals.
Figure 5.3: a) RC-type charge sensitive preamplifier with a positively biased detector; b) Output on
absorption of an x-ray. Note that the step has a falling edge, thus the signal polarity is
negative.
5.2 X-ray Energy Measurement & Noise Filtering:
Reducing noise in an electrical measurement is accomplished by
filtering in the frequency, or conversely, the time domain. When discussing
digital pulse-processor filters it's more straightforward to use the time domain.
Traditional analog pulse-processing filters use combinations of a differentiation
stage and multiple integration stages to convert the preamp output steps, such as
shown in Figure 5.1b, into either triangular or semi-Gaussian pulses whose
amplitudes (with respect to their baselines) are then proportional to Vx and thus
to the x-ray’s energy.
5.2.1
Digital Filtering Theory
Digital filtering proceeds from a slightly different perspective. Here
the signal has been digitized and is no longer continuous, but is instead a string
of discrete values, such as shown in Figure 5.4. The data displayed are actually
just a subset of Figure 5.3b, which was digitized by a Tektronix 544 TDS digital
oscilloscope at 10 MHz (10 million per second). Given this data set, and some
kind of arithmetic processor, the obvious approach to determining Vx is to take
some sort of average over the points before the step and subtract it from the
value of the average over the points after the step. That is, as shown in Figure
5/5/2009
53
DXP Saturn / ProSpect User Manual
MAN-SAT-PRO-0.1
5.4, averages are computed over the two regions marked “Length” (the “Gap”
region is omitted because the signal is changing rapidly here), and their
difference taken as a measure of Vx. Thus the value Vx may be found from the
equation:
Vx,k = – Σ wivi +
i (before)
Σ
i (after)
wi vi
Equation 5-2
where the values of the weighting constants wi determine the type of
average being computed. The sums of the values of the two sets of weights
must be individually normalized.
Preamp Output (mV)
4
2
Length
Gap
0
Length
-2
Digitized Step 960919
-4
20
22
24
26
28
30
Time ( μs)
Figure 5.4: Digitized version of one of the x-ray steps of Figure 5.3b.
The primary differences between different digital signal processors lie in two
areas: what set of weights {wi} is used and how the regions are selected for the
computation of
Vx,k = – Σ wivi +
i (before)
Σ
i (after)
wi vi
Equation 5-2. Thus, for example, when the weighting values decrease
with separation from the step, then the equation produces “cusp-like” filters.
When the weighting values are constant, one obtains triangular (if the gap is
zero) or trapezoidal filters. The concept behind cusp-like filters is that, since the
points nearest the step carry more information about its height, they should be
more strongly weighted in the averaging process. How one chooses the filter
lengths results in time variant (the lengths vary from pulse to pulse) or time
invariant (the lengths are the same for all pulses) filters. Traditional analog
filters are time invariant. The concept behind time variant filters is that, since
the x-rays arrive randomly and the lengths between them vary accordingly, one
5/5/2009
54
DXP Saturn / ProSpect User Manual
MAN-SAT-PRO-0.1
can make maximum use of the available information by adjusting Length on a
pulse by pulse basis.
In principal, the very best filtering is accomplished by using cusp-like
weights and time variant filter length selection. There are serious costs
associated with this approach however, both in terms of computational power
required to evaluate the sums in real time and in the complexity of the
electronics required to generate (usually from stored coefficients) normalized
{wi} sets on a pulse by pulse basis. A few such systems have been produced but
typically cost about $13K per channel and are count rate limited to about 30
Kcps. Even time invariant systems with cusp-like filters are still expensive due
to the computational power required to rapidly execute strings of multiply and
adds. One commercial system exists which can process over 100 Kcps, but it
too costs over $12K per channel.
5.2.2
Trapezoidal Filtering
The DXP processing system developed by XIA takes a different
approach because it was optimized for very high speed operation and low cost
per channel. It implements a fixed length filter with all wi values equal to unity
and in fact computes this sum afresh for each new signal value k. Thus the
equation implemented is:
L Vx,k =
–Σ
k –L – G
i = k – 2L – G + 1
vi +
Σ
k
i = k – L+ 1
vi
Equation 5-3
where the filter length is L and the gap is G. The factor L multiplying Vx,k
arises because the sum of the weights here is not normalized. Accommodating
this factor is trivial for the DXP’s host software. The operations are carried out
using hardwired logic in a field programmable gate array (FPGA) that is called
the FiPPI because is implements Filtering, Peak capture, and Pileup Inspection.
In the FiPPI, Equation 5-3 is actually implemented by noting the recursion
relationship between Vx,k and Vx,k-1, which is:
L Vx,k = L Vx,k-1+ vk - vk-L - vk-L-G + vk-2L-G
Equation 5-4
While this relationship is very simple, it is still very effective. In the
first place, this is the digital equivalent of triangular (or trapezoidal if G = 0)
filtering which is the analog industry’s standard for high rate processing. In the
second place, one can show theoretically that if the noise in the signal is white
(i.e. Gaussian distributed) above and below the step, which is typically the case
for the short shaping times used for high signal rate processing, then the average
in Equation 5-4 actually gives the best estimate of Vx in the least squares sense.
This, of course, is why triangular filtering has been preferred at high rates.
Triangular filtering with time variant filter lengths can, in principle, achieve
both somewhat superior resolution and higher throughputs but comes at the cost
of a significantly more complex circuit and a rate dependent resolution, which is
unacceptable for many types of precise analysis. In practice, XIA’s design has
been found to duplicate the energy resolution of the best analog shapers while
5/5/2009
55
DXP Saturn / ProSpect User Manual
MAN-SAT-PRO-0.1
approximately doubling their throughput, providing experimental confirmation
of the validity of the approach.
5.3 Trapezoidal Filtering in the DXP:
From this point onward, we will only consider trapezoidal filtering as it
is implemented in the DXP according to Equation 5-3 and Equation 5-4. The
result of applying such a filter with Length L = 20 and Gap G = 4 to the same
data set of Figure 5.4 is shown in Figure 5.5. The filter output Vx is clearly
trapezoidal in shape and has a risetime equal to L, a flattop equal to G, and a
symmetrical falltime equal to L. The basewidth, which is a first-order measure
of the filter’s noise reduction properties, is thus 2L+G.
5.3.1
Comparing DXP Performance
This raises several important points in comparing the noise
performance of the DXP to analog filtering amplifiers. First, semi-Gaussian
filters are usually specified by a shaping time, which is roughly half of the
peaking. Their pulses typically are not symmetric so that the basewidth is about
5.6 times the shaping time or 2.8 times their peaking time. Thus a semiGaussian filter typically has a slightly better energy resolution than a triangular
filter of the same peaking time because it has a longer filtering time. This is
typically accommodated in amplifiers offering both triangular and semiGaussian filtering by stretching the triangular peaking time a bit, so that the true
triangular peaking time is typically 1.2 times the selected semi-Gaussian
peaking time. This also leads to an apparent advantage for the analog system
when its energy resolution is compared to a digital system with the same
nominal peaking time. A valid energy resolution comparison must start with
filters that have equal basewidths, and thus equal throughput, e.g. The energy
resolution of an analog system with shaping time of 1 μs should be compared to
that of a DXP with a peaking time of 2.8 μs.
5.3.2
Decimation by N means to
pre-average sequential
sums of length D = 2N.
5/5/2009
Decimation and Peaking Time Ranges
A practical limitation on the implementation of Equation 5-4 is that two
FIFO memories are required, one of length L and one of Length L+G. Since
memory space is limited in FPGAs, we have restricted our designs to values of
L+G less than 32; reserving 7 samples for the gap time leaves 25 samples for the
filter length. The DXP Saturn samples at 20 MHz (the fast-variant Saturn
samples at 40MHz) so this corresponds to a maximum peaking time of 1.25 μs.
XIA overcomes this limitation by first pre-averaging the data stream from the
ADC by performing sequential sums of D data points, where D = 2N. We refer
to this pre-averaging procedure as “Decimating by N”. By feeding the
decimated data in an Equation 5-4 filter, we now obtain peaking times that are
extended to L*D. It is important to understand that no data are lost in this
procedure, we have merely rearranged the order of the summations represented
in Equation 5-3. By extension, a “Decimation N FiPPI” is one that decimates
the data by N before applying the energy filter. The common decimation values
in the DXP Saturn are 0, 2, 4, and 6, corresponding to averaging times of 50 ns
(no averaging), 200 ns, 800 ns, and 3.2μs, respectively.
56
DXP Saturn / ProSpect User Manual
MAN-SAT-PRO-0.1
Decimation
N
ADC Clock
Period Δt
#ADC Samples Decimation
Peaking Time
in Average 2N
Period Δt *2N Range*
Standard 20MHz Saturn
0
50 ns
1
50 ns
200 ns – 1.25μs
2
20 ns
4
200 ns
800 ns – 5.00 μs
4
50 ns
16
800 ns
3.20 μs – 20.0 μs
6
50 ns
64
3.20 μs
12.8 μs – 80.0 μs
Fast 40MHz Saturn
0
25 ns
1
25 ns
100 ns – 625 ns
2
25 ns
4
100 ns
400 ns – 2.50 μs
4
25 ns
16
400 ns
1.6 μs – 10.0 μs
6
25 ns
64
1.60 μs
6.4 μs – 40.0 μs
*Experience has shown that an absolute minimum slow filter length of 4 should
be used.
Table 5.1: FiPPI decimation details.
In practice it is important to realize that implementing an energy filter
in a Decimation N FiPPI sets certain limitations on the flat-top lengths that can
be obtained in trapezoidal filters. Because the decimation process is
uncorrelated with the arrival of x-rays, the gap G must be 3 or greater to assure
that the filter’s peak truly represents the x-ray’s energy. Therefore, the
minimum Decimation N gap time is G*2N*Δt, where Δt is the ADC’s sampling
interval. With the DXP Saturn’s Δt = 50 ns sampling interval, for instance, the
smallest useful flat-top in Decimation 6 is 3*3.2 μs = 9.6 μs.
Given the significant overlap in peaking time ranges, it is generally
better to choose a lower decimation value, such that a shorter gap time can be
used. Decimation 0 has other limitations, i.e. no intermediate baseline filter, and
is thus an exception to this rule. The FDD firmware file defines the actual, i.e.
non-overlapping, peaking time ranges used.
5.3.3
Time Domain Benefits of Trapezoids
One extremely important characteristic of a digitally shaped trapezoidal
pulse is its extremely sharp termination on completion of the basewidth 2L+G.
This may be compared to analog filtered pulses which have tails which may
persist up to 40% of the peaking time, a phenomenon due to the finite bandwidth
of the analog filter. As we shall see below, this sharp termination gives the
digital filter a definite rate advantage in pileup free throughput.
5/5/2009
57
DXP Saturn / ProSpect User Manual
MAN-SAT-PRO-0.1
6
Filtered Step S.kfig 960920
Output (mV)
4
2
0
L
L+G/2
2L+G
-2
Preamp Output (mV)
Filter Output (mV)
-4
24
26
28
Time ( μs)
30
32
Figure 5.5: Trapezoidal filtering the Preamp Output data of Figure 5.4 with
L = 20 and G = 4.
5.4 Baseline Issues:
5.4.1
The Need for Baseline Averaging
Figure 5.6 shows the same event as is Figure 5.5 but over a longer time
interval to show how the filter treats the preamplifier noise in regions when no
x-ray pulses are present. As may be seen, the effect of the filter is both to
reduce the amplitude of the fluctuations and reduce their high frequency content.
This signal is termed the baseline because it establishes the reference level or
offset from which the x-ray peak amplitude Vx is to be measured. The
fluctuations in the baseline have a standard deviation σe which is referred to as
the electronic noise of the system, a number which depends on the peaking time
of the filter used. Riding on top of this noise, the x-ray peaks contribute an
additional noise term, the Fano noise, which arises from statistical fluctuations
in the amount of charge Qx produced when the x-ray is absorbed in the detector.
This Fano noise σf adds in quadrature with the electronic noise, so that the total
noise σt in measuring Vx is found from
σt = sqrt( σf2 + σe2)
Equation 5-5
5/5/2009
58
DXP Saturn / ProSpect User Manual
MAN-SAT-PRO-0.1
6
Filtered Step L.kfig 960920
σt
Output (mV)
4
Vx
2
σe
0
-2
Filter Output (mV)
-4
5
10
15
20
25
30
Time ( μs)
35
40
45
Figure 5.6: The event of Figure 5.5 displayed over a longer time period to
show baseline noise.
The Fano noise is only a property of the detector material. The
electronic noise, on the other hand, may have contributions from both the
preamplifier and the amplifier. When the preamplifier and amplifier are both
well designed and well matched, however, the amplifier’s noise contribution
should be essentially negligible. Achieving this in the mixed analog-digital
environment of a digital pulse processor is a non-trivial task, however.
In the general case, the mean baseline value is not zero. This situation
arises whenever the slope of the preamplifier signal is not zero between x-ray
pulses. This can be seen from Equation 5-3. When the slope is not zero, the
mean values of the two sums will differ because they are taken over regions
separated in time by L+G, on average. Such non-zero slopes can arise from
various causes, of which the most common is detector leakage current.
When the mean baseline value is not zero, it must be determined and
subtracted from measured peak values in order to determine Vx values
accurately. If the error introduced by this subtraction is not to significantly
increase σt, then the error in the baseline estimate σb must be small compared to
σe. Because the error in a single baseline measurement is σe, by definition, this
means that multiple baseline measurements will have to be averaged. This
number, NB is the Baseline Average. For example, if NB = 128 measurements
are averaged then the total noise will be as shown in Equation 5-6.
5/5/2009
59
DXP Saturn / ProSpect User Manual
MAN-SAT-PRO-0.1
σt = sqrt( σf2 + (1+1/128)σe2)
Equation 5-6
This results in less than 0.5 eV degradation in resolution, even for very
long peaking times, when resolutions of order 130 eV are obtained.
5.4.2
Applying a Baseline Cut
can improve performance
when the Baseline
Histogram is nonGaussian. Outlying data
points are‘cut’ from the
running Baseline Average
(though still included in the
histogram)
Raw Baseline Measurement
The output of the energy filter (or a derivative of the energy filter, the
intermediate filter) is sampled periodically in the explicit absence of an x-ray
step, defined by a baseline threshold. In practice, the DXP initially makes a
series of NB baseline measurements to compute a starting baseline mean. It then
makes additional baseline measurements at quasi-periodic intervals to keep the
estimate up to date. These values are stored internally and can be read out to
construct a spectrum of baseline noise, referred to as the Baseline Histogram.
This is recommended because of its excellent diagnostic properties. When all
components in the spectrometer system are working properly, the baseline
spectrum should be Gaussian in shape with a standard deviation reflecting σn.
Deviations from this shape indicate various pathological conditions which may
also cause the x-ray spectrum to be distorted and therefore have to be fixed.
The situation is remedied by removing (“cutting”) outlying samples
from the baseline average described below. If the maximum in the baseline
distribution lies at E0, then captured baseline values that deviate from E0 by
more than ΔE+ and ΔE-, respectively, are not included in the running baseline
average. Note that all captured baseline values are included in the Baseline
Histogram, however, so that it is always a valid representation of the system’s
behavior.
5.4.3
Baseline Average Settings and Recommendations
A FIR running average of baseline measurements is computed, which is
then subtracted from sampled peak values to compute the energy of
corresponding incident x-rays. The number of baseline samples averaged is set
in ProSpect as “Baselines Average Samples”. In the DSP this is converted into
the parameter BLAVGDIV according to the equation:
# baseline samples averaged = 2(BLAVGDIV +1)
Decimation
# Baseline Samples to
Average
BLAVGDIV
(DSP Parameter)
0
2
4
6
64
128
256
256
5
6
7
7
Table 5.2:
5/5/2009
Typical values used for baseline averaging. The best value for
each decimation should be determined empirically, though the
general trend illustrated in the table, i.e. larger number to average
for higher decimations, should be followed.
60
DXP Saturn / ProSpect User Manual
MAN-SAT-PRO-0.1
5.4.4
Why Use a Finite Averaging Length?
Physically, the baseline is a measure of the instantaneous slope
(volts/sec) for a pulsed-reset detector, and a measure of the DC offset for an RCfeedback preamplifier. The variation in leakage current of the detector and
offset drift and 1/f noise of the preamplifier often contribute to a baseline with
significant low-frequency (i.e. relative to the energy filter cutoff) noise. These
variations pass through the energy filter, and thus should also pass through the
baseline averaging stage to achieve good cancellation when the baseline average
is subtracted from the energy filter sample. The goal is to produce a baseline
average that has a sufficient number of samples to average out the high
frequency noise, but which still reflects the ‘local’ instantaneous baseline upon
which the x-ray step ‘rides’. Generally speaking, the number of baseline
samples in the average is set to achieve the best energy resolution performance
over the desired range of input count rate. There are two considerations worth
emphasizing:
1.
Excess detector/preamplifier noise and pickup (all decimations): The values
in the table above implicitly assume a flat noise spectrum from the
preamplifier. A high-frequency noise peak can result in poor relative
performance at the corresponding ‘resonant’ peaking time. Often this
problem can be mediated, though not eliminated, by increasing the number
of baseline samples in the average for the affected peaking times. On the
other hand, excess low-frequency noise, i.e. wandering, can be remedied by
reducing the number baseline samples in the average.
2.
High rate performance (decimation 0): At higher rates, i.e. > 50%
deadtime, the slow filter returns less and less often to baseline, thus the time
between baseline samples grows longer. This is the primary cause of
degraded energy resolution at high rates. Decimation 2,4 and 6 firmware
now employs a proprietary circuit that virtually eliminates this problem,
resulting in industry-leading count rate stability. This improvement cannot
however be implemented in the decimation 0 firmware. The resolution can
nonetheless be improved in most cases by reducing the number of baseline
samples in the average.
5.5 X-ray Detection & Threshold Setting:
Before capturing a value of Vx we must first detect the x-ray. X-ray
steps (in the preamp output) are detected by digitally comparing the output of a
trapezoidal filter to a threshold.
In the DXP up to three trapezoidal filters are implemented: fast,
intermediate and slow; each with a threshold that can be individually enabled or
disabled. A fast filter very quickly detects larger x-ray steps. A slow (energy)
filter averages out the most noise and can thus detect smaller x-ray steps, but has
a response that is much slower. An intermediate filter (used in decimations 2, 4
and 6 only) is a derivative of the slow filter that provides a balance between the
speed of the fast filter and the noise reduction of the slow filter.
The fast filter is used solely for x-ray detection, i.e. a threshold crossing
initiates event processing. Its short basewidth (2L+G) means that successive
pulses that would ‘pile-up’ in the slow filter can be resolved in the fast filter and
rejected from the spectrum (see Figure 5.11 below). Conversely, little noise
5/5/2009
61
DXP Saturn / ProSpect User Manual
MAN-SAT-PRO-0.1
reduction is achieved in the fast filter, thus the fast threshold cannot be set to
detect particularly low x-ray energies.
The intermediate filter is used for reset-type preamplifiers, in
decimations 2, 4 and 6 only. Its threshold is automatically set by the DSP and
applied as part of the baseline acquisition circuitry, i.e. baseline measurements
are taken when the signal is below this threshold. Intermediate threshold
crossings by default also trigger event processing, extending the detectable
energy range significantly below the fast filter threshold.
After an x-ray has been detected, the step height is measured at the
slow filter output. The slow filter’s excellent noise reduction also allows for
detection of the very lowest energy x-rays however its slow response precludes
accuracy both in the determination of pulse pileup and the measurement of
deadtime. The intermediate filter, which does not suffer this loss of accuracy,
typically provides sufficient low energy detection. When present the
intermediate threshold is enabled by default, and should be used in most cases.
The slow threshold should be used cautiously, and only at low rates.
5.6 Peak Capture Methods
As noted above, we wish to capture a value of Vx for each x-ray
detected and use these values to construct a spectrum. This process is also
significantly different between digital and analog systems. In the analog system
the peak value must be “captured” into an analog storage device, usually a
capacitor, and “held” until it is digitized. Then the digital value is used to
update a memory location to build the desired spectrum. During this analog to
digital conversion process the system is dead to other events, which can severely
reduce system throughput. Even single channel analyzer systems introduce
significant deadtime at this stage since they must wait some period (typically a
few microseconds) to determine whether or not the window condition is
satisfied.
Digital systems are much more efficient in this regard, since the values
output by the filter are already digital values. All that is required is to capture
the peak value – it is immediately ready to be added to the spectrum. If the
addition process can be done in less than one peaking time, which is usually
trivial digitally, then no system deadtime is produced by the capture and store
operation. This is a significant source of the enhanced throughput found in
digital systems.
Once an active threshold is exceeded, the DXP Saturn employs one of
two methods to capture the slow energy filter output such that the best measure
of Vx results. For decimations 2,4 and 6 the slow filter output is monitored over
a finite interval of time in the region of its maximum, and the maximum value
within that interval is captured. This method is referred to as “peak finding” or
“max capture”. For decimation 0, the slow filter is sampled at a fixed time
interval after the pulse is detected by the fast filter. This method is referred to as
“peak sampling”.
After describing in section 5.6.1 below how to set the Gap parameter so
that there will be a quality value of the energy filter to capture, we describe the
two methods in detail in section 5.6.2.
5/5/2009
62
DXP Saturn / ProSpect User Manual
MAN-SAT-PRO-0.1
5.6.1
Setting the Gap Length
When starting with a new detector, it is important first to set
SLOWGAP to a minimum of 3, and at least one unit greater than the smallest
value, in decimated clock cycles (see Table 5.3), that encloses the entire
preamplifier risetime, per section 4.6.1.2.
Decimation
# ADC
Samples
averaged
Decimated
Clock
frequency
Decimated
Clock cycle
interval
Peaking Time
Range
(in μs)
0
2
4
6
1
4
16
64
20 MHz
5 MHz
1.25 MHz
312.5 kHz
50 ns
200 ns
800 ns
3.2 μs
0.25– 1.25
1.0 – 5.0
4 – 20
16 – 80
Table 5.3:
For decimation 0 the slow filter output is sampled a fixed time
after the x-ray is detected. PEAKSAM must be set properly to
achieve optimum performance.
For example, consider a preamplifier with a pulse risetime of 260ns. For
decimations 2, 4 and 6 SLOWGAP would be set to 3 or greater. For decimation
0 SLOWGAP would be set to 5 or greater. ProSpect will select these values
automatically if you enter a Gap Time of 260 ns. SLOWGAP is independent of
SLOWLEN, thus all peaking times having a common decimation can share the
same SLOWGAP value.
5.6.2
Peak Sampling vs. Peak Finding
The figures below illustrate the two peak capture methods. Under the
'peak finding method' the slow filter output is monitored over a finite interval of
time, and the maximum value within that interval is selected. The interval is set
automatically, solely based on the values of the DXP parameters SLOWLEN
and PEAKINT. SLOWLEN and PEAKINT are both automatically derived from
the peaking time value selected in ProSpect and should normally not be adjusted
by the user. PEAKINT is also a pileup inspection parameter, as will be
discussed in further detail in section 5.8.
5/5/2009
63
DXP Saturn / ProSpect User Manual
MAN-SAT-PRO-0.1
Figure 5.7: Peak finding method: The slow filter output is monitored and the peak value is selected.
In the 'peak sampling' method, the slow filter output is instead sampled
a fixed time after the x-ray is detected. An additional ‘Peak Sampling’ timer is
started when an x-ray step is detected which expires after PEAKSAM decimated
clock cycles. PEAKSAM must be less than PEAKINT, and should typically be
set such that the sample point lies in the ‘flat-top’ region of the slow filter
output:
SLOWLEN ≤ PEAKSAM ≤ SLOWLEN + SLOWGAP
Equation 5-7
The precise PEAKSAM setting has a strong effect on energy resolution
and should be determined empirically for each new detector. More on this
below...
5/5/2009
64
DXP Saturn / ProSpect User Manual
MAN-SAT-PRO-0.1
Figure 5.8: Peak sampling method: The slow filter output is sampled a fixed time after the x-ray is
detected. PEAKSAM must be set properly to achieve optimum performance.
In our experience values at the low end (i.e. PEAKSAM ~ SLOWLEN)
tend to work better. We recommend that you record the initial value of
PEAKSAM and then change it in steps of 1, working out from the initial value.
Certain PEAKSAM values may cause the DXP Saturn to crash. Do not be
alarmed, just restart and be sure to enter a valid PEAKSAM value before
proceeding. Making a plot of energy resolution versus PEAKSAM will indicate
the best value to select.
This determination need only be done for one peaking time per
decimation. The result can then be applied to any value of SLOWLEN and
SLOWGAP using the following recipe:
PEAKSAM = (SLOWLEN + SLOWGAP) – X
Equation 5-8
5.7 Energy Measurement with Resistive Feedback Preamplifiers
In previous sections, the pulse height measurement was shown for the
case of reset-type preamplifiers. The reset-type scheme is most often used for
optimum energy resolution x-ray detectors. Other detectors use an RC-type
preamplifier, as described in section 5.1.2. Resistive feedback is most often
used for gamma-ray detectors which cover a larger dynamic range and where the
electronic noise is not as significant a contribution to energy resolution.
5/5/2009
65
DXP Saturn / ProSpect User Manual
MAN-SAT-PRO-0.1
A
VD
Ve
LΔt
V0
LΔ t
t1
t2
GΔt
tD
t
0
Figure 5.9: RC preamplifier output voltage. An x-ray step of amplitude A
occurs at time t=0.
Where analog shaping amplifiers typically have a “pole-zero”
adjustment to cancel out the exponential decay, the DXP uses a patented digital
correction to achieve good energy resolution without a pole-zero stage. Figure
5.9 and Figure 5.10 illustrate the method used. The first shows the output
voltage of a RC feedback preamplifier with a x-ray or γ-ray step of amplitude A
appearing at t=0. Ve is the voltage just before the step pulse arrives and V0 is
the asymptotic value that the signal would decay to in the absence of steps. t1 is
the earliest time used in the slow filter, L and G are the length and gap of the
trapezoidal filter in clock units, and Δt is the clock period, In addition to the
normal slow filter measurement of the step height, the ADC amplitude, VD is
made at time tD. In the following discussion, it is assumed that the signal risetime is negligible.
5/5/2009
66
DXP Saturn / ProSpect User Manual
MAN-SAT-PRO-0.1
10000
ICR = 41 kcps
8000
Zr Kα
Step
6000
Zr Kβ
4000
2000
Ge escape
peaks
0
Noise
-2000
0
4000
8000
Amplitude
12000
Figure 5.10: Correlation between step size and amplitude for Zr Kα x-ray
events measured with the DXP-4C.
As Figure 5.10 makes clear, there is a linear correlation between the
step height from the trapezoidal filter and the ADC amplitude, for pulses of a
given energy. This is due to the fact that the exponential decay causes a deficit
in the measured step height, which grows linearly with the distance from the
asymptotic ADC offset at zero count rate.
The DSP reads these two values for each event that passes the FiPPI’s
trigger criteria, and makes a correction of the form:
E = k1 ( SX + k2 VX - < SB + k2 VB > )
B
B
Equation 5-9
Here the quantities SX and VX are the step height and ADC amplitude
measured for the step, and the corresponding values with the B subscript are
“baseline” values, which are measured frequently at times when there is no
trigger. The brackets <> indicate that the baseline values are averaged over a
large enough number of events to not introduce additional noise in the
measurement. The constant k2 (the DSP parameter called RCFCOR) is inversely
proportional to the exponential decay time; this correction factor is a constant
for a detector channel at a fixed gain and shaping time. The constant k1 is
effectively a gain factor, and is taken into account with a detector gain
calibration.
The parameter RCFCOR is a function of the digital filter parameters
(SLOWLEN, SLOWGAP and DECIMATION) and the preamplifier decay time
(the DSP parameter RCTAU). The decay time defined by RCTAU (and
fractional word RCTAUFRAC) has 50 ns granularity, and is measured and
5/5/2009
67
DXP Saturn / ProSpect User Manual
MAN-SAT-PRO-0.1
entered by the user. At the start of an acquisition run, the DSP calculates
RCFCOR using the following approximate expression:
RCFCOR = 2DEC * (LEN + GAP) / (RCTAU – (LEN + GAP/2 + 3)*2DEC)
Equation 5-10
The above expression is valid for peaking times less than about
RCTAU/2. Alternatively, RCFCOR can be determined empirically in a special
test run from a linear fit of data, as in Figure 5.10.
5.8 Pile-up Inspection:
The captured value Vx (see Figure 5.6) will only be a valid measure of
its associated x-ray’s energy provided that its filtered pulse is sufficiently well
separated in time from its preceding and succeeding neighbor pulses so that its
peak amplitude is not distorted by the action of the trapezoidal filter on those
neighbor pulses. That is, if the pulse is not piled up. The relevant issues may be
understood by reference to Figure 5.11, which shows 5 x-rays arriving separated
by various intervals.
Because the triangular filter is a linear filter, its output for a series of
pulses is the linear sum of its outputs for the individual members in the series.
In Figure 5.11 the pulses are separated by intervals of 3.2, 1.8, 5.7, and 0.7 μs,
respectively. The fast filter has a peaking time of 0.4 μs with no gap. The slow
filter has a peaking time of 2.0 μs with a gap of 0.4 μs.
The first kind of pileup is slow pileup, which refers to pileup in the
slow channel. This occurs when the rising (or falling) edge of one pulse lies
under the peak (specifically the sampling point) of its neighbor. Thus peaks 1
and 2 are sufficiently well separated so that the leading edge (point 2a) of peak 2
falls after the peak of pulse 1. Because the trapezoidal filter function is
symmetrical, this also means that pulse 1’s trailing edge (point 1c) also does not
fall under the peak of pulse 2. For this to be true, the two pulses must be
separated by at least an interval of L + G/2. Peaks 2 and 3, which are separated
by only 1.8 μs, are thus seen to pileup in the present example with a 2.0 μs
peaking time.
This leads to an important first point: whether pulses suffer slow pileup
depends critically on the peaking time of the filter being used. The amount of
pileup which occurs at a given average signal rate will increase with longer
peaking times. We will quantify this in section 0, where we discuss throughput.
Because the fast filter peaking time is only 0.4 μs, these x-ray pulses do
not pileup in the fast filter channel. The DXP can therefore test for slow channel
pileup by measuring for the interval PEAKINT after a pulse arrival time. If no
second pulse occurs in this interval, then there is no trailing edge pileup.
PEAKINT is usually set to a value close to L + G/2 + 1. Pulse 1 passes this test,
as shown in the figure. Pulse 2, however, fails the PEAKINT test because pulse
3 follows in 1.8 μs, which is less than PEAKINT = 2.3 μs. Notice, by the
symmetry of the trapezoidal filter, if pulse 2 is rejected because of pulse 3, then
pulse 3 is similarly rejected because of pulse 2.
Pulses 4 and 5 are so close together that the output of the fast filter does
not fall below the threshold between them and so they are detected by the pulse
detector as only being a single x-ray pulse. Indeed, only a single (though
5/5/2009
68
DXP Saturn / ProSpect User Manual
MAN-SAT-PRO-0.1
somewhat distorted) pulse emerges from the slow filter, but its peak amplitude
corresponds to the energy of neither x-ray 4 nor x-ray 5. In order to reject as
many of these fast channel pileup cases as possible, the DXP implements a fast
channel pileup inspection test as well.
The fast channel pileup test is based on the observation that, to the
extent that the risetime of the preamplifier pulses is independent of the x-rays’
energies (which is generally the case in x-ray work except for some room
temperature, compound semiconductor detectors) the basewidth of the fast
digital filter (i.e. 2Lf + Gf) will also be energy independent and will never
exceed some maximum width MAXWIDTH. Thus, if the width of the fast filter
output pulses is measured at threshold and found to exceed MAXWIDTH, then
fast channel pileup must have occurred. This is shown graphically in the figure
where pulse 3 passes the MAXWIDTH test, while the piled up pair of pulses 4
and 5 fail the MAXWIDTH test.
Thus, in Figure 5.11, only pulse 1 passes both pileup inspection tests
and, indeed, it is the only pulse to have a well defined flattop region at time
PEAKSAMP in the slow filter output.
5/5/2009
69
DXP Saturn / ProSpect User Manual
25
MAN-SAT-PRO-0.1
Digitized MultiPile kfig 960921
Preamp
4 5
20
Passes
PEAKINT
Test
2
1
3
Fails
PEAKINT
Test
Passes
MAXWIDTH
Test
15
Fails
MAXWIDTH
Test
Fast Filter
10
2
1
4
3
5
PEAKSAMP
1b
5
1a
2a 1c
Slow Filter
0
5
10
15
20
25
30
Time ( μs)
Figure 5.11: A sequence of 5 x-ray pulses separated by various intervals to show the origin of both slow
channel and fast channel pileup and demonstrate how the two cases are detected by the DXP.
Note that PEAKINT and MAXWIDTH are both DSP parameters and
are normally set automatically. In particular, there is almost never any benefit to
a longer value of PEAKINT than the standard value as it does not improve
energy resolution and only decreases throughput for a given input rate. Please
see section Error! Reference source not found. for details on how to adjust
MAXWIDTH.
5.9 Input Count Rate (ICR) and Output Count Rate (OCR):
During data acquisition, x-rays will be absorbed in the detector at some
rate. This is the true input count rate , which we will refer to as ICRt. Because
of fast channel pileup, not all of these will be detected by the DXP’s x-ray pulse
detection circuitry, which will thus report a measured input count rate ICRm,
which will be less than ICRt. This phenomenon, it should be noted, is a
5/5/2009
70
DXP Saturn / ProSpect User Manual
MAN-SAT-PRO-0.1
characteristic of all x-ray detection circuits, whether analog or digital, and is not
specific to the DXP.
Of the detected x-rays, some fraction will also satisfy both fast and
slow channel pileup tests and have their values of Vx captured and placed into
the spectrum. This number is the output count rate, which we refer to as the
OCR. The DXP normally returns, in addition to the collected spectrum, the
REALTIME for which data was collected, the fast channel LIVETIME for
which the fast channel was below threshold (and thus ready to detect a
subsequent x-ray) together with the number FASTPEAKS of fast peaks detected
and the number of Vx captured events EVTSINRUN. From these values, both
the OCR and ICRm can be computed according to Equation 5-11. These values
can then be used to make deadtime corrections as discussed in section 5.11.
ICRm = FASTPEAKS/LIVETIME; OCR = EVTSINRUN/REALTIME
Equation 5-11
Note: The fast channel LIVETIME should only be used to determine
the input count rate according to Equation 5-11. Specifically, it is NOT related
to the energy filter livetime and should not be interpreted as the inverse of the
processor deadtime. The DSP does calculate the energy filter livetime
ELIVETIME, however, it is only an approximation. The most accurate
deadtime measurement is obtained from ICRm and OCR in Equation 5-11, as
discussed in section 5.11.
5.10 Throughput:
Figure 5.12 shows how the values of ICRm and OCR vary with true
input count rate for the DXP and compare these results to those from a common
analog shaping amplifier plus SCA system. The data were taken at a
synchrotron source using a detector looking at a CuO target illuminated by xrays slightly above the Cu K absorption edge. Intensity was varied by adjusting
two pairs of crossed slits in front of the input x-ray beam so that the harmonic
content of the x-ray beam striking the detector remained constant with varying
intensity.
5/5/2009
71
DXP Saturn / ProSpect User Manual
MAN-SAT-PRO-0.1
200
DXP OCR
DXP ICR m
Analog OCR
Analog ICR
True ICR t
150
Output Count Rate (kcps)
NOTE: The DXP’s peaking
time is twice as long as the
analog system peaking time
in this comparison, and yet
the throughput is nearly the
same.
m
100
50
ICR/OCR Plot kfig 960922
0
0
50
100
150
200
Input Count Rate (kcps)
Figure 5.12: Curves of ICRm and OCR for the DXP using 2 μs peaking time,
compared to a common analog SCA system using 1 μs peaking
time.
System
OCR Deadtime (μs)
ICR Deadtime (μs)
DXP (2 μs τp, 0.6 μs τg)
4.73
0.83
Analog Triangular Filter Amp (τp = 1 μs)
4.47
0.40
Table 5.4:
Comparing the deadtime per event for the DXP and an analog shaping amplifier. Notice that
that the DXP produces a comparable output count rate even though its peaking time is nearly
twice as long.
Functionally, the OCR in both cases is seen to initially rise with
increasing ICR and then saturate at higher ICR levels. The theoretical form,
from Poisson statistics, for a channel which suffers from paralyzable (extending)
dead time is given by:
OCR = ICRt * exp( - ICRt * τd ),
Equation 5-12
where τd is the dead time. Both the DXP and analog systems’ OCRs are so
describable, with the slow channel dead times - τd - shown in Table 5.4. The
measured ICRm values for both the DXP and analog systems are similarly
describable, with the fast channel dead times - τdf - as shown. The maximum
value of OCR can be found by differentiating Equation 5-12 and setting the
result to zero. This occurs when the value of the exponent is -1, i.e. when ICRt
equals 1/τd. At this point, the maximum OCRmax is 1/e multiplied by the ICR,
or:
5/5/2009
72
DXP Saturn / ProSpect User Manual
MAN-SAT-PRO-0.1
OCRmax = 1/(e τd) = 0.37/τd
Equation 5-13
These are general results and are very useful for estimating experimental data
rates.
Table 5.4 illustrates a very important result for using the DXP: the slow
channel deadtime is nearly the minimum value that is theoretically possible,
namely the pulse basewidth. For the shown example, the basewidth is 4.6 μs
(2Ls + Gs) while the deadtime is 4.73 μs. The slight increase is because, as
noted above, PEAKINT is always set slightly longer than Ls - Gs/2 to assure
that pileup does not distort collected values of Vx.
The deadtime for the analog system, on the other hand is much larger.
In fact, as shown, the throughput for the digital system is almost twice as high,
since it attains the same throughput for a 2 μs peaking time as the analog system
achieves for a 1 μs peaking time. The slower analog rate arises, as noted earlier
both from the longer tails on the pulses from the analog triangular filter and on
additional deadtime introduced by the operation of the SCA. In spectroscopy
applications where the system can be profitably run at close to maximum
throughput, then, a single DXP channel will then effectively count as rapidly as
two analog channels.
5.11 Dead Time Corrections:
The fact that both OCR and ICRm are describable by Equation 5-12
makes it possible to correct DXP spectra quite accurately for deadtime effects.
Because deadtime losses are energy independent, the measured counts Nmi in
any spectral channel i are related to the true number Nti which would have been
collected in the same channel i in the absence of deadtime effects by:
Nti = Nmi ICRt/OCR
Equation 5-14
Looking at Figure 5.12, it is clear that a first order correction can be
made by using ICRm of Equation 5-11 instead of ICRt, particularly for OCR
values less than about 50% of the maximum OCR value. For a more accurate
correction, the fast channel deadtime τdf should be measured from a fit to the
equation:
ICRm = ICTt * exp( - ICRt τdf )
Equation 5-15
Then, for each recorded spectrum, the associated value of ICRm is
noted and Equation 5-15 inverted (there are simple numerical routines to do this
for transcendental equations) to obtain ICRt. Then the spectrum can be
corrected on a channel by channel basis using Equation 5-12. In experiments
with a DXP prototype, we found that, for a 4 μs peaking time (for which the
maximum ICR is 125 kcps), we could correct the area of a reference peak to
better than 0.5% between 1 and 120 kcps.
5/5/2009
73
DXP Saturn / ProSpect User Manual
MAN-SAT-PRO-0.1
6 DXP Saturn Hardware Description
6.1 Organizational Overview:
The DXP channel architecture is shown in Figure 6.1, showing the
three major operating blocks in the DXP: the Analog Signal Conditioner (ASC),
Digital Filter, Peak Detector, and Pileup Inspector (FiPPI), and Digital Signal
Processor (DSP). Signal digitization occurs in the Analog-to-Digital converter
(ADC), which lies between the ASC and the FiPPI. In the DXP Saturn, the
ADC is a 12 bit, 40 MSA device, which is currently being used as a very linear
10-bit, 20 MHz ADC. The functions of the major blocks are summarized below.
Figure 6.1: Block diagram of the DXP channel architecture, showing the major
functional sections.
6.2 The Analog Signal Conditioner (ASC):
The ASC has two major functions: to reduce the dynamic range of the
input signal so that it can be adequately digitized by a 12 bit converter and to
reduce the bandwidth of the resultant signal to meet the Nyquist criterion for the
following ADC. This criterion is that there should be no frequency component
in the signal which exceeds half of the sampling frequency. Frequencies above
this value are aliased into the digitized signal at lower frequencies where they
are indistinguishable from original components at those frequencies. In
particular, high frequency noise would appear as excess low frequency noise,
spoiling the spectrometer’s energy resolution. The DXP Saturn therefore has a 4
pole Butterworth filter with a cutoff frequency of about 8 MHz.
5/5/2009
74
DXP Saturn / ProSpect User Manual
MAN-SAT-PRO-0.1
The dynamic range of the preamplifier output signal is reduced to allow
the use of a 12 bit ADC, which greatly lowers the cost of the DXP. This need
arises from two competing ADC requirements: speed and resolution. Speed is
required to allow good pulse pileup detection, as described in section 5.8. For
high count rates, pulse pair resolution less than 200 ns is desirable, which
implies a sampling rate of 10 MSA or more. The DXP uses a 20 MSA ADC.
On the other hand, in order to reduce the noise σ in measuring Vx (see Figure
5.1 and Figure 5.3), experience shows that σ must be at least 4 times the ADC’s
single bit resolution ΔV1. This effectively sets the gain of the amplifier stages
preceding the ADC. Then, if the preamplifier’s full scale voltage range is
Vmax, it must digitize to N bits, where N is given by:
N = log 10 (Vmax/ΔV1)/log 10 (2)
Equation 6-1
For a typical high resolution spectrometer, N must equal at least 14.
However, ADCs with 14 bits effective resolution (14-bit ADCs typically have
between 12 and 13 effective bits, due to integral and differential non-linearities)
operating in excess of 10 MSA are very expensive. At the time of this writing a
12 bit 20 MSA ADC costs less than $10, while a real 14-bit 20 MSA ADC costs
several hundred dollars, which would more than triple the parts cost per channel.
The ASC circumvents this problem using a novel dynamic range
technology, for which XIA has received a patent, which is indicated in Figure
6.2. Here a resetting preamplifier output is shown which cycles between about 3.0 and -0.5 volts. We observe that it is not the overall function which is of
interest, but rather the individual steps, such as shown in Fig. 3.1b, that carry the
x-ray amplitude information. Thus, if we know the average slope of the preamp
output, we can generate a sawtooth function which has this average slope and
restarts each time the preamplifier is reset, as shown in Figure 6.2. If we then
subtract this sawtooth from the preamplifier signal, we can amplify the
difference signal to match the ADC’s input range, also as indicated in the
Figure. Gains of 8 to 16 are possible, thus reducing the required number of bits
necessary to achieve the same resolution from 14 to 10. The generator required
to produce this sawtooth function is quite simple, comprising a current integrator
with an adjustable offset. The current, which sets the slope, is controlled by a
DAC (SLOPEDAC), while the offset is controlled by adding a current pulse of
either polarity using a second DAC (TRACKDAC). The DAC input values are
set by the DSP, which thereby gains the power to adjust the sawtooth generator
in order to maintain the ASC output (i.e. the “Amplified Sawtooth Subtracted
Data” of Figure 6.2) within the ASC input range.
5/5/2009
75
DXP Saturn / ProSpect User Manual
MAN-SAT-PRO-0.1
ADC Max Input
3.0
2.0
Amplified Sawtooth Subtracted Data
Preamp Output (V)
1.0
ADC Min Input
Preamp
Output
0.0
-1.0
-2.0
Sawtooth
Function
Reset
Level
-3.0
0
Preamp-Sawtooth kfig 960923
1
2
3
4
5
Time (ms)
Figure 6.2: A sawtooth function having the same average slope as the preamp
output is subtracted from it and the difference amplified and offset
to match the input range of the ADC.
Occasionally, as also shown in Figure 6.2, fluctuations in data arrival
rate will cause the conditioned signal to pass outside the ADC input range. This
condition is detected by the FiPPI, which has digital discrimination levels set to
ADC zero and full scale, which then interrupts the DSP, demanding ASC
attention. The DSP remedies the situation by adjusting the TRACKDAC until
the conditioned signal returns into the ADC’s input range. During this time,
data passed to the FiPPI are invalid. Preamplifier resets are detected similarly.
When detected the DSP responded by resetting the current integrator with a
switch.
6.3 The Filter, Pulse Detector, & Pile-up Inspector (FiPPI):
The FiPPI is implemented in a field programmable gate array (FPGA)
to accomplish the various filtering, pulse detection and pileup inspection tasks
discussed in chapter 4.6. As described there, it has a fast channel for pulse
detection and pileup inspection and a slow channel for filtering, both with fully
adjustable peaking times and gaps. The "fast" filter’s τp (τpf) can be adjusted
from 100 ns to 1.25 μs, while the "slow" filter’s τp (τps) can be adjusted from
0.25 μs to 80 μs. Adjusting τpf allows tradeoffs to be made between pulse pair
resolution and the minimum x-ray energy that can be reliably detected. When
τpf is 200 ns, for example, the pulse pair resolution is typically less than 200 ns.
When τpf is 1 μs, x-rays with energies below 200 eV can be detected and
5/5/2009
76
DXP Saturn / ProSpect User Manual
MAN-SAT-PRO-0.1
inspected for pileup. To maximize throughput, τps should be chosen to be as
short as possible to meet energy resolution requirements, since the maximum
throughput scales as 1/τps, as per Eqn. 3.9. If the input signal displays a range
of risetimes (as in the “ballistic deficit” phenomenon) the slow filter gap time
can be extended to accommodate that range. The shortest value of τps 0.25 μs,
is set by the response time of the DSP to the FiPPI when a value of Vx is
captured. At this setting, however, with a gap time of 100 ns, the dead time
would be about 0.65 μs and the maximum throughput according to Equation
5-13 would be 560 kcps. This throughput cannot be reached in practice by the
20 MHz version of the Saturn, which is restricted by its DSP processing speed to
maximum OCR values of about 450 kcps. There is also a 40 MHz version of
the Saturn that can handle peaking times down to 0.125 μs and OCR values in
excess of 700 kcps.
The FiPPI also includes a livetime counter which counts the 20 MHz
system clock, divided by 16, so that one “tick” is 800 ns. This counter is
activated any time the DSP is enabled to collect x-ray pulse values from the
FiPPI and therefore provides an extremely accurate measure of the system
livetime. In particular, as described in section 6.2, the DSP is not live either
during preamplifier resets or during ASC out-of-ranges, both because it is
adjusting the ASC and because the ADC inputs to the FiPPI are invalid. Thus
the DXP measures livetime more accurately than an external clock, which is
insensitive to resets and includes them as part of the total livetime. While the
average number of resets/sec scales linearly with the countrate, in any given
measurement period there will be fluctuations in the number of resets which
may affect counting statistics in the most precise measurements.
All FiPPI parameters, including the filter peaking and gap times,
threshold, and pileup inspection parameters are externally supplied and may be
adjusted by the user to optimize performance. Because the FiPPI is
implemented in a Xilinx field programmable gate array (FPGA), it may also be
reprogrammed for special purposes, although this process is non-trivial and
would definitely require XIA contract support.
6.3.1
FiPPI Variants
The FiPPI pipeline topology for RC-type preamplifiers is different than
for reset-type preamplifiers, thus two standard code variants are offered for each
decimation. See section 6.4.1 below for the variant file names included in the
distributed FDD firmware files.
6.3.2
FiPPI Decimation
FiPPI’s are distinguished also by ‘decimation’. Decimation refers to
pre-averaging of the ADC signal prior to the FPGA processing pipeline. Each
decimation accommodates a specific range of peaking times, i.e. shaping or
integration times. Typically four (4) FiPPI configuration files are required by
the DXP Saturn. When the peaking time is changed such that a range boundary
is crossed, the host software downloads the appropriate FiPPI configuration to
the DXP Saturn.
5/5/2009
77
DXP Saturn / ProSpect User Manual
MAN-SAT-PRO-0.1
Decimation
0
2
4
6
#ADC Samples
in Average
1
4
16
64
Peaking Time
Range
250ns – 1.25μs
1 μs – 5 μs
4 μs – 20 μs
16 μs – 80 μs
‘Shaping Time’
Range
500ns – 2.5μs
2 μs – 10 μs
8 μs – 40 μs
32 μs – 160 μs
Table 6.1: FiPPI decimation details.
6.4 The Digital Signal Processor (DSP):
The Digital Signal Processor acquires and processes event data from
the FiPPI, controls the ASC through DACs, and communicates with the host.
The processor is an Analog Devices ADSP-2183 16 bit Fixed-Point DSP
optimized for fixed point arithmetic and high I/O rates. Different DSP program
variants are used for different types of data acquisition and different
preamplifier types. section 7 describes in detail the DSP operation, its tasks,
and parameters which control them.
The ADSP-2183 has 16K words of 16-bit wide data memory and 16K
words of 24-bit wide program memory, part of which is used as data memory to
hold the MCA spectrum. (If more memory is required for special purposes, up
to 4 Mbytes of extended memory can be added by specifying option M).
Transferring data to/from these memory spaces is done through the DSP’s builtin IDMA port, which does not interfere with the DSP program operation.
6.4.1
Code Variants
6.4.1.1 MCA acquisition with RC-type preamplifiers
Variant 0 is the standard firmware variant supplied with the DXP
Saturn, as described in this manual. It is intended for use with reset-type
preamplifiers (described in section 5.1.1).
FDD file:
X10P_RESET.FDD
DSP file name:
X10P_0106.HEX
Fippi file names:
FXPD00J_PSAM.FIP
FXPD200J_ST.FIP
FXPD420J_ST.FIP
FXPD640J_ST.FIP
Note: To use this variant, the “Ramp/Offset” jumper should be in the
“Ramp” position.
6.4.1.2 MCA acquisition with RC-type preamplifiers
This firmware variant is intended for use with resistive feedback
preamplifiers (described in section 5.1.2).
5/5/2009
78
DXP Saturn / ProSpect User Manual
MAN-SAT-PRO-0.1
FDD file:
X10P_RC.FDD
DSP file name:
X10PRC_0103.HEX
Fippi file names:
FXRC00J.FIP
FXRC200J.FIP
FXRC420J.FIP
FXRC640J.FIP
Additional parameters (described in Section 5.10 ):
RCTAU: Exponential decay time in 1 μs units.
RCTAUFRAC: Fractional decay time in 1.15 format.
RCFCOR: Correction factor (calculated automatically at start of run if
RCTAU not 0)
Note: To use this variant, the “Ramp/Offset” jumper should be in the
“Offset” position.
6.5 Interface to the Host Computer:
ADVICE!! XIA strongly
recommends using the
Handel libraries to develop
your own code to drive the
Saturn, instead of trying to
understand the rest of this
manual.
5/5/2009
Communications between the DXP and host computer occur through
the Enhanced Parallel Port (EPP), and complies with IEEE specification 1284.
Such a port is included in most Pentium class PCs, and if not a very inexpensive
card can be added. The DXP Saturn interface is implemented in an FPGA
which can be thus be relatively easily modified by a PROM upgrade. Access to
the DXP Saturn is supported t on Windows 95/98/NT platforms both by the
application ProSpect and by a function library named Handel, that can be called
using spectrometrically relevant parameters. In this way a programmer who
wants to develop his own Saturn interface application needs to know very little
about interface specifics. Handel is available for download on XIA’s website.
The following paragraphs, as well as section 7 are provided for the
benefit of programmers who have special needs that require an intimate
knowledge of how the DXP’s interface and DSP code work at the lowest level.
XIA strongly recommends using Handel as a preferred approach to developing
applications.
The host application is responsible for downloading firmware to the
FiPPI, software to the DSP program memory segment and parameters to the
DSP data memory segment. The Control Status Register (CSR) is used to
control the downloading of firmware and the starting and stopping data
acquisition. Reading and writing to the DSP (program download, parameter
download, spectrum download...) takes place directly through an IDMA transfer.
These transfers involve first writing an address to the EPP address port followed
by one or more reads/writes from/to the EPP data port.
The following is the address space of the DXP. Addresses 0x00000x7FDF map directly into the on board DSP, while those addresses greater the
07FFF are decoded by the DXP interface circuit.
79
DXP Saturn / ProSpect User Manual
MAN-SAT-PRO-0.1
Address
0x0000 - 0x3FFF
Name
Program memory
0x4000 - 0x7FDF
Data memory
0x7FE0 - 0x7FFF
0x8000
Reserved
Control Status
Register (CSR)
0x8001-0x8002
0x8003
Description
Contains the DSP instructions and
24-bit data
16-bit data, including the
parameters memory
A bitwise flag register for
controlling the DSP. See below
for further details.
Diagnostic or special purpose
registers
FiPPI configuration register
Table 6.2: Map of the DXP memory.
Bit
0
1
Access
R/W
r/w
Name
RunEnable
NewRun
8
r
FPGAErr
9
11
r
r
DSPErr
Active
Meaning
Disable(0) or Enable(1) data
Update(0) or Reset(1) spectra,
statistics at run start
Set if FiPPI configuration download
error
Set of DSP error condition exists
Set if data acquisition is in progress
Table 6.3: The Control Status Register flag bits.
5/5/2009
80
DXP Saturn / ProSpect User Manual
MAN-SAT-PRO-0.1
7 DXP Saturn DSP Code Description
NOTICE: if you are curious about how the DSP operates in controlling the DXP
and processing data from the FiPPI, then please read on. You will also find this
information useful if you wish to develop your own control code for the Saturn.
However, in the latter case, we strongly advise you to use XIA’s support
libraries (Handel) to interface between your program and the Saturn module.
7.1 Introduction and Program Overview
The following sections are intended to provide the DXP user with a
good understanding of the various tasks performed by the DSP in the DXP
Saturn. The DSP performs several functions:
1) Respond to input and output calls from the host computer to start and
stop data collection runs, download control parameters, and download
collected data.
2) Perform system calibration measurements by varying the various DAC
settings under its control and noting the output change at the ADC.
3) Make initial measurements of the slow filter baseline and preamplifier
slope value at the start of data taking runs to assure optimum starting
parameter values.
4) Collect data:
a)
Read energy values Ex from the FiPPI, under interrupt control, and
store them in DSP buffer memory in less than 0.25 μs.
b) Adjust the ASC control parameters, under interrupt control, to
maintain its output within the ADC’s input range.
c)
Process captured Ex values to build the x-ray spectrum in DSP
memory.
d) Sample the FiPPI slow filter baseline and build a spectrum of its
values in order to compute the baseline offset for Ex values.
Several DSP program variants are available to cover a range of
applications. The standard program provided with the DXP Saturn is for typical
x-ray fluorescence spectroscopy using a reset-type preamplifier. Additional
program variants are available for other applications, including hardware
diagnostics and other specialized measurements, e.g.:
5/5/2009
•
X-ray mapping
•
Quick XAFS scanning
•
Switching between multiple spectra synchronously with an
experimentally derived signal (e.g. “Phased locked EXAFS”)
•
Time resolved spectroscopy (e.g. “multi-channel scaling”)
81
DXP Saturn / ProSpect User Manual
MAN-SAT-PRO-0.1
Standard variants available to all users via our website are described in
section 7.11. Several other variants have been developed for particular
customers and may be made available upon request.
By convention, the DSP programs are named “NAMEmmnn.HEX”,
where NAME is the variant name listed in the table, mm and nn are major and
minor version numbers, respectively. The hex file format is in ASCII, with the
parameter table at the top followed by the code generated by the Analog Devices
218x development system.
The internal data memory area is subdivided into three sections. The
first section, starting at location 0x4000, contains DSP parameters and
constants, both those used for controlling the DSP's actions and those produced
by the DSP during normal running. These parameters and their addresses are
listed and described in the following sections. When these parameters are
referred to they will be denoted by all capital letters (e.g. RUNTASKS ). The
locations of parameters can (and, for forward compatibility should) be
determined from the symbol table.
The second section of data memory contains acquired monitoring data
such as the baseline event histogram. The third section of internal data memory
is used as a circular buffer for storing events from the FiPPI. Note that future
hardware revisions may eliminate the need for this buffer area, in which case it
could be switched to more histogramming area.
7.2 Program Flow
The flow of the DSP program is illustrated in Figure 7.1. It is
essentially identical for all program variants. The structure is very simple; after
initialization, the DSP enters an idle phase, waiting for a signal from the host to
start a run. During this idle phase, the DSP is continuously collecting baseline
events from the FiPPI as well as monitoring the Analog Signal Conditioner
(ASC) to keep the ADC input signal in the proper range and to adjust the slope
generator to match the current input rate. When the Begin Run signal is
received (from the host through the CSR register), the DSP first determines
whether the run is a normal data-taking run or a special run.
5/5/2009
82
DXP Saturn / ProSpect User Manual
MAN-SAT-PRO-0.1
Figure 7.1 DSP code flow diagram.
In a normal run, ASC monitoring and baseline collection continue as in
the idle phase. Event interrupts are enabled; when the FiPPI detects an event, it
interrupts the DSP, which quickly responds and reads the energy value from the
FiPPI into an internal buffer in data memory. The events in the buffer are then
used to build the x-ray spectrum (or fill regions of interest).
In a special run, the action is determined by the value of the parameter
WHICHTEST. The special runs include calibration tasks such as collecting an
ADC trace, as well as ways of putting the DSP code into a special state (such as
putting it into a dormant state to allow reprogramming the FiPPI on the fly).
Special runs normally end on their own and the DSP returns to the idle state.
After the initialization phase, the Timer interrupt is enabled. This
interrupt is used to handle the housekeeping type chores, such as updating the
statistics during a run, controlling the rate LED, and handling fixed length runs.
The Timer interrupt occurs with a period of 500 μsec.
5/5/2009
83
DXP Saturn / ProSpect User Manual
MAN-SAT-PRO-0.1
If the DSP encounters an error condition, the DSP turns on the red
status LED and waits for the host to set the parameter RUNERROR to 0 (after
finding and fixing the problem that resulted in the error condition).
Each phase of the DSP program is discussed in more detail below.
7.3 Initialization
The DSP code starts running immediately after the DSP download is
complete. During the initialization phase, several tasks are performed:
5) Setup internal DSP control registers
6) Zero spectrum and data memory, then initialize parameters to default
values.
7) Set ASC DACs to initial default values
8) Initialize FiPPI and download default filter parameters
9) Perform initial calibrations for controlling the ASC:
a)
Find the SlopeDAC setting corresponding to zero slope
b) TrackDAC Calibration (determine TrackDAC step needed to move
the ADC input signal from the edge of the range to the center of
the range)
c)
Measure conversion factor used to calculate the contribution of the
slope generator to the FiPPI baseline.
10) Enable the input relay and enable the ASC and timer interrupts.
After the interrupts are enabled, the DSP is alive and ready to take data.
After completing the initialization phase, the DSP enters the idle phase. In the
idle phase, the DSP continuously samples the FiPPI baseline and updates the
baseline subtraction register in the FiPPI so that the FiPPI is always ready to
take data as soon as a run is started. There are two primary tasks performed
during a normal data-taking run: event processing and baseline measurement.
These tasks are described in detail below.
7.4 Event Processing
7.4.1
Run Start
Prior to the start of a normal run, the DSP performs several tasks:
1) Sets the desired gain (by setting the GAINDAC). If the gain has
changed, the TrackDAC calibration is redone (for reset detectors only).
2) Sets the desired polarity (the internal DSP polarity and the FiPPI
polarity must be changed simultaneously to avoid ASC instability).
Only applicable if the desired polarity differs from the default negative
polarity (and then only for the first run).
3) Downloads the specified FiPPI parameters (SLOWLEN, SLOWGAP,
etc) to obtain the desired peaking time.
4) Updates the internal calibrations with the new gain and FiPPI values.
5) If desired, the run statistics and the MCA are cleared (determined by
the NewRun bit in the CSR). Otherwise, the run is treated as a
5/5/2009
84
DXP Saturn / ProSpect User Manual
MAN-SAT-PRO-0.1
continuation of the previous run. Note that for a run continuation, no
gain or FiPPI changes are performed. In either case, the run number
(parameter RUNIDENT) is incremented.
7.4.2
Event Interrupt
When the FiPPI detects a good event, it triggers a high priority interrupt
in the DSP. Upon receiving the interrupt, the DSP immediately reads the event
energy from the FiPPI into an internal circular buffer and increments the write
pointer into that buffer. The normal event loop compares the write pointer to the
read pointer to determine that there is a new event to process.
7.4.3
Event Loop
The processing that takes place during a normal collection run is very
simple, in order to allow high event rates. The structure of the event loop is
illustrated below in pseudocode:
while (RunInProgress)
{
if (EventToProcess)
ProcessEvent
else
CollectBaseline
endif
}
RunFinish
goto IdleLoop
The run can be stopped by the host by clearing the RunEnable bit in the
CSR, or can be stopped internally for fixed length runs; see Section 0 below.
The event processing involves either binning the energy into an MCA
or determining whether the event falls into a defined SCA window, depending
upon the DSP code variant. If there is no event to process, the DSP reads a
baseline value from the FiPPI; see below for a detailed description of the
baseline processing. Once the run is over, the statistics are finalized and the
DSP returns to the idle state where it continuously samples baseline and waits
for a command to start a new run.
7.4.4
Spectrum Binning
The primary event processing task is to use the energies measured in
the FiPPI to build up a full energy spectrum (MCA). The MCA bin width is
determined by the analog gain, the FiPPI filter length, and the binning parameter
BINFACT1. The DSP determines the spectrum bin by multiplying the FiPPI
energy output by (1/BINFACT1). If the bin is outside the range determined by
the parameters MCALIMLO and MCALIMHI, the event is classified as an
underflow or overflow. Otherwise, the appropriate bin is incremented. A 24-bit
word is used to store the contents of each bin, allowing nearly 16.8 million
events per MCA channel.
5/5/2009
85
DXP Saturn / ProSpect User Manual
7.4.5
MAN-SAT-PRO-0.1
SCA Mapping
An alternate variant of the DSP code allows the user to define up to 24
SCA regions and count the number of events that fall into each region. The
regions are defined in terms of MCA bin number, and can overlap. A useful
method for defining the SCA windows is to take a run with the full MCA
spectrum, and use the spectrum as an aid in choosing the limits for each SCA.
The reduced amount of data storage in SCA mapping mode is very useful in
time resolved spectroscopy or scanning applications, where separate spectral
data are desired for many different time or spatial points.
7.5 Baseline Measurement
The DSP collects baseline data from the FiPPI whenever there are no
events to process, both during a run and between runs (when there are never
events to process). The DSP keeps a running average of the most recent
baseline samples; this average is written back into the FiPPI where it is
subtracted from the raw energy filter value to get the true energy. The baseline
data read from the FiPPI is just the raw output of the energy filter. One bit of
the baseline register is used to indicate whether the sample occurred while an
event was in progress, in which case it is not used.
Two methods are available to determine the average baseline value. By
default, an infinite impulse response (IIR) filter is used, where the baseline
average is calculated by combining a new baseline sample with the old average,
using weights x and (1-x) respectively, where x is typically 1/128. By setting
the appropriate bit in the parameter RUNTASKS (see below), a finite impulse
response (FIR) filter is used, where the baseline mean is just the straight average
of the N most recent baseline samples. Both averaging methods are described in
more detail in the following sections. The baseline mean is stored with 32 bit
precision in the parameters BASEMEAN0 (high order word) and
BASEMEAN1.
7.5.1
IIR (Infinite Impulse Response) Filter
By default, the baseline mean is calculated using an infinite impulse
response filter, characterized in the following way:
< Bi >=
N −1
1
< Bi − 1 > + Bi
N
N
Equation 7-1
where <Bi> is the baseline mean after the ith baseline sample, Bi is the ith
baseline sample, and <Bi-1> is the baseline mean before the ith sample. With
this filter, the most recent baseline samples are weighted the most, but (up to the
precision of the stored mean value) all baseline values have a small effect on the
mean (hence the infinite in the name).
The length of the filter is controlled by the parameter BLFILTER,
which holds the value 1/N in 16 bit fixed point notation, which has 1 sign bit
and 15 binary bits to the right of the decimal point. Expressed as a positive
5/5/2009
86
DXP Saturn / ProSpect User Manual
MAN-SAT-PRO-0.1
integer, BLFILTER = (1/N)*215. The default value for BLFILTER corresponds
to N=64. Interpreting BLFILTER as an integer gives (1/128)* 215 = 29 = 256.
7.5.2
FIR (Finite Impulse Response) Filter
By setting the appropriate RUNTASKS bit, it is possible to choose a
finite impulse filter to calculate the baseline mean. With this filter, a straight
average of the N most recent valid baseline samples is used to calculate the
mean. To implement this filter, a buffer large enough to hold all N samples is
necessary. For this reason, the length of the finite response filter is limited to
1024. The filter length is stored in the parameter BLFILTERF.
7.5.3
Baseline Histogram
As part of the baseline processing, all valid baseline samples are
entered into the baseline histogram, which occupies 1024 words of data
memory. The baseline histogram can be very useful in monitoring or evaluating
the performance of the DXP Saturn, as discussed in section 4.6.2. The
parameter BASESTART contains the pointer to the location of the histogram in
data memory, and the length (nominally 1K) is contained in the parameter
BASELEN.
The baseline histogram is centered about a zero baseline. The
parameter BASEBINNING determines the granularity of the histogram;
2**BASEBINNING baseline values are combined into one bin of the baseline
histogram. The default value of BASEBINNING is 2 (i.e., the baseline value is
divided by 4 to determine the bin). All valid baseline values are included in the
histogram, even if there is a baseline cut (see section 7.5.5 below) in use.
The baseline histogram is only filled during a normal data taking run;
when the DSP is idle, the baseline average is calculated but the histogram is not
filled. Since the baseline histogram is stored in data memory, 16-bit words are
used to record the bin contents. As a result, the histogram overflows quite often;
the time to overflow depends on the baseline sample rate (typically several 100
kHz) and the width of the baseline distribution. When the DSP detects an
overflow, all bins are scaled down by a factor of 2 and histogramming
continues.
The baseline distribution should be very Gaussian; the width of the
distribution reflects the electronic noise in the system (including the effects of
the energy filter). A tail on the positive side of the distribution indicates the
presence of energy in the baseline, resulting from undetected pileup or energy
depositions that did not satisfy the trigger threshold. The tail should be very
small compared to the peak of the histogram; it will grow with rate. If this tail is
too large, it can have a noticeable effect on the baseline mean, leading to
negative peak shifts. Under these circumstances, enabling the baseline cut is
useful in eliminating the bias.
A tail on the low energy side of the baseline distribution is usually
caused by baseline samples just after a preamplifier reset; the effects of the reset
can last quite a while (tens of microseconds), especially for optical reset
preamplifiers. It is usually best not to take data while the reset is in effect; the
dead time associated with a reset can be adjusted using the parameter
RESETWAIT, which sets the dead time in units of 250 ns or, more easily, by
5/5/2009
87
DXP Saturn / ProSpect User Manual
MAN-SAT-PRO-0.1
using the ProSpect path Saturn » Detector Preamplifier Settings » Reset
Interval to enter a dead time value (See section 4.2.3)
7.5.4
Residual Baseline
When operating with a reset type preamplifier, the raw baseline
measured in the FiPPI (which is just the output of the energy filter) comes from
two sources: the detector preamplifier and the slope generator in the DXP Saturn
itself. At high rates, the slope gets rather large in order to balance the high
energy deposition rate in the detector; under these conditions, the baseline due to
the slope is by far the dominant factor in the baseline.
By default, the DSP continually adjusts the slope to match the current
rate; these slope adjustments result in an instantaneous change in the baseline. If
the baseline due to the slope generator is included in the baseline mean, the
change in the calculated mean would be delayed relative to the change in the
slope, due to the effect of all the baseline samples prior to the slope change. For
this reason, the baseline due to the slope is subtracted out of the overall baseline
prior to calculating the mean value (and added back in prior to loading the FiPPI
baseline subtraction register). The residual baseline included in the mean
reflects the detector leakage current, and should be fairly constant with rate (to
the extent that the leakage current does not depend on rate). The calibration
procedure used to determine the baseline due to the slope generator is performed
during the initial startup procedure.
By default, the baseline due to the slope generator is taken out of the
baseline average. You can choose to include the slope baseline in the mean (e.g.
for diagnostic purposes) you can do so by clearing the residual baseline bit (6) in
RUNTASKS.
7.5.5
Baseline Cut
As specified above, a baseline cut is available to exclude baseline
samples that include real event energy, which can lead to peak shifting at high
event rates. The cut is expressed as a fraction of the peak value of the baseline
distribution; by default, the baseline cut is set to 5%. The cut values are based
on the baseline histogram, and are recalculated every time the histogram
overflows (every few seconds). The DSP searches on either side of the peak of
the baseline distribution for the first bin whose contents are less than the cut (.05
by default) times the peak value; these bin numbers are used to calculate the
actual baseline cut.
The cut fraction is stored in the parameter BLCUT, expressed in 16-bit
fixed-point notation. Interpreted as an integer, BLCUT = (cut fraction)* 215; the
default 5% cut corresponds to BLCUT=1638 decimal (or 666 hex). The actual
cut values determined by the DSP code are stored in BLMIN and BLMAX. The
baseline cut is enabled or disabled by setting or clearing a bit (10) in the
RUNTASKS parameter.
7.6 Interrupt Routines
There are several tasks performed under interrupt control within the
DSP on the DXP Saturn. The event interrupt routine (which just transfers event
data from the FiPPI to an internal buffer) is described above in Section 7.4
5/5/2009
88
DXP Saturn / ProSpect User Manual
MAN-SAT-PRO-0.1
above. There are two other interrupt routines: the ASC interrupt is used to keep
the analog signal within the input range of the ADC, and the timer interrupt is
used to handle such housekeeping chores as updating statistics. These routines
are described in more detail below.
7.6.1
ASC Monitoring
There are four main tasks performed by the ASC interrupt routine:
1) Detects Resets (reset-type detectors only)
2) Adjusts the slope generator to match the event rate (reset-type detectors
only)
3) Adjusts the offset value to keep the signal in range (RC feedback
detectors only)
4) Moves the signal back to the center of the ADC range whenever it
drifts out of range (high or low)
The ASC interrupt routine is triggered whenever the FiPPI detects the
ADC going out of range. If the out of range is due to the signal drifting out of
range (instead of a reset), the DSP triggers a TrackDAC step to bring the signal
back to the center of the ADC range, and data taking resumes. If the DSP
determines that the out of range is due to a reset, then the DSP holds the signal
at the center of the ADC range for a time determined by the parameter
RESETINT, which specifies the dead time after a reset in 0.25 μsec units. After
the reset interval, the signal is released and data taking resumes.
The DSP keeps track of how many times the signal drifts out of range
in both directions, and adjusts the slope such that the number of drifts high
(DriftUps) roughly matches the number of drifts low (DriftDowns). If the DSP
determines that the slope must be changed to match the rate, the SlopeDAC
value is modified by a constant fraction of the parameter SLOPEVAL
determined by the value of the parameter SGRANULAR. By default, the slope
adjustment granularity is 5%, which is a good compromise between adjusting
the slope quickly to match quickly changing input rates and being able to set the
SlopeDAC just right.
For an RC feedback detector, the offset added to the input signal is
adjusted such that the signal stays in range as much as possible.
7.6.2
Timer Interrupt
Every 500 μsec, the DSP is interrupted to take care of the regular
‘maintenance’ type tasks. These tasks include:
1) Update the run statistics EVTSINRUN, LIVETIME, REALTIME and
FASTPEAKS (only during a run).
2) Control the Rate LED. This LED flashes whenever a reset is detected
(reset detector only), and during a run the color indicates the current
output/input ratio. By default, the LED flashes green for
OCR/ICR>0.5, flashes yellow (green plus red) for 0.5>OCR/ICR>1/e,
and flashes red for OCR/ICR<1/e. The thresholds are determined by
the parameters YELTHR and REDTHR.
5/5/2009
89
DXP Saturn / ProSpect User Manual
MAN-SAT-PRO-0.1
3) Handle fixed length runs. During a fixed length run, the current value
of EVTSINRUN (output events), FASTPEAKS (input events),
LIVETIME or REALTIME is compared to the desired run length.
Once the value exceeds the desired value, the run is ended.
7.7 Error Handling
When the DSP detects an error in the operation of the DXP Saturn, the
red Status LED is turned on, and the source of the error is stored in the
parameter RUNERROR. The possible values for RUNERROR are listed below:
RUNERROR Value
0
1
2
3-5
6
Table 7.1:
Meaning
No Error
FiPPI communication error
ASC setup failure
Reserved
TrackDAC calibration error
Identification of DXP errors according to the DSP parameter
RUNERROR.
A FiPPI communication error could mean that the FiPPI configuration
was not successful. An ASC calibration error can indicate a hardware problem,
or possibly that a jumper is not set properly (for example, the DSP code for reset
preamplifiers will generate an error if the jumper is set to run in OFFSET
mode).
Once the source of the error has been located and cleared, the host can
set RUNERROR to 0 to force the DSP to exit the error loop and reinitialize the
system. Note that all system settings are saved when initialization is performed
coming out of the error loop. Of course, another valid method for clearing the
error is to redownload the DSP code after fixing the problem.
7.8 Specifying Data Acquisition Tasks (RUNTASKS):
Many aspects of the operation of the DXP Saturn are controlled by
individual flag bits of the parameter RUNTASKS. The meaning of each
RUNTASKS bit is described in Table 7.2 below:
5/5/2009
90
DXP Saturn / ProSpect User Manual
Bit
0
1
2
3
4
5
6
7
8
9
10
11-15
Meaning if set (1)
Reserved (set to 0)
Update SlopeDAC or OffsetDAC value to match
current rate (DEFAULT)
Use Finite Impulse Response (FIR) filter to
calculate baseline average
Acquire baseline values for histogramming and
averaging (DEFAULT)
Adjust fast filter threshold to compensate for
rate shifts
Correct for baseline shift, either in FiPPI (pulse
reset) or DSP (RC feedback) (DEFAULT)
Apply residual baseline correction (DEFAULT)
Disable writing baseline values to baseline
history circular buffer
Indicates special task or calibration run specified
by WHICHTEST
Histogram DeltaBaseline
(baseline - <baseline>)
Enable baseline cut
Reserved (set to 0)
MAN-SAT-PRO-0.1
Meaning if cleared (0)
Reserved (set to 0)
SlopeDAC or OffsetDAC adjustments disabled
Use Infinite Impulse Response (IIR) filter to
calculate baseline average (DEFAULT)
Disable baseline acquisition
Disable fast filter threshold adjustment
Disable baseline correction
No residual baseline correction
Continuously write baseline values to baseline
history circular buffer (DEFAULT)
Indicates normal acquisition run
Histogram raw baseline (DEFAULT)
Disable baseline cut (DEFAULT)
Reserved (set to 0)
Table 7.2: Data acquisition tasks controlled by the DSP parameter RUNTASKS.
7.9 Special Tasks (WHICHTEST)
Special tasks are selected by starting a run with bit 8 of the
RUNTASKS parameter set. The following tasks are currently supported:
Number
0
1
2
3
4
5
6
7
8
9-10
11
12
13
14
15
16
Test Segment
Set ASC DAC values to current value of GAINDAC, SLOPEDAC and/or OFFSETDAC
Acquire ADC trace in history buffer
Gain calib (measure TDACPERADC)
Slope calibration (measure SLOPEMULT)
Measure ADC non-linearity
Not currently used
Put DSP to sleep while FPGA logic is downloaded
Not currently used
OffsetDAC calibration (measure OFFDACVAL)
Not currently used
Program Fippi
Set internal polarity to current value of POLARITY parameter
Close input relay
Open input relay
RC feedback calibration trace of baseline filter and decimator values
RC feedback calibration trace of event filter and decimator values
Table 7.3: Special tasks and test segments that can be selected with the DSP parameter WHICHTEST.
5/5/2009
91
DXP Saturn / ProSpect User Manual
MAN-SAT-PRO-0.1
7.10 DSP Parameter Descriptions
As noted above, DSP operation is based on a number of parameters.
Some are control parameters required to operate the DXP, some are calibration
values determined by the DSP, and others are run statistics.
NOTE: in general you will not want to modify these parameters
directly, but only through a host control program like ProSpect or, if you are a
programmer, through a software library like XIA’s Handel library.
Variable
Type
PROGNUM
Constant
CODEREV
Constant
HDWRVAR
Constant
FIPPIREV
Constant
FIPPIVAR
Constant
DECIMATION
Constant
RUNIDENT
Returned
RUNERROR
Returned
BUSY
Returned
Acquisition Statistics:
LIVETIME0,1,2
Statistic
ELIVETIME0,1,2
Statistic
REALTIME0,1,2
Statistic
EVTSINRUN0,1
Statistic
UNDRFLOWS0,1
Statistic
OVERFLOWS0,1
Statistic
FASTPEAKS0,1
Statistic
NUMASCINT0,1
Statistic
NUMRESETS0,1
Statistic
NUMUPSETS0,1
Statistic
NUMDRUPS0,1
Statistic
NUMDRDOS0,1
Statistic
NUMZIGZAG0,1
Statistic
BASEEVTS0,1
Statistic
BASEMEAN0,1
Statistic
Control parameters:
WHICHTEST
Parameter
RUNTASKS
Parameter
BINFACT1
Parameter
MCALIMLO
Parameter
MCALIMHI
Parameter
TRACEWAIT
Parameter
ASCTIMOUT
Parameter
YELLOWTHR
Parameter
REDTHR
Parameter
PRESET
Parameter
Description
Program variant number.
Current DSP program revision.
Hardware variant. DSP reads this from interface FPGA.
FiPPI design revision. DSP reads this from FiPPI FPGA.
FiPPI design variant. DSP reads this from FiPPI FPGA.
Slow filter decimation factor. DSP reads this from FiPPI FPGA.
Run identifier
Error code if run is aborted, 0 for success
DSPs current acquisition status. Values listed below.
Reference
Intermediate filter live time in 800 nsec units
Energy filter live time in 800 nsec units
Elapsed acquisition time in 800 nsec units
Number of events in MCA spectrum
Number of MCA underflow events
Number of MCA overflow events
Number of input events detected by FiPPI
Number of ASC interrupts
Number of "reset" events seen
Number of "upset" events seen
Number of "drift up" events seen
Number of "drift down" events seen.
Number of "zigzag" events seen
Number of baseline events acquired
Updating mean baseline value
Which test segment to execute.
Which tasks will be executed in run sequence
MCA binning factor
Lower limit of MCA spectrum
Upper limit of MCA spectrum
ADC trace time factor
Timeout for ASCSetup in tenths of seconds
Medium rate throughput threshold for front panel LED
High rate throughput threshold for front panel LED
Preset type (0:none; 1:real time; 2:live time; 3: output cts; 4: input
cts)
PRESETLEN0,1
Parameter Preset run length
FiPPI Digital Filter/Event selection parameters:
SLOWLEN
Parameter Slow filter length
SLOWGAP
Parameter Slow filter gap
PEAKINT
Parameter Peak interval
FASTLEN
Parameter Fast filter length
FASTGAP
Parameter Fast filter gap
THRESHOLD
Parameter Threshold value for fast filter trigger (range: 1-255, 0 disables)
5/5/2009
92
DXP Saturn / ProSpect User Manual
MINWIDTH
MAXWIDTH
BASETHRESH
Parameter
Parameter
Parameter
BASETHRADJ
Parameter
FIPCONTROL
Parameter
MAN-SAT-PRO-0.1
Minimum peak width
Maximum peak width
Automatically set threshold for intermediate filter trigger (range 1255, 0 disables both baseline and event discrimination—use
FIPCONTROL to disable event discrimination only)
Coefficient for BASETHRESH auto-set algorithm (range 1-255,
smaller values result in tighter thresholds)
FiPPI advanced control, bitwise flag register:
bit 0 – fast threshold (0: enabled)
bit 1 – intermediate threshold (0: enabled)
bit 2 – slow threshold (0: enabled)
Threshold for slow filter trigger (range 1-255, 0 disables)
Peak sampling time
SLOWTHRESH
Parameter
PEAKSAM
Parameter
Baseline Related Parameters:
BLFILTER
Parameter Filtering parameter for baseline (IIR filtering)
BLFILTERF
Parameter Filtering parameter for baseline (FIR filtering)
BASEBINNING
Parameter Baseline binning for histogram (0:finest to 6:coarsest)
BLCUT
Parameter DSP baseline cut (cut at BLCUT*FWHM, units defined below)
BLMIN
Calibration Min baseline value accepted in average (calculated from BLCUT)
BLMAX
Calibration Max baseline value accepted in average (calculated from BLCUT)
ASC Control Parameters and Calibrations (all variants)
POLARITY
Parameter
Preamplifier signal polarity (0:negative step; 1:positive step)
GAINDAC
Parameter
Current Gain DAC value (16 bit serial DAC, range 0-65535).
INPUTENABLE
Parameter
Input Enable relay setting
ASC Control Parameters and Calibrations (reset-type variants)
RESETWAIT
Parameter Quick Reset time, 25ns units
RESETINT
Parameter Reset time, 0.25 usec units
SLOPEDAC
Calibration Current Slope DAC value (16 bit serial DAC, range 0-65535)
SLOPEZERO
Calibration Slope DAC zero value (approximately center of range)
SLOPEVAL
Calibration Abs(SLOPEDAC-SLOPEZERO)
SGRANULAR
Parameter Slope DAC step size
TRKDACVAL
Parameter Tracking DAC value: 12-bit parallel
TDACWIDTH
Parameter Track DAC pulse width 50 ns units
TDQPERADC
Calibration
TDQPERADCE
Calibration
ASC Control Parameters and Calibrations (RC feedback variants)
OFFSETDAC
Parameter
Current offset DAC value (16 bit serial DAC, range 0-65535).
OFFSETSTEP
Parameter
Offset DAC step size
RCTAU
Parameter
Preamplifer decay constant, in 1 μs units (RCF variant only)
RCTAUFRAC
Parameter
Fractional (1.15) decay constant (RCF variant only)
RCFCOR
Calibration Preamplifer decay correction (RCF variant only)
Miscellaneous Constants:
SPECTSTART
Constant
Address of MCA spectrum in program memory
SPECTLEN
Constant
Length of MCA spectrum buffer
BASESTART
Constant
Address of baseline histogram in data memory (offset by 0x4000)
BASELEN
Constant
Length of baseline histogram
EVTBSTART
Constant
Address of event buffer in data memory (offset by 0x4000)
EVTBLEN
Constant
Length of baseline histogram
HSTSTART
Constant
Address of history buffer in data memory (offset by 0x4000)
HSTLEN
Constant
Length of history buffer
NUMSCA
Parameter Number of SCA regions defined (mapping variants only)
SCAxLO, x=0-23
Parameter Lower MCA channel for SCA region x (mapping variants only)
SCAxHI, x=0-23
Parameter Upper MCA channel for SCA region x (mapping variants only)
USER1-USER8
User
User variables. Host software can use these for any purposes
Table 7.4: Summary of DSP parameter definitions
5/5/2009
93
DXP Saturn / ProSpect User Manual
MAN-SAT-PRO-0.1
7.10.1 Specifying fixed run lengths (PRESET,
PRESETLEN0,1):
By default, the DXP Saturn acquires data until a stop command is
received from the host.
A fixed run length can be specified using the parameters PRESET and
PRESETLEN0,1, as follows:
PRESET specifies the type of run: 0 = indefinite (default)
1 = fixed realtime
2 = fixed (energy filter) livetime
3 = fixed output events
4 = fixed input counts
PRESETLEN0,PRESETLEN1 specifies the length of preset fixed
length run, as a 32 bit quantity. For fixed realtime or livetime, the units are 800
nanosecond intervals.
7.10.2 Setting the slow filter parameters (SLOWLEN,
SLOWGAP)
The DXP uses a trapezoidal filter, characterized by the peaking time,
Tp, and gap time, Tg. The peaking time is determined by the SLOWLEN and
DECIMATION values. SLOWLEN is the interval of time, in units of decimated
clock cycles, during which the decimated ADC signal is integrated, referred to
as the peaking time. DECIMATION is automatically sensed by the DSP and
should not be modified. For Tp and Tg. in µsec, and the pipeline clock running
at 20MHz, the following gives the value of SLOWLEN and SLOWGAP:
SLOWLEN = 20 *Tp *2-DECIMATION
e.g. At DECIMATION = 4, Tp = 16 µsec yields SLOWLEN=20. The user will
want to be able to choose the peaking time based on resolution and throughput
requirements as described earlier in this document.
SLOWGAP is the gap time, visible as the ‘flat-top’ region of the
trapezoid.
SLOWGAP = 20*Tg*2-DECIMATION
Subject to the restriction that it must exceed 3, SLOWGAP is set such
that the flat-top interval is longer than the 0%-100% risetime of the preamplifier
output pulses by at least 1 decimation period:
Gap Time = (2 D * SLOWGAP * 50ns) > pulse risetime+ 2D * 50 ns
or: (2 D * (SLOWGAP-1) * 50ns) > pulse risetime
7.10.3 Setting the fast filter parameters(FASTLEN, FASTGAP)
The fast filter is also trapezoidal but has a decimation of 0 for all FiPPI
designs. The values of FASTLEN and FASTGAP are given, for Tp’ fast
peaking time and Tg’ = fast gap time in µsec:
FASTLEN = 20*Tp’
FASTGAP = 20*Tg’
5/5/2009
94
DXP Saturn / ProSpect User Manual
MAN-SAT-PRO-0.1
Typical values of these parameters are FASTLEN=4 and FASTGAP=0.
7.10.4 Setting the pulse detection parameters (THRESHOLD,
MINWIDTH, BASETHRESH, BASETHRADJ,
SLOWTHRESH, FIPCONTROL)
X-rays are identified when a filter output goes above an active
threshold. Thresholds can be applied to the fast (THRESHOLD), intermediate
(BASETHRESH, BASETHRADJ) and energy filters (SLOWTHRESH), though
in practice the energy threshold is rarely used. The user will typically only
adjust the fast filter threshold, THRESHOLD.
All thresholds are scaled by their respective filter lengths. Further, they
cannot be expressed in energy units until the DXP conversion gain (see section
7.10.6 below), GDXP = number of ADC counts per eV at the DXP input, is
known. For an energy threshold Eth in eV,
THRESHOLD=GDXP*Eth*FASTLEN
BASETHRESH=GDXP*Eth*SLOWLEN
SLOWTHRES=GDXP*Eth*SLOWLEN
THRESHOLD is typically set by the user. A good procedure is to
initially set the value too high. Once a spectrum is observed, reduce
THRESHOLD until the zero energy noise peak starts to become significant, and
then raise it again until only a trace of the noise peak remains. The MINWIDTH
parameter is used for noise rejection: It is the minimum number of time bins the
fast filter is above threshold. A typical value that works with FASTLEN=4 is
MINWIDTH=4.
BASETHRESH is automatically set by the DSP and applied to the
intermediate filter as part of the baseline acquisition circuitry, i.e. baseline
measurements are taken when the signal is below this threshold.
BASETHRESH threshold crossings by default also trigger event processing,
effectively extending the detectable energy range significantly below the fast
filter THRESHOLD. The parameter BASETHRADJ controls the algorithm that
calculates BASETHRESH, with larger BASETHRADJ values resulting in more
conservative BASETHRESH values. In the rare case the the baseline threshold
is set incorrectly by the DSP algorighm, we recommend adjusting
BASETHRADJ rather than BASETHRESH itself.
The use of a slow threshold introduces significant errors in the counting
statistics. Specifically, the dead-time-per-event is markedly different for x-rays
above and below the threshold. SLOWTHRESH should only be used if:
9 Your detector has a very thin window and operates in a vacuum.
9
You understand that it is not possible to compute input count rates for
x-ray peaks below the threshold relative to x-ray peaks above the
threshold.
Setting a threshold to zero disables that threshold. Individual
thresholds can also be enabled and disabled via the lowest 3 bits of the
parameter FIPCONTROL:
5/5/2009
95
DXP Saturn / ProSpect User Manual
FIPCONTROL
BIT
0
1
2
MAN-SAT-PRO-0.1
Meaning, if = 0
Meaning, if = 1
THRESHOLD event
discrimination enabled
BASETHRESH event
discrimination enabled;
baseline discrimination
enabled
SLOWTHRESH event
discrimination enabled
THRESHOLD event
discrimination disabled
BASETHRESH event
discrimination disabled;
baseline discrimination
enabled
SLOWTHRESH event
discrimination disabled
Table 7.5: Threshold control via FIPCONTROL.
The two methods of disabling thresholds are equivalent, except in the case of the
intermediate filter threshold BASETHRESH, which is used for both baseline
and energy discrimination,
e.g. setting FIPCONTROL = XXXX XXXX XXXX X110 enables event
discrimination based on the fast filter THRESHOLD, disables event
discrimination based on the intermediate filter BASETHRESH and slow filter
SLOWTHRESH, however, BASETHRESH still discriminates baseline
measurements in the intermediate filter; alternatively, setting BASETHRESH to
zero would disable both event and baseline discrimination, regardless of the
value of FIPCONTROL.
7.10.5 Setting the Pile-up inspection parameters (MAXWIDTH,
PEAKINT)
MAXWIDTH is used to reject pulse pile-up on a time scale that is
comparable to FASTLEN as discussed in section 5.8. A typical value is
MAXWIDTH = 2*FASTLEN + FASTGAP +N
where N is in the range 4-8. If the signal rise-time depends on the x-ray energy
(e.g. bandwidth limited preamplifier or low field regions of the detector that are
preferentially sampled at some energy) this cut can bias the spectrum if it is too
small.
PEAKINT is used to reject energy channel pulse pile-up when the
pulses are well resolved by the fast channel. This value should be set as:
PEAKINT = SLOWLEN + SLOWGAP + N
where N = 0 typically. Setting N to higher values will increase the deadtime per
event.
7.10.6 Setting the Analog Gain (GAINDAC)
The DXP internal gain is chosen to set the ADC dynamic range
appropriately for the signals of interest. If it is set too low, the energy resolution
may be compromised, while if is set too high there may be excessive deadtime
and thus attenuation of higher energy x-rays. The ADC range is one volt full
scale. Two guidelines are suggested for the internal gain setting:
5/5/2009
96
DXP Saturn / ProSpect User Manual
MAN-SAT-PRO-0.1
1) This is appropriate when there is a single peak of interest: Set the gain
such that the typical pulse height is between 5 and 10% of the ADC
range (for 10 bit ADC; or between 2 and 10% of the ADC range for 12
bit ADC).
2) This is appropriate when looking at a fixed energy range, with no
particular peak of interest: Set the gain such that the maximum energy
pulses are around 300-400 displayed vertical units in the ADC Trace
readout.
The parameter GAINDAC sets the internal amplifier gain. For
particularly high gain detectors, the coarse gain jumper setting via JP102 offers
a factor of 4 input signal attenuation. See Appendix A for the location of JP102.
The overall gain can be expressed as follows:
Gtot = Gin’ * Gvar * Gbase
where
Gin’: the nominal input stage gain Gin ~ 1 (JP102 set to “0dB Attenuation”) or ~
¼ (JP102 set to “12dB Attenuation”), is modified by the resistive divider
created by the output impedance of the preamplifier and the input
impedance of the Saturn to the value Gin’.
Gvar: variable gain setting = 0.5 to 35.5 depending on GAINDAC setting
Gbase: reference gain ~ 0.8
The total internal gain ranges from 0.2 VADC/VINPUT to 57.7 VADC/VINPUT.
The digital gain control is a 16 bit DAC which sets the gain of a “linear
in dB” variable gain amplifier. The gain setting accuracy is approximately one
bit (or 0.00061 dB = 0.007%). The relationship between Gvar and GAINDAC
is:
Gain (in dB) = (GAINDAC/65536) * 40 dB
Gvar = 10**(Gain(in dB)/20)
The output impedance ROUT of the preamplifier creates a resistive
divider with the Saturn input impedance RIN, and thus affects the input gain term
Gin. If JP102 is set to “0dB Attenuation”, the input impedance RIN = 10.0kW.
If JP102 is set to “-12dB Attenuation”, the input impedance RIN = 1.00kΩ. This
factor can be expressed as follows:
Gin (ROUT)’ = 2k /( (1k or 500) + Output Impedance))
7.11 Standard Program Variants
7.11.1 MCA acquisition with reset-type preamplifiers
Variant 0 is the standard firmware variant supplied with the DXP
Saturn, as described in this manual. It is intended for use with reset-type
preamplifiers (described in Section 3).
5/5/2009
97
DXP Saturn / ProSpect User Manual
MAN-SAT-PRO-0.1
FDD file:
X10P_RESET.FDD
DSP file name:
X10P_0106.HEX
Fippi file names:
FXPD00J_PSAM.FIP
FXPD200J_ST.FIP
FXPD420J_ST.FIP
FXPD640J_ST.FIP
Note: To use this variant, the “Ramp/Offset” jumper should be in the
“Ramp” position.
7.11.2 MCA acquisition with RC-type preamplifiers
This firmware variant is intended for use with resistive feedback
preamplifiers (described in Section 3.6).
FDD file:
X10P_RC.FDD
DSP file name:
X10PRC_0103.HEX
Fippi file names:
FXRC00J.FIP
FXRC200J.FIP
FXRC420J.FIP
FXRC640J.FIP
Additional parameters (described in Section 5.10 ):
RCTAU: Exponential decay time in 1 μs units.
RCTAUFRAC: Fractional decay time in 1.15 format.
RCFCOR: Correction factor (calculated automatically at start of run if
RCTAU not 0)
Note: To use this variant, the “Ramp/Offset” jumper should be in the
“Offset” position.
5/5/2009
98
DXP Saturn / ProSpect User Manual
MAN-SAT-PRO-0.1
Appendices
Appendix A. DPP-X10P Revision D.2 Circuit Board Description
This Appendix to the DXP Saturn User’s Manual is provided for DXPOEM customers. It summarizes jumper settings, connector locations, part
numbers and pinouts, and power consumption calculations for the DPP-X10P
Revision D.2 digital x-ray processor circuit board.
Figure A.1: Jumper and connector locations for the DPPX10P Rev. D.2 printed
circuit card.
5/5/2009
99
DXP Saturn / ProSpect User Manual
MAN-SAT-PRO-0.1
A.1. Jumper Settings
Reference
Jumper Label
JP1
-
JP9 &
JP10
INPUT
JP20
JP21
HV INHIBIT
-ASSERT LEVEL
HV INHIBIT
-DEFAULT
JP100 &
JP101
INPUT
JP102
INPUT
JP104
MODE
Position Labels
GND (symbol)
DSUB-9
BNC
0
1
0
1
SINGLE-ENDED
DIFFERENTIAL
-12dB ATTEN.
0dB ATTEN.
RAMP
OFFSET
Description
- Chassis and internal ground not connected
- Chassis connected to internal ground
Improves signal integrity in some cases, but can
introduce a ground loop.
- Signal entry via DSUB-9 connector
- Signal entry via BNC connector
- HV inhibited when BNC input is LO
- HV inhibited when BNC input is HI
- If BNC disconnected, asserted level is LO
- If BNC disconnected, asserted level is HI
- Single-ended input configuration (standard)
- Differential input configuration (rare)
- input signal divided by four (-12dB attenuation)
- input signal not divided (0db attenuation)
The –12dB setting should be selected if the
preamplifier output voltage exceeds +/- 10V.
- Setting for pulsed-reset preamplifiers
- Setting for resistive-feedback preamplifiers
A.2. LED Indicators
D1 – Status LED: Red, illuminated when an error condition is present
QT Optoelectronics P/N: MV67539.MP7
D2 – I/O LED: Yellow, illuminated during USB transfers
QT Optoelectronics P/N: MV63539.MP7
D2 – Rate LED: Red/Green bi-color LED, flashes at a frequency proportional to x-ray event rate. Flashes
green, yellow or red, depending on the processor dead time.
Gilway P/N: E250
5/5/2009
100
DXP Saturn / ProSpect User Manual
MAN-SAT-PRO-0.1
A.3. Connectors
J101 - Signal Input: BNC, connects preamplifier output to the DPP.
Bomar P/N: 364A595BL
J7 - Gate Input: BNC, halts data acquisition when asserted (polarity selectable)
Bomar P/N: 364A595BL
J8 - Sync Input: BNC, timing signal for time-resolved spectroscopy and other special modes
Bomar P/N: 364A595BL
J9 - DC Power Entry: 0.100” Header with lock/ramp, input from the DC power supply
Molex P/N: 22-23-2121
Pin Name
Description
#
1
GND
Internal ground connection – NOT chassis ground
2
VCC_RAW
+5V DC supply (regulated on-board to 3.3V DC) for digital components
3
GND
Internal ground connection – NOT chassis ground
4
+5V_RAW
+5V DC supply for on-board analog components
Optional preamplifier supply
(individually, or substituted for +12V, both options require soldering)
5
-5V_RAW
+5V DC supply for on-board analog components
Optional preamplifier supply (substituted for -12V, requires soldering)
6
+12V_RAW
+12V DC supply for on-board analog components
Standard supply for preamplifier
7
-12V_RAW
-12V DC supply for on-board analog components
Standard supply for preamplifier
8
+24V_RAW
+24V DC analog supply for preamplifier – not used by DPP
9
-24V_RAW
-24V DC analog supply for preamplifier– not used by DPP
10
HV_INHIBIT*
HV Inhibit output – only used in conjunction with PWR-X10P supply
11
EXT_INHIBIT
HV Inhibit input – only used in conjunction with PWR-X10P supply
12
GND
Internal ground connection – NOT chassis ground
P1 - Preamplifier Power Exit: DSUB-9 Female, output DC voltages to preamplifier.
AMP P/N: 745781-4
Pin Name
Description
#
1
GND
Internal ground connection – NOT chassis ground
2
GND
Internal ground connection – NOT chassis ground
3
IN_ALT
Alternate signal input, selected with jumper JP10 (BNC standard)
4
+12V_OUT
+12V (+5V solder option) DC for preamplifier
5
NC
No connection –- solder option +5V connection
6
-24V_OUT
-24V DC for preamplifier
7
+24V_OUT
+24V DC for preamplifier
8
REF_ALT
Alternate signal reference, selected with jumper JP9 (BNC standard)
9
-12V_OUT
-12V (-5V solder option) DC for preamplifier
P2 – IEEE 1284 Standard EPP Port: DSUB-25 Female, parallel communications port; standard pinout.
5/5/2009
101
DXP Saturn / ProSpect User Manual
MAN-SAT-PRO-0.1
AMP P/N: 745783-4
A.4. Power Consumption:
DPP-X10P Only (preamplifier power consumption NOT INCLUDED)
Name
VCC
V+5
V-5
V+12
V-12
Total
5/5/2009
Voltage [V]
5
5
-5
12
-12
Standby
Current [mA]
120
220
100
40
30
Power [mW]
600
1100
500
480
360
3040
Active
Current [mA]
240
230
100
40
40
Power [mW]
1200
1150
500
480
480
3810
102
DXP Saturn / ProSpect User Manual
MAN-SAT-PRO-0.1
Appendix B. PWR-OEM (PWR-X10P) Revision E.1 - Preliminary
This addendum to the DXP Saturn User’s Manual is provided for PWR-OEM
customers. It summarizes switches/controls, jumper settings, connector
locations, part numbers and pinouts, displays (LEDs and LCD), power
consumption and power supplied.
B.1. Switches and Controls
Reference
Function
Part #
S1
Power
(rocker)
C&K
DF62J12S2AHQF
5/5/2009
Description
Connects the AC line voltage input to the toroidal transformer
such that unit is powered on.
Jumper wires in footprints R17 and R18 bypass the power
switch, routing the AC line votage directly to the transformer.
103
DXP Saturn / ProSpect User Manual
S2
Line Voltage
Select
(slide)
SWHV
HV Enable
(momentary
pushbutton)
U15
HV Polarity
(cardedge
‘switch’)
R50
HV Setting
Potentiometer
MAN-SAT-PRO-0.1
C&K
1201M2S3AQE2
Molex
22-23-2021
(Mountain Switch
10PA032)
Sullivan
EZM10DRXH
+ Custom PCB
Key
Phillips
CT9P102
- Left-hand position selects 115V/60Hz
- Right-hand position selects 230V/60Hz
Jumper wires in footprints R16 and R19 select 115V (standard).
Momentary short (debounce circuit on PCB) enables/disables
the high voltage supply.
Only two (out of four) positions are valid!
Desired polarity indicator enclosed in a circle should be located
at lower left. Note also that the more widely spaced contacts
should be on the right-hand side.
Clockwise (CW) increases the HV bias.
Pin 1 = CCW; Pin 2 = Wiper; Pin 3,4 (center pins) = CW
B.2. Jumper Settings
Reference
Jumper Label
JP1
HV RAMP
JP2
-
Position Labels
FAST
SLOW
-
Description
- HV ramp-up (and down) interval is ~10 seconds
- HV ramp-up (and down) interval is ~50 seconds
FAST mode is typically used (maximum rate 100V/s).
- When present, bypasses the Inhibit loop to/from DPP
card (HV is inhibited when the logic level is LOW)
The DPP card has additional jumpers to set the polarity
and default level (when Inhibit cable disconnected).
B.3. LED Indicators and LCD Display
DHV_NEG – HV Control Status LED: Only illuminated when polarity is set to NEGATIVE. Yellow when
disabled (though possibly ramping down); Red when enabled. Current drive is approximately 15mA per color.
Gilway P/N: E247 (T-5mm, bi-color, 3-pin: pin 1= red anode; center pins = cathode (GND); pin = yellow anode)
DHV_POS – HV Control Status LED: Only illuminated when polarity is set to POSITIVE. Yellow when
disabled (though possibly ramping down); Red when enabled. Current drive is approximately 15mA per color.
Gilway P/N: E247 (T-5mm, bi-color, 3-pin: pin 1= red anode; center pins = cathode (GND); pin = yellow anode)
D16 – HV Present LED: Illuminated (red) when HV is present, i.e. ramping or not. Current approximately 15mA.
Gilway P/N: E247 (T-3mm,bi-color, 3-pin: pin 1= red anode; center pins = cathode (GND); pin = yellow anode)
J5 – HV LCD Display: connection for +/- 200mV LCD voltmeter; supplies +/-5V
e.g. Lascar P/N: DPM 2AS-BL (3 ½ digits)
Pin #
Name
Description
1
-5V
locally decoupled negative 5V supply
3
Input (low)
connected to ground (
5
Input (high)
HV divided by 10,000 (e.g. 1kV HV --> 100mV); 1 MΩ impedance
5/5/2009
104
DXP Saturn / ProSpect User Manual
7
9
11
13
15
17
19
even #’d
COM
REF
NC
CAPCAP+
GND
+5V
NC
MAN-SAT-PRO-0.1
simply connected to pin 9
simply connected to pin 7
not connected
negative terminal of a 1uF, 25V tantalum capacitor
positive terminal of a 1uF, 25V tantalum capacitor
ground connection
locally decoupled positive 5V supply
not connected (this is the entire row adjacent to the board edge)
B.4. Connectors
J7 – Line Voltage Entry: 0.156”, 3-pin, lock-ramp, polarity-keyed Header
Molex P/N: 26-60-4030
Pin #
Name
Description
1
Neutral
Neutral (isolated within the unit)
2
Earth
Earth is typically connected to the chassis. Local GND is connected to Earth by
a 1kΩ 1W on-board resistor (R7)
3
Line
Hot (isolated within the unit)
J2 – DC Output Voltages (to DPPX10P, preamplifier): 0.100” 12-pin Header;
Molex P/N: 22-23-2121
Pin #
Name
Description
1
GND
Local GND
2
VCC
Pos. 5V digital supply voltage (DPPX10P board regulates down to pos. 3.3V)
3
GND
Local GND
4
V+5
Pos. 5V analog supply voltage
5
V-5
Neg. 5V analog supply voltage
6
V+12
Pos. 12V analog supply voltage
7
V-12
Neg. 12V analog supply voltage
8
V+24
Pos. 24V analog supply voltage
9
V-24
Neg. 24V analog supply voltage
10
HV Inhibit
TTL/CMOS logic level signal returned from DPP card, which optionally changes
Return
the polarity of the signal. Use jumper JP2 to bypass the DPP send/return loop,
resulting in an active low Inhibit function (HV inhibited for a low logic level).
11
HV Inhibit Send TTL/CMOS logic level. Connects directly to the Inhibit BNC inner conductor.
Use jumper JP2 to bypass the DPP send/return loop, resulting in an active low
Inhibit function (HV inhibited for a low logic level).
12
GND
Local GND
JHV4 - Inhibit Input: BNC, inhibits the HV bias supply. Inhibit signal is usually routed through the DPP card for
optional polarity inversion and default (disconnected) mode. Use jumper JP2 to bypass the DPP loop, resulting in
an active low Inhibit function (HV inhibited for a low logic level).
Bomar P/N: 364A595BL
5/5/2009
105
DXP Saturn / ProSpect User Manual
MAN-SAT-PRO-0.1
J3 –Fan Supply: Unregulated 6-12 Volt supply for fan (e.g. EBM/Pabst P/N: 412)—right-hand pin is positive.
Electrolytic capacitor C8 (e.g. Panasonic P/N:EEU-FA1E471) MUST be present.
Molex P/N: 22-23-2021
J8 – Transformer Primaries (CAUTION: AC Line, Neutral): 0.156”, 4-pin, lock-ramp, polarity-keyed Header
USE ONLY WITH XIA-SUPPLIED TOROIDAL TRANSFORMER!!!
Molex P/N: 26-60-4040
J1 – Transformer Secondaries: 0.100”, 9-pin, lock-ramp, polarity-keyed Header
USE ONLY WITH XIA-SUPPLIED TOROIDAL TRANSFORMER!!!
Molex P/N: 22-23-2091
B.5. Power Consumption:
PWRX10P Total Capacity and Estimated Reserves
Voltage
Secondary
VCC and V+5**
V+12
V-12 and V-5**
V+24
V-24
Total
Capacity
Current [mA]
1000
500
500
100
100
DPP Load
(active)
Current [mA]
370
40
140
-
HV Load
(enabled)
Current [mA]
90
80
90
-
Combined
Load*
Current [mA]
460
120
230
Estimated
Reserves
Current [mA]
540
380
270
100
100
*Doesn't include preamplifier or accessory (eg. OPLC) load currents.
**Regulators share the same secondary winding and voltage rectifier, thus total current limit is shared; either voltage
capable of providing full current rating.
5/5/2009
106
DXP Saturn / ProSpect User Manual
MAN-SAT-PRO-0.1
Appendix C. Sample INI File(s)
Below is a sample INI file that is appropriate for a detector with:
o Reset-type preamplifier
o
6.6mV/keV detector gain
o
positive signal polarity
[detector definitions]
* Kevex Detector
START #1
alias = detector1
number_of_channels = 1
type = reset
type_value = 10.0
channel0_gain = 6.6
channel0_polarity = +
END #1
[firmware definitions]
START #1
alias = firmware1
filename = c:\program files\xia\ProSpect\firmware\saturn_reset.fdd
END #1
[module definitions]
START #1
alias = module1
module_type = dxpx10p
number_of_channels = 1
interface = epp
epp_address = 0x378
channel0_alias = 1
channel0_detector = detector1:0
channel0_gain = 1.0
firmware_set_all = firmware1
END #1
Below is a sample INI file that is appropriate for a detector with:
o RC-type preamplifier
5/5/2009
o
3.0mV/keV detector gain
o
negative signal polarity
107
DXP Saturn / ProSpect User Manual
MAN-SAT-PRO-0.1
[detector definitions]
* Ketek Detector
START #1
alias = detector1
number_of_channels = 1
type = rc_feedback
type_value = 10.0
channel0_gain = 3.0
channel0_polarity = END #1
[firmware definitions]
START #1
alias = firmware1
filename = c:\program files\xia\ProSpect\firmware\saturn_rc.fdd
END #1
[module definitions]
START #1
alias = module1
module_type = dxpx10p
number_of_channels = 1
interface = epp
epp_address = 0x378
channel0_alias = 1
channel0_detector = detector1:0
channel0_gain = 1.0
firmware_set_all = firmware1
END #1
5/5/2009
108
DXP Saturn / ProSpect User Manual
MAN-SAT-PRO-0.1
Appendix D. Firmware File Formats
D.1. Firmware and FDD Files
Firmware refers to the DSP and FiPPI (FPGA) configuration code that
is downloaded to, and runs on, the DXP Saturn itself. Typically one DSP file
and four FiPPI files comprise a complete firmware set. For simplicity XIA
combines a complete firmware set into a single file of the form
“firmware_name.fdd”. This file format is supported by Handel, XIA’s digital
spectrometer device driver, and is the standard firmware format used in
ProSpect. The FiPPI and DSP are discussed in chapters 5 and 7.
D.1.1. Code Variants
MCA acquisition with RC-type preamplifiers
Variant 0 is the standard firmware variant supplied with the DXP
Saturn, as described in this manual. It is intended for use with reset-type
preamplifiers (described in section 5.1.1).
FDD file:
SATURN_RESET_REVC.FDD
DSP file name:
SAT_0113.HEX
Fippi file names:
FXPD00L.FIP (decimation 0)
FXPD200L.FIP (decimation 2)
FXPD420L.FIP (decimation 4)
FXPD640L.FIP (decimation 6)
Notes:
- This is the 20MHz version. The 40MHz version is
SATURN_RESET_REVC_40MHZ.FDD.
- To use this variant, the “Ramp/Offset” jumper should be in the “Ramp”
position.
5/5/2009
109
DXP Saturn / ProSpect User Manual
MAN-SAT-PRO-0.1
MCA acquisition with RC-type preamplifiers
This firmware variant is intended for use with resistive feedback
preamplifiers (described in section 5.1.2).
FDD file:
SATURN_RC_REVC.FDD
DSP file name:
SAT_RC_0111.HEX
Fippi file names:
F00XRC00L.FIP (decimation 0)
F00XRC20L.FIP (decimation 2)
F00XRC40L.FIP (decimation 4)
F00XRC60L.FIP (decimation 6)
Additional parameters (described in Section 5.10 ):
RCTAU: Exponential decay time in 1 μs units.
RCTAUFRAC: Fractional decay time in 1.15 format.
RCFCOR: Correction factor (calculated automatically at start of run if
RCTAU not 0)
Notes:
- This is the 20MHz version. The 40MHz version is
SATURN_RC_REVC_40MHZ.FDD.
- To use this variant, the “Ramp/Offset” jumper should be in the “Offset”
position.
D.2. DSP Code
The Digital Signal Processor acquires and processes event data from
the FiPPI, controls the analog front-end through DACs, and communicates with
the host. Different DSP program variants are used for different types of data
acquisition and different preamplifier types. Section 7 describes in detail the
DSP operation, its tasks, and parameters which control them. The DSP file
takes the form “dsp_name.hex”. Two standard DSP programs are available:
One for reset-type detectors and one for RC-type detectors. Program variants
for specialized applications are developed on an NRE basis. Please contact XIA
for more information.
5/5/2009
110
DXP Saturn / ProSpect User Manual
MAN-SAT-PRO-0.1
D.3. FiPPI Code
The Filter-Pulse-Pileup-Inspector (FiPPI) performs real-time digital
waveform processing and pileup inspection, and extracts user-defined metrics.
FiPPI configurations take the form “fippi_name.fip”. FiPPI’s are distinguished
by preamplifier type, but also by ‘decimation’. Decimation refers to preaveraging of the ADC signal prior to the FPGA processing pipeline. Each
decimation accomodates a specific range of peaking times, i.e. shaping or
integration times. Typically four (4) FiPPI configuration files are required by
the DXP Saturn. When the peaking time is changed such that a range boundary
is crossed, the host software downloads the appropriate FiPPI configuration to
the DXP Saturn.
Decimation
#ADC Samples in
Peaking Time Range
Pre-Average
0
1
250ns – 1.25μs
2
4
1 μs – 5 μs
4
16
4 μs – 20 μs
6
64
16 μs – 80 μs
Table 0.1: FiPPI decimation details (assumes 20MHz ADC clock).
5/5/2009
Equivalent Shaping Time Range
500ns – 2.5μs
2 μs – 10 μs
8 μs – 40 μs
32 μs – 160 μs
111