1
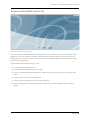
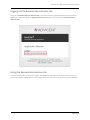
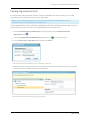
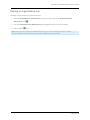
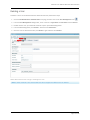
NaviPlan ®
Financial Planning Application
NaviPlan User Manual:
Business Administration
NaviPlan User's Guide: (USA) Version 15.0
NaviPlan User Manual: Business Administration
Copyright and Trademark
© Copyright 2013-2014 Advicent LP and its affiliated companies (Advicent). All rights reserved. Advicent ® and NaviPlan ® are trademarks of
Advicent.
No part of this publication may be reproduced or transmitted in any form, by any means (electronic, photocopying, recording, or otherwise)
without the written permission of Advicent.
Microsoft Word is a registered trademark of Microsoft Corporation. Adobe and Acrobat are trademarks of Adobe Systems Inc. All other
product names are the sole properties of their respective owners.
Software License
This publication is intended for use by authorized licensees of Advicent’s proprietary NaviPlan software described herein. This publication does
not grant any license or right to use of the software, and use of the software or this publication is prohibited by anyone who is not an
authorized licensee. All licenses, rights, and restrictions on use of the software are governed by a separate license agreement.
Disclaimer
The software described in this publication is designed to allow a financial planner to demonstrate and evaluate various strategies in order to
achieve a client’s financial goals. It is licensed to authorized licensees on the understanding that Advicent is not engaged in rendering legal,
accounting, or other professional advice and, if any such advice is required, the services of a competent professional person should be
obtained.
Advicent has engaged Ibbotson Associates, Inc., a wholly owned subsidiary of Morningstar, Inc., to develop proprietary asset allocation tools
for educational purposes. Ibbotson has granted to Advicent a license for use thereof.
1/6/2015
Page 2 of 26
NaviPlan User Manual: Business Administration
Contents
Contents
3
Chapter 1: Getting Started
5
Purpose of the NaviPlan Admin Site
6
Conventions used in this manual
7
Logging into the Business Administration Site
8
Exiting the Business Administrative Site
8
Find More Information
9
Help
9
Learning Center
9
Chapter 2: Organization Units
10
Org Unit Management
11
Creating Organizational Units
12
Deleting an Organizational Unit
13
Chapter 3: User Management
14
User Management
15
Creating a New User
16
Searching for Users
17
Editing a Current User
17
Resetting User Passwords
18
Deleting a User
19
Chapter 4: Manage Templates
20
Using Templates
21
Searching for Templates
21
Creating a New Template
22
Entitlement List
23
Entitlement List Cont'd...
24
Chapter 5: Client management
25
Page 3 of 26
NaviPlan User Manual: Business Administration
Reassigning clients to another User
26
Page 4 of 26
NaviPlan User Manual: Business Administration
Chapter 1: Getting Started
Purpose of the NaviPlan Admin Site
6
Conventions used in this manual
7
Logging into the Business Administration Site
8
Exiting the Business Administrative Site
8
Find More Information
9
Page 5 of 26
NaviPlan User Manual: Business Administration
Purpose of the NaviPlan Admin Site
NaviPlan Business Administration main page
The primary purpose of NaviPlan Business Administration is to set up and control access to the NaviPlan online
application. If some users will have oversight responsibility over the work of other users or if you plan to use
NaviPlan’s generic management reports, then you will also use the administrative site to define the hierarchical
structure of your organization.
Using NaviPlan Business Administration, you can:
n
create and maintain application users.
n
create and maintain administrative user profiles.
n
create and maintain ownership groups (teams in which all members of the team share ownership of the
client).
n
reassign clients from one user to another user.
n
create the base organization(s) for your company (optional).
n
set up organizational units within the organization (optional), and create organizational unit oversight
groups.
Page 6 of 26
NaviPlan User Manual: Business Administration
Conventions used in this manual
This manual uses the following conventions:
n
The names of items on the screen are italicized and bolded. For example, the Users page opens.
n
The names of items that you must select, click, or enter appear in bold. For example, make your changes,
and then click Done.
Page 7 of 26
NaviPlan User Manual: Business Administration
Logging into the Business Administration Site
To log into the NaviPlan Business Administration, you will first need to log into NaviPlan online. Once you have
logged in you will be brought to the Application Selection page where you can then select NaviPlan Business
Administration.
Exiting the Business Administrative Site
To exit the administrative site and save changes, click Logout in the top-right corner of the screen. Do not close
your browser without logging off first, or any changes made on the last screen you worked on may not be saved.
Page 8 of 26
NaviPlan User Manual: Business Administration
Find More Information
If you have a question that is not addressed in this manual, there are other places to look for additional information.
Help
The quickest way to get information about any command, dialog box, or item within the NaviPlan Online
Administrative Site is to use the Help. To access the Help, click the button at the top of the current dialog box or at
the bottom of the Home page.
Learning Center
Find training, support, and additional resources quickly and easily in the NaviPlan Learning Center. Use the Learning
Center as your first stop for finding supporting documentation, training opportunities, and the latest updates to
NaviPlan.
To access the NaviPlan Learning Center, open the Help & Resources menu from anywhere in NaviPlan, then select
Learning Center.
Page 9 of 26
NaviPlan User Manual: Business Administration
Chapter 2: Organization Units
NaviPlan Business Administration Main Page
Org Unit Management
11
Creating Organizational Units
12
Deleting an Organizational Unit
13
Page 10 of 26
NaviPlan User Manual: Business Administration
Org Unit Management
In NaviPlan, companies are structured using a hierarchy of Organizational Units. Each Organizational Unit
represents a different part of the company and establishes the oversight privileges necessary for management to
review and approve financial plans.
Each user must belong to one organizational unit, and to all parent units in one direct path up to the highest level.
For example, branch manager, Paul Smith may belong to the Florida unit (Hierarchy level 2) and to XYZ Financial
(Hierarchy level 1), but not to the Tampa unit (Hierarchy level 3).
Companies must define their organizational structure in NaviPlan if:
n
Some users are to have oversight access over other users
n
You want to use NaviPlan management reports (NaviPlan uses the organizational structures to group data
in management reports)
If oversight access is not required (i.e., users work independently) and you are not going to use the NaviPlan
management reports, then you do not have to enter any organizational units.
Page 11 of 26
NaviPlan User Manual: Business Administration
Creating Organizational Units
If some members of the organization will have oversight responsibility over other members, you must add
organizational units to define the hierarchy of your organization.
Note: If you are adding organizational units, each user must belong to one organizational unit, and
to all parent units in one direct path up to the highest level.
To add organizational units, and to create the oversight groups within the organizational unit that give read, write,
and/or control access to the members of that organizational unit, follow these steps:
1. Go to the NaviPlan Business Administration main page, and then click the Organizational Unit
Management icon
.
2. From the Organizational Unit Management page click on the
icon to add an org unit.
3. Fill in the Name (ID) and Description fields and then click Create.
NaviPlan Business Administration Main Page - Org Unit Management - Add Child
4. Multiple sub units can be created under the original org unit, as well as within other sub units. An example
of how to branch out multiple sub units can be seen here:
NaviPlan Business Administration Main Paige - Org Unit Management
Page 12 of 26
NaviPlan User Manual: Business Administration
Deleting an Organizational Unit
To delete an organizational unit, follow these steps:
1. Go to the NaviPlan Business Administration main page, and then click on the Organizational Unit
Management icon
.
2. From the Organizational Unit Management page, highlight the org unit you wish to delete.
3. Click the delete
icon.
Note: Be sure that all members associated within the org unit you are deleting have been removed.
If there are still users associated with the org unit you will not be able to delete it.
Page 13 of 26
NaviPlan User Manual: Business Administration
Chapter 3: User Management
NaviPlan Business Administration Main Page
User Management
15
Creating a New User
16
Searching for Users
17
Editing a Current User
17
Resetting User Passwords
18
Deleting a User
19
Page 14 of 26
NaviPlan User Manual: Business Administration
User Management
Before any person can use NaviPlan Online, that person must be entered in the administrative site as a user.
NaviPlan Online maintains information about each user of the application in the form of a user profile. This
information is used to control access to different parts of the application. Administrators can enter, edit, and delete
all this information in the administrative site.
Page 15 of 26
NaviPlan User Manual: Business Administration
Creating a New User
To create a brand new user, follow these steps:
1. Go to the NaviPlan Business Administration main page, and then click on the User Management icon
.
2. From the User Management screen, select Add a New User.
3. On the Create User screen be sure to include the following information.
n
User Name
n
Password
n
Confirm Password
n
First Name
n
Last Name
n
Email Address
4. Click Create.
Note: The password must have at least one upper case letter, one lower case letter, and must be
10 characters total.
NaviPlan Administration Main Page - User Management - Add A New User
Page 16 of 26
NaviPlan User Manual: Business Administration
Searching for Users
To find a user, follow these steps:
1. Go to the NaviPlan Business Administration main page, and then click on theUser Management icon
.
2. On the User Management page enter the Login Name or User Name of the user you are searching for.
n
To search for a user who currently has access to NaviPlan Online, select Active.
n
To search for a user who no longer has access to NaviPlan Online, select Inactive.
n
To search for both active, and inactive users click Both.
3. Click Search and a list of the users who meet your criteria will appear below.
Note: When entering criteria, you can also use wildcards. For example, to generate a list of users
whose login names start with J, enter J* in the Login Name field. To view a list of all users, click
Search without entering any criteria.
Editing a Current User
Users that have already been created can be edited. To do so use the following steps:
1. Go to the NaviPlan Business Administration main page, and then click on the User Management icon
.
2. Enter in the Login Name or User Name of the user and click Search.
3. Select the user from the user list section.
4. The User page will appear and the following information can be edited:
n
Organization: Allows you to see which organizations the user belongs to.
n
Entitlements: Allows you to add individual entitlements to a users profile.
n
Oversight: Allows you to add or make changes to what oversight permissions a user has within their
organizational unit.
Page 17 of 26
NaviPlan User Manual: Business Administration
Resetting User Passwords
When users forget their NaviPlan login passwords, administrators cannot tell them what their passwords are, but
they can assign new ones.
To reset a password, follow these steps:
1. Go to the NaviPlan Business Administration main page, and click the User Management icon
.
2. Select Active.
3. Find the user whose password you want to reset. See User Search on page 17.
4. Click the Login name of the user.
5. Under User Password, enter a new password twice, once in the New Password field and once in the
Confirm Password field.
6. Click Set Password.
NaviPlan Business Administration main page - User Management - Search - User dialogue
Page 18 of 26
NaviPlan User Manual: Business Administration
Deleting a User
To delete a user from the NaviPlan Business Administration tool, follow these steps:
1. Go to the NaviPlan Business Administration main page, and then click on the User Management icon
.
2. From the User Management dialogue box, enter in the user's Login Name or Last Name and click Search.
3. Double click the user you would like to delete to open up the User Dialogue box.
4. From the User Dialogue box, click Actions and then select Deactivate.
5. Once the user has been deactivated, click Actions again and then select Delete.
NaviPlan Business Administration main page - User Management - User
Note: In order to delete a user all client data must be re-assigned to a different user or deleted.
Page 19 of 26
NaviPlan User Manual: Business Administration
Chapter 4: Manage Templates
NaviPlan Business Administration Main Page
Using Templates
21
Searching for Templates
21
Creating a New Template
22
Entitlement List
23
Entitlement List Cont'd...
24
Page 20 of 26
NaviPlan User Manual: Business Administration
Using Templates
User templates allow you to make changes to an entire group of users in one location, instead of modifying each
profile individually. In order to reduce the amount of time spent creating user profiles, click on the Template
Management Icon
.
Searching for Templates
The search function enables you to search for templates that exist in the administrative site. Search for templates
by entering the template name. To generate a list of names that start with a particular letter, enter that letter in the
field.
To find a template, follow these steps:
1. Go to the NaviPlan Business Administration main page, and then click the Manage Templates icon
.
2. Enter the search criteria for a template. Searching by name is case sensitive. To search for all templates,
leave the fields under Search By blank.
3. Click Search.
4. Click the name of the appropriate template.
Note: You are only able to search templates by name and not by description.
Page 21 of 26
NaviPlan User Manual: Business Administration
Creating a New Template
To create a brand new template, follow the following steps:
1. Click on the Template Management icon
and then click
from the Template
Management dialog box.
2. Fill in the Template Name and Description with the applicable information. To create an updated version
of a previously created template, simply select it from the Copy Existing Template drop down.
3. From the Template Editor dialog box, go to the Entitlements tab. Here you can search for entitlements in
the Entitlement Name search box, or scroll through each one individually using the scroll bar at the right.
NaviPlan Central Main Page - Template Management - Select Template - Entitlements
4. Next, choose what oversight permissions should be added to the template by clicking on the Oversight tab.
Oversight allows users to have different levels of access to other users clients and can be set at different
organizational unit levels. The four different permissions to choose from are Read, Write, Control, and
None.
Permission
type:
Read:
Write:
Control:
None:
Description:
Allows users to
view each
others clients.
Allows users to view
and make edits to
clients and plans.
Allows users to view, make
changes, and re-assign
clients to other users.
Users cannot
see others
clients at all.
5. Once you have finished setting oversight permissions click Save. Now the template appears as a choice
when entering new users under User Management.
Page 22 of 26
NaviPlan User Manual: Business Administration
Entitlement List
The following is a list of entitlements that can be added on an individual user level, or to a template:
n
ACCESS_MGMTREPORTS: Generate management reports for all organization units the user belongs to.
n
ACCESS_NPSE: Log on to NaviPlan.
n
ADDITIONAL_REPORTS_GRAPHS: Access additional reports from the Reports menu.
n
ADVANCED_ESTATE_MODULE:
n
APPROVER: Approve all plans.
n
CALCULATORS: Access the financial calculators.
n
CLIENT_GRANT_REVOKE: Grant and revoke clients they have control over to other users.
n
CLIENT_REASSIGN: Reassign clients they have control over to other users.
n
CRITICAL_ILLNESS_MODULE: Select the Critical Illness module for a plan.
n
CUSTOMIZED_ACTION_PLAN: Modify Action Plan Text on the User-defined Text tab.
n
CUSTOMIZED_OBJECTIVES: Modify Objectives text on the User-defined Text tab.
n
CUSTOMIZED_RECOMMENDATIONS: Modify Recommendations text on the User-defined Text tab.
n
DETAILED_INCOME_TAX_CALCS: Select the Detailed Tax method as the income tax method for a plan.
n
DISABILITY_INSURANCE_MODULE: Select the Disability Income module for a plan.
n
EDUCATION_MODULE: Select the Education module for a plan.
n
EFFICIENT_FRONTIER_INFO: Select the efficient frontier graph in the Financial Needs Summary report.
n
EMERGENCY_FUND_MODULE: Select the Emergency Fund module for a plan.
n
FA_DETAILED_RETIREMENT: Access to the detailed Retirement page in Financial Assessments.
n
FA_SIMPLE_RETIREMENT: Access to the simple Retirement page in Financial Assessments.
n
INTERACTIVE_USER: Access NaviPlan online.
n
LIFE_INSURANCE_MODULE: Select the Survivor Income module for a plan.
n
MAJOR_PURCHASE_MODULE: Select the Major Purchase module for a plan.
n
MONTE_CARLO: Select the Monte Carlo Analysis module for a plan.
n
OVERRIDE_PROPOSED_PORTFOLIO: Override the default asset class weighting in the Asset Class Weighting
dialog box.
n
OVERRIDE_REPORT_FOOTER: Override and edit the client report footer text.
n
OVERRIDE_RETURN_RATES: Edit the Return Rate field throughout NaviPlan
n
OVERRIDE_RISK_TOLERANCE: Override the portfolio proposed by the risk tolerance questionnaire.
n
PLANLEVEL0: Create and modify Financial Assessments.
n
PLANLEVEL2: Create and modify Level 2 Plans.
n
PLANLEVELAA: Create and modify Asset Allocation Assessments.
n
PLANNER: Create and modify a NaviPlan plan.
n
PLANNER_ASSISTANT: Perform data-entry tasks but not actual financial planning.
Page 23 of 26
NaviPlan User Manual: Business Administration
Entitlement List Cont'd...
n
PRESENTATION_ACCESS_PLAYER: View and enter financial planning data in the Presentation Module.
n
REPORT_OUTPUT_FORMAT_SELECTION: Choose the format used for reports (PDF or RTF (Word) file).
n
SCENARIO_MANAGER: Access the Analyze Goals section in the UI for a plan.
n
USER_DEFINED_TEXT: Access the User-defined Text tab, where user can add custom text to reports.
Page 24 of 26
NaviPlan User Manual: Business Administration
Chapter 5: Client management
NaviPlan Business Administration Main Page
Reassigning clients to another User
26
Page 25 of 26
NaviPlan User Manual: Business Administration
Reassigning clients to another User
To reassign clients to another user, follow these steps;
1. Go to the NaviPlan Business Administration main page, and click theClient Management icon
.
2. Choose one of the following:
n
To reassign a single client, under Client Source select Single client.
n
To reassign all the clients belonging to one user, under Client Source select All clients of, and then
enter the user's name in the Owner User field.
n
To reassign only specific clients, under Client source select Selected Clients of and then enter in the
Owner User name.
3. Choose one of the following:
n
To reassign the client(s) to a single user, enter that user's login name in the New Owner User field
under Client Destination.
n
To reassign the client(s) to a user group, enter the user group name in the New Owner Group field
under Client Destination.
4. Click Reassign.
NaviPlan Business Administration main page – Client Management – Client Management dialog box
Page 26 of 26