1
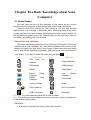
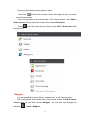
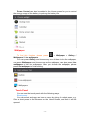
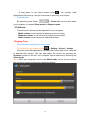
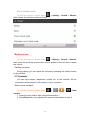
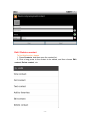
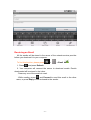
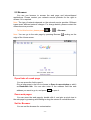
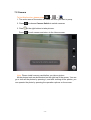
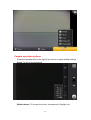
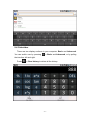
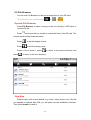
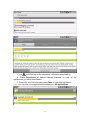
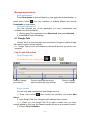
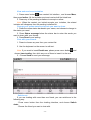
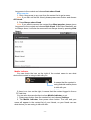
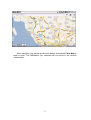
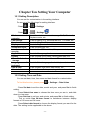
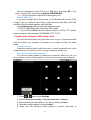
YPAD A7
User manual
-1-
Content
Chapter One Quick Start Guide ............................................................................ - 5 1.1 PRODUCT DESCRIPTION .....................................................................................- 5 Front and rear view .............................................................................................................. - 5 Side view .............................................................................................................................. - 6 -
1.2 ACCESSORIES .....................................................................................................- 7 1.3 INSTALLATION OF SIM CARD AND MEMORY CARD ............................................- 7 SIM card............................................................................................................................... - 7 Memory card ........................................................................................................................ - 7 -
1.4 CHARGING AND EARPHONE ...............................................................................- 8 Charging ............................................................................................................................... - 8 Earphone .............................................................................................................................. - 8 -
1.5 TURNING ON/OFF ..............................................................................................- 8 Turning on ............................................................................................................................ - 8 Turning off ........................................................................................................................... - 8 Dormant state ....................................................................................................................... - 9 -
Chapter Two Basic Knowledge about Your Computer ..................................... - 10 2.1 HOME SCREEN .................................................................................................- 10 Status bar and indicator ...................................................................................................... - 10 Shortcut .............................................................................................................................. - 10 Widgets .............................................................................................................................. - 11 Wallpaper ........................................................................................................................... - 12 Touch Panel ........................................................................................................................ - 12 Main buttons ...................................................................................................................... - 13 -
2.2 VOLUME ..........................................................................................................- 14 Ringing Tone ...................................................................................................................... - 14 Media volume .................................................................................................................... - 15 Calling volume ................................................................................................................... - 15 -
2.3 CONTACTS .......................................................................................................- 15 Add a new contact .............................................................................................................. - 15 Edit / Delete a contact ........................................................................................................ - 16 Backup contacts ................................................................................................................. - 17 Import contacts................................................................................................................... - 17 Add contacts to Favorites ................................................................................................... - 18 -
Chapter Three Using Your Computer ................................................................. - 19 3.1 CALLING GUIDE...............................................................................................- 19 Make a phone call .............................................................................................................. - 19 Answer a phone call ........................................................................................................... - 19 Speaker ............................................................................................................................... - 19 Mute during calling ............................................................................................................ - 19 Teleconference ................................................................................................................... - 19 Call log ............................................................................................................................... - 20 -2-
Emergency call ................................................................................................................... - 21 -
3.2 SENDING A MESSAGE .......................................................................................- 22 Edit a new message ............................................................................................................ - 22 Replying a message ............................................................................................................ - 22 Send a MMS ...................................................................................................................... - 23 -
Chapter Four About Emails ................................................................................. - 24 4.1 SIGN IN WITH GOOGLE ACCOUNT ...................................................................- 24 Get the password of your Google account ......................................................................... - 24 Set for synchronization ...................................................................................................... - 24 -
4.2 GMAIL .............................................................................................................- 25 Compose a new mail .......................................................................................................... - 25 Other operations ................................................................................................................. - 25 -
4.3 EMAIL ..............................................................................................................- 26 Setting for the email ........................................................................................................... - 26 Send an Email .................................................................................................................... - 26 Receiving an Email ............................................................................................................ - 27 -
Chapter Five About Browser ............................................................................... - 28 5.1 CONNECTING TO THE INTERNET .......................................................................- 28 Wi-Fi .................................................................................................................................. - 28 -
5.2 BROWSER ........................................................................................................- 29 Open links of a web page ................................................................................................... - 29 Zoom web pages ................................................................................................................ - 29 Set for Browser .................................................................................................................. - 29 -
Chapter Six About Bluetooth ............................................................................... - 31 6.1 CONNECTING BLUETOOTH ...............................................................................- 31 Turn on/off ......................................................................................................................... - 31 Connect to a new device .................................................................................................... - 31 Disconnect from a device ................................................................................................... - 32 -
Chapter Seven About Multimedia ....................................................................... - 33 7.1 MUSIC .............................................................................................................- 33 Play music .......................................................................................................................... - 33 -
7.2 CAMERA ..........................................................................................................- 34 Camera operation options .................................................................................................. - 35 Viewing photos .................................................................................................................. - 37 Sharing photos ................................................................................................................... - 38 Editing photos .................................................................................................................... - 38 -
7.3 CAMCORDER....................................................................................................- 38 Viewing videos................................................................................................................... - 39 Manage videos ................................................................................................................... - 40 -
Chapter Eight USB Connection and Memory Card .......................................... - 42 -
-3-
8.1 USB CONNECTION...........................................................................................- 42 8.2 MEMORY CARD ...............................................................................................- 43 Chapter Nine The Other Applications ................................................................ - 45 9.1 ALARM ............................................................................................................- 45 Add alarm........................................................................................................................... - 45 -
9.2 CALENDAR ......................................................................................................- 45 Add new event ................................................................................................................... - 46 Managing calendar ............................................................................................................. - 46 -
9.3 SEARCHING ......................................................................................................- 46 9.4 CALCULATOR ...................................................................................................- 47 9.5 FILE BROWSER ................................................................................................- 48 Operate File Browser ......................................................................................................... - 48 View files ........................................................................................................................... - 48 Manage applications .......................................................................................................... - 49 -
9.6 ANDROID MARKET ..........................................................................................- 49 Open Android Market ........................................................................................................ - 49 Search for an application.................................................................................................... - 50 Download and open an application .................................................................................... - 51 Manage applications .......................................................................................................... - 53 -
9.7 GOOGLE TALK .................................................................................................- 53 Log in and talk online ........................................................................................................ - 53 Managing contacts ............................................................................................................. - 55 Mobile indicator ................................................................................................................. - 56 Set for IM notifications ...................................................................................................... - 57 Sign out Google Talk ......................................................................................................... - 57 -
9.8 MAPS ...............................................................................................................- 57 Open the map ..................................................................................................................... - 58 View the map ..................................................................................................................... - 59 Get a route .......................................................................................................................... - 59 -
Chapter Ten Setting Your Computer .................................................................. - 62 10.1 SETTING DESCRIPTION...................................................................................- 62 10.2 SETTING TIME AND DATE ...............................................................................- 62 10.3 SETTING LANGUAGE ......................................................................................- 63 10.4 SCREEN CALIBRATION ...................................................................................- 63 10.5 DISPLAY.........................................................................................................- 63 Set brightness ..................................................................................................................... - 63 Set screen timeout .............................................................................................................. - 64 -
10.6 PRIVACY ........................................................................................................- 64 Factory data reset ............................................................................................................... - 64 -
10.7 PROTECTING YOUR COMPUTER .....................................................................- 64 Protect SIM card with PIN ................................................................................................. - 64 Protect your computer with screen lock ............................................................................. - 65 -
-4-
Chapter One Quick Start Guide
1.1 Product Description
Front and rear view
-5-
Side view
Back Button
USB Port
Menu Button
Indicator
Home Button
DC in Port
Earphone
Power Button
Microphone
TF Card
SIM Card Slot
Reset Button
Volume -
Volume +
-6-
1.2 Accessories
The following accessories are provided together with each of your
purchasing this product. If you find something missing, please contact the
seller for it.
· Tablet PC
· USB Cable
· Adaptor
· User Manual
· Earphone
· SD Card
1.3 Installation of SIM card and Memory Card
SIM card
SIM Card contains details of your telephone numbers, storage status and
network service.
Installation of SIM card
Open the protection cover for TF card and SIM
card, and insert cards as the following pictures
show. Please make sure the card pin face the
right direction.
Removal of SIM card
Note: Please turn off your computer before
removing the SIM card.
Open the protection cover, press the card lightly,
then it will spring back.
Memory card
A SD card is needed to store the picture, music,
video and the other data.
Installation of memory card
1. Open the protection cover for TF card and
SIM card;
2. Make the card pin face the right direction and
insert it into the slot;
3. Insert the card till it clicks into the position.
Removal of memory card
1. Please make sure the memory card has been disconnected from your
computer before removing it.
Press
>
> Setting > SD card & device storage > Unmount
-7-
SD card;
2. Open the protection cover of TF card and SIM card;
3. Press the card lightly, and then it will spring back from the slot.
1.4 Charging and Earphone
Charging
Please do as the picture tells when the battery needs charging.
Connect the power cord to your computer, and then plug the adaptor into
the socket.
When the battery is being charged, icon
appears on the status bar.
When the battery is fully charged, it will turn into icon
.
Earphone
When you need to use the earphone for chatting or listening music, please
insert the earphone into its jack, and then icon
will appear on the
status bar.
Note:
· When you are using the earphone, your hearing ability will probably be
restricted from the external sound.
· Please do not use it when it will do ill to your health.
. Please do not turn it up to the maximum when you are using the
earphone because it will do bad to your hearing ability.
1.5 Turning On/Off
Your computer can be turned on after the SIM card is inserted and the
battery is fully charged.
Turning on
A short press of the power button
can turn on your computer,
then vibration occurs and the button is lightened. It will take some time for
your computer to be initialized. Please wait for a while.
Turning off
Press power button
to turn off your computer, a “Device
options” will pop up on the screen, then press Power off, and press
OK.
-8-
Dormant state
Give a short press to the power button
to make your
computer enter into dormant state. This way can save battery energy and
prolong its working life. You can also set the time for the screen to lock
automatically. To wake up your computer, please press any of the following
keys: Power button, Home screen button, Menu button, etc.
-9-
Chapter Two Basic Knowledge about Your
Computer
2.1 Home Screen
You can view and use by the operation of the Home screen various
functions of your computer as well as read and search other information.
There are five Home screens for your computer. You can slide left and
right with one of your fingers to switchover them, and can go back to the Home
screen interface from any interface by pressing the Home screen button. All
the application programs put on the Home screen can be seen here, and you
can open it by pressing any icon of them.
Status bar and indicator
There are many status indicators on the right top of the screen. If there are
missed calls or new messages, etc., the relative indicators will come up to the
screen to remind you. Use one of your fingers to slide down from the status
bar to view all the indicating information, and then press any one of them to
view details. If you want to close the status bar, just press
Icon
Description
SIM Card not
inserted
Icon
.
Description
Signal Indicator
3G Network
GSM Network
EDGE
Flight Mode
Battery
Charged
Battery
Charged
Being
Fully
Low
Battery
Capacity.
Mute Mode
Vibration Mode
Alarm
GPS turned on
Wi-Fi Connected
USB Connected
Bluetooth
Reminder: You can press the status bar to view the date.
Note: The indicators may be different from the real icons of your computer due
to the update of the system.
Shortcut
It is allowed to add shortcut icons on the Home screen.
- 10 -
There are the following three ways to add it.
· Click icon
on the Home screen, press and drag the icon you need
to the Home screen.
· Give a long press on the blank area of the Home screen, next Add to
Home screen will pop up to the screen, then choose Shortcuts.
· Press
from the Home screen, then choose Add > Shortcuts to add
shortcut icon.
Widgets
You can add Analog clock, Music, calendar, etc. to the Home screen.
Give a long press to the blank area of the Home screen till Add to Home
screen pops up, and then choose Widgets. You can also add Widgets by
pressing
> Add > Widgets.
- 11 -
Power Control can also be added to the Home screen for you to control
the energy usage of the battery to prolong the battery life.
Wallpaper
To find this function, please press
> Wallpaper > Gallery /
Wallpapers / Live wallpapers.
You can press Gallery and choose any one of them to be the wallpaper,
can press Wallpapers and choose one as the wallpaper, can also press Live
wallpapers to set live wallpapers. After you choose the wallpaper, please
press Set wallpaper to finish setting.
Touch Panel
You can use the touch panel with the following ways.
Short press
You can select and open an icon or menu by giving it a short press, e.g.
Give a short press to the Browser on the Home screen, and then it will be
opened.
- 12 -
Long press
By giving a long press to the existing interface, or an icon, or an input field,
etc., you can get more options to operate it, e.g. Give a long press to any
contact from the contact list, then you can press any options from the menu
pops up to do further operation.
Dragging
Drag the touch panel or press the scroll bar and move it in vertical
direction, e.g. Dragging to view all the contacts from the Contact list.
Minifying and magnifying
When you are surfing the internet, you can double-click the web page to
minify or magnify it.
Main buttons
Home screen means the standard screen status after your computer is
powered on and you are not using any function or any application of your
computer.
Please use the front face of your finger tip to operate the touch panel and
the four buttons at the bottom of some of the interfaces.
· Menu button
: Press to get the relative operating options of the
existing screen.
· Home screen button
· Return button
: Press to go back to the Home screen.
: Press to return to the previous interface.
- 13 -
· A long press to the Home screen button
: The recently used
applications will show up, and you can press to open any one of them.
Power button:
By pressing power button
> Power off, you can shut down
your computer, or choose Silent mode or Airplane mode.
2.2 Volume
Three kinds of volume can be adjusted for your computer.
· Media volume: to set volume for playing music and video;
· Ringtone volume: to set volume for ringing tone and alert;
· Alarm volume: to set volume for calling and alarm.
Ringing Tone
Set volume for ringing tone and alarm
To find this function, please press
> Setting > Sound > Volume
Move the scroll bar rightward to increase the volume and move it leftward
to decrease the volume. You can also adjust the volume by pressing the
Volume+/- button on the left. Your computer can be silenced by choosing the
Silent mode.
Note: When your computer is set to the Silent mode, all the volume options
are set silent, except for those for media and alarms.
- 14 -
Set to vibration mode
To find this function, please press
then choose the vibration mode you need.
> Setting > Sound > Vibrate,
Media volume
To find this function, please press
> Setting > Sound > Volume,
then move the scroll bar or press the volume button on the left side to adjust
the volume.
Calling volume
During calling, you can adjust the volume by pressing the volume button
on the left side.
2.3 Contacts
You can save names, telephones, emails, etc. to the contacts. All the
information will be stored in the memory of your computer.
Add a new contact
To find this function, please press
>
>
>
> New
contact
1. Press the input field to input required information.
2. Press Done after your inputting the required information to save it.
- 15 -
Edit / Delete a contact
To find this function, please
1. Press Contacts, and then open the contact list.
2. Give a long press to the contact to be edited, and then choose Edit
contact, Delete contact, etc.
- 16 -
Backup contacts
You can output the contact details to the SD card to backup.
To find this function, please
1. Press Contacts, and open the contact list.
2. Press
> Import / Export
3. Press Export to SD card.
Press OK later on to backup the details to SD card.
Import contacts
Import from SIM card
To find this function, please
1. Press Contacts, and open the contact list.
2. Press
> Import / Export.
3. Choose Import from SIM card.
All the contacts from the SIM card will be listed here, and press the one
- 17 -
you need to input, then press input to import it to your computer. You can
also press
, and choose input all to import all the contacts from SIM
card to your computer.
Import from SD card
To find this function, please
1. Press Contacts, and open the contact list.
2. Press
> Import / Export.
3. Choose Import from SD card
All the contacts will be imported from SD card to your computer.
Add contacts to Favorites
You can add some contacts to Favorites for easy search and use.
To find this function, please press
>
>
Choose a contact from the contact list and give it a long press, then press
Add to favorites. Now this contact has been added to Favorites, and you
can see there is a golden star marked on the right top of the box after your
giving a short press to view details.
- 18 -
Chapter Three Using Your Computer
3.1 Calling Guide
Make a phone call
1. Press
to open the dialpad.
2. Press number keys to enter the
phone number.
3. Press the calling key to make a
phone call.
4. Press hang-up key to end a call.
Note:
1. Press the right one of the three
buttons at the bottom to delete the number
entered.
2. During calling, you can press Home
screen button
or return button
to hide the calling interface to operate the
other applications. To return to the calling
interface, please press
> Back.
Answer a phone call
When somebody is calling you, your computer will remind you in the way
you pre-set. You can move the answering key
call or move the hang-up key
rightward to answer the
leftward to hang up.
Speaker
You can choose this function while driving to keep safer.
Use speaker, earphone, or Bluetooth to answer the phone.
Mute during calling
During calling, you can use mute function to avoid the other side hearing
your voice.
Press Mute to open or close mute function.
Teleconference
You can make a teleconference with many parties.
1. Press calling key to open the dialpad.
- 19 -
2. Press the numbers to enter the phone number of the first party.
3. Press
to make a call.
4. After receiving the answer, press Add call.
5. Click the numbers to enter the phone number of the next party, and
press
.
6. After the call is connected, press Merge calls to connect all parties.
Call log
You can get the information of Received calls, Missed calls, Dialed calls,
etc. from Call log.
To find this function, please press
- 20 -
>
>
> Call log
Emergency call
Your network service provider provides one or more than one emergency
call which you can dial even with your computer locked.
1. Press
>
>
to open the dialpad. (If your computer is
locked, press Emergency call.)
2. Press numbers to enter the phone number.
3. Press
to call.
Note:
1. In different countries, the emergency numbers are different, so the
- 21 -
emergency number set to your computer may not work in the other countries.
Sometimes the emergency call can not get through due to the influence of the
network, environment, etc.
2. For dialing emergency call, the calling function of your computer must
be enabled.
3.2 Sending a Message
You can send or receive text messages or MMS.
Edit a new message
To find this function, please press
>
> Messaging
New message
1. Press To to input the receiver.
2. Press Type to compose or next to input the message.
3. Press Send to send it.
>
Replying a message
When you receive a new message, the reminder will pops up onto the
status bar.
To find this function, please press
Press the related message, then
1. Press Type to compose.
- 22 -
>
> Messaging
2. Input the content, and press Send to send this message.
Send a MMS
To find this function, please press
>
> Messaging
>
New message
1. Press To to input the contact information you need to send this
message to or you can press
to add contacts from the contact list.
2. Press
> Add subject to add the subject for this message.
3. Press Type to compose to edit the content, and then press Send to
send it.
Note: You can press
to insert smiley, Attach, etc.
- 23 -
Chapter Four About Emails
4.1 Sign in With Google Account
Signing in with Google account can synchronize your computer with the
server in terms of Gmail, calendar and contact list. Further more, you have
to sign in with Google account in order to synchronize Google applications,
e.g. Google Talk, Android Market, etc.
The first time you start your computer, the operation options will pops up
onto the interface for you to sign in with Google account. Or press Google
Account > Yes > Next from the interface of account setting, and press Sign
in to enter your account and password, and then press Sign in.
After signing in, all the emails, contact list and calendar of your Google
account will synchronize automatically to your computer.
Note: Please press Create if you do not have a Google account.
Get the password of your Google account
If you forget the password of your Google account, you can get it back
through the following steps.
1.
Open
the
browser
of
your
computer,
and
go
to
http://google.com/accounts.
2. Press can’t access your account on the right part of the web page.
3. Input the email address and press Submit.
4. Press related code to continue.
5. Press Continue to get your password by following the subsequent
process suggested.
Set for synchronization
You can synchronize the contact information, etc. of your computer to the
web by binding Google account. This can help to update the Google
applications.
To find this function, please
>
> Settings > Accounts & sync
1. Press
2. Press Background data
Note: For saving energy of your battery, please do not press Background
data.
3. Press Add account to set a new account.
- 24 -
4.2 Gmail
Gmail can be used after you successfully set a Google account.
Compose a new mail
To find this function, please press
>
> Gmail
>
> Compose
Input the email address of the receiver and the content, then press Send
to send it.
Note: You can get more operation options by press menu button
, e.g.
Attach, Add Cc/Bcc, etc.
Other operations
· Press menu button
> Search to search emails;
· You can set the way of reminding you when receiving a new mail, such
as set a special tone for a new email. To find this function, please press
menu button
> More > Settings > Email notifications, and choose
the one you need.
· If you want to mark the email subject, please give a long press to the
email and choose Change labels.
- 25 -
4.3 Email
You can use this function to send and receive emails.
Note:
1. You must at first set the email box before use it to send or receive emails.
2. All the emails are sent or received with the internet connected. For detailed
setting parameters, please refer to your network service provider.
Setting for the email
To find this function, please press
>
> Email
After entering the email address and password, please press Next to set
your account, name, signature, etc., then press Done to end setting.
You can also set your email account in the following way.
1. Enter the email address and password;
2. Press Manual setup and choose account type;
3. Set the incoming server, etc;
4. Set the outgoing server, etc;
5. Press Done to end setting.
Send an Email
You can send an email to one or more than one person. Before sending,
you can add email address by manual input or from the address list.
To find this function, please press
1. Press
>
> Email
, and Compose to open the interface for text editing.
2. Press To to input the email address of the receiver. Press
> Add
Cc/Bcc to add CC or Bcc address if it is necessary.
3. Press Subject to enter the subject, and press Compose Mail to input
email text.
Press
and Add attachment to insert the needed document, etc.
4. Press Send to deliver your email.
- 26 -
Receiving an Email
All the emails will be stored in the server of the network service provider
before you download it to your computer.
To find this function, please press
1. Press
>
> Email
and press Refresh.
2. Your computer will connect the server to download emails. Emails
downloaded will be stored in the inbox.
· Press any one of the emails to read.
· While reading, press
and Forward to send this email to the other
users, or press Reply to edit and send to the sender.
- 27 -
Chapter Five About Browser
5.1 Connecting to the Internet
Wi-Fi
You can use Wi-Fi to surf the internet and download.
Turn on/off Wi-Fi
To find this function, please press
> Settings > Wireless &
networks > Wi-Fi
Tick to turn it on and tick again to turn it off.
Note: To prolong the battery life and save energy, please close Wi-Fi if you
do use it.
Scan and connect Wi-Fi
1. Press
> Settings > Wireless & networks > Wi-Fi settings
2. Press Wi-Fi to scan. If Wi-Fi is turned on, your computer will list below
all the network searched.
Note: Press
> Advanced to view all the details about your Wi-Fi.
3. Press the network you want to connect.
4. Enter the password of the network if it is required, and press Connect.
When the network is connected, icon
will show up on the status bar.
Note: If Wi-Fi is turned on and you are in the area the network covers,
your computer will connect automatically to the network you connected
before.
- 28 -
5.2 Browser
You can use browser to access the web page and internet-based
applications. Please contact your network service provider for the right to
access if it is required.
Note: The type of network depends on the network service provider. Different
types cause different network charges. For charge details, please contact the
network service provider.
To find this function, please press
>
> Browser
Note: You can go to the web page by pressing Browser
resting on the
edge of the Home screen.
Open links of a web page
You can press the link to open it.
Give a long press to the link to choose to Open in new window or add it
as Bookmark link. You can also enter in the address field the web
address you want to go to, and press
to open it.
Zoom web pages
You can zoom the web page by double-click it, and give a quick view to
the web page by pressing and holding to drag the screen in vertical direction.
Set for Browser
You can set the browser for customization.
- 29 -
To find this function, please press
More > Settings
- 30 -
>
> Browser >
>
Chapter Six About Bluetooth
6.1 Connecting Bluetooth
Your computer supports application of Bluetooth, and you can connect
your computer to Bluetooth-supporting devices for data switching, e.g.
earphones, mobile phones, laptops, etc.
Turn on/off
To find this function, please press
> Settings > Wireless &
networks > Bluetooth
Tick to turn it on and tick again to turn it off.
Connect to a new device
1. Make sure the Bluetooth of this new device is turned on and its name is
on the screen.
2. Press
> Settings > Wireless & networks > Bluetooth settings
with your computer.
3. Turn on the Bluetooth of your computer and press Scan for devices.
4. All the Bluetooth names searched are listed below, and press the one
you need to pair.
5. Type PIN code (e.g.0000), and then press OK to pair.
If Bluetooth is turned on, icon
will show up on the status bar.
Note:
1. Different Bluetooth devices may have different features and functions,
please read related user manuals for details.
2. Different Bluetooth devices may cause different ways of connecting;
- 31 -
this user manual is only for your reference.
Disconnect from a device
In the name list, choose and give a long press to the one you want to
disconnect, the press Unpair.
- 32 -
Chapter Seven About Multimedia
7.1 Music
Play music
You can use music application to have a good enjoyment.
>
> Music
To find this function, please press
Press Songs and choose a song you want to listen to.
Functions for the buttons of the music player:
Operation
Button
Play / Pause
Short press
/
Previous / Next Song
Short press
/
FF / Rewind
Long press
Show Playlists
/
Shot press
Loop
Short press
Shuffle
Short press
Volume
Short press to buttons on the
side
Add to Playlist
Short press
> Add to
playlist
Set to Tone
Short press
> Use as
ringtone
Delete
Short press
> Delete
Only after the songs are copied to SD card can they be played.
Note:
1. Press Home screen button
to use the other applications and let
music player work in the background.
2. While you are playing music, icon
will show up on the status bar.
Pull down the status bar to view details and click it to go to the playing
interface.
3. Press
to stop playing.
- 33 -
7.2 Camera
To find this function, please press
>
>
1. The active area of the screen will show the view you want to peep.
2. Press
3. Press
Press
to choose Camera Switch to switch cameras.
at the right bottom to take pictures.
to exit camera and return to the Home screen.
Note: Please install memory card before you take a picture.
All the photos took are skeletonized on the right top of the screen. You can
go to view all the photos by pressing it, and after viewing all the photos, you
can operate the photo by pressing the operation options on the screen.
- 34 -
Camera operation options
Press the operation bar on the right of the screen to open related settings.
Zoom: To set for focal distance
White balance: To choose from Auto, Incandescent, Daylight, etc.
- 35 -
Store location: To choose to Off/On store location.
Picture size: To set for the resolution
- 36 -
Viewing photos
To find this function, please press
>
>
Press the photo you want to view to open it, and drag it with one finger
leftward or rightward to view the previous or the next one.
Slideshow
You can view the photos in the way of slideshow.
- 37 -
In the photo browser interface, give a short press to the photo and choose
Slideshow. Press the photo again to stop playing.
Sharing photos
1. Press the photo you want to share to go the photo browser interface,
then choose menu button to share the photo.
2. Choose the way you want to share the photo: Email, Bluetooth or
Messaging, etc.
Editing photos
Press the photo you want to edit, and press
> More, then choose
from the edit menu to operate it.
7.3 Camcorder
To find this function, please press
>
> Camcorder
1. The active area of the screen will show the view you want to peep.
2. Press
3. Press
to choose Camera Switch to switch cameras.
at the right bottom to take videos; press it again to stop taking.
Press
to exit camcorder and return to the Home screen.
Note: Please install memory card before you take a video.
- 38 -
Viewing videos
All the videos took are skeletonized on the right top of the screen. You can
go to view all the videos by pressing it, then press Play button to play it. You
can also choose other operation options to do related operation.
Note: You can view all the media files by dragging in horizontal direction.
- 39 -
Manage videos
Playing videos
To find this function, please press
>
> Videos
Press any one to play it.
Delete Videos
To find this function, please press
>
> Gallery to get the
video.
Give a long press to the video you want to delete, and choose Delete.
- 40 -
- 41 -
Chapter Eight USB Connection and
Memory Card
8.1 USB Connection
You can use USB cable to connect your computer to PC for transmission
of pictures, videos, music, etc. between your memory card and PC.
1. Insert memory card into your computer, and use USB cable to connect
your computer to PC.
2. Icon
will show up on the status bar. Slide down the status bar and
press USB connected.
3. Press Turn on USB storage to open USB device.
Note: During this period, you can not access to the memory card through
your computer, neither can you use the softwares, etc. in the card.
4. Find the disc from My Computer of the PC.
- 42 -
5. Click the disc to access to the memory card of your computer.
6. Drag pictures, videos, etc. of the PC into the memory card of your
computer.
7. Press Turn off USB storage of your computer to disconnect from the
PC.
8.2 Memory Card
Note: Please insert memory card before you use your computer, otherwise,
camera and camcorder, etc. may not function well.
Remove memory card after it is disconnected from your computer.
Press
>
> Settings > SD card & device storage >
Unmount SD card
After unmounting SD card, you can press Format SD card to format
memory card.
- 43 -
Note: Please turn off your computer to install or remove memory card to
avoid damages to the card.
- 44 -
Chapter Nine The Other Applications
9.1 Alarm
To find this function, please press
>
>
Add alarm
Press
> add alarm, then set alarm and press Set and Done to end
setting.
Press
to go to the Alarm interface, and press
on the left to open
the related alarm. When the index turns green, it means “already opened”.
When the alarm rings, you can press Dismiss to close it or press Snooze to
let it remind you later.
Note: Alarm does not work if your computer is powered off.
9.2 Calendar
You can use calendar to schedule and manage your To Do list.
Note: Before using calendar, you have to sign in your Google account and
set your computer to the right time and right date.
To find this function, please press
- 45 -
>
>
Add new event
Press
> More > New event to go to the interface, and edit the related
field, the press Done and save the event.
Managing calendar
Choose a date:
· Edit
Press an event to go to the viewing interface, and press
> Edit
event.
· Delete
Press an event to go to the viewing interface, and press
> Delete
event.
9.3 Searching
You can use the searching function on the Home screen to search the
needed documents, information, etc.
1. Input the words you want to search in the searching field.
2. The related searching results will come to the screen below.
3. Press any of the searching results or icon
search, e.g. the internet or your computer.
- 46 -
, then choose a place to
9.4 Calculator
There are two display surfaces in your computer: Basic and Advanced.
You can switch over by pressing
> Basic and Advanced, or by pulling
the interface left and right.
Press
> Clear history to delete all the history.
- 47 -
9.5 File Browser
You can use File Browser to use and manage files in your SD card.
To find this function, please press
>
>
Operate File Browser
Press File Browser to open it and go to the root directory of SD card, to
view the file list.
Press
and input the key words to search the files in the SD card. The
search results will be listed thereafter.
Press
to set the display format.
Press
to set the sorting order.
Press a file to open it, press
press
to return to the parent directory and
to return to the root directory.
View files
Press to open a file to view details, e.g. music, video, picture, etc. If the file
you opened is suffixed with APK, you will enter into the installation interface.
Then press Install to install it.
- 48 -
Manage applications
To find this function, please press
> Settings > Applications >
Manage applications
Press to open it and view details. You can also download, move, etc. the
application.
9.6 Android Market
A great number of applications and games are stored in the Android
Market and can be downloaded to your computer. You can comment and
share your opinion to the related applications. It is also allowed for you to
mark the applications which you think are not good or incompatible.
Open Android Market
To find this function, please press
>
>
Note: If it is the first time for you to open Android Market, there will be Android
Market Terms of Service on the screen. Press Accept to continue.
- 49 -
Press to view
application
details
Press to view
games details
Press to view
what you have
downloaded
Press to
search the
market
Ask for help
If you need any help or have some question about Android market, please
press menu button
and press Help, then the related web page will open
for your reference.
Search for an application
The home page of Android Market offers several ways to search the
application, and it lists the application by type, e.g. Games, Links, etc.
You can click any type to view its details and subclass, and then view the
applications by choosing Top free or Just in of each subclass.
- 50 -
Download and open an application
1. Press the application you want to download.
2. You can view application details by pressing About, and view
comments by pressing Comments. By sliding down the web page, you
can view About the developer, visit developer’s web page, send
email to developer, etc.
Note: Press Related to view the related application list.
3. Press Install on the About interface to install the application.
Note: Android Market will remind you if the application to be downloaded
needs to access to any source or control any function of your computer.
Reminder: Please be cautious of the application which will store or use a
great number of functions or sources on your computer. You will bear the result
caused by your using this application on your computer if you press OK. If you
agree to use this application, please press OK.
4. Pull down the notification interface to view the downloading progress. It
takes only a few seconds to download most of the applications. Press Cancel
download to stop downloading.
- 51 -
5. Icon
will show up on the status bar if it finishes downloading.
6. Press Downloads of Android Market interface to view all the
applications you have downloaded.
7. Press any one of the list and press Open to open this application.
Note: You can also view applications installed from All applications.
- 52 -
Manage applications
View applications
Press Downloads of Android Market to view applications downloaded, or
from any interface of Android Market and choose
press menu button
Downloads to view details.
Uninstall applications
You can uninstall any of the application you have downloaded and
installed from Android Market.
1. Choose any of the application from Downloads and press Uninstall.
2. Press OK to finish uninstalling.
9.7 Google Talk
Google Talk is a communication tool provided by Google to enable Google
Talk users to communicate instantly.
Note: Google Talk account is set based on the Gmail account you set for your
computer.
Log in and talk online
Open Google Talk
To find this function, please press
Press to change
your picture
>
>
Press to input the words you
want to share with your friends.
Press to change
online status
Add a contact
You can only add a contact that has Google account.
1. Press menu button
from contact list interface, and press Add
friend.
2. Input Google Talk ID or Google email address of the contact.
Note: When you use Google Talk ID to add a contact who you have
already added to your loop, the related contact will show up as search results.
3. Press to Send invitation.
- 53 -
View and receive an invitation
1. Press menu button
from contact list interface,and choose More,
then press Invites. All the invitation sent and received will be listed here.
2. Press any of the pending invitations to accept or refuse.
Note: When the contact you invited accepts your invitation, the related
invitation will disappear from the pending invitation list.
Change your online status and words you want to share
1. Press the online status bar beside your name, and choose to change to
the status you need.
2. Press Status message below the status bar to enter the words you
want to share with your friends.
3. Press Done to end setting.
Chat with your friends
1. Press to choose any one from your contact list.
2. Use the keyboard on the screen to edit text.
Note: If you want to insert Emoticons, please press menu button
, and
choose Insert smiley, then click any one of them to insert it to the text.
3. Choose Send to send your message.
Switchover
If you are chatting with more than one friend, you can switchover in the
following way.
· Press menu button from the chatting interface, and choose Switch
chats.
· Choose the friend you want to chat with.
- 54 -
End chatting
Do as one of the following ways:
· From the contact list, give a long press to the friend you are chatting with,
and press End chat.
· From chatting interface, press menu button, and press End chat to end
chatting.
Managing contacts
All the friends are sorted based on the online status, e.g. Available, busy,
invisible, etc. The contacts of a certain online status are listed based on
letters of the alphabet.
The default setting is that the friends you frequently contacted are listed in
the visible list. If you want to view all the friends, please press menu button
and choose All friends.
Note: Press menu button and choose Most popular to switchover.
Block friend
You can block a friend not to let him send message to you. The blocked
friend will also disappear from the visible contact list.
1. Choose one that you want to block from the contact list.
Note: If you can not find the friend, please press menu button and choose
All friends.
2. Give a long press to the friend and choose Block friend. Then this
friend will disappear from the contact list and will appear on the blocked list.
Note: To unblock the friend, please press the menu button from the
contact list, and choose More, then press Blocked. Choose the one you want
to unblock from the blocked contact list and press OK.
Always show friend
You can set the friend to always show to make it visible all the time in the
Most popular list.
1. Give a long press to any one from the contact list to get a menu.
Note: If you can not find the contact, please press menu button and
choose All friends.
2. Press Always show friend
Note:To remove the contact from Always show friend, please give a
- 55 -
long press to the contact and choose Auto show friend.
Most popular
1. Give a long press to any one from the contact list to get a menu.
Note: If you can not find the friend, please press menu button and choose
All friends.
2. Press Always show friend
Note: If you want to remove the contact from Most popular, please give a
long press to the contact and choose Hide friend. If this friend has been set
to Always show, it will also be removed from Always show by pressing Hide
friend.
Mobile indicator
You can check the icon on the right of the contact name to see what
device the contact is using to talk with you.
It means that the contact is
using Android mobile phone
to talk with you.
If there is no icon on the right, it means that the contact logged in from a
PC last time.
You can also choose whether to show Mobile indicator or not.
1. Press menu button from the contact list, and choose Settings.
2. Tick Mobile indicator, then press return button. The icon and your
name will appear in the contact list of your friends, so your friend can see
what device you are using to talk with him.
- 56 -
Set for IM notifications
Set for notification after receiving a new message
You can set your computer to ringtone, Vibrate or showing on the status
bar after receiving a new message.
1. Press menu button from the contact list, and choose Settings.
2. To do as one or all of the followings.
· Tick IM notifications to make icon
show up on the status bar after
receiving a new message.
· Tick Select ringtone to make it remind you by ringing after receiving a
new message. Pleas choose Mute if you do not want it to ring.
· Tick Vibrate if you want it remind you by vibration after a new message.
Automatically sign in
You can sign in Google Talk automatically every time you turn on your
computer.
1. Press menu button from contact list, and choose Settings.
2. Tick Automatically sign in.
3. Press return button to save settings.
Sign out Google Talk
When you want to quit Google Talk, please press menu button from
contact list and choose sign out.
9.8 Maps
Maps can let you know where you are now, check traffic information, and
receive the exact direction of the destination. By using the search function it
provides, you can find the satellite image of the place you want to visit, and
can also view it in some other ways.
Note: Before using map function, you have to get 3G/GPRS service or get
Wi-Fi network.
· Not all the countries or cities can be found in the map.
Identify your location
You have to indentify your location to open the map and search your
location or some other places.
To find this function, please press
>
> Settings > Location &
security
Tick Use wireless networks, Use GPS satellites, or both.
Note: By ticking Use GPS satellites, you can search a place by street
layer, but it is only allowed to use in a fine and clear day and will use more
energy of your battery.
- 57 -
Open the map
To find this function, please press
>
>
Find where I am now.
Press icon
on the right top of the map, then your place will flash blue.
Search for the other places
1. Press menu button on the map interface, and press Search.
2. Input the place you want to search for. You can choose to input an
address, a city, a building name, etc.
Input a place you want to search for.
Press to search.
Note: When you are entering an address, the addresses you searched or
visited will come to the screen. By your pressing any one of them, the map will
show you where it is.
3. Press
to see all the search results.
4. Press text field on the interface to view details of the place you
searched.
- 58 -
View the map
You can use the following skills to view the map.
Zooming
Press
to magnify, and press
to minify.
Navigation
You can go to the other area by using one of your fingers to slide the map
in the direction you want.
Change map pattern
on the right top to
You can view the map by different patterns. Press
choose from Traffic, Satellite, Terrain, Latitude, etc. More Layers includes
My Maps, Wikipedia, and Transit Lines.
· Terrain: It is default setting. It not only shows the map, but also shows
streets, rivers, lakes, parks, etc.
· Satellite: It uses the same data as Google Earth, but the satellite image
is not the real time. Google Earth will choose the best image, but most of the
images have a history of from one to three years.
· Traffic (limited to a certain area): Traffic information of the real time will
be marked with different colors. Different color means different moving speed.
Get a route
You can use the map to get a detailed route to your destination.
1. Press menu button from any of the map pattern, and choose
Directions.
2. Input the starting address in the first field and the destination in the
second field. Your place will be default set in the first field.
- 59 -
You can also press
to open the address list to choose the place you
need.
4. Choose the transportation mode you need.
Transportation Mode
Destination
Starting address
5. Press Go to get a detailed route list, and press the icon on the right top
of the screen to get a route on the map.
- 60 -
After using this map, please press menu button and choose Clear Map to
reset a route. The destination you searched will be saved in the records
automatically.
- 61 -
Chapter Ten Setting Your Computer
10.1 Setting Description
You can set for customization in the setting interface.
Do as one of the followings for setting interface.
· Press
>
> Settings
· Press
>
> Settings
Wireless
&
networks
Call settings
Sound
Display
Accounts & sync
Location
&
security
Applications
Privacy
SD card & device
storage
Language
&
keyboard
Date & time
About device
To set for wireless connection, e.g. Wi-Fi, Bluetooth,
Airplane mode, etc.
To set for calling, e.g. Voicemail service, TTY mode, etc.
To set for Ringtone, Volume, etc.
To set for Brightness, Animation, etc.
To set for Auto-sync, etc.
To set for Use GPS satellites, Set up screen lock, etc.
To set for Manage applications
To set for Back up my data, Factory data reset, etc.
To check Available space, Format SD card, etc.
To set for Select language, Android keyboard, etc.
To set for date, time zone, date format, etc.
To check Status, Battery use, Legal information, etc.
10.2 Setting Time and Date
You can set date, time, time zone and date format for customization.
To find this function, please press
> Settings > Date & time
· Press Set date to set the date, month and year, and press Set to finish
setting.
· Press Select time zone to choose the time zone you are in, and slide
down to view more.
· Press Set time to set hour and minute, and press Set to finish setting.
· Tick or untick Use 24-hour format to switchover between display
formats of 12 hours and 24 hours.
· Press Select date format to choose the display format your want for the
date. The setting is also applicable to the alarm.
- 62 -
10.3 Setting Language
To find this function, please press
> Settings > Language &
keyboard > Select language
Choose the language you need.
10.4 Screen Calibration
To find this function, please press
>
Screen calibration
Click carefully each point for calibration.
> Settings > Display >
10.5 Display
Set brightness
To find this function, please press
Brightness
- 63 -
> Settings > Display >
Move the scroll bar to adjust the brightness, and press OK.
Set screen timeout
To find this function, please press
> Settings > Display > Screen
timeout
Adjust the delay before the screen automatically turns off.
10.6 Privacy
Factory data reset
Note: You can set your computer to the factory data.
This operation will clean away the following data from your computer.
· Your account
· Customization to the system and applications in your computer and
related history.
· All the applications downloaded.
This operation will not clean away the following data.
· System softwares and bound applications.
· Files and documents stored in SD card, e.g. music, photos, etc.
To find this function, please press
> Settings > Privacy > Factory
data reset
10.7 Protecting Your Computer
Protect SIM card with PIN
You can set a PIN (personal identification code) to protect your SIM card
from embezzlement.
Set PIN from your SIM card
Press
>
> Settings > Location & security > Set up
SIM/RUIM card lock, and tick Lock SIM/RUIM card.
- 64 -
Use the keyboard to input PIN of your SIM card, and press OK. If you
want to change PIN, please press Change SIM/RUIM PIN.
Note: You do not have to input PIN for emergency call.
Unlock SIM card
If you input wrong PIN for three times, your SIM card will become “PUK
Locked”, then you have to input PUK to reget access to this SIM card. PUK
and PIN will be provided together with SIM card.
Press Emergency call, and input the following words:
**05*[PUK code]*[New PIN code]*[New PIN code]#
E.g. If your PUK is 888888 and you want to reset your PIN to 7777, please
press emergency call and input **05*888888*7777*7777#
Protect your computer with screen lock
You can lock the screen and require the user to give a correct password
each time when your computer is powered on or waken up from the sleep
mode.
Lock the screen
Press the power button to lock the screen to avoid unwanted touch to the
screen when your computer is put in a bag, haversack, pocket, etc.
Draw and use the unlock pattern
You can set unlock pattern to protect your computer. When it is set, you
have to draw a correct unlock pattern on the screen to unlock your computer.
1. Press
>
, and choose Settings.
2. Press Location & security > Set up screen lock > Pattern.
3. Read carefully the description on the screen and press Next.
4. View the example pattern, and press Next.
5. Draw your own personal unlock pattern in vertical, horizontal, or
- 65 -
diagonal direction to link at least four points. After setting, please move your
finger away from the touch screen.
Note: You have to use your finger to slide on the screen to draw unlock
pattern. No pattern will be drawn by pressing the point.
6. Your computer will record the unlock pattern you have drawn, please
press Continue.
7. Draw the unlock pattern again to make sure, and then press Confirm.
Note: If you do not want the unlock patter to appear on the screen when
you are unlocking, please untick Use visible pattern.
Note: If you want to change unlock pattern, please press Home screen
button
> menu button
, and choose Settings > Location & security >
Change screen lock.
If you fail to give a correct unlock pattern for five times, it will remind you to
wait for 30 seconds for the next try. If you forget unlock pattern, please press
Forget unlock pattern. Then it will remind you to log in with your Google
account and password, and will ask you to make a new unlock pattern before
entering the main interface.
- 66 -