1
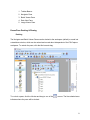
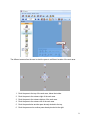
Quality Assurance Module
Application User Guide
August 2009
Copyright 2009 PSIGEN Software, Inc., All Rights Reserved
This product and the accompanying printed and electronic materials are protected by copyright laws. You may
not make or distribute copies of this product and the accompanying document, or decompile, decrypt, or
reverse engineer this product. No part of this product and document may be reproduced or transmitted in any
form or any means for any purpose, without the express written permission of PSIGEN Software, Inc. To the
maximum extent permitted by applicable laws, in no event shall PSIGEN Software, Inc. be liable for any
damages whatsoever arising out of the use of or inability to use this product and the accompanying
documentation. Information in this document is subject to change without notice. The information contained in
this document represents the current features of PSI:Capture as of the date of publication. Because PSIGEN
responds to changing market conditions with new facilities, PSIGEN cannot guarantee the accuracy of any
information presented after the date of publication.
PSIGEN Software, Inc., 8 Goodyear Suite 110
Irvine, CA 92618 – USA
[email protected]
www.psigen.com
1
About this Guide
This document is intended for the typical user of the PSI:Capture Quality Assurance Module.
Typical tasks for such persons include reviewing scanned documents for data accuracy and
image quality. These document types should be configured by an administrator prior to the start
of the capture process. Refer to the Administrative Guide as necessary for information relating
to configuration of document types.
About PSIGEN Software, Inc.
PSIGEN Software is a fast growing, privately held, provider of document capture and retrieval software
solutions. Our product lines address production capture, distributed capture, web based retrieval,
including the Microsoft SharePoint platform. Our largest customers include scanning service providers,
business process outsourcers, and the corporate services divisions of Fortune 500 corporations. We
have significant customer concentration in financial services, healthcare, and manufacturing. Our
channel partners include document imaging value added resellers, major brand MFP dealers, Microsoft
solution providers, and document management software vendors.
2
Table of Contents
Quality Assurance Overview
Page 5
Select Batch
Page 6
User Interface Overview
Frame/Pane Docking & Pinning
Toolbars
Pages 7 - 8
Pages 8 - 10
Pages 11 - 13
Quality Assurance Toolbar
Pages 11 - 12
Viewing Toolbar
Pages 12 - 13
Navigator Pane
Batch Viewer Pane (Tree View)
Batch Viewing Toolbar
Pages 14 - 16
Page 17
Page 18
Editing Toolbars
Pages 19 - 20
Flags
Pages 21 - 24
Go
Page 25
Recycle Bin
Pages 25
Crop Page
Pages 25 - 27
Page Information
Pages 28 - 30
Batch Viewer Pane (Data View)
Image Viewer Pane
Menu Bar
Pages 31
Pages 32 - 33
Page 34
File
Pages 34 - 62
Image Processing Options
Pages 50 - 62
View
Pages 63 - 66
Security
Pages 67 - 69
Window
Pages 70 - 72
3
Help
Pages 73 - 75
Appendix A
Pages 76 - 77
4
Quality Assurance Module Overview
The purpose of the Quality Assurance (QA) module is to verify that the images are legible,
contain no unwanted images and are separated correctly. The QA module enables the user to
replace pages that were inadequately scanned or to insert one or more pages that were found
to be missing. The QA user has the ability to view each image individually, to view all pages of
a document via thumbnails, or open multiple document views simultaneously. A flagging system
enables multiple operators and supervisors to manage the process of identifying items to
review, reject or delete. The QA module can also be used to verify that two independent
documents were not split or combined in error, permitting the user to split/combine documents
as necessary to achieve batch integrity. Additionally, the user may “drag and drop” pages,
documents or folders to insure that the images are in the preferred order.
5
Select Batch
To begin the quality assurance process, click on the Quality Assurance icon in the Navigator
Pane. The "Select Batch" window will open.
The user can select a batch to perform QA on by making a selection from the list and then
hitting "Select". All batches currently in the QA workflow step are displayed here.
Local/Shared Tabs
A document type set as a Local will show its batches on the Local tab if it was created on that
computer. A document type set as part of a multi station deployment would typically be
configured as Shared, and therefore its batches would be found on the Shared tab. See
“Document Type Configuration (Step 1 of 9)” in the Administrative Guide for further detail.
6
User Interface Overview
The PSI:Capture interface is divided into different functional areas as seen in the layout below.
These panes of the user interface will be referenced throughout this manual.
Tree View
Data View
7
1. Toolbar Banner
2. Navigator Pane
3. Batch Viewer Pane
4. Data View Pane
5. Image Viewer Pane
Frame/Pane Docking & Pinning
Docking
The Navigator and Batch Viewer Panes can be docked to the workspace (default) or made into
a standalone window, which can be resized and moved about independent of the PSI:Capture
workspace. To undock the pane, click the title bar and drag.
To re-dock a pane, click the title bar and drag to one of the
arrows. The blue shaded area
indicates where the pane will be docked.
8
The different arrows allow the user to dock the pane to a different location of the work area.
1. Dock the pane to the top of the work area, below the toolbar
2. Dock the pane to the extreme right of the work area
3. Dock the pane to the extreme bottom of the work area
4. Dock the pane to the extreme left of the work area
5. Dock the pane below another pane already docked to the top
6. Dock the pane next to another pane already docked to the right
9
7. Dock the pane above another pane already docked to the bottom
8. Dock the pane next to another pane already docked to the left
When dragged to this icon, any pane becomes a standalone window.
Pinning
The docked panes can either be pinned to the workspace (default) or set to auto hide into the
left margin. To enable or disable auto hide, click on the thumbtack icon in the upper right corner
of the pane.
10
Toolbars
Quality Assurance Toolbar
Close Module – closes the current module.
Select Batch – Opens the Batch Manager list for selection of existing batches for
processing.
Close Batch – brings up the “Close Batch” dialog box.
Auto View – automatically advances through each page for viewing at a user defined
time interval. See “File – Quality Assurance Settings” for more information.
Auto Orient Pages – attempts to automatically orients all pages in the current Batch.
Toggle Index Data Editing – enables and disables the editing of index data in Data
View. NOTE: “Allow Index Data to be edited” must be enabled in Quality Assurance Settings.
Run Lookups – used in data view to perform data lookup on index fields.
Toggle Thumbnail Viewer – toggles the Thumbnail Viewer on/off.
The Thumbnail
Viewer displays the pages of the current document as thumbnails in the Image Viewer Pane.
The user can choose from 4 different thumbnail sizes.
Open New Viewer – opens a new viewer in the Image Viewer Pane.
Data View Records Display – allows user to choose which type of records to show in
data view (Folder/Document hierarchical view, Folder Records only or Document Records only).
11
Print – prints the current page.
Select Capture Device – allows the selection of the device used to capture images.
Configure Device Profiles – allows for the creation of
device profiles for capture device settings.
For scanners, driver settings can be
configured and named for quick recall during capture operations. For the Import Device,
folder paths can be specified for quick access to image directories.
Image Processing – allows image processing to be run on pages in the current Batch.
QA Auto Processing – allows various QA auto processing commands to be configured
and run on the current Batch.
Viewing Toolbar
Page Navigator – allows User to navigate between pages
in the current document.
Rotate Left/Right– provides the ability to rotate the document. Rotating will only
affect the way the images are displayed in the Viewer. To save the Rotation to the actual image
file, you must click the Save Rotation button.
Save Rotation – save the current rotated page.
Pointer – allows selection of a page or item.
12
Selection Zoom – click and drag with your left mouse button in the Image Viewer Pane
to zoom in on a selected area of a page. Double clicking will bring the image back to Fit Page
zoom level.
Magnifier – when selected, a left click will magnify the area on the document.
Zoom Controls – provides zoom in and zoom out capability, as well as a
drop down with predefined zoom levels.
Toggle Standalone Viewer – allows the image viewing pane to be detached. This can
be useful in a multi-monitor/large display setup.
13
Navigation Pane
Navigation Pane can either be pinned to the desktop (default) or set to auto hide.
Modules Tab
Capture / Import – Opens the Capture/Import module
Quality Assurance – Opens the Quality Assurance module
Index – Opens the Index module
OCR – Opens the OCR module
Retrieval - Opens the Retrieval module.
Migration – Opens the Migration module
Reporting – Opens the Reporting module
Batch Manager – Opens the Batch Manager module
14
Configuration – Opens the Configuration module
Security – Opens the Security module
Support Tab
Contains links to support website, support email, and view logs.
Support Web Site
Opens the default web browser to www.psigen.com/support
Email Support
Opens the default mail service for user to compose an email to [email protected].
View Logs
Displays a list of PSI:Capture error and processing logs.
Utilities Tab
Contains Barcode Generator and Network Manager utilities.
15
Barcode Generator
Opens up a utility for users to create/save/print custom separator/indexing barcode sheets.
Network Manager
Allows user to manage the port and IP settings for PSIGEN Platform Services and License
Server.
16
Batch Viewer Pane (Tree View)
Displays in tree structure the contents of the current batch in Quality Assurance, as well as a
collection of various toolbars.
17
Batch Viewing Toolbar
Validate Batch – checks if batch has met validation critera dictated in document type
configuration and displays the Validation Results dialog.
Toggle Bookmark – Allows you set a Bookmark on the selected item. Only one
Bookmark can exist in a Batch at one time. Setting a Bookmark is useful if you need to know
where you left off in a Batch if you need to suspend the Batch and come back to it later.
Flags – Folders, Documents and Pages can be tagged with flags via the drop down
menu. Options include: set review, reject, delete, or process flags, clear one or all flags, file size
auto flagging, image level auto flagging, delete items flagged for deletion, reject items flagged
for rejection, split documents at pages flagged for processing.
Notes – allows User to attach Note(s) to any Batch, Folder, Document or Page.
Go – Skips to the next item in the tree that matches the selected
criteria when you press the Go button.
Expand All Batch Tree Nodes – opens all folders and documents within the batch.
Collapse All Batch Tree Nodes - collapses all folders and documents within the batch.
Hot Keys Help – lists keyboard shortcuts for commonly used toolbar commands. See
Appendex A for for complete list.
Recycle Bin – opens a window to view previously deleted items.
18
Editing Toolbars
Batch Editing Toolbar
Reject Batch – rejects batch and sends it to an earlier workflow step.
Folder Editing Toolbar
Combine with Previous Folder – Combines the current Folder with the Folder that
comes before it. This function will append all of the Documents in the selected Folder to the
previous Folder.
Rename Folder – Allows the currently selected Folder to be renamed.
Delete Folder – Deletes the selected Folder and all its contents from the Batch.
Reject Folder – Rejects the Folder and sends it to the Exceptions Batch linked to the
current Batch. If the current Batch does not have an associated Exceptions Batch yet, it will be
created.
Document Editing Toolbar
Create New Folder – Creates a New Folder containing this Document and all the
Documents that follow it in its original Folder.
Combine with Previous Document – Combines the current Document with the
Document that comes before it. This function will append all of the pages in the selected
Document to the previous Document.
Delete Document – Deletes the selected Document and all its contents from the Batch.
19
Reject Document – Rejects the current Document and sends it to the Exceptions Batch
linked to the current Batch. If the current Batch does not have an associated Exceptions Batch
yet, it will be created.
Page Editing Toolbar
Split Document – Splits one Document into two Documents with the selected Page
being the first Page in the new Document. The selected Page and all the Pages that follow it in
its original Document will be added to a new Document that will be created immediately after the
original Document.
Save Page – Allows you to save a Page from the Batch to disk.
Insert Page Before – inserts a new Page into a Document before the currently selected
Page.
Insert Page After – inserts a new Page into a Document after the currently selected
Page.
Replace Page – replaces the selected page with a new page
Crop Page – allows an area of the current page to be cropped out. The cropped portion
can replace the current page’s image, be inserted as a new page in the current Document or
inserted as a new Document.
Redaction – allows a selected area of the current page to be blacked out.
Delete Page – deletes the currently selected Page from the Batch.
Page Information – provides information on the current page including general page
properties, recognition results, OMR results, and OCR indexing results.
20
Validate Batch
Checks if batch has met validation critera dictated in document type configuration. Any items
that do not pass will be displayed here. The batch will not be allowed to leave this workflow step
until the issue is corrected. See “Document Type Validation” in the Administrative Guide for
more details.
Flags
There are four types of flags that can be tagged to a Batch, Folder, Document, or Page.
NOTE: A rejection flag can only be assigned to a Batch, Folder, or Document.
21
Set Review Flag – places a review flag on current Batch, Folder, Document, or Page.
Set Reject Flag – places a reject flag on current Batch, Folder, or Document (cannot be
place on a Page).
Set Delete Flag – places a delete flag on current Batch, Folder, Document, or Page.
Set Process Flag – places a process flag on current Batch, Folder, Document, or Page.
Clear Flag – removes flag on selected item.
Clear All Flags – removes all flags in the current Batch.
Auto Flagging – allows flags to be set automatically based on certain criteria.
22
File Size Auto Flagging – Automatically tags one of the four flags to a page based on size of
the image file. A separate threshold can be set for the front and the back of a page. NOTE: The
back threshold only applies to batches scanned in duplex with pages marked as back pages.
Image Color Level Auto Flagging – Automatically tags one of the four flags to a page based
on image color level (black/white, grayscale, or color).
23
Auto Processing – Items that are tagged by a flag can be handled in one of three ways.
Delete Items Flagged For Deletion – will delete all items tagged with a delete flag.
Reject Items Flagged For Rejection – will reject all items tagged with a reject flag, and create
an exceptions batch with the same name as the current batch, containing the rejected item(s).
Split Documents At Pages Flagged For Processing – Creates a new document at the
page(s) tagged with the process flag.
Notes
Allows the user to attach a note to the batch, folder, document, or page. The note will follow the
batch throughout the entire workflow and can be viewed at anytime.
24
Go
Skips to the next item in the tree that matches the selected criteria when you press the Go
button.
Recycle Bin
Opens a window to view previously deleted items in PSI:Capture.
Batch Recycle Bin
Manually deleted pages can be found here, arranged in a tree structure according to their
original position.
25
Close
Exits from the Batch Recycle Bin.
Empty Recycle Bin
Permanently deletes all image files currently in the Batch Recycle Bin.
Open Recycle Bin Folder
Opens the folder where the contents of the Batch Recycle Bin are stored. User can
retrieve these files from here if needed.
Crop Page
Changes the pointer to a crop cursor, allowing the user to drag and select (click left mouse
button on the image, while holding the mouse button drag to the opposite corner and let go) to
capture a portion of the current page.
26
Crop Preview
As soon as the user lets go of the left mouse button, a Crop Preview window shows the results
and provides options for the location of the new page.
Cropping Options (Crop Behavior)
User can select from the following options: replace current page (default), insert as page before
current page, insert as page after current page, insert as page at end of current document,
insert as document before current document, insert as document after current document, or
insert as document at end of current folder. Press OK to save the cropped image.
Redaction
Redaction allows the user to drag and select an area by drawing a box. Once a box is drawn, a
dialog will pop up displaying the contents. Hit “OK” and the contents inside the box will be
blacked out.
27
Page Information
Brings up the Page Information dialog box containing details specific to the current page.
General
Shows page number, storage location, source file, bate stamp values, as well as any notes
attached to the page.
Recognition Results
Displays recognition results for barcodes and patch codes. Details include type, value, and
location.
28
OMR (Optical Mark Recognition) Results
Displays OMR results for marks found on page. Details include, zone, value, and weight.
29
OCR (Optical Character Recognition) Indexing Results
Displays OCR Assisted Indexing results for words found on page. Details include word and
location.
30
Batch Viewer Pane (Data View)
Displays in grid format the index fields and data of the current batch in Quality Assurance as
well as a collection of various toolbars. Each index column as well as the Document Name can
by sorted and filtered similar to the Batch Manger. Modifications of the field content can be
performed at this stage (permitting “Allow Index Data to be Edited” and “Toggle Index Data
Editing” are both enabled).
31
Image Viewer Pane
The Image Viewers consist of two parts, the “Page Viewer” and “Thumbnail Viewer”. Either one
or both can be enabled for use.
Page Viewer
Displays the image for the currently selected page.
32
Thumbnail Viewer
Displays all pages contained within the document with the page number and image file size
(optional). Once the thumbnail viewer is open, the user has the ability jump to any page in the
document by selecting it. The page selected will be displayed in the Page Viewer.
33
Menu Bar
Contains drop down menus: File, View, Security, Window, and Help.
File
Contains numerous commands specific to the Quality Assurance module and the current batch.
34
Select Batch...
Opens the Select Batch dialog box which will list only those batches that are in the QA workflow
step. By highlighting a batch and clicking “Select” the selected batch will open.
Local/Shared Tabs
A document type set as a Local will show its batches on the Local tab if it was created on that
computer. A document type set as part of a multi station deployment would typically be
configured as Shared, and therefore its batches would be found on the Shared tab. See
“Document Type Configuration (Step 1 of 9)” in the Administrative Guide for further detail.
Close Batch
Brings up the “Close Batch” dialog box. Prompts user to select one of three options.
Close Batch
Closes the current batch and sends the batch to the next workflow step. The user stays in the
Quality Assurance module, and the “Select Batch” dialog box comes up.
35
Close Batch and Continue in next Workflow step
Closes the current batch and the Quality Assurance module. The batch is immediately reopened
in the next module. Example above shows “Migration” as the next workflow step.
Suspend Batch in Quality Assurance
Suspends the batch in the Quality Assurance workflow step for processing at a later time. The
Quality Assurance Module remains open and the “Select Batch” dialog box comes up.
View Batch Information
Opens the “Batch Information” dialog box. The button for “Modify Document Type Definition” as
well as the “Batch Overrides” tab will not be available.
Main
Information on Batch Name, Batch Fields, Batch Totals, and Batch Summary are displayed. The
user cannot change the batch to “High Priority” at this point, but a batch can be held by
checking the “Hold Batch” box. A batch on hold will no longer be listed in the Select Batch dialog
box.
36
Batch Overrides
This tab is unavailable.
Batch Note
Allows the user to attach/view a note to the batch. The note will follow the batch throughout the
entire workflow and can be viewed at anytime.
Batch History
Shows the history of the batch with a date timestamp.
37
By clicking on the binocular icon the “Batch History Item Details” of the selected workflow
step are shown.
Document Type Summary
A brief summary of the document type configuration settings presented in a tree structure.
38
Auto View
Automatically advances through pages for viewing. See “File – QA Settings” for more
information.
Auto Orient Pages
Attempts to automatically orients all pages in the current Batch.
Toggle Index Data Editing
Enables and disables editing data in Data View. NOTE: “Allow Index Data to be edited” must
be enabled in “Quality Assurance Settings”
Run Lookups
Used in data view to perform data lookup to populate/update index fields.
Toggle Thumbnail Viewer
Pages are viewed as thumbnails in the Image Viewer Pane.
Open New Viewer
Opens a new viewer in the Image Viewer Pane. Multiple viewers may be opened
simultaneously. Various viewers may display different pages, as well as be adjusted using the
viewer tools (i.e. zoom, rotate, magnify). See “Viewing Toolbar” for more details.
39
Data View Records Display
Lets user chose whether to show folder and/or document records in data view.
Print
Prints the current page.
Select Capture Device
Allows the selection of Import, ISIS or Adrenaline/VRS Scanning as the designated capture
device.
40
Import
This selection adds the Upper and Lower File Browser Panes to the PSI:Capture interface.
ISIS Scanning
Scanner Selection
User is prompted to select a scanner.
41
Adrenaline/VRS Scanning
Select Scan Source
User is prompted to select a scanner. The population of this list reflects the hardware installed
on the workstation.
Configure Device Profiles
Device Profiles Setup (Import)
Add
Creates a new import profile. Sets a default local folder, mapped drive, or network folder where
images to be captured are located. NOTE: selecting a network folder by using the Browse
button\Network\Computer\share will place the UNC path in the “Default Import Directory” field. It
is Strongly suggested that you use UNC paths when running in a “Capture Server” / “Network
Station” environment.
42
Edit
Changes an existing import profile.
Delete
Deletes an existing import profile.
Copy
Duplicates an existing import profile and prompts the user to name the new profile.
Rename
Allows user to rename an existing import profile.
43
Set Default
Designates the Default import profile the capture module loads when opened.
Close
Exits the Device Profile Setup dialog box.
Device Profiles Setup (Scanning)
Allows for the creation of device profiles for capture device settings.
For scanners, driver
settings can be configured and named for quick recall during capture operations. For the Import
Device, folder paths can be specified for quick access to image directories. NOTE: the profile
settings are independent on each document type, device, and scan station.
Add
Creates a new scan profile.
44
Edit
Changes an existing scan profile, including paper size, resolution, color level, etc. These
parameters are device specific.
Delete
Deletes an existing scan profile.
Copy
Duplicates an existing scan profile and prompts the user to name the new profile.
Rename
Allows user to rename an existing scan profile.
Set Default
Designates the Default scan profile the capture module loads when opened.
Close
Exits the Device Profile Setup dialog box.
45
Import/Export Device Profiles
Enables user to export/import a device profile on a workstation, and import/export that profile on
alternate an alternate workstation. Because device profiles are unique on each workstation this
is often helpful.
Import/Export
Select either import or export of profile(s).
Device Selection
Select Import, ISIS Scanning, or Adrenaline/VRS Scanning.
Profile Storage
Select Integrated “Capture Server Storage” (recommended for multi station deployment) or
“Custom Location” (allows user to specify location to store the profiles).
Click “Next” to proceed once selections are made.
Profile Selection
Export
User can click on one or multiple checkboxes of existing profiles for export.
46
Import
User can click on one or multiple checkboxes of previously exported profiles for import.
Device Driver Information
Provides information on the device driver. Information is unique per application.
47
QA Setup
Brings up the “Quality Assurance Settings” dialog box. NOTE: All settings should be defined
previously by the system administrator. However, some QA operators may wish to make
adjustments to the individual batch’s settings to suit their needs.
Quality Assurance Settings
See “Quality Assurance Workflow Configuration” in “Document Type Configuration (Step 8 of 9)”
in the Administrative guide for more details.
48
General Settings
Default Viewing Options
Sets the default setting for batch/data/image view and thumbnail image size.
Auto Viewing Settings
Sets the page and time intervals for QA Auto View. A setting of 0.5 seconds is common for the
average user.
Manual Cropping Options
Sets PSI:Capture’s behavior while performing manual cropping. Common settings include
replace or insert page before/after current page.
Scripting
See “Scripting” in Administrative Users manual for details.
Editing Options
Contains numerous checkboxes pertaining to index data editing and validation.
Capture Options
Provides the user with options to enable blank page deletion/retention, and change the
resolution to captured images imported from PDFs.
Batch View Display Options
Changes default document/folder node display fields in data view.
Auto Processing Settings
Lists the available automatic processing commands in the left column. Lists the automatic
processing commands currently in use in the right column. Each command can be configured
individually.
49
Image Processing Options
Brings up the “Image Processing Profiles” dialog box where various profiles are listed. A new
profile can be added, or an existing profile edited/enabled/disabled. NOTE: All settings should
be defined previously by the system administrator. However, some QA operators may wish to
make adjustments to the settings to suit the needs of a particular batch or page.
50
When “Edit” is selected, the “Image Processing Profile” dialog box is displayed. Various image
processing commands can be added, removed, or reconfigured.
The user may select any of the appropriate image processing functions by adding them to the
right side. It is highly recommended that the “Use default ordering” be checked.
The following image enhancement processes are available:
Advance Border Removal: Automatically removes black/white borders from an image
using a sophisticated object detection algorithm.
Auto Invert: Change from white on black to black on white and vice versa
51
Auto Orient: Attempts to determine the orientation of an image and then save it.
Binarize: Converts a grayscale or color image to black and white using the selected
Binarize method.
Border Removal: Removes solid borders from images. (do not use if using Advance
Border Removal)
Brightness: Modifies the Brightness of a grayscale or color image.
52
Contrast: Either automatically using the built in algorithm or manually using the slide bar
provided modifies the Contrast of a grayscale or color image
Crop: Allows an image to be either manually cropped or automatically cropped.
Auto Crop will crop an image by removing solid color borders around the edge
of an image.
Manual Crop allows users to set a region on an image to be cropped.
53
De-skew: Automatically deskews an image.
Cropping Mode: None, Original Size or Full Crop
Precision: can be set from 1/10 to 1 degree
Background Fill Color: Black or White
De-speckle: This command cleans the image of small speckles by using either a
Standard (1 x 1 pixel) or Aggressive (3 x 3) filter.
Flip: Flips an image either horizontally or vertically. (mirrored image)
54
Hole Punch Removal: This command is used when scanning to a black background
and the desired result is to have the hole punches be white or filled in.
Invert: This command is used when an image appears with a black background with
white writing and the desired result is a white background with black writing.
Line Removal: This command is used to remove lines and may be especially helpful
during zone OCR.
Morphological Filters: Processes incoming images with one of the following filters:
1. Dilation: Used to smooth small dark regions tending to enhance black features in
the image. (Darken)
2. Erosion: Used to smooth small light regions tending to reduce black features in
the image. (Lighten)
3. Open: The dilation of the erosion of the image used to reduce small black
regions within the image. (Deshade)
4. Close: The erosion of the dilation of the image used to reduce small white
regions within the image. (Light Thicken)
55
5. Boundary Extraction (B/W only): Perform a boundary detection/extraction on a
binary image. This will generate an outline of the foreground features of the input
image.
6. Thinning (B/W only): Reduces the geometric size of an image, leaving only a
skeletonized frame in its place.
7. Top Hat (Grayscale Only): Enhances low-contrast, high frequency details within
an image.
8. Gradient (Grayscale Only): Highlights sharp gray-level transitions (edges) in an
image.
Resize: Allows image to be resized to a set of user defined dimensions.
Resize Mode: Allows Manual Resize, Maintain Aspect Ratio Using Width, or
Maintain Aspect Ratio Using Height
Rotate: Automatically rotates an image clockwise by 90-degree increments or by the
user specified number of degrees.
56
Sharpen: Applies of the following sharpening filters to the image.
Sharpen Method
Standard
Unsharp Mask
57
Adaptive Unsharp Mask
Recognition Options
Brings up the “Recognition Settings” dialog box, where barcode, patch code, and black page
detection can be configured. See “Recognition” in “Document Type Configuration (Step 4 of 9)”
in the Administrative guide for more details.
58
Image Processing
Allows user to easily perform individual image processing to a specific page, document, or
folder.
Selecting any of the processes will bring up a preview window showing the original image and
the new image. The drop down list allows user to apply the process to the current page,
document, folder, entire batch, or flagged items. To accept the new image, user must then click
Apply. Example below is of Morphological Filters (dilation).
59
Fine Rotation: Rotates the image by the specified number of degrees (positive number for
clockwise rotation and negative number for counter clockwise rotation).
60
Composite Image Processing
Useful if user wants to perform multiple processes at a time. Combinations of processes can be
saved for later use in different profiles.
Run Image Processing Profile
Runs previously saved image processing profiles. Shows original image, new image, and all
saved profiles and their functions.
61
QA Auto Processing
Sets up automatic processing commands on index values. See “Auto Processing Settings” in
"Document Configuration (Step 8 of 9)" in the Administrative Guide for more details.
Close Module
Closes the Quality Assurance Module. NOTE: If a batch is currently open, user will be prompted
to close or suspend the batch. PSI: Capture will remain open.
Exit
Exits out from PSI:Capture. NOTE: If a batch is currently open, user will be prompted to close or
suspend the batch. The PSI:Capture application will then end.
62
View
Contains numerous commands relevant to page viewing and navigation in the Quality
Assurance module and the current batch.
First Page
Jumps to the first page of the document.
Previous Page
Jumps to the page before the current page.
Next Page
Jumps to the page after the current page.
63
Last Page
Jumps to the last page of the document.
Rotate Right
Provides the ability to rotate the document right. NOTE: you must click on the save rotation
button to save your changes to the page.
Rotate Left
Provides the ability to rotate the document left. NOTE: you must click on the save rotation
button to save your changes to the page.
Save Rotation
Saves the current rotated page.
Page Layout
Simplex
The standard method of viewing, this shows one page at a time in the “Viewing Pane.”
Duplex
Shows two consecutive pages (top and bottom) in the “Viewing Pane.” This is useful to view
the front and backside of the page simultaneously.
64
Pointer
Changes the mouse cursor back to the pointer (from “Zoom” or “Magnifier”)
Selection Zoom
Click and drag with your left mouse button to zoom in on a selected area on the image. To
bring the image back to full size, double right-click.
Zoom In
Provides zoom in capability.
Zoom Out
Provides zoom out capability.
Zoom
Provides a menu for actual size, fit page, fit width and zoom levels.
Thumbnail View
Select this option to change the size of thumbnail images displayed in the Thumbnail Viewer
Pane. NOTE: "Toggle Thumbnail Viewer" must be enabled.
65
Thumbnail Image Sizes:
Smallest
Small
Medium
Large
Image Properties
Displays file and image information about the current page.
66
Security
Contains commands relevant to security in PSI:Capture.
View User Profile
Opens the View User Details dialog box.
View User Details
Properties
Displays details about the current user.
67
Roles
Displays the current user’s role settings as dictated by the administrator. See “Roles” in
“Security Module” in the User Manual.
History
Displays the history of the user’s login activity in PSI:Capture.
68
Print History
Opens the Print Preview window.
Print Preview
Displays the standard functions for viewing and printing, such as zoom options and page setup.
Export History
Exports the login history in a Microsoft Excel Workbook file. This allows user to save the log to a
desired location.
Switch User
Logs out the current user out from the PSI:Capture and allows an alternate log in.
69
Window
Contains commands relevant to the Image Viewer Pane in PSI: Capture.
Cascade
Cascades all open windows in the Image Viewer Pane.
70
Tile Horizontally
Displays all open windows horizontally in the Image Viewer Pane.
71
Tile Vertically
Displays all open windows vertically in the Image Viewer Pane.
Minimize All Windows
Minimizes all open windows in the Image Viewer Pane.
72
Help
Contains information and details about PSI:Capture.
View Logs
User can select either PSI: Capture Logs or Platform Service Logs.
Log Viewer (PSI:Capture Logs)
Displays a list of logs containing all PSI:Capture modules.
View Log
Pressing this button brings up the log in your default text file viewer.
73
Log Viewer (Platform Services Logs)
Displays a list of logs for Platform Services.
View Log
Pressing this button brings up the log in your default text file viewer.
Service Status (Local Services / Remote Services)
Shows the version and current status of the services.
Reset User Window Settings
Resets the Window settings to default.
License Agreement
Displays PSI:Capture License Agreement
Update License
Updates PSI:Capture License with the License Server.
74
About
Shows
PSI:Capture
copyright
information,
maintenance
expiration
date,
installed
modules/assemblies, and license agreement.
75
APPENDIX A
Hot Keys Help
Batch
R
Reject Batch
Folder
E
Combine Folders
T
Rename Folder
DELETE
Delete Folder
R
Reject Folder
Document
F
Create New Folder
W
Combine Documents
DELETE
Delete Document
R
Reject Document
Page
Q
Split Document
X
Crop Page
DELETE
Delete Page
General
B
Toggle Bookmark
D
Flag Delete
A
Flag Review
76
S
Flag Reject
Z
Flag Process
C
Clear Flag
N
Notes
G
Tree Navigation – Go To Next Item
Viewer
+
Zoom In
-
Zoom Out
Page Up
Scroll Up
Page Down
Scroll Down
<
Rotate Left
>
Rotate Right
A
Actual Size
B
Best Fit
H
Fit to Height
W
Fit to Width
Home
Scroll to Top of Document
End
Scroll to Bottom of Document
77