1
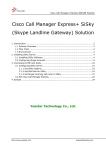
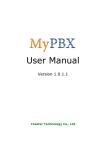
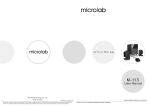
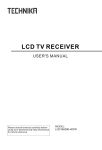
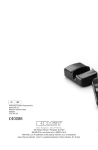
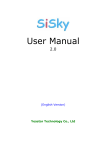
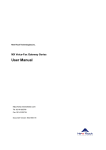
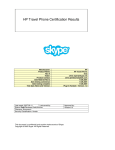
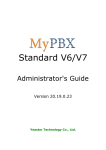
Server Guide Version: 2.4.0.2 (English Version) Yeastar Technology Co., Ltd. BizPBX Server User Manual Table of Contents 1. Introduction ............................................................................................ 4 2. Before You Proceed.................................................................................. 7 3. Installation Procedure .............................................................................. 8 4. Installing BizPBX Software ........................................................................ 9 5. Running Config Wizard ........................................................................... 14 5.1 Launch the Config Wizard .................................................................. 15 5.2 Choose Skype Trunk Quantity ............................................................ 15 5.3 Configure Skype for Each Port ............................................................ 17 5.4 Install Skype Cables .......................................................................... 19 5.5 Finish Config Wizard .......................................................................... 20 6. Running BizPBX Software ....................................................................... 21 7. Managing BizPBX Software ..................................................................... 23 7.1 Open BizPBX Homepage .................................................................... 23 7.2 Administrator Logging in .................................................................... 23 7.3 Status and Management .................................................................... 25 7.3.1 Line Status ................................................................................. 25 7.4 General Settings ............................................................................... 27 7.4.1 Extension ................................................................................... 27 7.4.1.2 SIP Extension........................................................................ 29 7.4.2 Trunk ........................................................................................ 31 7.4.2.1 PSTN(FXO)Trunk ................................................................ 31 7.4.2.2 Skype Trunk ......................................................................... 31 7.4.2.3 SIP Trunk ............................................................................. 33 7.4.2.4 E1/T1 Trunk.......................................................................... 33 7.4.3 Outbound Routes ........................................................................ 34 7.4.3.1. Buildup Outbound Routes ...................................................... 34 7.4.3.2. Remove Route ..................................................................... 35 7.5 Inboud Call Control ........................................................................... 36 7.5.1 Auto Attendant ........................................................................... 36 7.5.1.1 Setup Auto Attendant............................................................. 36 7.5.1.2 Remove IVR.......................................................................... 37 7.5.2 Ring Groups ............................................................................... 38 7.5.2.1 Create Ring Group ................................................................. 38 7.5.2.2 Remove Ring Group ............................................................... 39 7.5.3 Queues ...................................................................................... 40 7.5.4 Inbound Routes .......................................................................... 42 7.5.3.1 Buildup Inbound Routes ......................................................... 43 7.5.3.2 Remove Route ...................................................................... 44 7.5.4 DISA ......................................................................................... 44 www.yeastar.com Page 2 BizPBX Server User Manual 7.5.4.1 Create DISA.......................................................................... 45 7.5.4.2 Remove DISA ....................................................................... 46 7.5.5 Blacklist ..................................................................................... 46 7.5.5.1 Add Blacklist ......................................................................... 47 7.5.5.2 Remove Blacklist ................................................................... 47 7.6 System Settings ............................................................................... 48 7.6.1 Gnereal Settings ......................................................................... 48 7.6.3 Time Conditions .......................................................................... 51 7.6.4 Feature Codecs ........................................................................... 52 7.6.5 Dial Rule .................................................................................... 54 7.6.6 Public Speed-dial ........................................................................ 56 7.6.6.1 Add public Speed-dial ............................................................ 57 7.6.6.2 Delete public Speed-dial ......................................................... 57 7.6.7 Advanced Module Settings............................................................ 58 7.6.8 Backing up & Restore .................................................................. 58 7.7 Reports ........................................................................................... 60 7.7.1 FAX Logs.................................................................................... 60 7.7.2 Call Logs .................................................................................... 61 7.7.3 Server Status ............................................................................. 62 8. Using BizPBX......................................................................................... 63 8.1 Usage of Making Outging Call ............................................................. 63 8.1.1 Call Out through Skype Trunk ....................................................... 63 8.1.2 Call Out through SIP Trunk........................................................... 66 8.1.3 Call Out through PSTN (FXO) Trunk ............................................... 67 8.2 Usage of Answering Incoming Call ...................................................... 68 8.2.1 Inbound ..................................................................................... 68 8.3 Usages of Website Click-to Call (SkypeMe) & SkypeIn ........................... 69 8.3.1 Showing Company Skype ID as SkypeMe on Website ...................... 69 9. Uninstalling BizPBX Software................................................................... 71 10. Installing TDM800 Card ........................................................................ 72 Appendix A Customizing WAV Format(Auto Attendant)................................ 74 Appendix B Glossary .................................................................................. 76 Appendix C Country/Region List .................................................................. 77 Appendix D FAQ ........................................................................................ 78 Appendix E Manage E1/T1 DID.................................................................... 80 www.yeastar.com Page 3 BizPBX Server User Manual 1. Introduction You may skip section 1- Introduction and directly move to section 2- Before you Proceed. However, we recommend reading through the introduction to familiarize yourself with the features and functions of BizPBX and help improve its operation. Thank you for purchasing BizPBX! BizPBX —Unified Communication PBX BizPBX is Windows-based software PBX solution, which is the world first communication system that realizes the free flexible externally connection with three popular networks Skype, telecom PSTN and SIP; internally work with analog phone, SIP phone, Skype mobile phone and computer softphone (can be used as an extension). It not only includes complete and rich functions of PBX, but also integrates Skype server, internal Instant Messaging server and E-Mail server for easily realizing high efficiency and free communication. Who Suit BizPBX? BizPBX is a unified communication PBX especially suit for those SMBs who want to get the maximum functions at the minimum costs on company internal and external work. Using BizPBX, you can save much time and energy to manage your calls and also costs in purchasing different kinds of servers, such as file server, phone system, conference server and record server. Why Choose BizPBX? Small system, big features BizPBX includes an amazing range of sophisticated, user-friendly features that give you complete call control. Hold, transfer and conference calls? Of course. Voicemail, auto attendant, music on hold, ring groups? Sure. But you also get advanced features like voicemail to E-mail, call recordings, remote extensions, instant message, and short message, and much more. Flexible and communication system-PBX hybrid BizPBX supports traditional and VOIP networks (SIP & Skype), so you choose how you want to connect. You can take advantage of VoIP and traditional telephone network service provider offerings and in the meantime enjoy the smooth, quick and even free communication (writing and speaking) through Call Messenger. 1.1 Benefits 1. Increase communication efficiency • Internal Directory at a glance, online status, click-to-call. • Customer Directory at a glance, ready for search, click-to-call. www.yeastar.com Page 4 BizPBX Server User Manual • Initiate a conference call at any time, easy to use. • Internal IM transmission in LAN & real-time arrival. • Internal E-mail transmission in LAN & real-time arrival. • Caller file bomb display, be prepared before answering a call. • Call history available for search and push to call back. • Retroactive recording to hold back important calls. • Work at home as work in company office. 2. Save on call costs • Call through VoIP/Skype. • Calls among branches can be free. • Access into BizPBX remotely to make free calls. 3. Improve corporate image & degree of satisfaction • Increase call-in mode that provide web call-me as an option. • IVR customizing function to foster a good company image. • Ring group allows calls to be accepted as soon as possible. • Receive fax in real-time to show the high efficiency. 4. Strengthen internal management • Auto-record for all phone calls or designated ext.'s calls. • Call record keep for future reference. • Fax files retain. • Network disk management for data security and backup 1.2 Features Automated Attendant Blind Transfer Call Booking Call Detail Records Call Forward Call Monitoring Call Parking Call Queuing Call Recording Call Restriction Call Retrieval Call Routing Call Transfer Call Waiting Call Remind www.yeastar.com CallerID Database Integration Dial by Name Direct Inward System Access(DISA) Do Not Disturb Extension Group Interactive Voice Response(IVR) Local and Remote Call Agents Music On Hold Protocol Conversion Remote Call Pickup Remote Office Support Roaming Extensions Share Contacts Interoffice Trunking Page 5 BizPBX Server User Manual 1.3 Minimum System Requirement ● PC Requirement Intel Core Duo & 2G RAM for 64 Simultaneous calls & 4 Skype trunks; ● Operating System Windows XP Professional + SP2 or Windows Server 2003 + SP2 ● Internet Connection Different numbers of Skype concurrent calls require different bandwidth; each port average occupies 3Kb/s to 16 Kb/s. Ext. List, Status Visible Call Conference Internal Mail System Call Recording www.yeastar.com Business Card, One Key Dial Call History Instant Message PSTN Soft Fax Caller ID Voice Message Call Forwarding Short Message Service (SMS) Page 6 BizPBX Server User Manual 2. Before You Proceed Note the following important precautions before you install the software. 1 . Choose a computer with suitable configuration to run as the server (referenece on 1.3) 2.Install OS Windows XP Professional SP2 or Windows Server 2003 SP2. 3.Don’t use the clone way to install the operating system of BizPBX Server PC. 4.Make sure BizPBX Server PC designated for BizPBX has a clean system with only anti-virus installed. 5.Make sure BizPBX Server PC designated for BizPBX has no Skype applications installed. 6.Make sure BizPBX Server PC has no SIP Server or SIP Softphone installed. 7.Make sure BizPBX Server PC designated for BizPBX has no domain controller installed and the disable the password complexity. 8.Make sure BizPBX Server has a dedicated broadband access to ensure voice quality. 9.Make sure to login on BizPBX Server with an account that has administrator privileges. 10.Please don’t login BizPBX server by “Remote Desktop Connection”, but use VNC in case you need remote login BizPBX server. www.yeastar.com Page 7 BizPBX Server User Manual 3. Installation Procedure Below is BizPBX installaton and configuration flow diagram that gives you an overview of all the steps required in installing BizPBX. BizPBX Installation Flow Install BizPBX Run BizPBX Config. Wizard Software Buildup BizPBX Operating Install TDM800 card for trunk & Software Environment PSTN analog Manage phone if wants to enjoy Run BizPBX BizPBX traditional Software telecome service Figure 3-1 www.yeastar.com Page 8 BizPBX Server User Manual 4. Installing BizPBX Software This section shows how to install BizPBX software on the PC. 1. Download the BizPBX from: http://www.yeastar.com/download/all/All.asp. 2. Doube-click the ‘BizPBXSetup.exe’, Welcome to the BizPBX Installation screen will come up. Click Next to continue. See Figure 2. Figure 4-1 3. Read through the software License Agreement, select ‘I agree with the above terms and conditions’, and then click Next to continue. See Figure 3. www.yeastar.com Page 9 BizPBX Server User Manual Figure 4-2 4. An info window will appear to remind you that if you want to use PSTN line or desk analog phone, BizPBX needs the dedicated analog interface hardware card TDM800 supplied by Yeastar. Figure 4-3 www.yeastar.com Page 10 BizPBX Server User Manual 5. The Destination folder window will offer you the option where you would like BizPBX to be stored on your computer. Click Next to continue. Figure 4-4 6. Enable the options by your own demands, and then click Next. Figure 4-5 7. Enter into the Installing Files,system begin to configuration, which will www.yeastar.com Page 11 BizPBX Server User Manual last for a while. Figure 4-6 8. When the installation is complete, a screen pop-up to notify you that the software is installed successfully. Click Finish. Figure 4-7 9. The final screen reminds you to restart computer in order to complete the www.yeastar.com Page 12 BizPBX Server User Manual installation. You would better to restart now. Figure 4-8 10. Launch BizPBX to enter the next chapter. Note: Before installing BizPBX software, you should first uninstall Skype software on this BizPBX server installed computer if you already have Skype software installed. www.yeastar.com Page 13 BizPBX Server User Manual 5. Running Config Wizard Configure BizPBX through Wizard. You can click the ‘Config’ on the prompted menu from the BizPBX on the right foot of the screen to start the Config Wizard. If the ‘Config’ key is invalid, please click ‘Stop’ first to stop running BizPBX. Figure 5-1 www.yeastar.com Figure 5-2 Page 14 BizPBX Server User Manual 5.1 Launch the Config Wizard Click Next Figure 5-3 5.2 Choose Skype Trunk Quantity Choose the Skype trunk quantity Note: Please don’t enable ‘Install TDM800 Driver’ if you don’t connect PSTN line or analog regular phone. Figure 5-4 The following window maybe will appear during the system installation. Click www.yeastar.com Page 15 BizPBX Server User Manual Continue Anyway Figure 5-5 www.yeastar.com Page 16 BizPBX Server User Manual 5.3 Configure Skype for Each Port Figure 5-6 A Skype?—Creat Account will appear. Create a new account (see Figure 16) or cancel it and log in by using an existing Skype account. Figure 5-7 www.yeastar.com Page 17 BizPBX Server User Manual Enable the Sign me in when Skype Starts and wait for Skype to log you in successfully. Figure 5-8 When BizPBX get the Skype Name automatically, the configuration of Port 1 is finished. Click Next to configure other ports by the same way. Note: After these steps are complete, repeat step 5.3 to configure the remaining ports and their Skype accounts. When the remaining ports are congifured, there will be a green tick before every port. See Figure 18 www.yeastar.com Page 18 BizPBX Server User Manual 5.4 Install Skype Cables Enable Install Skype Cables and click Next to continue. Figure 5-9 The following window maybe will appear during the system installation. Click Continue Anyway Figure 5-10 www.yeastar.com Page 19 BizPBX Server User Manual 5.5 Finish Config Wizard Choose the country where you are, and the saving path of sound file. Suggest you to not change the default of flash time settings. Figure 5-11 BizPBX system configuration is complete! www.yeastar.com Page 20 BizPBX Server User Manual 6. Running BizPBX Software Step 1 Double-click the shortcut on desk to run the software Figure 6-1 Step 2 Another program wants to use Skype screen will come up. Enable Allow this program to use Skype, and click Ok to save. Figure 6-2 Step 3 Check if the status of all ports and Skype are absolutely normal www.yeastar.com Page 21 BizPBX Server User Manual Figure 6-3 www.yeastar.com Page 22 BizPBX Server User Manual 7. Managing BizPBX Software 7.1 Open BizPBX Homepage Double-click the shortcut ‘BizPBX Management’ on desk to run the software. Figure 7-1 Or you can open the IE browser and enter in: http://127.0.0.1:8080 If you are not operating in BizPBX Server, please open the 8080 port of BizPBX Server through IE browser. For example, if the IP address of BizPBX Server is 192.168.0.101,then you can type in http://192.168.0.101:8080 7.2 Administrator Logging in Open the BizPBX user login page. Input your username and password to gain access. Use the default administrator username ‘admin’ and the default password ‘password’ to login. www.yeastar.com Page 23 BizPBX Server User Manual Figure 7-2 If the next page is abnormal after you login, that mainly because of the safety setting of IE browser. Click here link on this page and follow the guides to restore the normal page. www.yeastar.com Page 24 BizPBX Server User Manual 7.3 Status and Management 7.3.1 Line Status Figure 7-3 Description of all BizPBX items Extensions: SIP Extension: SIP Phone Status: 1) : Phone is unregistered. 2) : Phone is idle. 3) : Phone is in service. www.yeastar.com Page 25 BizPBX Server User Manual Client Status: 1) : Offline. 2) : Online. FXS Extension: Analog Phone Status 1) : Doesn’t connect to analog phone/ Port is not available. 2) : Phone is idle. 3) : Phone is in service. Client Status: 1) : Offline. 2) : Online. Trunk: SIP Trunk: 1) : Red— indicates failed initialization. Trunk registration failed. 2) : Blue— indicates succeeded initialization.Trunk is idle. 3) : Green—indicates succeeded initialization. Trunk is in service. FXO Trunk: 1) : Red— indicates failed initialization.FXO port hasn’t connected with PSTN line. 2) : Blue— indicates succeeded initialization.Trunk is idle. 3) : Green—indicates succeeded initialization. Trunk is in service. Skype Trunk: 1) : indicates failed initialization. Skype is error. 2) : indicates succeeded initialization. Trunk is idle. www.yeastar.com Page 26 BizPBX Server User Manual 3) : indicates succeeded initialization. Trunk is in service. E1/T1 Trunk: 1) : Red— indicates failed initialization. 2) : Blue— indicates succeeded initialization. Trunk is idle. 3) : Green—indicates succeeded initialization. Trunk is in service. 7.4 General Settings 7.4.1 Extension Extension has two kinds: PSTN(FXS)and SIP Extension Figure 7-4 www.yeastar.com Page 27 BizPBX Server User Manual 7.4.1.1 PSTN(FXS)Extension 1. Add PSTN(FXS)Extension PSTN Exetension is configured through Serve’s Config.Wizard, it needs the Yeastar’s TDM800 hardware card support. It’s impossible to add PSTN Extension directly on homepage, but you can plug the TDM800 card with FXS modules, through this way you can get more PSTN extensions after finishing the ‘Config.Wizard’. The newly generated PSTN (FXS) Extension will be showed as ‘Undefined’ and status is ‘Error’; the extension can’t be used until you configure it. Please refer to ‘Edit PSTN (FXS) Extension’. 2. Edit PSTN(FXS)Extension You should fill in the following blacks: 1.Extension Info ·Account – Extension number ·Password User can login the BizPBX Client on this account. 2.User Profile ·Name – User Name/ Nickname ·Group – group contacts on Client ·Skype ID ·Family Telephone Number ·Mobile Phone Number 3.Call Forwarding The way of call forwarding. Here, administrator can set up the call transferring mode for extensions. 4.Administration Authority Admin can distribute the authority to extensions. Note: Here the authority means the administration right of BizPBX Client, such as surveillance, monitoring and automatic recording. When administrator distributes the right to an extension user and enables the advaced functions in ‘Advanced Modules’, this extension user will be able to monitor other extensions when logged on to Client. www.yeastar.com Page 28 BizPBX Server User Manual Figure 7-5 7.4.1.2 SIP Extension 1. Add SIP Extension You should fill in the following blacks: 1.Extension Info ·Account – Extension number (SIP number) ·Password User can login the BizPBX Client on this account. 2.User Profile ·Name – User Name/ Nickname ·Group – group contacts on Client ·Skype ID ·Family Telephone Number ·Mobile Phone Number 3.Call Forwarding www.yeastar.com Page 29 BizPBX Server User Manual The way of call forwarding. Here, administrator can set up the call transferring mode for extensions. 4.Administration Authority Admin can distribute the authority to extensions. Note: Here the authority means the administration right of BizPBX Client, such as surveillance, monitoring and automatic recording. When administrator distributes the right to an extension user and enables the advaced functions in ‘Advanced Modules’, this extension user will be able to monitor other extensions when logged on to Client. Figure 7-6 2. Remove SIP Extension Click the extension that you want to remove, and click ‘Delete Extension’ key. www.yeastar.com Page 30 BizPBX Server User Manual 7.4.2 Trunk It has three kinds of trunk, they are PSTN(FXO),Skype and SIP trunks. Figure 7-7 7.4.2.1 PSTN(FXO)Trunk PSTN trunk is configured by Server Client’s Config.Wizard, it needs the TDM800 hardware card support. Add PSTN(FXO)Trunk It’s impossible to add PSTN trunk directly on homepage, but you can plug the TDM800 card with FXO modules, through this way you can get more PSTN trunks after finishing the ‘Config.Wizard’. The trunk can be available when you plug PSTN line into the FXO port on the TDM800 card. 7.4.2.2 Skype Trunk Skype trunk is configured by Server Client’s Config.Wizard. www.yeastar.com Page 31 BizPBX Server User Manual Add Skype Trunk It’s impossible to add Skype trunk directly on homepage, but you can get more Skype trunks through running ‘Config Wizard’. Please refer to 5.2 and 5.3 ·Trunk Name: the number connected with this trunk, just use as a marker. ·Activation: Whether or not enable this Skype trunk ·Skype Name: account of this Skype ·Skype Password: password of Skype account ·Busy Transfer: When the port is busy in service, it can transfer the following incoming calls to other idel trunks 1) If you enable ‘No Transfer’, system will hang up the call. 2) If you enable ‘Transfer to Any idle Trunk’, call will be transferred to next idle trunk. 3) If you enable ‘To Customized Skype ID’, the ID can be either a one in this server or not. Figure 7-8 www.yeastar.com Page 32 BizPBX Server User Manual 7.4.2.3 SIP Trunk 1. Add SIP Trunk SIP trunk can not work until you fill in the SIP information correctly; you can ask VOIP Provider about details. Figure 7-9 2. Remove SIP Trunk Click the extension that you want to remove, and click ‘Delete Extension’ key. 7.4.2.4 E1/T1 Trunk 1. Add E1/T1 Trunk Note: E1/T1 trunk is configured by Server Client’s Config Wizard, it needs the E1/T1 hardware card support. It’s impossible to add E1/T1 trunk directly on homepage, but you can plug the YE110 card, through this way you can get the E1/T1 trunks after finishing the www.yeastar.com Page 33 BizPBX Server User Manual ‘Config Wizard’. 2. E1/T1 Setting Please see General Settings 3. Manage E1/T1 Trunk’s DID When configured E1/T1 on YE110 card, user is able to manage the DID of E1/T1 card. Please refer to the appendix E Manage E1/T1 DID 7.4.3 Outbound Routes Outbound routing mainly works for gudies outgoing calls to go through trunks. 7.4.3.1. Buildup Outbound Routes 1)Click ‘Add Outboud Route’ and fill in the name of outbound route. 2)Dedicate routings for different type of calls. On ‘Apply this rule to’ , please fill in the following blacks: · Calls to Numbers starting with - To allow all those outgoing call numbers begin by this prefix number to use this outbound route. For example, if set this prefix as 9, then all the telephone numbers that begin by 9 will call out through this routing. ·Calls from Extension(s)– Extensions allowed to use this routing. ·Auto attendant of outgoing calls – the auto attendant that allowed to use this routing. When someone makes incoming call to this auto attendant, he can dial telephone number to call out directly through this routing specially allowed auto attendant. 3)Appoint a calling way for outgoing calls ‘Make outbound calls on’,you can choose the type of trunk 1、All trunks 2、All SIP trunks 3、All PSTN trunks 4、All Skype trunks 5、All E1/T1 trunks 6、Customized– User can appoint other type of trunk 4)Other Deleted Prefix Count: If you set the number is 1, when you dial number 91234567, system will delete the first number 9, and the real dialing out number would be 1234567; if you set the number is 2, system will delete the 91, and the real dialing out number would be 234567. www.yeastar.com Page 34 BizPBX Server User Manual Direct-Out number: If you set a number here, all the outging calls thourgh this route will guide to this number directly. It usually use for multi-branch connection. Figure 7-10 7.4.3.2. Remove Route Click on the route and then click ‘Delete Selected route’. www.yeastar.com Page 35 BizPBX Server User Manual 7.5 Inboud Call Control 7.5.1 Auto Attendant The auto attendant plays: Welcome to xxx Company. For product information, please press 1; For technical support, please press 2; For help press 0 or dial extension number directly. Figure 7-11 7.5.1.1 Setup Auto Attendant Click ‘Add Auto Attendant’ 1)Name (Virtual Extension Number) 2)Click ‘View’ to choose the voice file you want to upload. This file will copy to BizPBX system \prompts\MusicOnHold catalog. Please refer to Appendix A 3)Whether to enable ‘Direct Dial to Extension Number’ or not If disable it, user has no right to call extensions directly except press the number (DTMF) on IVR. www.yeastar.com Page 36 BizPBX Server User Manual If enable it, user is able to call extension directly as well as pressing the keys provided by IVR (DTMF). 4)Enable or disable ‘Direct dial to outline number’ If you diabled the function, when someone calls in and dial the out-line number directly after hearing the prompt sound, system will prompt call error. If you enabled the function, when someone calls in and dial the out-line number directly after hearing the prompt sound, system will selete the corresponding outbound routing to call out. Note: Out-line number refers the telephone number or mobile phone number. 5)Make IVR on Menu Choose the action for corresponding key. You have three options here, Extension, IVR or Ring Group. Figure 7-12 7.5.1.2 Remove IVR Select the item you’d like to remove and click ‘Delete Selected’ key. www.yeastar.com Page 37 BizPBX Server User Manual 7.5.2 Ring Groups Figure 7-13 7.5.2.1 Create Ring Group 1)Click ‘Add Ring Group’ 2)Input the required informations: Group Name: It’s a virtual extension number that different from real extension number. Please distribute a number for this group. Ring Strategy: You have two options. ·Hunt — it rings from the first extension to the next, one by one ·Ring all — all extensions on the group will ring at the same time Ring time: the duration of ringing. Music on hold: You can DIY the file. Please refer to Appendix A. 4)Ring Group Members Click ‘>’ to move the selected extension into Members. Click ‘>>’ to move all extensions. You can have priority of them by Top, Up, Down or Bottom. 5)Destination of no answer www.yeastar.com Page 38 BizPBX Server User Manual If none of the group members to answer the call, you can handle it by various ways, such as end the call directly, transfer to Extension, transfer to IVR or transfer to another group. Figure 7-14 7.5.2.2 Remove Ring Group Delete the selected group. www.yeastar.com Page 39 BizPBX Server User Manual 7.5.3 Queues Call queues allow calls to be sequenced to one or more agents. · Queue Name (Virtual Extension number): This option defines the numbered extension that may be dialed to reach this Queue. · Ring Strategy: This option sets the Ringing Strategy for this Queue. The options are 1) RingAll: Ring All available Agents simultaneously until one answers. 2) Hunt: Take turns ringing each available Agent. 3) FewestCalls: Ring the Agent with the fewest completed calls. 4) Random: Ring a Random Agent. 5) RRmemory: RoundRobin with Memory, Remembers where it left off in the last ring pass. 6) ShortestTime: Ring the Agent which was least recently called · Max Wait Time: The maximum number of seconds a caller can wait in a queue before being pulled out. · Music on hold: Music (or Commercial) played to the caller while they wait in line for an available agent. · Queues Agents: This selection shows all Users, Choose a User here makes them a member of the current Queue. · Destination if timeout: 1) End Call 2) Extension 3) IVR 4) Ring Group 5) Queues · Announcements Is Announce:. Enabling this option causes BizPBX to report to the Agent, the hold time of the caller before the caller is connected to the Agent. Frequency: How often to announce queue position and estimated holdtime (0 to Disable Announcements) Custom Announcements Prompt: For example: "Hi, you have entered the service queue, you are the n waiting person now." If the user wants to record this voice, as the number n is a random change (the system will automatically replace), so we have to split it into 3. Voice 1: Type: Sound; File: upload a custom file (audio content: Hi, you have entered the service queue, you are); Order: 1 Voice 2: Type: Number; Order: 2 www.yeastar.com Page 40 BizPBX Server User Manual Voice 3: Type: Sound; file: upload a custom file (audio content: a wait person); Order: 3 · Other Options Retry: The number of seconds we wait before trying all the phones again. Wrap-Up-Time: How many seconds after the completion of a call an Agent will have before the Queue can ring them with a new call. The default is 0, which is no delay. Least Members: limit the number of members, when members of the queue is less than the limit value, the member will not quit. IVR Break Out Menu: You can optionally present an existing IVR as a ‘break out’ menu. This is IVR must only contain single-digit ‘dialed options’. The recording set for the IVR will be played. Join Announcement: When members join the queue, this tone will be played. Quit Announcement: When members quit the queue, this tone will be played. Enable Custom Prompt: If enable custom prompt, it will play this prompt after the IVR break out menu prompt. Note: Order of pleay queue prompt. 1) Play “Music on hold” 2) If Queue is busy, and enable Announcement, it will play “Custom Announcement Prompt”. 3) And then it will play “IVR Break Out Menu” prompt. 4) If enable custom prompt, it will be played in the end. www.yeastar.com Page 41 BizPBX Server User Manual Figure 7-15 7.5.4 Inbound Routes Inbound routing mainly works for gudies incoming calls to reach destination extension within the business hours or out of working hours. www.yeastar.com Page 42 BizPBX Server User Manual Figure 7-16 7.5.3.1 Buildup Inbound Routes 1)Click ‘Add Inboud Route’ and fill in the name of inbound route. 2)Dedicate routings for different type of calls. Please input the number length on ‘Callin number length’ ·Caller ID Number (DID/DDI number/mask) Note:If empty caller ID number, it would be suitable for all incoming calls, and "00*" suitable for the calls that begin with 00. You can enter multiple numbers here and separate them by semi-com. 3)Appoint the source for incoming calls 1、All trunks 2、All SIP trunks 3、All PSTN trunks 4、All Skype trunks 5、All E1/T1 trunks 6、Customized www.yeastar.com Page 43 BizPBX Server User Manual 4)Route calls during office hours to You can choose the options for aswer incoming calls during office hours. 5)Route call outside office hours to You can choose the options for aswer incoming calls during offwork time. Figure 7-17 7.5.3.2 Remove Route Click on the route and then click ‘Delete Selected route’. 7.5.4 DISA DISA (Direct Inward System Access) allows someone calling in from outside the telephone switch (PBX) to obtain an ‘internal’ system dial tone and make calls as www.yeastar.com Page 44 BizPBX Server User Manual if they were using one of the extensions attached to the telephone switch. To use DISA, a user calls a DISA number, which invokes the DISA application. The DISA application in turn requires the user to enter his extension number and extension password. If the extension number and password is correct, the user will hear dial tone on which a call may be placed. Obviously, this type of access has serious security implications, and great care must be taken not to compromise your security. Note: if you enable the User’s contact information verification, User use his contact information (mobile phone,home phone,skypeID) call in to the DISA, system will autoverify, if the information is correct, user will hear dial tone which a call may be palced. Figure 7-18 7.5.4.1 Create DISA To add a new DISA application, click the New DISA button. 1) General ·Name www.yeastar.com Page 45 BizPBX Server User Manual Give this DISA application a name to help you identify it. ·User’s contact information (mobile, home phone, skypeID) verification If enable the User’s contact information verification, User use his contact information (mobile phone,home phone,skypeID) call in to the DISA, system will autoverify, if the information is correct, user will hear dial tone which a call may be palced. ·Comment Give this DISA a comment to help you identify it. Figure 7-19 7.5.4.2 Remove DISA Click on the DISA and then click ‘Delete Selected’. 7.5.5 Blacklist Blacklist can forbid bootie calls. www.yeastar.com Page 46 BizPBX Server User Manual 7.5.5.1 Add Blacklist 1)Click ‘Add Blacklist’ . 2)Input the annoying number or SkypeID on the item ‘Number’ to forbid all the incoming calls from this number or ID. Figure 7-20 7.5.5.2 Remove Blacklist Selected the item and then click ‘Delete Blacklist’ key. www.yeastar.com Page 47 BizPBX Server User Manual 7.6 System Settings 7.6.1 Gnereal Settings 1. Country Select the country to match with the country’s tone cadence. 2. Port Configuration SIP port and RTP port are dedicated for SIP usage, please don’t modify them. 3. Codec The default codecs are G.711 U-Law Codec,G.711 A-Law Codec and GSM 6.10 Codec. BizPBX also compatible with G.729 Codec and G.7231 Codec Notes: please make sure you have got the license of G.729 and G.7231 before using them. 4. STUN Server Settings Enable STUN Server for extensions. 5. Extend Card Settings 1) Caller ID Type This option allows you to define the start of a Caller ID signal: After Ring: Start after a ring is received. Before Ring: Start before a ring is received. NTT-Japan: this is for Japan, Start when a polarity reversal is started. 2) Speaker Volume: set the speaker volume for the extend card. 3) Microphone Volume: set the microphone volume for the extend card. 4) NTT-Japan 6. E1/T1 Settings 1) E1/T1 Switch Type: Unknown,NI-1、NI-2,DMS 100,Lucent 5E, AT&T 4ESS,EuroISDN E1,EuroISDN T1,GR-303 EOC,GR-303 TMC,QSIG. 2) E1/T1 Node Type: pri_cpe or pri_net 3) E1/T1 DTMF Type: inband or pri_info 4) E1/T1 Codec Type: A_Law or U_Law 5) E1/T1 CallerID: when extension make call via E1/T1 Trunk, callee will display this caller id. 7. Timeout Settings 1)Waiting time to dial first number(DTMF) 2)Interval time on dailing(DTMF): 3)Incoming call timeout: 4)Outgoing call timeout: 5)Call on hold timeout: 6)Voicemail timeout:When the max. voicemail duration exceeded, call will be hang up. 。 www.yeastar.com Page 48 BizPBX Server User Manual 8. Flash Time Setting Flash Time 9. File saves Path 1)Voicemail save path If you empty it, file will be saved on sounddata folder under program path 2)E-Mail attachment save path If you empty it, file will be saved on attachments folder under program path Note:Save path must be on Server port. (format:C:\BizPBX) 10. Others: 1)Keep call history 2)keep voicemail for 3)Keep recordings for 4)Keep auto-records for You have options ‘Not Save’, ‘Save a moth’, ‘Save 3 months’, ‘Save 6 months and ’Save forever’ Figure 7-21 www.yeastar.com Page 49 BizPBX Server User Manual 7.6.2 System Prompts 1)Dial Tone 2)Ring Back Tone: Caller hears this sound after get through. 3)Music on Hold: Caller hears this music when the call is hold. 4)Transfer to voicemail: Prompt the caller that the call will be transferred to voicemail. 5)Call Transfer failed: Prompt the caller that the call transferred failed. 6)Call failed: Prompt the caller that the call failed. 7)Call Busy: Prompt the caller that callee is busy now. 8)Invalid key in IVR: Prompt the caller that the key pressed is invalid. 9)Finish listening voicemail: Play this sound to prompt caller when over listening voicemail 10)Skype Extension incoming call When there’s a incoming call come from the Skype Extension, BizPBX will play this Prompt and guide the caller to make call. 11) Extension no answer. 12) Prompt sound for entering extension number after DISA. 13) Prompt sound for entering authentication code after DISA. 14) Prompt sound for authentication error after DISA. 15) The dial tone that will be played after entered DISA. 16) Prompt sound for dial error after entered DISA. 17) A total number of voice mails. 18) Number of new voice mail. www.yeastar.com Page 50 BizPBX Server User Manual Figure 7-22 7.6.3 Time Conditions You can setup the business hours here. www.yeastar.com Page 51 BizPBX Server User Manual Figure 7-23 7.6.4 Feature Codecs 1)Park current call Default setting is“**1” You can press **1 on telephone to hold this call 2)Pick up call from appointed extension Default setting is“*70” When Ext.502 is ringing, you can press *70502 on Ext.501 to answer the call. 3)Pick up call from any extension Default setting is“*71” When Ext. 501,502,……505 are ringing, you can press *71 to answer 4)Transfer call Default setting is“**2” When Ext. 501 and 502 are busy, you can transfer the incoming call to Ext.503 by press **2503 5)Invite to conference www.yeastar.com Page 52 BizPBX Server User Manual Default setting is“**3” If Ext.501 wants to invite Ext. 503 into conference, he can press **3503 6)Monitor call from appointed extension Default setting is“*72” If Ext.501 wants to monitor Ext. 503, he can press *72503 7)Monitor/Pickup call from appointed extension Default setting is“*73” When 502 is in conversation or ringing, Ext.501 can press *73502 to Monitor or Pickup the call. Note: this function can compatible with Yealink’s T28 IP Phone. 8)Push-To-Talk(PTT) Default setting is“*74” When Ext. 501 press *74502, Ext. 502 will answer the call automatically. Note: this function can compatible with Yealink’s T28 IP Phone. 9)Start Recroding Default setting is“**4” When Ext. 501 and 502 are in conversation, he can press **4 to record 10)Stop Recording Default setting is“**5” Press **5 to stop the recording 11)Listen to voicemail Default setting is“*75” Press *75 to listen to voicemail 12)Pick up current voicemail call Default setting is“*76” When someone is leaving a voice mail to Ext.501, Ext.501 can press *76 to answer the call 13)Play previous voicemail Default setting is“4” 14)Repeat current voicemail Default setting is“5” 15)Play next voicemail Default setting is“6” 16)Delete current voicemail Default setting is“7” 17)Receive FAX Default setting is“**0” When someone send FAX to Ext.501, he can press **0 to receive 18)Send FAX to appointed extension Default setting is“*77” When someone want to send FAX to Ext.501, he can press *77501. www.yeastar.com Page 53 BizPBX Server User Manual Figure 7-24 7.6.5 Dial Rule www.yeastar.com Page 54 BizPBX Server User Manual Making calls through Skype, one have to conform to the Skype dialing scheme as well as calling through PSTN. Maybe you had already got used to PSTN scheme and not accustomed to Skype rules. Therefore, Dial Rule settings will assist you to make Skype calls based on traditional PSTN calling habits. Keep the dialing habit as same as PSTN. For example, a PSTN user in the mainland of China wants to make an international call IDDD (international direct distance dialing), which format is 00+country code+area code+telephone number; make a domestic call DDD (domestic distance dialing), which format is 0+area code+telephone number; While the SkypeOut format, no matter of domestical or international calls, is 00+country code+area code+ telephone number. An International call: 1) A Chinese user calls to Canada in traditional PSTN format: the country code is 1, the area code is 416, phone number is “12345678”, then he would dial: 00 +1+ 416 + 12345678; 2) A Chinese user calls to Canada in SkypeOut format: the country code is 1, the area code is 416, phone number is “12345678”, then he would dial: 00 +1+ 416 + 12345678; In this example, the PSTN and SkypeOur format for an international call is the same. A Domestic Distance call: 3) A Chinese user in Paking calls to Shenzhen in traditional PSTN format: the area code is “755”, phone number is “12345678”, then he would dial: 0+755+12345678; 4) A Chinese user in Paking calls to Shenzhen in SkypeOut format: the area code is “755”, phone number is “7571234”, then he would dial: 00+86 (country code)+755+12345678; In order to not change the PSTN dialing format, this user can take advantage of the Dial Rule to place 0086 with 0, as shown on Figure 49 When the number begins by 00, BizPBX will identify it as international call requirement. When the dialing call begins by 0, BizPBX will identify the 0 as domestic call requirement and transfer it to 0086 automatically to conform SkypeOut format. Why we substitute 00 for 00? Say it simply, to prevent 00 matches with 0. Because both the international and domestic calls are begin by 0, for fear of replacing 00141612345678 with 00860141612345678, substitution rules priority are listed basipetally. Dialing number will search the suitable rule from the beginning. www.yeastar.com Page 55 BizPBX Server User Manual Figure 7-25 Although the Dial Rule Configuration seems a little complicated, you will find its powerful functions if you can well understand its usages. 7.6.6 Public Speed-dial www.yeastar.com Page 56 BizPBX Server User Manual Admin can maintain the public Speed-dial. Figure 7-26 7.6.6.1 Add public Speed-dial 1)Click ‘Add Speed-dial’ into manage page. 2)You must enter the ‘ Dial number’ and ‘Skype Account/telephone number’, the rest are options. Note: If you want to enter a telephone number, please abide to the SkypeOut required format, 00+ country number + city number + telephone number or 00+ coutry number + mobile phone number 7.6.6.2 Delete public Speed-dial Choose the item and click ‘Delete this item’. www.yeastar.com Page 57 BizPBX Server User Manual 7.6.7 Advanced Module Settings Administrator can enable the advanced functions of BizPBX that includes automatic recording, desktop monitor and short message service. Just log on BizPBX Client with the authorized extension number, advanced functions are available. Please refer to chapter 7.4.1 Figure 7-27 7.6.8 Backing up & Restore www.yeastar.com Page 58 BizPBX Server User Manual As an administrator, you can backup database shown on Figure 46. Click ‘Back Up’ butoon and choose a destination to save the file. The Restore option will restore your data to the existing database. Select the type of data you want to restore and click Browse to choose the location of the backup file to load, and then click RESTORE. The data is restored to the database. Figure 7-28 7.6.9 Administrator You can change the password here. www.yeastar.com Page 59 BizPBX Server User Manual 7.7 Reports 7.7.1 FAX Logs FAX Log captures all call details: Date, Extension, Number, Type, Status and so on. For administrator’s convenience, admin can search information by calling time, call type and call duration and export them into CSV file. Figure 7-29 www.yeastar.com Page 60 BizPBX Server User Manual 7.7.2 Call Logs Call Log captures all call details: calling time, caller number, callee number, call type, call duration and so on. For administrator’s convenience, admin can search information by calling time, call type and call duration and export them into CSV file. Figure 7-30 www.yeastar.com Page 61 BizPBX Server User Manual 7.7.3 Server Status Administrator can monitor the server performance through staturs. Figure 7-31 www.yeastar.com Page 62 BizPBX Server User Manual 8. Using BizPBX Make three examples for the below typical applications: Usage of making outging call Usage of answering incoming call Website Click-to-Call (SkypeMe) and receving SkypeIn calls All the telephone numbers are overed by “#” in order to quick up the callout, which is not necessary. FXO port of TDM800 card should connect with PSTN line, FXS port of TDM800 card should connect with analog regular phone. For example, BizPBX has SIP Extension 501 and 502, analog Extension 601 and 602, Skype Trunk OutSkype 1 and OutSkype2; SIP Trunk OutSIP1 and OutSIP2; PSTN Trunk OutPSTN1 and OutPSTN2. Out Out Skype1 SIP1 Out Out PSTN 1 Out SIP2 Skype2 Skype Trunk Out PSTN2 SIP Trunk PSTN Trunk BizPBX SIP Extension Analog Extension Ext. No. Ext. No. Ext. No. Ext. No. 501 502 601 602 8.1 Usage of Making Outging Call 8.1.1 Call Out through Skype Trunk www.yeastar.com Page 63 BizPBX Server User Manual Out Skype1 Skype Trunk Port Out Access Code“81” Skype2 Skype Trunk SIP Trunk PSTN Trunk BizPBX SIP Extension Analog Extension Ext. No. Ext. No. Ext. No. Ext. No. 501 502 601 602 On the above demonstrated environment: Suppose the settings of outbound routes are as below: Route Name:81 Apply this rule to: Calls from extension(s)——All Extensions Make outbound calls on: Trunk Sequence—— All Skype trunks Other: Deleted Prefix Count——2 Making calls through SkypeOut: For example: 1) If a Chinese user (User of Ext. 501) wants to make an international call to Canada through SkypeOut, the number is 001-416-12345678, he can dial: 8100141612345678#; 2) If a Chinese user (User of Ext. 501) wants to make a domestic long distance to Shenzhen through SkypeOut, the number is 755-12345678, suppose he had already setup the Dial Rule as Figure 51 ( 0 substitiute for 0086): He can dial 81-0-755-12345678# Here, system will delete the two digits of prefix 81 before sending the signal to Skype. www.yeastar.com Page 64 BizPBX Server User Manual Figure 8-1 www.yeastar.com Page 65 BizPBX Server User Manual 8.1.2 Call Out through SIP Trunk Out SIP1 SIP Trunk Port Access Code“85” Out SIP2 Skype Trunk SIP Trunk PSTN Trunk BizPBX SIP Extension Analog Extension Ext. No. Ext. No. Ext. No. Ext. No. 501 502 601 602 On the above demonstrated environment: Suppose the settings of outbound routes are as below: Route Name:85 Apply this rule to: Calls from extension(s)——All Extensions Make outbound calls on: Trunk Sequence—— All SIP trunks Other: Deleted Prefix Count——2 Making calls through SIP: For example: 1) If a Chinese user (User of Ext. 501) wants to make an international call through SIP, the number is 001-416-12345678, he can dial: 8500141612345678#; 2) If a Chinese user (User of Ext. 501) wants to make a domestic long distance call through SIP, the number is 755-12345678, suppose he had already setup the Dial Rule as Figure 51 ( 0 substitiute for 0086): He can dial 85-0-755-12345678# Here, system will delete the two digits of prefix 85 before sending the signal to SIP. Note: The example here, Chinese SIP Provider requires to add country code 0086 before normal numbers. Different SIP providers in different countries have different definitions. www.yeastar.com Page 66 BizPBX Server User Manual 8.1.3 Call Out through PSTN (FXO) Trunk Out PSTN Trunk Port Access Code“9” PSTN1 Out PSTN2 Skype Trunk SIP Trunk PSTN Trunk BizPBX SIP Extension Analog Extension Ext. No. Ext. No. Ext. No. Ext. No. 501 502 601 602 On the above demonstrated environment: Suppose the settings of outbound routes are as below: Route Name:9 Apply this rule to: Calls from extension(s)——All Extensions Make outbound calls on: Trunk Sequence—— All PSTN trunks Other: Deleted Prefix Count——1 For example: 1) If a Chinese user (User of Ext. 501) wants to make an international call through PTSN, the number is 001-416-12345678, he can dial: 900141612345678#; 2) If a Chinese user (User of Ext. 501) wants to make a domestic long distance call through PSTN, the number is 755-12345678; he can dial 9-0-755-12345678# Here, system will delete the one digit of prefix 9 before sending the signal to PSTN. www.yeastar.com Page 67 BizPBX Server User Manual 8.2 Usage of Answering Incoming Call 8.2.1 Inbound Out Out Skype1 SIP1 Out Out PSTN 1 Out SIP2 Skype2 Skype Trunk Out PSTN2 SIP Trunk PSTN Trunk BizPBX SIP Extension Analog Extension Ext. No. Ext. No. Ext. No. Ext. No. 501 502 601 602 On the above demonstrated environment: Suppose the settings of inbound routes are as below: Route Name: All Source:Trunk Sequence——All Trunks Route calls during office hours to: Destination——IVR 7777 Route calls outside office hours to: Destination——End Call For example: All the incoming calls during the office hours will be answered by IVR 7777 and then forwarded to corresponding extension according to the transferring list. And system will end the calls directly if outside of working hours. www.yeastar.com Page 68 BizPBX Server User Manual 8.3 Usages of Website Click-to Call (SkypeMe) & SkypeIn Using BizPBX, you can make a Company Skype ID through two ways: apply an ID and public it on website directly as shown on figure 52, or apply an SkypeIn number as Company Skype ID, and then clients can make call to company through web directly and multiple concurrent calls are acceptable. 8.3.1 Showing Company Skype ID as SkypeMe on Website It allows visitors to call the company directly through SkypeMe button. Figure 8-2 Step 1: Allow online status to be shown on the website Log in Skype on Company Skype ID (Skype1) Click ‘Tools’ ‘Options’ on menu, as Figure 53 Click on checkbox ‘Allow my status to be shown on web’ as Figure 54 Save settings Step 2: Public SkypeMe button on the website Please add the following html code on the relevant position of the web: <a href="skype: Skype1?call"><img src="http://mystatus.skype.com/smallclassic/Skype1 " style="border: none;" width="114" height="20" alt="My status" /></a> Here Skype1 stands for your Company Skype ID. Step 3: Company Skype ID is complete. You are now ready to receive calls from website. www.yeastar.com Page 69 BizPBX Server User Manual Figure 8-3 Figure 8-4 www.yeastar.com Page 70 BizPBX Server User Manual 9. Uninstalling BizPBX Software Uninstalling BizPBX Software will delete all your data, including phonebook, call log and recorded voice prompt recordings on this PC. Before you uninstall BizPBX, make sure you have backed up the necessary data. Method 1: 1. Go to the Window’s Start menu and open BizPBX Uninstall, click Yes on the pop-up confirmation window ‘Do you want to uninstall BizPBX’. 2. The next prompt window will guide you to Close the current running BizPBX program first. Choose ‘Stop’ to abandon uninstallation; ‘Cancel’ to continue the uninstallation program. 3. The Uninstallation process will delete the BizPBX files from your computer. When the uninstallation process is complete, the Uninstall Finished screen will pop up. Click Finish button. Method 2: 1. Go to the Window’s Start menu and open the Control Panel. 2. Go to the Add or Remove Programs, which will open a new window with a list of software programs installed on the computer. Scroll down to BizPBX and click Change/Remove button. www.yeastar.com Page 71 BizPBX Server User Manual 10. Installing TDM800 Card In order to use traditional telecom PSTN line and connect with analog phone, users need to install Yeastar’s TDM800 PCI card into BizPBX server computer. Steps: 1.Power down the PC 2.Unplug the PC from its main AC power supply 3.Plug the hard disk power supply cable to power jack of TDM800 card for FXS port power supply. 4.Fix the TDM800 card and make sure it stays in good contact with PCI slot. 5.Connection: FXS port connects to regular phone; FXO port connects to PSTN line. Figure 10-1 TDM800 can install 4 modules of S2 (FXS) and/or O2 (FXO) , each one with 2 ports. www.yeastar.com Page 72 BizPBX Server User Manual Red light: it stands for the FXO port. Green light: it stands for the FXS port. 6.Power on the PC That’s all for installation hardware card TDM800. How to confirm the card is installed successfully? When continue to section 6 ‘Run BizPBX Config. Wizard’, you will see the lighted LED on TDM800 card. If the Wizard reads all the configurations of card correctly, it indicates the success of installation. Or else, please check if the PCI slot is in good contact. If you are unable to clear of trouble, contact your reseller. www.yeastar.com Page 73 BizPBX Server User Manual Appendix A Customizing WAV Format (Auto Attendant) Here, users can customize a WAV file through Windows accessories recorder, or through other software to finish the format, like CoolEdit. (WAV Format: 8,000 kHz,4 Bit, Mono 3KB/sec) Step: Start menuProgramAttachment Entertainment Recorder 1. Record the prompt message file Figure A-1 2. Save it As Figure A-2 3. Change the format; click the button as Figure 56 www.yeastar.com Page 74 BizPBX Server User Manual Figure A-3 4. Choose an entry on ‘Sound Selection’ Format: IMA ADPCM Attributes: 8,000 kHz,4 Bit, Mono 3KB/sec Figure A-4 5. Click ‘OK’ to save the settings and voice files. www.yeastar.com Page 75 BizPBX Server User Manual Appendix B Glossary Busy tone: Low-pitched tone interrupted sixty times per minute. This tone indicates that the called station is off-hook or busy. Dial tone: A constant high-pitched tone indicating that the system is ready to process your call. It’s essential that users listen to this tone before dialing phone numbers. DTMF(Dual Tone Multi-Frequency): DTMF is used for most call set ups between the telephone set and telephone switch. FXO(Foreigh Exchange Office ): FXO interface receives POTS Service, typically from a Central Office of the Public Switched Telephone Network FXS(Foreigh Exchange Station): FXS is the interface on a VoIP device for connecting directly to phones, faxes, and CO ports on a PBX or key telephone system. Off-hook: The handset is removed from the cradle or you are in conversation. On-hook: The handset is in the cradle. PBX(Private Branch Exchange): It is a private telephone network used within an enterprise. Users of the PBX share a certain number of outside lines for making telephone calls external to the PBX. PSTN(Public Switched Telephone Network): It is the world’s collection of interconnected Voice-oriented public telephone networks. VoIP (Voice over Internet Protocol): A category of hardware and software that enables people to use the Internet as the transmission medium for telephone calls by sending voice data in packets using IP rather than by traditional circuit transmission of the PSTN. www.yeastar.com Page 76 BizPBX Server User Manual Appendix C Country/Region List BizPBX supports the following countries’ and regions’ telecommunication parameters: ARGENTINA AUSTRALIA AUSTRIA BAHRAIN BELGIUM BRAZIL BULGARIA CANADA CHILE CHINA COLUMBIA CROATIA CYPRUS CZECH DENMARK ECUADOR EGYPT ELSALVADOR FINLAND FRANCE GERMANY GREECE GUAM HONGKONG HUNGARY ICELAND INDIA INDONESIA IRELAND ISRAEL ITALY JAPAN JORDAN KAZAKHSTAN KUWAIT LATVIA www.yeastar.com LEBANON LUXEMBOURG MACAO MALAYSIA MALTA MEXICO MOROCCO NETHERLANDS NEWZEALAND NIGERIA NORWAY OMAN PAKISTAN PERU PHILIPPINES POLAND PORTUGAL ROMANIA RUSSIA SAUDIARABIA SINGAPORE SLOVAKIA SLOVENIA SOUTHAFRICA SOUTHKOREA SPAIN SWEDEN SWITZERLAND SYRIA TAIWAN THAILAND UAE UK USA YEMEN Page 77 BizPBX Server User Manual Appendix D FAQ A. Skype Issues 1. Q: What is the bandwidth for each Skype Call? A: The bandwidth of one Skype Call depends on Internet access bandwidth and PC’s CPU performances of the both sides of the conversation. According to statistics provided by the official website of Skype, each Skype Call requires an average bandwidth of 3Kb/s-16Kb/s, please refer to http://www.skype.com/help/faq/technical.html 2. Q: What is SkypeOut? A: SkypeOut allows you to place calls to regular telephones (landlines or mobiles) all over the world for a low fee. 3. Q: What is SkypeIn? A: SkypeIn allows you to own a regular phone number. Thus your contacts can call your Skype account on a regular phone. 4. Q: Can BizPBX work with SkypeIn? A: BizPBX can work with SkypeIn, especially SkypeIn in some areas can support concurrent multiple incoming calls. 5. Q: What is SkypeMe? A: Please refer to Figure 69. You can make a SkypeMe button on the web or email and allow visitors to view the online status so as to click the button to call the relevant Skype account. Figure D-1 6. Q: How can I set my Skype status always ‘Online’? A: You need to do nothing for it. BizPBX will set it for you automatically and Skype of all trunks will be kept ‘Online’ status always. www.yeastar.com Page 78 BizPBX Server User Manual B. BizPBX Issues 1. Q: Why the LEDs on card are still not lighted yet after I installed TDM800 driver through running BizPBX Installation Wizard? A: Firstly please make sure whether you cloned the operating system, and then check if hardware TDM800 card stays in good contact with PCI slot. 2. Q: Why the Skype can’t be started automatically when I running BizPBX Installation Wizard? A: Main reasons maybe are: 1) This PC is Domain Controller. 2) This PC has minimum password length requirement (no zero). 3) Services in the Manage and Applications, the Secondary Logon service haven’t been started. 3. Q: What is the function of the one DOS program that launches after completing the installation of BizPBX software? A: The DOS program is used for Web/SQL services. Please do not close it. 4. Q: Why can’t I make SkypeOut calls? A: Main reasons are: 1) have not purchased SkypeOut credit for the relevant trunk’s Skype ID; 2) dialed telephone numbers in error SkypeOut format, the right format is: 00+country code+ area code+ telephone number or mobile phone number If you encounter any other problems about our products, please contact us or view in the following way: http://www.yeastar.com/faq.asp www.yeastar.com Page 79 BizPBX Server User Manual Appendix E Manage E1/T1 DID After configured E1/T1 hardware card in system, there will be an interface as following: Figure E-1 As on Figure E-1, click ‘DID Manage’ to access into the next DID manage interface as Figure E-2. www.yeastar.com Page 80 BizPBX Server User Manual Figure E-2 1. Add E1/T1 DID You’re required to input following information: ·Number – Number of DID ·Begin from DID –Means the initial DID number ·Begin form Extension – Extension number for corresponding DID For Example, if users filled in following information: Number:2 Begin from DID:5503301 Begin from Extension:301 Now there are two DID numbers with two extensions: 5503301 corresponds to 301 5503302 corresponds to 302 When calling 5503301, system will auto call 301 extension; it’s the same www.yeastar.com Page 81 BizPBX Server User Manual when calling 5503302, system will auto call 302 extension Figure E-3 2. Delete DID Choose the DID item and click ‘Delete this item’. Thank you for using BizPBX. We value your comments and concerns. <Finished> www.yeastar.com Page 82