1
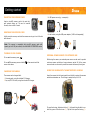
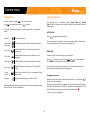
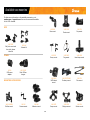
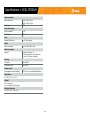
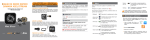
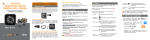
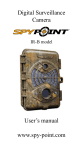
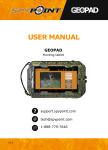
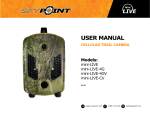
USER MANUAL ACTION CAMERA Model: XCEL STREAM v1.3 support.spypoint.com 1-888-779-7646 [email protected] ABOUT US THANK YOU FOR CHOOSING A SPYPOINT-XCEL PRODUCT. For 10 years, GG Telecom, makers of XCEL products and SPYPOINT surveillance cameras, has the mission to offer products that are easy to use, innovative, affordable and of exceptional quality. We promote family values and the involvement of our employees in all stages of development, manufacturing and product promotion. Our priority is to provide outstanding multilingual customer service. This manual will guide you through all the features of your device so that you will get optimal use out of your product. Our priority is to provide outstanding customer service. If you need support for your product, please contact the SPYPOINT-XCEL technical service or visit our website. Prosperous and respected, GG Telecom is a company that keeps abreast of new technologies and listens to its customers. Our XCEL products are constantly being developed. Our research and development team works tirelessly to offer high performance action cameras and a full range of innovative accessories that will follow you everywhere and let you capture your best moments. CONTACT 1-888-779-7646 [email protected] More than a dozen accessories are included with the XCEL camera. Just install your camera to discover a world of possibilities. xcelcam.com / spypoint.com XCEL | Show your skills JOIN THE SPYPOINT COMMUNITY facebook.com/SPYPOINT twitter.com/SPYPOINTcamera youtube.com/SPYPOINTtrailcam JOIN THE XCEL COMMUNITY facebook.com/XCELCAM vimeo.com/XCELCAM youtube.com/XCELCAM 2 Table of contents Package contents.............................................................. 4 Components...................................................................... 5 Gettings started................................................................ 7 MicroSD card....................................................................... 6 Charging the camera............................................................. 6 Attaching to XCEL mounts..................................................... 7 Camera menu.................................................................... 8 XCEL STREAM application.................................................. 9 Local................................................................................ 10 Internet............................................................................ 13 Transferring files to a computer...................................... 15 Viewing on a television.................................................... 16 Maintenance of the camera.............................................. 17 Troubleshooting.............................................................. 18 Error messages............................................................... 18 Available accessories....................................................... 19 Specifications XCEL STREAM.................................................................... 21 Regulation....................................................................... 22 Limited warranty............................................................. 23 Repair service.................................................................. 23 3 Package contents ACCESSORIES INCLUDED: 12V charger Flat adhesive mount USB cable Strap XCEL mount adaptor Slider Strap slider Lens cleaning cloth Hunting camo waterproof housing SPYPOINT stickers (3) Clear waterproof housing XCEL stickers (3) 4 Low quick release stand with safety ring Components BACK VIEW LEFT VIEW 7 8 6 5 1 2 3 4 RIGHT VIEW 1 Power button Speaker 2 Indicator 3 4 Record button 5 LCD screen 9 Lens 6 7 Microphone 8 MicroSD card slot 9 Micro-USB port 10 Micro HDMI port 10 5 Getting started INSERTING THE MICROSD CARD 3. A USB power source (e.g. a computer) Insert a microSD memory card in the card slot, gold contacts facing up. The card is inserted correctly when a click is heard. REMOVING THE MICROSD CARD 4. A wall socket, using the USB power adaptor (XHD-A sold separately) Lightly press the memory card into the camera once to pop it out of the slot and remove it. Note: The camera is compatible with microSD memory cards with capacity up to 64 GB (not included). See AVAILABLE ACCESSORIES section. TURNING ON THE CAMERA To turn on the camera, press EXTERNAL POWER SOURCE FOR EXTENDED USE . To turn off the camera, press and hold screen shuts down. While using the camera, an external power source can be used to provide continuous power and allow a longer autonomy period. All of the power sources shown can be used to power the camera continuously during use. a few seconds until the USING THE CAMERA WITH THE WATERPROOF HOUSING The camera can be charged with: Insert the camera into the housing and close it tightly to protect the camera and allow underwater use. The housing is waterproof up to 160 ft. 1. A booster pack, using the included 12V charger 2. Any car/ATV 12V outlet, using the included 12V charger 1 1 2 CHARGING THE CAMERA 3 2 6 To open the housing, slide down the lock (1) while switching the latch to unhook the groove of the front cover (2). Flip the lid to open the housing (3). Getting started ATTACHING THE CAMERA TO XCEL MOUNTS INSTALLING THE QUICK RELEASE STAND WITH SAFETY RING The XCEL mount adaptor is necessary to attach the camera and the housing to any XCEL mount. Installation With housing: Screw the XCEL mount adaptor into the hole provided in the housing. Without housing: Insert the slider in the runner located at the top of the camera*. Then, screw the XCEL mount adaptor into the hole provided in the slider. *The orientation of the image can be changed in the mobile app. Note: The XCEL mount adaptor is designed to attach securely and adequately to the anchorage system of the camera and resist to activities with impact. 7 Camera menu CAMERA MENU OPERATION MODES To enter the menu, press Use in the preview screen. to navigate the menu and The camera has 2 recording modes; Dash Cam and Action Cam. Dash Cam mode is set by default. Modes can be switched from the camera menu. to select. At the end of the menu options, the camera goes back to the preview screen. Playback ACTION CAM Press Play recorded videos to trigger and stop recording. Action Cam/ Dash Cam Switch between Action Cam and Dash Cam modes The record duration is limited to the memory space available. The camera screen displays the SD card remaining recording time. Wi-Fi local Enable/Disable Wi-Fi for wireless connection on a smartphone DASH CAM Wi-Fi cloud Enable/Disable internet cloud connection for live streaming Voice record Enable/Disable voice recording (Dash Cam mode) to trigger recording. Press then Press The camera screen displays the current date & time. Enable/Disable auto recording on 12V (Dash Cam mode) In this mode, when the memory card is full, the camera will continue to record videos by deleting the first recorded files. Action Cam Auto record Screen auto off Settings Auto REC 60 SEC OFF Continuous loop video recording in 3 min sections. Screen turns off after 60 sec. of non-operation (Dash Cam mode) to stop recording. Emergency functions Reset to default settings or format SD card Emergency recording can be triggered by car impact* or by pressing during loop video recording. When the emergency option is triggered, a 1 min video section will be separated from the loop video recording; 30 sec before the triggering and 30 sec after. In Playback, emergency videos will be identified with . Menu language and advanced settings can be set via the smartphone application (see p.11 for more information). *See p.12 for more information. 8 XCEL STREAM Application Note : During live streaming, no footage can be recorded. DOWNLOADING THE APP Before using your camera with your smartphone, install the XCEL STREAM app from Google Play Store or Apple Store. CONNECTING THE CAMERA TO THE SMARTPHONE APP 1. In the menu of the camera, enable the Wi-Fi local option. 1. Go to Google Play Store or Apple store on your smartphone or tablet. 2. Search for XCEL STREAM. 3. Tap «Install». 2. Turn on the Wi-Fi option of your smartphone and choose the network named after your camera ID (ex: R2-...) 4. Wait for the end of the installation before using your phone to control the camera or to live stream over the web. 3. Run the XCEL STREAM app. APP FUNCTION 4. Tap on the Local icon, and then select your camera. The app has two functions; Local and Internet. Ver.1.5 SPYP LOCAL The smartphone directly connects to the camera via Wi-Fi for remote control, setup, photo and live view. Local INT Internet Ver.1.5 SPYP Local INT Internet Your_camera Available Local Scanning… Scanning... Smartphone Camera INTERNET The smartphone and the camera are connected to the cloud server for live streaming. The access point can either be a wireless router, a 3G/4G mobile wireless router or a 3G/4G hot spot. will appear in the upper left corner of the camera screen. It • An arrow means the smartphone is connected to the camera. In "Local", you can only control the camera via the phone. Internet Smartphone Cloud Server Camera The quality of the streaming depends on the speed of your access point’s internet connection. 9 XCEL STREAM Application "LOCAL" VIEW 4. Starts/stops video recording. Files are saved to the camera microSD card only. Home Your_camera 5. Starts/stops video recording or takes photos. Files are saved to the smart phone only. ALBUM Allows to view and manage videos stored in the camera microSD card. 2 Home 1 3 Album 1 2 IMAG0008.mp4 00:00:38 2014/02/26 02:38:02 PM 4 IMAG0007.mp4 00:03:10 2014/02/22 11:24:50 PM 5 View Album IMAG0006.mp4 00:01:16 2014/02/20 09:11:56 PM Setup IMAG0005.mp4 00:00:50 2014/02/16 04:31:04 PM Home between the camera and the smartphone. 1. Enables voice communication IMAG0004.mp4 00:01:05 2014/02/12 12:51:18 PM 2. Changes the orientation of the image and the menus when the camera is placed upside down. 3 3. Allows viewing multiple cameras at the same time. R2-Your Camera 1 View Album Setup R2-Your camera 2 1. Manage videos taken in Action cam mode. 2. Manage videos taken in Dash cam mode. R2-Your camera 3 R2-Your camera 4 3. Select or unselect all Record Connect a camera to the "Local" app, and then click on the multiple camera icon. The mobile will detect the other cameras and they will automatically be connected. Up to 4 cameras can be added. It is possible to record a video including all of the camera views. Press Record once to start recording and press it again to stop recording. A window can be selected for single view. 10 Copy the files in the smartphone Delete selected files Close menu XCEL STREAM Application "LOCAL" 3. Allows to choose the video resolution (Full HD or Super HD). Here is a table showing the different resolutions depending on the recording type. SETUP Allows to configure the advanced settings. There are three categories of settings: Camcorder settings, Internet settings and Car DVR settings (Dash cam). Home Save Setup Camera ID 2304 X 1296 800 X 480 * 5. Resets factory settings. Confirm 6. Allows to format SD card and to attribute space for each of the modes (Action cam and Dash cam). 2013 / 01 / 01 12:34 AM 3 Resolution FHD SHD 4 Operating Sound ON ON OFF OFF 5 Factory Setting 7. Allows to choose the language of the camera menu. INTERNET SETTINGS Reset Internet Settings 6 Format 1.4 GB 7 SHD 4. Enables or disables the operating sounds of the camera. Password Date & Time 800 X 480 recorded properly. To know if it works on your mobile, record a video in that resolution and try viewing it. P2-FA006036 Camera Name Your camera 2 Recording on mobile 1920 X 1080 * If SHD resolution is not supported by the mobile, videos willl not be Camcoder Settings 1 Recording on SD card FHD Language 2.6 GB Email [email protected] AP WiFi_Wireless_02 English Allows to set an email and access point to be able to live stream in "Internet". Choose the access point that will be used to connect to the internet. CAMCORDER SETTINGS 1. The camera ID is the default camera ID. The camera name is the name the user gives to the camera to easily identify it. A password can be set but is not necessary. Note: The password is not case sensitive. 2. Synchronizes date and time with the mobile. 11 XCEL STREAM Application "LOCAL" CAR DVR SETTINGS (DASH CAM) 6. Allows to automatically record emergency videos in case of impact. These settings are available in Dash cam mode only. H: Small impacts will trigger an emergency video. L: Impacts have to be important in order to trigger an emergency video. Car DVR Settings 1 Voice Record ON ON OFF OFF 2 Power On Record ON ON OFF OFF 3 LCD Auto Off ON OFF 4 Motion Detector ON OFF 5 Delayed Shutdown ON OFF 6 G-Sensor View H Album L OFF: Emergency videos can only be triggered manually (see p.8 for more details) OFF Setup 1. Enables or disables sound recording. 2. Enables or disables auto recording on 12V. When the camera is powered by a 12V source, for example on an ATV, recording automatically starts when engine starts. 3. When this option is enabled, the screen of the camera turns off after 60 seconds of inactivity. When the screen turns of and a video is being recorded, the indicator flashes green to indicate that the camera is still recording. Note: To turn the screen on again, press one of the two camera buttons. 4. This option allows to trigger recording by movement detection. When the camera is powered by a 12V source and that the power stops, the user has to choose to activate the movement detection or to turn the camera off. If the user chooses to activate movement detection, the camera will record 60 second videos at each movement detection. 5. When the camera is powered by a 12V source and that the power stops, the user has to choose either to continue recording or to turn off the camera. By pressing "Active", the camera will continue to record until it runs out of batteries. 12 XCEL STREAM Application "INTERNET" PREPARING A DISTANT SMARTPHONE FOR RECEIVING LIVE STREAMING PREPARING THE CAMERA FOR LIVE STREAMING (CONNECTING THE CAMERA TO THE CLOUD SERVER) (CONNECTING A SMARTPHONE TO THE CLOUD SERVER) In order to view live streaming from a smartphone, the XCEL STREAM Ver.1.5 app must be installed. SPYP INT 1. With your smartphone, open the App in "Local" then click on "Setup". 1. Connect the smartphone to the internet. View Album 2. Run the XCEL STREAM app. Setup 3. Tap on the Internet icon. Under "Internet Settings", enter your Email and AP (access point). Choose the access point you will use to connect to the internet, then press save. Local Internet 4. Tap on the + icon Ver.1.5 SPYP INT Scanning… Scanning... Internet Settings Local Email [email protected] AP WiFi_Wireless_02 Internet 5. Enter the camera ID and the Scanning… Scanning... password (if applicable) of the camera from which you want to see live streaming. 2. In the menu of the camera, enable the Wi-Fi cloud option. 6. Tap on the camera ID when it is online. Ver.1.5 SPYP Home INT Add Camcorder Camcorder ID Ex: R2-29WFK59U When the Wi-Fi cloud is enabled, the menu screen of the camera displays the connection process. When it is done, the screen will switch to preview. Password Local OK Internet R2-29WFK59U Online An arrow will appear in the upper left corner of the camera screen. It means that live streaming has started. 13 XCEL STREAM Application "INTERNET" LIVE STREAMING SCREEN DISPLAY SPYP INT Home R2-29WFK59U 0 0 :0 3 :3 6 Indicates the signal strength of the camera. Indicates that the camera and the application are connected via the cloud server. If the icon does not appear, it means that the camera is connected directly to the smartphone. The countdown indicates the time remaining before the interruption of live streaming. Press this button to refresh the countdown and continue live streaming. 14 Transferring files to a computer TRANSFERRING FILES TO A COMPUTER Allows to transfer or to view videos using a computer. 1. Connecting the camera to a computer using the USB cable included. USB 2. 3. 4. 5. The computer will detect the camera and install the driver automatically. Click on "My Computer" and select "Removable Disk". Then click on "DCIM" and "100MEDIA" to find all recorded videos. Drag or save the files to the desired location. Taking the memory card out of the camera and inserting it into the computer slot will achieve the same results (a microSD adaptor may be required). Note: Videos in .MP4 format require the use of a compatible video player software such as VLC, Windows Media Player or QuickTime. 15 Viewing on a television VIEWING ON A TELEVISION Allows the user to view videos directly on a television. 1. Turn the camera off. 2. Connect the camera and the TV with an audio-video cable (sold separately). HDMI 3. 4. 5. Turn the camera on. Tune the TV to the HDMI channel. The camera's display will now be on the TV. Select "Playback" and choose between Action Cam and Dash Cam to view videos. Note: When the camera is connected to a television, it is also possible to record videos. The camera functions are the same as usual. 16 Maintenance of the camera CLEANING THE LENS WARNINGS To clean the lens, use an air blower to remove dirt such as dust or sand. Then gently wipe the lens tissue (included) on the lens. • CLEANING THE CAMERA • Gently wipe the camera with a soft, dry cloth. DO NOT use thinners or other cleaners to clean the camera, these products can cause damage. • • CLEANING THE WATERPROOF HOUSING • • It is important that the rubber gasket is always clean to ensure a perfect seal. Rinse the housing in fresh water and shake it to dry. Do not use a cloth to dry the seal, as lint may settle there and compromise the effectiveness of it. After using the housing in salt water, rinse it in fresh water and dry it. The salt can build up on the seal and the buttons may rust. • • STORAGE • If the camera will not be used for more than a month, the camera should be stored properly. The storage temperature should be between -10 °C and + 60 °C (+14°F and +140 °F). Note: It is important to follow these tips, because the warranty does not cover any GG Telecom products which has been subjected to water damage due to user error. See p.23 for more information on the warranty. 17 Never place the camera inside or above a heating device such as a microwave oven, a stove or a radiator. This could lead to overheating or the deformity of materials, or even cause a fire or explosion. Protect the lens from fingerprints and scratches using the waterproof housing. Do not expose the memory card to extreme temperatures (below -20 °C or above 50 °C). This may cause the memory cards to malfunction. Insert the memory card in the correct direction, otherwise it may damage the camera and the memory card. Do not bend, drop or subject the memory card to shock or pressure. Do not put the memory card into contact with liquids, dust or foreign bodies. If the memory card is dirty, clean with a soft cloth before you insert it into the camera. Do not place the camera on flammable surfaces such as bedding, blankets, carpets, or electric blankets for extended periods. The recommended operating temprature is between -20 °C to + 70 °C (-4 °F to +158 °F) Cold temperatures can affect battery life. Troubleshooting/ Error messages TROUBLESHOOTING Problem Possible solutions Impossible to turn on the camera • Charge the battery. The screen of the camera turns off •The screen turns off in Dash cam mode when the "Screen auto off" option is enabled. To turn the screen on again, press one of the two buttons. •To disable this function, select the option in the . camera menu and press The camera turns off •Charge the battery. Impossible to take videos/photos •Charge the battery. •Memory card is full. •Verify if the camera is turned on. •The only way to take photos is via the "Local" application. The camera heats Impossible to connect to the application. Message: "Camera is in recording mode". •Use anti-fog inserts, sold separately (see AVAILABLE ACCESSORIES section. •Apply an anti-drip solution on the lens of the housing to prevent fogging when using the camera in the rain or underwater. The videos/photos do not appear on the television • Verify if the camera is correctly connected to the television using the HDMI cable. • Verify if the memory card contains videos. The computer does not recognize the camera • Verify if the camera is properly connected to the computer using the USB cable. • Verify that camera is turned on. The computer can’t play videos • The .MP4 video format requires the use of a video playback software compatible such as VLC, Windows Media Player or QuickTime. • If the video was recorded in the mobile, make sure it supports SHD resolution. • Stop the video recording by pressing . ERROR MESSAGES •It is possible that the camera warms up during extended use. This is normal and does not affect the life or performance of the camera. The housing fogs • When recording a video on the camera SD card, the connection will fail if the mobile is put in Sleep mode. 18 Error message Possible solutions No SD card •There is no memory card in the camera. The use of a memory card is required to record videos. No Available Wi-Fi access point (AP). •An access point has to be set to access the app in "Internet" (see p.11). Login failed • The connection to the Wi-Fi cloud failed. Try again. Connection failed •The connection to the Wi-Fi cloud failed. Try again. •Make sure the access point is set properly (see p.11). Memory full •Delete the files or use a new memory card Low battery •Charge the battery using the supplied USB cable. Buttons disabled when connected to mobile. •The camera can only be controlled via the smart phone/tablet when connected in "Local". Available accessories To obtain more information on the available accessories, go to xcelcam.com / spypoint.com. Here are the accessories available for the XCEL cameras. KITS XHD-BM Bow mount XHD-BJM Ball joint mount and low quick release stand kit XHD-DM Decoy mount XHD-DOG Dog mount XHD-HSM Head strap mount XHD-NVG NVG helmet mount XHD-PICATINNY Picatinny mount XHD-PM Pole mount XHD-SCM Scope mount XHD-SGM Shotgun mount XHD-SM Suction mount XHD-CUSB Dual USB car charger MOUNTING ACCESSORIES XHD-360RBM Roll bar mount XHD-CM Cap mount XHD-HK Helmet kit POWER XHD-A USB power adaptor XHD-CHM Chest mount MA-360 Camera mount XHD-AM Adhesive mount 19 Available accessories XHD-SSM Sling stud mount XHD-TPM Tripod mount MEMORY E M O R Y /RFN M 32 GB HIGH SPEED HAUTE VITESSE Adapter Adaptateur MICROSD 16GB/32GB PROTECTION AND OTHERS ACCESSORIES XHD-FOG Anti-fog inserts XHD-TL Tether leash 20 Specifications • XCEL STREAM Video recording Video resolution FHD: 1080p /30 fps SHD: 1296p /30 fps File format .MP4 Photo Recording Photo resolution 2 MP File format JPG Lens Optical field of view • 160° wide angle Audio Sound recording Stereo, MPEG AAC codec Memory storage Support • Internal memory: no • External memory: microSD card, up to 64 GB (not included) Viewing TV output Micro-HDMI Computer output Micro-USB Power source Rechargeable internal battery 700 mAh Li-ion rechargeable battery Dimensions 2.2" W x 2.2" H x 1.1" D Weight 2.5 oz (camera) 3.2 oz (camera with housing) Wireless functions • Built-in Wi-Fi up to 400 ft 21 Regulation FCC REGULATIONS FCC Part l5 This equipment has been tested and found to comply with the limits for a Class B digital device, pursuant to Part 15 of the Federal Communications Commission (FCC) rules. These limits are designed to provide reasonable protection against harmful interference in a residential installation. This equipment generates, uses and can radiate radio frequency energy and, if not installed and used in accordance with the instructions, may cause harmful interference to radio communications. However, there is no guarantee that interference will not occur in a particular installation. If this equipment does cause harmful interference to radio or television reception, which can be determined by turning the equipment off and on, the user is encouraged to try to correct the interference by one or more of the following measures: • Reorient or relocate the receiving antenna. • Increase the separation between the equipment and receiver. • Connect the equipment into an outlet on a circuit different from that to which the receiver is connected. • Consult the dealer or an experienced radio/TV technician for help. Changes or modifications to this equipment not expressly approved by the party responsible for compliance could void the user’s authority to operate the equipment.This device complies with Part 15 of the FCC rules. Operation is subject to the following two conditions: (1) this device may not cause harmful interference, and (2) this device must accept any interference received, including interference that may cause undesired operation. Hereby, GG Telecom declares that this camera is in compliance with the essential requirements and other relevant provisions of Directive 99/5/EC. The user can obtain a copy of the Declaration of Conformity by e-mail at [email protected]. 22 Limited warranty and repair INSTRUCTIONS FOR REPAIR SERVICE GG Telecom will repair the product without charge or replace it at its discretion with an equivalent product, if it has a manufacturing defect covered by the warranty described previously. We will pay the shipping costs only for the return of the products covered by the warranty. The shipping costs for an item sent to us will be assumed by the customer. This XCEL product designed by GG Telecom, is covered by a one (1) year warranty on material and workmanship starting from the original date of purchase. The sales receipt is your proof of purchase and must be presented if warranty service is needed. This warranty will be honored in the country of purchase only. This GG Telecom warranty does not apply: (a) to consumable parts, including but not limited to batteries, which performance is designed to decrease over the course of time; (b) to damage caused by misuse, use with another product, neglect, accidents, liquid contact, fire, earthquake or any other external cause; (c) to GG Telecom products that have been purchased online from an unauthorized dealer; (d) to products that have had any modification or tampering; (e) to cosmetic damage including but not limited to scratches and broken plastic; (f) to damage caused by operating the GG Telecom product outside of GG Telecom’s recommendations. Repairs for damages not covered by the warranty will be subject to a reasonable charge. The customer will pay all shipping costs. 1. BEFORE sending a product for repair, please contact our technical support team at 1-888-779-7646 or [email protected]. Clearly describe the problem and give a phone number where we can reach you. It happens regularly that some problems can be solved over the phone. 2. If a product needs to be sent, an RMA number will be given to the customer (Return Merchandise Authorization). 3. Prepare a package for GG Telecom and include the original receipt or a copy. 4. Write the RMA number on the outside of the package and send it to: CANADA GG Telecom 120 J.Aurèle-Roux Victoriaville, QC G6T 0N5 United States GG Telecom 555 VT route 78 Swanton, Vermont 05488 IMPORTANT: Under no circumstances will GG Telecom accept returned products without a Return Material Authorization number (RMA). It is essential to contact us before making a return. The customer is liable for loss or damage to the product that may occur during the transport to GG Telecom. We recommend you to use a traceable method of shipping to ensure your protection. WWW.XCELCAM.COM WWW.SPYPOINT.COM 23