1
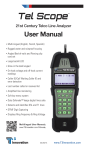
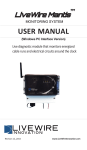
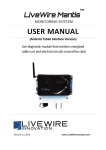
Arc Chaser
™
21st Century Dual Mode TDR for Testing and
Monitoring Energized and Unenergized Cables
Quick Start Guide
The Arc Chaser Dual Mode TDR is
capable of finding faults (Opens,
Shorts, Arc Faults) on fully energized
cables up to 600 Volts. Arc Chaser can
monitor live cables for intermittent
conditions, capturing these “events”,
and reporting where and when
they occur. Using advanced Spread
Spectrum Time Domain Reflectometry
(SSTDR), Arc Chaser is capable of
accuracy to fault of better than 1%.
AC120
Revison 08/19/13
www.T3Innovation.com
Interface
Live IFD
Fault Location
Tone Generation
System Settings
USB
File Manager
Back
Preferences
Test
Home
Power
BNC Male to
F Female
2
Dual Banana
to BNC Female
T3 Leader Cable
5ft 600V CAT III
Flanged Crocodile
Clips: red and black
600V CAT III
Arc Chaser Quick Start Guide
Fault Location
Fault Location mode will identify a cable fault as “short” or “open” and provide a
length measurement to the fault. This menu is also useful in determining cable
characteristics such as VOP and Test Frequency.
Frequency
Chosen
Select Test Setup to
configure a cable.
Length to Fault
Fault Detected
Select Custom VOP to
create a cable name
with a known VOP
Select a cable type
from the cable list
Cable type and
corresponding
VOP currently
being used
Save VOP of the
selected cable type
Save test results
as PDF
Select to
view test
graph
Select to
view test
results in
full screen
Use “Prev” / “Next”
to charge selected
cable type
•
Power the Arc Chaser on by pressing Power Button
•
Select Fault Location icon
•
Connect the Arc Chaser to the cable (via leader cable or dual banana plug
to BNC female adapter)
•
Select Test Setup icon to configure the Fault Location cable test
▪
Leader Settings: select Leader or No Leader (Leader should be used
unless dual banana plug to BNC female adapter is being used.)
▪
Cable Type: Select either Twisted Pair/Coax or Other
▪
VOP: Three options to select cable VOP (Custom VOP, Cable Type,
Discover VOP)
Note: Only select one of the three options:
▫
If you know the cables VOP, select Custom VOP and enter the
VOP.
▫
If you do not know the VOP, but do know the cable type select
Cable Type and pick the cable type then press Select icon.
T3 Innovation
3
Fault Location (Cont’d)
▫▫ If the VOP or Cable Type is not known, select Discover VOP and
enter the known length of the cable you are testing. This will give
you your VOP for this cable.
Note: VOP values can vary among cable types, lots, and manufacturers. In
most cases, these differences are minor and may be disregarded.
▫▫ Select Save icon
• Press the Test Button
to perform a test
Note: Select Graph View to view waveform
Live Intermittent Fault Detection (Live IFD):
Live IFD mode can monitor live cables for intermittent conditions, capturing
these “events”, and reporting where and when they occur.
• Power the Arc Chaser on by pressing the Power Button
.
• Select Live IFD icon.
• Connect the Arc Chaser to the cable (via leader cable or dual banana
plug to BNC female adapter).
• Select Test Setup icon to configure the Live IFD cable test.
• Test Setup: Auto Frequency
▪▪ Leader Settings: select Leader or No Leader (Leader should be
used unless dual banana plug to BNC female adapter is being
used.)
▪▪ Cable Type: Select either Twisted Pair/Coax or Other
▪▪ Test Frequency: Two options to select test frequency (Estimated
Test Length or choose one of 5 preset Frequencies on the right
hand side of screen).
▪▪ If you do not know which of the five preset frequencies to use,
select Estimated Test Length icon to enter the approximate
length of the cable to determine test frequency.
Note: Running a Fault Location test will help to obtain the most
accurate test frequency.
• Test Setup: VOP
▪▪ VOP: Two options to select cable VOP (Custom VOP, Cable Type)
4
Arc Chaser Quick Start Guide
Note: Only select one of the two options:
▫
If you know the cables VOP, select Custom VOP icon and
enter the VOP.
▫
If you do not know the VOP, but do know the cable type
select Cable Type icon and pick the cable type, then press
Select icon.
Note: If you do not know the cable type or the cable type is not in the
select Fault Location>Test
listing, go to back to the Home screen
Setup>Discover VOP to determine your cables VOP.
▫
Select Save icon.
•
Press the Start icon or the Test Button
•
When your test is complete, select Stop icon.
to begin and stop a test.
Frequency
Chosen
Time elapsed prior
to pressing start
Select to begin test
Primary and
Secondary faults.
Fault length and
fault type are also
displayed
Select to view a
graphic representation
of the faults
Select Test Setup
to configure cable
parameters or
discover VOP
Select a saved
cable type from
Total faults and
fault locations
since pressing
Start
Cable type and
corresponding VOP
currently being used
T3 Innovation
Select to access
additional menu
options
5
Live Intermittent Fault Detection (Live IFD) Continued:
Select to save test results as PDF
Select to save test results as CSV
Select to enter a custom VOP value
Select to save an adjusted VOP value
Select to access additional menu options
Tone
Tone Generation mode is used to trace cable runs and locate faults by sound.
• Power the Arc Chaser on by pressing the Power Button
• Select Tone icon
• Connect the Arc Chaser to the cable (via leader cable or dual banana
plug to BNC female adapter)
• Select one of the four tone cadences in the Tone Selection box:
▪ Low - High - Melody #1 – Melody #2
• Select Start icon to send the tone
• Use a tone probe (refer to accessories) alongside the cable or at the end
of the cable to hear an audible tone
• Select Stop icon to stop the tone generator
System Settings
System Settings is for management of Arc Chaser system settings.
• Power the Arc Chaser on by pressing the Power Button
• Select the System Settings icon or System Settings Button
the Arc Chaser settings
• Press the System Settings button
6
.
to enter
to access additional settings
Arc Chaser Quick Start Guide
File Manager
File Manager mode is for management of saved test results.
• Power the Arc Chaser on by pressing the Power Button
• Select the File Manager icon
• Fault location files will be displayed first. To view IFD files, select Show
IFD icon
• Select the Up or Down icons to scroll through the file list
• The files can be renamed or deleted by selecting the Rename or Delete
icon
USB
USB mode is for transferring results from Arc Chaser to a computer for record
keeping and printing.
• Power the unit on by pressing the Power Button
.
• Connect Arc Chaser to your computer by using the included micro USB
cable
• Select USB icon
• A dialog window will appear on your computer (if a dialog window does
not appear, open Computer then double click on the Removable drive)
• Double click on the Reports folder
• Double click in either the Live IFD or Fault Location folder
• Right click on the desired files and copy them to a folder in your
computer
Note: Saving test results to your computer can be done either by using your
micro USB cable or SD card. See the Arc Chaser instruction manual for specific
instructions.*
T3 Innovation
7
Arc Chaser Kit
Part Number
AC120
Description
•
•
•
•
•
•
•
•
•
•
Arc Chaser main unit
T3 Leader Cable 5ft 600V CAT III
Flanged Crocodile Clips: red and black 600V CAT III UL/CSA
Dual banana to BNC female
Adapter: BNC male to F female
Power Supply
SD Card
Micro USB Cable
Carabiner Strap
Protective Arc Chaser Case
Optional Accessories
TP200
TrakAll Tone Probe
AD006
Adapter: Multi-Pin
Connectors
For complete Arc Chaser user manual, technical information and
customer support, please visit www.t3innovation.com or send an
email to [email protected].
Contact Numbers: Phone: 805-233-3390
Fax: 805-383-4507
Address: 808 Calle Plano
Camarillo, CA 93012
Made
in USA
With Global Components
www.T3Innovation.com