Download Install our iPhone/iPad app from AppStore by searching "Wireless
Transcript
iOS App User Manual
Install our iPhone/iPad app from AppStore by searching "Wireless Tag List" or follow this link.
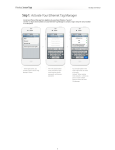
Use the 12 digit serial numbers on your Ethernet Tag Manager to create a login. Keep the serial number
in a safe place.
In the login screen, tap
"Create New Account" button.
Fill in the serial number
(case insensitive), login
email (used to recover
password), and choose a
password.
Tap "Create" button in the
upper right corner to
create an account.
Uncheck "Allow creating
more accounts..." unless
you plan to create multiple
logins to access the same
Tag Manager.
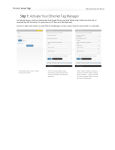
Follow this step to associate each new Tags with the Tag Manager. For water/mositure sensors,
please activate by shorting the tip using a metal object (scraping the tip using a coin, for example)
or dipping the tip into water. A red light should start flashing on the sensor every few seconds for
about 2 minutes, before the sensor goes into sleep again. Search & associate like other tags while
the light is flashing.
In the tag list screen, tap
"+" button at the upper
right corner.
An unassociated tag
periodically broadcasts
information about itself
when powered on. Click
"Scan" button to receive
this information.
When an unassociated tag
is found, its information is
displayed. Assign a name
and comment (optional) to
the tag, then tap
"Associate".
You can edit tag names, comments and assign pictures to each Wireless Sensor Tag.
Assign Picture
Tap the picture icon in
each Tag's screen to bring
up the camera, or delete
the picture if you already
have one for the tag.
Take the picture and use
finger to move or scale.
Edit Name
The picture is now assign
to the tag, and will be
automatically visible on
other devices accessing the
same tag list in a few
seconds.
Edit Name
In the tag list screen, tap
on the tag you want to edit
to open the tag screen.
Tap at the right end of
"Edit name:" row to edit the
tag name, and tap "Done".
The new name is now
assigned to the tag, and is
automatically propagated
to all other devices
accessing the same tag list.
Motion sensor, temperature monitoring, and out-of-range notification are turned off until they are
needed to conserve battery. Follow the steps below to turn them on/off as needed.
Tap the tag of interest on
the list screen to open the
details screen, and tap the
keypad icon at the bottom.
Instead of
arming/disarming motion
sensor for each tag
individually, you can also
tap the keypad icon in the
tag list screen to
arm/diarm all motion
sensor tags.
Temperature Monitoring
When motion sensor is
armed, the tag on the list
will have a black
background.
Temperature Monitoring
Open the temperature
sensor options for each tag
individually by tapping the
gear icon at the bottom.
The temperature sensor
often needs calibration to
remove an offset. In the
"Calibrate Temperature at
Tag" section, set the
correct current
temperature, and tap the
"Calibrate" button.
Out-of-Range Notification
Turn on "Monitor
Temperature", choose
notification settings you
want, and tap "Save". The
tag will notify you when
the temperature exceeds
upper or lower limits, or
returned to normal range.
Out-of-Range Notification
Tap the refresh icon at the
bottom of tag list screen,
and choose any of the
"Update every ..." options.
Longer interval results in
longer battery life but
longer the out-of-range
notification delay, and vice
versa.
Tap the gear icon at the
bottom right corner to
open "Out of Range
Options" for specific tag or
all tags on list.
Set the notification
methods you want and tap
"Save".
Tune the sensitivity and responsiveness of the motion sensor to suit your application. In motion
detection mode, choose to remember moved state indefinitely or reset to armed state after a while.
In door/gate mode, choose the threshold angle (23 degree is recommended for automatic garage
doors, 2~5 degree for regular doors), or choose to get notified only when door is opened for too
long.
Choose to get notified by emails, tweets, speech, or whether to make tag beep upon motion.
Set the schedule to automatically arm or disarm the motion sensor at certain time of the day, and
days of the week.
Sensitivity/Responsiveness
Tap the gear icon at the
bottom of tag list to open
the Options screen for all
motion sensor tags on the
list, or on the details
screen for each tag to open
the Options screen for that
individual tag.
You can choose sensitivity
(50% is recommended to
eliminate false alarms in
most environment), and
responsiveness ("Slow" is
12x the delay and battery
life of "Fast") that best suit
your application.
Notification Settings
When door/gate mode is
enabled, you can choose
the threshold angle, when
tag orientation changes
more than this, the door is
deemed open, when tag
orientation returns within
this threshold, it is deemed
closed.
Notification Settings
When not in door/gate
mode, after movement is
detected, by default the
system remembers the tag
has been moved
indefinitely. Instead you
can choose to have the tag
automatically reset to
armed state after a while.
When in door/gate mode,
you can choose to be
notified only when it is
been open for longer than
a certain time period.
Arm/Disarm Scheduling
You can choose to be
notified by email, have the
system post a tweet on
your Twitter account, beep
or speak on your phones,
or make the tag beep.
Arm/Disarm Scheduling
Each tag has two sets of auto-arming/disarming schedule, each for specified days of the week
(mutually exclusive). Specify time of day to disarm (for example, in the morning), and arm (for
example, after dark), for each of the checked days of the week.
Every wireless sensor tag has a beep function to help you find missing tags. Attach the tag to key
chains, put inside your wallet, or strap to TV remote controls, and never waste time looking for
these items again.
In the tag list screen, tap
on the tag you want to
beep. The tag details
screen opens.
Beep the tag by tapping on
the speaker button at the
upper right corner. To
change beep options, scroll
down until you see "Beep
option". Tap on it to
choose the option.
You can choose beep until
moved, for 5,10,15,20,30
seconds, or indefinitely
beep until stopped by the
stop beep button at the
bottom of the tag details
screen.
Each tag automatically logs temperature and each time it is moved, opened or closed, so you can
always check what happened while you were away.
Door Stats
In the tag detail screen,
scroll down and tap on
"Door Stats" button.
For every day in the past 6
months, number of times
door is opened and
average duration vs. time
of the day are displayed.
Temperature Stats
When you tap on anywhere
on the graph for a
particular date, a detail
history for that day is
displayed. You can sort by
time of the day, how long
the door has been open, or
event type (opened or
moved).
Temperature Stats
Before temperature can be
logged, specify the interval
at which temperature is
logged by clicking the
In the tag detail screen,
scroll down and tap on
"Temperature Graphs"
button.
icon.
Multiple Tags
For every day in the past 6
months (unlimited for
sensors with 13-bit
temperature), temperature
and humidity graphs are
displayed. Rotating the
phone to landscape mode
allows zooming/pannning
by gesture.
Multiple Tags
From the tag list screen,
tap on the
icon.
Choose the type of data
you want to view.
Choose which Tags /
KumoSensors / Nest whose
data you wish to view side
by side.
For every day in the past 6
months (when there is data
available), graphs are
displayed. Rotating the
phone to landscape mode
allows the graph to be
zoomed/panned by
pinch/swipe gesture.
Use multiple tag managers to to cover a wider area, enable tags to "roam" from one area to another,
or manage more than 255 tags at one time. Use the Web/Android app to add tag managers to your
account.
Navigation
Tap on the name of tag
manager (at the top of the
tag list screen) to switch
tag managers added to
your account.
When "All Tag Managers"
are chosen, tags from all of
your tag managers are
listed simultaneously.
Events
When a tag manager is
grouped with another, they
manage the same list of
tags. Any single tag can
"roam" from one tag
manager to another, and
be accessed from either
one.
Events
When a tag manager is not
grouped with another tag
manager, it has its own list
of (up to 255) tags.
While an event is received
from one of your tags not
associated to the tag
manager you are currently
viewing, you can tap on the
popup...
...to switch to the right tag
manager, and view details
about the event.
This device complies with Part 15 of the FCC Rules. Operation is subject to the following two conditions:
1. This device may not cause harmful interference.
2. This device must accept any interference received, including interference that may cause undesired operation.
Modifications: Any modifications made to this device that are not approved by Cao Gadgets LLC may void the authority granted to the user by the FCC to operate this
equipment.
NOTE: This equipment has been tested and found to comply with the limits for a Class B digital device, pursuant to Part 15 of the FCC Rules. These limits are designed to
provide reasonable protection against harmful interference in a residential installation. This equipment generates, uses and can radiate radio frequency energy and, if not
installed and used in accordance with the instructions, may cause harmful interference to radio communications. However, there is no guarantee that interference will not occur
in a particular installation. If this equipment does cause harmful interference to radio or television reception, which can be determined by turning the equipment off and on, the
user is encouraged to try to correct the interference by one or more of the following measures: - Reorient or relocate the receiving antenna. - Increase the separation between
the equipment and receiver. - Connect the equipment into an outlet on a circuit different from that to which the receiver is connected. - Consult the dealer or an experienced
radio/TV technician for help.
"Wireless Sensor Tags", "KumoSensor" and "Kumostat" are trademarks of Cao Gadgets LLC. © 2010-2014 Cao Gadgets LLC


