1
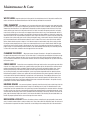
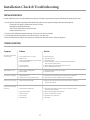
Warranty Information
Welcome to the rapidly growing group of pool owners who enjoy the ease and convenience of an automatic safety cover
system. We work hard to provide the best engineering and highest quality materials to make you a satisfied customer and a
happy pool owner.
Please read this owner’s guide and follow its instructions carefully. It is designed to acquaint you with the features of your
new cover system and to help you operate and maintain your system properly. The information here is the accumulated
knowledge of thousands of installations. If you receive conflicting information elsewhere, please call Coverstar for
clarification.
Coverstar is a “wholesale only” manufacturer of pool cover systems. We have selected the most qualified professional
distribution companies to represent our products throughout the world. They will provide you with the local service and
maintenance that you may require. The enclosed warranty page has all the warranty information for your specific system
and cover material.
Warranty Registration
In order to receive warranty service, please register your cover system with the manufacturer as soon as it is fully installed
using the dealer/distributor information and warranty ID# provided. To do this:
Go to www.coverstar.com and click on the Product Registration button on the home page. Fill out the online registration form
and submit it.
OR
Fill out the postage paid registration card and mail it.
For your information, fill in your Dealer / Distributor Information below:
Dealer / Distributor Information
Dealer/Distributor Name
Address
City
State
Phone
Date Installed
By
2
ZIP
Table of Contents
Safety Instructions
ASTM required safety warning .................................................................. 4
Pool water level ........................................................................................ 4
Using the cover pump ............................................................................... 4
Aluminum lid............................................................................................. 5
Key switch location ................................................................................... 5
Partially covered pools .............................................................................. 5
Operating Instructions
Pool cover operators ................................................................................. 6
Covering the pool ...................................................................................... 6
Covering the pool manually ....................................................................... 6
Uncovering the Pool .................................................................................. 7
Uncovering the pool manually ................................................................... 7
Cover Care &
System Maintenance
Water level................................................................................................ 8
Pool chemistry .......................................................................................... 8
Cleaning the cover .................................................................................... 8
Tracks ...................................................................................................... 8
Housing drains .......................................................................................... 8
Mechanism and pulleys............................................................................. 9
Preventing rodent damage ........................................................................ 9
Adjustments and minor repairs ................................................................. 9
Adjusting the torque limiter ....................................................................... 9
Patching the cover .................................................................................... 9
Winterizing the cover ................................................................................ 9
Installation Safety
Checklist
& Trouble Shooting
Customer sign off list & trouble shooting ................................................. 10
Cover will not move forward or will not reverse ....................................... 10
Water leaking onto cover ........................................................................ 10
Cover retracts out of square .................................................................... 10
Cover not even at end of pool .................................................................. 10
Cover seems to be running under stress ................................................. 10
Pool Safety Tips
Pool Safety Tips ...................................................................................... 11
Information in this user guide is believed to be accurate at time of printing. Coverstar, Inc. reserves the right to make product and
instructional changes over time without notice. Visit www.coverstar.com for the latest information and updates to this user guide.
3
Safety Instructions
IMPORTANT SAFETY INSTRUCTIONS
1.
READ AND FOLLOW ALL INSTRUCTIONS.
2. WARNING: To reduce the risk of injury, do not permit children to use this
product unless they are closely supervised at all times.
3. All field-installed metal components such as rails, ladders, drains, or other
similar hardware within 3m of the unit shall be bonded to the equipment
grounding bus with copper conductors not smaller than No. 8 AWG (No. 6 AWG
for Canada.)
4. Keep the pump on the cover and set up for proper use whenever the cover
is over the pool.
5. Check cover frequently for signs of premature deterioration or weakness.
6.
SAVE THESE INSTRUCTIONS.
POOL WATER LEVEL
Maintain the water level at the middle elevation of the skimmer opening. If the water drops below this level, the cover may
operate under stress. Never cover the pool without the proper water level under the cover. The water supports all weight
on the surface of the cover. If the water level is low and water builds up on the cover, severe damage may be done to the
coping and/or cover system.
USING THE POOL COVER PUMP
Water accumulation on the top of the cover can come from rain, snow, overspraying sprinklers, or leaks that may develop
in the cover. Even what appears to be small amounts of water spread over the whole surface of the cover can migrate and
accumulate in depressions. This is dangerous. Any accumulation of water on the surface of the cover must be removed
immediately using the cover pump. The cover is not a safety cover unless the pump is in place.
•
•
•
•
Every cover system comes with a pump that automatically senses water and removes it, provided the pump is operable, properly placed,
and maintained according to the pump manufacturer’s instructions.
After the pump is placed upright on its base in the middle of the cover, plug it into a G.F.C.I. protected outlet. If the pump does not turn
on immediately, it will reset itself automatically. This can take up to five minutes. Consult the pump’s user manual for any operational or
service problems.
During the winter, the pump will freeze into the ice without damage. As the ice melts during the winter, the pump will automatically
activate. Make sure to keep power to the pump and the discharge hose free of kinks.
You must follow all pump manufacturer’s instructions regarding its
use and maintenance.
4
• After the pump has removed all water from one location on the cover, it may be necessary to move the pump to other locations
to remove all accumulated water.
•
The pump is covered under the pump manufacturer’s warranty.
•
For service, return it to the manufacturer’s service center.
•
Avoid using extension cords.
•
•
If your pump or cord becomes damaged, replace the pump immediately!
Plug the pump into a G.F.C.I. Protected outlet only. Place the pump on the cover first, then plug in the pump. DO NOT stand on a wet surface
while using the pump.
•
Avoid contacting accumulated surface water on your cover when the pump is on the cover. Electric shock is possible. Your pump should not be used for any application
•
other than specified in these instructions.
Your pump has been provided with a stabilizer plate so it remains upright. DO NOT allow the pump to tip over.
WARNING! Your pump is an electric appliance and caution should be used when handling your pump and electric cord around water.
ALUMINUM LID
The aluminum lid on below-deck systems is a long-lasting cosmetic cover for the housing. It is not intended for anyone to
walk or step on. It can be slippery when wet and walking on it can loosen the support brackets under it. Instruct children
not to step on the lid.
KEY SWITCH LOCATION
All controls for the cover system must be located where the pool is completely visible during cover operation.
All plants and shrubs should be maintained for continuous visibility.
PARTIALLY COVERED POOLS
It is extremely important to always cover or uncover the pool completely. Never leave the pool partially covered. A partially
covered pool presents a serious danger as people or pets may drown under the cover.
WARNING! A partially covered pool can pose a safety hazard. Never leave the cover over the pool in a partially covered
position. Always completely cover or uncover the pool. Even children or pets who can swim may drown if they lose their
orientation under the cover. Never allow anyone to swim under the cover.
WARNING! A cover with water on it poses the same safety hazard as an open pool.
WARNING! A child can create a depression on the cover great enough to collect a dangerous amount of water.
IMPORTANT NOTICE
This user guide is intended to instruct cover system owners in
the proper operation and maintenance of their cover system. If
a salesman or installer gives information that contradicts this
user guide, you should disregard their instruction on that topic.
5
Operating Instructions
POOL COVER OPERATORS Only instructed, responsible individuals should operate the cover.
For this reason, all systems are key controlled. This is an expensive piece of equipment and, like your
automobile, should be operated only by someone who can exercise judgment and care. Children should not
be permitted to use this product unless they are closely supervised at all times.
WARNING!: Do not operate the cover with water on it. Just one inch of water on a cover can weigh thousands of
pounds!
1
2
COVERING THE POOL
Unlock the switch cover. Toggle the switch to the “cover” position. It takes a second for the gear to engage the rope
take-up reels. Safety covers are required to have a momentary power switch that requires constant pressure to operate
the motor. This keeps the operator in complete control of the mechanism.
1
Hold the switch in the “cover” position until the cover extends to the position required for your pool cover model.
A. For “Underguide” systems, where guides are mounted under the pool coping, lightly bump the leading edge against
the end of the pool. Do not continue to force the cover closed after it touches the coping.
B. For “Topguide” systems where the guides are mounted on top of or in the deck, the cover should extend over the
pool, but stop several inches short of reaching the end pulley housings at the end of the guides. Make sure the leading
edge of the pool cover clears the top surface of the deck to prevent damage to the bottom of the leading edge or its
fabric cover.
3
Release the switch when you have reached the proper closed position discussed above. Close the switch lid, lock it, and
remove the key.
4
Place the pump on the cover.
2
Underguide System
2B
Note: If the cover hesitates or stops before it reaches the end of the pool, you should immediately release the switch and
investigate the problem. Sometimes dirt, debris, or obstacles like towels or hoses can stop the cover. Remove the
obstruction and continue covering the pool. If, after investigation, you cannot find a reason for the hesitation, you should
reverse the direction of the cover a foot or two and then retry to cover the pool. If the same thing occurs, immediately
release the switch and call your SwimWise distributor. Continuing to operate the cover can cause damage not covered
by the manufacturer’s warranty.
Topguide System
3
COVERING THE POOL MANUALLY
If there is a loss of electrical power to the system and the cover must be closed for safety or other reasons, the
cover can be closed manually. This is not easy to do, but it can be done by following these steps:
1
Remove the cover lid.
2
Pull the ropes to extend the cover out over the pool.
4
Note: For large pools, it may be necessary to loosen the cover mechanism’s torque limiter to close the pool.
6
UNCOVERING THE POOL
WARNING: Do not operate the cover with water on it. Just one inch of water on a cover can weigh
thousands of pounds!
1
Remove any objects from the cover including the pump.
2
Unlock the switch cover. Toggle the switch to the “uncover” position.
3
Hold the switch in the “uncover” position until the cover extends to the position required for your pool cover
model.
1
A. For “Underguide” systems, where the cover is attached to the underside of the pool deck, retract the cover
until the front edge of the cover is 6 inches from the cover housing lid.
B. For “Topguide” systems, where the guides are mounted on top of or in the deck, the cover should be retracted
to a point several inches in front of the emergency stops on the cover guides. Make sure the leading edge of the
pool cover clears the top surface of the deck to prevent damage to the bottom of the leading edge or it’s fabric
cover. The stops are there to prevent pulling the cover out of the guides in the event of over-retraction, but are
not meant as a stop to run the cover up against. Driving the cover into the end pulley housings or retracting
against the emergency stops on a regular basis may damage several components, including the cover, rope,
webbing, and possibly mechanical components.
4
2
Release the switch when you have reached the proper position discussed above. Close the switch lid, lock it, and
remove the key.
Note: If the cover hesitates or stops before it reaches the end of the pool, you should immediately release the switch
and investigate the problem. Sometimes dirt, debris, or obstacles like towels or hoses can stop the cover. Remove
the obstruction and continue covering the pool. If, after investigation, you cannot find a reason for the hesitation,
you should reverse the direction of the cover a foot or two and then retry to uncover the pool. If the same thing
occurs, immediately release the switch and call your SwimWise distributor. Continuing to operate the cover can
cause damage not covered by the manufacturer’s warranty.
3A
Underguide System
Note: For large pools, it may be necessary to loosen the cover mechanism’s torque limiter to close the pool cover.
3B
Topguide System
UNCOVERING THE POOL MANUALLY
If there is a loss of electrical power to the system and the cover must be opened for some reason, it can be done
manually. This is not easy to do, but it can be done by following these steps:
1
Remove the cover lid at the non-motor end.
2
Insert a ¾” x ½” adapter onto a ½” ratchet.
3
Insert the ¾” adapter into the end of the cover drive shaft.
4
Ratchet the cover off the pool.
4
Note: For large pools, it may be necessary to loosen the cover mechanism’s torque limiter to open the pool cover.
7
Maintenance & Care
WATER LEVEL
Keep the water level in the pool at the mid-skimmer level. If the pool is overfilled, the
water can flow over the lowered bond beam into the housing and flood the mechanism.
POOL CHEMISTRY
We suggest, as all cover manufacturers do, that you only cover pool water that
you would swim in. If the water is temporarily out of balance due to chemical additive, covering the pool will
shorten the life of the fabric. Use a good test kit frequently to maintain proper chemical balance. You must
avoid a build-up of chemicals in the pool water that can result in serious damage to pool walls and equipment. Such a build-up can also create an improper water balance which may cause deterioration of the vinyl cover. A deterioration so caused is not covered by the warranty. After adding any chemicals to your pool,
allow the chemicals to circulate before closing the cover. If you are unsure if it is safe to close the cover, test
the water at the surface with your test kit. Some pH adjusters may create harmful levels of alkalinity (high
pH) if not allowed to mix with the water before the cover is closed. The same is true with chlorine shocks.
Some chlorine shocks require as long as 12-24 hours to return to swimmable range. Since safety is often
the major reason people purchase a cover, we recommend the use of a non-chlorine shock. With this type
of shock the cover may be closed in 30 minutes or less. Please check with your pool service company for
proper usage. The use of floating chlorine feeders is not recommended because they vent chlorine gas that
can burn the cover fabric and often remain trapped in the same location.
CLEANING THE COVER When you uncover the pool, the water in the pool is transferred from
the pool to the top surface of the cover. The sun then dries it, causing high concentrations of chlorine on top
of the cover that may damage the fabric. You can wash the cover with a mild hand dish washing liquid every 3-6 months to remove this accumulation. However, do not use laundry detergent or any other chemicals
to clean the cover.
COVER GUIDES
Retract the cover completely off the pool and clean the cover guide rope and slider
channel. Use a high pressure nozzle on a garden hose to spray directly into the slots of the aluminum deck
guides to remove built-up dirt and debris. Repeat as often as necessary to keep the guides clean. Spray
into the pulley housing at the end of the guides at close range to remove debris from within the housing. In windy and dusty areas with blowing dirt, covers may become inoperable until the debris has been
hosed from the guides. In these areas, guides will have to be flushed clean more frequently. A build-up of
sand and/or dirt will grind the webbings causing them to fail prematurely. The webbings used on our covers have been proven over many years and thousands of covers to last beyond the life of the fabric if the
cover guides are kept clean. Premature webbing failure due to abrasion from debris in the guides is easily
preventable and is not covered under the warranty.
HOUSING DRAINS On recessed systems, frequently check the drain(s) to be certain they drain the
housing completely and do not allow water to stay in the housing area. If water is allowed to stand in the
mechanism area over periods of time, the system may become damaged by the constant moisture. Damage
to either electrical or mechanical components resulting from standing water or extended submersion is not
covered under the warranty. Clean leaves and debris from the housing as necessary. Run the cover over the
pool, prop the housing lid open or remove it, and remove the debris in the housing. Accumulated debris can
hinder the proper operation of the cover or damage the cover material.
MECHANISM & PULLEYS
Clean all rotating surfaces and pulleys by spraying with a hose nozzle
every 3 months or more often in sandy or windy areas. Use a hose nozzle to completely wash all surfaces of
the mechanism to prevent fine dust or sand from accumulating on the moving surfaces of the mechanism.
8
PREVENTING RODENT DAMAGE
In certain areas, rodents may nest in the cover housing and chew on the cover and ropes. A common cause of rope breakage is rodent damage, which is not
covered under the warranty. Moth balls in a perforated, tamper proof container placed on a block or brick
to keep them dry may help keep rodents under control. Keep poisons out of reach of children.
ADJUSTMENTS AND MINOR REPAIRS
Some repairs, such as adjusting the torque limiter
or patching holes, are so easy you can do them yourself. Other repairs are much more complex. We would
ordinarily recommend that an owner refers these repairs to his local, authorized serviceman or organization.
ADJUSTING THE TORQUE LIMITER
If the pool cover will not retract or extend over the
pool, it may become necessary to adjust the torque limiter. This device is designed to prevent damage to
the motor or mechanism if there is too much stress on the system due to a worn-out pulley or other problems. If the torque limiter needs adjustment:
1. To increase motor torque, tighten the bolts with a 7/16 wrench 1/2 turn.
2. How far you tighten or loosen the adjustment bolts will depend on the size of your pool so you should
make smaller adjustments in either direction until the cover operates normally.
WARNING! Never adjust the cover or try to perform any other maintenance while the cover is running. Disconnect the breaker first if you attempt to service any movable part of the cover system.
PATCHING THE COVER
Patch even the smallest holes as soon as they occur with the repair kit
provided. Small pin-sized holes can be patched by applying a drop of glue directly in the hole. Large cuts
or tears can be patched using a piece of material cut from the repair kit. Cut a piece of material that forms
a 1” overlap around the tear. Clean and dry the area around the cut or tear. Apply glue to one side of the
patch. Apply glue to the area around the cut or tear that will be covered by the patch. Let the glue set up
for one minute. Apply the patch to the cover.
WINTERIZING THE COVER Although during the winter your pool cover requires less attention,
water and/or snow will build up on the cover. If the water level in the pool is not properly maintained, serious damage to the cover can occur. Properly maintaining a pool’s water level prevents excess weight on
the top surface of the cover that can cause serious damage to the cover system.
• During the winter, make at least monthly inspections of the pool’s water level and make sure the cover
pump is operating properly so that water on top of the cover does not build up. Even a few inches of water
on top of the cover is an enormous weight and can pull the cover and guides into the pool. In situations
where the water level is too low, you should add water to the pool immediately to better support the water
or ice that are on the cover. Your cover will survive any normal winter if these simple precautions are taken.
• Make sure your water is chemically balanced before covering the pool for extended periods of time.
Double check the water after the chemicals have had a chance to mix completely. This may require checking the pool water a day or two after chemicals have been added. When covering the pool for long periods
of time, turn down ozone generators and chemical feeders to their lowest level. Constant long-term build
up of ozone can damage the fabric. Place the cover pump on the cover to remove melted snow.
9
Installation Check & Troubleshooting
INSTALLATION CHECK
For your satisfaction, please check the following items with your installation representative to help you understand how to operate your cover.
1. Be sure that the installation representative who installed your pool cover has explained the proper operation of the following:
• Placing the cover pump in position when the cover is closed
• Operation by authorized persons only
• Pool chemical application as it affects the cover
• Proper maintenance & care
2. Did you read the drowning prevention information on the back cover of this user guide?
3. Did a representative offer you assistance on how to maintain a safer pool area?
4. Were you informed of the importance of removing all standing water from your cover for safety and operation?
TROUBLE SHOOTING
Symptom
Problem
Solution
A. Circuit breaker or G.F.C.I. is tripped.
B. Water on cover.
C. Water accumulated between roll-up tube and pool.
D. Cover adhering to deck.
E.Torque limiter loose.
F. Motor needs service.
A. Reset circuit breaker.
B. Pump water from cover.
C. Sweep water off cover.
D. Lift cover and billow air under cover. Use replaceable welcome mat etc.
under cover to break deck adhesion
E. Tighten both torque limiter brake bolts until the cover moves.
F. Call your distributor/dealer for service.
Water leaking onto cover
A. Cover caught on something sharp.
B. Abrasion pinhole.
A. Remove sharp object and use patch kit to repair.
B. Use patch kit to repair.
Cover retracts out of square
A. Rope lengths unequal.
B. Uneven drag on cover as it retracts off pool.
A. Re-pin the rope on rope reel so the rope is exactly the same on both sides.
B. Some unevenness may be unavoidable due to pool configuration.
Cover not even at end of pool
A. Ropes are not the same length.
A. Re-pin the rope on the rope reel so the rope is relatively longer or shorter than
the rope on the other side.
Cover seems to be running
under stress
A. Excess friction during operation.
A. Check pulleys to see if they are binding. If they are, clean them. Check and
clean cover guides if necessary.
B. Billow cover by lifting fabric to break adhesion.
C. Remove cover lid and clean out debris.
D. Add water to pool or replace cover.
E. Adjust brake.
Cover will not move forward
or will not reverse
B. Cover adhering to deck.
C. Debris in housing
D. Cover too tight.
E. Brake too tight.
10
Pool Safety Tips
Automatic safety pool covers are easy and convenient to use but they should not be the only
source of protection for your family. Please read the recommendations provided by industry
and safety groups listed below and implement as many of them as possible for your pool.
Multiple Safety Layers
Don’t rely on only one system of protection—layering several safety precautions together provides the
strongest safeguard. You should never rely on any one layer to be fail-proof. Enclose the pool with a barrier. In
fact, fencing may be required in certain areas. Keep all doors and windows leading from the house to the pool
area secure. Install self-closing mechanisms on doors. Install only child-proof, self-closing, self-latching gates
around the pool.
Your Responsibility
As a pool owner, be aware that you must ensure your child’s safety. Make sure you have rescue devices that
are easily accessible. Never leave a pool with its cover partially closed since children may become trapped
under it. Always drain standing water off of your spa or pool cover. A child can drown in as little as two inches
of water.
Adult Supervision
There is no substitute for constant adult supervision. Never leave a child alone—even for a second. Most
drownings occuduring a five minute (or less) lapse in supervision. There is a risk of a child drowning when
around any body of water. Maintain constant eye contact with your children when they are around the pool. Do
not consider young children water-safebecause they have had swimming lessons. Post and enforce rules such
as No Running, No Pushing, No Dunking, and Never Swim Alone.
Extend Safety Awareness
Instruct baby-sitters about potential hazards to young children in and around swimming pools and the need for
constant supervision. Alert your pool maintenance people, utility personnel, and your neighbors to keep covers,
gates, and doors to pool closed and locked at all times.
Pool Toys
Remember to keep toys and inflatables away from the pool when the pool is not in use. These items can lure a
child into the pool.
Inspect Equipment
Inspect safety and pool equipment regularly. Preventive devices are only effective if they are in working order.
Gate latches, gate closure devices, fences, door and pool alarms, and the pool cover should be inspected
frequently to be certain they are working properly.
Sources: Drowning Prevention Society; United States Consumer Product Safety Commission; National Spa and Pool Institute’s Operation Water Watch; and the
American Academy of Pediatrics.
11
™
Automatic Safety Cover
L9832
© Coverstar 2007 ver. 1.0
™
Automatic Safety Cover
Use & Care Guide