1
AlvariSTAR™
Installation Manual
November 2006
P/N 214145
Rev. D
Legal Rights
Legal Rights
© Copyright 2006 Alvarion Ltd. All rights reserved.
The material contained herein is proprietary, privileged, and confidential and
owned by Alvarion or its third party licensors. No disclosure thereof shall be made
to third parties without the express written permission of Alvarion Ltd.
Alvarion Ltd. reserves the right to alter the equipment specifications and
descriptions in this publication without prior notice. No part of this publication
shall be deemed to be part of any contract or warranty unless specifically
incorporated by reference into such contract or warranty.
Trade Names
Alvarion®, BreezeCOM®, WALKair®, WALKnet®, BreezeNET®, BreezeACCESS®,
BreezeMANAGE™, BreezeLINK®, BreezeCONFIG™, BreezeMAX™, AlvariSTAR™,
AlvariCRAFT™, BreezeLITE™, MGW™, eMGW™, WAVEXpress™, MicroXpress™,
WAVEXchange™, WAVEView™, GSM Network in a Box and TurboWAVE™ and/or
other products and/or services referenced here in are either registered
trademarks, trademarks or service marks of Alvarion Ltd.
All other names are or may be the trademarks of their respective owners.
Statement of Conditions
The information contained in this manual is subject to change without notice.
Alvarion Ltd. shall not be liable for errors contained herein or for incidental or
consequential damages in connection with the furnishing, performance, or use of
this manual or equipment supplied with it.
Warranties and Disclaimers
All Alvarion Ltd. ("Alvarion") products purchased from Alvarion or through any of
Alvarion's authorized resellers are subject to the following warranty and product
liability terms and conditions.
Exclusive Warranty
With respect to the Software, Alvarion warrants the correct functionality
according to the attached documentation, for a period of fourteen (14) month from
invoice date (the "Warranty Period")". During the Warranty Period, Alvarion may
release to its Customers software updates, which include additional performance
improvements and/or bug fixes, upon availability (the "Warranty"). Bug fixes,
temporary patches and/or workarounds may be supplied as Software updates.
Additional hardware, if required, to install or use Software updates must be
purchased by the Customer. Alvarion will be obligated to support solely the two (2)
most recent Software major releases.
ii
AlvariSTAR Installation Manual
Legal Rights
ALVARION SHALL NOT BE LIABLE UNDER THIS WARRANTY IF ITS TESTING
AND EXAMINATION DISCLOSE THAT THE ALLEGED DEFECT IN THE PRODUCT
DOES NOT EXIST OR WAS CAUSED BY PURCHASER'S OR ANY THIRD
PERSON'S MISUSE, NEGLIGENCE, IMPROPER INSTALLATION OR IMPROPER
TESTING, UNAUTHORIZED ATTEMPTS TO REPAIR, OR ANY OTHER CAUSE
BEYOND THE RANGE OF THE INTENDED USE, OR BY ACCIDENT, FIRE,
LIGHTNING OR OTHER HAZARD.
Disclaimer
(a) The Software is sold on an "AS IS" basis. Alvarion, its affiliates or its licensors
MAKE NO WARRANTIES, WHATSOEVER, WHETHER EXPRESS OR IMPLIED,
WITH RESPECT TO THE SOFTWARE AND THE ACCOMPANYING
DOCUMENTATION. ALVARION SPECIFICALLY DISCLAIMS ALL IMPLIED
WARRANTIES OF MERCHANTABILITY AND FITNESS FOR A PARTICULAR
PURPOSE AND NON-INFRINGEMENT WITH RESPECT TO THE SOFTWARE.
UNITS OF PRODUCT (INCLUDING ALL THE SOFTWARE) DELIVERED TO
PURCHASER HEREUNDER ARE NOT FAULT-TOLERANT AND ARE NOT
DESIGNED, MANUFACTURED OR INTENDED FOR USE OR RESALE IN
APPLICATIONS WHERE THE FAILURE, MALFUNCTION OR INACCURACY OF
PRODUCTS CARRIES A RISK OF DEATH OR BODILY INJURY OR SEVERE
PHYSICAL OR ENVIRONMENTAL DAMAGE ("HIGH RISK ACTIVITIES"). HIGH
RISK ACTIVITIES MAY INCLUDE, BUT ARE NOT LIMITED TO, USE AS PART OF
ON-LINE CONTROL SYSTEMS IN HAZARDOUS ENVIRONMENTS REQUIRING
FAIL-SAFE PERFORMANCE, SUCH AS IN THE OPERATION OF NUCLEAR
FACILITIES, AIRCRAFT NAVIGATION OR COMMUNICATION SYSTEMS, AIR
TRAFFIC CONTROL, LIFE SUPPORT MACHINES, WEAPONS SYSTEMS OR
OTHER APPLICATIONS REPRESENTING A SIMILAR DEGREE OF POTENTIAL
HAZARD. ALVARION SPECIFICALLY DISCLAIMS ANY EXPRESS OR IMPLIED
WARRANTY OF FITNESS FOR HIGH RISK ACTIVITIES.
(b) PURCHASER'S SOLE REMEDY FOR BREACH OF THE EXPRESS
WARRANTIES ABOVE SHALL BE REPLACEMENT OR REFUND OF THE
PURCHASE PRICE AS SPECIFIED ABOVE, AT ALVARION'S OPTION. TO THE
FULLEST EXTENT ALLOWED BY LAW, THE WARRANTIES AND REMEDIES SET
FORTH IN THIS AGREEMENT ARE EXCLUSIVE AND IN LIEU OF ALL OTHER
WARRANTIES OR CONDITIONS, EXPRESS OR IMPLIED, EITHER IN FACT OR BY
OPERATION OF LAW, STATUTORY OR OTHERWISE, INCLUDING BUT NOT
LIMITED TO WARRANTIES, TERMS OR CONDITIONS OF MERCHANTABILITY,
FITNESS FOR A PARTICULAR PURPOSE, SATISFACTORY QUALITY,
CORRESPONDENCE WITH DESCRIPTION, NON-INFRINGEMENT, AND
ACCURACY OF INFORMATION GENERATED. ALL OF WHICH ARE EXPRESSLY
DISCLAIMED. ALVARION' WARRANTIES HEREIN RUN ONLY TO PURCHASER,
AND ARE NOT EXTENDED TO ANY THIRD PARTIES. ALVARION NEITHER
AlvariSTAR Installation Manual
iii
Legal Rights
ASSUMES NOR AUTHORIZES ANY OTHER PERSON TO ASSUME FOR IT ANY
OTHER LIABILITY IN CONNECTION WITH THE SALE, INSTALLATION,
MAINTENANCE OR USE OF ITS PRODUCTS.
Limitation of Liability
(a) ALVARION SHALL NOT BE LIABLE TO THE PURCHASER OR TO ANY THIRD
PARTY, FOR ANY LOSS OF PROFITS, LOSS OF USE, INTERRUPTION OF
BUSINESS OR FOR ANY INDIRECT, SPECIAL, INCIDENTAL, PUNITIVE OR
CONSEQUENTIAL DAMAGES OF ANY KIND, WHETHER ARISING UNDER
BREACH OF CONTRACT, TORT (INCLUDING NEGLIGENCE), STRICT LIABILITY
OR OTHERWISE AND WHETHER BASED ON THIS AGREEMENT OR
OTHERWISE, EVEN IF ADVISED OF THE POSSIBILITY OF SUCH DAMAGES.
(b) TO THE EXTENT PERMITTED BY APPLICABLE LAW, IN NO EVENT SHALL
THE LIABILITY FOR DAMAGES HEREUNDER OF ALVARION OR ITS EMPLOYEES
OR AGENTS EXCEED THE PURCHASE PRICE PAID FOR THE PRODUCT BY
PURCHASER, NOR SHALL THE AGGREGATE LIABILITY FOR DAMAGES TO ALL
PARTIES REGARDING ANY PRODUCT EXCEED THE PURCHASE PRICE PAID
FOR THAT PRODUCT BY THAT PARTY (EXCEPT IN THE CASE OF A BREACH OF
A PARTY'S CONFIDENTIALITY OBLIGATIONS).
iv
AlvariSTAR Installation Manual
Legal Rights
Important Notice
This user manual is delivered subject to the following conditions and restrictions:
This manual contains proprietary information belonging to Alvarion Ltd. Such
information is supplied solely for the purpose of assisting properly authorized
users of the respective Alvarion products.
No part of its contents may be used for any other purpose, disclosed to any
person or firm or reproduced by any means, electronic and mechanical,
without the express prior written permission of Alvarion Ltd.
The text and graphics are for the purpose of illustration and reference only.
The specifications on which they are based are subject to change without
notice.
The software described in this document is furnished under a license. The
software may be used or copied only in accordance with the terms of that
license.
Information in this document is subject to change without notice.
Corporate and individual names and data used in examples herein are
fictitious unless otherwise noted.
Alvarion Ltd. reserves the right to alter the equipment specifications and
descriptions in this publication without prior notice. No part of this
publication shall be deemed to be part of any contract or warranty unless
specifically incorporated by reference into such contract or warranty.
The information contained herein is merely descriptive in nature, and does not
constitute an offer for the sale of the product described herein.
AlvariSTAR Installation Manual
v
About This Manual
This manual describes how to install the AlvariSTAR software and includes the
following chapters:
Chapter 1 - Introduction to Alvaristar Installation: Describes the AlvariSTAR
architecture and the minimum system requirements.
Chapter 2 - Pre-Installation Requirements: Provides details of information that
must be available and procedures to be performed before starting the
installation.
Chapter 3 - Installation on Windows OS: Describes server and client
installation on machines running Windows OS.
Chapter 4 - Installation on Solaris OS: Describes how server installation on
machines running Solaris OS.
Chapter 5 - Post-Installation Tasks: Describes tasks to be performed after
installation.
Chapter 6- Running Applications: Describes how to run AlvariSTAR.
Chapter 7 - System Maintenance: Describes procedures necessary for
maintaining the system.
Chapter 8 - Uninstalling AlvariSTAR: Describes how to remove AlvariSTAR
from machines running either Windows or Solaris operating systems.
This manual uses the following conventions:
Commands appear in special font: e.g., mkdir/opt/AlvariSTAR
Names of buttons appear in Bold and names of windows in italics: e.g., Click
Next. The License Agreement window appears.
<Text> means that an actual value is to be entered instead of the text in
between the angled brackets.
Contents
Chapter 1 - Introduction to AlvariSTAR Installation
1.1 About AlvariSTAR ......................................................................................................... 2
1.2 AlvariSTAR Architecture .............................................................................................. 3
1.2.1 Functional Architecture ........................................................................................ 3
1.2.2 AlvariSTAR Basic Components ........................................................................... 4
1.3 Operating System.......................................................................................................... 5
1.4 Database ........................................................................................................................ 6
1.5 Deployment Scenarios.................................................................................................. 7
1.6 Minimum Requirements................................................................................................ 8
Chapter 2 - Pre-installation Procedures
2.1 Pre-Installation Check List ......................................................................................... 10
2.1.1 Server Installation .............................................................................................. 10
2.1.2 Client Installation................................................................................................ 10
2.2 Server Installation on Windows OS........................................................................... 11
2.2.1 Configuring the Network..................................................................................... 11
2.3 Solaris OS Pre-installation Procedures .................................................................... 14
2.3.1 Limitations and Special Notes for Installation on Solaris OS ............................. 14
2.3.2 Creating an Installation Folder ........................................................................... 15
2.4 Configuring the Oracle Database .............................................................................. 16
2.4.1 Installing and Running the Oracle Database...................................................... 16
2.4.2 Defining the Required Environment Variables ................................................... 18
2.4.3 Testing Oracle Client Connectivity ..................................................................... 19
Contents
Chapter 3 - Installation on Windows OS
3.1 Overview ...................................................................................................................... 22
3.2 Steps Common to All Installation Procedures ......................................................... 23
3.3 Server Installation ....................................................................................................... 26
3.3.1 Installation with MySQL...................................................................................... 28
3.3.2 Installation with Oracle DB ................................................................................. 30
3.4 Client Installation ........................................................................................................ 35
Chapter 4 - Installation on Solaris OS
4.1 Installation ................................................................................................................... 42
Chapter 5 - Running Applications
5.1 Running AlvariSTAR on Windows OS....................................................................... 52
5.1.1 Manually Starting and Stopping AlvariSTAR...................................................... 52
5.1.2 Verifying the Application Server State................................................................ 52
5.2 Running AlvariSTAR on Solaris OS .......................................................................... 53
5.2.1 Manually Starting and Stopping the AlvariSTAR Daemon ................................. 53
5.2.2 Verifying the Application Server State................................................................ 53
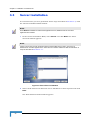
Chapter 6 - Post Installation Tasks
6.1 Enabling E-Mail Notification of Alarms & Events..................................................... 56
6.2 Synchronizing the Time Zone Settings ..................................................................... 57
6.2.1 Verifying and Setting the Internal Clock ............................................................. 57
6.2.2 Verifying and Tuning Server and Client Time .................................................... 58
6.3 Installing the License.................................................................................................. 60
Chapter 7 - System Maintenance
7.1 Memory Tuning............................................................................................................ 62
7.2 Database Management ............................................................................................... 63
7.2.1 Oracle Database Backup ................................................................................... 63
viii
AlvariSTAR Installation Manual
Contents
7.2.2 MySQL Backup/Restore..................................................................................... 63
7.3 File System Maintenance............................................................................................ 67
Chapter 8 - Uninstalling AlvariSTAR
8.1 Uninstalling AlvariSTAR ............................................................................................. 70
8.1.1 Windows OS ...................................................................................................... 70
8.1.2 Solaris OS .......................................................................................................... 72
8.2 Removing AlvariSTAR Data from Oracle .................................................................. 76
AlvariSTAR Installation Manual
ix
1
Chapter 1 - Introduction to AlvariSTAR
Installation
In This Chapter:
“About AlvariSTAR” on page 2
“AlvariSTAR Architecture” on page 3
“Operating System” on page 5
“Database” on page 6
“Deployment Scenarios” on page 7
“Minimum Requirements” on page 8
Chapter 1 - Introduction to AlvariSTAR Installation
1.1
About AlvariSTAR
AlvariSTAR is a comprehensive, Carrier-Class Network Management System
(NMS) for Alvarion Broadband Wireless Access (BWA) product based networks. It
enables service providers to monitor, manage and optimize the operation and
performance of Alvarion BWA networks.
2
AlvariSTAR Installation Manual
AlvariSTAR Architecture
1.2
AlvariSTAR Architecture
1.2.1
Functional Architecture
AlvariSTAR focuses on the Element Management System (EMS) and Network
Management System (NMS) layers of Telecommunication Management Networks
(TMN) to provide FCAPS management functions:
Fault Management - Alarm observation including alarm and state report,
correlation, suppression, alarm sorting, filtering and reports, alarm log,
summarized alarms and acknowledgment, color coding and forwarding to
upper level management systems.
Configuration Management - Device discovery and scheduled periodical
updates, hierarchical location and contacts management, single and multiple
unit configuration and software upgrade, services provisioning, unit and board
configuration, telephony and data service provisioning, logical and
geographical topology views and inventory management.
Performance Management - Monitoring of over-the-air traffic load, Device
discovery and scheduled periodical updates, hierarchical location and
contacts management, single and multiple unit configuration and software
upgrade, services provisioning, unit and board configuration, telephony and
data service provisioning, logical and geographical topology views and
inventory management.
Security Management - AlvariSTAR and subscriber security facilities
including management users, user groups, functional permissions and
passwords for multi-level authorizations and access protection.
AlvariSTAR multi-layer archi-functional architecture comprises an infrastructure
layer providing common functionality including inventory, faults, topology, log
and reports, SW download, performance monitoring and security. The Device
Drivers layer enables to add management, configuration and service provisioning
capabilities that may differ among various BWA product families. The common
infrastructure can be integrated with either one or several Device Drivers,
according to need.
AlvariSTAR Installation Manual
3
Chapter 1 - Introduction to AlvariSTAR Installation
Figure 1-1: AlvariSTAR Architecture
1.2.2
AlvariSTAR Basic Components
AlvariSTAR is an N-Tyer type system that can be divided into three major
sub-systems:
Application Server - The Application Server, which typically runs on a
dedicated server, enables the system to process incoming events and
communicate with equipment and network devices.
Database Server - The Database Server provides the centralized storage for all
data in the AlvariSTAR application.
Client Application – An end-user application with a Java based Graphical
User Interface (GUI) that enables user access to AlvariSTAR management
information and processes.
4
AlvariSTAR Installation Manual
Operating System
1.3
Operating System
AlvariSTAR can only be installed on machines with one of the following operating
systems installed:
Microsoft Windows operating systems: Windows XP Professional, Windows
2000 Professional, Windows 2000 Server, Windows 2000 Advanced Server,
Windows 2003 Server.
SUN Solaris operating systems: Solaris 9 or 10.
AlvariSTAR Installation Manual
5
Chapter 1 - Introduction to AlvariSTAR Installation
1.4
Database
MySQL and Oracle database installations are supported. The MySQL database
installation is available only on Microsoft supported platforms and is integrated
with the AlvariSTAR installation. In installations in which a Oracle database is to
be used, the Oracle database must be acquired and installed separately.
6
AlvariSTAR Installation Manual
Deployment Scenarios
1.5
Deployment Scenarios
AlvariSTAR is designed to work in networks of varying sizes. You can customize
the system to work as an entry-level single server for a small deployment, or you
can scale it out to manage a more complex deployment. AlvariSTAR’s flexible
design enables you to continuously change and scale the deployment as your
network needs grow.
Entry Level (Single Server) Configuration – The ideal solution for smaller
network environments. In single server deployment, all sub-systems are
installed on a single machine. The client application can be installed on
additional computers to provide management access to the system from a
number of locations. The client application is only supported on Microsoft
platforms.
Distributed Configuration – Suitable for most network environments. In a
distributed configuration, the application and database servers can be
installed on different machines in various combinations: for example,
application server on one machine, database server on another machine, and
client applications on additional machines.
NOTE
The application servers and database server must all run the same type of operating system.
Combinations of different operating systems are not supported.
AlvariSTAR Installation Manual
7
Chapter 1 - Introduction to AlvariSTAR Installation
1.6
Minimum Requirements
The requirements for the machines vary depending on your network topology and
installation configuration.
The minimum configuration of any system should be based on expected peak load
and number of managed elements.
To view the most up-to-date requirements, download the latest Release Note from
Alvarion’s web site:
8
1
Visit Alvarion’s web site at www.alvarion.com.
2
Go to the Customer Service area and select Product Support.
3
Enter your Username and Password and click Enter.
4
In the Product Support window:
a
Select Product Line: AlvariSTAR
b
Select Product Series
c
Select Topic: Operating Software Downloads
d
Click Go. Download the last Release Note from the list.
AlvariSTAR Installation Manual
2
Chapter 2 - Pre-installation Procedures
Before beginning the AlvariSTAR installation, you will need to check that you have
all the necessary information and that you have performed pre-installation
procedures.
A data migration utility is available for migrating from AlvariSTAR Version 2.6 to
Version 3.0. The data migration utility saves information, such as security
settings, contacts, etc., that is stored in the database. The utility can be obtained
from the Alvarion web site.
In This Chapter:
“Pre-Installation Check List” on page 10
“Configuring the Network” on page 11.
“Solaris OS Pre-installation Procedures” on page 14
“Configuring the Oracle Database” on page 16
Chapter 2 - Pre-installation Procedures
2.1
Pre-Installation Check List
Before starting to install AlvariSTAR, contact the system administrator and verify
the following information, depending on the type of installation mode:
2.1.1
Server Installation
Folder location: Server installation requires 1.3GB disk space. Verify in
which folder the software will be installed.
Server IP: For systems with more than one NIC (network identity card)
installed, verify the IP address on which the server will listen to client
requests.
Root password: For installations on Solaris OS, verify the root password.
For installations using Oracle DB:
Verify the Oracle server URL (host or IP, port, SID)
Verify the Oracle system password
Define the name for the AlvariSTAR scheme.
Define the password for the AlvariSTAR scheme. Follow the Oracle
password policy.
2.1.2
Client Installation
Folder location: Client installation requires 0.5 GB disk space. Verify in
which folder the software will be installed.
Server IP: Verify the server IP address.
Partition Name: Verify the partition name of the server.
10
AlvariSTAR Installation Manual
Server Installation on Windows OS
2.2
Server Installation on Windows OS
The computer on which the server is installed must meet minimal hardware
and software requirements. For further information refer to the Release Notes.
The computer should be dedicated to running AlvariSTAR.
Uninstall any previous versions of AlvariSTAR that were installed on the
server.
If MySQL is installed on the server, uninstall before proceeding with
AlvariSTAR installation.
Log in to the system with administrator privileges.
If using Oracle DB, verify that the Oracle client is configured properly and that
the AlvariSTAR can reach the Oracle server. See Section 2.4 for more details.
2.2.1
Configuring the Network
AlvariSTAR must be installed on a machine with a valid network connection and a
valid IP address.
IMPORTANT
As the license mechanism includes the IP and MAC address, it is essential that the IP address is a
static address.
AlvariSTAR supports multiple NIC servers. Before starting installation, the user
must choose which NIC the server will use to communicate with the clients. Due
to the limitations of Windows, once selected, the NIC must be the first connection
to appear in the connection list as it appears in the Windows operating system
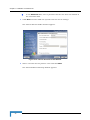
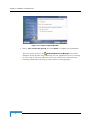
To set the NIC order:
1
From the Windows Start menu, select Control Panel—Network Connections
(Network and Dialup Connections).
2
Select Advanced Settings from the Advanced menu in the toolbar at the top of
the window.
AlvariSTAR Installation Manual
11
Chapter 2 - Pre-installation Procedures
3
Use the arrows to move the network card that you have selected to the top of
the connections list in the Adapters and Bindings folder and click OK.
2.2.1.1
Configuring Network Ports
The following ports between the server machine and the managed network
equipment must be open.
TFTP — 69 (UDP)
SNMP — 161, 162 (UDP)
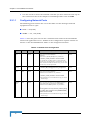
Table 2-1 lists the ports used in the communication between the AlvariSTAR
clients and application server. All files in the Configuration Option column are
relative to the AlvariSTAR home folder on the designated machine.
Table 2-1: Network Ports Configuration
Bootstrap
port
Def.Port
Direction
Protocol
3100
Client to
Server
TCP
Configuration Option
Configure on
<mbean code="org.jboss.ha.jndi.HANamingService"
name="jboss:service=HAJNDI">
<attribute
name="Port">@NODE_NUM@3100</attribute>
in oware/conf/cluster-service.xml
App.
Server
You should only configure this in conjunction with
the discovery override property on the client. See the
above section for details on the discovery process and
the discovery override procedure.
Naming
Service
1099
Client to
Server
TCP
oware.listenport.appserver
in oware/lib/owappserver.properties
App.
Server
HA RMI
Port
User
def
Client to
Server
TCP
<mbean code="org.jboss.ha.jndi.HANamingService"
name="jboss:service=HAJNDI">
<attribute name="RmiPort">0</attribute>
App.
Server
in
oware/conf/cluster-service.xml
If left 0 (default) the server will bind to any port in the
0 - 65535 range.
RMI
Adaptor
Port
User
def
Client to
Server
TCP
<mbean
code="org.jboss.jmx.adaptor.rmi.RMIAdaptorService"
name="jboss.jmx:type=Connector,name=RMI">
<attribute name="RMIObjectPort">0</attribute>
App.
Server
in
oware/jboss-3.0.8/server/oware/dep
loy/jmx-rmi-adaptor.sar/META-INF/
jboss-service.xml
If left 0 (default) the server will bind to any port in the
0 - 65535 range.
12
AlvariSTAR Installation Manual
Server Installation on Windows OS
Table 2-1: Network Ports Configuration
JRMP
Invoker
Def.Port
Direction
Protocol
4444
Client to
Server
TCP
Configuration Option
<mbean
code="org.jboss.invocation.jrmp.server.JRMPInvoker"
name="jboss:service=invoker,type=jrmp"><attribute
name="RMIObjectPort">4444</attribute>
in
SoniqMQ
Client
Port
2506
RMI Port
User
def
Client to
Server
TCP
Client to
Server
TCP
oware/lib/owappserver.properties
<mbean code="org.jboss.naming.NamingService"
name="jboss:service=Naming">
<attribute name="RmiPort">0</attribute>
in
App.
Server
oware/conf/jboss-root-service.xml
com.dorado.jms_vendor.port.sonicmq
in
Configure on
App.
Server
App.
Server
oware/conf/jboss-root-service.xml
If left 0 (default) the server will bind to any port in the
0 - 65535 range.
AlvariSTAR Installation Manual
13
Chapter 2 - Pre-installation Procedures
2.3
Solaris OS Pre-installation Procedures
NOTE
It is recommended to create a distinct user (e.g. alvari) for the installation (and ownership) of the
AlvariSTAR installation.
Install the patches specified in this section on all Solaris machines on which
AlvariSTAR system components will be installed.
The installation software and runtime environment use standard Sun Solaris
JDK which requires a minimum set of patches to be installed onto Solaris in
order to run.
The patch cluster can be downloaded from:
http://sunsolve.sun.com/pub-cgi/show.pl?target=patchpage
Additional patches for a particular machine can be downloaded from Sun via
the PatchPro Expert Applet (http://patchpro.sun.com/).
Select the Solaris version from the Operating System Release dropdown menu
and read the README file or download the cluster of patches.
Install the patches using the patchadd(1M)utility according to the
instructions given in patchadd(1M)as well as in the Solaris AnswerBook.
NOTE
AlvariSTAR requires, and ships with, JDK 1.5.1.
2.3.1
Limitations and Special Notes for Installation
on Solaris OS
Due to a bug in Sun Solaris JDK (bugid 4281163), the AlvariSTAR installation
process requires access to a Sun X11 environment, even in cases when no Java
graphics are displayed. To provide X11 access, do one of the following:
1
Install the software on a Solaris system with a graphics card, monitor and X
Window System.
2
Install the software on a Solaris system remotely from a machine that is
running X Window System (e.g. another Solaris workstation, X Window on
14
AlvariSTAR Installation Manual
Solaris OS Pre-installation Procedures
Linux or Windows with X Window Server) - Make sure “xhost +” has been
run on the target Solaris server in order to allow connections from X
Terminals.
2.3.2
Creating an Installation Folder
Before installing AlvariSTAR you must create an installation folder to host the
installation and make sure the designated user has full rights on it. The default
folder is /opt/AlvariSTAR). Before creating the folder, make sure that you know
the user name and group of the user who will install AlvariSTAR.
1
Log in as user root.
2
Enter the following command to create the folder:
mkdir/opt/AlvariSTAR
3
Enter the following command to change the owner type of the folder:
chown <user>:<group> /opt/AlvariSTAR
where <user> and <group> are the actual names defined for the user installing
AlvariSTAR.
4
Enter the following command to verify the user’s rights:
ls –ld /opt/AlvariSTAR
The owner is displayed in the third and forth columns.
NOTE
In order to log in as user root, enter: SU - followed by the root password from any Telnet/terminal
session.
5
Log out from user root.
AlvariSTAR Installation Manual
15
Chapter 2 - Pre-installation Procedures
2.4
Configuring the Oracle Database
NOTE
The Oracle database should be installed separately according to the installation instructions
provided by Oracle before installing the AlvariSTAR software.
The Oracle Database Configuration procedure consists of:
1
Installing the Oracle software on the Oracle DB Server, according to the
instructions provided by Oracle.
2
Performing additional configuration instructions as described in this chapter.
3
For machines on which the AlvariSTAR Application Server will be installed:
Installing Oracle Client software including: SQLNet8, sqlplus, and JDBC
driver.
Performing additional configuration procedures.
2.4.1
Installing and Running the Oracle Database
1
Install the Oracle software on the Oracle DB Server, according to the
instructions provided by Oracle.
2
Create an Oracle DB to be used by AlvariSTAR (instance). Make sure the
created instance runs.
3
Install Oracle Client software including SQLNet8, sqlplus, and JDBC driver
on the machine on which the Application Server is installed.
4
Configure the Oracle TNS service using Oracle Net8 Configuration Assistant
or by manually editing the
%ORACLE_HOME%/network/admin/tnsnames.ora file. Make sure that the
local service name for the database is identical to the SID (System Identifier) of
the database on the database server.
5
On the database server, check the Oracle initialization parameters in the file
init<InstanceSID>.ora. AlvariSTAR will usually work with the default
database settings. For larger deployments and fine tuning alter the
initialization file and make sure that the minimums below are met. We
recommend checking all modifications to these files with your Oracle DBA.
shared_pool_reserved_size = 12 MB
shared_pool_size = 256 MB
16
AlvariSTAR Installation Manual
Configuring the Oracle Database
open_cursors = 300
processes = 150
job_queue_processes = 10
sort_area_size = 524 KB
sort_area_retained_size = 0
db_cache_size = 752 MB
large_pool_size = 144 MB
java_pool_size = 24 MB
NOTE
These are guidelines. For large deployments we recommend that a qualified DBA fine tune the DB
instance parameters.
AlvariSTAR Installation Manual
17
Chapter 2 - Pre-installation Procedures
2.4.2
Defining the Required Environment Variables
If you are working on a Windows machine, skip to Section 2.4.3.
In order for AlvariSTAR to run with Oracle, several Oracle related environment
variables need to be set for the user installing AlvariSTAR on the Oracle client
machine. If you are using /bin/sh or /bin/bash, edit the .profile file in its home
directory.
The following environment variables should be set in order to run AlvariSTAR with
Oracle:
ORACLE_HOME
PATH
LD_LIBRARY_PATH
The following instructions assume that Oracle client has been installed in the
/opt/oracle folder.
ORACLE_HOME=/opt/oracle
PATH=$ORACLE_HOME/bin:/usr/bin:/etc:/usr/ccs/bin:/usr/openwin/bin
:$PATH
LD_LIBRARY_PATH=$ORACLE_HOME/lib32:/usr/local/lib:$LD_LIBRARY_PAT
H
export ORACLE_HOME
export PATH
export LD_LIBRARY_PATH
If using /bin/csh edit the .cshrc file in the user home directory:
setenv ORACLE_HOME /opt/oracle
setenv PATH $ORACLE_HOME/bin:/usr/bin:/etc:/usr/ccs/bin:/usr/openw
in/bin:$PATH
setenv LD_LIBRARY_PATH $ORACLE_HOME/lib32:/usr/local/lib:$LD_LIBRA
RY_PATH
18
AlvariSTAR Installation Manual
Configuring the Oracle Database
2.4.3
Testing Oracle Client Connectivity
To test connectivity to the database server from the AlvariSTAR machine, use the
sqlplus utility as follows:
1
Assuming that the database SID is testme, switch to the command prompt and
enter the following command:
sqlplus system@testme
You will be prompted for the password for the user system. If the SQL prompt
is displayed, connectivity to the database server is confirmed. Any error
message should be reported to and resolved by the DBA.
2
Enter exit or quit to complete the procedure.
AlvariSTAR Installation Manual
19
3
Chapter 3 - Installation on Windows OS
This chapter describes how to install AlvariSTAR on Windows operating systems.
In This Chapter:
“Overview” on page 22.
“Steps Common to All Installation Procedures” on page 23.
“Server Installation” on page 26.
“Client Installation” on page 35.
Chapter 3 - Installation on Windows OS
3.1
Overview
AlvariSTAR comprises a number of components which can be installed and run on
a single machine, or installed and run on separate machines in various
combinations as independent processes.
NOTE
Before starting installation, verify that you have all the necessary information and that you have
carried out all the necessary procedures as outlined in Chapter 2.
You can select one of the following installation options:
Server – Used for Entry Level Single-server configurations. It installs all the
system components (Application Server, Database Server, and Client
Application) on the same host.
Client – Used to install the Client software on additional machines. The
installation does not configure the machine to run the Application Server or
Database Server.
Some of the steps (described in the following section) are common to all
installations, while others differ according to the installation option selected and
are detailed in their respective sections.
NOTE
All the installation steps are saved in a log file <INSTALL_ROOT> AlvariSTAR_InstallLog.log.
22
AlvariSTAR Installation Manual
Steps Common to All Installation Procedures
3.2
Steps Common to All Installation
Procedures
1
Log in to the computer on which the installation is to be performed as a user
with administrator privileges.
2
To begin the installation:
Double-click the install.exe file directly from the AlvariSTAR Install CD;
OR
For FTP installations, copy the AlvariSTAR directory to your hard-drive
and click install.exe.
The install.exe file can be found at Disk1\InstData\Windows\VM\
CAUTION
When copying or downloading the installation kit to a local disk, make sure you copy the entire
content of the kit - not only the install.exe file.
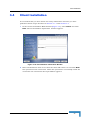
InstallAnyware is activated.
Figure 3-1: InstallAnywhere Initialization
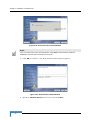
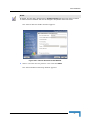
3
Wait until InstallAnywhere has completed the initialization. An Introduction
window appears.
NOTE
During installation, a console screen is displayed in the background behind the installation windows.
This screen does not require user intervention and should be ignored.
AlvariSTAR Installation Manual
23
Chapter 3 - Installation on Windows OS
Figure 3-2: Introduction Window
4
Review the information and click Next.
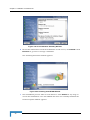
The License Agreement window appears.
Figure 3-3: License Agreement Window
5
Accept the terms of the license agreement and click Next.
The Choose Install Folder window appears.
24
AlvariSTAR Installation Manual
Steps Common to All Installation Procedures
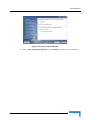
Figure 3-4: Choose Install Folder Window
6
To accept the default destination folder, click Restore Default Folder. To
change the directory: either enter the complete path (if the directory does not
exist, it will be created automatically by the system) or click Choose to locate
an existing directory and click Next. The Choose Installation Mode window
appears.
Figure 3-5: Choose Installation Mode Window
7
Choose the installation mode and click Next.
AlvariSTAR Installation Manual
25
Chapter 3 - Installation on Windows OS
3.3
Server Installation
It is assumed that you have performed all the steps described in Section 3.2, until
the Choose Installation Mode window.
NOTE
When Server installation is selected the Application Server, Database Server and Client
Application are installed.
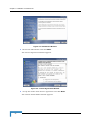
1
In the Choose Installation Mode, select Server and click Next. The Select
Server IP window appears.
NOTE
If there is more than one NIC (network interface card) installed in the system, a list of the IP
addresses for each NIC appears in the Select Server IP window. Make sure that the selected IP is
setup as described in Section 2.1.1.
Figure 3-6: Select Server IP Window
2
Select the IP address on which the server will listen to client requests and click
Next.
The Enter Partition Name window appears.
26
AlvariSTAR Installation Manual
Server Installation
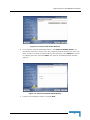
Figure 3-7: Enter Partition Name Window
3
Specify a Partition Name for the server (by default, the system displays the
host name in capital letters). Verify that it is unique in the network (the
partition name is CASE sensitive). All other AlvariSTAR system elements will
refer to this name. Click Next.
The Choose Database Type window appears.
Figure 3-8: Choose Database Type Window
4
Select the database support to be installed and click Next.
AlvariSTAR Installation Manual
27
Chapter 3 - Installation on Windows OS
3.3.1
Installation with MySQL
NOTE
The MySQL database installation is integrated with the AlvariSTAR installation and does not require
any special configuration or preparation.
1
Select MySQL from the Choose Database Type window and click Next.
The Choose Shortcut Folder window appears.
Figure 3-9: Choose Shortcut Folder Window
2
Select a location for the product icons and click Next.
The Pre-Installation Summary window appears.
28
AlvariSTAR Installation Manual
Server Installation
Figure 3-10: Pre-Installation Summary Window
3
Review the information and if the definitions are all correct, click Install. Click
Previous to go back to change a definition.
The Installing Alvaristar window appears.
Figure 3-11: Installing AlvariSTAR Window
4
The installation process takes several minutes. Click Cancel at any stage to
cancel the installation. Once AlvariSTAR has been successfully installed the
Install Complete window appears.
AlvariSTAR Installation Manual
29
Chapter 3 - Installation on Windows OS
Figure 3-12: Install Complete Window
5
Select Yes, restart the system and click Done in order to initialize the
AlvariSTAR service.
After the system restarts, the
AlvariSTAR Process Manager icon will be
displayed on the System Tray indicating the application server is starting up.
The color on the icon will indicate the status of the service: Red when not
running, Yellow while starting up; Green when running properly.
3.3.2
Installation with Oracle DB
NOTE
Before installing AlvariSTAR with an Oracle DB, configure the database as described in
Section 2.4.
1
Select Oracle from the Choose Database Type window (Figure 3-8) and click
Next. The Database Information window appears.
30
AlvariSTAR Installation Manual
Server Installation
Figure 3-13: Database Information Window
2
Define the parameters as follows:
In the Database URL field, enter the ID (name or IP) of the computer on
which the Oracle DB is running, in the format host:port:SID
where:
¾ host = host name or IP address of the machine where the Oracle DB is
installed. Make sure that the specified database host is accessible. If
you entered a hostname rather than an IP address, you should be able
to ping that hostname (that is the hostname should be properly
resolved by operating system).
¾ port = port number to access DB (default = 1521)
¾ SID = Oracle System Identifier.
For example, a database URL may look like one of the following:
¾ 10.0.22.200:1521:testme
¾ myhost:1521:testme
In the SYSTEM Password field, enter the Oracle system password that is
necessary in order to create an AlvariSTAR user in Oracle.
In the Username field, enter a username for the AlvariSTAR schema
within the Oracle instance. Do not specify an existing or reserved
username (e.g. system, sys, internal, scott).
AlvariSTAR Installation Manual
31
Chapter 3 - Installation on Windows OS
In the Password field, enter a password for the user that was defined in
the Username field.
3
Click Next and wait while the system tests the Oracle settings.
The Choose Shortcut Folder window appears.
Figure 3-14: Choose Shortcut Folder Window
4
Select a location for the product icons and click Next.
The Pre-Installation Summary window appears.
32
AlvariSTAR Installation Manual
Server Installation
Figure 3-15: Pre-Installation Summary Window
5
Review the information and if the definitions are all correct, click Install. Click
Previous to go back to change a definition.
The Installing Alvaristar window appears.
Figure 3-16: Installing AlvariSTAR Window
6
The installation process takes several minutes. Click Cancel at any stage to
cancel the installation. Once AlvariSTAR has been successfully installed the
Install Complete window appears.
AlvariSTAR Installation Manual
33
Chapter 3 - Installation on Windows OS
Figure 3-17: Install Complete Window
7
Select Yes, restart the system and click Done to complete the installation.
After the system restarts, the
AlvariSTAR Process Manager icon will be
displayed on the System Tray indicating that the application server is starting
up. The color on the icon indicates the status of the service: Red when not
running, Yellow while starting up; Green when running properly.
34
AlvariSTAR Installation Manual
Client Installation
3.4
Client Installation
It is assumed that you have all the necessary information and that you have
performed all the steps described in Section 2.1.2 and Section 3.2.
1
In the Choose Installation Mode window (Figure 3-5), select Client and click
Next. The Pre-Installation Information window appears.
Figure 3-18: Pre-Installation Information Window
2
Enter an IP address of the server that the client will connect to and click Next.
The system tests the connection. When the system has successfully tested the
connection the Connection Succesful window appears.
AlvariSTAR Installation Manual
35
Chapter 3 - Installation on Windows OS
Figure 3-19: Connection Successful Window
NOTE
If the connection fails an error message appears. Click Back to enter another IP address or
Continue to continue without connecting to the server.
3
Click OK to continue. The Enter Partition Name window appears.
Figure 3-20: Enter Partition Name Window
4
36
Specify a Partition Name for the server and click Next.
AlvariSTAR Installation Manual
Client Installation
NOTE
By default, the name that is displayed in the Partition Name field is the host name of machine
on which the client is installed. This must be changed to the partition name of the server.
The Choose Shortcut Folder window appears.
Figure 3-21: Choose Shortcut Folder Window
5
Select a location for the product icons and click Next.
The Pre-Installation Summary window appears.
AlvariSTAR Installation Manual
37
Chapter 3 - Installation on Windows OS
Figure 3-22: Pre-Installation Summary Window
6
Review the information and if the definitions are all correct, click Install. Click
Previous to go back to change a definition.
The Installing Alvaristar window appears.
Figure 3-23: Installing AlvariSTAR Window
7
The installation process takes several minutes. Click Cancel at any stage to
cancel the installation. Once AlvariSTAR has been successfully installed the
Install Complete window appears.
38
AlvariSTAR Installation Manual
Client Installation
Figure 3-24: Install Complete Window
8
Select Yes, restart the system and click Done to complete the installation.
AlvariSTAR Installation Manual
39
4
Chapter 4 - Installation on Solaris OS
This chapter describes how to install AlvariSTAR on Solaris operation systems.
NOTE
Before starting the installation, verify that you have all the necessary information and that you have
carried out all the necessary procedures as outlined in Chapter 2.
Also, uninstall any previous installation of AlvariSTAR. To uninstall AlvariSTAR, refer to
Chapter 8.
In This Chapter:
“Installation” on page 42
Chapter 4 - Installation on Solaris OS
4.1
Installation
NOTE
All the installation steps are saved in a log file <INSTALL_ROOT> AlvariSTAR_InstallLog.log.
MySQL is NOT supported on installations on Solaris OS. Before installing AlvariSTAR with an
Oracle DB, configure the database as described in Section 2.4.
1
Log in as the defined User. It is recommended that you create a dedicated user
to install and own the AlvariSTAR installation.
2
To begin the installation:
Run the install.bin file directly from the AlvariSTAR Install CD;
For FTP installations, copy the entire installation kit to your hard-drive and
run install.bin. Note that you might have to set executable permissions on
the install.bin file. Do this by using the chmod a+x install.bin command in
the folder where the installation files reside.
The install.bin file can be found at Disk1/InstData/Solaris/VM/
InstallAnyware is activated.
3
Wait until InstallAnywhere has completed the initialization. An Introduction
window appears.
Figure 4-1: Introduction Window
42
AlvariSTAR Installation Manual
Installation
4
Review the information and click Next.
The License Agreement window appears.
Figure 4-2: License Agreement Window
5
Accept the terms of the license agreement and click Next.
The Choose Install Folder window appears.
Figure 4-3: Choose Install Folder Window
AlvariSTAR Installation Manual
43
Chapter 4 - Installation on Solaris OS
6
To revert to the default destination folder, click Restore Default Folder. To
change the directory: either enter the complete path or click Choose to locate
an existing directory; then, click Next.
Make sure that the user that you are logged on as has full permissions on the
folder designated for installation. If the folder does not exist make sure you
have create rights on its parent folder.
The Choose Installation Mode window appears.
Figure 4-4: Choose Installation Mode Window
7
Choose Server and click Next. The Select Server IP window appears.
NOTE
If there is more than one NIC (network interface card) installed in the system, a list of the IP
addresses for each NIC appears in the Select Server IP window.
44
AlvariSTAR Installation Manual
Installation
Figure 4-5: Select Server IP Window
8
Select the IP address on which the server will listen to client requests and click
Next.
The Enter Partition Name window appears.
Figure 4-6: Enter Partition Name Window
9
Specify a Partition Name for the server (by default, the system displays the
host name in capital letters). Verify that it is unique in the network (the
partition name is CASE sensitive). All other AlvariSTAR system elements will
refer to this name. Click Next.
AlvariSTAR Installation Manual
45
Chapter 4 - Installation on Solaris OS
The Oracle Database Information window appears.
Figure 4-7: Oracle Database Information Window
46
AlvariSTAR Installation Manual
Installation
10 Define the parameters as follows:
In the Database URL field, enter the ID (name or IP) of the computer on
which the Oracle DB is running, in the format host:port:SID
where:
¾ host = host name or IP address of the machine where the Oracle DB is
installed. Make sure that the specified database host is accessible. If
you entered a hostname rather than an IP address, you should be able
to ping that hostname (that is the hostname should be properly
resolved by operating system).
¾ port = port number to access DB (default = 1521)
¾ SID = Oracle System Identifier.
For example, a database URL may look like one of the following:
¾ 10.0.22.200:1521:testme
¾ myhost:1521:testme
In the SYSTEM Password field, enter the Oracle system password that is
necessary in order to create an AlvariSTAR user in Oracle.
In the Username field, enter a username for the AlvariSTAR schema within
the Oracle instance. Do not specify an existing or reserved username (e.g.
system, sys, internal, scott).
In the Password field, enter a password for the user that was defined in the
Username field.
11 Click Next and wait while the system tests the Oracle settings.
The Pre-Installation Summary window appears.
AlvariSTAR Installation Manual
47
Chapter 4 - Installation on Solaris OS
Figure 4-8: Pre-Installation Summary Window
12 Review the information and if the definitions are all correct, click Install. Click
Previous to go back to change a definition.
The Installing Alvaristar window appears.
Figure 4-9: Installing AlvariSTAR Window
13 The installation process takes several minutes. Click Cancel at any stage to
cancel the installation. During the last stage of the installation process you
will be prompted to run a script command under the user root ( Figure 4-10).
48
AlvariSTAR Installation Manual
Installation
Figure 4-10: Root Script Execution Message
14 Log in as user root, run the script and click OK.
NOTE
In order to log in as user root, enter: SU - followed by the root password from any Telnet/terminal
session.
IMPORTANT
In some x-window emulations, you might encounter difficulties in executing the root script. This is
because the window that prompts you to execute the script always remains active. If you have a
problem, use one of the following solutions to run the script:
1
Minimize the installation screen and open a new telnet console.
2
Switch to working with a different CDE workspace, run the script, and then switch back to the
original workspace.
3
Open a non x-window telnet session (run ' telnet) and execute the script.
The Install Complete window appears.
AlvariSTAR Installation Manual
49
Chapter 4 - Installation on Solaris OS
Figure 4-11: Install Complete Window
4
50
Click Done to quit the installer.
AlvariSTAR Installation Manual
5
Chapter 5 - Running Applications
This chapter describes how to run AlvariSTAR.
In This Chapter:
“Running AlvariSTAR on Windows OS” on page 52
“Running AlvariSTAR on Solaris OS” on page 53
Chapter 5 - Running Applications
5.1
Running AlvariSTAR on Windows OS
The Application Server runs as a Windows Service. By default the service is
configured to run on system initialization. To start or stop the service, select
Control Panel—Administrative Tools—Services from the Start Menu.
Run AlvariSTAR Client from the Start Menu.
5.1.1
Manually Starting and Stopping AlvariSTAR
Right-click on the AlvariSTAR icon in the Notification area (on the Status Bar) and
select Start/Stop.
5.1.2
Verifying the Application Server State
After installing the AlvariSTAR Server on Windows OS, an icon appears in the
Notification area (on the Status Bar). The icon’s color indicates the state of the
Application Server, as follows:
Application Server is up.
Application Server is down.
Application Server is shutting down/starting up
Service is down.
52
AlvariSTAR Installation Manual
Running AlvariSTAR on Solaris OS
5.2
Running AlvariSTAR on Solaris OS
The Application Server automatically runs as Daemon.
5.2.1
Manually Starting and Stopping the
AlvariSTAR Daemon
NOTE
The AlvariSTAR Setup application automatically configures the system to run the AlvariSTAR
application server as a daemon. However it is possible to start and stop the AlvariSTAR daemon
manually.
In order to start the AlvariSTAR server daemon after a manual stop use the
following command in superuser (root) mode:
/etc/rc2.d/S76owprocmon start
In order to manually stop the AlvariSTAR server daemon (for maintenance or
other tasks) use the following command in superuser (root) mode:
/etc/rc2.d/S76owprocmon stop
NOTE
In order to log in as user root, enter: SU - followed by the root password from any Telnet/terminal
session.
5.2.2
Verifying the Application Server State
In order to confirm that the server is up and running, log in as the user installing
AlvariSTAR and perform both of the following steps:
1
Use the following UNIX command:
ps -aef | grep java | grep server
When the server is up the command will display a result detailing the
AlvariSTAR process in the operating system. Otherwise, a blank prompt is
displayed.
2
Open the file:
<AlvariSTAR Root>/oware/jboss-3.2.3/server/oware/log/server.log
and locate the following line:
>>>>> Oware Application Server initialization COMPLETE. <<<<<
AlvariSTAR Installation Manual
53
6
Chapter 6 - Post Installation Tasks
This chapter describes the tasks to be performed after installation. Make sure you
install a Client before performing the post installation tasks.
In This Chapter:
“Enabling E-Mail Notification of Alarms & Events” on page 56
“Synchronizing the Time Zone Settings” on page 57
“Installing the License” on page 60
Chapter 6 - Post Installation Tasks
6.1
Enabling E-Mail Notification of Alarms &
Events
The Application Server host must be configured to send SMTP based e-mails to
notify operators/system users of alarms and events. The Application Server
requires an SMTP proxy server to relay the outgoing e-mails to the public Internet.
To enable the e-mail sending feature:
1
Shut down the AlvariSTAR Application Server (refer to Chapter 5).
2
Edit the properties file
<AlvariSTAR Root>/owareapps/redcell/lib/redcell.properties
3
Modify the variable: redcell.smtphost to the host name of the SMTP proxy in
your network.
4
Modify the variable: redcell.returnaddress to the reply e-mail address (if
required).
5
Start up the AlvariSTAR Application Server (refer to Chapter 5).
NOTE
SMTP port (25 / TCP) must be reserved for the AlvariSTAR server in order to send the outgoing
e-mails to the SMTP proxy.
56
AlvariSTAR Installation Manual
Synchronizing the Time Zone Settings
6.2
Synchronizing the Time Zone Settings
In order for the system to run smoothly, the internal clocks of the client machine
and the server machine must be synchronized. After AlvariSTAR is installed you
must make sure that both client and server are set to the same GMT time and
have the same time zone settings.
6.2.1
Verifying and Setting the Internal Clock
To set the internal clock in Windows systems:
1
From the Start Menu, select Control Panel—Date and Time.
2
Select the Time Zone tab and select GMT from the drop-down list.
3
Select the Date & Time tab and set the time so that is the same time as GMT.
4
Verify that the date is correct.
5
Select the Time Zone tab, select the regional time from the drop-down list and
click Apply.
To set the internal clock in Solaris systems:
1
Log in as user root.
2
Type date -u
GMT according to the clock in the computer is displayed in the following
format:
[ [mmdd] HHMM | mmddHHMM [cc] yy] [.SS]
where mm is the month, dd the day, HH the hour and MM the minutes.
3
Verify that this is the same time as GMT and if not, change the parameters
accordingly.
4
Type tzselect and enter the correct regional time.
5
After setting the time zone, type date to confirm correct time setting.
AlvariSTAR Installation Manual
57
Chapter 6 - Post Installation Tasks
NOTE
In order to log in as user root, enter: SU - followed by the root password from any Telnet/terminal
session.
6.2.2
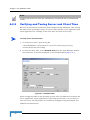
Verifying and Tuning Server and Client Time
Because of potential inconsistencies with daylight saving definitions, after setting
the times in the operating system, you must verify that the server application and
client application are running on the same time and tune if necessary.
To verify server and client time:
1
To verify server time, open the log file
<AlvariSTAR Root>/oware/jboss-3.2.3/server/oware/log/server.log
and check the last date stamp.
2
To view the client time, select Network Scan from the Task Manager window.
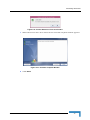
The client time is the time displayed in the Schedule Editor (Figure 6-1).
Figure 6-1: Schedule Editor
If after setting the times in the operating system, there are differences between the
server application, client application or operating system time, it is necessary to
tune the server and client times to override the daylight saving mechanism and
eliminate inconsistencies.
58
AlvariSTAR Installation Manual
Synchronizing the Time Zone Settings
To tune the server time:
1
In the <AlvariSTAR Root>/oware/bin/startappserver script file, locate the line
that starts with:
JAVA_OPTS="$SERVER_FLAG -Xrs -Xconcurrentio -XX:MaxPermSize=128m
-ms256m -mx1024m
2
…
Add the following after mx1024m :
-Duser.timezone=GMT+n
where n is the local offset from GMT
For example if the local offset from GMT is 2 hours, the line should read:
JAVA_OPTS="$SERVER_FLAG -Xrs -Xconcurrentio -XX:MaxPermSize=128m
-ms256m -mx1024m -Duser.timezone=GMT+2
3
…
Restart the server.
To tune the client time:
1
In the <AlvariSTAR Root>/oware/bin/owlaunch script file, locate the second
to last line that starts with:
$JAVA -Duser.timezone=GMT+n -Xconcurrentio -mx${MAX_MEM}
${LOCAL_IP_PROP} …
where n is the local offset from GMT
2
Make sure that the GMT offset parameter for the Duser timezone
(-Duser.timezone=GMT+n) is the same as for the server
NOTE
The location of the parameter in the argument line is crucial.
1
Restart the client.
2
After restarting the server and the client, verify that the times are now the
same on both.
AlvariSTAR Installation Manual
59
Chapter 6 - Post Installation Tasks
6.3
Installing the License
AlvariSTAR is supplied with a default license that is limited in time and in the
number of devices. If you obtained a permanent license from the supplier, refer to
Section 5.3 of the AlvariSTAR User Manual for instructions on how to install it.
60
AlvariSTAR Installation Manual
7
Chapter 7 - System Maintenance
This chapter describes how to configure memory allocation for the AlvariSTAR
application server.
In This Chapter:
“Memory Tuning” on page 62
“Database Management” on page 63
“File System Maintenance” on page 67
Chapter 7 - System Maintenance
7.1
Memory Tuning
As with any server system, proper memory tuning is crucial for the overall
AlvariSTAR system performance. This section allows you to configure in detail the
memory allocation for the AlvariSTAR application server.
To modify memory allocation settings on the application server edit the script file
oware/bin/startappserver and locate the line that starts with:
JAVA_OPTS="$SERVER_FLAG -Xconcurrentio -XX:MaxPermSize=128m -ms256m
-mx256m
The following two options can be used to control the memory allocation process:
-ms
Specify the initial size, in bytes, of the memory
allocation pool. This value must be a multiple
of 1024 greater than 1MB. Append the letter k
or K to indicate kilobytes, or m or M to indicate
megabytes.
Examples:
-ms6291456
-ms6144k
-ms6m
-mx
Specify the maximum size, in bytes, of the
memory allocation pool. This value must a
multiple of 1024 greater than 2MB. Append
the letter k or K to indicate kilobytes, or m or M
to indicate megabytes. The default value is 64
MB.
Examples:
-mx83886080
-mx81920k
-mx80m
62
AlvariSTAR Installation Manual
Database Management
7.2
Database Management
The AlvariSTAR is heavily dependent on the database for the most basic
operations. A database crash will cause the system to stop functioning and may
cause loss of data.
Although most of the operational data is kept in the Base Station's internal
database, the following data is kept only in the AlvariSTAR database:
NMS security setting (User, Groups, permissions etc.)
IP list for the discovered network + SNMP details
Location schema and the correlated maps files
Contact information
PM collection tasks and data
Configuration backup files
NMS license keys
Trap settings (NMS severity, filters, views, northbound etc.)
Traps history.
7.2.1
Oracle Database Backup
For Oracle fault tolerance, back up your Oracle database. To do this, we
recommend using Oracle's Recovery Manager (RMAN) backup utility. This is an
Oracle tool that lets you back up, copy, restore, and recover data files, control
files, and archived redo logs. It is included with Oracle server and does not require
a separate installation.
7.2.2
MySQL Backup/Restore
The Backup/Restore procedures described are based on the standard tools
provided by MySQL distribution.
The basic backup procedure is mysqldump.exe. The backup files created should
be saved on separate media/storage for increased preservation. For further details
go to http://dev.mysql.com/doc/refman/4.1/en/mysqldump.html.
AlvariSTAR Installation Manual
63
There are two main backup methods:
Full backup - backups all the data every time the process is executed.
Incremental backup - backups all the data once, and then backups only the
changes made in the DB since the last full backup
This section deals with the full backup. For more information on the increment
backup see:http://dev.mysql.com/doc/refman/4.1/en/mysqlbinlog.html.
7.2.2.1
Examples
Example 1:
The following is an example of a DOS batch file that can be used to back up the
database and thus provide the means to successfully restore:
::@ECHO OFF
:: Initializing
:: MySQL user & password
SET sMySQLAccess=-uoware -pdorado
:: databases to backed up
SET sDatabases=--databases bwanms owbusdb
:: full path for MySQL executables
SET
sMySQLBinPath=%OWARE_USER_ROOT%\oware3rd\mysql\mysql-4.1.16-wi
n32\bin\
:: directory for backup files
SET sBackupFileDir=C:\
:: generate an exact timestamp to be used a unique qualifier for the
backup file name
Database Management
SET sMySQLCMD=%sMySQLBinPath%mysql %sMySQLAccess% -N -s -D mysql -e
SET sSQL=select date_format(now(),'%Y%m%d_%H%i%s');
%sMySQLCMD%"%sSQL%">NUL
IF NOT %ERRORLEVEL%==0 EXIT /B %ERRORLEVEL%
FOR /F "tokens=1* delims= " %%i in
('%sMySQLCMD%"%sSQL%"') do set
sTS=%%i
echo Started Backup Process ....>%BackupFileDir%BkpLog_%sTS%
:: executing the backup command line
SET sBackupCMD=%sMySQLBinPath%mysqldump.exe %sMySQLAccess%
%sDatabases% --verbose --quick --add-drop-database
--create-options --flush-logs --master-data
--single-transaction --result-file=
%sBackupCMD%%sBackupFileDir%BkpFile_%sTS%
1>>%sBackupFileDir%BkpLog_%sTS% 2>>&1
IF NOT %ERRORLEVEL%==0 EXIT /B %ERRORLEVEL%
echo Terminated Backup Process ....>>%sBackupFileDir%BkpLog_%sTS%
The example includes the backup command line, executes a full backup using
mysqldump, and delivers a backup file and a backup log. The backup file name
and the log file name include a time stamp string and are unique, making it easier
to maintain different backup files and logs. Both the backup and the log files are
created in C:\.
The user can add more functionality according to organizational backup
standards, such as notification of backup process, automatic compression,
automatic archiving of the backup files and automatic re-cycling of the files.
Example 2:
To recover a database use the Mysql command with the last full backup file. For
example :
mysql -uoware -pdorado<C:\BkpFile_20060727_191835
AlvariSTAR Installation Manual
65
Chapter 7 - System Maintenance
restores the database that was backed up on 27/07/2006 19:18
66
AlvariSTAR Installation Manual
File System Maintenance
7.3
File System Maintenance
The AlvariSTAR system, during its normal activities, generates log files and DAP
backup files. The AlvariSTAR file system should not exceed 90% space utilization.
It is up to the NOC to monitor the AlvariSTAR file system and delete, compress, or
back up these files.
Log file: AlvariSTAR operates in a "Rolling log" method, every day (at midnight) or
every restart of the application server, the log closes (with a timestamp) and a new
one is created (named serevr.log).
If the system experiences low disk space, the older logs should be moved or
deleted.
The log files are located in:
<AlvariSTAR Root>/oware/jboss-3.2.3/server/oware/log/
DAP files: DAP files (event and audit logs) are generated by AlvariSTAR and stored
by default in the same parent directory as the application server.
The default location of the DAP files is:
<AlvariSTAR Root>/filesystem/archive
Even though the files are compressed (zipped), they can consume a lot of space
after several months of system operation. In case of low disk space, these files
should be moved to a different location. It is possible to configure the DAP process
to save the files in a different location at creation.
AlvariSTAR Installation Manual
67
8
Chapter 8 - Uninstalling AlvariSTAR
If you want to change the AlvariSTAR installation, the current installation must
first be removed according to the procedures described in this chapter, and the
new configuration installed.
This version of AlvariSTAR does not support the addition or removal of specific
components on an existing installation.
This chapter describes how to uninstall AlvariSTAR.
In This Chapter:
“Uninstalling AlvariSTAR” on page 70
“Removing AlvariSTAR Data from Oracle” on page 76
Chapter 8 - Uninstalling AlvariSTAR
8.1
Uninstalling AlvariSTAR
8.1.1
Windows OS
NOTE
Before uninstalling AlvariSTAR, it is recommended to backup the database and close the
application.
To uninstall AlvariSTAR:
1
From the Control Panel, select the Add/Remove Programs utility.
2
Locate AlvariSTAR and click the Uninstall button.
The Uninstall AlvariSTAR window appears.
Figure 8-1: Uninstall AlvariSTAR Window
3
70
Click Next. The Uninstall Options window appears.
AlvariSTAR Installation Manual
Uninstalling AlvariSTAR
Figure 8-2: Uninstall Options Window
4
Select Complete Uninstall and click Next. Messages relating to the uninstall
procedure are continuously displayed in the Uninstall AlvariSTAR window.
Figure 8-3: Uninstall AlvariSTAR Window
5
When all features have been removed the Uninstall Complete window appears.
NOTE
When uninstalling an AlvariSTAR server, you will be prompted to confirm the deletion of files that
were installed during the installation process. Click Yes to confirm the deletion.
AlvariSTAR Installation Manual
71
Chapter 8 - Uninstalling AlvariSTAR
Figure 8-4: Uninstall Complete Window
6
8.1.2
Select Yes, restart the system and click Done.
Solaris OS
NOTE
Before uninstalling AlvariSTAR, it is recommended to backup the database.
1
Make sure the AlvariSTAR server is not running (see Section 5.2).
2
Open a Console session and logon as the same User who originally installed
and owns the AlvariSTAR installation (see Section 4.1).
3
Go to the directory on which AlvariSTAR was installed, e.g.,
/opt/AlvariSTAR/Uninstall_AlvariSTAR/
where/opt/AlvariSTAR/ is the default directory on which AlvariSTAR was
installed.
4
Run the script: Uninstall_AlvariSTAR
The Uninstall AlvariSTAR window appears.
72
AlvariSTAR Installation Manual
Uninstalling AlvariSTAR
Figure 8-5: Uninstall AlvariSTAR Window
5
You will be promted to run a command as root to remove the remaining files.
Click OK after running the command.
Figure 8-6: Confirm Removal of Remaining Files
IMPORTANT
In some x-window emulations, you might encounter difficulties in executing the root script. This is
because the window that prompts you to execute the script always remains active. If you have a
problem, use one of the following solutions to run the script:
1
Minimize the installation screen and open a new telnet console.
2
Switch to working with a different CDE workspace, run the script, and then switch back to the
original workspace.
3
Open a non x-window telnet session (run ' telnet) and execute the script.
4
Click Next. The Uninstall Options window is displayed.
AlvariSTAR Installation Manual
73
Chapter 8 - Uninstalling AlvariSTAR
Figure 8-7: Uninstall Options Window
5
Select Complete Uninstall and click Next.Messages relating to the uninstall
procedure are continuously displayed in the Uninstall AlvariSTAR window.
Figure 8-8: Uninstall AlvariSTAR Window
6
You will be promted to confirm the deletion of files that were installed during
the installation process. Click Yes to confirm the deletion.
74
AlvariSTAR Installation Manual
Uninstalling AlvariSTAR
Figure 8-9: Confirm Deletion of Files and Folders
7
When all features have been removed the Uninstall Complete window appears.
Figure 8-10: Uninstall Complete Window
8
Click Done.
AlvariSTAR Installation Manual
75
Chapter 8 - Uninstalling AlvariSTAR
8.2
Removing AlvariSTAR Data from Oracle
For an Oracle installation, the AlvariSTAR uninstaller does not remove any of the
AlvariSTAR data from the Oracle database used by the system. To remove the data
without having to remove the whole Oracle instance do one of the following:
If you use Oracle DBA Studio:
1
Log on to the database using the system account in the Oracle DBA Studio
application (see the Oracle documentation for more information on the
DBA Studio tool).
2
Locate the user created by the AlvariSTAR installation under the Security >
Users tree entry. Right click on the user and select Remove… Confirm the
deletion of all owned data.
3
Locate the owrole role under the Security > Roles tree entry. Right click on
it and select Remove…
4
Locate the AlvariSTAR tablespaces under the Storage > Tablespaces tree
entry: owdata01 and all tablespaces starting with oware_ and fault_.
Individually delete the tablespaces.
If you use SqlPlus to manage the database:
1
Log on to the database using the system account.
2
Execute the following command to drop the user created by the AlvariSTAR
installation and all its associated data:
drop user <AlvariSTAR user> cascade;
3
Execute the following command to delete the OWROLE role:
drop role OWROLE;
4
Execute the following commands to delete all the AlvariSTAR tablespaces:
drop tablespace OWDATA01;
drop tablespace OWARE_SVC_JOBSTATUSMSG_TS;
drop tablespace OWARE_SVC_MSGCAT_TS;
drop tablespace OWARE_SVC_LOGMSG_TS;
76
AlvariSTAR Installation Manual
Removing AlvariSTAR Data from Oracle
drop tablespace FAULT_AS_EVENTINFO_TS;
drop tablespace FAULT_AS_EVENTINFO_COLL_TS;
drop tablespace FAULT_AS_EVENTINFO_IDX_TS;
drop tablespace OWPMCOLL_TS;
drop tablespace OWIDX01;
AlvariSTAR Installation Manual
77