1
AlvariSTAR
Installation Manual
September 2009
P/N: 215417
Rev. J
Legal Rights
Legal Rights
© Copyright 2009 Alvarion Ltd. All rights reserved.
The material contained herein is proprietary, privileged, and confidential and
owned by Alvarion or its third party licensors. No disclosure thereof shall be made
to third parties without the express written permission of Alvarion Ltd.
Alvarion Ltd. reserves the right to alter the equipment specifications and
descriptions in this publication without prior notice. No part of this publication
shall be deemed to be part of any contract or warranty unless specifically
incorporated by reference into such contract or warranty.
Trade Names
Alvarion®, BreezeCOM®, WALKair®, WALKnet®, BreezeNET®, BreezeACCESS®,
BreezeLINK®, BreezeMAX®, BreezeLITE®, BreezePHONE®, 4Motion®,
BreezeCONFIG™, MGW™, eMGW™ and/or other products and/or services
referenced here in are either registered trademarks, trademarks or service marks
of Alvarion Ltd.
All other names are or may be the trademarks of their respective owners.
Statement of Conditions
The information contained in this manual is subject to change without notice.
Alvarion Ltd. shall not be liable for errors contained herein or for incidental or
consequential damages in connection with the furnishing, performance, or use of
this manual or equipment supplied with it.
Warranties and Disclaimers
All Alvarion Ltd. ("Alvarion") products purchased from Alvarion or through any of
Alvarion's authorized resellers are subject to the following warranty and product
liability terms and conditions.
Exclusive Warranty
With respect to the Software, Alvarion warrants the correct functionality
according to the attached documentation, for a period of fourteen (14) month from
invoice date (the "Warranty Period")". During the Warranty Period, Alvarion may
release to its Customers software updates, which include additional performance
improvements and/or bug fixes, upon availability (the "Warranty"). Bug fixes,
temporary patches and/or workarounds may be supplied as Software updates.
Additional hardware, if required, to install or use Software updates must be
purchased by the Customer. Alvarion will be obligated to support solely the two (2)
most recent Software major releases.
AlvariSTAR
ii
Installation Manual
Legal Rights
ALVARION SHALL NOT BE LIABLE UNDER THIS WARRANTY IF ITS TESTING
AND EXAMINATION DISCLOSE THAT THE ALLEGED DEFECT IN THE PRODUCT
DOES NOT EXIST OR WAS CAUSED BY PURCHASER'S OR ANY THIRD
PERSON'S MISUSE, NEGLIGENCE, IMPROPER INSTALLATION OR IMPROPER
TESTING, UNAUTHORIZED ATTEMPTS TO REPAIR, OR ANY OTHER CAUSE
BEYOND THE RANGE OF THE INTENDED USE, OR BY ACCIDENT, FIRE,
LIGHTNING OR OTHER HAZARD.
Disclaimer
(a) The Software is sold on an "AS IS" basis. Alvarion, its affiliates or its licensors
MAKE NO WARRANTIES, WHATSOEVER, WHETHER EXPRESS OR IMPLIED,
WITH RESPECT TO THE SOFTWARE AND THE ACCOMPANYING
DOCUMENTATION. ALVARION SPECIFICALLY DISCLAIMS ALL IMPLIED
WARRANTIES OF MERCHANTABILITY AND FITNESS FOR A PARTICULAR
PURPOSE AND NON-INFRINGEMENT WITH RESPECT TO THE SOFTWARE.
UNITS OF PRODUCT (INCLUDING ALL THE SOFTWARE) DELIVERED TO
PURCHASER HEREUNDER ARE NOT FAULT-TOLERANT AND ARE NOT
DESIGNED, MANUFACTURED OR INTENDED FOR USE OR RESALE IN
APPLICATIONS WHERE THE FAILURE, MALFUNCTION OR INACCURACY OF
PRODUCTS CARRIES A RISK OF DEATH OR BODILY INJURY OR SEVERE
PHYSICAL OR ENVIRONMENTAL DAMAGE ("HIGH RISK ACTIVITIES"). HIGH
RISK ACTIVITIES MAY INCLUDE, BUT ARE NOT LIMITED TO, USE AS PART OF
ON-LINE CONTROL SYSTEMS IN HAZARDOUS ENVIRONMENTS REQUIRING
FAIL-SAFE PERFORMANCE, SUCH AS IN THE OPERATION OF NUCLEAR
FACILITIES, AIRCRAFT NAVIGATION OR COMMUNICATION SYSTEMS, AIR
TRAFFIC CONTROL, LIFE SUPPORT MACHINES, WEAPONS SYSTEMS OR
OTHER APPLICATIONS REPRESENTING A SIMILAR DEGREE OF POTENTIAL
HAZARD. ALVARION SPECIFICALLY DISCLAIMS ANY EXPRESS OR IMPLIED
WARRANTY OF FITNESS FOR HIGH RISK ACTIVITIES.
(b) PURCHASER'S SOLE REMEDY FOR BREACH OF THE EXPRESS
WARRANTIES ABOVE SHALL BE REPLACEMENT OR REFUND OF THE
PURCHASE PRICE AS SPECIFIED ABOVE, AT ALVARION'S OPTION. TO THE
FULLEST EXTENT ALLOWED BY LAW, THE WARRANTIES AND REMEDIES SET
FORTH IN THIS AGREEMENT ARE EXCLUSIVE AND IN LIEU OF ALL OTHER
WARRANTIES OR CONDITIONS, EXPRESS OR IMPLIED, EITHER IN FACT OR BY
OPERATION OF LAW, STATUTORY OR OTHERWISE, INCLUDING BUT NOT
LIMITED TO WARRANTIES, TERMS OR CONDITIONS OF MERCHANTABILITY,
FITNESS FOR A PARTICULAR PURPOSE, SATISFACTORY QUALITY,
CORRESPONDENCE WITH DESCRIPTION, NON-INFRINGEMENT, AND
ACCURACY OF INFORMATION GENERATED. ALL OF WHICH ARE EXPRESSLY
DISCLAIMED. ALVARION WARRANTIES HEREIN RUN ONLY TO PURCHASER,
AND ARE NOT EXTENDED TO ANY THIRD PARTIES. ALVARION NEITHER
AlvariSTAR
iii
Installation Manual
Legal Rights
ASSUMES NOR AUTHORIZES ANY OTHER PERSON TO ASSUME FOR IT ANY
OTHER LIABILITY IN CONNECTION WITH THE SALE, INSTALLATION,
MAINTENANCE OR USE OF ITS PRODUCTS.
Limitation of Liability
(a) ALVARION SHALL NOT BE LIABLE TO THE PURCHASER OR TO ANY THIRD
PARTY, FOR ANY LOSS OF PROFITS, LOSS OF USE, INTERRUPTION OF
BUSINESS OR FOR ANY INDIRECT, SPECIAL, INCIDENTAL, PUNITIVE OR
CONSEQUENTIAL DAMAGES OF ANY KIND, WHETHER ARISING UNDER
BREACH OF CONTRACT, TORT (INCLUDING NEGLIGENCE), STRICT LIABILITY
OR OTHERWISE AND WHETHER BASED ON THIS AGREEMENT OR
OTHERWISE, EVEN IF ADVISED OF THE POSSIBILITY OF SUCH DAMAGES.
(b) TO THE EXTENT PERMITTED BY APPLICABLE LAW, IN NO EVENT SHALL
THE LIABILITY FOR DAMAGES HEREUNDER OF ALVARION OR ITS EMPLOYEES
OR AGENTS EXCEED THE PURCHASE PRICE PAID FOR THE PRODUCT BY
PURCHASER, NOR SHALL THE AGGREGATE LIABILITY FOR DAMAGES TO ALL
PARTIES REGARDING ANY PRODUCT EXCEED THE PURCHASE PRICE PAID
FOR THAT PRODUCT BY THAT PARTY (EXCEPT IN THE CASE OF A BREACH OF
A PARTY'S CONFIDENTIALITY OBLIGATIONS).
AlvariSTAR
iv
Installation Manual
Important Notice
Important Notice
This user manual is delivered subject to the following conditions and restrictions:
This manual contains proprietary information belonging to Alvarion Ltd. Such
information is supplied solely for the purpose of assisting properly authorized
users of the respective Alvarion products.
No part of its contents may be used for any other purpose, disclosed to any
person or firm or reproduced by any means, electronic and mechanical,
without the express prior written permission of Alvarion Ltd.
The text and graphics are for the purpose of illustration and reference only.
The specifications on which they are based are subject to change without
notice.
The software described in this document is furnished under a license. The
software may be used or copied only in accordance with the terms of that
license.
Information in this document is subject to change without notice.
Corporate and individual names and data used in examples herein are
fictitious unless otherwise noted.
Alvarion Ltd. reserves the right to alter the equipment specifications and
descriptions in this publication without prior notice. No part of this
publication shall be deemed to be part of any contract or warranty unless
specifically incorporated by reference into such contract or warranty.
The information contained herein is merely descriptive in nature, and does not
constitute an offer for the sale of the product described herein.
AlvariSTAR
v
Installation Manual
About This Manual
About This Manual
This manual describes how to install the AlvariSTAR software and includes the
following chapters:
Chapter 1 - Introduction to AlvariSTAR Installation: Describes the AlvariSTAR
architecture and the minimum system requirements.
Chapter 2 - Server Installation and Upgrade: Windows OS: Describes server
and device driver installation and upgrade on machines running Windows OS.
Chapter 3 - Server Installation and Upgrade: Solaris OS: Describes server and
device driver installation and upgrade on machines running Solaris OS.
Chapter 4 - Client Installation: Describes software installation on Client
machines.
Chapter 5 - System Maintenance: Describes procedures necessary for
maintaining the system.
Chapter 6 - Uninstalling AlvariSTAR: Describes how to remove AlvariSTAR
from machines running either Windows or Solaris operating systems.
Appendix A - Migration Paths: Describes the migration paths available for the
latest AlvariSTAR release.
Appendix B - Migrating from AlvariSTAR 3.5 to AlvariSTAR 4.0/4.1: Describes
the differences in security mappings, behavioral changes and security rulings
between the two versions.
This manual uses the following conventions:
Commands appear in special font: e.g., mkdir/opt/AlvariSTAR
Names of buttons appear in Bold and names of windows in italics: e.g., Click
Next. The License Agreement window is displayed.
<Text> means that an actual value is to be entered instead of the text in
between the angled brackets.
AlvariSTAR
vi
Installation Manual
Contents
Contents
Chapter 1 - Introduction to AlvariSTAR Installation.............................. 1
1.1 STAR Management Suite Overview..........................................................................3
1.2 AlvariSTAR Overview.................................................................................................4
1.3 AlvariSTAR Architecture ...........................................................................................5
1.3.1 Layering Architecture View .................................................................................6
1.3.2 Logical Components View...................................................................................7
1.4 Deployment Scenarios...............................................................................................8
1.5 Hardware, Operating System, Database and Capacity Information ......................9
Chapter 2 - Server Installation and Upgrade: Windows OS ................. 11
2.1 Overview ...................................................................................................................13
2.2 AlvariSTAR Server Installation ...............................................................................14
2.2.1 Pre-installation Tasks........................................................................................14
2.2.2 Installing AlvariSTAR ........................................................................................21
2.2.3 Post-installation tasks .......................................................................................39
2.3 Running AlvariSTAR ................................................................................................45
2.3.1 Manually Starting and Stopping AlvariSTAR.....................................................45
2.3.2 Verifying the Application Server State...............................................................45
2.3.3 Configuring the Web Portal ...............................................................................45
2.4 Upgrading an AlvariSTAR Server Installation .......................................................49
2.4.1 Upgrading AlvariSTAR ......................................................................................49
2.4.2 Upgrading the Device Driver .............................................................................62
Chapter 3 - Server Installation and Upgrade: Unix Based OS ............. 70
3.1 Overview ...................................................................................................................72
3.2 AlvariSTAR Server Installation ...............................................................................73
3.2.1 Pre-Installation Tasks........................................................................................73
3.2.2 Configuring Network Ports ................................................................................78
3.2.3 Installing AlvariSTAR ........................................................................................80
AlvariSTAR
vii
Installation Manual
Contents
3.2.4 Post-installation Tasks ......................................................................................96
3.3 Running AlvariSTAR ..............................................................................................104
3.3.1 Manually Starting and Stopping the AlvariSTAR Daemon ..............................104
3.3.2 Verifying the Application Server State.............................................................104
3.4 Upgrading on AlvariSTAR Installation .................................................................106
3.4.1 Upgrading AlvariSTAR ....................................................................................106
3.4.2 Upgrading the Device Driver ...........................................................................116
Chapter 4 - Client Installation ............................................................ 124
4.1 Pre-installation Check list .....................................................................................126
4.2 Installing AlvariSTAR.............................................................................................127
4.3 Upgrading Client Installation ................................................................................140
Chapter 5 - System Maintenance ....................................................... 141
5.1 Memory Tuning.......................................................................................................143
5.2 Database Management ..........................................................................................144
5.2.1 Oracle Database Backup ................................................................................144
5.2.2 MySQL Backup/Restore..................................................................................144
5.2.3 Security Sub-System Backup/Restore ............................................................147
5.3 File System Maintenance.......................................................................................148
5.4 Telnet Cut-Through ................................................................................................149
5.5 Changing Application Server IP Address ............................................................151
Chapter 6 - Uninstalling AlvariSTAR .................................................. 152
6.1 Uninstalling AlvariSTAR ........................................................................................154
6.1.1 Windows OS ...................................................................................................154
6.1.2 Unix Based OS................................................................................................158
6.2 Removing AlvariSTAR Data from Oracle .............................................................162
Appendix A - Migration Paths ............................................................ 163
A.1 Migration from Version 3.5 and Later...................................................................165
AlvariSTAR
viii
Installation Manual
Contents
Appendix B - Migrating from AlvariSTAR 3.5 to AlvariSTAR 4.0/4.1 . 166
B.1 Security and Permissions .....................................................................................168
B.2 Migration of Security Rules...................................................................................171
AlvariSTAR
ix
Installation Manual
Chapter
1
Introduction to AlvariSTAR
Installation
Chapter 1 - Introduction to AlvariSTAR Installation
In This Chapter:
“STAR Management Suite Overview” on page 3
“AlvariSTAR Overview” on page 4
“AlvariSTAR Architecture” on page 5
“Deployment Scenarios” on page 8
“Hardware, Operating System, Database and Capacity Information” on page 9
AlvariSTAR
2
Installation Manual
Chapter 1 - Introduction to AlvariSTAR Installation
1.1
STAR Management Suite Overview
STAR Management Suite Overview
Alvarion’s STAR Management Suite offers complete and comprehensive
management solution for ensuring the successful deployment of WiMAX services.
The Alvarion STAR Management Suite offers a set of carrier class management
tools, each tool designed to fulfill a certain management purpose.
The STAR Management Suite includes:
AlvariSTAR - Carrier-class Management System for managing Alvarion’s
WiMAX Base Stations.
StarACS - An Automatic Configuration Server (ACS) for managing end-user
Fixed and Nomadic devices (CPE) based on TR-69 protocol. StarACS is
relevant only for WiMAX 16e Networks.
StarQuality - Performance monitoring system for optimizing the WiMAX
network.
StarReport - Powerful report generator for generating network inventory
reports.
AlvariSTAR
3
Installation Manual
Chapter 1 - Introduction to AlvariSTAR Installation
1.2
AlvariSTAR Overview
AlvariSTAR Overview
AlvariSTAR is a comprehensive, carrier-class network management system (NMS)
for managing Alvarion’s broadband wireless access networks. AlvariSTAR provides
a one-stop-shop for all WiMAX network management needs. Presenting topology,
fault, performance, configuration and security management - all with the same
uniform graphical user interface.
AlvariSTAR is designed to address the different needs of network technicians,
those in the field, and those in regional and national network operation centers.
AlvariSTAR
4
Installation Manual
Chapter 1 - Introduction to AlvariSTAR Installation
1.3
AlvariSTAR Architecture
AlvariSTAR Architecture
AlvariSTAR focuses on the Element Management System (EMS) and Network
Management System (NMS) layers of Telecommunication Management Networks
(TMN) to provide FCAPS management functions:
Fault Management - Alarm observation including alarm and state report,
correlation, suppression, alarm sorting, filtering and reports, alarm log,
summarized alarms and acknowledgment, color coding and forwarding to
upper level management systems.
Configuration Management - Device discovery and scheduled periodical
updates, hierarchical location and contacts management, single and multiple
unit configuration and software upgrade, services provisioning, unit and board
configuration, telephony and data service provisioning, off-line configuration,
logical and geographical topology views and inventory management.
Performance Management - AlvariSTAR Real Time performance monitoring
enables to monitor various counters showing statistics of communication
between the device and defined Policy Function server. In addition, the task
manager can retrieve 15min PM/TM file directly from the device and export
them to a folder.
Security Management - AlvariSTAR and subscriber security facilities
including management users, user groups, functional permissions and
passwords for multi-level authorizations and access protection.
AlvariSTAR’s multi-layer archi-functional architecture comprises an
infrastructure layer providing common functionality including inventory, faults,
topology, log and reports, SW download, performance monitoring and security.
The Device Drivers layer enables to add management, configuration and service
provisioning capabilities that may differ among various Alvarion product families.
The common infrastructure can be integrated with either one or several Device
Drivers, according to need.
AlvariSTAR
5
Installation Manual
Chapter 1 - Introduction to AlvariSTAR Installation
1.3.1
AlvariSTAR Architecture
Layering Architecture View
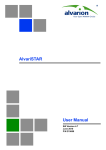
The AlvariSTAR System architecture was designed to provide flexible architecture
distribution capabilities to be spanned over three logical and physical tiers as
presented in Figure 1-1. The tree layers are:
Front-End Layer implementing the presentation
Back-End Layer implementing the FCAPS business logic
Mediation Layer implementing the communication with the NEs.
This ultimate architecture configuration model is suitable for managing large
network scale, however for small networks the tree layers can be configured on
one single server instance.
Figure 1-1: AlvariSTAR Architecture
AlvariSTAR
6
Installation Manual
Chapter 1 - Introduction to AlvariSTAR Installation
1.3.2
AlvariSTAR Architecture
Logical Components View
The AlvariSTAR application contains the following internal and external logical
components:
JBoss Application Server: Java Enterprise Edition Application Server that
hosts the AlvariSTAR server-side application.
AlvariSTAR: The server-side application containing the following
functionalities:
»
Infrastructure has the following components:
◊
FCAPS Business Services: Manages the Fault, Service Configuration,
Network Topology, Alarms, Security and BS Configuration business
logic.
◊
Presentation Layer:
Internal APIs: Exposes the whole FCAPS functionalities and handles
security access control, transactions and notifications related to the
Administrator northbound interfaces.
External APIs: Destined to OSS integration purpose, this layer
publishes limited FCAPS functionalities to external northbound OSS
applications.
◊
Security: Defines and manages user permissions and access rights for
system users.
»
Device Drivers: Performs NE business rules that are device specific. This
can be either working with various MIBs, BS types, protocols (SNMP, TFTP,
CLI) or performing different Traps and Alarms logic (Filtering, Priority,
Queuing, etc.).
AlvariSTAR Client Application: Rich client that uses the Internal API of the
Presentation Layer to access the entire AlvariSTAR functionality.
OSS: Northbound applications that connect to the AlvariSTAR server.
Network Elements: Any manageable network element (BS, µBS, CPE, etc),
that is supported by the device drivers.
LDAP: Used by the Security Infrastructure component.
Database: The RDBMS used by the system for data persistence.
AlvariSTAR
7
Installation Manual
Chapter 1 - Introduction to AlvariSTAR Installation
1.4
Deployment Scenarios
Deployment Scenarios
AlvariSTAR is designed to work in networks of varying sizes. You can customize
the system to work as an entry-level single server for a small deployment, or you
can scale it out to manage a more complex deployment. AlvariSTAR’s flexible
design enables you to continuously change and scale the deployment as your
network needs grow.
Entry Level Deployment – The ideal solution for small network
environments. In single server deployment, all sub-systems are installed on a
single machine. The client application can be installed on additional
computers to provide management access to the system from a number of
locations. The client application is only supported on Microsoft platforms.
Large Networks Deployment – The optimized solution for a large number of
network elements. Can be deployed on Microsoft Windows, Sun Solaris or
Linux operating systems together with the Oracle database. The underlying
Oracle database can be deployed on the same server as AlvariSTAR (internal)
or can reside on a different host (external). In cases where the Oracle is
deployed on a separate host, the host hardware specifications should be the
same as those of a stand-alone host.
NOTE
The application servers and database server must all run the same type of operating system.
Combinations of different operating systems are not supported.
AlvariSTAR
8
Installation Manual
Chapter 1 - Introduction to AlvariSTAR Installation Hardware, Operating System, Database and Capacity Information
1.5
Hardware, Operating System, Database
and Capacity Information
AlvariSTAR Server Configuration
Description
Demo/Trial/Small
Network
AlvariSTAR Windows
2003/2008 Server Solution
AlvariSTAR Unix
Based Server Solution
C
a
p
a
c
i
t
y
BreezeMAX
4Motion 16e
25 BSTs,
5 concurrent Clients
1000 BSTs
1000 BSTs
BreezeMAXFDD
16d, TDD
16e-ready
25 BSTs and 5,000 SUs,
5 concurrent Clients
1000 BSTs
1000 BSTs
Quad Core 3.16 GHz, 4
GRAM, 120 GB disk
1 x Sun Fire x4150 x4150
spec: Two Quad-Core Intel
Xeon X5460 processor 3.16
GHz, 8GB RAM, 4 x 146GB
disk
1 x Sun Fire x4150 x4150
spec: Two Quad-Core Intel
Xeon X5460 processor
3.16 GHz, 8GB RAM, 4 x
146GB disk
Hardware
Quad Core 3.16 GHz, 4
GRAM, 120 GB disk
Operating System
Win Server 2003/2008
Standard Edition English
Win Server 2003/2008
Enterprise Edition English
Solaris 10 English, latest
Linux distribution (RedHat,
Fedora, etc.)
Database
MySQL 5.1
MySQL 5.1 or Oracle 10g R2
Oracle 10g R2
Note: Oracle internal
database not supported on Win
Server 2008
Installation
Configuration
AlvariSTAR application
and MySQL are installed
on the same machine
AlvariSTAR application and
MySQL are installed on the
same machine
AlvariSTAR application can
reside with Oracle database on
the same machine or can
connect to external centralized
Oracle server
AlvariSTAR
9
AlvariSTAR application
can reside with Oracle
database on the same
machine or can connect to
external centralized Oracle
server
Installation Manual
Chapter 1 - Introduction to AlvariSTAR Installation Hardware, Operating System, Database and Capacity Information
AlvariSTAR Client
Hardware
1 CPU, Core2 Duo 2.4GHz, 2 GRAM, 80 GB disk
Operating System
Windows XP Pro English SP2
Windows XP SP2 English
Windows Server 2003 R2 English
Windows Vista English
NOTE
Installing the proper operating system and external database is mandatory and is a prerequisite
for AlvariSTAR installation.
AlvariSTAR will continue to support existing UNIX servers such as: Sun Fire v240, v440 and
T2000, but with limited capacity.
When using the external deployment, the Oracle database and the MySQL database must be
acquired and installed separately.
AlvariSTAR
10
Installation Manual
Chapter
2
Server Installation and Upgrade:
Windows OS
Chapter 2 - Server Installation and Upgrade: Windows OS
In This Chapter:
This chapter describes how to install or upgrade the AlvariSTAR Server
Application and relevant device driver on a Windows operating system.
“Overview” on page 13.
“AlvariSTAR Server Installation” on page 14.
“Running AlvariSTAR” on page 45
“Upgrading an AlvariSTAR Server Installation” on page 49
AlvariSTAR
12
Installation Manual
Chapter 2 - Server Installation and Upgrade: Windows OS
2.1
Overview
Overview
The AlvariSTAR installation package installs the infrastructure and one or more
device drivers, allowing connectivity to the different network elements. The
package also includes an Oracle database installation kit. In case the deployment
uses the embedded Oracle database on the same host, the "internal" database
installation type should be selected. In case of a non-embedded database usage,
the "external" database installation type should be selected. The AlvariSTAR
infrastructure and at least one device driver must be installed.
The device driver enables management, configuration and service provisioning
capabilities for a particular device.
Before starting installation, check whether AlvariSTAR has been installed
previously, and if so which version is installed. Also check which device is in use.
It is possible to upgrade the device driver or install a driver for a new device at any
time.
The install wizard searches for existing AlvariSTAR installations. If no previous
installation is detected the system performs a full installation. The installation
program installs all necessary system components for the AlvariSTAR
infrastructure. If an existing AlvariSTAR installation is detected, make sure
that the migration path is kept in accordance with Appendix B of this manual.
NOTE
All AlvariSTAR, Device Driver or Upgrade installation steps are saved in a log file
<INSTALL_ROOT> server-install.log.
All LDAP installation steps are saved in a log file <INSTALL_ROOT> ldap-install.log.
AlvariSTAR
13
Installation Manual
Chapter 2 - Server Installation and Upgrade: Windows OS
2.2
AlvariSTAR Server Installation
AlvariSTAR Server Installation
Before beginning the AlvariSTAR installation, you must check that you have all
the necessary information and that you have performed all the tasks as outlined
in Section 2.2.1.
2.2.1
Pre-installation Tasks
2.2.1.1
Check-list
The computer on which the server is installed must meet minimal hardware
and software requirements. For further information refer to the Release Notes.
The computer on which the AlvariSTAR Server is installed must be dedicated
to running AlvariSTAR.
For large network configurations using “internal” Oracle setups, disk
partitioning is most recommended (see Table 2-1).
For “external” Oracle database setups, the database must be installed,
Table 2-1: Recommended Partitioning when Oracle “Internal” Setup Is Used
Physical Disk
Volume
Setup
Physical disk 1
Volume 1
OS, AlvariSTAR SW, Oracle SW
Physical disk 2
Volume 2 - RAID 0
Oracle tablespaces
Volume 3
Oracle redo logs
Physical disk 3
Physical disk 4
configured, up and running and open for connections (see Section 2.2.1.3). In
addition, you must contact the Oracle DBA and:
»
Verify the Oracle server URL (IP, port, SID)
»
Verify the Oracle system password
»
Define the name for the AlvariSTAR schema. Follow the Oracle user policy.
»
Define the password for the AlvariSTAR schema. Follow the Oracle
password policy.
AlvariSTAR
14
Installation Manual
Chapter 2 - Server Installation and Upgrade: Windows OS
AlvariSTAR Server Installation
When using a MySQL “external” database, MySQL 5.1 or higher must be
running on the computer on which the server is installed (see Section 2.2.1.2).
»
Verify the MySQL server port. (The default is 3306.)
»
Verify the MySQL system password.
Contact the system administrator and verify the following information:
»
Folder location: Server installation requires 1.3GB disk space. Verify in
which folder the software will be installed.
»
Server IP: For systems with more than one NIC (network identity card)
installed, verify the IP address on which the server will listen to client
requests.
2.2.1.2
Installing and configuring the MySQL Database
1
Log in to the system with administrator privileges.
2
Download the latest version of MySQL Server (5.1 or higher) and run the
Setup Wizard.
3
Select the Custom option in the Setup Type window.
4
Select the MySQL Server icon from the list in the Custom Setup window and
click Change.
5
Change the destination folder to install the MYSQL Server in a different
partition from that on which the operating system is installed.
6
Select the MySQL Server Datafiles icon from the list in the Custom Setup
window and click Change.
7
Change the destination folder to install MYSQL Server Datafiles in the same
folder on the MySQL Server was installed..
8
Once MySQL has been successfully installed follow the instructions in the
MySQL Server Instance Configuration Wizard to configure the MySQL
Server server instance.
9
Select the Standard configuration option and click Next.. This will use a
general purpose configuration for the server that can be tuned manually.
AlvariSTAR
15
Installation Manual
Chapter 2 - Server Installation and Upgrade: Windows OS
a
b
c
AlvariSTAR Server Installation
Set the following Windows options and click Next:
◊
Check Install As Windows Service
◊
Check Launch the MySQL Server automatically
Set the following security options and click Next:
◊
Check Modify Security Settings
◊
Enter the root password and maintain for future use
◊
Uncheck Enable root access from remote machines
Press Execute to start the configuration.
10 Once the service is up and running, select Control Panel—Administrative
Tools—Services—MySQL51 and stop the MySQL service.
11 Using a text editor, open the my.ini file located in the folder in which MySQL
was installed and modify the following parameters:
innodb_buffer_pool_size= 500M (default=47M)
innodb_additional_mem_pool_size=12M (default =2M)
12 Restart the MySQL service.
2.2.1.3
Installing and Configuring the “External” Oracle Database
The Oracle Database Configuration procedure consists of:
1
Installing the Oracle software on the Oracle DB Server, according to the
instructions provided by Oracle. The exact version number for the Oracle DB
Server release is provided in the release notes.
2
2.2.1.3.1
Performing additional configuration instructions as described in this chapter.
Installing and Running the Oracle Database
1
Install and create an Oracle DB to be used by AlvariSTAR.
2
Configure the Oracle TNS service using Oracle Net8 Configuration Assistant
or by manually editing the
%ORACLE_HOME%/network/admin/tnsnames.ora file. Make sure that the
local service name for the database is identical to the SID (System Identifier) of
the database on the database server.
3
On the database server, check the Oracle initialization parameters in the file
init<InstanceSID>.ora. AlvariSTAR usually works with the default
database settings. For larger deployments and fine tuning alter the
AlvariSTAR
16
Installation Manual
Chapter 2 - Server Installation and Upgrade: Windows OS
AlvariSTAR Server Installation
initialization file and make sure that the minimums below are met. We
recommend checking all modifications to these files with your Oracle DBA.
Maximum SGA Size* (MB) = 3200 MB
processes =150
open_cursors = 1000
NOTE
The maximum SGA size should not exceed 70% of the physical memory.
2.2.1.3.2
Testing Oracle Client Connectivity
The AlvariSTAR installation CD includes a java utility (oracleConnectionTest.zip)
that can ensure that there is a connection available between the AlvariSTAR host
and the Oracle host. The howTo.txt file explains how to use this utility.
AlvariSTAR
17
Installation Manual
Chapter 2 - Server Installation and Upgrade: Windows OS
2.2.1.4
AlvariSTAR Server Installation
Configuring Network Ports
The following ports between the server machine, client machine, third party tools
and managed network equipment must be open.
Table 2-2: Network Ports Configuration
Use
Port
Protocol
Direction
App server
and
managed
equipment
161
SNMP
Outbound towards
NE
App server
and
managed
equipment
162
SNMP
Inbound from NE
App server
and
managed
equipment
69
TFTP
Outbound towards
NE
App server
for
northbound
of SNMP
traps
1610
SNMP
Outbound towards
OSS
App server
for
northbound
service
operations
8080
SOAP
Inbound/Outbound
App server
and Client
1098
RMI
App server
and Client
1099
RMI
Inbound/Outbound
between client and
server
App server
and Client
4444
RMI
App server
and Client
8093
RMI
AlvariSTAR
client and
managed
equipment
23
TELNET
AlvariSTAR
Remark
Outbound
between client and
NE
18
The TFTP request uses port 69 when going from
the server to the managed equipment. The
response from the equipment can use ANY port.
This should be taken into account when
hardening the servers.
This port is configurable. It can be changed by
editing the file:
<AlvariSTAR Root\
jboss\server\nms\deploy\jboss-web.deployer\serv
er.xml
If the "Cut through" operation is in use, the
AlvariSTAR client and managed equipment must
have IP connectivity on port 23.
Installation Manual
Chapter 2 - Server Installation and Upgrade: Windows OS
AlvariSTAR Server Installation
Table 2-2: Network Ports Configuration
Use
Port
Protocol
Direction
NetBIOS
137
netbios-n
Inbound/Outbound
LDAP
Server
10389
LDAP
Inbound/outbound
between the
AlvariSTAR server
and the LDAP
server
App server
and Oracle
server (if
exists)
1521
SQLNet
Inbound/outbound
between
AlvariSTAR and
database server
Oracle client configured port. Default: 1521
MySQL
database (if
exists)
User def
(default
3306)
MySQL
Inbound/outbound
betweenthe server
and the database
This port is set during the MySQL installation.
Another port can be selected.
AlvariSTAR
Remark
19
Installation Manual
Chapter 2 - Server Installation and Upgrade: Windows OS
2.2.1.5
AlvariSTAR Server Installation
Configuring the Network
AlvariSTAR must be installed on a machine with a valid network connection and a
valid IP address.
IMPORTANT
As the license mechanism includes the IP and MAC address, it is essential that the IP address is a
static address.
AlvariSTAR supports multiple NIC servers. Before starting installation, the user
must choose which NIC the server will use to communicate with the clients. Due
to the limitations of Windows, once selected, the NIC must be the first connection
to appear in the connection list as it appears in the Windows operating system.
To set the NIC order:
1
From the Windows Start menu, select Control Panel—Network Connections
(Network and Dialup Connections).
2
Select Advanced Settings from the Advanced menu in the toolbar at the top of
the window.
3
Use the arrows to move the network card that you have selected to the top of
the connections list in the Adapters and Bindings folder and click OK.
AlvariSTAR
20
Installation Manual
Chapter 2 - Server Installation and Upgrade: Windows OS
2.2.2
AlvariSTAR Server Installation
Installing AlvariSTAR
1
Log in to the computer on which the installation is to be performed as a user
with administrator privileges.
2
To begin the installation, double-click the setup.exe file directly from the
AlvariSTAR Install CD. (The setup.exe file can be found in Disk1.)
CAUTION
When copying or downloading the installation kit to a local disk, make sure you copy the entire
content of the kit - not only the setup.exe file.
InstallAnywhere is activated.
Figure 2-1: InstallAnywhere Initialization
3
Wait until InstallAnywhere has completed the initialization. An Introduction
window is displayed.
NOTE
During installation, a console screen is displayed in the background behind the installation windows.
This screen does not require user intervention and should be ignored.
AlvariSTAR
21
Installation Manual
Chapter 2 - Server Installation and Upgrade: Windows OS
AlvariSTAR Server Installation
Figure 2-2: Introduction Window
4
Review the information and click Next.
The License Agreement window is displayed.
AlvariSTAR
22
Installation Manual
Chapter 2 - Server Installation and Upgrade: Windows OS
AlvariSTAR Server Installation
Figure 2-3: License Agreement Window
5
Accept the terms of the license agreement and click Next.
The wizard searches for existing AlvariSTAR installations. If an existing
AlvariSTAR installation (version 3.5 or higher) is detected, the system will
automatically switch to upgrade mode (see Section 2.4). If no existing
installation is detected the Choose Install Set window is displayed.
AlvariSTAR
23
Installation Manual
Chapter 2 - Server Installation and Upgrade: Windows OS
AlvariSTAR Server Installation
Figure 2-4: Choose Install Set Window
6
Choose Server and click Next to continue with the server installation.
The Database Installation Type is displayed.
AlvariSTAR
24
Installation Manual
Chapter 2 - Server Installation and Upgrade: Windows OS
AlvariSTAR Server Installation
Figure 2-5: Database Installation Type
7
Select Internal for the Oracle embedded installation (see the release notes
about the Windows operating systems that support Oracle embedded
installations). Select External if you are planning to use an Oracle or MySQL
stand alone database. Then click Next to continue.
If you selected Internal, you must indicate where to place Oracle DB’s
datafiles and redo logs. The placement must be in accordance with the
recommended partitioning scheme described in Table 2-1.
AlvariSTAR
25
Installation Manual
Chapter 2 - Server Installation and Upgrade: Windows OS
AlvariSTAR Server Installation
Figure 2-6: Oracle DB Datafiles and Redo Logs
Next, you must select the NIC the Oracle database is bound to. If you use the
loopback IP address, no external application will be able to connect to this
database.
AlvariSTAR
26
Installation Manual
Chapter 2 - Server Installation and Upgrade: Windows OS
AlvariSTAR Server Installation
Figure 2-7: Oracle DB Network Configuration
If you chose an External database, you will also have to specify the type of
database you will use (see Figure 2-8).
AlvariSTAR
27
Installation Manual
Chapter 2 - Server Installation and Upgrade: Windows OS
AlvariSTAR Server Installation
Figure 2-8: Database Type
Select either MySQL or Oracle and click Next to continue.
a
AlvariSTAR
If you are using a MySQL database, the following window is displayed.
28
Installation Manual
Chapter 2 - Server Installation and Upgrade: Windows OS
AlvariSTAR Server Installation
Figure 2-9: MySQL Properties Window
»
b
AlvariSTAR
Enter the values for the following database properties and click Next:
◊
Port = port number to access the database (default = 3306)
◊
Password for root as set during the MySQL installation
If you are using an Oracle database, the following window is displayed.
29
Installation Manual
Chapter 2 - Server Installation and Upgrade: Windows OS
AlvariSTAR Server Installation
Figure 2-10: Oracle Properties Window
Define the parameters as follows and click Next:
»
In the TNS field, enter the ID of the computer on which the Oracle DB is
running, in the format IP:port:SID
where:
◊
IP = IP address of the machine where the Oracle DB is installed. PORT =
port number to access DB (default = 1521)
◊
SID = Oracle System Identifier.
For example, a TNS may look like the following:
AlvariSTAR
30
Installation Manual
Chapter 2 - Server Installation and Upgrade: Windows OS
AlvariSTAR Server Installation
10.0.22.200:1521:orcl
»
In the SYSTEM Password field, enter the Oracle system password that is
necessary in order to create an AlvariSTAR user in Oracle.
»
In the Username field, enter a username for the AlvariSTAR schema within
the Oracle instance. Do not specify an existing or reserved username (e.g.
system, sys, internal, scott). The username and password can only contain
characters from the installation database character set and must be no
more than 30 characters long.
»
In the Password field, enter a password for the user that was defined in the
Username field.
For Oracle Embedded installations, the default password is BWANMS.
NOTE
If the username already exists within the Oracle instance the user will be dropped and recreated. All
the objects owned by the user will be removed.
Connection to the database is tested.
Figure 2-11: Testing connection to the database
NOTE
If the database is not installed and running or values are incorrect, connection to the database
fails and an error message is displayed.
Next, the Device Driver Selector window is displayed.
AlvariSTAR
31
Installation Manual
Chapter 2 - Server Installation and Upgrade: Windows OS
AlvariSTAR Server Installation
Figure 2-12: Device Driver Selector Window
8
Select the device driver(s) to install and click Next.
NOTE
At least one device driver must be selected.
9
AlvariSTAR
The Server IP Selector window is displayed.
32
Installation Manual
Chapter 2 - Server Installation and Upgrade: Windows OS
AlvariSTAR Server Installation
Figure 2-13: Server IP Selector Window
NOTE
If there is more than one NIC (network interface card) installed in the system, a list of the IP
addresses for each NIC is displayed in the Server IP Selector window. Make sure that the selected
IP is setup as described in Section 2.2.1.5.
10 Select the IP address on which the server will listen to client requests and click
Next.
The Choose Shortcut Folder window is displayed.
AlvariSTAR
33
Installation Manual
Chapter 2 - Server Installation and Upgrade: Windows OS
AlvariSTAR Server Installation
Figure 2-14: Choose Install Folder Window
11 To accept the default destination folder, click Next. To change the directory,
either enter the complete path (if the directory does not exist, it will be created
automatically by the system) or, click Choose to locate an existing directory
and click Next.To return to the default destination folder, click Restore
Default Folder.
The Choose Shortcut Folder window is displayed.
NOTE
If a folder with the same name already exists on the computer, a warning to save all information in
the folder is displayed. Upon confirmation, the content of the folder will be deleted before installing
AlvariSTAR.
AlvariSTAR
34
Installation Manual
Chapter 2 - Server Installation and Upgrade: Windows OS
AlvariSTAR Server Installation
Figure 2-15: Choose Shortcut Folder Window
12 Select a location for the product icons and click Next.
NOTE
By default, the In an existing Program Group is selected and the Create Icons for All Users box is
checked. To create icons for the current user only, select the In a new Program Group option and
then uncheck the Create Icons for All Users box.
The Installation Summary window is displayed.
AlvariSTAR
35
Installation Manual
Chapter 2 - Server Installation and Upgrade: Windows OS
AlvariSTAR Server Installation
Figure 2-16: Installation Summary Window
13 Review the information and if the definitions are all correct, click Install. Click
Previous to go back to change a definition.
The Installing AlvariSTAR window is displayed.
AlvariSTAR
36
Installation Manual
Chapter 2 - Server Installation and Upgrade: Windows OS
AlvariSTAR Server Installation
Figure 2-17: Installing AlvariSTAR Window
14 The installation process takes several minutes.
Once AlvariSTAR has been successfully installed the Install Complete window
is displayed.
AlvariSTAR
37
Installation Manual
Chapter 2 - Server Installation and Upgrade: Windows OS
AlvariSTAR Server Installation
Figure 2-18: Install Complete Window
The
NMS Server Monitor icon appears in the System Tray and the
application starts running. The color of the icon indicates the status of the
service: red when not running, yellow while starting up, green when running
properly.
15 Click Done in order to quit the installer and complete the installation.
AlvariSTAR
38
Installation Manual
Chapter 2 - Server Installation and Upgrade: Windows OS
AlvariSTAR Server Installation
2.2.3
Post-installation tasks
2.2.3.1
Configuring Global Properties
The Application Server host must be configured.
To configure the global properties:
1
Shut down the AlvariSTAR Application Server.
2
Edit the the appserver.properties file <AlvariSTAR
Root>\jboss\server\nms\deploy\bwanms.sar\conf\appserver.properties and
modify the following parameters:
Table 2-3: Application Server Properties Parameters
Parameter
Default Value
Functionality
com.bwanms.serviceAffectingWarning
false
If true, a message confirming the
device driver, is displayed whenever
you click Apply.
com.bwanms.fault.event.lifeTime
30 (secs)
The minimum time an event is
displayed once it has been cleared or
acknowledged.
Note: The display time varies
depending on at which point of the 1
minute refresh cycle the event was
cleared/acknowledged.
Application Log Aging
com.bwanms.logging.retainsDays
10
The number of days that log files are
saved for display
Note: This condition is applied
cummulatively with
com.bwanms.logging.maxFileSize
com.bwanms.logging.maxFilesSize
2 GB
The maximum size of all the log files
combined.
Note: The smaller of the 2 values,
takes effect
Note: This condition is applied
cummulatively with
com.bwanms.logging.retainsDays
Performance Collection
AlvariSTAR
39
Installation Manual
Chapter 2 - Server Installation and Upgrade: Windows OS
AlvariSTAR Server Installation
Table 2-3: Application Server Properties Parameters
Parameter
Default Value
Functionality
com.bwanms.pmcollection.exportFolder
<AlvariSTAR
Root>\filesystem\export
The name of the folder to which the
performance files are saved.
3
Edit the the email.properties file <AlvariSTAR
Root>\jboss\server\nms\deploy\bwanms.sar\conf\email.properties and
modify the following parameters:
Table 2-4: Mail Settings Parameters
Parameter
Default Value
Functionality
mail.transport.protocol
smtp
The mail transport protocol.
AlvariSTAR currently only supports
smtp
mail.smtp.host
The smtp mail host
mail.smtp.port
The smtp mail port
mail.smtp.starttls.enable
false
If true, activates a data encryption
protocol
mail.smtp.auth
false
If true, requires using an
authenticated email account
mail.smtp.user
User name if authentication is
required
mail.smtp.password
Password if authentication is
required
mail.debug
false
4
If true, an entry is added to the log
file, everytime an email is sent
Edit the rb.properties file <AlvariSTAR
Root>\jboss\server\nms\deploy\bwanms.sar\conf\rb.properties and modify
the following parameters related to the device driver:
Table 2-5: RB Parameters
Parameter
Default Value
Functionality
FAULT
AlvariSTAR
40
Installation Manual
Chapter 2 - Server Installation and Upgrade: Windows OS
AlvariSTAR Server Installation
Table 2-5: RB Parameters
Parameter
Default Value
Functionality
com.bwanms.rb.ddi.disableSUSysTrap
true
If true, AlvariSTAR does not generate
network management system traps
for the SU. Traps that come from the
device itself, are processed.
If false, AlvariSTAR will generate
events for the SU as well.
com.bwanms.rb.ddi.disabledTrap
A list of SUs for which AlvariSTAR
does not treat traps generated by the
device. The format is trap source .
trap specific. eg. SU.101, SU.102.
TFTP
com.bwanms.rb.ddi.downloadConfigurationFi
le.tftpDefaultTimeout
5000 (ms)
The default timeout for configuration
file download.
com.bwanms.rb.ddi.downloadConfigurationFi
le.tftpDefaultRetries
3
The number of TFTP retries permitted
for configuration file download.
com.bwanms.rb.tasks.softwareupgrade.tftpD
efaultTimeout
5000 (ms)
The default timeout for software
upgrade file download
com.bwanms.rb.tasks.softwareupgrade.tftpD
efaultRetries
3
The number of TFTP retries permitted
for software upgrade file download.
5
If the TFTP Server IP address needs to be changed (for example: if there are
separate networks for Wimax and Client/Server),
»
Open the <AlvariSTAR
Root>\jboss/server\nms\deploy\bwanms.sar/META-INF/jboss-service.x
ml file and locate the following text:
<mbean code="com.bwanms.services.ejb.TFTPManagerService"
name="bwanms:service=TFTPManagerService">
<attribute name="WorkingDir">tftp</attribute>
<attribute
name="IPAddress">${jboss.bind.address}</attribute>
<attribute name="Port">69</attribute>
<depends>bwanms:service=PropertiesManagerService</depends>
</mbean>
and replace the "${jboss.bind.address}" token with the required IP.
AlvariSTAR
41
Installation Manual
Chapter 2 - Server Installation and Upgrade: Windows OS
AlvariSTAR Server Installation
OR
»
6
2.2.3.2
Edit the <AlvariSTAR Root>/watchdog/watchdog.properties file.
Restart the AlvariSTAR Application Server.
Synchronizing the Time Zone Settings
In order for the system to run smoothly, the internal clocks of the client machine
and the server machine must be synchronized. After AlvariSTAR is installed you
must make sure that both client and server are set to the same GMT time and
have the same time zone settings.
2.2.3.2.1
Verifying and Setting the Internal Clock
To set the internal clock in Windows systems:
1
From the Start Menu, select Control Panel—Date and Time.
2
Select the Time Zone tab and select GMT from the drop-down list.
3
Select the Date & Time tab and set the time so that is the same time as GMT.
4
Verify that the date is correct.
5
Select the Time Zone tab, select the regional time from the drop-down list and
click Apply.
AlvariSTAR
42
Installation Manual
Chapter 2 - Server Installation and Upgrade: Windows OS
2.2.3.2.2
AlvariSTAR Server Installation
Verifying Server and Client Time
Because of potential inconsistencies with daylight saving definitions, after setting
the times in the operating system, you must verify that the server application and
client application are running on the same time and tune it if necessary.
To verify server and client time:
1
To verify server time, open the log file
<AlvariSTAR Root>\jboss\server\nms\log\server.log and check the last date
stamp.
2
To view the client time, select Network Scan from the Task Manager window
and click Schedule. The Schedule Editor window is displayed. The client time
is the time displayed in the Schedule Editor (Figure 2-19).
AlvariSTAR
43
Installation Manual
Chapter 2 - Server Installation and Upgrade: Windows OS
AlvariSTAR Server Installation
Figure 2-19: Schedule Editor
3
If necessary, change the client time so that is the same as the server time and
click OK.
4
Restart the client and verify that the times on the server application and the
client application are now the same on both.
2.2.3.3
Installing the License
AlvariSTAR is supplied with a default license that is limited in time and in the
number of devices. If you obtained a permanent license from the supplier, refer to
Section 5.3 of the AlvariSTAR User Manual for instructions on how to install it.
AlvariSTAR
44
Installation Manual
Chapter 2 - Server Installation and Upgrade: Windows OS
2.3
Running AlvariSTAR
Running AlvariSTAR
The LDAP Server runs as a Windows Service. By default the service is
configured to run on system initialization. To start or stop the service, select
Control Panel—Administrative Tools—Services—Apache Directory Server default from the Start Menu
The Application Server runs as a Windows Service. By default the service is
configured to run on system initialization. To start or stop the service, select
Control Panel—Administrative Tools—Services—NMS Server Service from the
Start Menu.
The Watchdog Application runs as a Windows Service and starts together
with the AlvariSTAR Application Server service. For further information see the
Administration section in the AlvariSTAR User Manual.
Run AlvariSTAR Client from the Start Menu.
2.3.1
Manually Starting and Stopping AlvariSTAR
Right-click on the NMS Server Monitor icon in the Notification area (on the Task
Bar) and select Start/Stop.
2.3.2
Verifying the Application Server State
After installing the AlvariSTAR Server on Windows OS, an icon appears in the
Notification area (on the Task Bar). The icon’s color indicates the state of the
Application Server, as follows:
Application Server is up
Application Server is down
Application Server is shutting down/starting up
Service is not working
2.3.3
Configuring the Web Portal
The AlvariSTAR server runs a web portal which enables users to access all the
applications in the Star Management Suite via Java Web Start software
AlvariSTAR
45
Installation Manual
Chapter 2 - Server Installation and Upgrade: Windows OS
Running AlvariSTAR
framework (see the Remote Access section in the user manual for more
information). The web portal can be accessed by entering the following URL in a
web browser:
http://<AlvariSTAR IP Address>:8080/starsuite
Figure 2-20: The Web Portal
By default, all the applications are visible in the portal and the AlvariSTAR link is
working. However, the web portal’s interface must be configured depending on
which applications are installed and where they are installed. For this purpose,
you must edit the following file:
<AlvariSTAR folder>/jboss/server/nms/deploy/starsuite.war/ConfigApps.js
A typical configuration is described below:
// Define internal links for applications //
//1.Alvarion01 application
apps['Alvarion01']['title'] = "StarACS";
AlvariSTAR
46
Installation Manual
Chapter 2 - Server Installation and Upgrade: Windows OS
Running AlvariSTAR
apps['Alvarion01']['link'] =
"http://127.0.0.1/StarACS/Login.aspx";
apps['Alvarion01']['visible'] = true;
//2.Alvarion02 application
apps['Alvarion02']['title'] = "StarQuality";
apps['Alvarion02']['link'] = "http://127.0.0.1";
apps['Alvarion02']['visible'] = true;
//3.Alvarion03 application
apps['Alvarion03']['title'] = "StarReport";
apps['Alvarion03']['link'] =
"http://127.0.0.1:8080/InfoViewApp/logon.jsp";
apps['Alvarion03']['visible'] = true;
//4.Alvarion04 application
apps['Alvarion04']['title'] = "CSR";
apps['Alvarion04']['link'] =
"http://127.0.0.1/CSR/Login.aspx";
apps['Alvarion04']['visible'] = true;
//5.Alvarion05 application
apps['Alvarion05']['title'] = "AlvariSTAR";
apps['Alvarion05']['link'] =
"http://<NMS_SERVER_IP>:8080/webstart/client_<NMS_SERVER_I
P>.jnlp";
apps['Alvarion05']['visible'] = true;
//Applications Order
apps_order = new Array(4,2,5,1,3);
Each application must have 3 parameters configured:
AlvariSTAR
47
Installation Manual
Chapter 2 - Server Installation and Upgrade: Windows OS
1
Running AlvariSTAR
link - The URL used to access the application via Java Web Start. An empty
link will determine the icon to be grayed out.
2
visible - Indicates whether the application’s icon is visible by setting the value
to ‘true’ for visible and ‘false’ for hidden.
3
title - Indicates the title that is displayed under the icon when hovering with
the mouse cursor over it.
The order in which the applications are displayed on the web portal’s interface can
be adjusted using the apps_order parameter as shown above.
AlvariSTAR
48
Installation Manual
Chapter 2 - Server Installation and Upgrade: Windows OS
2.4
Upgrading an AlvariSTAR Server Installation
Upgrading an AlvariSTAR Server
Installation
Upgrading an AlvariSTAR server upgrades the database and replaces the software
with the latest version. Versions earlier than version 3.5 cannot be upgraded
automatically. The software must first be upgraded to version 3.5.
IMPORTANT
The migration path must be clear before starting the upgrade process (see Appendix A). Some
versions involve manual procedures.
IMPORTANT
Refer to the Release Notes for additional upgrade pre-requisites.
2.4.1
Upgrading AlvariSTAR
If version 3.5 or higher of AlvariSTAR Server installation with Oracle database is
detected on your system, the installation wizard will automatically start the
upgrade process. The installer automatically saves and upgrades data while
keeping the same host and database.
NOTE
MySQL based installations can only be upgraded up to version 4.0/4.1.
A migration procedure from a MySQL based AlvariSTAR 4.0 or 4.1 version to a later releas that
uses an Oracle database is also available. This procedure is documented in the
MYSQL_to_Oracle.zip file that comes with AlvariSTAR.
IMPORTANT
Do not uninstall the previous version manually. Install the current version on top of the previous
installation.
Some security features in version 4.x differ from those in version 3.5. For further
information about upgrading from version 3.5, see Appendix B. For a complete
migration path overview, see Appendix A
To upgrade an AlvariSTAR server installation:
1
AlvariSTAR
Log in as the User who owns the AlvariSTAR installation.
49
Installation Manual
Chapter 2 - Server Installation and Upgrade: Windows OS
2
Upgrading an AlvariSTAR Server Installation
To begin the installation, double-click the setup.exe file directly from the
AlvariSTAR Install CD. (The setup.exe file can be found in the Disk1 folder.)
InstallAnywhere is activated.
Figure 2-21: InstallAnywhere Initialization
3
Wait until InstallAnywhere has completed the initialization.
An Introduction window is displayed.
NOTE
During installation, a console screen is displayed in the background behind the installation windows.
This screen does not require user intervention and should be ignored.
AlvariSTAR
50
Installation Manual
Chapter 2 - Server Installation and Upgrade: Windows OS
Upgrading an AlvariSTAR Server Installation
Figure 2-22: Introduction Window
4
Review the information and click Next.
The MySQL database is exported.
Figure 2-23: Exporting MySQL Database
The security settings are exported.
AlvariSTAR
51
Installation Manual
Chapter 2 - Server Installation and Upgrade: Windows OS
Upgrading an AlvariSTAR Server Installation
Figure 2-24: Exporting Security Settings
The installation wizard searches for existing AlvariSTAR installations. The
following warning is displayed:
Figure 2-25: Preparing to uninstall warning
5
Click OK to proceed with the upgrade. The existing version of the product is
uninstalled.
Figure 2-26: Uninstalling AlvariSTAR
The Installer will now exit message is displayed.
AlvariSTAR
52
Installation Manual
Chapter 2 - Server Installation and Upgrade: Windows OS
Upgrading an AlvariSTAR Server Installation
Figure 2-27: The installer will now exit message
6
Click OK to exit the installer. The computer will restart automatically.
After AlvariSTAR has been uninstalled and the computer has rebooted
continue with the installation.
7
Log in as the User who owns the AlvariSTAR installation and install the
MySQL database (see Section 2.2.1.2).
8
Click the setup.exe again to continue with the installation and wait until
InstallAnywhere has completed the initialization.
The Introduction window is displayed.
AlvariSTAR
53
Installation Manual
Chapter 2 - Server Installation and Upgrade: Windows OS
Upgrading an AlvariSTAR Server Installation
Figure 2-28: Introduction Window
9
Review the information and click Next.
The License Agreement window is displayed.
AlvariSTAR
54
Installation Manual
Chapter 2 - Server Installation and Upgrade: Windows OS
Upgrading an AlvariSTAR Server Installation
Figure 2-29: License Agreement Window
10 Accept the terms of the license agreement and click Next.
The Choose Install Set window is displayed.
AlvariSTAR
55
Installation Manual
Chapter 2 - Server Installation and Upgrade: Windows OS
Upgrading an AlvariSTAR Server Installation
Figure 2-30: Choose Install Set Window
11 Choose Server and click Next. The Device Driver Selector window is displayed.
AlvariSTAR
56
Installation Manual
Chapter 2 - Server Installation and Upgrade: Windows OS
Upgrading an AlvariSTAR Server Installation
Figure 2-31: Device Driver Selector Window
12 Select any additional device driver(s) to install and click Next. The migrated
device is selected automatically.
The Choose Shortcut Folder window is displayed.
AlvariSTAR
57
Installation Manual
Chapter 2 - Server Installation and Upgrade: Windows OS
Upgrading an AlvariSTAR Server Installation
Figure 2-32: Choose Shortcut Folder Window
13 Select a location for the product icons and click Next.
The Installation Summary window is displayed.
AlvariSTAR
58
Installation Manual
Chapter 2 - Server Installation and Upgrade: Windows OS
Upgrading an AlvariSTAR Server Installation
Figure 2-33: Installation Summary Window
14 Review the information and if the definitions are all correct, click Install. Click
Previous to go back to change a definition.
The Installing AlvariSTAR window is displayed.
AlvariSTAR
59
Installation Manual
Chapter 2 - Server Installation and Upgrade: Windows OS
Upgrading an AlvariSTAR Server Installation
Figure 2-34: Installing AlvariSTAR Window
15 The installation process takes several minutes.
AlvariSTAR
60
Installation Manual
Chapter 2 - Server Installation and Upgrade: Windows OS
Upgrading an AlvariSTAR Server Installation
Once AlvariSTAR has been successfully installed the Install Complete window is displayed
Figure 2-35: Install Complete Window
16 Click Done to quit the installer and complete the upgrade.
IMPORTANT
After upgrading, the new license must be installed and activated . Refer to the AlvariSTAR User
Manual.
AlvariSTAR
61
Installation Manual
Chapter 2 - Server Installation and Upgrade: Windows OS
2.4.2
Upgrading an AlvariSTAR Server Installation
Upgrading the Device Driver
It is possible to upgrade the device driver or install a driver for a new device at any
time.
1
Log in to the computer on which the installation is to be performed as a user
with administrator privileges.
2
To begin the installation, double-click the setup.exe file directly from the
AlvariSTAR Install CD. (The setup.exe file can be found in the Disk1 folder.)
CAUTION
When copying or downloading the installation kit to a local disk, make sure you copy the entire
content of the kit - not only the setup.exe file.
InstallAnywhere is activated.
Figure 2-36: InstallAnywhere Initialization
3
Wait until InstallAnywhere has completed the initialization. An Introduction
window is displayed.
AlvariSTAR
62
Installation Manual
Chapter 2 - Server Installation and Upgrade: Windows OS
Upgrading an AlvariSTAR Server Installation
Figure 2-37: Introduction Window
4
Review the information and click Next. The License Agreement window is
displayed.
AlvariSTAR
63
Installation Manual
Chapter 2 - Server Installation and Upgrade: Windows OS
Upgrading an AlvariSTAR Server Installation
Figure 2-38: License Agreement Window
5
Accept the terms of the license agreement and click Next.
The Choose Install Set window is displayed.
AlvariSTAR
64
Installation Manual
Chapter 2 - Server Installation and Upgrade: Windows OS
Upgrading an AlvariSTAR Server Installation
Figure 2-39: Choose Install Set
6
Choose Customize Device Drivers and click Next. The Device Driver Selector
window is displayed.
AlvariSTAR
65
Installation Manual
Chapter 2 - Server Installation and Upgrade: Windows OS
Upgrading an AlvariSTAR Server Installation
Figure 2-40: Device Driver Selector Window
7
Select the device driver(s) to install and click Next.
NOTE
If no modifications are made to the current installation, a message is displayed.
The Customization Summary window is displayed.
AlvariSTAR
66
Installation Manual
Chapter 2 - Server Installation and Upgrade: Windows OS
Upgrading an AlvariSTAR Server Installation
Figure 2-41: Customization Summary Window
8
Review the configuration. Click Previous if you want to return to a previous
step and change your settings. Click Install when you are ready to proceed.
The Installing AlvariSTAR window is displayed.
AlvariSTAR
67
Installation Manual
Chapter 2 - Server Installation and Upgrade: Windows OS
Upgrading an AlvariSTAR Server Installation
Figure 2-42: Installing AlvariSTAR Window
9
The installation process takes several minutes.
Once AlvariSTAR has been successfully installed the Install Complete window
is displayed.
AlvariSTAR
68
Installation Manual
Chapter 2 - Server Installation and Upgrade: Windows OS
Upgrading an AlvariSTAR Server Installation
Figure 2-43: Install Complete Window
AlvariSTAR
69
Installation Manual
Chapter
3
Server Installation and Upgrade:
Unix Based OS
Chapter 3 - Server Installation and Upgrade: Unix Based OS
In This Chapter:
This chapter describes how to install or upgrade the AlvariSTAR Server
Application and relevant device driver on Unix Based (Solaris X86/Sparc or Linux)
operating systems.
“Overview” on page 72.
“AlvariSTAR Server Installation” on page 73
“Running AlvariSTAR” on page 104
“Upgrading on AlvariSTAR Installation” on page 106
AlvariSTAR
71
Installation Manual
Chapter 3 - Server Installation and Upgrade: Unix Based OS
3.1
Overview
Overview
The AlvariSTAR installation package installs the infrastructure and one or more
device drivers, allowing connectivity to the different network elements. The
package also includes an Oracle database installation kit. In case the deployment
uses the embedded Oracle database on the same host, the "internal" database
installation type should be selected. In case of a non-embedded database usage,
the "external" database installation type should be selected. The AlvariSTAR
infrastructure and at least one device driver must be installed.
Before starting installation, check whether AlvariSTAR has been installed
previously, and if so, which version is installed. Also check which device is in use.
It is possible to upgrade the device driver or install a driver for a new device at any
time.
The install wizard searches for existing AlvariSTAR installations. If no previous
installation is detected the system performs a Full installation and the installation
program will install all necessary system components.
If an existing AlvariSTAR installation is detected, make sure that the migration
path is kept in accordance with Appendix A of this manual.
You will need root credentials to install AlvariSTAR on a Unix based system.
NOTE
All AlvariSTAR, Device Driver or Upgrade installation steps are saved in a log file
<INSTALL_ROOT> server-install.log.
All LDAP installation steps are saved in a log file <INSTALL_ROOT> ldap-install.log.
AlvariSTAR
72
Installation Manual
Chapter 3 - Server Installation and Upgrade: Unix Based OS
3.2
AlvariSTAR Server Installation
AlvariSTAR Server Installation
Before beginning the AlvariSTAR installation, you must check that you have all
the necessary information and that you have performed all the tasks as outlined
in Section 3.2.1.
3.2.1
Pre-Installation Tasks
3.2.1.1
Check List
The computer on which the server is installed must meet minimal hardware
and software requirements. For further information refer to the Release Notes.
The computer on which the AlvariSTAR Server is installed must be dedicated
to running AlvariSTAR and Oracle in case of a single server deployment.
For large network configurations using internal Oracle setups, disk
partitioning is most recommended (see Table 3-1).
Table 3-1: Recommended Partitioning for Oracle Internal Setup
Physical Disk
Volume
Setup
Physical disk 1
Volume 1
OS, AlvariSTAR SW, Oracle SW
Physical disk 2
Volume 2 - RAID 0
Oracle tablespaces
Volume 3
Oracle redo logs
Physical disk 3
Physical disk 4
For external Oracle database setups, the database must be installed,
configured, up and running and open for connections (see Section 3.2.1.3). In
addition, you must contact the Oracle DBA and:
»
Verify the Oracle server URL (IP, port, SID)
»
Verify the Oracle system password
»
Define the name for the AlvariSTAR schema. Follow the Oracle user policy.
»
Define the password for the AlvariSTAR schema. Follow the Oracle
password policy.
AlvariSTAR
73
Installation Manual
Chapter 3 - Server Installation and Upgrade: Unix Based OS
AlvariSTAR Server Installation
Contact the system administrator and verify the following information:
»
Folder location: Server installation requires 1.3GB disk space. Verify in
which folder the software will be installed.
3.2.1.2
»
Root password: Verify the root password.
»
Patch status: Verify the patch status.
Limitations and Special Notes
Due to a bug in Sun Solaris JDK (bugid 4281163), the AlvariSTAR installation
process requires access to a Sun X11 environment, even in cases when no Java
graphics are displayed. To provide X11 access, do one of the following:
1
Install the software on a Solaris system with a graphics card, monitor and X
Window System.
2
Install the software on a Solaris system remotely from a machine that is
running X Window System (e.g. another Solaris workstation, X Window on
Linux or Windows with X Window Server) - Make sure “xhost +” has been
run on the target Solaris server in order to allow connections from X
Terminals.
NOTE
If the installation folder is not created in the default destination, an AlvariSTAR folder will
automatically be created within this folder.
NOTE
In order to log in as user root, enter: su followed by the root password from any Telnet/terminal
session.
3.2.1.3
Installing and Configuring the External Oracle Database
The Oracle Database Configuration procedure consists of:
1
Installing the Oracle software on the Oracle DB Server, according to the
instructions provided by Oracle.
2
AlvariSTAR
Performing additional configuration instructions as described in this chapter.
74
Installation Manual
Chapter 3 - Server Installation and Upgrade: Unix Based OS
3.2.1.3.1
AlvariSTAR Server Installation
Installing and Running the Oracle Database
3
Install and create an Oracle DB to be used by AlvariSTAR (instance). Make
sure the created instance runs.
4
Configure the Oracle TNS service using Oracle Net8 Configuration Assistant
or by manually editing the
%ORACLE_HOME%/network/admin/tnsnames.ora file. Make sure that the
local service name for the database is identical to the SID (System Identifier) of
the database on the database server.
5
On the database server, check the Oracle initialization parameters in the file
init<InstanceSID>.ora. AlvariSTAR usually works with the default
database settings. For larger deployments and fine tuning alter the
initialization file and make sure that the minimums below are met. We
recommend checking all modifications to these files with your Oracle DBA.
Maximum SGA Size* (MB) = 3200 MB
processes =150
open_cursors = 1000
NOTE
The maximum SGA size should not exceed 70% of the physical memory.
6
When using a stand-alone server, the Oracle startup scripts must be placed
before AlvariSTAR startup scripts (S76nmsproc).
#!/bin/sh
#
#
Script to reside in /etc/init.d as "oracle"
# Create symbolic links in appropriate run-level directories
# ie. /etc/rc2.d
# to determine/control automatic startup and shutdown of
Oracle.
#
# Oracle startup must happen before the S76nmsproc
#
AlvariSTAR
75
Installation Manual
Chapter 3 - Server Installation and Upgrade: Unix Based OS
AlvariSTAR Server Installation
#this script is based on Oracle's dbstart and dbshut inherent
scripts that must be edited to be used by Solaris (see
inside script).
# In addition /var/opt/oracle/oratab must be set to support
auto-start/stop.
#
#
#
#-----------------------------------------------------------# the user that oracle runs as
ORACLE_OWNER=oracle
# ORACLE_HOME (file system) path - needs to be set according
to Oracle environment
ORACLE_HOME=/export/home/oracle/product/10.2.0/Db_1
PATH={$PATH}:$ORACLE_HOME/bin
export PATH
case $1 in
'start')
echo "Starting Oracle Databases"
su - $ORACLE_OWNER -c $ORACLE_HOME/bin/dbstart
su - $ORACLE_OWNER -c "$ORACLE_HOME/bin/lsnrctl start"
;;
'stop')
echo "Stopping Oracle Databases"
su - $ORACLE_OWNER -c "$ORACLE_HOME/bin/lsnrctl stop"
su - $ORACLE_OWNER -c $ORACLE_HOME/bin/dbshut
;;
*)
AlvariSTAR
76
Installation Manual
Chapter 3 - Server Installation and Upgrade: Unix Based OS
AlvariSTAR Server Installation
echo "usage: $0 {start|stop}"
;;
esac
exit
NOTE
These are guidelines. For large deployments we recommend that a qualified DBA fine tune the DB
instance parameters.
3.2.1.3.2
Testing Oracle Client Connectivity
The AlvariSTAR installation DVD includes a java utility (oracleConnectionTest.zip)
that can ensure that there is a connection available between the AlvariSTAR host
and the Oracle host. The howTo.txt file explains how to use this utility.
AlvariSTAR
77
Installation Manual
Chapter 3 - Server Installation and Upgrade: Unix Based OS
3.2.2
AlvariSTAR Server Installation
Configuring Network Ports
The following ports between the server machine and the managed network
equipment must be open.
Table 3-2: Network Ports Configuration
USE
PORT
PROTOCOL
DIRECTION
App server and
managed
equipment
161
SNMP
Outbound towards
NE
App server and
managed
equipment
162
SNMP
Inbound from NE
Solaris Java VM
relay
1092
UDP
Inbound
App server and
managed
equipment
69
TFTP
Outbound towards
NE
The TFTP request uses port 69 when
going from the server to the managed
equipment. The response from the
equipment can use ANY port. This should
be taken into account when hardening
the servers.
App server and
Oracle server (if
exist)
1521
SQLNet
Inbound/Outbound
between
AlvariSTAR and
database server
Oracle client configured port. Default:
1521
App server for
northbound of
SNMP traps
1610
SNMP
Outbound towards
OSS
App server for
northbound
service
operations
8080
SOAP
Inbound/Outbound
App server and
Client
1098
RMI
App server and
Client
1099
RMI
App server and
Client
4444
RMI
App server and
Client
8093
RMI
AlvariSTAR
REMARKS
This port is configurable. It can be
changed by editing the file: <AlvariSTAR
Root>/jboss\server\nms\deploy\jboss-w
eb.deployer\server.xml
Inbound/Outbound
between client and
server
78
Installation Manual
Chapter 3 - Server Installation and Upgrade: Unix Based OS
AlvariSTAR Server Installation
Table 3-2: Network Ports Configuration
USE
PORT
PROTOCOL
DIRECTION
REMARKS
AlvariSTAR
client and
managed
equipment
23
TELNET
Outbound between
client and NE
If the "Cut through" operation is in use,
the AlvariSTAR client and managed
equipment must have IP connectivity on
port 23.
NetBIOS
137
netbios-ns
Inbound/ Outbound
LDAP Server
10389
LDAP
Inbound/outbound
between the
AlvariSTAR server
and the LDAP
server
AlvariSTAR
79
Installation Manual
Chapter 3 - Server Installation and Upgrade: Unix Based OS
3.2.3
AlvariSTAR Server Installation
Installing AlvariSTAR
NOTE
All the installation steps are saved in a log file <INSTALL_ROOT> AlvariSTAR_InstallLog.log.
Before installing AlvariSTAR with an Oracle DB, configure the database as described in
Section 3.2.1.3.
1
Log in as root with the following command:
su
2
To begin the installation:
»
Run the setup.sh file directly from the AlvariSTAR Install CD;
»
For FTP installations, copy the entire installation kit to your hard-drive and
run setup.sh. You might have to set executable permissions on the
setup.sh file and install.bin file. To do this use the following commands in
the folder where the installation files reside:
chmod a+x setup.sh
chmod a+x install.bin
»
The setup.sh file can be found in Disk1.
»
The install.bin file can be found in
◊
Disk1/InstData/Solaris/VM/ for Sparc platforms
◊
Disk1/InstData/SolarisX86/VM for X86 platforms
CAUTION
When copying or downloading the installation kit to a local disk, make sure you copy the entire
content of the kit - not only the setup.sh file.
InstallAnywhere is activated.
3
Wait until InstallAnywhere has completed the initialization. An Introduction
window is displayed.
AlvariSTAR
80
Installation Manual
Chapter 3 - Server Installation and Upgrade: Unix Based OS
AlvariSTAR Server Installation
Figure 3-1: Introduction Window
4
Review the information and click Next.
The wizard searches for existing AlvariSTAR installations. If an existing
AlvariSTAR installation is detected, the system will automatically switch to
upgrade mode (see Section 3.4).
The License Agreement window is displayed.
AlvariSTAR
81
Installation Manual
Chapter 3 - Server Installation and Upgrade: Unix Based OS
AlvariSTAR Server Installation
Figure 3-2: License Agreement Window
5
Accept the terms of the license agreement and click Next.
If no existing AlvariSTAR installation is detected, the Choose Install Set window
is displayed.
AlvariSTAR
82
Installation Manual
Chapter 3 - Server Installation and Upgrade: Unix Based OS
AlvariSTAR Server Installation
Figure 3-3: Choose Install Set Window
6
Click Next.
The Choose Install Folder window is displayed.
AlvariSTAR
83
Installation Manual
Chapter 3 - Server Installation and Upgrade: Unix Based OS
AlvariSTAR Server Installation
Figure 3-4: Choose Install Folder Window
7
To revert to the default destination folder, click Restore Default Folder. To
change the directory, either enter the complete path or, click Choose to locate
an existing directory and click Next.
NOTE
If a folder with the same name already exists on the computer, a warning to save all information
in the folder otherwise it will be deleted is displayed.
If the folder selected is not the default destination folder, an AlvariSTAR folder will automatically
be created within this folder.
The Database Installation Type is displayed.
AlvariSTAR
84
Installation Manual
Chapter 3 - Server Installation and Upgrade: Unix Based OS
AlvariSTAR Server Installation
Figure 3-5: Database Installation Type Window
8
Select Internal for the Oracle embedded installation or External if you are
planning to use an Oracle stand alone database. Then click Next to continue.
NOTE
The Oracle internal installation is not supported on Linux distributions.
a
AlvariSTAR
If you select Internal, the following window is displayed
85
Installation Manual
Chapter 3 - Server Installation and Upgrade: Unix Based OS
AlvariSTAR Server Installation
Figure 3-6: Database Datafiles and Redo Logs
Enter a location for the database datafiles and redo logs. If you use the
same location for both, you will also receive the following warning.
Figure 3-7: Datafiles and Redo Logs Warning
Next, enter the network configuration for the database. If you use the
loopback IP address, no external application will be able to connect to this
database.
AlvariSTAR
86
Installation Manual
Chapter 3 - Server Installation and Upgrade: Unix Based OS
AlvariSTAR Server Installation
Figure 3-8: Database Network Configuration
After you enter the network interface settings, click Next. The following
window is displayed.
AlvariSTAR
87
Installation Manual
Chapter 3 - Server Installation and Upgrade: Unix Based OS
AlvariSTAR Server Installation
Figure 3-9: Database Software Owner Creation
Enter your username and home folder path and click Next.
b
If you chose an external database, you have to specify the login credentials
(see Figure 3-10).
AlvariSTAR
88
Installation Manual
Chapter 3 - Server Installation and Upgrade: Unix Based OS
AlvariSTAR Server Installation
Figure 3-10: Oracle Properties Window
Define the parameters as follows and click Next:
»
In the TNS field, enter the ID of the computer on which the Oracle DB is
running, in the format IP:port:SID
where:
◊
IP = IP address of the machine where the Oracle DB is installed. PORT =
port number to access DB (default = 1521)
◊
SID = Oracle System Identifier.
For example, a TNS may look like the following:
AlvariSTAR
89
Installation Manual
Chapter 3 - Server Installation and Upgrade: Unix Based OS
AlvariSTAR Server Installation
10.0.22.200:1521:orcl
»
In the SYSTEM Password field, enter the Oracle system password that is
necessary in order to create an AlvariSTAR user in Oracle.
»
In the Username field, enter a username for the AlvariSTAR schema within
the Oracle instance. Do not specify an existing or reserved username (e.g.
system, sys, internal, scott). The username and password can only contain
characters from the installation database character set and must be no
more than 30 characters long.
»
In the Password field, enter a password for the user that was defined in the
Username field.
NOTE
If the username already exists within the Oracle instance the user will be dropped and recreated. All
the objects owned by the user will be removed.
Wait while the connection to the database is tested.
NOTE
If the database is not installed and running or values are incorrect, connection to the database
fails and an error message is displayed.
Next, The Device Driver Selector window is displayed.
AlvariSTAR
90
Installation Manual
Chapter 3 - Server Installation and Upgrade: Unix Based OS
AlvariSTAR Server Installation
Figure 3-11: Device Driver Selector Window
9
Select the equipment you wish to install and click Next.
The installation will be performed using the root account on a folder with root
permissions.
Next, the Server IP Selector window is displayed.
AlvariSTAR
91
Installation Manual
Chapter 3 - Server Installation and Upgrade: Unix Based OS
AlvariSTAR Server Installation
Figure 3-12: Select Server IP Window
NOTE
If there is more than one NIC (network interface card) installed in the system, a list of the IP
addresses for each NIC is displayed in the Select Server IP window.
10 Select the IP address on which the server will listen to client requests and click
Next.
The Installation Summary window is displayed.
AlvariSTAR
92
Installation Manual
Chapter 3 - Server Installation and Upgrade: Unix Based OS
AlvariSTAR Server Installation
Figure 3-13: Installation Summary Window
11 Review the information and if the definitions are all correct, click Install. Click
Previous to go back to change a definition.
The Installing AlvariSTAR window is displayed.
AlvariSTAR
93
Installation Manual
Chapter 3 - Server Installation and Upgrade: Unix Based OS
AlvariSTAR Server Installation
Figure 3-14: Installing AlvariSTAR Window
The inThe startup configuration files are loaded and the Install Complete
window is displayed.
AlvariSTAR
94
Installation Manual
Chapter 3 - Server Installation and Upgrade: Unix Based OS
AlvariSTAR Server Installation
Figure 3-15: Install Complete Window
12 Click Done to exit the installer.
IMPORTANT
After the installation is completed, it is necessary to start the AlvariSTAR server manually (see
Section 3.3 ).
AlvariSTAR
95
Installation Manual
Chapter 3 - Server Installation and Upgrade: Unix Based OS
3.2.4
Post-installation Tasks
3.2.4.1
Configuring Global Properties
AlvariSTAR Server Installation
The Application Server host must be configured.
To configure the global properties:
1
Shut down the AlvariSTAR Application Server.
2
Edit the the appserver.properties file
<AlvariSTARRoot>\jboss\server\nms\deploy\bwanms.sar\conf\appserver.pr
opertiesand modify the following parameters:
Table 3-3: Application Server Properties Parameters
Parameter
Default Value
Functionality
com.bwanms.serviceAffectingWarning
false
If true, a message confirming the
device driver, is displayed whenever
you click Apply.
com.bwanms.fault.event.lifeTime
30 (secs)
The minimum time an event is
displayed once it has been cleared or
acknowledged.
Note: The display time varies
depending on at which point of the 1
minute refresh cycle the event was
cleared/acknowledged.
Application Log Aging
com.bwanms.logging.retainsDays
10
The number of days that log files are
saved for display
com.bwanms.logging.maxFilesSize
2 GB
The maximum size of all the log files
combined.
Note: The smaller of the 2 values,
takes effect
Performance Collection
com.bwanms.pmcollection.exportFolder
3
<AlvariSTAR
Root>\filesystem\export
The name of the folder to which the
performance files are saved.
Edit the the email.properties file <AlvariSTAR
Root>\jboss\server\nms\deploy\bwanms.sar\conf\email.properties and
modify the following parameters:
AlvariSTAR
96
Installation Manual
Chapter 3 - Server Installation and Upgrade: Unix Based OS
AlvariSTAR Server Installation
Table 3-4: Mail Settings Parameters
Parameter
Default Value
Functionality
mail.transport.protocol
smtp
The mail transport protocol.
AlvariSTAR currently only supports
smtp
mail.smtp.host
The smtp mail host
mail.smtp.port
The smtp mail port
mail.smtp.starttls.enable
false
If true, activates a data encryption
protocol
mail.smtp.auth
false
If true, requires using an
authenticated email account
mail.smtp.user
User name if authentication is
required
mail.smtp.password
Password if authentication is
required
mail.debug
false
4
If true, an entry is added to the log
file, everytime an email is sent
Edit the rb.properties file <AlvariSTAR
Root>\jboss\server\nms\deploy\bwanms.sar\conf\rb.properties and modify
the following parameters related to the device driver:
Table 3-5: RB Parameters
Parameter
Default Value
Functionality
true
If true, AlvariSTAR does not generate
network management system traps
for the SU. Traps that come from the
device itself, are processed.
FAULT
com.bwanms.rb.ddi.disableSUSysTrap
If false, AlvariSTAR will generate
events for the SU as well.
com.bwanms.rb.ddi.disabledTrap
A list of SUs for which AlvariSTAR
does not treat traps generated by the
device. The format is trap source .
trap specific. eg. SU.101, SU.102.
TFTP (applicable for BreezeMAX equipment only)
com.bwanms.rb.ddi.downloadConfigurationFi
le.tftpDefaultTimeout
AlvariSTAR
5000 (ms)
97
The default timeout for configuration
file download.
Installation Manual
Chapter 3 - Server Installation and Upgrade: Unix Based OS
AlvariSTAR Server Installation
Table 3-5: RB Parameters
Parameter
Default Value
Functionality
com.bwanms.rb.ddi.downloadConfigurationFi
le.tftpDefaultRetries
3
The number of TFTP retries permitted
for configuration file download.
com.bwanms.rb.tasks.softwareupgrade.tftpD
efaultTimeout
5000 (ms)
The default timeout for software
upgrade file download
com.bwanms.rb.tasks.softwareupgrade.tftpD
efaultRetries
3
The number of TFTP retries permitted
for software upgrade file download.
5
If the TFTP Server IP address needs to be changed (for example: if there are
separate networks for WiMAX and Client/Server),
»
Open the <AlvariSTAR
Root>\jboss/server\nms\deploy\bwanms.sar/META-INF/jboss-service.x
ml file and locate the following text:
<mbean code="com.bwanms.services.ejb.TFTPManagerService"
name="bwanms:service=TFTPManagerService">
<attribute name="WorkingDir">tftp</attribute>
<attribute
name="IPAddress">${jboss.bind.address}</attribute>
<attribute name="Port">69</attribute>
<depends>bwanms:service=PropertiesManagerService</depends>
</mbean>
and replace the "${jboss.bind.address}" token with the required IP.
OR
»
6
3.2.4.2
Edit the <AlvariSTAR Root>/watchdog/watchdog.properties file.
Restart the AlvariSTAR Application Server.
Synchronizing the Time Zone Settings
In order for the system to run smoothly, the internal clocks of the client machine
and the server machine must be synchronized. After AlvariSTAR is installed you
must make sure that both client and server are set to the same GMT time and
have the same time zone settings.
AlvariSTAR
98
Installation Manual
Chapter 3 - Server Installation and Upgrade: Unix Based OS
AlvariSTAR Server Installation
To set the internal clock:
1
Log in as user root.
2
Type date -u
GMT according to the clock in the computer is displayed in the following
format:
[ [mmdd] HHMM | mmddHHMM [cc] yy] [.SS]
where mm is the month, dd the day, HH the hour and MM the minutes.
3
Verify that this is the same time as GMT and if not, change the parameters
accordingly.
4
Type tzselect and enter the correct regional time.
5
After setting the time zone, type date to confirm correct time setting.
NOTE
In order to log in as user root, enter: su followed by the root password from any Telnet/terminal
session.
3.2.4.2.1
Verifying Server and Client Time
Because of potential inconsistencies with daylight saving definitions, after setting
the times in the operating system, you must verify that the server application and
client application are running on the same time and tune if necessary.
To verify server and client time:
1
To verify server time, open the log file
<AlvariSTAR Root>/jboss\server\nms\deploy\jboss-web.deployer\server.xml
and check the last date stamp.
2
To view the client time, select Network Scan from the Task Manager window.
The client time is the time displayed in the Schedule Editor (Figure 3-16).
AlvariSTAR
99
Installation Manual
Chapter 3 - Server Installation and Upgrade: Unix Based OS
AlvariSTAR Server Installation
Figure 3-16: Schedule Editor
If after setting the times in the operating system, there are differences between the
server application, client application or operating system time, it is necessary to
tune the server and client times to override the daylight saving mechanism and
eliminate inconsistencies.
3.2.4.3
Installing the License
AlvariSTAR is supplied with a default license that is limited in time and in the
number of devices. If you obtained a permanent license from the supplier, refer to
the AlvariSTAR User Manual for instructions on how to install it.
AlvariSTAR
100
Installation Manual
Chapter 3 - Server Installation and Upgrade: Unix Based OS
3.2.4.4
AlvariSTAR Server Installation
Configuring the Web Portal
The AlvariSTAR server runs a web portal which enables users to access all the
applications in Star Management Suite via Java Web Start software framework
(see the Remote Access section in the user manual for more information). The web
portal can be accessed by entering the following URL in a web browser:
http://<AlvariSTAR IP Address>:8080/starsuite
Figure 3-17: The Web Portal
By default, all the applications are visible in the portal and the AlvariSTAR link is
working. However, the web portal’s interface must be configured depending on
which applications are installed and where they are installed. For this purpose,
you must edit the following file:
<AlvariSTAR folder>\jboss\server\nms\deploy\starsuite.war\ConfigApps.js
A typical configuration is described below:
// Define internal links for applications //
AlvariSTAR
101
Installation Manual
Chapter 3 - Server Installation and Upgrade: Unix Based OS
AlvariSTAR Server Installation
//1.Alvarion01 application
apps['Alvarion01']['title'] = "StarACS";
apps['Alvarion01']['link'] =
"http://127.0.0.1/StarACS/Login.aspx";
apps['Alvarion01']['visible'] = true;
//2.Alvarion02 application
apps['Alvarion02']['title'] = "StarQuality";
apps['Alvarion02']['link'] = "http://127.0.0.1";
apps['Alvarion02']['visible'] = true;
//3.Alvarion03 application
apps['Alvarion03']['title'] = "StarReport";
apps['Alvarion03']['link'] =
"http://127.0.0.1:8080/InfoViewApp/logon.jsp";
apps['Alvarion03']['visible'] = true;
//4.Alvarion04 application
apps['Alvarion04']['title'] = "CSR";
apps['Alvarion04']['link'] =
"http://127.0.0.1/CSR/Login.aspx";
apps['Alvarion04']['visible'] = true;
//5.Alvarion05 application
apps['Alvarion05']['title'] = "AlvariSTAR";
apps['Alvarion05']['link'] =
"http://<NMS_SERVER_IP>:8080/webstart/client_<NMS_SERVER_I
P>.jnlp";
apps['Alvarion05']['visible'] = true;
//Applications Order
AlvariSTAR
102
Installation Manual
Chapter 3 - Server Installation and Upgrade: Unix Based OS
AlvariSTAR Server Installation
apps_order = new Array(4,2,5,1,3);
Each application must have 3 parameters configured:
1
link - The URL used to access the application via Java Web Start. An empty
link will determine the icon to be grayed out.
2
visible - Indicates whether the application’s icon is visible by setting the value
to ‘true’ for visible and ‘false’ for hidden.
3
title - Indicates the title that is displayed under the icon when hovering with
the mouse cursor over it.
The order in which the applications are displayed on the web Portal’s interface can
be adjusted using the apps_order parameter as shown above.
AlvariSTAR
103
Installation Manual
Chapter 3 - Server Installation and Upgrade: Unix Based OS
3.3
Running AlvariSTAR
Running AlvariSTAR
The Application Server automatically runs as Daemon.
3.3.1
Manually Starting and Stopping the
AlvariSTAR Daemon
In order to start the AlvariSTAR server daemon after a manual stop use the
following command in superuser (root) mode:
/etc/rc2.d/S76nmsproc start
In order to manually stop the AlvariSTAR server daemon (for maintenance or
other tasks) use the following command in superuser (root) mode:
/etc/rc2.d/S76nmsproc stop
NOTE
In order to log in as user root, enter: su followed by the root password from any Telnet/terminal
session.
The AlvariSTAR server daemon also starts the ldap server and the watchdog. For
further information see the Administration section in the AlvariSTAR User Manual.
3.3.2
Verifying the Application Server State
In order to confirm that the server is up and running, log in as the user installing
AlvariSTAR and perform both of the following steps:
1
Use the following UNIX command:
ps -aef | grep java
Verify that both the AlvariSTAR and LDAP servers are listed as running in
/opt/AlvariSTAR.
2
Open the file:
<AlvariSTAR Root>/jboss/server/nms/log/server.log
and locate a line that includes information as to when the server started.
For example:[org.jboss.system.server.Server] JBoss (MX MicroKernel)[4.2.3.GA
(build: SVNTag=JBoss_4_2_3_GA date=200807181439)] Started in
1m:48s:969ms
AlvariSTAR
104
Installation Manual
Chapter 3 - Server Installation and Upgrade: Unix Based OS
Running AlvariSTAR
where: 200807181439 is the date when the server started and 1m:48s:969ms
is the time that it took for the server to start.
AlvariSTAR
105
Installation Manual
Chapter 3 - Server Installation and Upgrade: Unix Based OS
3.4
Upgrading on AlvariSTAR Installation
Upgrading on AlvariSTAR Installation
Upgrading an AlvariSTAR server upgrades the database and replaces the software
with the latest version. Versions earlier than version 3.5 cannot be upgraded
automatically. The software must first be upgraded to version 3.5.
IMPORTANT
Refer to the Release Notes for additional upgrade pre-requisites.
3.4.1
Upgrading AlvariSTAR
If version 3.5 or higher of AlvariSTAR Server installation with Oracle database is
detected on your system, the installation wizard will automatically start to
upgrade the installation. The installer automatically saves and upgrades the data
while keeping the same host and database.
NOTE
MySQL based installations can only be upgraded up to version 4.0/4.1.
IMPORTANT
Do not uninstall the previous version manually. Install the current version on top of the previous
installation.
Some security features in version 4.x differ from those in version 3.5. For further
information about upgrading from version 3.5, see Appendix B.
To upgrade an AlvariSTAR installation:
1
AlvariSTAR
Log in as the User who owns the AlvariSTAR installation.
106
Installation Manual
Chapter 3 - Server Installation and Upgrade: Unix Based OS
2
Upgrading on AlvariSTAR Installation
To begin the installation:
»
Run the setup.sh file directly from the AlvariSTAR Install CD;
»
For FTP installations, copy the entire installation kit to your hard-drive and
run setup.sh. You might have to set executable permissions on the
setup.sh file and install.bin file. To do this use the following commands in
the folder where the installation files reside:
chmod a+x setup.sh
»
The setup.sh file can be found in the Disk1 folder
InstallAnywhere is activated.
3
Wait until InstallAnywhere has completed the initialization. An Introduction
window is displayed.
An Introduction window is displayed.
NOTE
During installation, a console screen is displayed in the background behind the installation windows.
This screen does not require user intervention and should be ignored.
AlvariSTAR
107
Installation Manual
Chapter 3 - Server Installation and Upgrade: Unix Based OS
Upgrading on AlvariSTAR Installation
Figure 3-18: Introduction Window
4
Review the information and click Next.
The security settings are exported.
Figure 3-19: Exporting Security Settings
The installation wizard searches for existing AlvariSTAR installations. The
following warning is displayed.
AlvariSTAR
108
Installation Manual
Chapter 3 - Server Installation and Upgrade: Unix Based OS
Upgrading on AlvariSTAR Installation
Figure 3-20:
5
Click OK to proceed with the upgrade. The existing version of the product is
uninstalled.
Figure 3-21: Uninstalling AlvariSTAR
After the previous version of AlvariSTAR has been uninstalled, installation of
version 4.0 starts automatically.
The License Agreement window is displayed.
AlvariSTAR
109
Installation Manual
Chapter 3 - Server Installation and Upgrade: Unix Based OS
Upgrading on AlvariSTAR Installation
Figure 3-22: License Agreement Window
6
Accept the terms of the license agreement and click Next.
The Choose Install Set window is displayed.
AlvariSTAR
110
Installation Manual
Chapter 3 - Server Installation and Upgrade: Unix Based OS
Upgrading on AlvariSTAR Installation
Figure 3-23: Choose Install Set Window
7
AlvariSTAR
Choose Server and click Next. The Device Driver Selector window is displayed.
111
Installation Manual
Chapter 3 - Server Installation and Upgrade: Unix Based OS
Upgrading on AlvariSTAR Installation
Figure 3-24: Device Driver Selector Window
8
Select any additional device driver(s) to install and click Next. The migrated
device is selected automatically.
The Installation Summary window is displayed.
AlvariSTAR
112
Installation Manual
Chapter 3 - Server Installation and Upgrade: Unix Based OS
Upgrading on AlvariSTAR Installation
Figure 3-25: Installation Summary Window
9
Review the information and if the definitions are all correct, click Install. Click
Previous to go back to change a definition.
The Installing AlvariSTAR window is displayed.
AlvariSTAR
113
Installation Manual
Chapter 3 - Server Installation and Upgrade: Unix Based OS
Upgrading on AlvariSTAR Installation
Figure 3-26: Installing AlvariSTAR Window
10 The installation process takes several minutes.The database parameters are
Figure 3-27:
automatically imported from the previous installation and the Install Complete
window is displayed.
AlvariSTAR
114
Installation Manual
Chapter 3 - Server Installation and Upgrade: Unix Based OS
Upgrading on AlvariSTAR Installation
Figure 3-28: Install Complete Window
11 Click Done to quit the installer.
IMPORTANT
After the upgrade is completed, it is necessary to start the AlvariSTAR server manually (see
Section 3.3 ).
IMPORTANT
After upgrading, the new license must be installed and activated . See the AlvariSTAR User Manual.
AlvariSTAR
115
Installation Manual
Chapter 3 - Server Installation and Upgrade: Unix Based OS
3.4.2
Upgrading on AlvariSTAR Installation
Upgrading the Device Driver
It is possible to upgrade the device driver or install a driver for a new device at any
time.
1
Log in as root.
2
To begin the installation:
»
Run the setup.sh file directly from the AlvariSTAR CD
»
For FTP installations, copy the entire installation kit to your hard-drive and
run setup.sh. You might have to set executable permissions on the
setup.sh file and install.bin file. To do this use the following commands in
the folder where the installation files reside:
chmod a+x setup.sh
»
The setup.sh file can be found at Disk1.
/
CAUTION
When copying or downloading the installation kit to a local disk, make sure you copy the entire
content of the kit - not only the setup.sh file.
NOTE
The following installation procedure assumes that you are installing the BreezeMAX Device Driver.
The installation steps are the same for all device drivers, but the name of the device in the
installation screens varies according to the device.
InstallAnywhere is activated.
Figure 3-29: InstallAnywhere Initialization
AlvariSTAR
116
Installation Manual
Chapter 3 - Server Installation and Upgrade: Unix Based OS
3
Upgrading on AlvariSTAR Installation
Wait until InstallAnywhere has completed the initialization. An Introduction
window is displayed.
Figure 3-30: Introduction Window
4
Review the information and click Next. The License Agreement window is
displayed.
AlvariSTAR
117
Installation Manual
Chapter 3 - Server Installation and Upgrade: Unix Based OS
Upgrading on AlvariSTAR Installation
Figure 3-31: License Agreement Window
5
Accept the terms of the license agreement and click Next.
The Choose Install Set window is displayed.
AlvariSTAR
118
Installation Manual
Chapter 3 - Server Installation and Upgrade: Unix Based OS
Upgrading on AlvariSTAR Installation
Figure 3-32: Choose Install Set
6
Choose Customize Device Drivers and click Next. The Device Driver Selector
window is displayed.
AlvariSTAR
119
Installation Manual
Chapter 3 - Server Installation and Upgrade: Unix Based OS
Upgrading on AlvariSTAR Installation
Figure 3-33: Device Driver Selector Window
7
Select the device driver(s) to install and click Next to install the device
driver(s).
NOTE
If no modifications are made to the current installation, a message is displayed.
The Customization Summary window is displayed.
AlvariSTAR
120
Installation Manual
Chapter 3 - Server Installation and Upgrade: Unix Based OS
Upgrading on AlvariSTAR Installation
Figure 3-34: Customization Summary Window
8
Review the configuration. Click Previous if you want to return to a previous
step and change your settings. Click Install when you are ready to proceed.
The Installing AlvariSTAR window is displayed.
AlvariSTAR
121
Installation Manual
Chapter 3 - Server Installation and Upgrade: Unix Based OS
Upgrading on AlvariSTAR Installation
Figure 3-35: Installing AlvariSTAR Window
9
The installation process takes several minutes.
Once AlvariSTAR has been successfully installed the Install Complete window
is displayed.
AlvariSTAR
122
Installation Manual
Chapter 3 - Server Installation and Upgrade: Unix Based OS
Upgrading on AlvariSTAR Installation
Figure 3-36: Install Complete Window
AlvariSTAR
123
Installation Manual
Chapter
4
Client Installation
Chapter 4 - Client Installation
In This Chapter:
This chapter describes how to install the AlvariSTAR Client application on
additional machines.
“Pre-installation Check list” on page 126
“Installing AlvariSTAR” on page 127
“Upgrading Client Installation” on page 140
NOTE
The Client application can only be installed on Windows operating systems. The software version
must be the same as that of the server.
NOTE
You don’t need to have the the client application installed on your machine in order to access the
AlvariSTAR server remotely. If you have Java Runtime Environment 1.6 or higher installed on your
system, you can use the Java Web Start functionality to run AlvariSTAR. For more information, see
the Web Start related section in the AlvariSTAR User Manual.
AlvariSTAR
125
Installation Manual
Chapter 4 - Client Installation
4.1
Pre-installation Check list
Pre-installation Check list
The computer on which the client is installed must meet minimal hardware and
software requirements. For further information refer to the Release Notes.
Before starting the installation:
Make sure that AlvariSTAR Client is not already installed on the computer. If
there is a previous installation, uninstall (Section 6.1) before proceeding.
Contact the system administrator and verify the following information:
»
Folder location: Client installation requires 0.5 GB disk space. Verify in
which folder the software will be installed.
»
AlvariSTAR
Server IP: Verify the server IP address.
126
Installation Manual
Chapter 4 - Client Installation
4.2
Installing AlvariSTAR
Installing AlvariSTAR
To install an AlvariSTAR client:
1
Log in to the computer on which the installation is to be performed as a user
with administrator privileges.
2
Open an internet browser and type the following url: http://<AlvariSTAR
server IP>:8080/bwanms/client/install.htm where < AlvariSTAR server IP> is
the IP address of the computer on which the AlvariSTAR is installed (e.g.,
http://172.30.105.213:8080/bwanms/client/install.htm).
The InstallAnywhere Web Installer opens.
Figure 4-1: InstallAnywhere Web Installer
AlvariSTAR
127
Installation Manual
Chapter 4 - Client Installation
3
Installing AlvariSTAR
Click on the Download Installer for Windows button or on the Download
link. A file download security warning is displayed.
Figure 4-2: File Download - Security Warning
4
Click Run to install the software or Save to save the installation program on
the hard disk to install later.
NOTE
The install.exe file does not have a digital signature that verifies its publisher. If a warning is
displayed asking whether you are sure that you want to run the software, click Run to proceed with
the installation.
InstallAnywhere is activated.
Figure 4-3: InstallAnywhere Initialization
AlvariSTAR
128
Installation Manual
Chapter 4 - Client Installation
5
Installing AlvariSTAR
Wait until InstallAnywhere has completed the initialization. An Introduction
window is displayed.
NOTE
During installation, a console screen is displayed in the background, behind the installation
windows. This screen does not require user intervention and should be ignored.
Figure 4-4: Introduction Window
6
Review the information and click Next.
The License Agreement window is displayed.
AlvariSTAR
129
Installation Manual
Chapter 4 - Client Installation
Installing AlvariSTAR
Figure 4-5: License Agreement Window
7
Accept the terms of the license agreement and click Next.
The Choose Install Set window is displayed.
AlvariSTAR
130
Installation Manual
Chapter 4 - Client Installation
Installing AlvariSTAR
Figure 4-6: Choose Install Set Window
8
Choose Client and click Next.
The Choose Install Folder window is displayed.
AlvariSTAR
131
Installation Manual
Chapter 4 - Client Installation
Installing AlvariSTAR
Figure 4-7: Choose Install Folder Window
9
To accept the default destination folder, click Restore Default Folder. To
change the directory: either enter the complete path (if the directory does not
exist, it will be created automatically by the system) or click Choose to locate
an existing directory and click Next.
NOTE
If a folder with the same name already exists on the computer, a warning to save all information in
the folder otherwise it will be deleted is displayed.
The Server Configuration window is displayed.
AlvariSTAR
132
Installation Manual
Chapter 4 - Client Installation
Installing AlvariSTAR
Figure 4-8: Server Configuration Window
10 Enter the IP address of the server that the client will connect to. The Server
HTTP Port is 8080. Click Next to continue with the installation.
NOTE
The Client application can only be installed on a computer connected to an active server.
The Choose Shortcut Folder window is displayed.
AlvariSTAR
133
Installation Manual
Chapter 4 - Client Installation
Installing AlvariSTAR
Figure 4-9: Choose Shortcut Folder Window
11 Select a location for the product icons and click Next.
NOTE
By default, the In an existing Program Group is selected and the Create Icons for All Users box is
checked. To create icons for the current user only, select the In a new Program Group option and
then uncheck the Create Icons for All Users box.
The Installation Summary window is displayed.
AlvariSTAR
134
Installation Manual
Chapter 4 - Client Installation
Installing AlvariSTAR
Figure 4-10: Installation Summary Window
12 Review the information and if the definitions are all correct, click Install. Click
Previous to go back to change a definition.
The Installing AlvariSTAR window is displayed.
AlvariSTAR
135
Installation Manual
Chapter 4 - Client Installation
Installing AlvariSTAR
Figure 4-11: Installing AlvariSTAR Window
13 The installation process takes several minutes. Once AlvariSTAR has been
successfully installed the Install Complete window is displayed.
AlvariSTAR
136
Installation Manual
Chapter 4 - Client Installation
Installing AlvariSTAR
Figure 4-12: Install Complete Window
14 Click Done to quit the installer and complete the installation.
NOTE
After the client has been successfully installed, there is an inconsistency between the server and
client installations. When running the client console for the first time, the application closes and the
device driver is configured.
15 From the Windows Start menu, select AlvariSTAR > Start Client Console.
16 Enter a valid user name and password at the login prompt. (For more
information refer to the AlvariSTAR User Manual.).
AlvariSTAR
137
Installation Manual
Chapter 4 - Client Installation
Installing AlvariSTAR
The following error message appears.
Figure 4-13: Automatic Upgrade Message
17 Click Close to start the process.
The Update summary window appears.
Figure 4-14: Update summary Window
18 The update process takes several minutes. Once the update has been
successfully complete the Update finished window appears.
AlvariSTAR
138
Installation Manual
Chapter 4 - Client Installation
Installing AlvariSTAR
Figure 4-15: Update finished Window
19 Click Finish to exit the update procedure.
NOTE
The regional Launcher application is automatically installed as part of the Client installation. This
application enables the client to connect to a server, other than that defined during installation. For
more information, refer to the AlvariSTAR User Manual.
NOTE
The Client application always checks for inconsistencies with the device driver installed on the
server and if detected automatically starts updating. Updating the device driver will install, upgrade
or remove device drivers to be consisten with the server.
AlvariSTAR
139
Installation Manual
Chapter 4 - Client Installation
4.3
Upgrading Client Installation
Upgrading Client Installation
Client upgrade is not currently supported.
To upgrade a client installation:
1
Manually uninstall the current client installation (Section 6.1)
2
Upgrade the server installation (Section 2.4).
3
Install the client again from the upgraded server installation (Section 4.2).
NOTE
If there is a new device driver on the server, the client will be updated automatically.
If there is a patch installed on the server, the client will be updated automatically.
AlvariSTAR
140
Installation Manual
Chapter
5
System Maintenance
Chapter 5 - System Maintenance
In This Chapter:
This chapter describes how to maintain and tune the system to ensure that the
AlvariSTAR application server runs smoothly.
“Memory Tuning” on page 143
“Database Management” on page 144
“File System Maintenance” on page 148
“Telnet Cut-Through” on page 149
“Changing Application Server IP Address” on page 151
AlvariSTAR
142
Installation Manual
Chapter 5 - System Maintenance
5.1
Memory Tuning
Memory Tuning
As with any server system, proper memory tuning is crucial for the overall
AlvariSTAR system performance. This section allows you to configure in detail the
memory allocation for the AlvariSTAR application server.
To modify memory allocation settings on the application server edit the script file
/bin/startappserver and locate the line that starts with:
JAVA_OPTS="$SERVER_FLAG -Xconcurrentio -XX:MaxPermSize=128m -
AlvariSTAR
143
Installation Manual
Chapter 5 - System Maintenance
5.2
Database Management
Database Management
AlvariSTAR is heavily dependent on the database for the most basic operations. A
database crash will cause the system to stop functioning and may cause loss of
data.
Although most of the operational data is kept in the Base Station equipment’s
internal database, the following data is kept only in the AlvariSTAR database:
IP list for the discovered network + SNMP details
Location schema and the correlated maps files
Contact information
PM collection tasks and data
Configuration backup files
NMS license keys
Trap settings (NMS severity, filters, views, northbound etc.)
Traps history.
5.2.1
Oracle Database Backup
For Oracle fault tolerance, back up your Oracle database. To do this, we
recommend using Oracle's Recovery Manager (RMAN) backup utility. This is an
Oracle tool that lets you back up, copy, restore, and recover data files, control
files, and archived redo logs. It is included with Oracle server and does not require
a separate installation.
5.2.2
MySQL Backup/Restore
The Backup/Restore procedures described are based on the standard tools
provided by MySQL distribution.
The basic backup procedure is mysqldump.exe. The backup files created should
be saved on separate media/storage for increased preservation. For further details
go to http://dev.mysql.com/doc/refman/5.1/en/mysqldump.html.
AlvariSTAR
144
Installation Manual
Chapter 5 - System Maintenance
Database Management
There are two main backup methods:
Full backup - backups all the data every time the process is executed.
Incremental backup - backups all the data once, and then backups only the
changes made in the DB since the last full backup
This section deals with the full backup. For more information on the increment
backup see: http://dev.mysql.com/doc/refman/5.1/en/mysqlbinlog.html.
5.2.2.1
Examples
Example 1: The following is an example of a DOS batch file that can be used to
back up the database and thus provide the means to successfully restore:
::@ECHO OFF
:: Initializing
:: MySQL user & password
SET sMySQLAccess=-uroot -ppassword
:: databases to back up
SET sDatabases=--databases bwanms owbusdb
:: full path for MySQL executables
SET sMySQLBinPath=C:\"Program Files"\MySQL\"MySQL Server 5.1"\bin\
:: directory for backup files
SET sBackupFileDir=C:\
:: generate an exact timestamp to be used a unique qualifier for the backup file name
SET sMySQLCMD=%sMySQLBinPath%mysql %sMySQLAccess% -N -s -D mysql -e
SET sSQL=select date_format(now(),'%%Y%%m%%d_%%H%%i%%s');
%sMySQLCMD%"%sSQL%">NUL
IF NOT %ERRORLEVEL%==0 EXIT /B %ERRORLEVEL%
FOR /F "tokens=1* delims= " %%i in ('%sMySQLCMD%"%sSQL%"') do set sTS=%%i
echo Started Backup Process ....>%BackupFileDir%BkpLog_%sTS%
:: executing the backup command line
SET sBackupCMD=%sMySQLBinPath%mysqldump.exe %sMySQLAccess% %sDatabases% --verbose --quick
--add-drop-database --create-options --flush-logs
--single-transaction --result-file=
%sBackupCMD%%sBackupFileDir%BkpFile_%sTS% 1>>%sBackupFileDir%BkpLog_%sTS% 2>>&1
IF NOT %ERRORLEVEL%==0 EXIT /B %ERRORLEVEL%
echo Terminated Backup Process ....>>%sBackupFileDir%BkpLog_%sTS%
The example includes the backup command line, executes a full backup using
mysqldump, and delivers a backup file and a backup log. The backup file name
and the log file name include a time stamp string and are unique, making it easier
to maintain different backup files and logs. Both the backup and the log files are
created in C:\.
AlvariSTAR
145
Installation Manual
Chapter 5 - System Maintenance
Database Management
NOTE
When using this batch file:
Replace -ppassword with -p<actual root password>
Update the sMySQLBinPath with the actual path on which MySQL was installed
Verify that the value of the SET sBackupCMD% command includes all the --options in the
same line
The user can add more functionality according to organizational backup
standards, such as notification of backup process, automatic compression,
automatic archiving of the backup files and automatic re-cycling of the files.
Example 2:
To recover a database use the Mysql command with the last full backup file. For
example:
mysql
-uroot -ppassword<C:\BkpFile_20060727_191835
restores the database that was backed up on 27/07/2006 19:18
AlvariSTAR
146
Installation Manual
Chapter 5 - System Maintenance
5.2.3
Database Management
Security Sub-System Backup/Restore
The AlvariSTAR security sub-system is based on LDAP and is independent of the
database and thus must be backed up and restored independently.
To backup the security sub-system:
1
Verify that the system is up and running.
2
Run the following script file to export the data to a backup file:
Windows OS
<AlvariSTAR Root>/bin/ldap-export.bat
Solaris OS
<AlvariSTAR Root>/bin/ldap-export.sh <file name>
To restore the security sub-system:
1
Verify that the system is up and running.
2
Run the following script files to first import the backup file and then replace
it:
Windows OS
<AlvariSTAR Root>/bin/ldap-import.bat continue_on_error
<backup file name>
<AlvariSTAR Root>/bin/ldap-replace.bat continue_on_error
<backup file name>
Solaris OS
<AlvariSTAR Root>/bin/ldap-import.sh continue_on_error
<backup file name>
<AlvariSTAR Root>/bin/ldap-replace.sh continue_on_error
<backup file name>
AlvariSTAR
147
Installation Manual
Chapter 5 - System Maintenance
5.3
File System Maintenance
File System Maintenance
The AlvariSTAR system, during its normal activities, generates log files and DAP
backup files. The AlvariSTAR file system should not exceed 90% space utilization.
It is up to the NOC to monitor the AlvariSTAR file system and delete, compress, or
back up these files.
Database Aging files: Database aging files are generated by AlvariSTAR and
stored by default in the same parent directory as the application server. Even
though the files are compressed (zipped), after several months of system operation
they can consume a lot of space. When disk space is limited, these files should be
moved to a different location.
The following are the default locations of the files:
Event and audit logs:
<AlvariSTAR Root>/filesystem/archive
Performance files generated by the PM task:
<AlvariSTAR Root>/filesystem/export
Performance files generated by PMTM tasks:
<AlvariSTAR Root>/filesystem/pmtm
AlvariSTAR
148
Installation Manual
Chapter 5 - System Maintenance
5.4
Telnet Cut-Through
Telnet Cut-Through
If a client does not have direct access to a device because the device is in a
different network, it is possible to access the device using Telnet cut-through.
To access the device from the user interface:
Run the following batch file that can be found in
\\AlvariSTAR_install_folder\bin\:
clientconsole-cutthrough.bat server_ip username password
eq_ip
where:
server_ip is the IP address of the AlvariSTAR server
username is the server username
password is the server password
eq_ip is the IP address of device that you want to access
To access the device using a Telnet cut-through proxy:
Install a SSH server on the AlvariSTAR server and configure the following
parameters in the appserver.properties file. This file can be found in
C:\AlvariSTAR\jboss\server\nms\deploy\bwanms.sar\conf\appserver.prope
rties.
AlvariSTAR
149
Installation Manual
Chapter 5 - System Maintenance
Telnet Cut-Through
Table 5-1: Telnet Cut-Through Proxy Parameters
Parameter
Value
com.bwanms.features.telnetcutthrough.serveripaddress
The IP address of the AlvariSTAR server
com.bwanms.features.telnetcutthrough.serveripport
The IP port of the server
com.bwanms.features.telnetcutthrough.serverusername
Server username
com.bwanms.features.telnetcutthrough.serverpassword
Server password
com.bwanms.features.telnetcutthrough.strategy
DirectlyToEquipment
NOTE
The AlvariSTAR server must be in the same network as the device.
AlvariSTAR
150
Installation Manual
Chapter 5 - System Maintenance
5.5
Changing Application Server IP Address
Changing Application Server IP Address
When replanning a network, it sometimes necessary to change the IP address of
the application server.
To change the application server IP address:
1
Stop the service (see Section 2.3 and Section 3.3).
2
Open the script file <AlvariSTAR Root>/bin/env.bat and change the IP address
in the line:
set NMS_SERVER_IP=
3
AlvariSTAR
Save the changes and restart the application server.
151
Installation Manual
Chapter
6
Uninstalling AlvariSTAR
Chapter 6 - Uninstalling AlvariSTAR
In This Chapter:
If you want to change the AlvariSTAR installation, the current installation must
first be removed according to the procedures described in this chapter, and the
new configuration installed.
This version of AlvariSTAR does not support the addition or removal of specific
components on an existing installation.
This chapter describes how to uninstall AlvariSTAR.
“Uninstalling AlvariSTAR” on page 154
“Removing AlvariSTAR Data from Oracle” on page 162
AlvariSTAR
153
Installation Manual
Chapter 6 - Uninstalling AlvariSTAR
6.1
Uninstalling AlvariSTAR
Uninstalling AlvariSTAR
NOTE
Uninstalling the AlvariSTAR server, also uninstalls all device drivers.
6.1.1
Windows OS
NOTE
Before uninstalling AlvariSTAR, it is recommended to backup the database and close the
application.
To uninstall AlvariSTAR:
1
From the Control Panel, select the Add/Remove Programs utility, locate
AlvariSTAR and click the Remove button.
OR
From the Start Menu select Programs — AlvariSTAR — Uninstall.
The Uninstall AlvariSTAR window is displayed
AlvariSTAR
154
Installation Manual
Chapter 6 - Uninstalling AlvariSTAR
Uninstalling AlvariSTAR
.
Figure 6-1: Uninstall AlvariSTAR Window
2
Click Uninstall. Messages relating to the uninstall procedure are
continuously displayed in the Uninstall AlvariSTAR window.
AlvariSTAR
155
Installation Manual
Chapter 6 - Uninstalling AlvariSTAR
Uninstalling AlvariSTAR
Figure 6-2: Uninstall AlvariSTAR Window
Once all items have been successfully uninstalled the Uninstall Complete
window is displayed.
AlvariSTAR
156
Installation Manual
Chapter 6 - Uninstalling AlvariSTAR
Uninstalling AlvariSTAR
Figure 6-3: Uninstall Complete Window
3
Click Done to complete uninstallation.
NOTE
The following folders contain user data and will not be deleted after AlvariSTAR has been
uninstalled:Firmware; Inventory and Migration.
6.1.1.1
Uninstalling the MySQL database
Uninstalling AlvariSTAR does not uninstall the MySQL database that was
installed as a prerequisite and it should be uninstalled manually.
To uninstall the MySQL database:
1
Right-click on the AlvariSTAR icon in the Notification area (on the Task Bar)
and Stop the service.
2
From the Control Panel, select the Add/Remove Programs utility, locate
MySQL and click the Remove button.
AlvariSTAR
157
Installation Manual
Chapter 6 - Uninstalling AlvariSTAR
3
Uninstalling AlvariSTAR
Delete the MySQL folder in which the data files were stored. This folder can be
found under C:\Documents and Settings\All Users\Application Data\MySQL
Solaris OS
6.1.2
Unix Based OS
NOTE
Before uninstalling AlvariSTAR, it is recommended to backup the database.
1
Make sure the AlvariSTAR server is not running (see Section 3.3.1).
2
Open a Console session and logon as root.
3
Go to the directory on which AlvariSTAR was installed, e.g.,
/opt/AlvariSTAR/Uninstall_AlvariSTAR/
where /opt/AlvariSTAR/ is the default directory on which AlvariSTAR was
installed.
4
Run the script: Uninstall_AlvariSTAR
The Uninstall AlvariSTAR window is displayed.
AlvariSTAR
158
Installation Manual
Chapter 6 - Uninstalling AlvariSTAR
Uninstalling AlvariSTAR
Figure 6-4: Uninstall AlvariSTAR Window
The Uninstall AlvariSTAR window is displayed.
AlvariSTAR
159
Installation Manual
Chapter 6 - Uninstalling AlvariSTAR
Uninstalling AlvariSTAR
Figure 6-5: Uninstalling AlvariSTAR Window
Once all items have been successfully uninstalled the Uninstall Complete
window is displayed.
AlvariSTAR
160
Installation Manual
Chapter 6 - Uninstalling AlvariSTAR
Uninstalling AlvariSTAR
Figure 6-6: Uninstall Complete Window
5
Click Done to exit the uninstaller.
NOTE
The following 3 folders contain user data and will not be deleted after AlvariSTAR has been
uninstalled:Firmware; Inventory and Migration.
AlvariSTAR
161
Installation Manual
Chapter 6 - Uninstalling AlvariSTAR
6.2
Removing AlvariSTAR Data from Oracle
Removing AlvariSTAR Data from Oracle
For an Oracle external installation, the AlvariSTAR uninstaller does not remove
any of the AlvariSTAR data from the Oracle database used by the system. To
remove the data without having to remove the whole Oracle instance do one of the
following:
If you use Oracle DBA Studio:
1
Log on to the database using the system account in the Oracle DBA Studio
application (see the Oracle documentation for more information on the
DBA Studio tool).
2
Locate the user created by the AlvariSTAR installation under the Security >
Users tree entry. Right click on the user and select Remove… Confirm the
deletion of all owned data.
If you use SqlPlus to manage the database:
1
Log on to the database using the system account.
2
Execute the following command to drop the user created by the AlvariSTAR
installation and all its associated data:
drop user <AlvariSTAR user> cascade;
AlvariSTAR
162
Installation Manual
Appendix
A
Migration Paths
Chapter A - Migration Paths
In This Appendix:
“Migration from Version 3.5 and Later” on page 165
AlvariSTAR
164
Installation Manual
Chapter A - Migration Paths
A.1
Migration from Version 3.5 and Later
Migration from Version 3.5 and Later
AlvariSTAR supports Oracle as its underlying database server. However for
small/demo/trial networks one can also use MySQL with Windows Server. As a
result, the migration of Windows based older AlvariSTAR versions to the current
AlvariSTAR version involves migration of the database from MySQL to Oracle. For
this purpose, a utility is available on the installation DVD.
Migration of versions older than 4.0 must go though 4.0 as a mandatory stage
before migrating to the current version. For instance, to upgrade to version 4.5
from version 3.5 one must upgrade to version 4.0 first and from 4.0 to 4.5. For
information on migrating to AlvariSTAR 4.0, see Appendix B.
The following table outlines all possible migration paths - note the differences
when using the "internal" Oracle (Int.) and "external" Oracle (Ext.) database.
Table A-1: AlvariSTAR Migration Paths
Upgrade
Version
Legacy Version
3.5 MySQL
3.5 Ext.
Oracle
4.0 MySQL
4.0 Ext.
Oracle
4.1 MySQL
4.1 Ext.
Oracle
3.5 MySQL
N/A
N/A
N/A
N/A
N/A
N/A
3.5 Ext.
Oracle
N/A
N/A
N/A
N/A
N/A
N/A
4.0 MySQL
3.5 -> 4.0
N/A
N/A
N/A
N/A
N/A
4.0 Ext.
Oracle
N/A
3.5 -> 4.0
N/A
N/A
N/A
N/A
4.1 MySQL
3.5 -> 4.1
N/A
4.0 -> 4.1
N/A
N/A
N/A
4.1 Ext.
Oracle
N/A
3.5 -> 4.1
N/A
4.0 -> 4.1
N/A
N/A
4.5 Ext.
Oracle
3.5 -> 4.0
3.5 ->4.5
4.0 -> 4.5
Manual
migration
using tool
4.0 -> 4.5
4.1 -> 4.5
Manual
migration
using tool
4.1 -> 4.5
4.5 Int.
Oracle
3.5->4.0
N/A
4.0->4.5
Manual
migration
using tool
N/A
4.1->4.5
Manual
migration
using tool
N/A
AlvariSTAR
4.0 -> 4.5
Manual
migration
using tool
4.0->4.5
Manual
migration
using tool
165
Installation Manual
Appendix
B
Migrating from AlvariSTAR 3.5 to
AlvariSTAR 4.0/4.1
Chapter B - Migrating from AlvariSTAR 3.5 to AlvariSTAR 4.0/4.1
In This Appendix:
“Security and Permissions” on page 168
“Migration of Security Rules” on page 171
AlvariSTAR
167
Installation Manual
Chapter B - Migrating from AlvariSTAR 3.5 to AlvariSTAR 4.0/4.1
B.1
Security and Permissions
Security and Permissions
AlvariSTAR 4.x includes improved LDAP based security features. When migrating
from version 3.5 to version 4.x, the previous proprietary based system is mapped
to the new LDAP based system. Three new default groups and three new default
users are created. For more information refer to the AlvariSTAR User Manual.
Table B-1 includes the full security mappings between the versions and
behavioral changes due to the migration.
Table B-1: Security Mappings and Behavioral Changes
3.5 Functional Permissions
4.x Functional Permissions
Configure Backup
Manager
delete
Delete
execute
Export
read
View
add
New
write
Edit
delete
Delete
read
View
add
New
write
Edit
delete
Delete
read
View
execute
Configure,CutThrough
write
Ack,UnAck,Clear
read
View
add
Add
write
Activate
read
View
add
New
write
Edit
delete
Delete
read
OpenMap,View
Configure Contacts
Configure Equipment
Configure Events
Configure Licenses
Configure Locations
AlvariSTAR
168
Filemanager
ContactManager
EquipmentManager
EventManager
LicenseManager
LocationManager
Installation Manual
Chapter B - Migrating from AlvariSTAR 3.5 to AlvariSTAR 4.0/4.1
Security and Permissions
Table B-1: Security Mappings and Behavioral Changes
3.5 Functional Permissions
4.x Functional Permissions
Configure Subscribers
add
New
write
Edit
delete
Delete
read
View
add
New
write
Edit
read
View
add
New
write
Edit
delete
Delete
read
View
execute
Configure
add
New
write
Edit
delete
Delete
read
View
execute
Run,Abort,Schedule
add
New
write
Edit
delete
Delete
read
View
execute
Kill
read
view
execute
Export
read
View
add
New
write
Edit
delete
Delete
read
View
Configure Services
Configure Service Profiles
Configure Tasks
Northbound System
Manager
User Monitor
Configure Audit Trail
Manage Network
AlvariSTAR
169
SubscriberManager
ServiceManager
ServiceProfileManager
TaskManager
EventForwardingNBIMan
ager
UserSessionManager
AuditLogManager
DiscoverySettings
Installation Manual
Chapter B - Migrating from AlvariSTAR 3.5 to AlvariSTAR 4.0/4.1
Security and Permissions
Table B-1: Security Mappings and Behavioral Changes
3.5 Functional Permissions
4.x Functional Permissions
Manage Permissions
add
New
write
Edit
delete
Delete
read
View
AlvariSTAR
170
UserManager,
UserProfileManager
Installation Manual
Chapter B - Migrating from AlvariSTAR 3.5 to AlvariSTAR 4.0/4.1
B.2
Migration of Security Rules
Migration of Security Rules
In version 4.x, User and Group names are in lower case letters only.
»
If there are users/groups with upper case letters, they will be converted to
lower case.
»
If there are the same users/groups, one with upper case letters and one
with lower case letters, only the user/group with lower case letters will be
migrated.
»
If there are two users with the same name, but one with upper case letters
(e.g Test) from one group(e.g Administrators) and another with lower case
letters (e.g test) from another group (e.g Operators), only the user with
lower case letters will be migrated. The user will be associated with both
the profiles (e.g Administrators and Operators).
»
If there are two groups with the same name, one with upper case letter and
the other with lower case letters and each of the groups has different
permissions, only the group with the lower case letters will be migrated
and the permissions from both the groups will be combined.
All passwords will be reset to be the same as User ID.
A user who has no functional security defined will see an empty main
navigation tree.
All of the default 3.5 users and default 3.5 groups will be migrated.
A user that is not associated with a group will not be migrated.
A user that has both group permissions and user permissions will retain only
group permissions after migration
AlvariSTAR
171
Installation Manual