1
Sonic Studio
V'#()%K*+,*%W'#10%
!"#$%&'#()%$*+,*%*'*-,#+.%#$%#/*0/101%*-%+(&'+#/*%2-'%3#*"%*"0%4+$#(%-50,+6-/%-7%$-'/18.+10%9:;%!"0%<-+.%-7%*"#$%1-('=0/*%#$%*-%>?%
$*05%2-'%*",-'<"%#=5-,6/<%$-/<$%#/*-%*"0%$2$*0=@%A?%"0.5%2-'%*-%'/10,$*+/1%*"0%<0/0,+.%(-/(05*$%-7%01#6/<@%%+/1%B?%(,0+*0%+%
C/+.%=+$*0,%+$%0#*"0,%+%DDE%F=+<0@%GDHI%-,%$0(',0E.+20,%+55.#(+6-/;%
*399341*34:%4;34<1=<%.1>41<3?4.@5#.%1
•
•
•
•
•
!"#$%&'#(J%K*+,*%+/1%$*-5%5.+24+()%
L)MJ%N--=$%-'*%*-%$"-3%*"0%0/6,0%5,-O0(*%
*+,&-J%K0.0(*%+..%
*+,&,J%D0$0.0(*%+..%
G.#()%+/23"0,0%#/%+%*,+()%*-%5.+(0%*"0%)./0123/401
K-/#(%K*'1#-%$-'/18.+10%V'#()%K*+,*%W'#10XAY>AZ%[#$#*%333;$-/#($*'1#-;(-=%
•
•
•
•
25#6'#$71+.3+2$%$*+,*$%+/1%$*-5$%7,-=%*"0%:1#*%E-#/*%.-(+6-/%
P%!%89%401#$%+/2%+'1#-%*"+*%"+$%+/%FQ%+/1%RS!%7+10%
!%5%$01+%$0<=0/*J%G.#()%-/%*"0%/+=0%4+,%-T0,%*"0%3+T07-,=%
+3:%1+%$0<=0/*J%U+)0%$',0%$0<=0/*%#$%$0.0(*01@%*"0/%(.#()H1,+<%
*"0%$-.#1%20..-3%4+,%1#,0(*.2%+4-T0%*"0%3+T07-,=;%
•
•
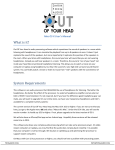
Drag your group of mixes from the Finder into the top track in
your EDL. Fig. 1
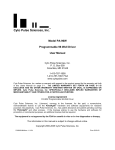
Press the “E” key to show the ‘entire’ group of tracks after they
appear in the EDL. Fig 2.
Note: Once in the EDL, a sound is referred to as a “Segment”
Note: A segment always has a fade-in and a fade-out
represented by a black line on either side of the segment. The
default fade time is so short you can’t hear it.
Fig. 1%
Mac Finder%
Fig. 2%
SELECTING SEGMENTS
• A selected segment is yellow. Notice there’s
a yellow directly above the waveform. You
can click and drag that bar to move the
segment around on the timeline.
Note: If the segment is selected, playback will
start at the beginning of the segment when
you press Space-bar.
G.#()%*"0%6*.0%4+,%-7%*"0%%K0<=0/*%
*-%$0.0(*%*"0%K0<=0/*%
THE EDIT POINT
• Click anywhere in timeline and the Edit Point
will appear where you clicked.
• Playback starts from the Edit Point position.
• Click anywhere in the waveform you’d like to
hear, and press the Space-bar to start
playback. Press Space-bar again to stop.
Note: You’ll notice the segment turns white
when the Edit Pointer is visible.
G.#()%+/23"0,0%#/%*"0%6=0.#/0%%
*-%$"-3%*"0%:1#*%E-#/*%
SELECTING SOUND AND ZOOMING IN/OUT
• Click-drag on the waveform to highlight a
section. You can adjust the size of the selection
by holding the Shift key and click-dragging the
beginning or end of the selection.
Note: if you hit Delete it will edit-out the selected
sound. Don’t do that for this tutorial.
Note: Hit CMD-G to zoom into the selection.
Note: You can also use the Up and Down
arrows on your keyboard to zoom in and out.
EDITING FADES IN / OUT
• The line at the beginning or end of a Segment is
a very short fade.
• Move your mouse over the IN fade. Notice the
fade will turn green; OUT fades turn red.
• Click-hold-drag the middle of the fade to move
its position in the timeline. Use this move to
eliminate silence at the beginning or end of a
song.
• Click-drag the top of the fade to create a longer
fade time.
G.#()H1,+<%*"0%:1#*%E-#/*%*-%
"#<".#<"*%$-'/1;%
G.#()H1,+<%*"0%=#11.0%-7%*"0%7+10%
*-%=-T0%#*;%%G.#()H1,+<%*"0%*-5%-,%
4-\-=%-7%*"0%7+10%*-%0]*0/1%#*;%
• Adjust the beginning and end fades on each segment so they are they way you
want them to sound. Remember to click anywhere on the timeline to bring the Edit
Pointer to that location; then hit Space-bar to start and stop playback to audition
the fades.
• If two songs are too close together it can sometimes make it hard adjust a fade. If
that happens, simply single-click on the white bar that shows the name of the
song to select the entire segment. You’ll notice the waveform will turn yellow and a
yellow bar appear just below the title bar. Click-drag the yellow bar to move the
selected segment out of the way.
• Don’t worry about the final position of the songs yet. Just adjust the fades for now.
• Move on to the next step when you’re finished.
• Hit Cmd-A to select all the segments.
• In the Edit Menu, choose Auto Space All Segments.
Note: The auto space command moves all the selected
segments so that they are two seconds apart. Two seconds
is the standard interval for CD spacing.
• Hit Cmd-A to select all the segments.
• In the Mark Menu, choose Edited Black to Marks. This will
automatically put P and Q codes on your segments.
Notes:
A CD player uses PQ codes to identify where a songs begin
and end. The player also uses them when skipping between
songs on your disc.
The term “Edited Black” means digital silence, or the
absence of a segment. “Analog Black” means recorded
silence, or a segment that has silence in it.
The Edited Black to Marks function looks for the digital
silence spaces you put in when you Auto Spaced the
Segments and then places P and Q code marks at the start
and end of each of the songs.
EV%D0.#T0,2%!+4%
• In the Windows Menu, choose Mark Info – soundBlade LE Project
• Select a song in the track list and its title will appear in the Track Title
window. This is the title that will appear when the song’s text is
displayed on the player if you want to use CD-TEXT, so change it if
you want a different title to display.
• If you wish, you can also add the Album Title and Artist Info here. This
information will exported in the PQ Log text file, you’ll learn about in
the next step.
• Don’t change any of the offsets.
• When you’re finished entering the information, select the PQ Delivery
Tab at the top of the window.
Note: You don’t have to change or add any information in this window if
you don’t want to; it won’t affect the outcome of your CD.
!,+()%9#$*%
!"#$%&'()%*+',)-%
• Choose the type of output you want by selecting either DDP Image,
CD-R, securePlayer or JAM Image.
• Select CD-TEXT if you want the name of the song to appear in the
player display.
• Hit the PQ List button to save the PQ list. This is a text document
that can send to both your client and the pressing plant that shows all
the info on the PQ list. You can ignore the Export List and Track List
buttons for now.
• Hit the Execute button once you’ve selected the output you want.
• If you selected DDP, you’ll see a typical dialog enabling you to select
the location to save the DDP file set. Choose your location and hit
Save, then the delivery will begin.
Note:
• DDP is the typical choice for sending a finished project to the pressing
plant. The output is a set of files that include everything necessary to
make the glass master.
• CD-R is the choice if you want to make a disc playable reference.
• securePlayer creates a DDP and wraps it in self-contained Amarra
music player with 128-bit encryption. This is a perfect choice to send
to clients as a secure full-resolution reference player because it also
provide the client the ability to burn a CD-R directly from the
securePlayer application. Requires a Macintosh for playback.
G.#()%*-%10.#T0,%%
2-',%5,-O0(*%
:]5-,*$%+%*0]*%C.0%
*"+*%#/(.'10$%+..%*"0%EV%#/7-%
Please visit Sonic Studio on the Web at www.sonicstudio.com
Technical support: [email protected]
Sales: [email protected]
Learn more about soundBlade operations in the User Manual. You can find the
manual in the Documentation folder located along with your soundBlade application.
Thank you for choosing soundBlade.