1
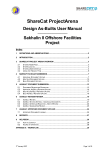
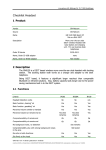
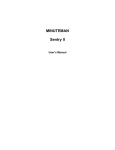
Copyright
2002-2005 Omni Technology Solutions
Inc. All rights reserved. All registered trademarks in this
document are the property of their respective owners.
1
DISCLAIMER
EMU (Enterprise User and Import Management Utility) is provided based on the condition that the
customer accepts the licensing agreement as set out in the installation programme. This agreement
stipulates that the customer accepts full and sole liability and responsibility for use of the software under all
circumstances. It further states that the software developers, vendors, and suppliers cannot, under any
circumstances, be held responsible for any damage, downtime, and financial or other losses related to
EMU’s utilisation.
As is the case when all software is first being tested and introduced into your environment, we
recommend EMU be installed on a “non-mission-critical” workstations and test servers. Before using EMU
to manage users on a production server, we recommend that you test EMU in a lab environment. After
confirming that EMU will work properly in your environment, we recommend that you back up your
servers—as well as your Novell Directory Services (NDS) database and GroupWise installations—before
using EMU to make modifications. We further suggest that you confirm WAN links are up, your
GroupWise database is consistent, NDS is healthy, and partition synchronisation and replication are
complete.
Product Requirements
4
Features
5
Setup Guide
7
GroupWise Troubleshooting
7
Create an Import Data File
8
Launching EMU
9
Importing Users Based on a CSV-Delimited Text File
9
Home Directory and Configuration Volume Restrictions
12
Modifying Home Directory Trustee Assignments
13
Assigning Passwords
14
Assigning Groups
15
GroupWise Account Names and Options
16
GroupWise Distribution Lists
17
GroupWise Connectivity Test
18
Deleting/Modifying User Objects Based on the Contents of a Text File
19
Creating External GroupWise Accounts
20
Moving Multiple User Home Directories
22
NDS Export Function
23
Delete Multiple Containers, Users, GroupWise Accounts, and Home Directories
24
Licensing the Full Version of EMU
26
Product Requirements
Prior to installing an updated version of EMU, please ensure that you remove any previous
versions. This may be done by selecting
, or by using the Wise Installation Utility that ships with EMU.
Please ensure that the
option (under custom installation) was
selected when the client was installed. Depending on the version of Client32 that is installed, this
may have not been the default setting. This option is required for Novell'
s nwusergrp.ocx
component. If Novell’s Workstation Manager Client32 was not active when you installed EMU,
when you try to run EMU you will receive an error indicating that the nwusergrp.ocx could not be
registered. Please uninstall EMU, reinstall Novell’s Client32 with the Workstation Manager
component selected, and reinstall EMU.
Windows XP Professional, Windows 2000 (SP1), Windows
NT (SP6), Windows9X, 64MB of RAM, (96MB if the station is running background processes
that require additional memory), Novell Client32 (Workstation Manager must be installed), and
IPX or IP. EMU has received siginificant testing on all of the above platforms. There still may be
unexplainable problems that occur with your particular environment. We recommend you not
have NWAdministrator open at the same time when running Windows NT workstation. This
appears to create issues that are difficult to explain. These issues "disappear" when you use
EMU on a Windows 9X workstation or close NWAdmin.
!
!
"
#
NetWare 6, NetWare 5.X, NetWare 4.X, Novell e-
Directory and Account Manager on all Novell supported evnironments (SUN Solaris, Linux,
and Windows NT/2000 . . .) In this manual, NDS and eDirectory are used interchangeably.
$
%
#
EMU supports GroupWise 6, GroupWise 5.5 Enhancement Pack
(EP) and GroupWise 5.5 (non-enhancement pack). To manage Groupwise users, the
appropriate GroupWise client software must be properly installed and configured on the client
and server. Please ensure that the GroupWise client that is installed on your computer matches
the version that is running on the GroupWise server. EMU uses the GroupWise Client DLLs
and APIs to control the GroupWise database. Using a GroupWise 5.2 client against a
GroupWise 5.5, 5.5 Enhancement Pack or GroupWise 6 installation (or any other mismatched
combination) will result in unexpected errors. There are two separate versions of EMU. One
version for all versions of GroupWise except GroupWise 5.5 Service Pack 4 and a second
version that is specific to GW 5.5 SP 4. Please ensure that you have downloaded the correct
version for your environment. Please contact us if you need to run EMU against GroupWise
5.2. We have had some success using the GroupWise 5.5 client against a GroupWise 5.2
system.
&
'
The administrator using EMU needs supervisory rights to the container in
which users are going to be created; RWECMFA rights to the appropriate directory structure if
( )
4
*+
home directories are being created; and the necessary rights to create, manage, and delete
users in the GroupWise system. We recommend the user running EMU have an
%
%
trustee assignment to the directory in which the users’ home directories are being
created. This improves the speed when creating large numbers of home directories.
We recommend you use EMU on a workstation connected at LAN speeds
(rather than over a WAN) to communicate with the server holding a R/W or Master Replica of
the NDS partition and the GroupWise domain and post office databases. The speed of any
WAN links will be the restricting performance factor when using EMU over a WAN. To improve
performance using EMU, it is best to be logged into a server that has a R/W or Master replica on
the partition into which you want to add the users. From a file system perspective, we
recommend that you create an explicit Supervisor Trustee Assisgnment to the parent directory
where you are going to create the users'home directories. This is also recommended for the
GroupWise Domain Object.
To date, the largest NDS tree managed by EMU contained 80,000 user objects. The upper limit
of objects that can be managed in one EMU session is a function of the speed and
perfomance of your hardware and network configuration. Time to display information on
12,000 NDS users in a single container: 12 seconds. Time to display information on
12,000 GroupWise users in a single post office: 30 seconds. This benchmark was created on
a Pentium II 350MHz computer with 128MB of RAM, running Windows 98, Client32 Version
3.1.0.0, connecting to a Pentium II 266 NetWare 5.0 server running GroupWise 5.5 on 256MB
of RAM over a switched 10 megabit Ethernet network.
Following are settings that can increase performance when creating or managing large numbers
of home directories. This information was taken from a Novell TID that describes how to
improve performance when large directory structures are involved.
set dirty directory cache delay time = 0.5 seconds
set directory cache allocation wait time = 0.5 seconds
set maximum directory cache buffers = 4000
set minimum directory cache buffers = 2000
( )
*+
5
Features
EMU was originally developed to enhance Novell'
s valuable, yet somewhat restrictive and
cryptic, Uimport, Bulkload and ICE utilities. EMU is proving most useful in large enterprise
business networks and educational institution implementations.
EMU offers the following features:
•
Ability to check the entire eDirectory/NDS Tree or particular containers for duplicate account
names prior to creating the users.
•
Automatically append a number to accounts that would otherwise conflict. Ability to change
the duplicate accounts to a name of your choice.
•
Change the Default Server
•
Save new, non-conflicting user names to a text file for future reference.
•
Ability to bulk modify NDS and/or GroupWise passwords based on the contents of a text file.
•
Ability to select and bulk modify accounts and account information based on the contents of a
text file.
•
Support for managing Novell NetMail user preference settings
•
Support for managing Novell NetMail user preference settings
•
Create and copy files to "Secondary" home directories (directories in another location with
"home directory" Trustee Assignments and file ownership)
•
Set Trustee Assignments for Home Directories (and Secondary Home Directories) - at creation
and during mass modification
•
Ability to mass copy files or directories into home directories
•
Move user home directories to other volumes - keeps Trustee Assignments, File Ownership
and Disk Restriction information (creates a batch file to run that deletes the original home
directories after you have confirmed the copy was satisfactory
•
Check for duplicate user names in specific containers (or the entire tree) before creating user
IDs
•
Enhanced ability to modify users based on the contents of a text file
•
Bulk modify user properties based on Group Membership
•
Add and delete Group Membership at the same time
•
Export a subset of NDS user property values (*including location of home directories)
to a text file which can be used to import users into a different tree.
•
Take advantage of administrator-configurable, user-naming convention options
(JSmith, JohnS, JoSmith, SmithJoh, ...). Allows you to save the EMU generated login
names to a text file for future use and bulk modifications.
( )
•
*+
“Drag-and-drop” users from the import file to the destination NDS container and
GroupWise database.
•
Add all users to the same groups during creation.
•
Add individual users to multiple groups during creation (multiple and different groups
for each individual user are added from the contents of a text file). This feature allows
different users to be added to different groups during the same import operation,
rather than being restricted to importing all users into the same multiple groups. To
use this feature, names of the groups must be provided in typeful, fully-distinguished
names separated by semi-colons: (first,middle,last, .CN = groupname.OU =
OUName.O = OName;.CN = groupname2. OU = OUname.O = Oname
•
Right click on a container and select all users in that container or all users below the
selected container.
•
Select individual/multiple users (click, ctrl-click, shift-click) and modify/delete multiple
user objects at once. At the same time, the administrator can choose to delete
associated user accounts, GroupWise accounts, and/or home directories.
•
Mass-modify selected users’ NDS properties and GroupWise account information,
including NDS and GroupWise passwords.
•
Add or delte multiple users to/from multiple groups at once
•
Mass modify NDS and GroupWise account expiry dates.
•
Disable multiple NDS accounts at once.
•
Create GroupWise IDs for existing NDS accounts.
•
Create external GroupWise entities (GroupWise accounts without full NDS accounts).
•
Assign GroupWise accounts to GroupWise distribution lists during creation.
•
Create home directories with greater than eight characters. Our home directory
creation process allows for home directories to respect mixed upper and lower case
directories for Macintosh and long-name-space users who want their home directory
folder to display both cases. For example, HendersonD will display in correct case
rather than all in capital letters.
•
Change the default Trustee Assignments that are made/or have been made to users’
home directories. This option is used most often to remove the Access Control right
from existing users.
•
Remove all trustee assignments that have been made under users’ home directories.
•
Define home directory space restrictions at creation time.
•
Define volume space restrictions on the volume that contains the home directory
being created.
•
Move user home directories to a different volume or server, while maintaining rights
and file ownership so disk restrictions continue to apply.
•
Create user home directories for existing users who do not currently have one.
6
( )
•
7
*+
Create a directory under the home directory (user defined) to allow NDS users to
publish web pages on a NetWare Enterprise Web Server 5.1. This is most often used
to create a %
•
&
directory.
When using EMU to export users and move them from one tree to another, the
administrator can choose to copy the contents of the users’ original home directories
to the new home directories. The administrator can choose to delete the source
directories or leave them on the original server.
Set-up Guide
The ( )
%)
" creates a number of files and a folder called LOGS in the default
installation directory, C:\PROGRAM FILES\OMNI\EMU. These files include sample 100 and
1,000 user preformatted import files. Also included is a Multigroups.csv file that shows the
formatting required to import user-specific groups for each user during the creation process. If
you would like to try a large import with the demonstration version, there are no restrictions when
you use the provided sample data files. The sample files will not work if they have been
modified.
If you want to create users based on your own data file, you will be limited to importing a
maximum of five users at once. Any NDS groups or GroupWise distribution lists to which you
want to assign users
exist in the NDS tree before you start EMU.
TroubleShooting
EMU contains an Enable Debug option that creates a number of log files that we will send you if
you are having unknown problems. A technician will direct you to send the log files that are
created in the installation directory. You may be directed to download a “debug” version of EMU
to provide additional diagnostic informtion.
Create an Import Data File
EMU accesses a comma separated value text file to import/modify users. This file is most often
created by exporting user information from a human resources or student information system.
The names of the columns that are used as field headers must be in the first line. This
information is required to be able to align the database fields with the NDS fields during the user
creation process. The data file must be saved as a comma-separated ASCII text file (CSV).
Support for native Microsoft Excel format will be included in a future release. When you save
the file as a CSV, it will automatically place double quotation marks around fields that include a
comma in the data component. (See user number two in the sample file.) Please note that there
must be no spaces ,(-. ( .
-/( the commas. The correct format will be
automatically used when you save the text as CSV format in Microsoft Excel. EMU’s advanced
group import option, Add User to Groups based on import field, requires that the multiple
( )
8
*+
group names be contained within the assigned comma-separated field, separated by a semicolon. See the sample file
groups
%
in the installation directory. Remember that these
exist in NDS before you start EMU.
A sample standard import data file:
First Name,Last Name,Full Name,Middle Initial,Title,Location,Department,Telephone,Fax Number
Caz,Bradbury,Caz Bradbury,1,Mrs,Saskatoon,Education,747-369-8308,520-626-5359
Alana,Aleong,Alana Aleong,2,Mr.,"Saint John, N.B.",Administration,712-285-7503,844-344-9884
Cornie,Cakarevic,Cornie Cakarevic,3,Mrs.,Edmonton,Communications,958-800-2308,242-468-4654
Petronille,Koval,Petronille Koval,4,Mr.,Halifax,IT,913-676-9007,605-469-4589
Simonne,Mahn,Simonne Mahn,5,Mr.,Toronto,Corporate,149-855-3197,940-203-4882
Set-up Procedure
1.
Begin the setup procedure by running the installation file. Please ensure that you
do NOT install the GW 5.5 product on a GW 55 Enhancement Pack (EP) system.
2.
The EMU Setup Utility displays the Installation Wizard splash screen. If this is the first
time the wizard has been used, you will be prompted to restart your workstation.
3.
Click Next on the welcome screen.
4.
Accept the default destination directory of C:\PROGRAM FILES\EMU, or choose a
directory of your choice and click Next.
5.
Follow the remaining prompts.
6.
EMU will install a shortcut under Start/Programs/Omni/EMU.
( )
9
*+
LAUNCHING EMU
When EMU first launches, it detects the NDS tree(s) to which you are authenticated. The demo
version will allow you to work in any tree. After registering EMU 2.x and copying the licence file
to the installation directory, EMU will be registered for use in the licensed tree.
Importing Users Based on a CSV-Delimited Text File
1.
Start EMU.
2.
When the opening screen prompts you to
!
/
, choose the tree you
wish to work on and Enable/Disable GroupWise functions as required.
After selecting the NDS tree you wish to manage, and Enabling/Disabling GroupWise Support,
and/or enabling NetMail support, EMU requires that you identify the containers that are going to
serve as “Search Containers”. Select the containers that include the server, volume, group,
NetMail, and GroupWise Domains objects that you want to make available during the EMU
session. This does not effect where you can create or modify users. In a Wide Area Network
(
) environment, we recommend that you only enable those containers that apply for the
current EMU session. Performance will be negatively effected if you select containers that span
the WAN. EMU will scan each of the containers and attempt to contact all of the servers,
volumes, group objects, NetMail objects and GroupWise Domain objects in the selected
containers and confirm they are available. If you are using the demo version, EMU will scan the
containers you have listed and users can be created in all containers. If you are using the
licensed version, EMU will scan the selected containers but will only allow you to create users in
the containers that were registered during the licensing process. If you have enabled
GroupWise support in the startup screen, EMU will communicate with the GroupWise system
( )
10
*+
and domain objects in the search enabled containers. EMU will not detect, nor can it be used to
manage GroupWise external or external foreign domains.
3.
After selecting the NDS tree you wish to manage, EMU analyses the tree and detects
all containers, file servers, and GroupWise objects in the selected tree.
5.
Highlight the right half of the screen and select 0 %
!
-
from the -
( )
11
*+
menu. Choose the CSV-delimited text file that contains the user information you wish
to import.
6.
On the right half of the screen, select !
-
displayed) from the drop-down box. Ensure that
(if not already
0
!
0
is displayed on
the left-hand side.
By default, the left panel shows your NDS tree, and the right panel depicts your
GroupWise system. You may change what is displayed in each section of the
interface by highlighting the section you wish to change, then modifying your selection
in the appropriate drop box. .)
( )
12
*+
Highlight the user names that you wish to import from the Data File, and drag the
selected users to the container in which you want to import them. When you select
%
!
, a dialogue box will open, allowing you to configure
this EMU session. This is where you select to open an EMU profile if you have
created an EMU profile based on the information in a previous EMU session. An
EMU profile allows you to save different user creation information and call up that
information or use in EMU sessions. EMU profiles are created by EMU and can be
copied from one system to another. There is a sample EMU profile (sample.cp) that
can be loaded. If you are using EMU profiles on different trees or in different
locations, there may be options that have been saved into the profile that do not apply
(default server, home directory locations, etc.). When EMU finds information in the
profile that does not apply, it simply ignores that information.
( )
8.
13
*+
To configure the user name, select whether you are using a single field from the data
file for the user login name or a combination of fields from the data source. In the
screen shot below, the administrator has selected a combination of data from three
separate data fields to create the
!
: first letter of the Given Name,
first four letters of the Last Name, and the last four digits of the Student ID number.
This combination will create the user
111. You can choose to save the EMU
generated names to a text file for future selection and modifications.
( )
9.
14
*+
If you are using EMU to create, manage, or delete GroupWise objects, please ensure
that the appropriate GroupWise client is installed on the computer on which you are
using EMU. EMU uses GroupWise DLLs and APIs to directly access GroupWise
database information. Using a GroupWise 5.2 client against a GroupWise 5.5 or 5.5
Enhancement Pack database (or any other mismatched combination) may result in
unexpected errors. IPX is the preferred Client32 protocol when managing GroupWise
with EMU.
Home Directory Configuration and Volume Restrictions
To configure home directory options and volume restrictions, select the 2
tab, choose
2
!
!
"
, and click on the ellipsis to browse for the volume
and directory to use as the users’ home directory. Enter restriction values in the appropriate
boxes. A number of options may be selected. In the following screen, the administrator has
chosen to create a home directory, enable space restrictions, create a directory called TEMP in
each user’s new home directory and not to copy any default data or directory structure into their
home directories.
( )
15
*+
Modifying Home Directory Trustee Assignments
EMU will allow you to modify the default home directory trustee assignments that are made by
Novell during user creation. By default, these assignments include all rights except supervisor.
EMU allows you to reassign the trustee assignments to home directories and/or remove all
existing trustee assignments that have been made to users’ home directories and subdirectories. These modify functions will be supported in a future release of EMU. Right-click the
user objects, select
changes.
"
34
"2
! , and make the desired
( )
16
*+
Assigning Passwords
You may assign the same password to all users at creation time. Passwords may be assigned
from the import file or randomly generated. If they are randomly generated, you will be prompted
for the name of the password log file. The NDS password log file and the GroupWise password
log file, if selected, will write the information to a single file with the user name and passwords.
Assigning Groups
To assign all users in the import data file to the same groups, click on $
% in the selection
( )
17
*+
list. You may also place individual users in specific groups by assigning them to a field in the
import file. When you select the
)
$
% ,
0 %
-
,a
message box identifies the required format for specific group assignments. See the
%
sample file in the EMU installation directory to obtain the required format for
individual group assignments.
GroupWise ACCOUNT Names and Options
$
and options are configured under the GroupWise tab.
%
GroupWise Distribution Lists
Users are assigned to $
%
!
5
by choosing from the lists selection
screen. If the distribution list you want does not exist, you can switch to
create the distribution lists, return to EMU, and select the
display the newly-created lists.
& button. EMU will now
,
( )
$ .)
18
*+
0 ( / .),5( 2../0 $
EMU includes a GroupWise Connectivity Test called $
, located in the default
%
EMU installation directory. We recommend that you assign an explicit
assigment to the GroupWise domain and post office objects. $
%
trustee
%
reports domain
database accessibility, connectivity status, and time-out information which is helpful for
administrators using EMU to connect to GroupWise domains over slow WAN links. If you are
having problems connecting to your GroupWise Domains or Post Offices, run the
GWREPORT.EXE and email the resulting log file to us for analysis. Most GroupWise
connectivity errors are caused by slow WAN links and different versions of the GroupWise client
than what is on the server.
( )
19
*+
Deleting/Modifying User Objects Based on the Contents of a Text File
This function allows you to select NDS accounts based on the contents of a text file. To use this
option, you must have an ASCII text file that contains the name of the user objects to be
modified in a text file. This file can have multiple fields. The first row in the fields must have the
names of the fields. These names will be used as headers to identify the columns of data. You
will be prompted to align the headers with the fields that contain the appropriate data to be
modified. If the user name is in distinguished format (.shane.edm.nlm), EMU will select the
explicit users rather than doing an entire tree search. This is a faster process. When you select
the
&,
!
-
under the /
menu, you will be
prompted for the text file location. After selecting the source text file, EMU will ask you to select
the field that contains the User Account Identifier and to indicate whether the field includes the
User Name or the Distinguished Name.
The next step is to indicate which containers EMU should search for the users. This will not
appear if the data file contains Distinguished Names. In a slow and complex WAN environment,
we recommend you keep the number of containers to be searched to a minimum.
( )
*+
EMU will display a list of names that it finds, names that aren’t found, and duplicate names. By
checking the names in the found list that you want to modify, EMU will make them available in
the right-hand pane of the EMU window. By selecting and right-clicking on the highlighted users
in the right half of the screen, and selecting Highlight the users in the NDS view, EMU will
highlight the users in the NDS tree. Now that the users are highlighted in the NDS tree, you can
carry out all of the standard “Right-click/Modify” functions.
Mass Modify/Delete Accounts Functions
EMU allows you to select multiple users and carry out mass modify functions using three
different strategies: 1. Select accounts, right-click and modify their values to a common value
for all highlighted users; 2. Modify users that are members of a group by selecting and rightclicking the Group Icon; and 3. Modifying selected accounts based on values that are in a text
file. In the example below, we have selected the option to modify accounts based on Group
Membership. All of the members of the group are listed. You can select to modify all of the
users or you can check those users whose accounts you want to modify.
20
( )
*+
You can select these users one-by-one in the EMU interface or you can use the Select Users
based on text file described above. EMU also allows you to manage users based on their group
membership. Right-click or double-click a group object to see and/or select the users to be
modified. All modify functions can be carried out based on group membership.
This function is often used to make mass changes to users Group Membership. You can add
and remove users to/from groups at the same time by selecting the Group Tab in the Modify
screen.
21
( )
*+
Other Mass Modify functions include the ability to change users‘ NDS and/or GroupWise
passwords (most often changed based on the contents of a text file), Organizational Role
Occupancy, GroupWise Distribution Lists and Visibility, GroupWise and NDS Account Expiry
dates and many others. Following are a number of screen shots that illustrate some of the Mass
Modify Changes that are available.
22
( )
*+
23
( )
*+
24
To change NDS Password Restrictions is a two-step process. The first step is to Check each option that
you want to enable. If this option is not selected, you can not make the Modifications in the other list. All
values that are modified for the enabled options will be changed in the NDS.
The remaining options are too numerous to describe in this document. If there are Mass Modify options
that are not included in EMU that you would like to request, please send an email to
[email protected]. EMU continues to improve based on user feedback and enhancement requests.
( )
25
*+
Creating External GroupWise accounts
Depending on which release of Version 3.x you are using, this option may differ. Please contact
[email protected] if you have questions about how to create External GroupWise accounts.
To create external GroupWise accounts, you must open the data source from the list on the lefthand side of the screen. (The demo version of EMU is restricted to creating five accounts at one
time). On the right-hand side, select GroupWise view and expand the GroupWise system until
you see the post office into which you want to import the users. Select your users from the data
file and drag them to the post office (do not drag them onto a !
form, click on the
%$
%
5
). In the setup
button and choose the appropriate naming
convention. Select the NDS container in which you want your GroupWise external entities to be
( )
26
*+
created. (This is done by clicking on the
!
button). The “last name”
field is a required field.
Moving Multiple User Home Directories
EMU supports moving multiple user home directories. Highlight the users whose home
directories you would like to move. Right-click on the user objects and select
. Select the
2
!
"
button and identify where you want to move the
objects. You may choose to keep the original directories or delete them after they have been
moved. A similar process is used to create new home directories for users.
NDS Export Function
EMU includes the ability to export certain NDS user information to an ASCII text file.
1.
Launch EMU.
( )
2.
27
*+
On the
!
portion of the screen, select those users whose
0
information you wish to export.
3.
Multiple users can be selected by clicking on the first name in the list, then
<shift>+clicking on the last user listed—or by using a <ctrl>+click on each of the users
you wish to add at random. (Users from multiple containers may be added using this
method.)
4.
Once you have all your users selected, click on the !
5.
-
menu and select ( %
.
The
%
dialogue box will open. Select the fields you
wish to export.
6.
The data is exported into a file called “export.csv”, but you may choose to rename the
file. It can then be opened and modified with an application like Microsoft Excel. By
default, the file will be saved in the EMU install directory.
( )
28
*+
Delete Multiple Containers, Users, GroupWise Accounts,
and Home Directories
(This function will be available in a future version of EMU 2.x. For clients who need this
functionality, it is fully supported in Version 1.3.5.)
Note: This is a +( 6
this option, it
.
( -)5 and !
$( .)
feature of EMU. Once you select
be stopped. PLEASE ensure that you have practised using this feature
on containers and users that contain no important information. When you delete a container
object with EMU, it will delete all objects (containers, objects, servers, volumes, groups,
computers, etc.) from the container and all sub-containers. This includes objects which will not
be displayed in the EMU interface. !
%
—the objects cannot be
recovered once deleted. As per the licensing agreement, the software provider #
%
"
%
" for the results of misusing this feature.
In the following example, if an administrator were to right-click on the CORP.NYC.EMA
container and select Delete, EMU would ask the user to select deletion options (delete
GroupWise account, delete Home Directory, etc.). After accepting the prompts, EMU would
delete the CORP container and ALL objects based on the options selected by the administrator.
In this example, the CORP container also contains the Server Objects, Volume Objects,
ZenWorks Objects, and a number of other objects that do not appear in the EMU interface. They
would all be deleted if the administrator continued the deletion operation!!
( )
5(
29
*+
( ) ( /2( !(5(/(
. / 0 (
. /0.
0/2 (7/ ( (
)/0. 8
Once you are comfortable with the EMU interface, the remaining features are relatively selfexplanatory. We look forward to receiving your product feedback, as well as your
recommendations for product enhancements.
( )
30
*+
Registering EMU
To register EMU, please provide the name of your NDS tree and the number of users you
want to manage with EMU. This number is the total number of users in the NDS tree or in
the container that you are going to manage with EMU. This is not the number of users
that you want to import or manage at once. EMU can be licensed for multiple trees.
There are different categories for EMU pricing. Pricing and order information can be
found at http://www.omni-ts.com/Pricing/Pricing_EMU.html
Support and Software Updates
When you buy EMU, you receive 30 days of support and software updates. To purchase
unlimited support and software updates, the price is 30% of the purchase price, pro-rated
to June 30 of each year. The unlimited support and software updates option can be
renewed each year for 30% of the purchase price. When you are under a support
contract, all you have to do to update to the most current version is download the version
that is on our web site. Your registration file will automatically recognise versions of EMU
that are downloaded for the period that you have purchased support. Our support desk is
open from 8:30 a.m. to 5:00 p.m., Mountain Time, Monday to Friday. Our email contact
address is [email protected].
Additional Information
For information on EMU and other NDS and GroupWise programmes developed by Omni
Technology Solutions, send an email to [email protected] or visit & % # # #
*