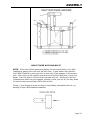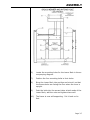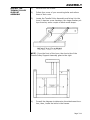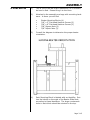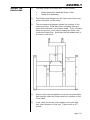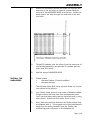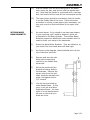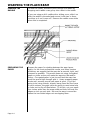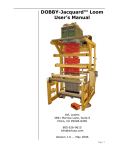
1
Studio Dobby Loom
User’s Manual
AVL Looms
3851 Morrow Lane, Suite 9
Chico, CA 95928-8305
U.S.A.
530 893-4915
530 893-1372 fax #
[email protected]
www.avlusa.com
Version 4
May 2008
TABLE OF CONTENTS
Introduction
•
•
About AVL1-1
SDL Design Concept1-1
Set Up
•
•
•
•
•
Receiving Your New Loom
Shipping Damage
Assembled or Not
United Kingdom Customers
Unpacking an Assembled Loom
2-1
2-1
2-1
2-1
2-2
AssemblY
•
•
•
•
•
•
•
•
•
•
•
•
•
•
•
•
•
•
•
•
•
•
•
•
Before You Begin
Install the Dobby Cam Cylinder
Installing the Cross Members
Install the Cloth Storage Beam
Install the Lower Front Assembly
Install the Brake Pedal
Install the Treadle Pulley Support Assembly
Install the Spring Lever Supports
Install the Harness Pulley Support Assembly
Install the Beater Assembly
Sliding Beater
Install the Swinging Beater
Install the Dobby Head
Harnesses Assemblies
Install the Harnesses
Install the Warp Beam
Second Warp Beam Brackets
Mount the Brake Cable
Connecting the Right Treadle Cable
Connecting the Left Treadle Cable
Install the Shelf
The Compu-Dobby
General Information
Installation
3-1
3-4
3-5
3-8
3-9
3-10
3-11
3-12
3-13
3-14
3-15
3-16
3-17
3-18
3-19
3-21
3-23
3-24
3-26
3-26
3-28
3-28
3-28
3-29
WARPING THE
PLAIN BEAM
•
•
•
•
•
•
•
•
•
•
•
•
•
•
Creating Two Crosses
Securing the Crosses
Removing the Warp for the Warping Board
Adjusting the Tension Device
Attaching the Raddle
Winding the Apron
Attaching the Warp to the Apron
Inserting Sticks in the Raddle Cross
Feeding the Raddle
Preparing the Paper
Winding the Warp
Threading Cross
Removing the Raddle
Two Beams
4-1
4-2
4-2
4-2
4-2
4-2
4-3
4-3
4-4
4-4
4-5
4-6
4-6
4-6
Page TOC-
TABLE OF CONTENTS
•
•
•
When do you need to tension your warps
separately?
Setting Two Beams
More than Two Warps, Separate Tensioning
4-7
4-7
4-8
WARPING THE
SECTIONAL BEAM
•
•
•
•
•
•
•
•
•
•
•
•
•
•
•
Sectional Beam Calculation
Extension Cords
Feeding the Spool Rack
Positioning the Tension Box
Tension Box
Tension Box Heddle Installation Instructions
Threading the Tension Box
Positioning the Separation Beam
Winding the Warp
Adjusting the Size of the Section
Counting Turns or Yardage
Creating the Cross
Inserting Sticks in the Threading Cross
Readjusting the Tension
Combining Sectional and Plain Warping
5-1
5-2
5-3
5-3
5-3
5-4
5-5
5-6
5-7
5-7
5-8
5-9
5-9
5-9
5-10
THREADING,
SLEYING, AND
TYING ON
•
•
•
•
•
•
Preparation for Threading
Threading the Harnesses
Unused Heddles
Sleying the Reed
Tying on to the Apron
Tying on to an Old Warp
6-1
6-1
6-1
6-2
6-2
6-3
Loom Controls
•
•
•
•
•
•
•
•
•
•
•
•
•
Right Treadle
Left Treadle
Cam Cylinder
Brake System
Cloth Storage System
Removable Breast and Separation Beams
Sliding Beater
Swinging Beater
Sectional Beam
Plain Beam Dobby Head and Compu-Dobby
Spring Levers
Harnesses
7-1
7-1
7-1
7-1
7-2
7-2
7-3
7-3
7-3
7-3
7-4
7-4
7-5
Page TOC-
TABLE OF CONTENTS
Maintenance
•
•
•
•
•
Tightening the Bolts
Lubrication and Cleaning
Cleaning a Filter
Checking Cords and Cables
Tool Kit and Spare Parts
8-1
8-1
8-1
8-1
8-2
AVL Customer
Service
•
•
AVL Warranties
AVL Returns Policy
9-1
9-1
Page TOC-
INTRODUCTION
About AVL
AVL Looms has been in the business of designing and building some of the world’s finest handweaving looms since 1976.
Jim Ahrens, the “A” in AVL, was the seminal mind behind our
basic design concept. His immeasurable contributions to
handweaving are the products of a keen mind coupled with his
training as an engineer, in-depth historical research, and constant application. Now in his nineties, Jim maintains an active
collaboration with the company from his home in Utah, where
he resides with his wife Ethel.
Over the years many people, from customers to staff, have offered suggestions that have helped us improve our products.
Once known for our production looms, AVL has broadened its
line considerably and we now offer customers a full spectrum
of fine weaving equipment, ranging from our small Home
Looms, to our Industrial Dobby Looms, Rug Looms, and Jacquards.
SDL Design
Concept
In 1996 we began, in earnest, to design a loom that would
meet the very specific needs of university weaving programs
and small design studios. According to our research, such a
loom would need to be small, extremely robust, and very basic in its mechanical systems. However, it would still need to
offer harnesses in sufficient number to handle complex weaving structures and had to be computer capable.
The result of that process is the loom you have before you. It
is in all respects an Ahrens loom, however, it benefits significantly from suggestions made by noted weaver and teacher,
Ann Sutton, from other weaving instructors, and from the
work of our own very capable design staff.
The Studio Dobby Loom is not a production loom. It was designed from the ground up as an instructional loom that might
serve equally well as a sampling loom. Such mechanisms as
Automatic Cloth Advance and Auto Warp Tensioning, extremely valuable in a production environment, have been replaced
by systems more appropriate in an instructional or design
context, where speed is less an issue, but ease of maintenance is more. We think you’ll be delighted with the functionality afforded by this design.
Page 1-
SET UP
RECEIVING YOUR
NEW LOOM
If your loom was assembled by AVL it will have arrived in a
single large box. Looms delivered outside the continental U.S.
will probably be further contained within a protective framework. Accessories too large to include with the loom will be
located in supplementary boxes. Looms delivered knocked
down will arrive in several large and small boxes.
Please confirm that you received the number of boxes indicated on your copy of the Bill of Lading. If not, best call the
delivery company, you may have parts still roaming the countryside.
SHIPPING DAMAGE
Rarely is a loom damaged in shipping, however, if you do discover damage please call the delivery company immediately.
Then call us at 530 893-4915.
Freight haulers are not agents of AVL and only the consignee,
the customer, you, may file a damage claim. It’s best if you
save your packing materials; some freight companies wish to
examine them as part of their claims process.
AVL will immediately replace the damaged parts and invoice you for them. You, in turn, should present the bill to
the freight company. They, in turn, will pay it (they always
have!). It’s inconvenient for all of us, but really not too troublesome and we’ll make an extra effort to get your replacements to you quickly.
ASSEMBLED OR NOT
If you purchased your loom pre-assembled, please proceed
now to the instructions provided in the next section: Unpacking an Assembled Loom. If you requested your loom
knocked-down, move on to Assembly on page 3-1.
United Kingdom
Customers
Your loom will have been packaged somewhat differently than
those shipped to other locales. Essentially, we have already
assembled your side frames. This means that you will NOT
have a package of side frame hardware. You should begin assembling your loom at page 3-4, Install the Compu-Dobby
Cylinder. However, we do urge you to read the introductory
material on pages 3-1 and 3-3 before you proceed to page 34.
Page 2-
SET UP
UNPACKING AN
ASSEMBLED LOOM
Again, if we assembled your loom at our facility, it will arrive
wholly or mostly in one box.
•
•
•
•
•
•
•
•
•
•
Cut and remove the plastic strapping.
Use a screwdriver or other flat implement (not a knife,
please!) to separate the top and bottom trays from the
cardboard sides.
Pull off the cardboard top cap.
Lift the sides up and over the loom (they are joined into
a single piece).
Untape and remove any ancillary boxes. We try always
to leave a tab at the end of each piece of tape, so you
can pull it off rather than cut it.
Get a helper to aid you in lifting the loom off it’s plywood skids.
Move the loom to its permanent location.
Carefully untape the beater, harnesses, and all other
mechanisms.
Replace any cables that have obviously been dislodged.
Carefully check the loom for damage.
Once you've installed the Compu-Dobby your loom will be
weaving ready. We'll explain the Compu-Dobby installation
later, but first let's make a quick inspection. You may wish to
consult the Parts List in the appendix if any of our part names
are unfamiliar to you.
•
Remove the Shelf Retention Pin at the rear of the Harness Pulley Supports. Slide the shelf out and set it
aside.
•
Working down from the top of the loom, please verify
that:
•
•
•
•
•
•
•
•
•
•
All Harness Cables are located in their pulleys.
All Harnesses are attached to Harness Cables.
Dobby Cables are not tangled in the Dobby Head.
Harness Springs are connected between Spring
Levers.
Treadle Cables are strung over pulleys.
Treadles operate freely.
Sliding Beater (if equipped) operates smoothly.
Swinging Beater (if equipped) swings smoothly,
without interference from adjacent parts.
Cloth Advance Handle engages with Cloth Storage Beam Ratchet and advances beam.
Depressed Brake Pedal(s) releases tension on
cables.
Replace the shelf.
Page 2-
ASSEMBLY
BEFORE YOU BEGIN
Let us offer a few words of encouragement. You may be a
little intimidated by the prospect of assembling your new loom
— perhaps you don’t consider yourself very mechanical or are
afraid you’ll make some horrendous, irremediable error that
will finally prove to the world that you are a complete technical incompetent. Relax; you do many things in your daily life
that are more complicated and technically challenging than
the thing you’re about to do. If at any point you become
disoriented, unsure, or outright confused, call us at 530 8934915. We’re here to help. If you’re nervous that you might
be asking a dumb question, console yourself with the knowledge that with absolute certainty someone else has already
asked it. The only dumb question, of course, is the one not
asked. Besides, we know you’re brilliant — you bought an
AVL!
There is a definite advantage in assembling your own loom.
You’ll come to know it very well, sooner than you otherwise
would, and the better you know your loom, the better you’ll
be able to use and maintain it.
Tools:
First, you’ll need tools:
•
•
•
•
•
•
•
•
Hammer
Socket Wrench with 1/2”, 7/16”, and 9/16” sockets.
Large Bladed Screwdriver
Medium Phillips Screwdriver
Large Phillips Screwdriver
Scissors
Crescent Wrench
Occasional Extra Pair of Hands
Packed with your hardware are a few additional tools that you
may not have. They’ll be there when you need them.
Once you’ve gathered your tools, open all the boxes and lay
the contents out just as you find them. Please DO NOT remove the tape from any of the components until we tell you.
Please, too, leave the hardware bags unopened until they are
required. Clear away all your packing materials — they’ll just
be in the way. It’s best if you keep your work area as organized and free of clutter as possible.
You’ll need a space about 5’ x 5’ to assemble your loom. In
addition, a conveniently located desk or table will come in
very handy for several of the operations.
Depending on your particular style of work, the entire assembly operation will take between three and eight hours.
Page 3-
ASSEMBLY
LEFT AND RIGHT SIDE FRAMES COME TO YOU PRE-ASSEMBLED
(see Figures 1 and 2)
Page 3-
ASSEMBLY
ABOUT THOSE NUTS AND BOLTS
NOTE: Given the limited space provided by the nut access holes, it's a little
challenging getting the nuts onto the bolt ends. It gets easier with practice.
You’ll find it helpful to push each bolt in just until it just appears in the access
hole. Move the nut into position over the end of the bolt and back it with your
finger. Push the bolt in a little further and seat the nut. Slowly turn the bolt
clockwise and when the nut engages, tighten it most, but not all, the way down.
It’s best to leave everything a little loose at first.
Finally, if your fingers are just too big to comfortably manipulate the nut, try
backing it with a flat bladed screwdriver.
Page 3-
ASSEMBLY
INSTALL THE
DOBBY CAM
CYLINDER
The Dobby Cam Cylinder provides mechanical advantage to
the right treadle, greatly reducing the amount of effort required for harness lifting.
1.)
This assembly is supported by an axle that spans parts
#3 and #4.
2.)
Locate the assembly and withdraw the axle. It should
slide out effortlessly.
NOTE: Make sure there isn't anything (string, tape) lodging
the axel in the cam.
Page 3-
3.)
Insert the axle from the left side, into the mounting
hole in part #3. Push it about half way through the
hole.
4.)
Rotate #3 about 20 degrees so that the free end of the
axle points to the outside of the loom.
5.)
Thread the Cam Cylinder and wooden pulley back onto
the axle.
6.)
Pivot #3 back into position so that the free end of the
axle now points to the opposite mounting hole in #4.
ASSEMBLY
7.)
Push the axle through the hole in #4 until the blank end
comes out the other side.
8.)
Check the position of the Cam Cylinder and pulley
against the diagram below. Looks the same? Good!
9.)
Find the black plastic cap provided in the hardware bag.
Use your hammer to drive this cap onto the end of the
axle. You’ll likely need that extra pair of hands to bear
against the cap at the other end.
10.) Tighten the screws that secure #3. Bring the frame
back to its feet and tighten the top screw.
Let’s declare the side frames finished. Great time to take a
moment for reflection. If your extra hands aren’t otherwise
occupied, you may want to invite them to remain a while longer. If they beg relief, dismiss them curtly and together we’ll
demonstrate just how independent you can be!
INSTALLING THE
CROSS MEMBERS
In the next stage of your loom assembly, you’ll attach the
various members that connect the left and right side frames.
We’ve already sub-assembled many of the components and
you’ll progress quickly through these operations. When done,
your loom will look like a loom.
The tools you already have at hand will suffice.
1.)
Please locate:
•
Lower Back (#17)
•
Cross Member Hardware Pack
2.)
By now you know the drill. Sort the hardware.
3.)
Select four 3-1/4” Chrome Plated bolts, with square
nuts. Remove the nuts.
Page 3-
ASSEMBLY
Page 3-
4.)
Stand both side frames on their feet, about 2’ apart,
with their access holes facing inward. Put yourself at
the front of the frames.
5.)
Pivot each frame forward 90 degrees so that they lay
on their Front Verticals (#2).
ASSEMBLY
6.)
Locate the mounting holes for the Lower Back in the accompanying diagram.
7.)
Position the four mounting bolts in their holes.
8.)
Bring the Lower Back into position and orient it so that
the access holes are facing the floor when the loom is
upright.
9.)
Push the bolts into the access holes at both ends of the
Lower Back; add the nuts and tighten down well.
10.) The frame is now self-supporting. Put it back on its
feet.
Page 3-
ASSEMBLY
INSTALL THE CLOTH
STORAGE BEAM
Page 3-
The Cloth Storage beam MUST be installed at this point in the
assembly process. Its axle fits into holes in the side frames
and once the frames are joined further, it will be impossible to
add the beam.
1.)
Locate the beam mounting holes in each side frame.
These are about 1” in diameter and lay opposite one
another in the Mid Front Horizontals. They are drilled
completely through the frames.
2.)
The Cloth Storage Beam has a metal ratchet on one
end. Find the beam now. Find, too, the Cloth Advance
Handle and bring beam and handle to the loom.
3.)
You’ll see that the advance handle has an oblong hole
at one end. Fit this hole over the cloth storage beam
axle (ratchet side). Be sure that the wooden handle
will point to the interior of the loom.
4.)
Now slip both ends of the beam into their mounting
holes.
5.)
Allow the handle to rest
atop the small block
you previously installed
in the right side frame.
6.)
Push the side frames
together. Take care not
to dislodge the beam
until the lower front is
installed.
ASSEMBLY
INSTALL THE
LOWER FRONT
ASSEMBLY
1.)
The Lower Front Assembly consists of a cross member,
treadle assembly, and treadle mounting hardware (#16,
#35, #36, etc.). Find it now and bring it to the loom.
2.)
From the treadle rod, remove the two mounting blocks.
Leave the two stop collars in place on the rod. Slide
the long treadle on from the left and the short treadle
on from the right. Slide the mounting blocks onto the
ends of the rod. Now screw the mounting blocks to the
cross member.
3.)
Select and de-nut another four attachment bolts. Identify the Lower Front mounting holes on the diagram.
4.)
Move again to the front of the loom; this time, pivot it
away from you and lay it on its Rear Verticals.
5.)
Place the mounting bolts in the bottom holes in the
Front Verticals.
6.)
Bring the Lower Front Assembly into position. Orient it
so that the longest treadle is on the left.
7.)
Install the assembly. A bit awkward — just allow the
treadles to hang.
8.)
Leave the loom on its Verticals for now.
Page 3-
ASSEMBLY
INSTALL THE
BRAKE PEDAL
Page 3-10
1.)
If you will be using a single beam, you’ll want to mount
the Brake Pedal on the left side of the loom. If you
have two warp beams, you’ll need to mount two pedals;
one left, one right.
2.)
Please locate the Brake Pedal assembly or assemblies.
3.)
Remove and set aside the nut, washer, and carriage
bolt. Leave and the smaller bolt assembly at the end of
the pedal in place.
4.)
Find the Brake Pedal mounting hole in the diagram.
5.)
From the outside of the Left Castle (#16), insert the
carriage bolt into its hole. Use light hammer taps to
seat the bolt head in the wood.
6.)
Push the Brake Pedal onto the carriage bolt so that the
longest part of the pedal is to the front of the loom.
The pedal must also rest atop the metal stud you installed earlier. Add the washer (it should just fit the recess) and the nut, and snug down with a 9/16” socket.
7.)
If you have a second pedal, mount it now to the opposite side frame.
ASSEMBLY
INSTALL THE
TREADLE PULLEY
SUPPORT
ASSEMBLY
1.)
Put the loom on its feet.
2.)
Collect four more of your mounting bolts and relieve
them of their nuts.
3.)
Locate the Treadle Pulley Assembly and bring it to the
loom (it has two cross members, two large wooden pulleys on axles, and a couple of black metal straps.
NOTE: From the front of the loom, the short side of the
Treadle Pulley Support Assembly goes to the right.
4.)
Consult the diagram to determine the attachment location; then, locate the bolts in the frames.
Page 3-11
ASSEMBLY
INSTALL THE
SPRING LEVER
SUPPORTS
Page 3-12
5.)
This assembly has a definite left/right, up/down orientation. The metal straps indicate the top: when in
place, the right pulley is offset nearest the right side
frame. That is, there is more distance between the left
pulley and left side frame, than the right.
6.)
Once you’ve correctly oriented the assembly, bolt it into
place.
7.)
Leave the assembly mounting bolts loose enough that
you can spread the frame about 1/4". This will facilitate placement of the Spring Lever Supports.
1.)
The Spring Lever Support mounts a few inches above
the Treadle Pulley Support you just installed. It again
consists of two cross members and two axles, this time
carrying a series of 32 or 48 hooked levers with chains.
Please find it.
2.)
Again, there is a definite orientation that must be observed. If you examine the assembly closely, you’ll
note that half of the levers on each side are shorter
than the others. THE SHORT LEVERS GO TO THE
FRONT! Once more, the short levers go to the front!
Where do the short levers belong? In the front!!!
3.)
Four more bolts — you know the rest. But tighten
these bolts down hard. You’re quickly becoming a Master Loom Builder; have you noticed? Give yourself a
quick pat on the back.
ASSEMBLY
4.)
Return now and tighten the Treadle Pulley Support
bolts.
5.)
Before you proceed, you'll want to neaten the Spring
Levers. The left spring levers simply hang. Disengage
the brass hooks so that they all point to the interior of
the loom. The right levers will rest atop the right-most
metal strap. Here, too, deploy the hooks so that they
all point to the interior of the loom. Allow the chains to
hang.
One more set of cross members and you’ll be hanging the
Dobby, then the beater and harnesses. Soon, you’ll be finished.
INSTALL HARNESS
PULLEY SUPPORT
ASSEMBLY
1.)
Locate this assembly.
2.)
From your hardware pack, select:
•
•
3.)
Lay the HARNESS PULLEY SUPPORT ASSEMBLY atop the
loom frame. It should overhang about 4” on the right
side.
4.)
Cut and carefully remove the packing tape.
4 — 1/4” x 5-1/2” Flat Head Machine Screws
4 — 1/4” Square Nuts
Page 3-13
ASSEMBLY
INSTALL THE
BEATER ASSEMBLY
Page 3-14
5.)
Align the holes in the four mounting holes in the Pulley
Supports with those in the TOP HORIZONTALS.
6.)
Insert the Flat Head Machine Screws, add the Square
Nuts, and tighten.
7.)
Take a moment to breath and appreciate your progress.
You’ve achieved something like the pinnacle of the assembly process. Everything’s down hill from here.
AVL provides two beater options: an overhead Swinging
Beater or a rail mounted Sliding Beater. Follow those directions that are appropriate to your system. Both systems are
quite easy to install.
ASSEMBLY
SLIDING BEATER
1.)
This is one of the last major assemblies, so it shouldn’t
be hard to find. Please bring it to the loom.
2.)
Attached to the assembly are bags with mounting hardware. In them you will find:
•
•
•
•
•
3.)
Consult the diagram to determine the proper beater
orientation.
4.)
Each Mounting Block is labeled with an identifier. Position the blocks on the ends of the Beater Slide Rods
according to these identifiers. The large countersunk
holes in each block should be oriented to the top.
Beater Mounting Blocks (4)
3/8” x 3” Flat Head Machine Screws (2)
3/8” x 6” Flat Head Machine Screws (2)
3/8” Square Nuts (2)
3/8” Nylock Nuts (2)
Page 3-15
ASSEMBLY
5.)
Drop the longer screws into the rear blocks, the shorter
into the front.
6.)
Carefully position the assembly atop the Mid Front Horizontals (# 2, #13). With a little jiggling, the screws
will fall into the mounting holes.
7.)
Apply the square nuts and tighten them most, but not
all the way, down. We need to make an adjustment
before you lock the beater down tight.
8.)
Slide the beater all the way forward so that the leather
bumpers are equally compressed. While holding, snug
down the two front screws. (You really need your partner for this. If no one is available at this very moment,
leave the beater as it is and come back to adjust it
later.)
9.)
Now, push the beater all the way rearward and snug
down the back screws.
10.) Bring the beater forward again. Check its action: is it
square to the mounting blocks? If so, tighten the front
screws down hard.
11.) Push the beater all the way rearward and make the
same check. Tighten the screws.
12.) You may need to perform this back and forth action
several times, making minor adjustments as you go.
The point, of course, is to put the Beater Slide Axles in
exact parallel.
13.) When you’re finished, the beater should slide easily
along the full length of its travel.
INSTALL THE
SWINGING BEATER
Page 3-16
1.)
Installing the Swinging Beater is easier than making
Jello. We’ve already added the mounting blocks to the
Front Harness Pulley Support. All you need to do is
bring the assembly to the loom and drop the Hanging
Arms into their slots.
2.)
The beater may unavoidably have been put out of adjustment in shipping. If it seems so to you, loosen the
attachment hardware, bring it all the way forward, hold,
and retighten.
ASSEMBLY
INSTALL THE
DOBBY HEAD
1.)
Find and unpack the Dobby box. It will contain:
•
•
2.)
The Dobby Head hangs from the right side of the loom,
at the mid-point on the frame.
3.)
The accompanying diagram shows the location of the
mounting holes. Note that three mounting bolts protrude from the back of the Dobby Head. If any of these
have come loose, you’ll need to reposition them from
inside the Dobby Box. Note that the bolt heads seat in
a recess in the wood.
4.)
Remove the nuts and washers from the mounting bolts
and carefully slide the Dobby Head into position on the
loom frame.
5.)
From inside the frame, slip a washer onto each bolt
end, then thread on a hex nut. Tighten with a 1/2”
socket.
Dobby Head with attached Sensor Case
Dobby Arm Assembly
Page 3-17
ASSEMBLY
6.)
(For SDL with Compu-Dobby II only.) Find the Dobby
Arm and check that the magnet is installed at the end.
When orienting the arm, be sure that the magnet faces
away from the loom.
7.)
Remove the hardware and wooden spacer from the
pivot end of the arm.
8.)
Slide the Dobby Arm into the large window in the left
side of the Dobby Head. Push it through until the
magnet end sticks an inch or two through the slot on
the right side of the head. Don’t worry for the moment
about cable alignments — we’ll straighten all that out
later.
9.)
Use a 1/2” socket to bolt the Dobby Arm into the Front
Mid Horizontal.
10.) By hand, move the Dobby Arm up and down. Check
that the magnet clears the Dobby Arm. If not, loosen
the screws on the sensor and adjust it so that the magnet clears.
HARNESSES
ASSEMBLIES
It's time to add some of the muscle and sinew to your loom:
the harness cables, harnesses, and harness springs. If you
ordered your loom with Texsolv heddles, you'll need to assemble your harnesses now. Please follow the directions below.
If your loom is equipped with metal heddles, proceed immediately to step #1 of the harness installation instructions.
MAKE TEXSOLV
HARNESS
ASSEMBLIES
1.)
Locate the HARNESS STICKS, HARNESS WIRES, and
Texsolv heddles.
2.)
The sticks are divided into two groups: the top sticks
have hooks that are spaced closest together. The hooks
in the bottom sticks then, are farthest apart.
3.)
Select one top and one bottom stick. Lay them on a
table top parallel to one another, about 12” apart. Orient them so that the hooks point top and bottom.
Page 3-18
ASSEMBLY
INSTALL THE
HARNESSES
4.)
Select two HARNESS WIRES and slide one through the
end hole of the top stick so that the copper fitting at
the end of the HARNESS WIRE is at the top. Insert the
blank end of the wire through the end hole of the bottom stick.
5.)
Thread 25 heddles onto the sticks from the open end of
the harness assembly (we provide 25 heddles per harness, plus 200 extra).
6.)
Add the second HARNESS WIRE.
1.)
Please locate:
•
Harness Frames (if metal heddles)
•
Harness Springs
*
The Harness Pulley Box has a top that slides out to give
you access to the pulleys.
2.)
Your Dobby Head sports a long mane of bundled cables.
Please remove the twist ties now and separate them.
You'll see that each cable has two terminal ends, a long
and a short. Select the first cable, front or rear.
3.)
Now, draw the cable up and over the three pulleys that
are aligned with it. The longest end of the cable should
hang over the pulley furthest from the Dobby; the
shortest leg over the pulley in the between set.
Page 3-19
ASSEMBLY
Page 3-20
4.)
Check that the cable is not twisted on itself — this will
cause problems when you are weaving.
5.)
Select a harness frame (metal heddles) or harness stick
assembly (Texsolv heddles). Either assembly will have
two hooks, top and bottom. The hooks that are set
closest together are at the TOP of the assembly.
6.)
Hang the harness assembly from the cable you just
installed.
7.)
Locate a harness spring. Each of these springs has a
chain worked into one end. You will fasten one of these
spring and chain assemblies between each set of spring
levers (immediately below the harnesses).
ASSEMBLY
8.)
Find the corresponding set of spring levers. Each lever
has a brass hook, which pivots on a brass pin. If the
hooks are not already hanging free of their slots, pull
them out now.
9.)
Link the end of the chain into the hook in either spring
lever, left or right. Attach the spring end onto the hook
in the opposing lever.
10.) Lastly, hook the spring lever chains into the small hooks
at the bottom of the harness. If you are using Texsolv
heddles, the frames will be unstable until you completed this connection: managing them is frustrating, but
certainly not impossible.
11.) You’ve now installed one complete harness assembly. Go back and repeat steps 3 through 11 for each
remaining harness. Check your work periodically; it's
easy to connect the wrong harness into the wrong set
of levers.
INSTALL THE WARP
BEAM
1.)
The loom is designed to carry two Plain Warp Beams or
a single Sectional Beam. Plain beams may be used in
either the upper or lower position, however, a sectional
beam may only be mounted in the upper position.
If you intend to use two beams simultaneously, an additional assembly needs to be fixed to the Rear Verticals.
We’ll explain all that a bit later.
2.)
If you are using a single beam, you’ll likely prefer it in
the upper position.
3.)
Locate your Warp Beam and mounting hardware.
4.)
Unthread the nuts from the ends of the RETAINER bolts.
5.)
Slide each bolt through the mounting holes from the
back of the Rear Verticals. Leave the top bolts a little
shy of coming through.
Page 3-21
ASSEMBLY
6.)
Slip a retainer onto each of the lower bolts.
7.)
Bring the warp beam into position. If you are using the
upper location, orient the beam so that the long end of
the axle extends to the left of the loom (opposite the
Dobby Head).
8.)
Seat the beam in the axle pockets and, holding the
beam, rotate each retainer up.
9.)
Slip the top bolts through the retainers, add the nuts,
and tighten with your 1/2” socket.
10.) Locate the Warp Beam Handle and remove its hardware.
Page 3-22
ASSEMBLY
11.) Slip the handle over the protruding end of the beam
axle, insert the bolt, and secure with the washer and
nut. Note that the handle is connected with a carriage
bolt, the head of which must fit into its stamped recess.
12.) The lower beam should be oriented so that the handle
is on the Dobby Side of the loom. Follow the same
procedure to mount a lower beam (but remember, you
may only mount a Sectional Beam in the upper location).
SECOND WARP
BEAM BRACKETS
1.)
As noted above, if you intend to use two warp beams
in your weaving, you’ll need to attach an extra set
of brackets to the Rear Verticals. These Warp Beam
Brackets support an additional cross member which is
used to direct your warp to the harnesses.
2.)
Select the Warp Beam Brackets. They are identical, so
you needn’t be concerned about left and right.
3.)
As shown in the diagram, these brackets bolt into the
top of the Rear Verticals.
4.)
Remove and save the two
bolts that connect each
vertical to the Middle Rear
Horizontal.
5.)
We’ve pre-positioned the
bracket mounting bolts in
the brackets. Remove the
square nuts from the bolt
ends, push the brackets into
place, and tighten with a
1/2” wrench.
6.)
You will have received an
extra Breast Beam. In this
case, it will act as a Warp
Separation Beam. You may
place it in the bracket pockets now or wait until you
dress the loom.
Page 3-23
ASSEMBLY
MOUNT THE BRAKE
CABLE SYSTEM
1.)
You've already installed your Brake Pedal(s), now you
need to add the cables and springs.
2.)
Brake cables come in different lengths, depending on
the type of beam you’re using, and its location. Your
cable assemblies are individually bagged and marked,
but if you become confused, consult the table below.
Beam Type
Sectional
Upper Plain Beam
Lower Plain Beam
Page 3-24
Cable Length
74-1/4"
51"
48"
3.)
Select the poly bag with the appropriate cable assembly. It will contain:
•
Steel BRAKE CABLE
•1 — Tension Tie-Up with Toggle
•1 — “J” Bolt assembly
•1 — Eye Bolt/Cord assembly
4.)
The accompanying diagram indicates the holes for the
cable mounting hardware.
ASSEMBLY
5.)
Mount the “J” and eye bolts, making sure that each
points to the inside of the loom. The “J” bolt should
also point down.
6.)
Use a 7/16" wrench to remove the nut from the bolt in
the end of the brake pedal, then slide the bolt most of
the way out.
7.)
Get the tension tie-up (the dacron cord with toggle)
and position it in the hole at the end of the brake pedal.
You will be sliding the bolt you just removed through
the tie-up so that there are three strands on each side
with the toggle up.
8.)
Push down on the end of the brake pedal so that you
can attach the spring to the same bolt so you'll have
the tie-up and spring on the bolt.
9.)
Push the bolt back through the pedal and replace the
nut
10.) Now find the cable. Connect the loop end to the "J"
bolt.
11.) Bring the cable immediately up and around the BACK
side of the Brake Drum. Wrap it several times around,
taking care not to cross the cable on itself.
12.) When you've just enough
cable remaining to almost
reach the brake pedal, use
the snap hook to clip the
cable end onto the cording
(three loops of the cord go
into the snap hook). Slide
the other end of the cording (three loops) through
the large hole in the brake
pedal. Then hook one end
of the spring to the cording and the other end to the
eyebolt.
13.) Check again to make sure
the cable isn't crossed on
itself.
14.) Use the toggle on the tie-up to adjust the tension on
the pedal.
Page 3-25
ASSEMBLY
CONNECT THE
RIGHT TREADLE
CABLE
CONNECT THE LEFT
TREADLE CABLE
Page 3-26
Unless you've already untaped them, you'll find two cables
wound around the Dobby Cam Cylinder assembly. These connect to the Right Treadle and the Dobby Arm.
1.)
Untape the left-most cable, the one that circumscribes
the cam (that nautilus shaped part). You'll note that
this cable runs through a small hole in the cam. The
hole is directional and the cable must be threaded
around the cam in the direction established by this
hole.
2.)
Take the cable end from the bottom of the cam, over
the Right Treadle Pulley (but under the metal retainer),
and down to the end of the Right Treadle.
3.)
Bolt the cable into the hole at the end of the Right
Treadle.
4.)
Leave the other cylinder cable taped down for the moment. You'll eventually connect this to the Dobby Arm.
1.)
The Left Treadle Cable is likely hanging out the bottom
of the Dobby Head. As with the Right Treadle Cable, it
has an eye worked into one end. The other is finished
with a small copper barrel.
2.)
Conduct the eye end under the slender pulley at the
right of the Cam Cylinder assembly, over the remaining
Treadle Pulley, and finally to the Left Treadle. Bolt it in.
3.)
Find the end with the copper fitting. You will see a
small hole and a somewhat larger hole drilled through
the upper surface of the Dobby Arm. You should also
find a small bag with one plastic cylinder taped to the
arm. Remove the bag and select a cylinder. This is a
cable retainer.
4.)
Push the end of the cable through the small hole in the
Dobby Arm. Now take the retainer and push it onto the
cable in such a way that you can pull the copper fitting
into the hollow interior of the plastic retainer.
5.)
From above the Dobby Arm, pull up on the cable and
seat the retainer into the pocket drilled in the underside
of the Dobby Arm. If you've done your job, you'll no
longer be able to see the retainer and the cable end will
be firmly connected to the arm.
ASSEMBLY
CONNECT THE
CYLINDER TO
DOBBY ARM CABLE
One last cable connection.
1.)
Untape the remaining cable. It, too, comes out a directional hole.
2.)
Wrap the cable around the cylinder and bring it up to
the Dobby Arm.
3.)
Same thing here. Insert the cable end from the bottom
of the arm, up through the larger hole.
4.)
Fix the second plastic retainer onto the cable end and
seat it in the arm.
Page 3-27
ASSEMBLY
Let's check our work. The Left Treadle should hang about two
inches below its pulley, the Right Treadle should nearly touch
the floor. If this is not what you have, go back over the cable
installation procedure and see if you can find the problem.
Check, too, that the cables are properly located on their respective pulleys.
INSTALL THE SHELF
1.)
You're nearly finished! -- time to install the shelf.
•
Orient the shelf so that the felt strips on the
bottom will lay atop the three sets of harness
pulleys when the shelf is in place. These act as
cable retainers and will keep your Harness Cables
properly located when you treadle.
•
Slide the shelf into the grooves in the Harness
Pulley Supports.
•
Insert the Retention Pin into its hole. It will, and
should be, tight. It will loosen over time.
•
If you cannot push the pin all the way into the
shelf, check that you haven't put the shelf in
backwards.
THE COMPU-DOBBY
There remains one last assembly operation -- the installation
of your Compu-Dobby. No doubt you're extremely anxious to
get a warp on the loom. This next part won't take much time
or effort, but it does require precision so, if you're feeling at
all fatigued, you may want to take a short break. When you
return, we'll put the brains in the box.
GENERAL
INFORMATION
1.)
The Control Box on your loom is designed to sit atop
the shelf. If you wish, you may actually locate it at a
side table, provided the cables reach.
2.)
We use the same Compu-Dobby on several of our looms
and it has it's own manual. You'll refer to this manual
from here.
As you work through the directions, you'll find that
some instructions are clearly written for other looms.
This won't be particularly troublesome; the thrust of the
procedure is clear and we'll already have done some of
the operations for you. If you become confused at any
point, please call our Customer Service number (800
626-9615) and ask for Compu-Dobby support.
Page 3-28
ASSEMBLY
3.)
INSTALLATION
Once you've installed and adjusted the Compu-Dobby,
secured the cables, and made the computer connections, return to these instructions and we'll see about
getting a warp on your loom!
Now, open the Compu-Dobby box: find the manual: begin
with Install the Solenoid Box. See you when you return!
Page 3-29
WARPING THE PLAIN BEAM
If you have ordered only a sectional beam, proceed to the
section titled “Warping the Sectional Beam”.
Various warping methods can be adapted to the AVL loom.
However, we recommend the following method in which the
warp is first wound on to the plain beam with the use of a
raddle. Please study this method and try it. We have found
that it aids in getting a uniform warp tension, especially when
dealing with long warps.
Creating Two
Crosses
To begin, wind the warp on a warping board or reel. Make
sure you put in two crosses:
•
•
the threading cross
the raddle cross
In the threading cross, each thread crosses the next thread
in opposite directions. In the raddle cross, groups of threads
cross each other. The number of threads in a raddle group
can be determined by the number of ends to be placed in
each section of the raddle or by the number of threads you
are holding in your hand while winding the warping board.
Page 4-
WARPING THE PLAIN BEAM
SECURING THE
CROSSES
Before removing the warp from the board or the reel, secure
the crosses. Use four ties to secure each cross. These ties go
on each side of both pegs holding the cross.
It is usually a good idea to use different color threads for the
ties on the tops of the pegs and another color to tie the bows
underneath the pegs. By color coding your ties, you are less
likely to twist the warp later.
REMOVING THE
WARP FOR THE
WARPING BOARD
Remove the warp from the warping board by chaining or by
winding on the kitestick. Start from the threading cross and
proceed to the raddle cross.
Since the capacity of the warping board is limited, for wide
warps you will end up making a number of mini-warps and
taking them off individually.
ADJUSTING THE
TENSION DEVICE
Before winding on the warp, there are a few small things to
take care of on the loom. First, check the tension device to
make sure the rope is wrapped three times around the tension
drum and that the rope end is clipped to the spring. This will
prevent the warp beam from slipping backwards during winding and threading.
ATTACHING THE
RADDLE
Now secure the raddle to the back of the loom. If you have
an AVL raddle, simply slip it into the set of holes in the back of
the rear vertical members.
WINDING THE
APRON
Put your apron on the beam with velcro and wind your beam
in the warping direction so that your apron is wound on the
beam.
Page 4-
WARPING THE PLAIN BEAM
ATTACHING THE
WARP TO THE
APRON
Bring the apron around the separation beam and put the
metal rod through. You can also put your warp section onto
that rod or you can attach another one with the warp.
INSERTING STICKS
IN THE RADDLE
CROSS
Place two lease sticks in the raddle cross and secure together
with string through the holes in the ends of the sticks. Now
remove the ties from the raddle cross and spread the warp
out on the sticks.
Measure the center of your raddle to use it as a center of your
warp. The warp threads should either go through the middle
of the raddle.
Page 4-
WARPING THE PLAIN BEAM
FEEDING THE
RADDLE
To feed the raddle, distribute yarns through the raddle by
dropping each raddle cross group into a dent in the raddle.
If you are using an AVL raddle with a sliding cover, slide it on
after the raddle is threaded and secure it with two or three
cord ties so it can't come off. Remove the raddle cross sticks
when this is completed.
PREPARING THE
PAPER
Page 4-
Prepare the paper for winding between the warp layers.
Again, for the most professional results, and fewer tension
problems, we suggest that the warp be as smooth, tight, and
compact as possible. This would mean not using corrugated
paper or sticks as they will make the warp too fate and/or
lumpy. Corrugated paper is just too soft and the warp can
never be wound tight enough with it. Heavy wrapping paper
works well; seventy pound craft paper is good. If you are
going to be using smooth, slippery warp yarns like fine linens
or perle cottons, the edge yarns are going to need extra help
in order not to slip off themselves. To do this, cut your paper
four inches wider than the warp width and then fold over the
edges an inch on each side. Be sure the warp is wound between the two folded edges not overlapping them.
WARPING THE PLAIN BEAM
WINDING THE
WARP
When winding the warp on from the back, i.e., with the warp
spread out in back of the loom, turn the crank in a clockwise
direction so that the warp comes in from the bottom.
Page 4-
WARPING THE PLAIN BEAM
Remember, wind the warp on tightly under a lot of tension.
This will vary with each warp material, but a good rule to
remember is that the tension of the wound on warp must be
greater than the tension during the weaving operation. You
will need one person to hold a warp under tension on the back
and one person to wind the warp on the beam using a handle.
The person winding the warp can also insert the paper. For a
wide, heavy warp, several helpers may be required.
If you have to do it yourself, you can use the jerking method.
Make one turn around with your beam crank and then go to
the back of the loom and jerk one section at a time to make
the warp that is already on the beam tight. The idea of this
method is that the warp does not need to be under tension
all the time, but the part that is on the beam has to be tight.
Make another turn, go to the back of the loom and jerk all the
sections again and so on. If you have a wide warp, you might
need to do up to ten jerking motions after each turn.
THREADING CROSS
When you come to the end of your warp, insert lease sticks in
your threading cross.
Now remove the ties from each individual threading cross and
spread the warp out on the sticks.
REMOVING THE
RADDLE
When the warping is completed, free the warp from the raddle. If you have an AVL raddle, first untie the security strings,
lift the raddle top off, and remove the warp from the raddle.
Afterwards, replace the top on the raddle and leave it in its
place on the back of the loom if so desired as it will not interfere with the weaving process. Then be sure to bring the end
of the warp around the separation beam so that it now travels
into the loom.
TWO BEAMS
For those who ordered the second plain beam, it is wound in
exactly the same manner as the first warp beam except if you
put a second beam in the bottom position.
The loom is designed to carry two Plain Warp Beams or a
Single Sectional Beam.
There will be times when you will want to use more than one
warp, which can not be put together on one beam.
You will have to put them on separate beams or use some
kind of separate tension systems.
Page 4-
WARPING THE PLAIN BEAM
WHEN DO YOU
NEED TO TENSION
YOUR WARPS
SEPARATELY?
When weaving:
•
•
•
•
•
•
•
•
•
SETTING TWO
BEAMS
Very different size yarns.
Yarns with different stretching qualities.
Different densities.
Different structures.
Supplementary warp techniques (because some warp
threads do not interlace as often as others).
A group of special yarns for selvedges and borders.
Loops, piles, or puckers like seersucker.
More then one layer with different setts in each layer.
More than one layer with a different pick count in each
layer.
If you are confident in setting one beam, it is just as easy to
set up a loom with two beams. It might take twice as much
time and you do need to be more careful not to mix sequences.
•
Wind each warp on the beam the same way you would
do it if there were only one beam on the loom (plain or
sectional). Make a cross and have a pair of lease sticks
with a cross in each warp.
•
See enclosed picture for warp routing.
•
Proceed with a threading as if you only had one beam/
one cross, following your threading instructions and
taking special care of which thread from which pair of
lease sticks comes next.
Page 4-
WARPING THE PLAIN BEAM
MORE THAN TWO
WARPS, SEPARATE
TENSIONING
If you have more than two warps to set and not more than
two beams, you need to weight/tension your additional warps
separately (do the same if you only have one beam and more
than one warp to set).
•
•
•
Page 4-
Make your warp sections on the warping board and take
them off the board in a chain, on a kite stick, or just in
a plastic bag.
Make sure that each bundle is not too thick. You will
know when you need to divide each bundle if you feel
that all the threads are not being tensioned evenly.
The weight needs to have a strong loop of string on it
so the warp bundles can be slip knotted into it. This
makes it easy to undo the slip knot and move the
weight when it climbs up to the back beam and must be
let down again.
The weight also needs to be adjustable. Plastic bottles
with handles filled with water are perfect. You can also
use fishing weights, washers, nuts, bolts ... They are
not as easily adjustable like water bottles, but take less
space. The lower to the floor you can hang them, the
less often you need to reposition them.
WARPING THE SECTIONAL BEAM
The AVL sectional beam is designed to be warped in sections with the use of a tension box. The yarn travels directly
from cones or spools which are mounted on a rack behind the
loom, through the tension box, and onto the beam. Throughout the warping process, the tension box automatically keeps
a constant and uniform tension on the warp. Not only does
this system save time, but it makes it possible to wind on very
long warps which would never fit on a warping board or reel.
SECTIONAL BEAM
CALCULATION
First, you must calculate the number of spools or cones of
yarn you will need. Each section is wound onto the sectional
beam separately, therefore, you’ll need to have one spool or
cone for each end in that section (if your section is 2" wide,
with sixteen E.P.I., that would be thirty-two spools or cones of
yarn).
NOTE: It used to be that all sections were 2" wide. On an
AVL sectional beam with metal pegs, you can decide to use
1", 2", or any number of inches sections. You can simply add
more pegs in the pre-made holes or take them out.
To prepare for sectional beam warping, we need to calculate:
•
how many spools we need to wind
•
how many yards do we need to wind on each spool
•
total yardage for the project
•
NUMBER OF SPOOLS?
Sectional beaming requires the use of as many spools
loaded with thread per individual section as your
planned sett in the reed dictates.
To calculate the actual number of spools required, we
need to know:
•
how many EPI are we going to use in the fabric
•
what SIZE SELECTION will we have to use in the
fabric
If your warp is set at 24 epi per 1”, you will need 24
spools for a sectional beam with 1” sections or 48
spools for a beam with 2” sectionsl.
Therefore we can say:
# OF SPOOLS = EPI x SIZE OF THE SECTION
Page 5-
WARPING THE SECTIONAL BEAM
•
NUMBER OF YARDS PER SPOOL?
To calculate the number of yards per each spool, we
need to know:
•
the LENGTH OF THE WARP
•
NUMBER OF SECTIONS on the beam
We calculate the number of sections by dividing the
WIDTH OF THE WARP by the SIZE OF THE SECTION. If
the warp width is 40” and we are using 2” sections, our
number of sections is 20.
All together, we can say:
# OF YARDS PER SPOOL = LENGTH OF THE WARP
x # OF SECTIONS
•
TOTAL YARDAGE?
If it is a single color warp or if a color sequence is repeating in each section, the same spools or cones can
be used to wind all the sections needed for the warp.
TOTAL YARDAGE = # OF SPOOLS x # OF YARDS
PER SPOOL
It is important to make these calculations in advance so that
you can purchase your yarn in spools or cones corresponding
to the amount of yardage needed on each. Sometimes this is
not possible and you will need to wind your own spools from
yarn that is in larger packages. For doing this, you will need
empty plastic spools, a bobbin winder (preferably electric),
and a yardage counter. These items are available from AVL.
EXTENSION CORDS
Page 5-
You might want to make a permanent set of extension cords
to use when warping the sectional beam. Extension cords
are also called apron cords and have the same function as
the apron on the plain beam. They give you "reach" from the
warp beam and allow you to weave every possible inch until the end of the warp touches the last shaft you are using.
Make them out of a strong non-stretchable linen or cotton
cord. You will need to make one extension cord for each section in your sectional beam. For each extension cord, cut a
piece of cord. Take the two ends of the cord and knot them
together. Measure to make sure that they are long enough to
reach all the way to the harnesses. All extension cords should
be exactly the same size.
WARPING THE SECTIONAL BEAM
When measuring the length of the cords, also check to be
sure that when the cords are wound on to the beam, the end
of the loop and any knots in the cords fall between the crosspieces of the sectional beam, not on them. A sectional beam
is usually not solid. It is a frame that has metal pegs. That
way you can keep the warp smooth on the beam without going over the knots of threads.
FEEDING THE
SPOOL RACK
Next, place a spool or cone rack about five or six feet behind
your loom. Place the spools or cones for the first warp sections on the cone rack.
Make sure you put each thread through the metal eye on the
spool rack so the threads do not get tangled.
When arranging the spools on the spool rack, it doesn't matter
whether you go top to bottom or bottom to top, the important
thing is to be consistent in vertical columns and to place the
spools in the order that the threads are in the warp.
Before winding the sectional beam, make sure to disengage
the tension system so that the beam will turn counterclockwise swiftly. To do this, unlock the tension rope from the
spring and completely unwrap the plastic cord from around
the tension beam drum. Also, remember to remove the
weight from the tension arm, if you have automatic tension on
your loom.
POSITIONING THE
TENSION BOX
On the beam on the back of the loom, set the tension box.
That position will allow the tension box to travel from one section to another. The tension box is fastened to the separation
beam with wing nuts. These can be released for the tension
box to move. Once centered properly for a particular section,
the tension box needs to be tightened again (for each section).
TENSION BOX
The tension box is an essential warping tool which:
•
•
•
Puts threads under tension.
Spreads threads to the proper width.
Makes thread-by-thread lease.
Page 5-
WARPING THE SECTIONAL BEAM
TENSION BOX
HEDDLE
INSTALLATION
INSTRUCTIONS
If this is your first time to use a tension box, you need to install heddles on the harnesses.
Your tension box is delivered with one bundle of one hundred
heddles. These are held together with twist ties. Leave these
on for now. Refer to the upcoming diagram to familiarize
yourself with the tension box and its parts. Push down on one
of the harnesses until it stops. This causes the other harness
to go up. You will use that later for making a threading cross.
Right now we’ll need to use it to help in the assembly of the
heddles to the harnesses.
•
•
•
•
•
•
•
•
•
Page 5-
Remove the “heddle retainer” of the harness that is up,
using a phillips head screwdriver.
Notice there are four twist ties holding the heddles
together. Separate the top two. Insert the top bar (of
the harness that is up) into the space created by pulling apart the twist ties. Insert the bottom bar (of the
harness that is up) into the space created by pulling
apart the bottom two twist ties, making certain that the
heddles aren’t’ twisted. Now remove the twist ties.
Count off fifty heddles and cut the loop at the top between the 50th and the 51st heddle.
Now put the four twist ties back on the fifty heddles
that were the last to go on the harness.
Remove these fifty and reattach the “heddle retainer”.
Now push down on the harness that is up, making the
other harness come up.
Remove the heddle retainer.
Pull apart the top two twist ties and insert the top of
the harness (which is up) into the space created. Pull
apart the bottom two twist ties and insert the bottom of
the harness into the space created.
Reattach the heddle retainer.
WARPING THE SECTIONAL BEAM
THREADING THE
TENSION BOX
The best way to thread the tension box is to take one thread
from the cone rack and thread it all the way through all the
parts of the tension box, then the next thread all the way
through. It works best to use the threads from the rack in a
vertical order rather than a horizontal order.
Now let’s go through the sequence for threading the tension
box. First, move the two adjustable tension pegs up above
the stationary pegs or remove them completely. Now sley the
thread through the rear (stationary) reed section using a sley
hook. Since this reed is eight dents per inch, you will divide
the E.P.I. into eight to find out how many ends will be in each
dent (with sixteen E.P.I, put two ends in a section). If your
E.P.I. does not divide equally by eight, you can either vary the
number of ends in each dent (with twenty E.P.I., alternate two
and three ends in the dents) or thread the dents a little wider
than two inches (with twenty E.P.I., put two ends in each
dent; with forty ends, the reed will be sleyed 2-1/2” wide).
Next, bring the thread straight through the tension peg section in-between the larger adjustable tension pegs and the
smaller stationary pegs or just above the smaller stationary
pegs if you have removed the larger ones.
Next, thread the end through the two sets of heddles. The
first thread goes through the front set of heddles and the next
thread goes through the rear set of heddles. Repeat this alternating heddle threading for the rest of the ends. The heddle system will be used later to create the threading cross.
Page 5-
WARPING THE SECTIONAL BEAM
Now thread the end through the front pivoting reed. Here you
have a choice of using an eight dent or ten dent reed. Pick
the one that can be sleyed evenly and as close to the desired section width. If you can not get the exact width of the
section, sley your reed slightly wider. This will make it just
slightly wider than the space between the pegs. The section
will be narrowed down by pivoting the reed. Never sley the
reed narrower than the section on the beam. There is no way
to expand it. After the tension box is completely threaded,
the larger pegs are moved downward to apply tension. The
further down they are moved, the more tension will be applied
to the yarn. This is an adjustable system as different yarns
require more or less tension. With a heavy wool the pegs
may only need to be moved half way down, whereas with a
fine silk, the pegs may need to be moved all the way down
and the yarn wrapped an extra time around one of the stationary pegs to get the proper tension. Once you have adjusted the tension correctly, do not change it during the winding
of the beam, as long as you are using the same type of yarn.
Once the tension box has been threaded, it is not always necessary to rethread it. If you need to change spools or cones,
simply tie the new ends on to the old ends just before the rear
stationary reed, then gently pull on the old ends until the new
ends have come all the way through the box.
POSITIONING THE
SEPARATION BEAM
Page 5-
To adjust the direction of your warp that travels from the tension box to the beam, remove the breast beam from the front
position and place it in the mid-horizontal notch (see the illustration below).
WARPING THE SECTIONAL BEAM
WINDING THE
WARP
Before you start winding the warp, attach the extension cord
to the beam and the section of the warp to an extension cord,
tie an overhead knot in the warp threads from one section and
slip that knot into the opening of the larkshead knot you created in the extension cord.
Pull it tight.
ADJUSTING THE
SIZE OF THE
SECTION
Line up the tension box approximately behind the section you
will be winding. Now wind about one yard onto the beam. As
you wind, you will need to fine tune the placement of the tension box along the track. When it is centered properly, tighten
down the wing nuts under the tension box. At this point, you
can pivot the “pivoting reed section” so that the yarn comes
close to, but doesn’t quite touch, either the peg to the left or
the peg to the right. Now tighten the wing nut under the pivoting reed. This shouldn’t need to be readjusted until you are
using yarn of a very different size.
Extra care to correctly center and adjust the width of each
warp section will result in more perfect tension while weaving.
Make sure that the threads are going on to the beam in flat
layers. If you notice that warp piles up at the pegs, the section of the warp is too wide. If the warp falls down at the
pegs, the warp section is too narrow.
If any of the above is happening, go back and pivot the front
reed on the tension box again until you get perfectly flat layers. This is very important, otherwise you will end up having
different length threads in one section, since the circumference of the beam within the section is not going to grow evenly. Therefore, you will end up having lots of tension problems.
Page 5-
WARPING THE SECTIONAL BEAM
COUNTING TURNS
OR YARDAGE
To determine the length of the warp you are putting on the
beam, you need to count either turns, revolutions, or yards.
To count turns, you can do it in your head, but it is more reliable to use a digital or mechanical revolution counter.
Counting revolutions even with a digital counter will still give
the approximate warp length only, because the circumference
of the beam will increase slightly with each rotation. This is
called beam build up.
To count yards with a yardage counter while warping the
sectional beam, you need to place the yardage counter at the
front of the tension box. You should use an extra thread for
measuring yardage, because if you use one of the threads
from your warp section, that particular thread would have a
different tension once you start weaving. The extra thread
you use for measuring purposes only can be reused for each
section.
Page 5-
WARPING THE SECTIONAL BEAM
CREATING THE
CROSS
When there is about a half yard left to be wound onto the
beam, it is time to make the threading cross. Simply push on
the rear heddle frame of the tension box, making half of the
threads go up and the other half go down.
Now slip in an eight inch piece of contrasting thread (called a
marking thread) through the opening (called a shed) created
between the threads above and the threads below. Locate
this marking thread about half way between the tension box
and the separation roller.
Now push on the front heddle frame, making the other half of
the threads go up. Now take one end of your marking thread
and bring it through this shed. The two ends of the marking
thread should now be together. Tie them in a bow knot. Wind
the rest of the first section on, cut the ends, and secure to the
wound on thread using a rubber band over the pegs.
Continue winding all the sections in the same manner by moving the tension box along its track.
INSERTING STICKS
IN THE TREADING
CROSS
When all the winding is complete, remove the rubber bands,
unwind a few feet of warp, and slip one lease stick through
the path created by the upper portion of each marking tie.
Now slip another lease stick through the path created by the
lower portion of each marking tie. Secure the lease sticks together, leaving about two inches between them, using masking tape or string through the end holes of the lease sticks.
Now bring the lease sticks, with the warp ends, around the
separation beams, so that warp travels towards the center of
the loom (harnesses). Remove the breast beam from the position behind the harnesses and place it to its original position
on the front of the loom.
READJUSTING THE
TENSION
Now tie the lease sticks on the side of the loom so that they
are at eye level when you are in your threading position.
To keep the warp from slipping forward during the threading
process, rewind the tension rope around the pulley and tension drum and clip the rope end to the spring.
Page 5-
WARPING THE SECTIONAL BEAM
COMBINING
SECTIONAL AND
PLAIN WARPING
If you are winding a very fine warp, say forty ends to the
inch or more, and do not have or do not want to wind a lot of
spools or cones, it may be more convenient to wind separate
warp sections on a warping board or reel and go from there
directly to the sectional beam. If you decide to do this, however, your warp will be limited in length by what will fit on
the warping board or reel. If you choose this method, follow
these steps:
•
•
•
•
•
•
•
Page 5-10
Calculate number of threads for each section on your
sectional beam.
On the warping board or on the warping reel, make
“baby warps” for each section on your beam (if you are
using a warping board, you will be limited in length).
Make crosses at each end: raddle cross on one side
and thread-by-thread cross on the other.
Take the warp off the board or reel by taking off the
thread-by-thread cross first.
Put the warp threads from a first “baby” warp in the
raddle, making sure that threads are spread evenly and
that they are creating flat layers when wound on the
beam. Put the raddle top on or secure warp threads
with rubber bands.
Instead of a regular raddle, you can put a mini-raddle
in place of the front reed on the tension box. In this
case, the tension box is used only for guiding threads
into the sections. You do not thread threads in the tension box through the harnesses nor through the back
reed and you do not adjust tension with the pegs.
Attach each baby warp to the extension cords and proceed as in regular sectional beaming procedure.
Since you are not using the tension box for tension, be
sure to keep it taut manually.
When you come close to the end of the section, take
the reed cover off and continue winding the rest of the
baby warp.
Secure that section to the beam and continue to the
next one.
THREADING, SLEYING, AND TYING ON
PREPARATION FOR
THREADING
To prepare for threading, tie the threading cross sticks in a
comfortable and visible position for threading.
You may also find it helpful to raise the harnesses. To raise
the harnesses, pull the dobby arm down to the bottom of
its slot. To secure the arm in this position, simply insert the
wooden retainer block. On the bottom of the dobby unit are
16 cable ends corresponding to the 16 harnesses or 24 cables
for 24 harnesses. In turn, pull each cable end downward on
each cable into its slot in the arm, thus raising the harnesses.
Make sure to lower the harnesses again when threading is
completed. Never remove the block while any harnesses are
lifted as this will cause the harnesses to drop too rapidly.
It is helpful to remove the breast beam, the beater top, and
reed for the comfort.
The important thing in threading is your comfort. Take the
time to position everything so that your body feels at ease
while threading.
THREADING THE
HARNESSES
Now we're ready to thread the loom. If you are right handed, it is recommended to start at the right side of the warp.
Grasp one group of ends in your left hand and your sley hook
in your right hand. Direct the "hook end" of the sley hook
through the "eye" of the first heddle you need to thread. Pull
the thread through (for example, if you had a straight draft on
eight harnesses, your first thread would go through the eye
of a heddle on the 8th harness. The second thread would be
threaded through the eye of the heddle on the 7th harness,
the third thread through the 6th harness, and so on).
UNUSED HEDDLES
After threading is complete, make sure that the unused
heddles are all pushed to the far sides of the harness sticks
between the screw eyes and the ends of the harness sticks.
For balance, there should be approximately equal numbered
groups of unused heddles on both sides of each harness. This
is especially the case if you have PES heddles. In some cases
such as a very wide warp with a lot of unused heddles on the
ends of the harnesses, you may need to tie each group of
unused heddles into a tight bundle with tie tapes or string to
keep them from falling off the ends of the harness sticks or
you may need to take heddles off the loom. In the first six
months of using a new loom with polyester heddles, the heddles stretch out to adjust to the harnesses, and the heddles
on each harness get stretched out to different sizes. For this
reason, we do not recommend removing heddles from the
loom for six months.
Page 6-
THREADING, SLEYING, AND TYING ON
When heddles are removed, they should be marked so they
can be returned to the same harnesses. For the same reason, once the heddles have been on the loom for awhile, it
is not a good idea to switch heddles to different harnesses.
Mixing them up once they have been stretched would affect
the evenness of the shed. What some weavers do with wide
warps, in order to avoid having to take off extra heddles, is to
distribute the unused heddles among the threaded heddles as
the threading is taking place.
SLEYING THE REED
Now sley the warp ends through the reed. Some weavers
start from the right side; some from the left; some in the middle. But, in all cases, be sure to measure accurately before
starting so that the warp will be centered in the reed (or offset
four inches to the right if the warp on the beam is already
offset). Weavers have various ways of positioning the reed for
sley.
TYING ON TO THE
APRON
Now that you have your warp ends ready to tie, we need to
prepare the apron. The ends will be tied to the apron rod.
Notice that the apron has two hemmed ends. One end has
openings in it and the other end has a velcro strip. Take the
end with the velcro and secure it to the cloth storage beam,
making sure it is centered. Then wind the apron once around
so that it holds itself in place. Route the apron up and around
the cloth beam. Spread it out flat and center it over the cloth
beam and insert the metal rod into the hem.
Page 6-
THREADING, SLEYING, AND TYING ON
Now tie the ends to the metal rod. Starting from the middle,
bring a first bundle toward you over the apron rod, then
around and under it. Divide it in half and bring one half up on
each side of the bundle. Use the ends to tie a surgeon's knot.
It is the same as the first tie you make tying a shoelace, except you loop the end through twice. This kind of knot is very
good for readjusting the tension.
Start with one section in the middle, then the far right and the
far left outside ones. Work your way in.
By now, the sections that were tied first are quite a bit looser
than the ones tied last. To correct this, you do not need to
untie the knots, simply grasp the ends and pull them away
from you, then re-tighten the knots. Repeat this until all of
the section are at approximately the same tension.
TYING ON TO AN
OLD WARP
A new warp can be tied on to an old warp, thus eliminating
the threading and sleying process, if the new warp introduced
into the loom uses the same threading pattern and E.P.I. as
the last warp. This process is especially good for production
weavers as it saves time. It also takes less concentration and
there is less chance of making mistakes in threading.
The tying on process starts when you are finishing the last
warp on the loom. Before you cut off the fabric, make sure
to leave enough unwoven warp to extend one foot behind the
harnesses, through the heddles, and about six inches past the
reed when the beater is in its rear position. Now open two
opposite tabby sheds and insert the lease sticks into these
sheds behind the harnesses. Secure the sticks together with
tie tapes through the holes.
Page 6-
THREADING, SLEYING, AND TYING ON
Now carefully cut the fabric from the loom and tie bundles
of warp coming through the reed together so the yarn can’t
slip through. Cut the warp in back (leaving one foot past the
lease sticks) and also tie bundles of yarn together for security.
After winding on the new warp on the beam, you can sit on
a small stool placed in-between the harnesses and the back
of the loom and tie corresponding yarns from the two sets
of lease sticks together. An overhand or weaver's knot work
well. This may seem slow at first, but you will work up a
faster rhythm with some practice. A good goal to reach would
be to tie 200 to 250 ends together an hour.
When all ends are tied together, go to the front of the loom
and gently pull on the bundles of yarn going through the reed
to pull the new warp through the heddles and reed. Then tie
on to an apron.
Page 6-
LOOM CONTROLS
Right Treadle
The Right Treadle needs almost no explanation. It’s the thing
you use to raise the harnesses. Assuming your Compu-Dobby
is active, and you’ve a peg plan in place, you simply push
down on the Right Treadle and the selected harnesses raise.
Relax and the harnesses fall.
Left Treadle
Whereas the use of the Right Treadle requires no explanation,
the function of the Left requires some very specific understanding. It is probably the most misunderstood mechanism
on any AVL loom.
You might reasonably expect that, if the Right Treadle raises
harnesses, the Left must help lower them. It doesn’t — gravity and the Spring Levers bring the harnesses back down. The
real function of the Left Treadle is to return the Dobby Arm
to its proper reset position after each lift. If this is not done,
harnesses will either drop or fail to lift altogether at the following lift.
If you remember nothing else of these instructions, please remember that you must fully depress the Left Treadle at each
pick. It only performs its necessary function at the very end
of its throw and will offer relatively little resistance.
Cam Cylinder
The Right Treadle Cable is connected directly into the Cam
Cylinder. This remarkable little rotating whizbang is one of
Jim Ahrens’ best ideas. When you treadle, you’ll notice that
the excentrically shaped pulley into which the cable is connected gathers and pulls cable around itself. As it does so it
conveys mechanical advantage to the Right Treadle, making
it easier for you to lift. You won’t have much to do with the
Cam Cylinder, but its good to know why it’s there.
Brake System
Studio Dobby Looms are equipped with a locking brake system. This means that the warp beam will be held absolutely
captive — will not release warp — until you depress the Brake
Pedal. It’s fairly fool proof and affords very taut warps. When
your fell has moved as far forward as you’re comfortable, and
you wish to advance your warp, depress the pedal and crank
the warp forward with the Cloth Advance Handle. You will
have one Brake Pedal per warp beam and you’ll need to depress them simultaneously if you wish to advance from two
beams.
Page 7-
LOOM CONTROLS
If you find that the brake cable is not releasing properly, even
when you’ve fully depressed the pedal, you may need to remove the warp beam and lightly sand the groove in the brake
drum (use 220# sandpaper or finer). In times of high humidity especially, the grain in the drum may raise and prevent the
cable from slipping. Never, under any circumstances, should
you apply wax, talc, or other finishes to the groove. The
wood here needs to be raw for the mechanism to operate as
intended.
If you remove the brake cable, please be sure when you reinstall it that the looped end is secured to the “J” bolt, that the
cable is drawn immediately up from this bolt and around the
back of the drum (x3), and that it then routes down the front
of the drum where it connects to a spring at the pedal.
If the cable is installed in reverse the beam will not release
when you depress the pedal.
Cloth Storage
System
The Cloth Storage System consists of the Cloth Storage Beam
(immediately in front of your knees), the Cloth Storage Apron,
and the Cloth Advance Handle and pawl.
As directed in the preceding warping instructions, you’ll secure the front of your warp to the Cloth Storage Beam via its
apron. Use the handle at the right of the beam to advance
the warp. Simply release warp beam tension by depressing
the Brake Pedal(s), push the handle forward into the toothed
ratchet, and rotate it down. It will draw the warp forward
onto the beam. The pawl is that finger device that engages
in the ratchet. It’s job is to keep the beam from rolling backwards.
Removable
Breast and
Separation
Beams
Page 7-
You will have either two or three of these beams. They are interchangeable and, besides enhancing the structural integrity
of the loom and giving you a convenient arm rest, serve to establish the warp in its horizontal plain. The beam at the front
of the loom is called a Breast Beam; the beam at the rear, a
Separation Beam. If you have two warp beams you’ll need
two Separation Beams. Illustrations in the Assembly Instructions identify the mounting position of the second Separation
Beam, if you have one. These beams can be moved to the
interior slot to help with threading.
LOOM CONTROLS
Sliding Beater
Here again, the action is obvious: the beater moves forwards
and back on four precision bearings. To remove the reed,
simply unthread the two nuts at the Upper Reed Support, pull
off the support, and pull out the reed.
If at any point you feel that the beater is not running smoothly on its rods, you can easily adjust it: loosen the large
screws in the four mounting blocks; bring the beater forward
until it is equidistant from the Front Verticals at each side;
retighten the front blocks. Do the same at the rear blocks,
using the Castles as your reference point. The beater may
require a little persuasion before it comes to square: please
don’t use a hammer anywhere in the adjusting process!
Swing Beater
Some weavers are more comfortable with a Swinging Beater.
Except for its mode of travel, it is the same as our Sliding
Beater. You may adjust (rack) it by loosening the four bolts
that attach it to its arms, bringing it fully forward and retightening. The Swinging Beater will not take a good adjustment
unless a reed is in place.
Sectional Beam
If you are a sectional weave, you’ll be delighted with this
beam. Because each of its hoops is removable, you may create sections of any width you like, provided they are in one
inch increments. Tying on to the beam is explained in the
section entitled: Sectional Beam Warping.
There are two things to remember: 1.) You may only use a
Sectional Beam in the upper position; 2.) The loom will not
accommodate more than one warp beam if you are using a
sectional.
Plain Beam
The Plain Beam is provided with an apron which will allow you
to maximize the length of your warp. You may use two Plain
Beams at a time, however, if you do so, please orient them
so that the handle on the upper beam is to the left side of the
loom and the handle on the lower is to the right.
Page 7-
LOOM CONTROLS
Dobby Head AND
Compu-Dobby
The Dobby Head is that many cabled box hanging from the
right of your loom. It works in tandem with the CompuDobby and together they provide the interface between your
computer and loom. The operation of the Compu-Dobby is
explained in its own manual and we won’t reprise those instructions here. Suffice it to say that it is extremely important that you achieve and maintain a good adjustment of the
Solenoid Box. If this device is out of tune, your harnesses will
behave erratically.
These are the basic components on your loom. You’ve a world
of weaving before you so best get started!
SPRING LEVERS
The springs of the spring lever return system should also be
adjusted for positive harness return, i.e., the harnesses stay
all the way down in the depressed position and require the
least amount of effort for lifting. This will vary according to
the weight of the warp. In general, lightweight, less dense,
looser tensioned warps with a smaller weaving width will need
very little spring tension to assure positive harness return.
Heavier, denser, tighter tensioned, and wider warps will need
more spring tension. To tell if the harnesses are returning all
the way, open several sheds by working the treadles. Watch
the unlifted harnesses and if the tops of their heddles become
loose and tend to move around, then spring tension should be
increased, but just enough to get the harnesses to stay down
and no more or your treadling effort will be made greater than
it has to be. Not all harnesses will need the same adjustment.
It will depend on the distribution of your warp on particular
harnesses.
To adjust the spring tension, simply unhook the spring and
then rehook it one chain link shorter (see the assembly section). This tightens the spring and makes it pull down harder
on that particular harness. Test the warp again by doing
some more treadling and if more spring tension is still needed, try one or more chain link less. Under unusual conditions
(perhaps a very tight rug warp) two springs on some or all
of the harnesses may be necessary. If all the springs are set
the same, the back harnesses will have a looser tension than
the front. This is because the back spring levers and their
hooks are longer since the back harnesses travel farther when
a shed is made. Accordingly, in some cases, the back spring
levers might have to be adjusted shorter to give the same
tension as the front ones.
Page 7-
LOOM CONTROLS
The important thing to remember is that the system is designed so that it can be “fine tuned” for each particular warp,
so experiment with it. In general, for most medium tensioned
warps, you will find that adjusting will not be necessary. The
loom comes with sixteen chains and sixteen springs (or twenty-four chains and twenty-four springs). If extra springs are
needed, you can use 16” screen door springs which can be
purchased in almost any hardware store. You can also get
extra chain there.
HARNESSES
Your AVL will have either polyester or metal heddles. The
supporting harnesses (or shafts) are different for the two
heddle types: metal heddles, whether twisted wire or flat
steel, are suspended from rigid frames; polyester heddles are
carried on transverse Harness Sticks, top and bottom. In all
cases the harnesses are stabilized at the bottom by a series of
spring-tensioned levers, Spring Levers. These hold the harnesses down and prevent your heddles from floating.
Some weavers like metal heddles because they believe they
are easier to thread; others prefer the lighter and quieter
polyester heddles.
On occasion you will find that one or more of your harnesses
will misbehave. That is more likely to happen with harnesses
with Polyester Heddles. There are a finite number of things
that can cause these problems.
Page 7-
LOOM CONTROLS
TABLE 1 / HARNESSES
Symptom
Possible Cause
How to Fix it
A.) One or more top harness stick
collapses; it assumes a diagonal
angle and one leg of the harness
cable from which it is suspended
goes slack.
1.) Your heddles are bunched
together towards the center of the harness or on one
side only. This is a problem
because the heddles are part
of the harness structure.
Move a few heddles to each end
of your harness sticks; just to the
inside of the harness wires that connect the top and bottom sticks. That
way your harnesses will be balanced.
2.) The harness cable supporting the shaft has come
out of its pulleys at the top of
the loom.
Trace the cable back through its
pulleys in the Harness Pulley Support and make sure that the cable is
properly seated. Check the action of
the Dobby Cable as well. Make sure
that it moves easily up and down.
If the Dobby Cable seems to bind,
check for debris in the hole where it
comes through the Dobby Top. You
may need to use a very thin piece of
wire to dislodge accumulated yarn
dust or other debris.
B.) The heddles float; they are
lifted upwards by the warp thread
when you tension the warp and
your shed is not even or not large
enough.
1.) The tension in your warp
is greater than the tension in
the springs that hold the harnesses down.
Take up a link or two in the chain
that spans the Harness Spring Levers
for that particular harness. Check
the result and take-up more links
if you feel you need more holddown tension. Do not try to make
all chains the same size. The size
will depend on how much tension is
required for each harness depending
again on the number of threads going through that harness.
C.) One or more harnesses that
are supposed to raise don't.
1.) Left treadle isn't being
pressed all the way down.
Concentrate on getting both treadles
all the way through their travel.
2.) Dobby arm out of adjustment.
Realign the dobby arm according to
the assembly instructions.
3.) Dobby cables out of finger Rearrange the cables according to
slots.
the assembly instructions.
D.) Harnesses don't raise properly.
1.) Harness cables have been Rearrange the cables.
hooked to the wrong harness.
2.) Chains from the spring
levers have been hooked to
the wrong harnesses.
Rearrange the cables.
3.) Copper hooks on the
Straighten the hooks with pliers.
spring levers have been bent.
E.) Harnesses jam up on each
other.
Page 7-
1.) Heddles are not distributed evenly over the harness
sticks.
Redistribute the heddles evenly on
both sides from the center of the
harness sticks.
2.) Harness wire that connects the harness sticks has
jumped out and got stuck in
the heddles of the other harness.
Pull the wire out, make sure it does
not catch any heddles, and replace it
to just connect the top and the bottom harness sticks.
If you have a large number of extra
heddles on each side, you might
want to tie them in bundles to prevent getting caught by the harness
wires.
LOOM MAINTENANCE
Tightening the
Bolts
The single most important thing you can do to extend the life
of your loom, and preserve its operation, is tighten the bolts
that hold its frame together. These will loosen over time, due
to changes in its environment and to your own creative exertions. A loom which is allowed to become loose-jointed will
certainly cost you weaving time, perhaps affect the quality of
your work, and definitely become older than its years.
Loom Parts
Lubrication and Cleaning
Shuttles, Shuttle Race, Single-Box Flyshuttle Picker
Grooves
Paste Wax
Slide Rods (sliding beater rods, bobbin winder)
Steel Wool
Axles (pulleys, spring levers, overhead beater)
Silicon Spray
Warp Beam Metal Rods (where metal works against the
wood frame)
Paraffin
Warp Beam Brake Drum
Sandpaper
Lubrication and
Cleaning
There are several mechanisms on your loom which will benefit
from the occasional light application of an appropriate lubricant. Not all lubricants are suitable in the weaving environment. Machine oils and greases, for example, may provide
plenty of slick, but they also capture yarn dust and will, over
time, actually impede the action of your loom.
Cleaning a
Filter
Unless you have an AVL Air Shuttle or other pneumatic accessory, you will have only one filter on your loom, and then
only if you have a Compu-Dobby. This is the fan filter and it
performs two functions: it cools the unit and it removes dust
from the air before it is drawn into the fan.
Checking Cords
and Cables
Check those cords and cables. All machines wear, and cords
are usually the first things that fatigue on a loom.
Page 8-
LOOM MAINTENANCE
Tool Kit and
Spare Parts
Here’s a list of the basics, nice-to-have-around items:
a)
Minimum Tools
[
[
[
[
[
[
[
[
[
b)
]
Socket wrench with
[ ]
7/16”, 1/2”, 9/16” socket
]
6” or 8” crescent wrench
]
Medium standard blade screwdriver
]
4-1 Screwdriver or medium phillips and
standard screwdrivers
]1/8” allen wrench
]
Paste wax
]
0000 steel wool pad
]
220# sandpaper
]
Paraffin wax
Spare Parts You Might Consider Having
[ ]
[ ]
Page 8-
Spare Treadle Cable (left/right)
6’ length of 350# Braided Dacron
Cord (for emergency repairs)
AVL CUSTOMER SERVICE
AVL offers free technical support to the original owner of
all our looms. This means if you ever have a problem, you
can call, fax, or e-mail us and we’ll help you find a solution.
Please take advantage of this service; your satisfaction is extremely important to us.
Customer Service Phone: (530 893-4915)
Fax: (530) 893-1372
E-Mail: [email protected]
AVL WARRANTIES
Your loom carries a full warranty on parts and labor for two
years from the date we ship it to you. Your Compu-Dobby is
fully warranted for one year. If a part wears or breaks during
this period, we will replace or repair it at our discretion, but at
no charge to you.
AVL RETURNS
POLICY
All goods, excepting software, may be returned for refund
within thirty (30) days of the shipping date.
A 15% restocking fee will be assessed for all but defective
items.
AVL will pay all shipping costs for defective items within the
continental United States for the entire warranty period. Special provisions apply for the return of looms (please contact
your sales person for more information).
AVL will generally return repair or replacement items via UPS
Ground service. Additional charges for expedited shipping are
the responsibility of the customer.
Page 9-