1
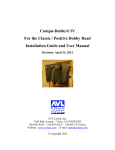
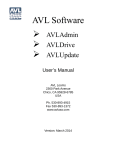
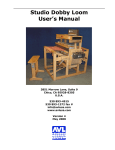
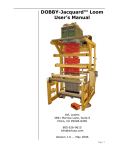
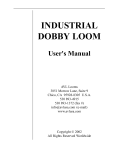
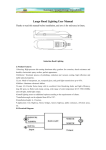
AVL Electric Bobbin and Spool Winder User Manual Revision: June 1, 2012 AVL Looms, Inc. 2360 Park Avenue | Chico, CA 95928-6785 800 626-9615 | 530 893-4915 | 530 893-1372 (fax) Website: www.avlusa.com | E-mail: [email protected] © Copyright 2012 AVL Electric Bobbin And Spool Winder User Manual 1. How To Use The Bobbin Winder Your new AVL Electric Bobbin and Spool Winder has been shipped as a complete unit and is ready for use after unpacking it from the box. It operates on regular household current (110 VAC or 220 VAC if purchased with the 220VAC transformer). Please refer to Figures 1, 2, and 3 when reading the following instructions. Other unique features of your winder include: Electronic foot pedal for accurate control of motor speed Sliding thread guide with low friction insert Precision ground points Sealed bearing in tail stock point Kiln-dried Ash hardwood heavy duty construction The AVL bobbin and spool winder has been designed to accept all types of bobbins and spools up to 3 inches in diameter. For added stability, the bobbin is held at each end (as shown in Figure 1). The tailstock is spring loaded for fast and easy replacement of bobbins. Figure 1 shows the bobbin winder with a stationary (or fixed) bobbin, the type used in AVL shuttles. The bobbin will be held in place between the two steel points. The tailstock and spring stop can be moved along the slide rod to fit almost any length bobbin. When properly adjusted, the tailstock can be slid back far enough to remove the bobbin, while at the same time allowing enough spring tension to hold the bobbin firmly in place while winding. TAIL STOCK Figure 1 Page 1 Rev. June 1, 2012 AVL Electric Bobbin And Spool Winder User Manual The AVL bobbin and spool winder has been equipped with a sliding thread guide block to assist the routing of the thread during winding (see Figure 1). An optional yardage counter is also available, which can be mounted onto this block. Its use is described in the following spool winding section. 2. Winding Stationary Bobbins Stationary bobbins are wound quite differently than spinning bobbins. They are not wound back and forth from one end of the bobbin to the other. They should be wound as shown in Figure 2 and as described in the next paragraph. Figure 2 Make a few winds of thread over itself about an inch down from the large end of the bobbin after it has been placed on the winder. Depress the foot pedal to start the bobbin spinning. Operate the winder at any spinning speed that you are comfortable with. Wind the thread tightly onto the bobbin in continuous overlapping two inch layers starting at the large end of the bobbin and working toward the narrow end. Each layer will be tapered toward the small end of the bobbin and become shaped much like the first layer which is pre-shaped for you at the large end of the bobbin. For each layer, wind the thread tightly and quickly back and forth covering a two inch area until that layer is complete, then move down one fourth of an inch and start a new layer which will overlap about one and three quarters Page 2 Rev. June 1, 2012 AVL Electric Bobbin And Spool Winder User Manual inches of the last layer. Keep repeating these tapered overlapping two inch layers until there is about one half inch left at the end of the bobbin. You will soon learn to know when each layer is complete; if the layers are too fat, the bobbin will not fit in the shuttle. If they are wound too thin, you will be changing bobbins more often than necessary. Once you have fully wound the bobbin, it can be removed from the winder by simply pushing the bobbin away from the motor with your left hand while you squeeze the tailstock toward the spring stop with your right hand. At this point, you should be able to wind any number of bobbins without making any further adjustments, providing the bobbins are all the same length. Generally speaking, the tighter you wind the bobbins, the better your results will be. Greater tension is created by simply pinching the weft yarn between your thumb and forefinger as it feeds onto the bobbin, or with the AVL Auto Tensioner. Where using the pinching technique, we suggest using a leather glove or a small piece of leather or similar material to save wear and tear on your fingers. By the way, the sliding thread guide block can be reversed from the position shown if you happen to be lefthanded. The AVL bobbin and spool winder has been made as a heavy unit to as to avoid the need to be mounted in place. However, if you find that you must wind on under extremely high tension, you can easily attach the winder to a table top by clamping the base of the winder to your table. 3. Winding Spools And Spinning Bobbins Spools and spinning bobbins are wound in a similar fashion as mentioned in the previous paragraphs, except there is no need to wind on in tapered layers. Instead, they should be wound by guiding the thread back and forth from one flange to the other until the desired amount of yarn is on the spool. Determining the amount you wind on can be tricky. Therefore, if this is important to you, you may wish to attach a yardage counter to the sliding thread guide of your AVL winder. The AVL counter simply slips into the bracket between the two pigtails on the sliding guide. The counter reads off in distance of yards Page 3 Rev. June 1, 2012 AVL Electric Bobbin And Spool Winder User Manual and is a great way to tell how much you are winding on each spool (see Figure 3 for routing of thread with the counter). Figure 3 4. Care And Maintenance Your AVL bobbin and spool winder has been designed to give you years of trouble-free service with very little maintenance. Care and maintenance includes: Clean as lint build up becomes noticeable. Keep from overheating of the motor by super high yarn tension at very slow motor speed. Perform yearly oiling of tail stock rod or when light rust becomes visible. Use a light grade oil (such as sewing machine oil) or one of the newer Teflon based lubricants (such as TriFlow). The wooden parts have been finished with a food-grade mineral oil which you can re-apply at any time as necessary. Should you ever require replacement parts or service on your winder, please contact AVL. Page 4 Rev. June 1, 2012 AVL Electric Bobbin And Spool Winder User Manual 5. Optional Equipment You may also wish to consider the purchase of the following items to insure a tight package while simultaneously preventing over-winding. AVL Auto Tensioner The AVL Auto Tensioner provides consistent yarn tension without burning your fingers! Tension is easy to set and the tension is mounted right on to the thread guide ensuring it is right where you need it. AVL Bobbin Winding Guide The AVL Bobbin Winding Guide is a nifty little tool that guides you through all your stationary pirn winding to ensure the perfect sized packages everytime. AVL Yardage Counter Never lose track of your spool yardage again! The AVL Yardage Counter with thread guide bracket fits perfectly to your thread guide like no other. For customer who prefer metric units, look for the AVL Meter Counter. Page 5 Rev. June 1, 2012