1
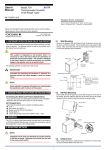
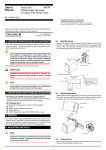
1. MOUNTING METHOD 1.4 DIN Rail Mounting 1.1 Installing/Uninstalling the Mounting Block Place the converter so that the DIN rail fits into the upper part of the DIN-rail groove at the rear of the socket, and fasten the socket using the slide lock located underneath the socket. To remove the converter, pull down the slide lock using a slotted screw-driver. The mounting block is necessary for rack mounting or wall mounting. Installing the mounting block Fit the mounting block into the grooves of the converter, and slide it in the direction of an arrow as shown belowleft. Uninstalling the mounting block Lift the stopper using a slotted screw-driver as shown below-right, and pull the mounting block to remove it. Mounting block Groove (Wall mounting) DIN rail DIN rail groove Slide lock Stopper Groove (Rack mounting) 1.5 Mounting Dimensions Unit: mm Angle Mounting Dimensions 1.2 Rack Mounting 24.5 24.5 24.5 24.5 Take the FRK panel and install it on a mounting angle as shown below. This method is suitable for high density mounting of the 24.5 M4×0.7 Mounting screw Mounting angle converters on a 19-inch rack panel. Support FRK panel 73 90 Mounting angle n×24.5+2 Wall Mounting Dimensions 24.5 24.5 Mounting screw (M4x0.7) (2 screws in the package) Mounting Dimensions 24.5 M4×0.7 Mounting screw M5 screw (4 places) 465±1 90 Unit: mm 450±1 2. INSTALLATION LOCATION Avoid the following environments for installation locations: Areas with vibration, corrosive gases, dust, water, oil, solvents, direct sunlight, radiation, a strong electric field, and/or a strong magnetic field, altitude of more than 2000m above sea level. If there is any risk of a surge being induced into the power line and/or signal lines due to lightning or other factors, a dedicated lightning arrester should be used as protection for both this converter and a field-installed device. Operating temperature/humidity range: 0 to 50C/5 to 90%RH (no condensation) 50 25 24.5 24.5 Mounting angle 25 50 Supplied spacer(50) or Wiring space(30 to 60) 1.3 Wall Mounting Mount the converter onto the FRK panel as shown below or mount it directly on the wall. 3. EXTERNAL WIRING FRK panel WARNING Be sure to turn OFF the power supply before wiring to avoid the risk of electric shock. Use a tester or similar device to ensure that no power is being supplied to a cable to be connected. IM 77J08R05-01E 1st Edition 2007.01.15-00