1
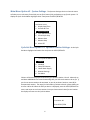
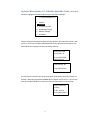
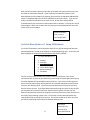
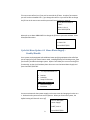
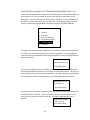
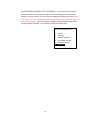
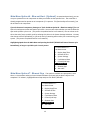
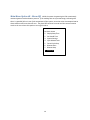
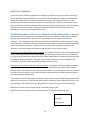
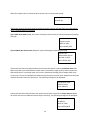
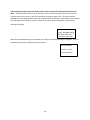
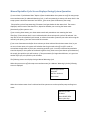
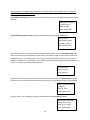
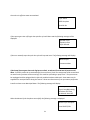
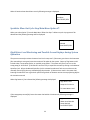
User Manual
1
Micro Environmental Control Systems – Woda Sci Sump Sprinkler and Home Water Control
System Manual
Contents
Powering Up .................................................................................................................................................. 3
Navigating thru the menus. .......................................................................................................................... 3
Main Menu Option ........................................................................................................................................ 4
Main Menu Option #1. Display Date/Time. ................................................................................................. 4
Main Menu Option #2. Set Date and Time................................................................................................... 4
Main Menu Option #3. System Settings ....................................................................................................... 6
Cycle Set Menu Option #1. Sprinkler Station Settings ................................................................................. 6
Cycle Set Menu Option #2. Schedule Sprinkler Cycles ................................................................................. 7
Cycle Set Menu Option #3. Sump Fill Estimate ............................................................................................ 8
Cycle Set Menu Option #4. Home Water Supply – Enable/Disable ............................................................. 9
Cycle Set Menu Option #5. Blowout Settings(Optional) ............................................................................ 10
Cycle Set Menu Option #6. Exit Menu. ...................................................................................................... 11
Main Menu Option #4. Cycle Manual Start- (Sprinkler) ............................................................................. 12
Main Menu Option #5. Forced Cycle Stop- (Sprinkler). .............................................................................. 12
Main Menu Option #6. Blow out Start. (Optional) .................................................................................... 13
Main Menu Option #7. Blowout Stop......................................................................................................... 13
Main Menu Option #8. Alarm Off. ............................................................................................................. 14
Refill Cycle Definition. ................................................................................................................................. 15
Scheduled Sprinkler Cycle- Screen Displays and Operating Notes. ............................................................. 15
Manual Sprinkler Cycle-Screen Displays During System Operation. ........................................................... 19
Sprinkler Blow- Out Cycle (Optional) and Possible Screen Displays during System Operation ................... 22
Sprinkler Blow-Out Cycle Stop Main Menu Option #7. ............................................................................... 23
High Water Level Monitoring and Possible Screen Displays during System Operation .............................. 23
High Pressure Issue- Total System Abort- Unplug Controller, Fix problem and reset system. .................... 24
Home Water Supply Monitoring and Possible Screen Displays During System Operation ......................... 25
2
Powering Up
When you first set up and plug in your new system, the sump pump will be on and the home water
system and sprinkler system will be off. You will need to use the menu to select the settings for each
system and then to activate/turn them on. Initially the display will scroll from right to left with the
following message.
“Welcome to Woda-Sci Systems! Press any KEY to continue….”
Press the Select/Rtrn Key.
Navigating thru the menus.
Navigate thru the choices on the menu screens by choosing the
up or down ARROW KEYS. The menu item you are currently on will be highlighted in black. If you do not
see all the choices on your screen move the ARROW KEYS down or up as needed and another section of
the menu will be displayed.
3
Main Menu Option
Main Menu Option #1. Display Date/Time.
When you first turn on the system the Date
and Time will need to be set by selecting option 2. This will be necessary in order to schedule a watering
cycle. Once you have set the time you can always select option 1 and the current time will be displayed.
<<<<Main Menu>>>>
Use Down Arrow
1. Display Date/Time
2. Set Date & Time
3. System Settings
4. Cycle Manual Start
5. Forced Cycle Stop
6. Blowout Start
7. Blowout Stop
8. Alarm Off
Main Menu Option #2. Set Date and Time.
Move the up or down arrow until choice
number 2, “Set Date & Time, is highlighted. Then press the SELECT/RTN KEY. The screen to the right
below will appear. You can subtract or add years to the value displayed on the screen by selecting the up
or down ARROW KEYS. Once you have changed the screen to display the current year press the
SELECT/RTN KEY.
<<<<Main Menu>>>>
Use Down Arrow
1. Display Date/Time
2. Set Date & Time
3. System Settings
4. Cycle Manual Start
5. Forced Cycle Stop
6. Blowout Start
7. Blowout Stop
8. Alarm Off
Select
4 digit year: 2015
Press SELECT/RTN
The next screen will ask you to input the numeric month. Once again use the up or down ARROW KEYS
to change the value until the current month is displayed. Then press the SELECT/RTN KEY.
Enter month: 01
Press SELECT/RTN
4
Next you will be asked to enter the numeric day of the month. Once again use the up or down ARROW
KEYS to change the value until the current month is displayed. Then press the SELECT/RTN KEY.
Enter
Day of month: 01
Press SELECT/RTN
Next you will be asked to enter the current hour of a 24 hour clock. (Midnight being 00, 5 am being 05,
10 pm being 22). Once again use the up or down ARROW KEYS to change the value until the current hour
SELECT/RTN to Continue
is displayed. Then press the SELECT/RTN KEY.
Enter
Hour (24hr): 13
Press SELECT/RTN
SELECT/RTN to Continue
Finally, you will be asked to enter the current minute. Once again use the up or down ARROW KEYS to
change the value until the current minute is displayed. Then press the SELECT/RTN KEY.
The screen will then display the complete current date based on what you entered. To finalize and
activate your time selection you MUST go back to the main menu by pressing the SELECT/RTN KEY.
Enter minute: 00
Press SELECT/RTN
Sun Sep 22, 2013
SELECT/RTN to Continue
13:05:25
Press Key to EXIT
Continue
SELECT/RTN to
Continue
5
Main Menu Option #3. System Settings.
The Systems Settings choice on the main menu
will take you to a sub menu from which you can finish most of the preliminary set up for the system. To
display the Cycle Set Sub Menu highlight choice 3 and press the SELECT/RTN KEY.
<<<<Main Menu>>>>
Use Down Arrow
1. Display Date/Time
2. Set Date & Time
3. System Settings
4. Cycle Manual Start
5. Forced Cycle Stop
6. Blowout Start
7. Blowout Stop
8. Alarm Off
Cycle Set Menu Option #1. Sprinkler Station Settings.
At the Cycle
Set Menu highlight the Stations
line and press the SELECT/RTN KEY.
1.
<<<<Cycle Set Menu>>>>
1.
2.
3.
4.
5.
6.
Stations
Schedule
Sump Fill Estimate
Home Water Supply
Blowout Settings
Exit Menu
Choices will then be displayed consecutively for sprinkler stations 1 thru 6. Move the up
and down ARROW KEYS to enter the watering time you wish each station to be on for. If
you do not want a station to be activated, or you do not have 6 stations, enter 00 for
that particular station. The range for the number of minutes that the system allows you
to enter is 00 to 99. When the time you desire is displayed, press the SELECT/RTN KEY to
save it and move on to the next station. Once you have entered a time for each station
the display will return to the Cycle Set Menu.
Set station1 time
in minutes: 00
Press SELECT/RTN
6
Press Key to EXIT
Continue
Cycle Set Menu Option #2. Schedule Sprinkler Cycles.
At the Cycle
Set Menu highlight the Schedule line and press the SELECT/RTN KEY.
<<<<Cycle Set Menu>>>>
1.
2.
3.
4.
5.
6.
Stations
Schedule
Sump Fill Estimate
Home Water Supply
Blowout Settings
Exit Menu
Choices will then be displayed consecutively for sprinkler cycle start time in hours, and
minutes. Use the up and down ARROW KEYS to set the right time and then press the
SELECT/RTN KEY to progress to the next setting selection.
Enter Start Time
hour (24hr): 11
Press SELECT/RTN
SELECT/RTN to
Continue.
Enter Minute: 00
Press Key to EXIT
Press SELECT/RTN
Continue
to want to water on
You will then be asked for each of the seven days ofSELECT/RTN
the week if you
Continue
that day. Move the up and down ARROW KEYS to display
a 0 for No or a 1 for Yes and
then hit the SELECT/RTN KEY to save your selection and continue to the next day.
Want to water on
Friday?
0=No, 1=yes: 0
Press SELECT/RTN
SELECT/RTN to
Continue
7
Once you have entered a choice for each day of the week, the system will ask you if you
are ready to activate the Schedule. If you would like to enable the system to start
watering based on the schedule you entered, then move the up and down ARROW KEYS
until a 1 is displayed and press the SELECT/RTN KEY to save your choice. If you are not
ready to activate the schedule set the menu to a 0. All the other settings will be
remembered and you can select this menu option later to activate. (It will go thru all the
choices again). When you are done with this screen press Select/Rtn and the menu will
return to the Cycle Set Menu.
Activate Schedule?
0=No, 1=yes: 0
Press SELECT/RTN
Cycle Set Menu Option #3. Sump FillSELECT/RTN
Estimate
to.
Continue
The Sump Fill Estimate is used to determine when to turn off the sump pump and start
accumulating water in order to be ready for a scheduled watering cycle. At the Cycle Set
Menu highlight the Sump Fill Estimate and press the SELECT/RTN KEY.
<<<<Cycle Set Menu>>>>
1.
2.
3.
4.
5.
6.
Stations
Schedule
Sump Fill Estimate
Home Water Supply
Blowout Settings
Exit Menu
The first screen will tell you what the system will use for the fill time if you do not
override the time. If this is the first time that you are using the system after powering up,
the value displayed will be the default value of 6 hours. If you have used the system at
least once since powering up, the estimate will be a learned value based on the fill time
from your last watering cycle. If you have recently experienced a heavy rain you may
want to reduce the time. If you have had an abnormally long time since the last rain fall
you may want to increase the wait time. Realize that the system will wait until the
water accumulated has reached the irrigation level,(third float sensor from the bottom in
the sump), before starting in either case. The fill time is used to determine when the
sump pump will be turned off by the system. The more accurate the fill time, the closer
you will be to watering at your desired scheduled watering time.
8
Estimated
Sump Fill Time
In hours: 6.25
Press SELECT/RTN
The next screen will ask you if you wish to override the fill time. A value of zero means
you will use the estimated time. If you change the value to 1 you will be able to change
the fill time in the next screen and the system will use the time you entered.
Override Estimated Fill
Time?
0=No, 1=Yes: 1
Press SELECT/RTN
Move the up or down ARROW KEYS to change the fill time to your new estimate. Press
Select/Rtn when done
User OVERRIDE Fill Time
in hours: 08
Press SELECT/RTN
Cycle Set Menu Option #4. Home Water Supply –
Enable/Disable
Your system can be equipped with additional water purifying equipment that will allow
you to supply all of your home’s water needs, including bathing and drinking water, from
your home’s foundation drainage system. Option 5 will allow you to turn on and off this
functionality. At the Cycle Set Menu place the cursor over the Home Water Supply and
press the SELECT/RTN KEY.
<<<<Cycle Set Menu>>>>
1.
2.
3.
4.
5.
6.
Stations
Schedule
Sump Fill Estimate
Home Water Supply
Blowout Settings
Exit Menu
You must activate the home water supply on the next screen by changing the value to a
1. Otherwise the system will not use this feature. When you receive the system, the
default setting will have this set to off.
Turn on Off Home
water Supply?
0=Off, 1=On: 1
9
Press SELECT/RTN
Cycle Set Menu Option #5. Blowout Settings(Optional).
Your
system can be equipped with a compressor that will allow you to automatically blow out
your sprinkler lines. You can choose to do this at the end of every watering cycle or
periodically. Since this also clears the lines of water, this option can be used at the end
of a season to prepare/winterize your sprinkler lines in areas where freezing can occur.
At the Cycle Set Menu highlight Blow Out Settings and press the SELECT/RTN KEY.
<<<<Cycle Set Menu>>>>
1.
2.
3.
4.
5.
6.
Stations
Schedule
Sump Fill Estimate
Home Water Supply
Blowout Settings
Exit Menu
The system will be delivered with a default set to 3 minutes for tank pressurization time.
This may not be the optimal time for your particular installation. You may modify this
time by moving the up and down arrows to the desired time. Press the SELECT/RTN KEY
when you are done.
Input tank Pressure
Time in minutes : 03
Press SELECT/RTN
SELECT/RTN to
The next screen will ask you to set the blow out time per sprinkler station. The system
Continue
will be delivered with a default set to 2 minutes for each sprinkler station. This may not
be the optimal time for your particular installation. You may modify this time by moving
the up and down arrows to the desired time. Press Select/Rtn when you are done.
Input blow out time
in minutes: 02
Press SELECT/RTN
The last choice in this section is whether to blow out your lines after each watering cycle.
The default choice is 0 for No. If you wish to do a one time or periodic blow out, the
main menu has an option to start this activity. This will be explained later in this
manual.
Blowout Every Cycle?
0=No, 1=Yes: 0
Press SELECT/RTN
10
Cycle Set Menu Option #6. Exit Menu..
You may move up and down in
the Cycle Set Menu in any order you choose until all the settings you wish have been
adjusted. You may return to this sub menu and change the settings at any time. Please
remember if a cycle has already started the settings will not go into effect until the next
time a cycle is initiated. Once you are done changing settings highlight the Exit Menu
and hit the SELECT/RTN KEY. This will take you back to the main menu.
<<<<Cycle Set Menu>>>>
1.
2.
3.
4.
5.
6.
11
Stations
Schedule
Sump Fill Estimate
Home Water Supply
Blowout Settings
Exit Menu
Main Menu Option #4. Cycle Manual Start- (Sprinkler).- You may not wish to
schedule watering cycles and instead opt to water whenever you think it is necessary. If you select this
option, the system will start watering as soon as water accumulation level has reached minimum, (first
sensor from the bottom of the sump). It will reference all other settings in the System Settings Menu that
you have entered. This includes activated watering stations, watering station time, and blow out cycle
options. If you run out of available water before completing a cycle, the system will estimate the
amount of time required to finish watering and wait to accumulate the necessary water before
continuing.
<<<<Main Menu>>>>
Use Down Arrow
1. Display Date/Time
2. Set Date & Time
3. System Settings
4. Cycle Manual Start
5. Forced Cycle Stop
6. Blowout Start
7. Blowout Stop
8. Alarm Off
Main Menu Option #5. Forced Cycle Stop- (Sprinkler).
There may be times when
you are in either a manual or scheduled watering cycle and you wish to stop it before it has completed.
An example of this would be to stop watering when it starts to rain. This can be accomplished by
selecting option 5 for Forced Cycle Stop from the Main Menu by highlighting it and pressing the
SELECT/RTN KEY.
<<<<Main Menu>>>>
Use Down Arrow
1. Display Date/Time
2. Set Date & Time
3. System Settings
4. Cycle Manual Start
5. Forced Cycle Stop
6. Blowout Start
7. Blowout Stop
8. Alarm Off
12
Main Menu Option #6. Blow out Start. (Optional)- As mentioned previously, you can
use your system with an air compressor to allow you to blow out the sprinkler lines. Your controller is
already programmed to operate an air compressor if it is present. This functionality will not work if you
do not have an air compressor.
If you do have an air compressor please go to “Cycle Set Menu Option #6 – Blow Out settings” first and
enter the tank pressure time and station cycle times. You must also select whether you wish to Blow Out
after each sprinkler cycle or not. (This process is explained earlier in this manual). You can choose to do
this at the end of every sprinkler cycle by selecting this choice in the System Settings Sub Menu. You may
also choose to do this periodically, or just at the end of a watering season when you are winterizing your
system. (This process is explained earlier in this manual).
Highlighting Option 6 on the Main Menu and pressing the SELECT/RTN KEY will start a blowout cycle
immediately, as long as a sprinkler cycle is not in process.
<<<<Main Menu>>>>
Use Down Arrow
1. Display Date/Time
2. Set Date & Time
3. System Settings
4. Cycle Manual Start
5. Forced Cycle Stop
6. Blowout Start
7. Blowout Stop
8. Alarm Off
Main Menu Option #7. Blowout Stop.
This option is available as a precaution in case
there is a circumstance when you have initiated a blowout cycle and wish to abort it before it has
completed. To initiate it, highlight Blowout Stop and press the SELECT/RTN KEY.
<<<<Main Menu>>>>
Use Down Arrow
1. Display Date/Time
2. Set Date & Time
3. System Settings
4. Cycle Manual Start
5. Forced Cycle Stop
6. Blowout Start
7. Blowout Stop
8. Alarm Off
13
Main Menu Option #8. Alarm Off.
While the system is operating it will be continuously
monitoring water levels and water pressure. If the readings are out of normal range, indicating that
there is a possible failure in one of the components of the system, corrective action is attempted and an
alarm will be turned on to alert the user. The alarm will continue to sound until the corrective action
works or the user selects this option to turn off the alarm.
<<<<Main Menu>>>>
Use Down Arrow
1. Display Date/Time
2. Set Date & Time
3. System Settings
4. Cycle Manual Start
5. Forced Cycle Stop
6. Blowout Start
7. Blowout Stop
8. Alarm Off
14
Refill Cycle Definition.
If you have not accumulated enough water to supply your sprinkler system for the amount of time you
have programmed, the system will go into a refill cycle when the water level reaches a low water level
minimum threshold, (first sensor from the bottom of the sump). The system will then stop. It will
estimate how much water you need to complete your watering cycle. It will then calculate how long it
will need to wait to accumulate the water necessary to complete the watering cycle . After this time has
elapsed, it will continue watering, as long as the water accumulated is above the low water level
threshold, (first sensor from the bottom of the sump).
Scheduled Sprinkler Cycle- Screen Displays and Operating Notes.
A Scheduled
Sprinkler Cycle is set up by the user. As stated previously, the user would first select Option 3- “System
Settings”, from the Main Menu. From the Cycle Set Sub Menu the user would select Option 2“Schedule”. You would pick the day of the week and time you would like the system to water your lawn.
Please note there is variability in the start time because water levels in your home’s foundation drainage
system vary during a typical year. Therefore, while the system tries to predict the amount of time
necessary to accumulate water, the actual time may be sooner or later than scheduled.
The water may accumulate faster than anticipated. For example, a heavy rain prior to the watering cycle
may saturate the ground and result in the irrigation level in the sump, (third sensor from the bottom of
the sump, being achieved much more quickly than normal. Waiting past this water level point could lead
to possibly flooding the basement. Therefore, the system will activate earlier than scheduled in this
circumstance, to water the lawn and reduce the water level in the sump.
The water may accumulate more slowly than anticipated. For example, a period of drought may lead to
the ground water levels dropping below their average. In many parts of the country the late summer
and early fall are much dryer than the spring and early summer. The system will wait past the scheduled
start time in this circumstance, since it will take longer to accumulate the necessary quantity of water in
the home foundation drainage field.
If the system runs out of water before completing a cycle in will go into refill mode and accumulate more
water in the sump system. It will continue watering when it estimates it has enough water to finish. The
cycle will abort if the system waits longer than 40 hours or it goes into more than two refill periods.
Below are the screens that will display during a scheduled watering cycle.
When the system turns off the sump to accumulate water for a Scheduled Watering Cycle.
Sched. Cycle Active
Sump Off
Filling System
15
When the irrigation level is achieved and the system turns on the sprinkler pump.
Sched. Cycle Active
Sprinkler On
If the water reservoir level goes below minimum the system stops to refill and waits until it determines
there is sufficient water accumulated.
If you HAVE home water in use, the system will wait for three minutes to refill and display the following
message.
Sch Sprink and Home
Capacity Issues
Wait for 3 Min
Press SELECT/RTN
If you DO NOT have home water in use, the system will display the following message.
Sched Cycle
Home Water Not On
Sprinkler in Refill
Press SELECT/RTN
If the water level does not replenish above the minimum level within 3 minutes and home water is in
use, the sprinkler cycle will be aborted. Home water is considered a higher priority and the system has
determined there is not enough water in the home’s foundation drainage field to support both at the
current time. The user will probably not experience any disruption in home water supply due to the water
replenishment rate inherent in the system. The following message will be displayed.
Sched Sprink Cycle
Capacity Issues
Cycle Aborted
If the water level does replenish above the minimum level within 3 minutes and home water is in use,
the system will wait one additional minute before continuing. The following message will be displayed.
Sch Sprink and Home
At MIN Lvl
Wait for 1 Min
Press SELECT/RTN
16
After the minute the following message will be displayed when home water is in use.
Home Water System On
Sump Water in Use
Sch Sprink in Refill
Press SELECT/RTN
Once there is sufficient water accumulated.
Sch Cycle Active
Refill Complete
Sprinkler On
Premature Abort
If the system goes into refill again the sprinkler cycle will abort and the following message will be
displayed.
Sch Sprink Cycle
Capacity Issues
Cycle Aborted.
If the water reservoir level goes below minimum level and the use of Home Water is NOT selected the
system stops to refill.
Sched. Cycle Home
Water Not On
Sprinkler in Refill
Press SELECT/RTN
When the water level has gone below the minimum level required, the system waits until it determines
there is a sufficient amount of water accumulated. Once sufficient water is accumulated,(water above
first sensor from bottom of the sump0, the following message is displayed.
Refill
in process
Sched.
Cycle Active
Refill complete
Sprinkler On
If the user manually stops the cycle(fault code=8) , or there is a sensor fault due to capacity issues,(fault
code=7),the cycle will stop and reset. The following message will display.
Sched. Cycle Fault
code = Premature
Abort
17
If the Pump/System goes above ther high pressure limit, an alarm will sound and all processes will
abort. The sump pump will be turned on and other process will be turned off. Processes cannot be reactivated until the root cause is fixed. This could be a plumbing or pump issue. The system must be
unplugged and then plugged back in after the problem has been addressed . Home water can be supplied
thru municipal water during the interim. Please see directions on Municipal Water. The following
.
message will display
Sched. Cycle Aborted
Check Pump&Plumbing
Off Alarm-EXIT Then
Hit Menu 8-alarm Off
When the scheduled watering cycle completes successfully the following message
is displayed.
The new
Premature
Abort
calculated fill time will be displayed as example below
Sched. Complete
Fill Hours = 12.25
Press SELECT/RTN
18
Manual Sprinkler Cycle-Screen Displays During System Operation.
If a user selects “Cycle Manual Start” Option 4 from the Main Menu the system turns off the sump pump
to accumulate water for a Manual Watering Cycle. It will start watering as soon as the water level in the
sump system is above the low water level sensor, (first sensor from the bottom of the sump).
The sprinkler cycle will stop watering if the water level goes below the low water level. The screens
displayed, and the actions that then occur, depend on whether you are using the home water
functionality of the system or not.
If you are using home water, your home water needs take precedence over watering the lawn.
Therefore, if the minimum level is not re-achieved within three minutes the cycle will be aborted. You
may wish to use the scheduled cycle instead, or reduce the number of stations you select when using the
manual cycle option, if you have issues with this situation.
If you are on home water and after three minutes you have achieved the minimum water level, or you
are not on home water, the system will calculate how long it needs to be off to refill in order to
accumulate enough water to finish your remaining sprinkler cycle. Once this calculated accumulation
time has elapsed, or the system has achieved irrigation level, (third sensor from bottom of the bottom of
the sump), the sprinkler cycle will continue. If the system waits for longer than 40 hours, or it goes into
another refill cycle, the sprinkler cycle will abort.
The following screens can display during a Manual Watering Cycle.
When the system turns off the sump to accumulate water for a Manual Watering Cycle the following
screen is displayed.
Manual Cycle Active
Sump Off
Wait for minimum
Water Level
When the minimum water level is achieved and the system turns on the sprinkler pump and begins to
water.
Manual Cycle On
To abort
Press SELECT/RTN
Press cycle stop
19
If the sump water level goes below minimum, the system stops to refill and waits until it determines
there is sufficient water accumulated.
If you HAVE home water in use, the system will wait for three minutes to refill and display the following
message.
Man Sprink and Home
Capacity Issues
Wait for 3 Min
Press SELECT/RTN
If you DO NOT have home water in use, the system will display the following message.
Manual Cycle
Home Water Not On
Sprinkler in Refill
Press SELECT/RTN
If the water level does not replenish above the minimum level within 3 minutes and home water is in
use, the sprinkler cycle will be aborted. Home water is considered a higher priority and the system has
determined there is not enough water in the sump field to support both at the current time. You will
probably not experience any disruption in home water supply due to the storage capacity inherent in the
system. The following message will be displayed.
Sprinkler Cycle
Capacity Issues
Cycle Aborted
If the water level does replenish above the minimum level within 3 minutes and home water is in use,
the system will wait one additional minute before continuing. The following message will be displayed.
Man Sprink and Home
At MIN Lvl
Wait for 1 Min
Press SELECT/RTN
After the minute, the following message will be displayed when home water is in use.
Home Water System On
Sump Water in Use
Man Sprink in Refill
Press SELECT/RTN
20
Once there is sufficient water accumulated.
Cycle Active
Refill Complete
Sprinkler On
Premature Abort
If the system goes into refill again the sprinkler cycle will abort and the following message will be
displayed.
Sprinkler Cycle
Capacity Issues
Cycle Aborted.
.
If the user manually stops the cycle the cycle will stop and reset. The following message will display
Manual Cycle
Premature Abort
If the Pump/System goes above the high pressure limit, an alarm will sound and all processes will
abort. Processes cannot be re-activated until the root cause is fixed. The sump pump will be turned back
on and all other functions will be turned off. This could be a plumbing or pump issue. The system must
be unplugged and then plugged back in after the problem has been addressed . Home water can be
supplied thru municipal water during the interim. Please see directions on from your water purification
.
installer on how to use Municipal Water. The following message will display
Man. Cycle Aborted
Check Pump&Plumbing
Off Alarm-EXIT Then
Hit Menu 8-alarm Off
Premature Abort
When the Manual Cycle Completes successfully the following message is displayed.
Manual Cycle Complete
Press SELECT/RTN
21
S
Sprinkler On
There may be situations when your sump pump fails. For example, the sump pump unit could wear out
or break down. The Woda Sci system is constantly measuring the water level in your home foundation
drainage system. If the water level goes above the high water level sensor,(fourth sensor from the
bottom of the sump) ,the system will try to protect your basement and turn on the manual water cycle to
bring down the water level. If the Manual Cycle has been activated due to a high water level the
following message will be displayed.
High Water Level
Hit Menu 8 – Alarm Off
Sprinkler On
To Lower Water Level
Sprinkler Blow- Out Cycle (Optional) and Possible Screen Displays during
System Operation
As mentioned previously, the system can be configured with an optional air compressor, that you
provide, which gives it the ability to blow out the sprinkler lines. Your controller is already programmed
S
to operate an air compressor if it is present. This functionality will not work if you do not have an air
compressor. This option helps to keep the sprinkler lines clean and free of sediment
andOn
protects them
Sprinkler
from freezing in the winter. The sprinkler lines can be blown out after every sprinkler cycle, periodically,
or at the end of a season.
If you do have an air compressor please go to “Cycle Set Menu Option #5 – Blow Out settings” first and
Select/Rtn the tank pressure time, station blow out times and station cycle times. The system will
pressurize the air compressor for the previously input tank pressurization time . Then, it will blow out
each active sprinkler station for the specified blow out time.
The system will do each station one at a time in two steps. First it will pressurize the compressor and the
following message will be displayed.
Blow Out Cycle
Waiting for
Pressure Time
After the compressor is pressurized the following message is displayed, (Where X is equal to the station
number the system is currently blowing out).
Blow Out Cycle
In Progress
S Station = X
22
Sprinkler On
When all stations have been blown out the following message is displayed.
Blow Out Cycle
Complete
Press SELECT/RTN
Sprinkler Blow-Out Cycle Stop Main Menu Option #7.
When you select Option 7 from the Main Menu “Blow Out Stop” a blow-out cycle in progress will be
aborted and the following message will be displayed.
S
Blow Out Stop
Sprinkler
On
Initiated
Press SELECT/RTN
High Water Level Monitoring and Possible Screen Displays during System
Operation
The system constantly monitors the water level in the sump well. If the water gets close to the basement
floor something is wrong and corrective action will be taken by the system. SCauses of high water could
include either a sump pump failure, or sprinkler pump failure. The system will first try to turn on the
Sprinkler On
sump pump for 10 minutes. If this doesn’t work it will try to expel excess water by turning on the Manual
Sprinkler Cycle. When the Manual Sprinkler Cycle is activated an alarm will also turn on that must be
manually turned off by the user acknowledging the situation. If these actions result in the water level
lowering the alarm will turn off and the system will go back to whatever actions it was performing before
the situation occurred.
When high water is first indicated the following message is displayed.
High Water Level
Sump On For 10 min.
To Lower Water Level
If the sump pump successfully lowers the water level within 10 minutes the following message is
displayed.
High Water Level
Water Level Now OK
Sump
Worked
S
Press SELECT/RTN
Sprinkler On
23
If the sump pump fails to lower the water level within 10 minutes the manual sprinkler cycle will activate
and the following message is displayed.
High Water Level
Hit Menu 8 – Alarm Off
Sprinkler On
To Lower Water Level
If the Sprinkler Cycle reduces the water level below the High Level Sensor the following message is
S
displayed.
Water Level Now OK
Sprinkler On
If Sprinkler On
Can Use Manual Stop
Press SELECT/RTN
High Pressure Issue- Total System Abort- Unplug Controller, Fix problem
and reset system.
The well pump should be self- regulating and monitor the system pressure at all times. As an added
precaution the Woda Sci System also monitors system pressure. If the pressure exceeds the high
pressure limit, (approximately 70 psi), all systems will abort and the sump will turn on. Sprinkler cycles
in process will be stopped. If home water is activated it will be stopped. The only way to resume normal
operation is to unplug the controller, fix the pump and then plug the controller back in. All inputs will
be set back to their original default values and will need to be reset. The following message is
displayed.
Hi Pressure Fault
Press SELECT/RTN
24
Home Water Supply Monitoring and Possible Screen Displays During
System Operation
If the home water application is in use, the system will constantly monitor the water level and maintain it
at a level around the home water level sensor, (second sensor from the bottom of the sump). Water
cannot be pumped from the sump into the home water system if the water level is below the low water
sensor, (first sensor from the bottom of the sump). If the water is above the home water sensor, the
system will briefly turn on the sump pump to lower the water level in the sump.
When the system is first activated the following message is displayed.
Home Water System On
Wait for minimum
water level
Press SELECT/RTN
When the home water system is in use the following message is displayed.
Home Water System On
Sump Water
In Use.
Press SELECT/RTN
Periodically the water level may go above the home water level sensor, (second sensor from the bottom
of the sump). When this happens the sump is turned on for 20 seconds to lower the water level. This can
occur multiple times during the day and will usually go unnoticed. It may increase in frequency during
times when you are not using much water or your field is heavily saturated.
Water System
Level High
Sump On
Press SELECT/RTN
Periodically the water level may go below the low water level sensor,(first sensor from the bottom of the
sump). When this occurs water cannot be pumped into the system since it would result in damage to the
pump. Hopefully this situation will only exist for a brief period of time while the field refills. If the
condition exists for a prolonged time, it may be necessary to turn on municipal water to supply your
home needs while the field refills. Please refer to directions regarding how to revert back to municipal
water provided in this manual. The screen will display the following message if this occurs.
Water System
In Refill
Level Low
Press SELECT/RTN
25
The user can also turn off or disable Home Water Usage. (Cycle Set Menu –4. Home Water Supply)
When this is done the following message will be displayed.
Home Water OFF
Press SELECT/RTN
26