1
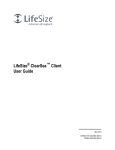
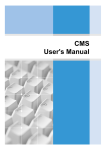
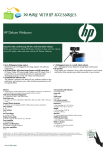
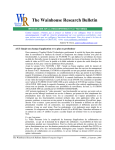
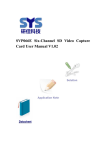
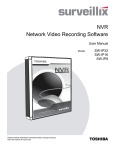
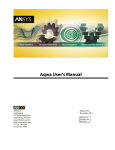
Mirial Softphone User Guide Ver 7.0.47 1. INTRODUCTION ....................................................................................................................... 4 2. INSTALLATION ......................................................................................................................... 5 2.1. MINIMUM REQUIREMENTS (Windows) ____________________________________ 5 2.1.1. CERTIFIED HIGH-END CONFIGURATION ................................................................................ 6 2.2. MINIMUM REQUIREMENTS (MAC OS X) ___________________________________ 6 3. CONFIGURATION .................................................................................................................... 8 3.1. LICENSE FILE _______________________________________________________ 8 3.2. GENERAL SETTINGS __________________________________________________ 8 3.3. VIDEO ____________________________________________________________ 11 3.3.1. Advanced video properties .......................................................................................................... 12 3.4. AUDIO ____________________________________________________________ 14 3.5. CODECS __________________________________________________________ 15 3.6. NETWORK _________________________________________________________ 16 3.6.1. Advanced network properties .................................................................................................... 17 3.7. SIP ______________________________________________________________ 18 3.7.1. SIP Advanced Settings .................................................................................................................. 19 3.8. H.323 ____________________________________________________________ 20 3.9. ABOUT____________________________________________________________ 21 4. RUNNING ................................................................................................................................... 22 4.1. DIAL A CALL _______________________________________________________ 22 4.2. CALL CONTROL _____________________________________________________ 23 4.2.1. Call Hold ............................................................................................................................................. 23 4.2.2. Call Transfer ...................................................................................................................................... 24 4.2.3. 3-Party Conference ........................................................................................................................ 24 4.3. HEAD UP DISPLAY (HUD) _____________________________________________ 25 4.3.1. CPU SATURATION WARNING...................................................................................................... 25 4.3.2. HIGH PACKET LOSS WARNING.................................................................................................. 25 4.3.3. MEDIA ENCRYPTION NOTICE ..................................................................................................... 26 4.4. ACOUSTIC ECHO CANCELLER (AEC)_____________________________________ 26 4.5. AUDIO DENOISE FILTER (DEN) ________________________________________ 27 4.6. PRIVACY MODE (VIDEO OFF) __________________________________________ 27 4.7. RECORDING A CALL _________________________________________________ 27 4.8. CONTACTS ________________________________________________________ 28 4.9. CALLS LOG ________________________________________________________ 29 4.10. VCR - RECORDED CALLS PLAYBACK _____________________________________ 30 4.10.1. Playback a call ................................................................................................................................. 31 4.10.2. Export a call to a video file ......................................................................................................... 31 www.mirial.com 4.11. PRESENTATION _____________________________________________________ 31 4.11.1. H.239 Presentation ......................................................................................................................... 32 4.11.2. Video Sharing ................................................................................................................................... 34 4.12. FAR END CAMERA CONTROL ___________________________________________ 34 4.13. CALL STATISTICS ___________________________________________________ 35 4.14. RESIZABLE GUI ____________________________________________________ 36 4.15. COMMAND LINE PARAMETERS _________________________________________ 36 4.16. DTMF TONES _______________________________________________________ 37 5. FIREWALL AND ROUTER CONFIGURATION ........................................................ 38 5.1. FIREWALL _________________________________________________________ 38 5.1.1. Windows XP system firewall....................................................................................................... 38 5.1.2. Other system software firewall ................................................................................................. 38 5.1.3. Generic/External firewall equipment ...................................................................................... 38 5.2. ROUTER___________________________________________________________ 38 5.2.1. Router with DMZ Host ................................................................................................................... 39 5.2.2. Generic Router ................................................................................................................................. 39 3 www.mirial.com 1. INTRODUCTION Mirial Softphone is a fully compliant H.323/SIP software-only video phone supporting the most advanced standard audio and video coding technologies. The interface is very essential. Surely there are a few extra controls compared to a classic phone, but you will soon discover that they are very useful for a video phone. If you have doubts about the purpose of a particular interface element, just stop your mouse cursor over it and a tooltip will appear. The configuration panel allows expert people to optimize quality and performance. It is important to know that quality/performance strongly depends on your operating system and hardware configuration, the most important factors being CPU power, network bandwidth, and video capture device performance. We recommend testing the Softphone at default setting, and then customizing it for maximum performance on your system. This may require some trial and error, so take your time to tune Mirial Softphone to your system. NOTE: Please invest a few minutes to read at least the important notes in this manual (the ones in red color like this one). They may save you a lot of time for troubleshooting. 4 www.mirial.com 2. INSTALLATION Just run the setup executable file and follow the installer steps. NOTE: Installation must be performed by a user with administrative privileges. The installer will also create a desktop icon to launch the application. You may be asked to reboot your PC after installing Mirial Softphone, depending on current system status. 2.1. MINIMUM REQUIREMENTS (WINDOWS) For the Windows version, these are the recommended minimum requirements. Note that CPU requirements should be considered indicative and may be higher depending on your actual system software and hardware configuration. Video Calls (H.264 CIF RX, H.263 CIF TX) P4 class, 2.0 GHz Video Calls (H.264 CIF RX, H.263+ 4CIF TX) P4 class, 2.4 GHz CPU GPU RAM Hard Disk Space OS SW P4 class, 3 GHz Core 2 Duo class, 2.33 GHz Core 2 Duo class, 3.00 GHz Core 2 Quad class, 2.66 GHz Support for Direct3D 9 or OpenGL 1.1 512 MB 1 GB 30 MB Video Calls (H.264 720p RX, H.263+ 4CIF TX) or (H.264 4CIF RX, H.264 CIF TX) at 1280 Kbps Video Calls (H.264 720p RX at 2 Mbps, TX) at 1280 Kbps Video Calls (H.264 720p RX&TX) at 2 Mbps Video Calls (H.264 1080p 15fps RX&TX) at 1280 Kbps Hardware accelerated texture mapping is required for video calls Windows XP (recommended 1 GB) Windows Vista (recommended 2 GB) Excluding space for recorded calls Windows 2000 / XP / 2003 / Vista DirectX 9.0c or better Audio Device Fully DirectSound compliant Video Required to send live video. Capture Fully DirectShow compliant Device 64 bit operating systems are supported (80x86 architecture only) DirectX 10 is supported on Windows Vista. Device must support 48 KHz sampling rate for input and output Device must support one or more of the following color formats: RGB32, I420, YV12, YUY2, UYVY, HYDC, DV (IEEE-1394) DV cams connected via Firewire IEEE-1394 are supported on Windows XP or newer operating systems. NOTE: Audio input is not yet supported from DV cams. 5 www.mirial.com 2.1.1. CERTIFIED HIGH-END CONFIGURATION The following system components have been certified for Full-HD calls with the following parameters. x Bandwidth: 2 Mbps duplex x Video Codec: H.264 1080p, 30 fps x Audio Codec: G.722.1 Annex-C CPU Core 2 Q9550, 2.83 GHz ATI Radeon HD 3470 (OpenGL) GPU nVidia GeForce 8800GT (OpenGL) RAM 4 GB DDR2 400 MHz (dual channel) OS Vista x64 Audio Device Analog Devices SoundMax Integrated Digital HD Audio Video Capture BlackMagic Design Intensity Pro (PCIe) Device 2.2. MINIMUM REQUIREMENTS (MAC OS X) For the Mac OS X version, Mirial Softphone requires an Intel-based Mac with Mac OS X 10.5 (Leopard) or better. PowerPC processors are not supported. DV cams connected via Firewire IEEE-1394 are not yet supported on Mac OS X operating systems. 6 www.mirial.com Core 2 Duo class, 1.8 GHz CPU RAM Hard Disk Space Core 2 Duo class, 2.33 GHz Core 2 Duo class, 3.00 GHz Core 2 Quad class, 2.66 GHz 1 GB 30 MB Video Calls (H.264 720p RX, H.263+ 4CIF TX) or (H.264 4CIF RX, H.264 CIF TX) at 1280 Kbps Video Calls (H.264 720p RX at 2 Mbps, TX) at 1280 Kbps Video Calls (H.264 720p RX&TX) at 2 Mbps Video Calls (H.264 1080p 15fps RX&TX) at 1280 Kbps Recommended 2 GB Excluding space for recorded calls Mac OS X 10.5 (Leopard) or better Audio Device Any integrated audio device - All Apple iSight webcams - BlackMagic "Intensity" or "Intensity Pro" PCIe board - Sony EVI-HD3V and EVI-HD7V (via HDMI input to BlackMagic board) Certified - Microsoft LifeCam Cinema Video - Logitech Quick Cam Vision Pro (Recommended) Capture - Logitech Quick Cam Orbit AF Devices - Logitech Quick Cam 3000 - Logitech Pro 9000 - Webcam Deluxe HP (KQ246AA) - Webcam 2-Megapixel Autofocus HP (GJ502AA) - Creative VF0280 Live OS 7 www.mirial.com 3. CONFIGURATION When you start Mirial Softphone for the first time you may need to install a valid license and then configure it using the Configuration Wizard. In the next chapters you will find a thorough description on each configuration panel;; be sure to read it if you have doubts about how to configure a particular parameter. 3.1. LICENSE FILE Mirial Softphone will ask you to provide a valid license file if one has not yet been installed on your system, or your evaluation period has expired. If you have received your license file attached to an email, then save it into any local folder on your hard drive. When Mirial Softphone opens the popup window "Mirial License Installation": 1) Click on "OK". Mirial Softphone will open a window to let you browse your file system and find your license file. 2) Browse to the folder where you have saved your license file and select the license file. 3) Click on the "Open" button. 4) The license will be activated and Mirial Softphone will start. You can retrieve anytime your License ID number from the "About" tab in the Configuration panel. Here you can also change or upgrade your license by clicking on the "Change License" button. Be sure to provide your License ID to your reseller for any support request. After your license has been installed you may be prompted with the Configuration Wizard. All configuration panels are described below with important notes for application tuning. NOTE: Ask your system administrator or telephony service provider if you are not sure about some network or telecom protocol settings. 3.2. GENERAL SETTINGS Here you can set the general settings of your Softphone. Always on top: The Softphone will always stay on top of other running applications. Changing this setting requires the application to be restarted under OS X. Start at Login: The Softphone will be launched automatically when you log in to your computer. Auto answer: Incoming calls will be automatically answered. 8 www.mirial.com Auto accept call transfer/redirect: Incoming call transfers or redirects will be automatically accepted. To avoid infinite loops there is a limit of 10 consecutive redirects after which the call is rejected. Disable screen saver: Disable the system screen saver while Mirial Softphone is on call. Disable auto update: Do not prompt to update even if a new version is available. Choose Language: Current version supports English, Italian, German and Spanish. Changing this setting requires the application to be restarted under OS X. Graphics Processing: Windows only. Select the interface to the GPU device. Depending on your graphics device manufacturer, model and driver version either Direct3D or OpenGL will be the fastest and/or most reliable. Changing this setting requires the application to be restarted. NOTE: Some graphics drivers may have bugs causing slowdowns, graphics artifacts, or even application and system hangs. If you have problems with a graphics processing interface then try updating your video drivers to the latest stable version, or change to another graphics processing interface. 9 www.mirial.com 10 www.mirial.com 3.3. VIDEO This configuration panel allows selecting and configuring your video capture device. Device list: Select your video capture device. If the list is empty, check that your device is connected, switched on, and the driver has been installed. In case of problems, check if the device manufacturer has a newer driver. Driver Settings: Configure custom properties of your capture device. This button will open a new window containing specific settings for your video capture device. These settings are provided by the device driver and are different depending on manufacturer, model, and driver version. Some devices may not retain their settings after a system reboot. Refer to your device user manual for more information. NOTE: If you see a solid blue image when using a PCI capture board, use the Driver Settings to switch the input source. Advanced: Configure advanced video properties (see § 3.3.1 below). 11 www.mirial.com 3.3.1. Advanced video properties Here you can set advanced parameters for the video capture device. Video Capture Format: Capture resolution, frame rate and pixel format can be chosen from a ordered list showing all formats supported both by Mirial Softphone and the selected device. The default option "Auto" sets all these parameters accordingly with the current maximum video output format configured in the "Codec" panel (see § 3.5 below). o Capture Resolution: Bigger capture size will improve image quality especially for transmission of 4CIF format and above (see below). NOTE: Higher capture quality means higher CPU load. Also, depending on the actual resolution supported by your device and the transmitted video format, the captured image may be cropped or may have tiny black borders due to aspect-ratio conversion. o Frame Rate: Windows only. For capture devices which support a range of frame rates, one option is given for the maximum frame rate supported and, if supported by the device, two options are given for the standard frame rates of 29.97 Hz and 15.00 Hz. For capture devices which support fixed frame rates, one option is given for each rate. Select the desired capture frame rate which also limits the maximum call frame rate. The actual call frame rate may be different depending on the remote party phone capabilities and bitrate. NOTE: Higher frame rates mean higher CPU load. Also, increasing the frame rate on consumer webcams may degrade picture quality due to increased sensor thermal noise. Some USB devices may not correctly work or may capture a black image if set to 30 fps (this also depends on the resolution and other USB devices present on the bus). Some webcams may ignore the frame rate settings when set to auto- exposure;; try increasing room lighting to improve actual frame rate. o Pixel format: Windows only. For a given resolution-frame rate pair, all available pixel formats are shown in order of CPU power requirements. Different formats do not improve or degrade image quality and are provided only for compatibility with faulty capture devices. NOTE: Depending on your system speed and configuration, increasing the frame rate and/or capture resolution may cause Mirial Softphone to run out of CPU power and degrade its performance. See also § 4.3.1. Camera Denoise: All CMOS/CCD devices and especially consumer webcams have a certain amount of thermal noise. You may notice it on a steady image in the form of fast random speckles, different on each frame. Thermal noise increases in low-light conditions and with higher frame rates, and it may 12 www.mirial.com considerably degrade your video call quality. Mirial Softphone provides an adaptive denoise filter to mitigate this problem. Enable the external preview (see below) to check thermal noise and tune the denoise filter accordingly. The "Auto" setting automatically adjusts the filter, scanning each frame in realtime but you may prefer to tune the filter manually. NOTE: The denoise filter works by blurring out noise speckles. High levels of denoise filter may produce a very blurred overall image. You will have to choose between a more blurred image or a noisier one. In the latter case you may just prefer not to enable the denoise filter at all (which also saves CPU power). If you have a high quality video device you will not need the denoise filter. Default: Click on this button if you want to restore the default safe video settings. 13 www.mirial.com 3.4. AUDIO This configuration panel allows configuring audio capture and playback. Audio Input: Select your audio capture device. While you talk normally, you should see a green bar showing your voice level in realtime. If a clipped signal is detected, the input level will be automatically adjusted to avoid distortion. NOTE: If the Acoustic Echo Canceller is enabled, the input level will be automatically adjusted in real time also during the call. Audio Output: Select your audio playback device. You can click on the "Test Play" button to test the output volume. See also §4.4 (Acoustic Echo Canceller) and §4.5 (Audio Denoise Filter). 14 www.mirial.com 3.5. CODECS Here you can enable each media codec and video formats independently for receive (RX) and transmit (TX). The number of options present in this panel may vary depending on the license you have purchased. Check the "TX" box if you want to enable the encoder for transmission. Check the "RX" box if you want to enable the decoder for reception. NOTE: The H.264 encoder is disabled by default. Due to the computational demand of H.264, a fast CPU supporting SSE2 instructions is required for H.264 encoding. If SSE2 instructions are not supported by your CPU, you can not enable H.264 encoding. If you experience problems during a call, such as audio/video errors or delays, then try disabling the higher resolution video formats (4CIF, 720p and 1080p). If you still have problems, then disable the H.264 video codec both RX and TX. H.224 allows sending FECC (Far End Camera Control) commands which are used to move the remote party's camera. FECC commands are also used to navigate visual menus using the arrow keys (e.g. Codian MCU series). It is strongly recommended to leave H.224 enabled since this protocol does not impact on performance/bandwidth. See § 4.12 for more information about using FECC. 15 www.mirial.com H.239 and related advanced properties are described in detail in § 4.11.1. NOTE: It is recommended to disable H.239 if not required, since H.239 may require higher computational power and may cause incompatibilities with legacy equipment (especially when using the SIP protocol). 3.6. NETWORK This panel allows configuring Mirial Softphone for your network environment. Select Telephony Protocols: Enable or disable the telephony protocols supported by your license. Note that the RTSP protocol is client-only and cannot be used to connect to another Mirial endpoint. IP Network Settings: Configure settings for IP telephony protocols. Choose one of the presets or "Custom" if you want to customize your receive and transmit speeds to best suit your connection type. All values are specified in Kbps (units of 1000 bits per second). You can always override these settings for an outgoing call if you right-click on the dial button (see § 4.1). x Automatic Input Bandwidth Control: Allows Mirial Softphone to request the remote party to change its output bandwidth based on realtime network statistics. Enable this option if you are using an error-prone network connection like the public Internet. Note that some third-party endpoints may not support or ignore bandwidth change requests. 16 www.mirial.com x Advanced: If you have a firewall or your network is using NAT (Network Address Translation), you may need to configure the advanced network properties. See also § 3.6.1, § 5.1 and § 5.2. 3.6.1. Advanced network properties Here you can set advanced parameters for your network. Local IP Address: If you have more than one network adapter, here you can choose the IP Address that Mirial Softphone will use. Leave this set to "Auto" unless Mirial auto detection is not working or you want to specify a specific IP address. NAT IP Address: If you are using NAT, here you can specify the external NAT IP address. If you are not using NAT, set this field to "0.0.0.0" (i.e. no NAT). PSE.VAM Server: If a Mirial PSE.VAM (Video Answering Machine) server is available in your Network, you can specify its address to obtain automatic alerts about new incoming Video Messages for you (optional). PSE.VAM Prefix: If a Mirial PSE.VAM (Video Answering Machine) server is available in your Network, you can specify its prefix to call the service directly with a single click from the main window (optional). Port Range: you can limit the port range for both RTP traffic and TCP call control connections. This is only required if you need to configure a specific port range, typically when using a firewall. You should ask to your network administrator or service provider the correct values. Leave untouched if unsure. QoS: Windows only. This is the DIFFSERV value (from 0 to 63) for media packets sent by Mirial Softphone over networks supporting Quality of Service. Set to 0 (default) if unsure. For this feature to work, the user must have administrative rights, and Windows "QoS Packet Scheduler" item must be enabled for the current network interface. 17 www.mirial.com 3.7. SIP Here you can configure SIP related settings. This panel is only available if enabled by your Mirial license. SIP User: This is the SIP user part of your SIP URI. If you are using a Registrar, you can also override the default host or domain part of the URI used for registration by appending a "@" symbol to the SIP user followed by the host or domain (e.g. "[email protected]"). Local port: It is the local port used by Mirial (default value: 5060). This port is used for both the UDP and TCP transport. Display Name: Name to be displayed on the remote endpoint. SIP Media Encryption: Choose among "Disabled", "Enabled", or "Required". "Disabled" specifies that Mirial Softphone will negotiate only unencrypted media;; "Enabled" specifies that encryption will be used when it is available on far-site endpoints. "Required" specifies that Mirial Softphone will negotiate only encrypted media. NOTE: If you select "Required", then unencrypted media will be rejected. If all media are rejected the call will be dropped. Registrar: Hostname or IP address of the Registrar you want to register to. Use Outbound Proxy: Check this box to use an Outbound Proxy. Proxy: Address or hostname of the Proxy you want to register to (usually the same as your Registrar, see the note below). 18 www.mirial.com Forced Routing: This parameter forces routing of new requests through the Proxy even if the destination peer may be directly reachable. This is done adding a pre-loaded route as recommended in RFC-3261. Enable this option if you have problems placing calls. NOTE: Many SIP services use a Proxy-Registrar (both Registrar and Proxy on the same host). If your provider refers to a "Proxy-Registrar" or in general to a "SIP Server" then you should enable and configure identically both the Registrar and the Proxy, using the same host and port number. 3.7.1. SIP Advanced Settings Here you can set the Advanced SIP Settings: Transport: Enable the UDP and/or TCP transport for outgoing SIP requests. Incoming requests will always be accepted on both protocols regardless of this setting for compliance to RFC-3261. Note that Microsoft Live Communication Server (LCS) only supports TCP. If more than one protocol is enabled, Mirial Softphone will perform the standard transport selection procedure. However, for compatibility with some nonstandard third-party equipment, you may have to enable just one of the supported protocols (see below). Authentication: The default authentication credentials (Username and Password) to access the SIP service. The Username is usually the same as your SIP User, but may be different. Mirial Softphone supports Digest, Kerberos and NTLM authentication challenges. If an authentication realm is in the route path for which the default credentials are not valid, Mirial Softphone will open a popup requesting additional credentials. Enable presence: Check this box if you want to allow incoming and outgoing SIP presence events. RFC-3581 UAC: Check this box if you want to enable SIP RFC-3581 UAC behavior for SIP signaling NAT traversal. Call Establishment Timeout: Increase this value if you have problems connecting calls using external gateways (like PSTN) which may require a long time for the call to be connected. The default value is 32 seconds as per RFC- 3261. NOTE: It is strongly recommended to have both TCP and UDP enabled unless you need to register Mirial Softphone with Microsoft LCS. If you need to register with a LCS server, you must enable the TCP transport and disable any other transport. Also, your system should be part of the LCS domain. NOTE: Some SIP terminals may not support TCP signaling even if this is not compliant with SIP standard RFC-3261. For compatibility with these terminals, you should only enable UDP and disable any other transport. Also disable any unneeded codec and video format in the "Codec" configuration panel so that any SIP message will fit in a single UDP packet. 19 www.mirial.com 3.8. H.323 Here you can configure H.323 related settings. This panel is only available if enabled by your Mirial license. H.323 Name: It is the alias you choose (do not use spaces). Phone number: It is your phone number (E.164 standard). Use Gatekeeper: Check this box to use a Gatekeeper (otherwise it is possible to place direct IP calls only). Use Gateway: When not using a Gatekeeper, you can configure a default H.323 Gateway for all H.323 calls. Gatekeeper autodiscovery, if you check this box Mirial Softphone will try to find an available Gatekeeper in your network. If you have more than one Gatekeeper on your network, you should disable this function and specify the Gatekeeper. Gatekeeper (Name or IP): Use this field to specify the host and port of the Gatekeeper you want to register to. If your Gatekeeper has a RAS port 20 www.mirial.com different from the default port 1719, then type a semicolon and the port number after the host (e.g. "mygatekeeper:port"). Disable Early H.245: Leave this option checked to improve compatibility with some non-standard network equipment. H.245 tunneling: Choose among "Disable", "Accept", or "Accept & Propose". Select "Disable" unless H.245 tunneling is required. NOTE: If you want to place a call through an external H.323 Gateway and you have not configured a default Gateway, just dial "h323:alias@gateway", where "alias" is the alias or number of the party you want to call, and "gateway" is the IP or hostname of the H.323 Gateway. 3.9. ABOUT Here you can view your Mirial Softphone release number (useful for technical support) and license information. You can also change your license by clicking on the "Change License" button. This will open a file requester to select the new license file. The new license will be applied the next time Mirial is started. The old license file will be renamed as "mirial.bak". 21 www.mirial.com 4. 4.1. RUNNING DIAL A CALL Just click on the MIRIAL icon on your desktop to launch Mirial Softphone. Type the remote party phone number, name, or IP address, in the dial input field and then press ENTER or left-click the "Call" button next to it to start a call. While on call, the same button will be colored in red and will hang up the call. If more than one VoIP protocol is enabled, Mirial Softphone will analyze the dialed number and automatically select a protocol depending on the dialed string. You can also specify which protocol the call will use by prefixing one of the following: "h323:" To force the H.323 protocol. "sip:" To force the SIP protocol. "rtsp:" To force the RTSP protocol. If the forced protocol is not enabled, the call will fail. For example, dialing "h323:1234" will place a H.323 call to "1234". You can also right-click on the "Call" button to open a bandwidth-selection popup;; the inserted bandwidth values will be used for that single outgoing call instead of the default ones defined in the Network configuration panel: Video calls may also be shown in full screen mode by clicking the full screen button on the upper right angle of the main window, or pressing the ESC key, or just double-clicking on the incoming video window. In full screen mode the video sent to remote party is displayed in a picture-in-picture window, draggable in any part of the screen using the mouse. Press again the ESC key to return to windowed mode. 22 www.mirial.com 4.2. CALL CONTROL Mirial Softphone supports up to two lines, depending on your license. If your license supports two lines, the interface will include line selectors and LED status indicators above the dial input field. To select a line, just click its label or LED. The selected line is the one with its label underlined and a little triangle below. In full-screen mode you can also press F1 to activate Line-A and F2 to activate Line-B. The currently selected line is the active line. Any Mirial Softphone action (e.g. Hang- Up) is performed on the active line. LED status indicators colors are described in the following picture. 4.2.1. Call Hold If a line is currently connected, switching to another line will set it On Hold (unless "3-Party" mode is active, see § 4.2.3). 23 www.mirial.com While a remote party is On Hold, Mirial Softphone will send "hold music" and a "hold slide". No live audio and video is sent, and any media received from the remote party will be ignored. To resume a call On Hold, just switch back to its line. 4.2.2. Call Transfer Click on the "Call Transfer" button to transfer a call. Two kinds of call transfer are supported: Blind Transfer: Mirial will require you to type the transfer destination. Attended Transfer: Mirial will transfer the remote-party on the active line to the remote party on the other line. Mirial will always perform an Attended Transfer if both lines are connected, unless you click on the "Transfer" button using the right-mouse button. NOTE: Some third-party endpoints do not support call transfer. Call transfer may fail if not supported by any of the involved endpoint, or if the transfer destination rejects it. 4.2.3. 3-Party Conference Mirial Softphone allows audio and video conferences with up to three parties (including yourself). This feature is only present if your license allows two lines. You can enter 3-Party Conference mode when both Line-A and Line-B are connected. Just click on the "3-Party" button. When in 3-Party mode, both Line-A and Line-B LEDs will be green. In this mode Mirial Softphone will take care of mixing audio and compositing video streams so that each of the three parties can hear and see the other two. The picture-in-picture area displaying the video received from third party endpoint can be moved to any part of the video window using the mouse. You can still switch between Line-A and Line-B depending on which party you want to see in more detail. In full-screen mode press the F1 key to activate Line-A or the F2 key to activate Line-B. To exit 3-Party Conference mode, click again on the "3-Party" button, or press F5 in full-screen mode. 24 www.mirial.com NOTE: 3-Party Conference mode requires enough CPU power to fully process two concurrent calls instead of a single one. 4.3. HEAD UP DISPLAY (HUD) Mirial Softphone will overlay some information on the main video window. Warning types are described below, along with their icon and verbose text message. The text message only appears the first time the warning occurs for each call;; subsequent occurrences will only flash the icon. 4.3.1. CPU SATURATION WARNING This warning is displayed when there is not enough processing power to handle current active calls as per user settings. NOTE: If your system has more than one CPU, you may see this warning even if not all CPUs are totally saturated. This is because some Softphone processing functions cannot be scaled on multiple CPUs. Prolonged CPU saturation will cause packet-loss, video stutters, video artifacts, lip- sync issues and audio drops. When CPU saturation is detected, Mirial Softphone will take countermeasures to improve the communication quality such as decreasing transmitted video resolution, framerate and bitrate. Note that depending on configured user settings and on current system usage by other applications, it might not be possible to completely avoid transmission errors. If you experience prolonged CPU saturation while in a call, you should try the following: Close any other application with high CPU usage. Configure your webcam to capture a smaller video resolution, and/or lower frame rate. Reduce maximum Receive and Transmit bitrates in the "Network" panel. Reduce maximum RX and TX video formats in the "Codecs" panel. Disable H.264 TX in the "Codecs" panel. If this only happens during a presentation, disable H.239 in the "Codecs" panel and/or use "Video Sharing" instead of "H.239 Presentation". 4.3.2. HIGH PACKET LOSS WARNING This warning is displayed when incoming media streams have a packet loss greater than 2%. If your Softphone has two lines (Line-A and Line-B) the corresponding letter ("A" or "B") will be present in the icon. 25 www.mirial.com NOTE: If you are also experiencing the "CPU SATURATION" warning, the packet loss may actually be caused by your system dropping incoming packets due to CPU saturation. In this case you should first try to solve the CPU saturation problem (see § 4.3.1). Packet-loss will cause video stutters, video artifacts and audio drops. If you experience prolonged high packet loss condition, you should try the following: Enable "Automatic Input Bandwidth Control" in the "Network" panel. Reduce maximum Receive bitrate in the "Network" panel. 4.3.3. MEDIA ENCRYPTION NOTICE This notice is displayed on call start when the media streams are encrypted. If your Softphone has two lines (Line-A and Line-B) the corresponding letter ("A" or "B") will be present in the icon. If not all active streams are encrypted, an additional text message displays an identifier for each encrypted stream (both input and output): "A" for AUDIO, "V1" for primary VIDEO, "V2" for H.239/presentation, "D" for DATA. The icon and the additional text message are displayed also when the encryption state of one or more streams change. 4.4. ACOUSTIC ECHO CANCELLER (AEC) The "AEC" button is on the lower right corner of the main window. If the button is green, then the AEC is enabled. You should enable the AEC only when you are using loudspeakers, either internal or external. NOTE: Always keep the AEC disabled when you are wearing headphones for maximum audio quality and minimum CPU load. 26 www.mirial.com The AEC will remove the remote party voice from your microphone input so that the remote party will not hear his voice back. If instead you are hearing your voice back, then it is the remote party's AEC which is not enabled or not correctly working. NOTE: When the AEC is active, the microphone level (MIC control) is automatically adjusted in realtime according to estimated environment parameters. If your AEC is not performing as expected (i.e. the remote party is hearing his voice back), you may try the following: Decrease your speakers volume Decrease your microphone gain Move the microphone farther from the speaker If available, use another audio input device as microphone input (e.g. the webcam microphone instead of the PC microphone or vice-versa). If none of the above works, then pragmatically turn off the AEC and use headphones instead of the speakers. Normal headphones without integrated microphone are also ok. 4.5. AUDIO DENOISE FILTER (DEN) The "DEN" button is on the lower right angle of the main window. You should activate the Audio Denoise Filter when you or the remote party experience background noise (hiss, hum, et cetera). The Audio Denoise Filter will remove background noise both from input and output audio at the cost of a little more CPU load. 4.6. PRIVACY MODE (VIDEO OFF) If you do not want to send your local video (privacy mode) you can click on the "Video Off" button or simply press the spacebar on the keyboard. The other party will still receive your audio but he will see a privacy mode video slide instead of your live video. 4.7. RECORDING A CALL You can record calls. If you wish to record a call, just press the "Record" button on the local view window. When you start recording the call, the remote party is notified by a "REMOTE PARTY IS RECORDING THIS CALL" message overlay on the received video;; this message is overlaid until you stop recording. 27 www.mirial.com If you wish to playback previously recorded calls, just click on the "Recorded Calls" button to open the VCR panel (see §4.10). 4.8. CONTACTS You may manage users contacts in your personal contact list clicking on the "Contacts" button . SIP presence status (if enabled) will be shown in the "Status" column, and the contact color will change accordingly. You can add, edit or delete a contact by selecting it and then pressing the corresponding button. Adding or editing a contact will open the "Edit Contact Information" window. 28 www.mirial.com Note that the "Name" field and at least one of "H.323 Alias", "SIP URI", "Mobile" are required. 4.9. CALLS LOG Incoming, outgoing and missed calls are reported into your calls log . You can see dialed numbers, date, time and call durations. Color scheme is: Blue: Outgoing calls. Green: Incoming calls (answered). Red: Incoming calls (missed). You can double-click on any list entry to place a call to the remote party. 29 www.mirial.com 4.10. VCR - RECORDED CALLS PLAYBACK "Recorded Calls" button is used to access the recorded calls list. A recorded call can be played, renamed or deleted;; it is also possible to add a short description to it and save the file as a Windows Media Video. 30 www.mirial.com 4.10.1. Playback a call To replay a selected call just press the Play button or double-click on the entry to open it inside a new recorded call window. The local video is shown on the left, while the remote video is on the right. The local video displays the same video stream originally sent to the remote party, thus it will include any recording overlay. If a H.239 presentation has also been recorded (§4.11.1), an additional "Presentation" window will be open. NOTE: You may open more than one playback window at the same time, however the playback function is CPU intensive and simultaneous playback of more than one call may result in video/audio artifacts if the system CPU is not powerful enough. 4.10.2. Export a call to a video file The "Export" function performs transcoding of the recorded call to either a Windows Media Video file (Windows version) or Quicktime file (Mac OS X version). Regardless of the original video resolution, the file produced is a double width CIF video format (704x288 pixels) and contains a Mirial logo overlay. NOTE: The transcoding process is CPU intensive. It is not recommended to perform WMV transcoding while in a call. NOTE: Exporting of a recorded H.239 presentation is not yet supported. 4.11. PRESENTATION Mirial Softphone allows sending the content of a local application window as a presentation to the remote party. Open the "Presentation" button by clicking on the button during a call. 31 www.mirial.com There are two different presentation modes: "H.239 Presentation" and "Video Sharing" which are described below. The best available presentation mode will be automatically selected when opening the "Presentation" window. You may change the presentation mode if desired and then click on an application in the list to start your presentation. The selected application window will remain on top of any other window while the presentation is in progress. This is to allow the window content to be captured in its entirety. If you move your mouse over the application window, a red arrow pointer will be overlaid by Mirial on the output video to simulate your mouse pointer. 4.11.1. H.239 Presentation If you have enabled H.239 in the "Codecs" panel and the remote party supports ITU- T H.239 (H.323) or RFC-4796 (SIP), then the "H.239 Presentation" mode is available. This presentation mode allows a very high-resolution additional video channel for the presentation, in addition to the live video channel so that the speaker remains visible while performing the presentation. Note that in H.323 only one party can be performing a H.239 presentation at one time, while in SIP (emulated H.239 using RFC-4796) any party can be performing a presentation at the same time. When sending a H.239 presentation, the local live video is moved in the incoming video window as a draggable picture-in-picture box, while the H.239 presentation is show in the local video window. When receiving a H.239 presentation, a new resizable window will open to show the remote presentation content. 32 www.mirial.com The remote presentation content is usually sent at high-resolution (Mirial Softphone supports up to 1280x768). The content size is shown in the window title bar. You can resize the window clicking on it and pressing the '+' and '-' keys, resize the window using the mouse or expand it full-screen. The H.239 video codecs and resolutions are totally independent from the live video codecs and resolutions. H.239 codecs and bandwidth can be configured in the "Codec" panel, "H.239 Adv." button. In the following example picture, H.239 has been configured to allow both H.263 and H.264 codecs, both RX and TX. While the presentation is active, the total output video bandwidth will be partitioned: 70% for the H.239 presentation and 30% for live speaker video. 33 www.mirial.com There is no configuration for H.239 video formats since Mirial Softphone will automatically select the highest available size to transmit the presentation video. 4.11.2. Video Sharing If "H.239 Presentation" is not available, or you manually select "Video Sharing" as the presentation mode, Mirial Softphone will send the presentation content instead of the local live video. You may adjust the size of the window to best suit the output proportion and make ant text readable. In this mode the presentation video will use the same resolution of the live video, therefore it is recommended to enable at least the 4CIF Video Format in the "Codecs" panel. Video Sharing in 4CIF or HD resolution is recommended for best results if your system is powerful enough to support it (see § 3.5). When you want to stop Video Sharing, just press again the "Collaboration" button to close the Video Sharing window. 4.12. FAR END CAMERA CONTROL The FECC protocol (H.281 over H.224) allows controlling a remote camera or navigating visual menus (e.g. Codian MCU). FECC is supported both in SIP and H.323. Mirial can both send and receive FECC commands. Note however that there is still no support for webcams with motors, therefore receiving FECC commands from the remote party has no effect. NOTE: For FECC to be functional the H.224 protocol must be enabled in the Codec configuration panel and it must be supported by the remote endpoint. To send FECC commands use the following keys: Cursor Left: PAN LEFT Cursor Right: PAN RIGHT Cursor Up: TILT UP Cursor Down: TILT DOWN Page Up: ZOOM IN Page Down: ZOOM OUT Home: FOCUS IN End: FOCUS OUT 34 www.mirial.com 4.13. CALL STATISTICS A minimalist real-time call statistics window can be shown or hidden while in a call by pressing the "S" key. Each slot contains a media channel (if open): AI: Audio Input channel. VI: Video Input channel (primary). VI2: Video Input channel (secondary/H.239). DI: Data Input channel (not yet supported). AO: Audio Output channel. VO: Video Output channel (primary). VO2: Video Output channel (secondary/H.239). DO: Data Output channel (not yet supported). 35 www.mirial.com The text line above each slot displays in order: Media channel name (AI, VI, AO, VO, DI, DO). Will be in red color if the channel is encrypted. codec@maxbitrate/negobitrate (units of 100 bps). RTP Payload Type. UDP/TCP port (local for input, remote for output). Current video resolution and frame rate. RTP clock frequency. Encryption status. Will display an uppercase 'S' if the channel is encrypted. Current codec payload bitrate in bits per second (BR). Current transport overhead bitrate in bits per second (OvBR). Percentage of lost packets during last 2 seconds. The graphics show: BLUE: Codec payload bitrate. CYAN: Codec overhead bitrate. MAGENTA: Bitrate change requests. YELLOW: Fast update requests. RED: Decode errors (only for input channels). 4.14. RESIZABLE GUI The main window can be resized by dragging the resize handle (bottom right corner) using the left mouse button or by pressing and holding the right mouse button down on any point of the background and then moving the pointer. The left and top borders will not move while the right and bottom borders will move accordingly. Contacts, Calls Log, VCR and Presentation windows can be vertically resized in the same manner while theirs width is tied to the width of main window. The minimum size for all windows is the same as previous (non-resizable) releases of the program. Window sizes are always saved and restored on next application restart. 4.15. COMMAND LINE PARAMETERS Mirial Softphone can be started minimized using the following command line parameter: --minimized If Mirial Softphone is already open, launching another instance will send its command line parameters to the first one. This can be used to control the running instance: !!!q quit. !!!m minimize. 36 www.mirial.com callto://address mirial://address address start a call to address on the active line. start a call to address on the active line. start a call to address on the active line. All command line parameters are case sensitive. Note that on Windows the full path leading to Mirial Softphone executable must be quoted while on MAC OSX all spaces must be escaped and all parameters must be passed between primes. For example, on Windows you can minimize a running application instance typing: "C:\Program Files\DyLogic\Mirial\bin\Mirial.exe" !!!m On Mac OSX, to do the same operation type: /Applications/Mirial\ Softphone.app/Contents/MacOS/Mirial\ Softphone '!!!m' 4.16. DTMF TONES Mirial Softphone supports two DTMF forwarding modes: In Band and Out of Band. Using In Band mode, you are able to send DTMFs to the remote party as audible tones over the audio channel. Therefore, the audio channel must be opened and active. The dialed tones are heard only by the remote user. Using Out of Band mode, you are able to send DTMFs in a separate data channel. The tones are not heard by any user (both local and remote). When you are on call, Mirial Softphone allows you to use the dial pad in order to forward DTMF tones. Left-clicking on the buttons DTMFs are sent using automatic detection of remote DTMF mode: Out-of-Band if the remote endpoint supports it, In-Band otherwise. Right-clicking on the buttons DTMFs are forcefully sent using the In-Band mode. 37 www.mirial.com 5. FIREWALL AND ROUTER CONFIGURATION This chapter provides information on how to configure firewalls and NAT routers. 5.1. FIREWALL 5.1.1. Windows XP system firewall The Windows XP firewall available since Service Pack 2 requires no configuration. The first time you start Mirial, the system will open a popup window asking you if it should keep blocking Mirial. Press the "Unblock" button to allow Mirial to traverse the firewall. 5.1.2. Other system software firewall If you have installed other software firewalls, you will probably be prompted with popups similar to the one described in § 5.1.1. Please refer to your software firewall user manual to check how to enable a program traverse the firewall. 5.1.3. Generic/External firewall equipment If you are using H.323 the following ports must be enabled on the firewall: 1718 UDP (If Gatekeeper discovery is required). 1719 UDP (Gatekeeper RAS). 1720 TCP (Call Signaling). nnnn...mmmm UDP (RTP port range configured in Mirial Network configuration panel). Configured RTP port range may be as small as 4 port but at least 64 ports are recommended. xxxx...yyyy TCP (Call Control port range configured in Mirial Network configuration panel). Configured Call Control port range may be as small as 1 port but at least 16 ports are recommended. If you are using SIP the following ports must be enabled on the firewall: 5060 UDP and TCP (May be different if the default "Local port" configured in the Mirial SIP configuration panel has been changed). nnnn...mmmm UDP (RTP port range configured in Mirial Network configuration panel). Configured RTP port range may be as small as 4 port but at least 64 ports are recommended. xxxx...yyyy TCP (Call Control port range configured in Mirial Network configuration panel). Configured Call Control port range may be as small as 1 port but at least 16 ports are recommended. 5.2. ROUTER Note that many routers also have firewall capabilities. Please refer to § 5.1.3 to configure your router firewall. 38 www.mirial.com 5.2.1. Router with DMZ Host If your router has a "DMZ Host" configuration, enable the "DMZ Host" and configure the private IP field of the DMZ Host to be the private IP used by your PC running Mirial. SECURITY WARNING: Depending on the router brand and model, the DMZ Host may be exposed directly to the Internet without router firewall protection. Check your router manuals for more information. 5.2.2. Generic Router If your Internet router is using a public IP address which is different than the one assigned to the PC running Mirial (i.e. using NAT), you will have to: In Mirial configuration panel (Network->Advanced), type your router IP address in the "NAT IP Address" field In Mirial configuration panel (Network->Advanced), set your "Local IP Address" selecting the IP address which is in the same LAN as your router. Configure your router to redirect to your PC (i.e. "Local IP Address") all network traffic incoming to the same ports listed in § 5.1.3. 39 www.mirial.com www.mirial.com © 2011 Mirial - All rights reserved. No part of this work may be reproduced, stored in a retrieval system, adopted or transmitted in any form or by any means, electronic, mechanical, photographic, graphic, optic recording or otherwise, translated in any language or computer language, without the prior written permission of MIRIAL. Due care has been taken to make this Document as accurate as possible. However, MIRIAL makes no representation or warranties with respect to the contents hereof and shall not be responsible for any loss or damage caused to the user by the direct or indirect use of this Document. Furthermore, MIRIAL reserves the right to alter, modify or otherwise change in any manner the content hereof, without obligation of MIRIAL to notify any person of such revision or changes. All company and product names are trademarks of the respective companies with which they are associated. 40