1
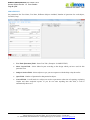
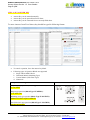
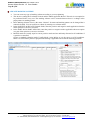
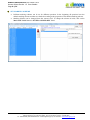
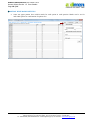
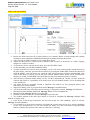
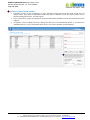
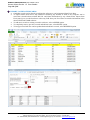
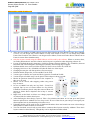
Addmen OMR Software User Guide v13.1 Answer Sheet Checker & Form Reader Page 1 of 16 CERTIFIED ISO 27001 : 2005 TABLE OF CONTENTS TOPIC PAGE 1. INSTRUCTIONS FOR INSTALLATION …. 2 2. UNDERSTANDING OMR ANSWER SHEETS …. 3 FILLING OF OMR ANSWER SHEETS WHAT IS ACCEPTED WHAT IS NOT ACCEPTED …. 3 …. 4 …. 4 5. STEP 1 > DEFINE TEST SUBJECT MASTER CREATE TEST …. 5 …. 5 …. 6 7. STEP 2 > SET ANSWER KEY CREATE MARKING SCHEME SET MARKING SCHEME OPTION WISE MARKS …. 7 …. 8 …. 9 …. 10 6. STEP 3 > READ SHEETS …. 11 8. STEP 4 > VIEW RESULTS EXPORT TO EXCEL OR OTHER DATA FORMAT CREATE PDF’S SEND SMS OR EMAIL ENTER CANDIDATE RECORD INPORT CANDIDATE RECORD …. 12 …. 12 …. 12 …. 12 …. 13 …. 14 9. DESIGN SHEET LAYOUT …. 15 10. UPLOADING RESULTS ON WEBSITE …. 16 Development Office: C 904, Eisha Bella Vista, Near Sai Service Centre, Kondhwa, Pune – 411048 (MS) Registered Office: 134, Indramani Nagar, Race Course Road, Gwalior – 474005 (MP) Ph.: 09229113500, 08411906600 Email: [email protected] Website: www.admengroup.com Addmen OMR Software User Guide v13.1 Answer Sheet Checker & Form Reader Page 2 of 16 CERTIFIED ISO 27001 : 2005 INSTALLATION OF OMR SOFTWARE 1. Use a fresh virus free Windows PC with MS Word and keep ready with good (broadband) internet connection for training. 2. Make a folder on Desktop and place all the downloaded and contents in it as guided below on this page. 3. Visit the Url: http://www.admengroup.com/support.htm From this Support Panel, you can download any required components mentioned below. The latest copy of this User Guide can also be downloaded from the Support Panel. 4. Download OMRSETUP.ZIP . Unzip and run the file. It will not ask for any options and complete the setup in one click. The default location of installation is C:\ADDMEN which can be changed if desired. 5. After installing the setup, ADDMEN folder is created in the location you selected (C:\ADDMEN) and required shortcuts are formed at the Desktop and Programs Menu. NOW THE SOFTWARE IS READY TO RUN. 6. Attach the USB Lock sent to you on an active USB port on your machine. The lock is a plug and play device and needs no driver installation. 7. Run the OMR/QPG Software using the shortcut given on the desktop. 8. If the software installed with the setup is not working with your Hardware lock, please carefully read the messages given. And if required contact technical support. You can obtain Updated Technical Support Team contact Nos. and Desktop Sharing utility link at www.admengroup.com/support.htm PLEASE CHECK THAT YOU HAVE FOLLOWED ALL INSTRUCTIONS GIVEN ABOVE BEFORE CALLING. PLEASE DO NOT CALL MARKETING NUMBERS FOR SETUP & TRAINING. +91-8805707333, 9229113577, 8411906655 FOR EXISTING USERS If you are an existing QPG User and wish to format your machine or reinstall the software, first take a backup of existing ADDMEN folder in a CD. Run the setup as explained above. ADDMEN folder will be created at C:\. This is a blank folder with no data as it has been freshly installed. Delete this newly created ADDMEN folder and replace it with your existing backup of ADDMEN folder. Development Office: C 904, Eisha Bella Vista, Near Sai Service Centre, Kondhwa, Pune – 411048 (MS) Registered Office: 134, Indramani Nagar, Race Course Road, Gwalior – 474005 (MP) Ph.: 09229113500, 08411906600 Email: [email protected] Website: www.admengroup.com Addmen OMR Software User Guide v13.1 Answer Sheet Checker & Form Reader Page 3 of 16 CERTIFIED ISO 27001 : 2005 UNDERSTANDING OMR ANSWER SHEETS An OMR sheet has 5 main components: Index Points These 4 points provided at the 4 corners of the OMR sheet are the most important components of an OMR sheet. The evaluation and accuracy of evaluation depends on the clarity of these 4 points in the scanned OMR sheet image. Test ID Block This block bears the value of the Test ID which we are checking. Test ID is required on the sheet to identify which set of correct answers to use for the evaluation of this sheet and how to distribute the marks into different subjects. Candidate ID Block This block bears the unique value of the Candidate ID which is required to identify to which candidate this answer sheet belongs and in whose academic account the marks should be credited. Answer Blocks This area contains option circles in front of each question. This is the target area to be evaluated. Title Box This is a blank area which can be customized according to your requirements, the logo and name of the institute and the column for candidate information can be printed within this area. Only the sheet layouts created using the OMR Software should be used. No other self-designed layouts will be recognized. On a sheet of 100 questions you can take a test of any number of questions up to 100. Same is applicable for other formats. FILLING OF OMR ANSWER SHEETS In order to take a test on an OMR sheet, first the test should be defined and the Test ID so generated should be We assume that unique Candidate ID has already been allocated to all the students appearing in the test. OMR Test Checker accepts maximum up to 10 digits for Candidate ID and 8 digits for Test ID fields. In case a Test ID or a Candidate ID has a lesser number of digits, it should be filled from the right in accordance with If a Test ID or a Candidate ID with say 4 digits is filled in the starting 4 columns leaving the fifth column blank, it will still be accepted, though it is not rightly suggested. The OMR software reads the numerical columns from top to bottom, thus if more than one darkened circle is encountered in one numerical column, the system prompts for the mistake. If the error prompt is suppressed and digits 6 and 7 both are filled where the correct ID was 1078, it will be read as 1068. Same is applicable for the Test ID field on the OMR sheet. FOR SAMPLE RUN: Fill Test ID 000001 (same in all 5 sheet prints), and fill different Candidate IDs in each sheet print. Development Office: C 904, Eisha Bella Vista, Near Sai Service Centre, Kondhwa, Pune – 411048 (MS) Registered Office: 134, Indramani Nagar, Race Course Road, Gwalior – 474005 (MP) Ph.: 09229113500, 08411906600 Email: [email protected] Website: www.admengroup.com Addmen OMR Software User Guide v13.1 Answer Sheet Checker & Form Reader Page 4 of 16 CERTIFIED ISO 27001 : 2005 WHAT IS ACCEPTED? WHAT IS NOT ACCEPTED? Circles marked with Pen or Pencil or both on the A scanned sheet in which all the 4 Index points same sheet are not visible clearly Light Circles and Dark Circles on the same sheet A sheet in which there is dirt or line at the edge of the image, which is comparable in width to Partially filled circles, even a tick mark in the half the width of index points option circle A sheet which has been scanned upside down Spilled out circles Any sort of dirt, scratch or line between the A distorted photocopy of the original sheet format circles A sheet not scanned as per the specifications Slightly tilted scanned image of the OMR sheet Modulated and transformed image files Improperly/light printed OMR sheets Files stored on a CD or any other 'Read Only' Any design layout in the Title Box storage Circles not neatly rubbed to change answer Development Office: C 904, Eisha Bella Vista, Near Sai Service Centre, Kondhwa, Pune – 411048 (MS) Registered Office: 134, Indramani Nagar, Race Course Road, Gwalior – 474005 (MP) Ph.: 09229113500, 08411906600 Email: [email protected] Website: www.admengroup.com Addmen OMR Software User Guide v13.1 Answer Sheet Checker & Form Reader Page 5 of 16 CERTIFIED ISO 27001 : 2005 STEP 1: DEFINE TEST SUBJECT MASTER Replace Subject1-Subject5 with the subjects in your institute. Remember the subject names must be entered in the same sequence in which you plan your test e.g. Physics, Chemistry, Maths or Economics, Law, Statistics etc. In Topics Master you can create multiple Topic Tags. For e.g. if Subject is Physics, Topics can be Light, Sound, Electricity etc. One test can contain maximum 5 Subjects. If there are more than 5 sections required, multiple Topic Tags are useful. Development Office: C 904, Eisha Bella Vista, Near Sai Service Centre, Kondhwa, Pune – 411048 (MS) Registered Office: 134, Indramani Nagar, Race Course Road, Gwalior – 474005 (MP) Ph.: 09229113500, 08411906600 Email: [email protected] Website: www.admengroup.com Addmen OMR Software User Guide v13.1 Answer Sheet Checker & Form Reader Page 6 of 16 CERTIFIED ISO 27001 : 2005 CREATE TEST Set parameters like Test Name, Test Date, Different Subjects included, Number of Questions for each subject, Cut-Off (if any). Test Tittle [Duration] Field - Insert Test Title. (Example:- SAMPLE TEST) Sheet Layout Field - Select Sheet Layout according to the design which you have used for this particular Test. Subject/ Section Field - Select subjects as per your test sequence with the help a drop down list. Ques Field - Number of Question for that particular subject. Cut Off Field - Cut off marks in a subject are used as a parameter at the time of reporting or plotting Graphs and other analytical reports. If you do not enter anything into this field, it will be automatically taken as 0. Development Office: C 904, Eisha Bella Vista, Near Sai Service Centre, Kondhwa, Pune – 411048 (MS) Registered Office: 134, Indramani Nagar, Race Course Road, Gwalior – 474005 (MP) Ph.: 09229113500, 08411906600 Email: [email protected] Website: www.admengroup.com Addmen OMR Software User Guide v13.1 Answer Sheet Checker & Form Reader Page 7 of 16 CERTIFIED ISO 27001 : 2005 STEP 2: SET ANSWER KEY Answer Key can be entered manually. Answer Key can be pasted from Excel Sheet. Answer Key can be extracted from a correctly filled sheet. To enter Answers from Excel sheet, they should be typed in following format: To cancel a question, leave the answer key blank. Following types of Question Blocks are supported a. Single Choice/Multi Choice b. Horizontal Matrix (Matching Type) c. Vertical Matrix (True/False Type) d. Numerical Sample answer string: SCQ/MCQ type question (Block Type GENERAL ) : A, AC, BCD Integer type question (Block Type NUMERIC): 9, 23, 0346, 346 Matching (4x5) type question (Block Type X-MATRIX) : XXRXX-XXXXT-XQXXX-PXRXX True/False(2x5) type question (Block Type Y-MATRIX): XQ-PX-XQ-XQ-PX Development Office: C 904, Eisha Bella Vista, Near Sai Service Centre, Kondhwa, Pune – 411048 (MS) Registered Office: 134, Indramani Nagar, Race Course Road, Gwalior – 474005 (MP) Ph.: 09229113500, 08411906600 Email: [email protected] Website: www.admengroup.com Addmen OMR Software User Guide v13.1 Answer Sheet Checker & Form Reader Page 8 of 16 CERTIFIED ISO 27001 : 2005 CREATE MARKING SCHEME: You can create any type of marking scheme according to your test planning. This involves setting the Evaluation Criteria and the Marks applicable thereof. This task is not required to be performed before every test. The marking schemes can be created whenever there is a change in the paper pattern or marking pattern. Basic Marking Scheme exists by the name “General”. Its name and marking pattern can be changed but it cannot be deleted. You can create new scheme by entering new scheme names. In the POSITIVE & NEGATIVE Marks fields, enter the positive and negative marks applicable when the entire question is correct or incorrect. In the PART POS & PART NEG fields, enter the positive or negative marks applicable when one option or a part of the question is correct or incorrect. BONUS marks are usually equal to correct positive marks and are uniformly allocated to all candidates if a question is cancelled. Choose a standard evaluation mode. Usually Mode 3 suits MCQs as it is the super set of all conditions. Mode 2 is suited where partial or proportional marking is applicable like in matrix matching questions. Development Office: C 904, Eisha Bella Vista, Near Sai Service Centre, Kondhwa, Pune – 411048 (MS) Registered Office: 134, Indramani Nagar, Race Course Road, Gwalior – 474005 (MP) Ph.: 09229113500, 08411906600 Email: [email protected] Website: www.admengroup.com Addmen OMR Software User Guide v13.1 Answer Sheet Checker & Form Reader Page 9 of 16 CERTIFIED ISO 27001 : 2005 SET MARKING SCHEME Different marking schemes can be set for different questions. In the beginning all questions bear the default marking scheme and thus are checked according to the properties of this default marking scheme. Marking Scheme can be changed from the Answer Grid. To change the scheme in bulk, Click on the MANAGE TAGS Button in ENTER ANSWER KEY Panel. Development Office: C 904, Eisha Bella Vista, Near Sai Service Centre, Kondhwa, Pune – 411048 (MS) Registered Office: 134, Indramani Nagar, Race Course Road, Gwalior – 474005 (MP) Ph.: 09229113500, 08411906600 Email: [email protected] Website: www.admengroup.com Addmen OMR Software User Guide v13.1 Answer Sheet Checker & Form Reader Page 10 of 16 CERTIFIED ISO 27001 : 2005 OPTION WISE MARKS SETTING Some test paper pattern bear variable marks for each option in each question. Marks can be set for individual options or combination of options also. Development Office: C 904, Eisha Bella Vista, Near Sai Service Centre, Kondhwa, Pune – 411048 (MS) Registered Office: 134, Indramani Nagar, Race Course Road, Gwalior – 474005 (MP) Ph.: 09229113500, 08411906600 Email: [email protected] Website: www.admengroup.com Addmen OMR Software User Guide v13.1 Answer Sheet Checker & Form Reader Page 11 of 16 CERTIFIED ISO 27001 : 2005 STEP 3: READ SHEETS Browse the folder and select all or limited sheets to be evaluated. Details of sheet printing and scanning format have been explained in OMR Sheet Printing & Scanning Instruction Document. Select Test ID on behalf of which you are reading these sheets. Adjust the sheet preview vertical scroll so that the Form ID and Test ID blocks are visible. Clipping margins are visible as red lines. To get answers from a selected answer sheet, press the GET KEY button. To start checking, press the READ SHEET button. To check multi-set tests, answer sheets of multiple sets of a test can be collected and scanned mixed up in the same folder. Later they get sorted in the software by pressing the SORT SHEET button first instead of CHECK SHEET. Once the sheets are sorted the files will be renamed asTestid_Scan001.BMP. Now select all the sheets of specific Test ID and press CHECK SHEET button. Sheets will be renamed after checking as TestID_FormID.BMP. The sheets that have not been checked will not be renamed. There are three evaluation modes namely, AUTO; ALART; and MANUAL. Mostly ‘ALART’ should be selected. But if there is a possibility of too many errors in Form ID/Roll Number or Test ID filling then select ‘MANUAL’. Any faulty sheets are prompted. Invalid or Duplicate roll numbers are also prompted. Sheets with following issues will be notified: a. Improper scanning or not as per prescribed norms: Message: Unreadable Sheet! b. Too much tilt so that any of the index point is missing or improperly scanned. Message: Invalid Index! c. Missing Form ID/Candidate ID/Roll No. Message: Blank or Zero Candidates ID! d. Missing Test ID. Message: Blank or Zero Test ID! e. Different Test ID from the one selected. Message: Invalid Test ID! f. Two bubbles marked in the same digit column in Test ID or Candidate ID. Message: Multiple filled marked in column of ID. g. Form ID not in the Groups selected for test and ‘Check only for valid candidates’ option is selected. Message: Invalid Candidate! To reevaluate or to begin fresh evaluation, first delete the result of that test for all or specific candidates for the View Results panel. You can also rename the sheets for visual convenience using RENAME button, so that the files bear the same name as at the time of scanning. Development Office: C 904, Eisha Bella Vista, Near Sai Service Centre, Kondhwa, Pune – 411048 (MS) Registered Office: 134, Indramani Nagar, Race Course Road, Gwalior – 474005 (MP) Ph.: 09229113500, 08411906600 Email: [email protected] Website: www.admengroup.com Addmen OMR Software User Guide v13.1 Answer Sheet Checker & Form Reader Page 12 of 16 CERTIFIED ISO 27001 : 2005 STEP 4: VIEW RESULTS Any test that has been read in Step 2, is visible in the central ‘Test IDs’ pane and displays ‘0’ records. Select the test and press the ‘CALCULATE’ Button. Now the ‘Test IDs’ pane will show some records against this test record for the number of sheets checked. To obtain processed results and related outputs for ready use, select ‘Marks & Results’ option in Data Search Options group. Usually required parameters are already selected and calculated. To obtain other parameters, select the appropriate check box. To obtain basic question response data and its detailed analysis select ‘Question Response’ option. Parameters like GROUPS & TEST TYPES are selected only if there are too many tests and we need to filter and shortlist them. Also selecting a parameter GROUP will list only the candidates belonging to that group even if there are more candidates in the test. Select the required test and the subjects therein and press SEARCH. ‘Marks & Results’ option allows you to select multiple tests at a time, while’ Question Response’ limits the search to one Test ID only. After searching for required records, Results can be previewed in ready to print layouts. Report preview layouts can be customized by the client also using Seagate Crystal Reports. EXPORT TO EXCEL OR OTHER DATA FORMAT Results can also be exported directly to XLS(Excel), MDB(Access), XML and DBF(DBASE) formats. Exported files are created in DATA folder in ADDMEN folder. CREATE PDFs Any report can be drawn as PDFs by pressing the CREATE PDF. To generate a PDF the user must have Seagate Crystal Reports Software installed on the system. SEND SMS OR EMAIL Excel exported output can be used for sending SMS through Addmen Desktop SMS which utility is installed with the OMR Software and can be found in ADDMEN/RESOURCE folder. Exported Access can be used to send SMS through ECAS. To send reports through email, individual candidate Test Analysis PDFs can be created as explained above and attached and sent. Development Office: C 904, Eisha Bella Vista, Near Sai Service Centre, Kondhwa, Pune – 411048 (MS) Registered Office: 134, Indramani Nagar, Race Course Road, Gwalior – 474005 (MP) Ph.: 09229113500, 08411906600 Email: [email protected] Website: www.admengroup.com Addmen OMR Software User Guide v13.1 Answer Sheet Checker & Form Reader Page 13 of 16 CERTIFIED ISO 27001 : 2005 ENTER CANDIDATE RECORDS Candidate records are not compulsory to enter. Software checks and stores the result on the basis of unique roll no. only which is mentioned on the sheet. But if candidate records are entered, names can be displayed alongside roll nos. in result reports. If you want to draw group wise/batchwise result and ranks then candidate records must be entered into the software. All distinct values in GROUP field are displayed at the time of Test Definition (STEP 1). So atleast one candidate name for every Group/Batch must always exist in the candidate records database. Development Office: C 904, Eisha Bella Vista, Near Sai Service Centre, Kondhwa, Pune – 411048 (MS) Registered Office: 134, Indramani Nagar, Race Course Road, Gwalior – 474005 (MP) Ph.: 09229113500, 08411906600 Email: [email protected] Website: www.admengroup.com Addmen OMR Software User Guide v13.1 Answer Sheet Checker & Form Reader Page 14 of 16 CERTIFIED ISO 27001 : 2005 IMPORT CANDIDATE RECORDS Candidate records can be directly typed into the software or can be imported from Excel sheet. To import names from Excel, any worksheet containing any number of fields in any sequence can be used. But it should atleast contain Roll No. and Name information by any column name. Import from Excel panel gives you the freedom to select any field from your Excel sheet to transfer information in the desired field in the OMR software. To add more records to existing records in software, select APPEND option. To completely remove previous records and add new ones, select RESET option. To keep previous Roll Nos. and to update them and add new records, select REFRESH option. Development Office: C 904, Eisha Bella Vista, Near Sai Service Centre, Kondhwa, Pune – 411048 (MS) Registered Office: 134, Indramani Nagar, Race Course Road, Gwalior – 474005 (MP) Ph.: 09229113500, 08411906600 Email: [email protected] Website: www.admengroup.com Addmen OMR Software User Guide v13.1 Answer Sheet Checker & Form Reader Page 15 of 16 CERTIFIED ISO 27001 : 2005 DESIGNING OMR TEMPLATE There are two modules of OMR software-Answer Sheet Checker & Form Reader. If only Sheet Checker is active, we can design only Answer Sheets. If only Form reader is active, we can design only OMR Forms. But if both are active then we can design-Answer Sheets, Forms and Combo Sheets which work as Form & Answer Sheet simultaneously. Only the layouts created using the OMR Software will be read by the software. When we create a sheet, its reading information is stored in software and its layout is exported to other designing software for Layout are defined through 3 parameters- Grid Size (distance between bubbles), No. of Bubbles (between horizontal and vertical margines) and margines (distance from left/top edge of paper). Different bubble sizes can be used like GridX=60; GridY=48 or GridX=48; GridY=45. Changing Grid size or No. of Bubbles will alter the final size of the layout. Changing the margine will alter position of layout on page. Different bubble shapes like, Circles and Box can be used. Various types of blocks in a layout are Block, Question, FormID & TestID. Various shapes of bubble arrays can be placed. Their output is shown on right. Blocks & Questions should be placed in the sequence as they are to be read. Blocks can be moved with snapping either using arrow keys or mouse. In case of OMR Form only one key block - Form ID is required. But in case of Answer Sheet two key blocksFormID & TestID are placed. Only then Answer Sheet will appear in ‘Select Sheet’ dropdown list in Step 2: Answer Key panel. Right Click on the block to delete or to change properties of selected block or whole sheet layout. After finalizing the sheet design, export it. Take a few printouts and check. If it is OK, press the Upload button to upload it on Addmen Server to keep it safe. In case of data loss at your end you can regain your sheet template back by downloading it from the server. Uploading facility can be used in case of distributed branches where one branch can create a sheet design and upload it for other branches to download. You can download several ready to print and use common sheet layouts created by Addmen. These basic layouts cannot be edited directly. Though they can be duplicated and then edited. Development Office: C 904, Eisha Bella Vista, Near Sai Service Centre, Kondhwa, Pune – 411048 (MS) Registered Office: 134, Indramani Nagar, Race Course Road, Gwalior – 474005 (MP) Ph.: 09229113500, 08411906600 Email: [email protected] Website: www.admengroup.com Addmen OMR Software User Guide v13.1 Answer Sheet Checker & Form Reader Page 16 of 16 CERTIFIED ISO 27001 : 2005 UPLOADING ONLINE RESULTS ON WEBSITE UPLOAD RESULT button can be pressed to upload results to Server. Additionally edited database can also be used to upload manipulated results. Candidate OMR Sheets and Test Analysis PDFs can be uploaded for display on website using the FTP login given to the user. Candidate can see complete results, sheets, analysis and solution of all test appeared in a single website window. The facility is not free and the user shall be able to upload only if his account has been activated on the website. The link to be added on your website will be found in Support Panel. Please Login and retrieve. On the STEP 4 > View Result Panel, to upload result, select Test to be uploaded and press SEARCH. After searching press UPLOAD button. If a series of test each containing single subject are linked and are to be presented as a single entity on the website, they must be selected together and then searched and uploaded. HOW TO UPLOAD SHEETS, ANALYSIS REPORTS AND SOLUTION ON WEBSITE? A FTP username and password is provided to user. Host Address: ftp://omrtestresult.com Username: please refer to your email Password: please refer to your email Open 'My Computer' and type your Host Address ( ftp://omrtestresult.com ) in the address bar and press enter. Login Panel will appear on the screen. Enter your username and password and click on logon button. If login screen does not appear then click on 'File Menu > Login as Command'. If login is successful then your FTP content will display in the window. Create a folder by name of desired TEST ID at server. Copy the OMR sheets and PDF files generated by OMR Software in the ADDMEN/DATA folder. Paste these files into the TEST ID folder created at server. Solution (.PDF) file can also be pasted in the same TEST ID folder created on the server. Development Office: C 904, Eisha Bella Vista, Near Sai Service Centre, Kondhwa, Pune – 411048 (MS) Registered Office: 134, Indramani Nagar, Race Course Road, Gwalior – 474005 (MP) Ph.: 09229113500, 08411906600 Email: [email protected] Website: www.admengroup.com