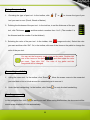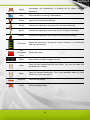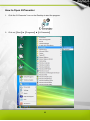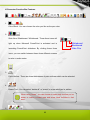
1
User Manual Windows & Macintosh V1.01 Table of the Contents About This User’s Manual ......................... 2 4. Using the Bundled Software ............... 44 Notes for This Manual ............................... 2 K-Jotter Overview ............................... 45 Safety Information ..................................... 3 Letter Mode ................................. 45 Care and Cleaning ..................................... 3 Desktop Mode ............................. 52 1. Product Introduction.............................. 4 K-OfficeMemo Overview ..................... 56 Package Contents ................................ 5 K-Presenter Overview ......................... 61 Tablet .................................................... 6 Before Installation ........................ 61 Digital Pen ............................................ 9 Hardware Installation ................... 61 2. Getting Started ..................................... 11 How to Open K-Presenter............ 62 Installation........................................... 12 5. Specification Summary ....................... 67 Windows ...................................... 12 Tablet .................................................. 68 Mac OS........................................ 14 Digital Pen .......................................... 69 Configuration ...................................... 17 6. Troubleshooting ................................... 70 Windows ...................................... 17 Testing your device ............................. 71 Mac OS........................................ 26 FAQ .................................................... 74 Uninstall .............................................. 33 Service and Technical Support ........... 75 Windows ...................................... 33 Driver Download ................................. 76 Mac OS........................................ 34 Appendix .................................................. 77 3. Using the Tablet ................................... 37 Declarations and Safety Statements ... 78 Holding the Pen .................................. 38 FCC ............................................. 78 Working Area ...................................... 39 CE................................................ 78 Positioning .......................................... 40 Clicking ............................................... 41 Ordering Components and Accessories ........................................ 79 Dragging ............................................. 42 Copyright Information ......................... 80 Pressure Control ................................. 43 Limitation of Liability ........................... 81 1 About This User’s Manual You are reading the Kanvus Artist 127 Graphic Tablet User Manual. This Manual provides information regarding the components in the Kanvus Graphic Tablet and how to use them. The following are major sections of this User’s Manual : 1. Product Introduction Provides information on the Kanvus Graphic Tablet’s components. 2. Getting Started Provides information on getting started with the Kanvus Tablet. 3. Using the Tablet Provides information on using the Kanvus Graphic Tablet. 4. Using the Bundled Software Provides information on using the Kanvus Graphic Tablet’s utility. 5. Specification Summary Gives you specifications summary of Kanvus Graphic Tablet. 6. Troubleshooting Provides information on Kanvus Graphic Tablet, where you can find the answers to most common questions. Notes for This Manual A few notes and manuals are used throughout this guide, allowing you to complete certain tasks safely and effectively. 1. WARNING 2. IMPORTANT 3. TIP Tips for completing tasks. 4. NOTE Information for special situations. Important Information that must be followed for safe operation. Vital information that must be followed to prevent damage to data, components, or persons. 2 Safety Information Adhering to the following safety information will prolong the life of the Tablet. 1. 2. 3. 4. 5. DO NOT try to open the housing of the tablet and the digital pen. It will void your warranty. DO NOT expose to or use near liquids, rain, or moisture. DO NOT place or drop objects on top of the Tablet. DO NOT expose to strong magnetic or electrical fields. DO NOT throw the Tablet in municipal waste. The product has been designed for proper reuse and recycling of parts. The symbol of the crossed-out wheeled bin indicates that the product should not be placed in municipal waste. Check your local regulations for disposal of electronic products. Care and Cleanin g 1. 2. 3. DO NOT expose to dirty or dusty environments to avoid wearing-down the surface of the tablet. Regular cleaning of the tablet surface with a soft cloth will help expand the life span of your tablet. DO NOT use any kind of volatile liquid on the tablet surface, as it will damage the plastic case. Store your tablet and the pen in a clean, dry place and avoid extreme temperatures. 3 1. Product Introduction -Package Contents -Tablet -Digital Pen 4 Package Contents Check your package for the following items. Kanvus Artist 127 Digital Tablet Installation CD(Windows) Quick Guide Digital Pen & 1.5V AAA Battery & Refills & Pen Clip Installation CD(Mac OS) Kanvus DM Pen Stand Corel PhotoImpact 12 SE Pad-Cover Adobe Photoshop Elements 7.0 5 Tablet Refer to the picture below. Rolling Pad USB Connector LED Indicator Hotspot Area Working Area Descriptions : 1 ○ — USB Connector : Connect to a USB port on your PC. 2 ○ — Working Area : There are two working areas for you to choose, wide (12” X 7.25”) and 4:3 (9.5” X 7.25”). Please press the “Wide” or “4:3” buttons on the top side of your tablet then the respective LED will be on. Please refer to Working area section for detail descriptions. 6 3 ○ — LED Indicator : The blue LED light on the tablet is the main indicator for hardware operation. This LED normally blinks, and will only be turned on/off in response to certain conditions. Pay attention to the states of the LED when you are encountering the following situations : (a) A built-in power saving function would execute the power saving mode for the pen if it is left unused for a period of time. Tap anywhere on the surface with the tip of the pen to “wake it up” if it has gone into power saving mode. (b) When the tablet detects the digital pen, the LED light will be on and solid. This happens when the pen tip is idling suspended within the working area on the tablet. (c) When you tap the tip or press a button of the pen within the working area on the tablet, the LED light will be turned off temporarily. (d) Moving the pen around the working area will cause the cursor on the screen to move accordingly. After the tablet’s device driver has been properly installed, a small tablet icon will appear in the System Tray, which is normally at the lower right corner of the desktop. 4 ○ — Hotspot Area : The hotspot area is located at the edge of the working area. A hotspot is used as a hot key. Press the hotspot to start a default or user-defined application or function. 5 ○ — Rolling Pad : It allows you to navigate easily in “Scroll”, “Zoom” or “VOL” functions. Please be noted that you have to install Hotspot Manager to enable the function. The usages of a rolling pad are as followed : (a) Scroll : The Rolling Pad enables you to scroll vertically and horizontally. Click the 7 central button of rolling pad to switch the direction. (b) Zoom : You can use the Rolling Pad to zoom in or zoom out. Keep pressing the central button of rolling pad will change to Hand Tool. (c) VOL : Adjusts the volume with the Rolling Pad. Click the central button of rolling pad to enable / disable mute. We design these key functions for Adobe PhotoShop Serial applications. However, different applications might have different definitions in terms of horizontal scrolling, Zoom and Hand Tool. Thus, the rolling pad may not work in all kinds of applications. 8 Digital Pen Refer to the pictures below. Button 2 Pen Stand Button 1 Pen Tip Descriptions 1 ○ — Button 2 : Functions like the Double Click of the mouse (by default). 2 ○ — Button 1 : This button functions as the Right Click of the mouse (by default). 3 ○ — Pen Tip : It is a pressure-sensitive freehand tool for image editing and creating pen strokes similar to real handwriting. Tap the Pen tip on tablet acts as the Left Click of the mouse (by default). 9 4 ○ — Pen Stand : Use the Pen stand to store the pen between tasks. Please refer to Configuration section for more detail settings. Changing the battery Changing the pen tip The power saving mode will be activated if the pen is left unused for about 3 minutes. To wake the pen up, please press the pen tip once anywhere on the surface before you start writing again. 10 2. Getting Started -Installation -Configuration -Uninstall 11 Installation Windows Installing the Driver Software on Windows Please follow the installation instructions below for Microsoft Windows 2000, XP, Vista and 7 operating systems : 1. Place the CD into the CD-ROM drive. 2. The main installation window will appear automatically. If not, please start the installation manually by opening 【My Computer】►【CD/DVD Rom】► then click on the 【Autorun】 program. 3. Press “Driver Setup” to install the Kanvus Tablet driver with the Hotspot manager. 12 4. When installing the driver, please follow the installation instructions on screen, pressing the “Enter” key through each step. After the installation is complete, please reboot the computer (recommended) Hardware Installation After you have finished the driver installation and restarted Windows, connect the tablet through a USB interface to the PC. Driver must be installed before you connect the device. 13 Mac OS Installing the Driver Software on Mac OS 1. Place CD labeled “Tablet Driver Mac” in CD-ROM drive. 2. Double click the icon “USB Tablet”, and you will see the folder containing “Kanvus Tablet Driver”. 3. Double click the driver “Kanvus Tablet Driver”. 4. Type your name and password and press “OK”. (Please note that Mac computers require a username and password) 5. Press “Continue” on the Introduction page. 14 6. In the top bar, choose “Easy Install” and press “Install”. 7. Installation may take a moment, please be patient. 8. The window will show a message telling you that the “Installation was successful”. Please press “Restart” to restart your PC. 15 Hardware Installation After you have finished the driver installation and restarted PC, connect the tablet through a USB interface to the PC. Driver must be installed before you connect the device. 16 Configuration Windows Once you install “Hotspot Manager” and plug the tablet into your PC, the icon ( ) will be showed in the System Tray. However, you can choose to disable the Hotspot Manager by clicking the right button and selecting “Disable”. Once you disable Hotspot Manager or un-plug your tablet from your PC, the original icon will be changed into icon ( ). Setting Move the cursor to the Hotspot manager icon in the system tray, and then click the right button. 17 About Shows information of Software Version, Driver Version and Firmware Version. 18 Show Shows the Hotspot Manager User Interface. 1. Hotspot Manager Panel Double click the Hotspot Manager in the system tray to access the functions. (1) Profile : You can select, create or modify Hotspot profiles on this page. There is a wide testing space for you to configure the profiles of Hotspots. 19 (2) Options : You can set the function of an individual Hotspot here. There are two kinds of setting. One is keyboard event setting (“Use hot key”) and the other is hyperlink setting (“Linking”). To finish setting these functions, you need to name the hints which will appear next to each key. (3) Preview : You can see the tablet image and the Hotspots of your tablet. By moving the cursor to the Hotspot, the Hotspot hint will pop up next to the key. 2. How to Set up a New Profile (1) Click “New” and type in a file name. (2) If a profile is set for a particular software, click the browser icon . If not, please skip this process and click “OK” to finish setting a new profile. (3) All installed software will be displayed. Click the software you need and then click “OK” (4) Click “OK” to finish this setting. 3. How to Modify a Profile Select the profile you want to modify and follow Hotspot setting steps to modify. Then, click “OK”. 4. How to Delete a Profile Select the profile you want to delete and click “Delete”. 20 5. How to Set Up the Hotspot Function (1) Choose the key you want to set as the hotspot (e.g. K29). (2) Tick “Setting” to enable the setting function. (3) Type in the function hint (necessary). (4) Define the function as a Hot Key or a “Linking” and then click “Confirm”. 6. Start Use After setting the profiles, you can start to use the Hotspot Manager. Please select the profile you want to use and click “OK” and then this selected profile will be the active profile. 21 Setting 1. Hotspot Timer You can set a timer for how much time the Hotspot Timer takes to work. There are five different choices; 0, 0.5, 1, 2 and 3 seconds. This means that it can take 0, 0.5, 1, 2 or 3 seconds for the Hotspots to work when the pen is pointed at the Hotspot area. 2. Pointing Sound You can enable and disable the pointing sound which occurs when the pen tip is pointing on the tablet. 22 Kanvus Tablet Please select 【Control Panel】►【Kanvus Tablet】or move the cursor to the Hotspot Manager icon in the system tray, and then right-click to select【Kanvus Table】. 1. About The pen is used as a normal handwriting pen. On the “About” tab, make sure the “Tracking Mode” is set to “Pen”. 2. Buttons On the “Buttons” tab, click on “Side Button 1” or “Side Button 2” to customize the two side buttons. (1) Default settings Side Button 2 = Left double click Side Button 1 = Right click The pen tip = Left click 23 (2) Pen Offset Value When using the tablet, if you want to use a new pen without restarting the computer, you need to perform the “Pen Offset Value” setting. (a) On the “Buttons” tab, un-tick the “Auto Setting” box to remove the former value. (b) Click the “Adjust” button. Then follow the on-screen instructions for adjustment. Tap the “OK” button when the “OK” message appears. (c) Ticking the “Auto Setting” box will detect the new pen offset value automatically when the 24 system is restarted. (3) Click Pressure (a) On the “Buttons” tab, move the slider up and down to adjust the pen pressure from level 0 to level 8 (level 0 is the lowest, and level 8 is the highest). (b) Click the “Test” button to launch the “Click Pressure Test” writing area. You can then test to see if the setting meets your needs. 25 Mac OS Connect the tablet via a USB port on your Mac computer. In the Dock area, you will see the driver icon. Setting Click the icon “FKeyHandlerX” and hold the button (or right click the icon), you will see Kanvus Tablet. 26 Kanvus Tablet Select Kanvus Tablet, it will launch Kanvus Tablet application. 1. About Under “About”, you will see the information on the hardware and driver. The pen is used as a handwriting pen or a mouse. To change the “Tracking Mode”, select “Pen” or “Mouse”. 2. Button Under “Buttons”, you can set side button functions and pen tip pressure. (1) Default settings Side Button 2 = Double Click Side Button 1 = Context Menu The pen tip = Clcik (2) Pen Offset Value When using the tablet, if you want to use a new pen without restarting the computer, you need to perform the “Pen Offset Value” setting. 27 (a) On the “Buttons” tab, un-tick the “Auto Setting” box to remove the former value. (b) Click the “Adjust” button. Then follow the on-screen instructions for adjustment. Tap the “OK” button when the “OK” message appears. (c) Ticking the “Auto Setting” box will detect the new pen offset value automatically when the system is restarted. (3) Click Pressure (a) On the “Buttons” tab, move the slider up and down to adjust the pen pressure from level 0 to level 8 (level 0 is the lowest, and level 8 is the highest) 28 (b) Click the “Test” button to launch the “Click Pressure Test” writing area. You can then test to see if the setting meets your needs. 29 Show Shows the Hotspot Manager User Interface. 1. Hotspot Manager Panel Click the Hotspot Manager “FKeyHandlerX” in the Dock area to access the functions. (1) Profile : You can select, create or modify Hotspot profiles on this page. There is a wide testing space for you to configure the profiles of Hotspots. (2) Options : You can set the function of an individual Hotspot here. There are two kinds of setting. One is keyboard event setting (“Use hot key”) and the other is hyperlink setting (“Linking”). To finish setting these functions, you need to name the hints which will appear next to each key. 30 (3) Preview : You can see the tablet image and the Hotspots of your tablet. By moving the cursor to the Hotspot, the Hotspot hint will pop up next to the key. 2. How to Set up a New Profile (1) Click “New” and type in a file name. (2) If a profile is set for a particular software, click the browser icon . If not, please skip this process and click “OK” to finish setting a new profile. (3) All installed software will be displayed. Click the software you need and then click “OK” (4) Click “OK” to finish this setting. 3. How to Modify a Profile Select the profile you want to modify and follow Hotspot setting steps to modify. Then, click “OK”. 4. How to Delete a Profile Select the profile you want to delete and click “Delete”. 31 5. How to Set Up the Hotspot Function (1) Choose the key you want to set as the hotspot (e.g. K29). (2) Tick “Setting” to enable the setting function. (3) Type in the function hint (necessary). (4) Define the function as a Hot Key or a “Linking” and then click “Confirm”. 6. Start Use After setting the profiles, you can start to use the Hotspot Manager. Please select the profile you want to use and click “OK” and then this selected profile will be the active profile. 32 Uninstall Windows In order to uninstall the Kanvus Tablet driver with the Hotspot manager, move your cursor to the lower left corner of the screen 【Start】►【Programs】►【Hotspot Manager】►【Remove Hotspot】. 33 Mac OS 1. Place CD labeled “Tablet Driver Mac” in CD-ROM drive. 2. Double click the icon “USB Tablet”, and you will see the folder containing “Kanvus Tablet Driver”. 3. Double click the driver “Kanvus Tablet Driver”. 4. Type your name and password and press “OK”. (Please note that Mac computers require a username and password) 5. Press “Continue” on the Introduction page. 34 6. In the top bar, choose “Uninstall” and press “Uninstall”. 7. Press “Continue”. 8. Uninstalling the driver. This will take a moment. 35 9. Uninstall has been completed. Click “Quit” when you see the “Finish Up” dialog box. 36 3. Using the Tablet -Holding the Pen -Working Area -Positioning -Clicking -Dragging -Pressure Control 37 Holding the Pen Hold the digital pen as you would hold a pencil. Keep the buttons of the pen close to your index finger or thumb so that you can click the button easily. When the pen is not in use, place it in the pen stand or lay it flat on your desk. To maintain the sensitivity of your pen tip, do not store the pen in a container where it will rest on its tip. 38 Working Area Working area is the area of the tablet that can sense the movement of the digital pen. The working area of the tablet corresponds with the screen of your PC. Screen Area Working Area The cursor in the screen area indicates pen position, and the cursor follows the movement of the pen. 39 Positioning Use the digital pen to position the cursor on your PC screen. The distance between the pen tip and the tablet surface must be less than 10mm so that the tablet can sense the movement / location of the pen. The cursor location on the screen corresponds with the location of your pen tip on the tablet. Lift the pen tip and place the pen tip in a new location on the tablet. The cursor will jump to the new position. 40 Clicking One Click : Tapping the pen tip once on the tablet surface within the working area performs a click. A “Click” is used to select something. Double Click : A double tap with the pen tip in the working area performs a double-click. “Double-Click” is used to open something you select. You can also set the function of pen buttons to click or double-click. You can also set the function of pen buttons to click or double-click. To assign new switch functions, see “Configuration”. 41 Dragging To drag an object, simply point to and click on the object (to highlight the object), then move the pen tip to the location you want to drag to. 42 Pressure Control The tablet comes with drawing applications that support pressure sensitivity, so you can change the thickness of the line you draw with different pressure, just as if you were using a real pen or pencil. To draw with pressure sensitivity, first select a pressure-sensitive tool from your application’s tool bar. Then draw along the surface of the tablet while applying various amounts of pressure downward on the tip of the pen. Press hard for thick lines or thin lines or dense color. Press gently for thin lines or softer color. 43 4. Using the Bundled Software -K-Jotter Overview -K-OfficeMemo Overview -K-Presenter Overview 44 K-Jotter Overview K-Jotter is a handwriting and drawing tool that gives users a more enjoyable experience. K-Jotter offers two modes : Letter Mode and Desktop Mode to meet different needs. You can work with pen tools and set the letter paper page to make your mails more colorful under the Letter Mode. Under the Desktop Mode, you can create desktop notes like your personal memos. Those notes can be saved in FNS / JPG formats. Letter Mode When you click the K-Jotter icon, the Letter Mode window will appear automatically. You can start to create a mail with your personal style in the document window. Before you get started with the Letter Mode, familiarize yourself with the following Basics. Letter Mode window 45 Basics This introduction to the basic features of the Letter Mode will help you to be familiar with the work area and icons. 1. Letter mode work area Document Window Navigation Bar Script Line Letter Paper Tool Bar 2. Basic Operation Navigation Bar : This lists all the functions. New Open a new document. Open Open the document. Save Save the document 46 Print Preview Preview the entire contents. Print Print the document. Send to Mail Recipient Email the document. Change to Desktop Mode Help Switch the mode from Letter to Desktop Mode. Get information on using K-Jotter. Toolbar : provides handwriting and editing functions. Move Picture Move the position of the inserted picture. Scale or re-shape the picture. Erase Clean the unwanted handwriting. Pencil Activate the digital pen as a pencil for writing and drawing. Brush Activate the digital pen as a brush pen for writing and drawing. Marker Activate the digital pen as a marker for writing and drawing. Thickness Adjust the thickness of the pencil / brush / marker. (1 is the thinnest and 5 is the thickset.) Script line Color Set the script line color. Script lines Interval Adjust the width between script lines. Click the upper scroll arrow for a larger width between script lines or the lower one for a smaller width. This function is available only when the document is blank. 47 Set Foreground Set the pen color. Color Set Background Color Set the letter background color. Pallet Show all the available foreground color. Undo Undo the last handwriting that was written. You can use undo until the document is blank. Redo Redo the deleted handwriting. This is only available when you have previously undone an action. Zoom In Zoom into the document window by 100%, 200% and 400%. Zoom Out Zoom out of the document window by 200%, 100% and 50%. Capture Screen Capture the screen to your document. Insert Image Insert the BMP or JPG file in the document from files stored on your computer. Add line Add lines to your document. This feature is enabled when the document reaches the last two lines. Using the pen tools 1. Choosing the type of pen tool : In the toolbar, click tool you want to use. (Pencil, Brush or Marker) 48 , or to choose the type of pen 2. Defining the thickness of the pen tool : In the tool bar, to set the thickness of the pen tool, click “Thickness” and then select a number from 1 to 5 . (The number 1 is the thinnest and the number 5 is the thickest) 3. Selecting the color of the pen tool : In the toolbar, click (foreground color). Select the color you want and then click “OK”. Or, in the toolbar, click one of the items on the pallet to change the color of the pen tool. You can set the frequency used colors on the pallet. Double-click one of the items on the pallet , and then select the color you want. Then click “OK”. The color of the pallet and the foreground will be changed. Correcting a mistake 1. Using the erase tool : In the toolbar, click “Erase” . Move the eraser cursor to the unwanted part and draw a line or circle around the unwanted part to remove it. 2. Undo the last handwriting : In the toolbar, click “Undo” to undo the last handwriting. Setting the script line and letter paper colors 1. Script line color : In the toolbar, click “Set Script Line Color” . Select the color you want and then click “OK”. 2. Letter paper color : In the toolbar, click “Background Color” then click “OK”. 49 . Select the color you want and Adjusting the script lines interval In the toolbar, click “Adjust Script Lines Interval” to enlarge the interval between lines or to narrow the interval. (Info on Adjust Script lines Interval) Inserting and moving a picture In the toolbar, click “Insert Image from File” . Select the desired file and then click “Open” to insert a picture. In the toolbar, click “Moving” . Move the cursor to the picture you want to move and click it. You can then move the picture. Editing a picture You can arrange the order of pictures, delete, re-scale or re-shape a picture. 1. Click , and the icon will turn to . Then move the cursor to the picture you want to edit and click it. Right-click on the picture and select one of the items to arrange it to the front, the back, the forward one, the back one, or delete it. 2. Click , and the icon will turn to . Then move the cursor to the picture and click it. Move the cursor to the edges of the picture and then drag to scale or re-shape the picture. 50 Adding the lines of the letter In the toolbar, click to add spaces for the document. (Info on Add line) Capturing the screen You can capture the desktop image, and even the contents or pictures on websites. 1. In the toolbar, click Capture” will pop up automatically. Click “Start to . A panel . The desktop color will then turn fluorescent blue. Draw a square with your pen to define the area you want to capture. Then lift your pen to capture the selected scene and paste it onto your document. 2. Click to exit the capture panel. Sending your mail In the navigation bar, click to send your mail. When using this function, the document will be saved as an attached JPG file automatically. Saving the file and exiting 1. Saving the file : In the navigation bar, click to save the document. 2. Closing the window : On the top-right section of the working area, click the icon 51 to exit. Desktop Mode When you are in the Letter Mode, click in the navigation bar to switch to the Desktop Mode. You can handwrite and draw on the full-screen desktop. An interesting feature of the Desktop Mode is that it allows you to send an email with the desktop handwriting note as an attachment. Before you get started with the Desktop Mode, familiarize yourself with the following Basics. Desktop Mode 52 Basics This introduction to the basic features of the Desktop Mode will help you get familiar with the working area and icons. 1. Desktop mode working area Desktop Tool Bar 2. Basic Operation Toolbar : lists the functions. System functions New Ope n a new document. Save Save the document. 53 Print Preview Preview the entire contents of the letter. Print Print the document. Send to Mail Recipient Email the document. Change to Letter Mode Switch the mode from Desktop to Letter Mode. Help Get information on using K-Jotter. Handwriting and Editing functions Erase Clean the unwanted handwriting. Pencil Activate the digital pen as a pencil for writing and drawing. Brush Activate the digital pen as a brush pen for writing and drawing. Marker Activate the digital pen as a marker for writing and drawing. Thickness Set Foreground Color Adjust the thickness of the pencil / brush / marker. (1 is the thinnest and 5 is the thickset.) Set the pen color. Pallet Show all the available foreground color. Undo Undo the last handwriting that was written. You can use undo until the document is blank. Redo Redo the deleted handwriting. This is only available when you have previously undone an action. Close Exit the Desktop Mode. 54 Using the pen tools 1. Choosing the type of pen tool : In the toolbar, click , or to choose the type of pen tool you want to use. (Pencil, Brush or Marker) 2. Defining the thickness of the pen tool : In the tool bar, to set the thickness of the pen tool, click Thickness and then select a number from 1 to 5. (The number 1 is the thinnest and the number 5 is the thickest) 3. Selecting the color of the pen tool : In the toolbar, click (foreground color). Select the color you want and then click “OK”. Or, in the toolbar, click one of the items on the pallet to change the color of the pen tool. You can set the frequency used colors on the pallet. Double-click one of the items on the pallet , and then select the color you want. Then click “OK”. The color of the pallet and the foreground will be changed. Correcting a mistake 1. Using the erase tool : In the toolbar, click “Erase” . Move the eraser cursor to the unwanted part and draw a line or circle around the unwanted part to remove it. 2. Undo the last handwriting : In the toolbar, click “Undo” to undo the last handwriting. Sending your mail In the navigation bar, click to send your mail. When using this function, the document will be saved as an attached JPG file automatically. 55 K-OfficeMemo Overview K-OfficeMemo is a tool that allows users to freely handwrite in applications where images can be inserted, such as Word, Excel, PowerPoint, FrontPage, Photoshop, CorelDraw, etc. Both the handwriting and drawing can be saved in the document. Before you get started with K-OfficeMemo, please go through the following Basics. 56 Basics When you click the K-OfficeMemo icon, a toolbar will be displayed at the bottom-right of the desktop. This introduction to the basic features of K-OfficeMemo will help you get familiar with the working area and icons. 1. K-OfficeMemo working area Document Window Tool Bar 2. Toolbar Start to Write Start to handwrite or draw. Cancel Cancel the handwriting or drawing. 57 Inking Incorporate the handwriting or drawing as an object into the document. Help Get information on using K-OfficeMemo. Erase Clean the unwanted handwriting. Pencil Activate the digital pen as a pencil for writing and drawing. Brush Activate the digital pen as a brush pen for writing and drawing. Marker Activate the digital pen as a marker for writing and drawing. Thickness Set Foreground Color Pallet Undo Redo Minimize Close Adjust the thickness of the pencil / brush / marker. (1 is the thinnest and 5 is the thickset.) Set the pen color. Show all the available foreground color. Undo the last handwriting that was written. You can use undo until the document is blank. Redo the deleted handwriting. This is only available when you have previously undone an action. Minimize the toolbar. Exit the Desktop Mode. 58 Using the pen tools 1. Choosing the type of pen tool : In the toolbar, click , or to choose the type of pen tool you want to use. (Pencil, Brush or Marker) 2. Defining the thickness of the pen tool : In the tool bar, to set the thickness of the pen tool, click Thickness and then select a number from 1 to 5. (The number 1 is the thinnest and the number 5 is the thickest) 3. Selecting the color of the pen tool : In the toolbar, click (foreground color). Select the color you want and then click “OK”. Or, in the toolbar, click one of the items on the pallet to change the color of the pen tool. You can set the frequency used colors on the pallet. Double-click one of the items on the pallet , and then select the color you want. Then click “OK”. The color of the pallet and the foreground will be changed. Creating a document with personal handwriting or drawing Launch an application first, i.e. Word or PowerPoint. In the toolbar, click to start Handwriting or Drawing. You can save the drawings into your document if you wish. The drawing you save will become an independent object, and this can be moved anywhere you like. 59 Cancelling unwanted drawing If you are not satisfied with the artwork you have created, click “Cancel” to remove all the drawings that are not yet embedded. Correcting a mistake 1. Using the erase tool : In the toolbar, click “Erase” . Move the eraser cursor to the unwanted part and draw a line or circle around the unwanted part to remove it. 2. Undo the last handwriting : In the toolbar, click “Undo” 60 to undo the last handwriting. K-Presenter Overview Before Installation Before activating K-Presenter, please make sure the tablet is properly connected to a USB port on a PC. K-Presenter is mainly a sub-tool for Microsoft Power-Point. When PowerPoint is not activated, this application is just a normal mouse tool and a written input interface. Installing procedure : 1. Driver 2. K-Presenter 3. Connecting the tablet and PC USB port. Hardware Installation Plug the larger end of the USB cable to the USB port on your PC. Before starting K-Presenter, make sure the tablet device is well connected with your PC. Or K-Presenter will not be activated. 61 How to Open K-Presenter 1. Click the “K-Presenter” icon on the Desktop to start the program. 2. Click on【Start】►【Programs】►【K-Presenter】 62 K-Presenter Function Bar Features 1. Color Block : You can choose the color you like as the pen color. 2. Slide films / Blackboard / Whiteboard : These three icons will light up when Microsoft PowerPoint is activated and is launching PowerPoint slideshow. By clicking these three Whiteboard Blackboard Slide Film icons, you can switch between these three different screens to write or make notes. 3. Point Outline : There are three thicknesses of point outlines which can be selected. 4. Eraser Tool : You can select “delete all” or “erase” to erase what you’ve written. When using “erase”, you can choose to erase only one line you’ve drawn or make a closed area and erase what includes in that area. 5. 63 Pen Tool / Cursor : There are three pen types : Pen, Brush pen and Marker. You can use each of them as your writing tool. If you want to highlight things, you can click on the “cursor” icon to switch it. When using “pen”, the script line won’t change because different pressure you put on the tablet. But “brush pen” will. 6. Previous / Next : These two icons will light up only when Microsoft PowerPoint is activated. Click on them to go between film slides. 7. Page : This icon will be available only when Microsoft PowerPoint is activated. Click on the icon to go into any page of filmstrips directly. 8. Mail / Save : You can also mail the screen image (including your writing) as an attached file (*.jpg) or save it into any assigned folder in your HD. 9. Record / Playback : This function helps you record the notes you have mentioned in the document. If you wish to present the same document again, you can use playback function to illustrate it again. 64 Record : (1) Have your pen tool ready. (2) Click on the K-Presenter function bar to start recording. (3) After the note-recording is done, click to stop the recording. Playback : Stop Pause Play Save Open Time Indication Timing Scroll Bar Exit (1) Click on K-Presenter function bar to play the clip. (2) A full-screen player with the control bar at the bottom will pop-up. (3) Click to start the playback. 10. My Computer : This icon will open the window of My Computer, you can open any kind of files during a presentation. 11. My Link : You can define your hot-keys. Click “Browse” to search or paste URL into the empty 65 space below directly. Then click “OK”. 12. Quit Slide Show : This icon will light up when a slide show starts. Click on this icon to stop playing the slide show. 13. Exit : Click on this icon to close K-Presenter. 66 5. Specification Summary -Tablet -Digital Pen 67 Tablet Active area Wide Mode : 12" x 7.25'' 4 : 3 Mode : 9.5" x 7.25" Dimension (L X W X H) 420 X 300 X 15.5 mm Weight 1200 g Interface USB 1.1 (Full Speed) Resolution 4000 LPI Report rate 200 RPS Pressure sensitivity 1024 Level Reading height 10 mm (max) Hotspot 34 Hotspots (Top : 16 ; Left : 9 ; Right : 9) Express Key Scroll / Zoom / Vol / Wide / 4 : 3 Rolling Pad X 2 Power consumption 0.2W USB cable length 1.5 m Windows® OS Windows® 2000 / XP / Vista / 7 Macintosh© OS Mac OS X 10.2.8 above 68 Digital Pen Dimension 155 X 16 mm Weight 32 g (Include battery) Power supply One 1.5V AAA alkaline battery Power consumption Sleep mode < 10uA Operation mode < 650uA (max) Buttons 3 keys (Pen Tip, Side Button x 2) Power saving Mode Yes Time to stand by 5~30 Min. Durability batteries 2000 Hr. (min) 69 6. Troubleshooting -Testing your device -FAQ -Service and Technical Support -Driver Download 70 Testing your device Please do the following tests first to identify your problem. 1. Check the connection : After you connect the device to your computer, you should see a tablet icon in the system tray. If you do not see the icon, please follow these steps : (1) Make sure the USB cable is properly connected to a USB port. (2) Try connecting to another USB port. (3) If the device is connected to a USB Hub, please make sure the USB Hub is properly connected to a USB port. (4) Check if your USB controller is activated or not. 2. Diagnose the device : If the pen or the tablet still does not work properly, please follow these steps to help diagnose the problem with the device. (1) Pull off the tablet's USB plug from the computer. (2) Remove the Tablet driver from the system. (3) Re-connect the Tablet's USB to the computer. (a) Check whether the tablet's LED is blinking or not. If the LED is not on, that means there is an error with your tablet. (b) Test your wireless digital pen on the tablet working area. If it can work as a mouse, it 71 means the hardware is OK. If it does not work, try replacing the battery. (c) After changing the pen’s battery, if it is still not working, this means there is an error with the hardware. (4) Download the latest version of the driver directly from our official website. You can also check the latest FAQ on our web site for other information. (5) After installing the new version of the driver, the system will require you to restart your computer. (6) After restarting your computer, you can find the tablet icon ( ) at the bottom right of the screen. (a) If you cannot find the tablet icon ( ) at the bottom right of the screen, it means the driver failed during startup. This might be caused by an incompatibility issue. (b) Check from 【My Computer】►【Properties】►【Hardware】►【Device Manager】, if there is an exclamation mark, it means the installed tablet driver is incompatible with the windows system. If you have this problem, please contact us immediately for help. (7) By clicking the tablet icon ( ) at the bottom right of the screen, you can test the pressure sensitivity to see whether the pen pressure function works or not. (Refer to Configuration.) If you do not have the pen pressure, it means the pen itself might be faulty. 3. Setting the mail system : If your default mail system is Outlook Express 4.0 (the default for the first-edition Win98), please go 72 to【Tools】and select【Options】in Outlook Express 4.0. Then you will see a dialogue box below. Please check each item carefully, and then click on “OK”. If your default mail system is not Outlook Express 4.0, you don’t have to follow the procedure above. 73 FAQ Question : Why is the LED on the tablet off ? Answer : It means that the USB port on your PC has a bad connection or the power supply is not stable. Please re-plug in your USB again. If the problem persists, try changing to another USB port. Question : How can I get the updated software ? Answer : You can download the new driver from our website. 1. Uninstall your old driver : Click【Start】►【Programs】►【Hotspot Manager】►【Remove Hotspot】 2. Download the latest version of the driver in the download section and save it onto your hard drive. 3. Unzip the file in a folder on your hard drive (with Windows built-in unzip utility or a program like Winzip for instance). 4. Double-click the Setup.exe in the folder where you unzipped the file. Question : How to install a new Pad-Cover ? Answer : Please follow the steps below. 1. Remove the device from USB port. 2. Remove the current Pad-Cover. (need some force) 3. Clean the surface with a wet cloth to keep it clean and smooth. 4. Tear off the protective film on the double-sided tape of the new Pad-Cover. 5. Put the new Pad-Cover on the tablet 74 Service and Technical Support If your tablet does not work properly, please check the Troubleshooting procedure and FAQ first. You can go to our web site to download the latest driver/software and check the updated FAQ. If your problem still remains unsolved, please contact our service and technical support staff. [email protected] KWorld Computer Co., Ltd. Tel : +886 2 8228 6066 6/F, No. 113, Jian 2nd Road Jhonghe City, Taipei County 235, Taiwan (R.O.C.) http://www.kanvus-global.com/ 75 Driver Download You can download the latest driver and e-documents from the following web sites. http://www.kanvus-global.com/ 76 A p p e n d i x -Declarations and Safety Statements -Ordering Components and Accessories -Copyright Information -Limitation of Liability 77 Declarations and Safety Statements FCC This device complies with Part 15 of the FCC Rules. Operation is subject to the following two conditions: (1) This device may not cause harmful interference, and (2) This device must accept any interference received, including interference that may cause undesired operation. This equipment has been tested and found to comply with the limits for a Class B digital device, according to Part 15 of FCC Rules. These limits are designed to provide reasonable protection against harmful interference in a residential installation. This equipment generates, uses, and can radiate radio frequency energy and, if not installed and used in accordance with the instructions, may cause harmful interference to radio communications. However, there is no guarantee that interference will not occur in a particular installation. You can determine whether the equipment is causing interference by disconnecting it from your computer. If the interference stops, it was probably caused by the equipment. If the equipment does cause interference to radio or television, you may be able to correct the interference by using one or more of the following measures : 1 Rotate the television or radio antenna until the interference stops. 2 Move the equipment farther away form the television or radio. 3 Plug the equipment and computer into an outlet that is on a different circuit form the television or radio. If necessary, consult with your dealer or an experienced radio/television technician for help. CE The Kanvus tablet, has been tested and found to comply with the following harmonized European Norms : 1 EN55024 (electromagnetic immunity) 2 EN55022 (electromagnetic emissions) 78 Ordering Components and Accessories To purchase parts and accessories, please contact your local dealer or distributor. 79 Copyright Information No part of this manual, including the products and software contained in it, may be reproduced, transmitted, transcribed, stored in a retrieval system, or translated into any language in any form or by any means, without the legal, written permission of Kworld Computer Co.LTD. Kanvus PROVIDES THIS MANUAL “AS IS” WITHOUT WARRANTY OF ANY KIND, EITHER EXPRESSED OR IMPLIED, INCLUDING BUT NOT LIMITED TO THE IMPLIED WARRANTIES OR CONDITION OF MERCHANTABILITY FOR A PARTICULAR PURPOSE. IN NO EVENT SHALL KANVUS, ITS DIRECTORS, OFFICERS, EMPLOYEES OR AGENTS BE LIABLE FOR ANY direct or indirect, INCIDENTAL, OR CONSEQUENTIAL DAMAGES (INCLUDING DAMAGES FOR LOSS OF PROFIT, LOSS OF BUSINESS, LOSS OF DATA, INTERRUPTION OF BUSINESS AND THE LIKE), EVEN IF KANVUS HAS BEEN ADVISED OF THE POSSIBILITY OF SUCH DAMAGES ARISING FROM ANY DEFECT OR ERROR IN THIS MANUAL OR PRODUCT. Products and corporate names appearing in this manual may or may not be registered trademarks or copyrights of their respective companies and are used only for identification or explanation and to the owners’ benefit, without intent to infringe. SPECIFICATIONS AND INFORMATION CONTAINED IN THIS MANUAL ARE PROVIDED FOR INFORMATION ONLY AND ARE SUBJECT TO CHANGE WITHOUT NOTICE, AND SHOULD NOT BE CONSTRUED AS A COMMITMENT BY KANVUS. KANVUS ASSUMES NO RESPONSIBILITY OR LIABILITY FOR ANY ERRORS OR INACCURACIES THAT MAY APPEAR IN THIS MANUAL, INCLUDING THE PRODUCTS AND SOFTWARE DESCRIBED IN IT. Copyright© 2009 Kworld Computer Co. Ltd. All Rights Reserved. 80 Limitation of Liability Circumstances may arise where because of a default on Kanvus part or other liability, you are entitled to recover damages from Kanvus. In each such instance, regardless of the basis on which you are entitled to claim damages from Kanvus , Kanvus is liable for no more than damages for bodily injury (including death), damage to real property and tangible personal property; or any other actual and direct damages resulted from omission or failure in performing legal duties under this warranty statement, up to the listed contract price of each product. Kanvus will only be responsible for or indemnify you for loss, damages or claims based on contract, tort or infringement under this Warranty Statement. This limit also applies to Kanvus suppliers and its distributors. It is the maximum for which Kanvus, its suppliers, and its distributors are collectively responsible. UNDER NO CIRCUMSTANCES IS KANVUS LIABLE FOR ANY OF THE FOLLOWING: (1) THIRD-PARTY CLAIMS AGAINST YOU FOR DAMAGES; (2) LOSS OF, OR DAMAGE TO, YOUR RECORDS OR DATA; OR (3) SPECIAL, INCIDENTAL, OR INDIRECT DAMAGES, OR FOR ANY ECONOMIC CONSEQUENTIAL DAMAGES (INCLUDING LOSS OF PROFITS OR SAVINGS), EVEN IF KANVUS, ITS SUPPLIERS OR DISTRIBUTORS ARE INFORMED OF THEIR POSSIBILITY. 81