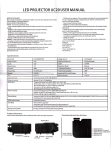
1
U
$
Oitttidtid b of,LB D b i6lid,x
2.
s&
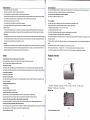
Productor Features
1.
2.
3.
4.
Productor Features
2.
3.
4.
5.
'
$rg
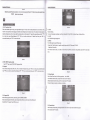
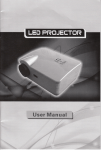
Projector Brief
Safeguards
Warning
t
Projector Overview
'1.
!
.:t;:
-;ri:
'lJ
1.
o&it*0&*i*r&B&ti&&
,]J
Catalogue
Single chip LCD technology
D High performance LED lamp (with 50,000 hrs life)
tr WXGA(1280x768 pixels native, suppori 1280-800,1280X1024 and '1366x768)
!
ll
!
!
compression compatibility for VGA, SVGA, XGA and SXGA
lnput source USB/SD/3'HDMUAV
r'GA,/S-VIDEO/ComponenUDTV(HD digital TV)
User-friendly, multFlanguage on-screen display
keystone correction
tr With USB,SD Slot
tr HD digital Tv(dvb{).
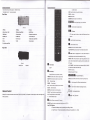
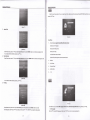
Top view
Bottom view
lmportant safeguards
Front view
Please read all these instructions regarding your Led projector and retain them for future reference. Follow all wamings and instructions marked
Back view
on the Led projector.
Rearview
1. Read instructions
All ths safety and operating instructions should be read before the appliance is opsrated.
3.
4.
Operationintroduction
2. Retain instructions
1.
2.
3. Wamings
connecting the projector
The safety and operating instructions should be retained for future reference.
Power on/Offthe projector
Menu operation
All warnings on the appliance and in the operating insfiuctions should be adhered to.
4. lnstructions
5.
User's maintenance
1.
2.
3,
4.
5.
All operating instructions must be followed.
Cleaning the lens
5. Cleaning
Cleaning the Projector Housing
Unplug this projector from the wall outlet before cleaning it. Do not use liquid aerosol cleaners. Use a damp soft cloth for cleaning.
Cleaning the Fliter Cover
6. Attachments and equipment
Replacing the Lamp
Never add any attachments and/or eqdpmenl without the approval ofthe manufacturer as
Simple repair and solution
such additions may result in the risk offire, electric shock or other personal injury
7. Waler and moisture
6.
Parameter and function
1.
2.
Do not use this projec'tor near water or in conlact with water.
Technicalspecification
8. Accessoribs
Main functions
Do not placs this projector on an unstable cart,stand, tripod, bracket or table. Use only with a cart, stand, tripod bracket, or table
IVofes on the AC Power Cord
This proiector should be operated only from the type of povver source indicated on the marking label. lf you are not sure of the type of
AC Power Cord must meet the requirement of countries where you use this projector.Please confirm yourAC plug type with the graphics below
and ensure that the properAC Power Cord is used.
power,please consult your appliance dealer or local power company.
1
s-------;;t
lT
particular attention to cords at plugs, convenience receptacles, and poinb where they exit from the appliance. Do not put the power cord
sl
ffi
[,"ift#;#
R-------r;l
|
1. Power-cord protection
Power-supply cords should bs routed so that they are not liksly to be walked on or pinched by items placed upon or against them. Pay
N*J
[@]
lN,.9
|l\r/l\,-,1
under a carpet.
12. Ovedoading
Do not overload wall outlels and extension cords as this can result in a fire or electric shock.
13. Objecb and liquids
|
Never push objects of any klnd through openings of this projector as thoy may touch dangerous voltage points or short-out parb that could
result in a flre or electric shock. Never spill liquid of any kind on th6 projector.
lntroduction
Projector Features
The projector offers the following features
.
10. Porer sources
14. Servicing
Do not attempt to service this projector yourself.Refer all s€rvicing to qualified seMce personnel.
15. Oamage requking seruice
Unplug this projector from the wall outlet and refer servicing to qualllied service personnel under the following conditions:
,,.
ffi
qpqt4ainid.I&DWaeb
agt ttt&m4fx&eMbuo,
(a) lf the power-supply cord or plug is damaged.
Clean the air-fllter frequently. lf the filter or ventilation slots become clogged with dirt or dust, the temperature inside of the projector may rise
(b) lf liquid has been spilled, or objects have fallen into the projector.
and cause some troubles, such as damage of inside parts, and shortening the Iife of panel.
(c) lf the prcjector does not operate normally ater you follow the operating instructions.
Do not look into the air outlet gillle when projector is operating.
Adjust only those controls that are covered by the operating instructions. An improper adjustment of other controls may result in damage
Heat, dust etc. may blow out of it and hurt your eyes.
and may often require extensive work by a qualilied technician to restore the projector to its normal operation.
(d) lf the prcjector has been exposed to rain or water.
Placo of installation
(e) lf the proJector has been dropped or the cabinet has been damaged.
For safetys sake, refrain from setting the projector at any place subjected to high temperature and high
(f) lf the projector exhibits a distinct change in performance - this indicates a need for service.
humidity. Please maintain an operating temperature, humidity, and altitude as specified below.
. Operating temperature: between +41T (+5C)and +95T (+35C)
'16. Replacement parts
. Operating humidity: between 30% and g0%
. Never put any healproducing device under the projector so that the projector does not overheat.
. Do not attach the projector to a place that is unstable or subject to vibration.
When replaement parts are required, be sure that the service lechnician has used replacement parts specilied by the manufacturer or
parts having the same characteristics as the original part. Unauthorized substitutions may result in fire, electric shock or other hazards.
17. Safety check
Upon completion of any service or repair to this projector, ask the seruice technician to perform safety checks determining that the projector
f
is in a safe operating condition. An appliance and cart combination should be moved with care. Quick stops, excessive force and uneven
surfaces may cause the appliance and cart combination to overturn.
'
'
18. Ventilation
Do not install the projector near any equipment that produces a strong magnetic field. Also refrain from installing near the prcjector any cable
carrying a large ouffent.
Place the projector on a solid, vibration free surface: otherwise it may fall, causing serious injury to a child or adult, and serious damage to the
product.
Slots and openings in the cabinet are provided for ventilation, ensuring reliable operation of the projector and to protect it from overheating. i
. Do not stand the prciector: it may fall, Gusing serious injury and damage to the prcjector.
Do not block these openings or allow them to be blocked by placing the projector on a bed, sofa, rug, or bookcase. Ensure that there is
'
'
adequate ventilation and that the manufacture/s inshuctions have been adhered to.
WARNING.'
I]
Unplug immediately if there is something wrong with your
projector.
Slanting the projector more
than
1o"(right and left)
or
15' (front and rear) may cause trouble or explosion of the lamp.
Do not place the projector near air-conditioning unit or heater to avoid hot air to the exhaust and ventilation hole of the projector.
Projector Overview
Top view
:
Do not operate if smoke, strange noise or odor comes out of your prcjector. lt might euse fire or electric
.:t
Never remove the
cabinet.
lll
This projector contains high voltage circuitry. An inadvertent contact may result in an eleckic shock.Except as specifically explained in
the
'
'
Owner's Guide, do not attempt to service this product yourself. Please contact your dealer when you want to fix, adjust or inspect the projector.
Do not modify this equipment.
It can lead to fire or electric shock.
lf you break or drop the
cabinet.
'11
Do not keep using this equipment if you break or drop it. Unplug the proiector and contract your dealer for inspection. lt may lead to fire if
keep using the
you
...:
;r
equipment.
1
Do not face the proiector lens to the sun,
(picture 1)
1.
It can lead to fire.
Use
Menu
Button
2.Power
Button
g.Red indicator 10. Remote
corect voltage.
3.Source
sensor
Button
4.V+
Button
5.V-
Bufton
11.Green indicator
Bottom view
lf you use incorect voltage, it can lead to fire.
Do not place the projector on uneven surface.
Place the projection on a leveled and stable surface only. Please do not place equipment on unstable surfacss.
Do not look into the lens when it is operating. lt may hurt your eyes.Never let children look into the lens when it is on.
Do not turn off the main power abruptly or unplug the prorector during
It can lead
operation.
to lamp breakage, fire, electric shock or other trouble. lt is best to wait for the fan to turn off before turning main power
Do not touch Alr outlet grille and Bottom plate whlch becomes
,ll'
off.
hot.
.,,
Do not touch them or put other equipment in front ofAir outlet grille. The heated Air outlet grille and Bottom plate may cause injury or damage to
other equipment.Also, do not set the prcjector on the desk which is easily afiected by
Clean the air-tilter once a
month,
-,1
heat.
'i
"i
r
(picture 2)
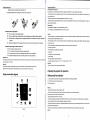
How to hang the projector to ceiling?
6.CH+
Button
7.CH- Button
Oiintiu
Operstion of LED prujeclot
of LED broiector
fix the 3 feet of mount to the prolector
The height ofA and
C
3
.
feet (B D E) hole
or other channel.
INFO: Press this button to show the information.
fee can be adjusted;
Back View
ENTER:: ok button.
MENU:menu button.
RETURN:Press this button to exit OSD menu.
tr tr tr E, ,"n, button for left, right, up and down.
E E,
(Picture 3)
1.PR(Red)
4.Left audio
input (Red)
7.HDMl3 input
2.PB(Blue)
3,Y(Green)
5.Right audio inputwhite)
6.AVlN(Yellow)
8" Remote
Sensor
E E,
'l1.HDMl2 input
'12. Card reader
't3.DTV
'l4.S.video input
'15.
16.VGA
,I7,USB
",
or,,on
DTV mode, press this button to select the following and above
9. Keystone correction knob
t0.HDM|'l inpul
press tnis button to adjust volume.
channel.
lnput
Right audio output (White)
18. Power Switch
19. Left audio output (Red)
Rear View
E,
Press this button to paly or pause.
E,
Press this button to stop
.
SUBTITLE: Press to turn ONiOFF subtitles,
AUD.TRACI(TTX:audio track button /Turn teletext function.(DTV).
9,
,,rr,
Select the program(movie or music) start time(suit for
usb/sd)/Display current Channel information(for DTV only).
REPEAT / EPG: Press this button to play video again(suit for usb,sd
card) / press to display electronic program guide (only available under
DTV mode)r
(Picture 4)
1. Exhaust vent
2.Speaker
E,
Power button
DTV channel and radio channel switch key.
ON/OF
DW:DTV menu key.
K, ,r*
ornon
Press this button to mute volume or recover.
P.MODE:Press this button to switch on picture mode.
AUDIO:Press this button to switch on sound mode.
FLIP:
Reversed image.
FREEZE:
FAV:
Picturefreeze.
Press this button to select the favorite channel
CHLIST: channel list button.
Remote Control
AB / TV RADIO: Press this button to paly selected AB(suit for usb/sd) /
ZOOM:Press this button to zoom the picture.
'16:9/4:3, Press this button to zoom the picture.
(Warning Do not expose the remote control to shocks, liquid or high humidity Do not expose it to direct sunlight or other intense light source
0-9:
Press digital button to select channel.
when you operate.)
-/-:
Channel selection button.
tr:RECALL
OK:Confirm key(for DTV only).
E E E
E:orvupldownitefvrishtkey.
EXIT:Press to exit DTV current menu and return to previous menu.
lil ,r,
Fast backward (for USB/card readerxred button).
E tt,
Fast foruard (for USB/card readerxgreen button).
\-J
PREV: Previous(yellow Button)
I8 *arr,
Next (blue Button)
KEYreturn to previous DTV channel,
SOURCE:Press this button to select specific source such as DTV, SV
lnsert The Batteries
l.
Remove the battery cover by pressing it and sliding it down.
2. lnsertthetwol.5V(AAAsize) batteriesmakingsurethepolarity(+or-) ofthe
iiF
op&q$wq{r|.sgilfitlfql
Otui^nafl.[nl,Mi,,fu
batteries matches the polarity marks inside the unit.
3. Replace the battery cover by sliding it in until you hear a click sound.
Front projection, ceiling mount
For ceiling mount, you need the ceiling mount kit.Ask a specialist for installation. For more details,consult your dealer.
. This waranty does not cover damage mused by the use of any unrecommended ceiling mount kit and the installation of the ceiling mount kit
at an improper location.
. When using the ceiling mount, set IMAGE REVERSE in the SET UP menu to FLIP.
. Pro.iected images may appear darker when the unit is used as a ceiling installation than when it is used in the tabletop position. This does not
signify a product malfunction.
Rear projection
Ask a specialist for installation. For more details,consult your dealer.
. For rear projection, set IMAGE REVERSE in the SET UP menu to FLIP.
Precautions when using batteries
t
O
O
Do not use old and new batteries together.
Caution:
Do not use different types of batteries (for example, Manganese and Alkaline batteries) together.
. Placing the proJector on a carpet reduces ventilation from the fan at the bottom and might cause problems. Place a hard board or simllar item
Note that there are chargeable and non-chargeable batteries. Do not attempt to charge non-chargeable
a
Remove the batteries from the remote control unit if you do not intend to use the unit for a long time.
Precautions when using the remote control unil
a
a
O
a
under the projector to facilitate ventilation of the unit.
. Place the projector more than 1 m (25 inch) from the wall to prevent blocking the intake, exhaust slots andventilation ofthis projector because
batteries.
Do not drop the remote control unit.
hot air comes out of it.
. Do not use the projector under the following circumstances, which may cause fire or electric shock.
. in a dusty or humid place
. while the projector is lying sideways or upside down
Do not subject the remote control unit to physical shocks.
. near a heater
Keep the remote control unit dry" Wetting it may cause the unit to malfunction.
. in a kitchen or oily, smoky or damp place
Replace the batteries with new ones when operation of the unit deteriorates.
Operation area
The range for operation is about '10 m (33 feet) when the remote control points to the projector. The distance to the screen back to the projector
must be less than 5.5 m (18 feet).
. in direit sunlight
. with high temperature, such as the closed car
. where the temperature is lower than +41
T
(+5C ) or higher than
+95T (+35!
)
lmportant:
lmportant:
Avoid the direct sunlight or fluorescent light to the remote controljsensor. Also keep the distance oi more than 2 m
. Do not put stress on the lens, as this may cause damage.
between the remote control sensor and fluorescent lamp on the remote control may not work conectly.
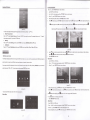
Preparing the projector for operation
Singal connection diagram
Getting ready for projection
1.
Connectthe powercord provided tothe projecto(lnputVoltage:100-240VAC;Frequency:50/60H2).
2. Connect the power cord to the wall power outlet.
3, Remove the lens cap.
Warning:
. Do not look directly into the lens when projector is 'ON".
. The lens cap is for protecting the lens. lf you leave the power on with the cap on, the cap may be warped.
Please remove the lens cap when you turn ths powsr on.
. Use the appropriate power cord for your country.
. A three-pin grounding type power plug is used with the projector. Do not remove the grounding pin on the power plug. lf you are unable to
insert the plug into the outlet, contact your electrician to replace your A'lC outlet.
. Do not place any objects on the power cord, and keep the prorector away from heat sources to avoid breaking the power cord. A broken power
cord can cause fire or electric shock.
. Do not revise or alter the power cord otherwise it may causs fire or olgctric shock. Contact your dealer if the cord is broken.
(Picture 5)
Caution:
fi
&raiodlaliebl&8&.itiidlirybt
. Plug
in firmly and unplug by holding
1. Prcss the " MENU" button on the remote to open the OSD menu.
the plug, not by pulling the cable out.
2.WhenOSDisdisplayed,use"<"/">" "4'T"V"keytoselectanyfeatureinthemainmenu.
. Do not plug in or out with wet hands. lt may cause an electric shock.
3. After selecting the desired main menu item,
4. Use "<"/
To operate projector power ON
1 .Plug in
6. To exit OSD, Press the "
the power cord,the POWER Green indicator lights up,then Green indicator off and Red indicator lights up.
l
"ENTER".
MENU' button again(or press "RETURN" button). The OSD menu will close and the pro.iector will automatically save
1. Press the 'MENU" button to open the OSD menu.
lr'-"
2. When OSD is displayed, use 'V+" /
To exit from this mode, press "RETURN'button on the remote control.
I
Press the POWER button again.The projector will be turned off.
,
else unwanted damage should occur.)
Focusing
The focus length will change with the change ofthe distane between the projector and the screen, so that the image will blur. Now you can tum
the lens gently with your hand, to correct the focal length so as to obtain distinct images.
screen mode
When playing DVD discs containing data of leterboxed image, press the 16:9 button. Exit the Widescreen mode, by pressing the 16:9 button
again.
"CH+"/ "CHJ key to select any feature in the main menu.
3. After selecting the desired main menu item,
"V-'
press "SOURCE'
key to enter sub-menu for feature setting.
ti
4. Use "V+' /
..
6. To exit OSD, Press the " MENU" button again. The OSD menu will close and the proJector will automatically save the new settings.
Keystonc conection
knob. (115 degree adjusting angel) (Note: When turning the keystone correction knob, please turn it gently, and never use too much effort, or
,f
"CH+"/ "CHJ to select the desired item and adjust the settings with "V+" / 1/-" or "SOURCE".
5. Press the " MENU" button, the screen will return to the main menu.
,'
Menu and Operations
1. Input source(select
2. DTv
3. Picture
4. Sound
5. Option
6. Usb
7. Sd
lnput source)
Pressing "SOURCE" key on the remote to Enter input source, you can select DTv, AV, S-VIDEO, YPBPR ,HDM11,HDMl2,HDM13, PC-RGB,
Caution:
. When you have finished using this equipment, unplug the power cable from the wall outlet, for safety purposes.
USB and SD CardRead by pressing
(Pressr,g 'SOaIRCE" key on
Refer to the graphic and table below to determine the screen size and projection distance.
Projection
1m
1.5m
2m
2.5m
3.0m
3.5m
4m
5.5m
Aspect ratio
16:9
l6:9
l6:9
l5:9
l6:9
l6:9
't6:9
't6:9
lmage size(inch)
25"
47"
63'
82
100"
'l18"
135"
200"
distance
'4"/'v"
key(or pressing "SOURCE" key again), enter the input source by pressing "ENTER" key
top
of the projector
bufton to
Enter input source menu, you can select DTV, AV, S-VIDEO, YPBPR ,HDM||,
HDMI2, HDM|3, PGRGB, USB a/,d SD CardRead by pressing 'CH+'FoHrbutton(orpress,,ng 'SOURCE key again), enter the input source
by pressing ry+"
or'vr
bdton
.
The selected item will change to highlight colour.)
irote;
x
Posilion the proJector in a horizontal position; other positions can cause heat build-up and damage to the projector.
!
Keep a space of 30 cm or more between the sides of the projector.
.! Do not use the projector in
.
The selected item will change to highlight colour.
Adjusting Projection lmage Size
!
"{" /'}"and
Using the top of projector key button:
I
Press the POWER button. The message "POWER ? "
image keystone distortion may occur. ln case of keystone distortion, the image can be pro.iected regularly by adjusting the keystone correction
.
"ENTER" key to enter sub-menu for feature setting.
I
When the projector is turned on, the pojected images become brighter gradually. Owning to the different angle of the positions of the projector
.
press
select the desired item and adjust the settings with
the new settings.
To operate projector power off
.
"1"/ "V'to
5. Press the "MENU" button, the screen will return to the main menu.
2. Tum the projector on by pressing the POWER button. The power lamp will be green.
.
.
.
">"
a smoky environment. Smoke residue may buildup on critical parts and damage
the projector or its performance.
Consult with your dealer for special installation such as suspending{rom a ceiling.
System function operation
How to operate
Using the remoter
10
At,, t tto.4,tiflrqp.
iN erlol
Op
u iltun
$1 I;ED
liliijgti&|i
(picture 6)
Method of oPeration:Press Source button on the remote lo show source list,Press"l,
"ENTEN" button to enter
v"
button to choose the mode,then Press
the mode.
ffi
I.DVB-T lnstallation Guide
Follow the installation guide to enjoy your high defmition digital TV world. Follow the help infomation that at the bottom ofthe
window to select preference menu language and suitable country (Region) and start chanael search. Ifno channel is found during the
channel searching process, the user may adjust the antenna position to obtain optimal TV signal.Press upward/downward
key to select item, press leftward/rightward
("<'/'>)
('A Y'V
)
(l
(Picture 9)
2.1.2 Sort
Program ordering.
1)
key to switch selected items. In Channel Search item, press "OK" to
auto-search channels, press "EXIT" to retum main menu.
You can sort the programs according to your flavor Option By LCN, By ONID , By Service Name , By Service ID etc.
2.1.3 LCN
LCN: ON/OFF for logical progam list.
2.2 Picture
Set the following items under Picture menu:
l)Aspect ratio: Under this item, it is enable to switch between Auto/I6:9 Wide screen/4:3 FulV4:3
Pan&Scan/4:3 Letter Box.
2)TV Format: Under this item,
it is enable to switch between PALA{TSC
system.Once setting finished, press EXIT to retum maln
menu,
(Picture 7)
2. DVB-T Mf,,NU Operation Guide
Press
"DTV" key to
enter
D\IB-T MENU Operation Guide.
2.1 Program
Four sub-menus (Program Edit, EPG, Sort, LCN) are included in Program item, press
(" A "/" V ") key to select item, pressleftward/rightward
('{
"/
"
}
'OK'key to enter, press upward/downward
") key to switch selected items, press "EXIT" to rehrm main menu.
(Picture 10)
2.3 Channel Search
Under Channel Serch item, the following operations Are available:
l)Auto
Search: Select this item, and press OK to auto search TV channels.
2)Manual Search: Select this item, press OK to manual search TV channels
3)Country: Setup your country according to your location.
)
(Picture 8)
i)
2.1.1 Program Edit
Befbre entering Program Edit item, enter factory password 888888 or 000000.
Before entering Program Edit interface, press red/green/yellow,/blue key on the remote to Move/Skip/Lock/
Delete/FAV all TV channels. Press EXIT key to exit.
(Plcture
11 )
2,3.1 Manual Search
Under Frequency Channel item, press digital number on the rcmote to input channel number directly, press
OK to manual search TV channels.
11
t2
WW;iiiifrwyrgp4lo!
2.4
ODqii&tn nf LED &r,le',tar
fime
Can adjust Picture Mbde,Color Temperature,Aspect
Setup the following items under Time menu:
Press
l)Time Offset: Adjust time zone to Auto or Mmual.
2)Country Region: Setup your capital ofthe Country under this item.
1.
'4"/'V" "<"/">"
Ratio,Noise Reduction and PC Setup.As below(picture 9):
to move cursor. Press "ENTER" to enter the sub-menu or adjust item. Press"l\,lENu" to return or exit menu.
PICTUREMoDE(picture 10):
There are 4 picture modes: Standard/N4ild/User/Dynamic.
3)Time Zone: Setup your time zone according to your location.
Standard: middle brightness and contrast;
l\4ild: low brightness and contrast;
User: user define the brightness and contrast.
Dynamic: high brightness and contrast;
value, the picture mode will auto change to User mode.
Note: when user adjust brightness/contrasvhue/saturation/sharpness
(picture 12)
2.5 Option
OSD Language, Subtitle Language, Audio Language, are available to seh-rp in Option menu, press upward/
domwrd
key to select the above items, press leftward,/rightward key to switch the selected item. Once
(picture
Press
'
'4"/'V" "<'/'>"
5)
1
button to select Picture Mode,and then press "ENTER" button to enter the sub-menu(picture 16).
(Picture'l3)
2.6 System
The following operations are available in System interface:
1)Parental Guidance: Setup Lock function according to audiences'ages.
2)Set Password: Change factory password in this item. Input old password and new one orderly, and then confirm. The defaull
(picture 16)
password is 888888 or 000000. Please remember the new password after modifuing.
Press
3)Restore Factory Default: Press OK key to restore to actory default setting.
"{"/'}"
and Tint(suitforAV)
buttonto selectContrast,Brightness,Color,Sharpness
A. Contrast: Press "<" to decrease value, Press ">" to increase value. Press "l\,lENU" to return menu.
4)Information: Press OK key to check system information.
"<"
. B. Brightness:Press
5)Software Update: Upgrade is needed. select this item for relative operation.
C. Color:Press
"{"
D. Sharyness: Press
E.
2.
to decrease value, Press
to decrease value, Press
"<"
">" to increase
value. Press "MENU" to return menu.
">" to increase value. Press
to decrease value, Press
")'to
"l\,lENU" to return menu.
increase value. Press "MENU" to return menu.
Tint:Press "<" to decrease value, Press ">" to increase value. Press "MENU" to return menu.
ColorTemperature
There are 4 Color Temperature modes: MediumruVarm/User/Cool.
Enter Picture menu, you can selectColorTomporaturo
enter the sub-menu(picture
1
by pressing
"
'l"v"
Medium: inlcuded red setting,green sottlng end bluo setting;
(Picture'14)
t3
key,and then press "ENTER" button to
l).You can ad,iust the ltem selected by pressing
Warm:
inlcuded red setting,green settlng and blus B6ttlng;
Cool:
inlcuded red setting,green settlng and blus g€ttlng;
User:
you can set red,green,blue by preeslng
"{" / ">"
t4
kay.
"{" / "}"
key.
wwwwi@nte
Enter the sound menu (picture 21), you can adjust Sound Mode, Balance,Auto Volume,Surround Sound,SPDlF MODE and EQ item by
pressing
"4"/"V"
key.
(picture 17)
3.
Aspect Ratio
.
(Picture 21)
Sound Menu
1,
Sound mode;c
an support Standad/Mu sicthovie/sports/llset.
Standar:suit for W progmm:
Music:suit for listening music:
(picture 18)
Enter Picture menu, press
"
'7'V" key to select Aspect Ratio,and then press "ENTER' button to enter the sub-menu(picture 18).
'7"V' key.
You can adjust the item selected by pressing
Movie:suit for media:
"
User:user define te bass and treble.
Noise Reduction
Enter Picture menu, press
"
Sporfsisu,t for spo/ts program music,movie,personal,spois;
'7"V" key to select Noise Reduction,and then press "ENTER' button to enter the sub-menu(picture l9).
Balance;
Auto Volume;
Surround Sound;
SPDIF MODE;
EQ:
(picture't9)
You can select the item selected by pressing
"
'l"V"
key.
PC Setup
(Picturo 22)
(picture 20)
Enter Picture menu, press
'4"/"v"
key to select Pc setup (suit for vcA),and then press "ENTER" button to enter the
sub-menu(picture 20). Press "A'7"V" key to select,and then press
t5
"<'/
">" or,,ENTER,
key to adjust the item selected.
Enter this menu, you can select OSD Language, Rartore Factory Default,Blending,OsdDuration
1.
item by pressing
OSD Language;
Press "A'7"V" to select OSD language,and thsn pross'ENTER" koy to enter the sub-menu(picture 23).
'
'l"V"
key
,
Apualipttol&WitbiQttq-t
Select C:\, p..r. "ENTER" bruoiIIt"Ir:6i;il. Insert USB Port to USB entry.
2. Press <"/">" to select photo, and then "ENTER" button to enter submenu.
3. SelectC:\, press "ENTER"buttontoentersubmenu
4. Select the specific photo, and press 'TNTER" button to con{irm
5. Press '{X" button to play, and
button to show function menu. Press "X" button to pause, "n"
"
"X"button to play
2.
and Chinese by pressing
"
"/"V'
,enu;
'["
button to repeat all of the programs.
Sbutton
pr".."E"
to show photo detail information;
Restore Factory Default;
key to restore or press
">"
Press"<"
key to return OPTION menu.
Blending;
Press
4.
button to stop or return to the previous
key.
Press" '7'V"toselectRestoreFactory,,andthenpress"ENTER"keytoenterthesub-menu,Themessage"Areyousure?"
3.
"1"
button to play MP3 music stored at music menu; Ebutton to show playlist;
(picture 23)
You can choose English,Franais,Espaol,Portugues,Arabic
next one;
button to play the previous one,
"l'"/'v"
to select Blending,and then press "ENTER" key to choose LOW,MIDDLE,HIcH or OFF mode.
OsdDuration;
Press
"1"/"V"
to selectOsdDuration,and then press "ENTER" keyto choose 5 Sec, I0 Sec, 15 Sec or OFF mode.
(picture 26)
6,
press')"button to show the second function ,"nu;
Press
7.
USB/Card reader function
This Prcjector integrates powerful function to support USB/SD Card reader and you can connect Ex-equipmentsvia the USB/SD Card reader. At
present, system can support usual USB/card reader media players and upgrade to system software.
It can support only the files displaying in the list and the file formate
this product plays. Enter USB by Pressing "SOURCE" key on the remote to
Eor
E
pr".rg,o,
button to ,oom out or zoom in the photo;
E
E
button to rotate the photo counter-clockwise or rotate clockwise.
button to move view.
Press "RETURN" button to exit,
Music Show
l. Insert USB Pon lo USB entry.
. Press < "/'> " to select music program, and then "ENTER" button to enter submenu.
3. SelectCl, press "ENTER" buttontoenter submenu.
2
"
select input source "USB" or "SD " (for card reader),and then pressing "ENTER" key to enter.
(picture 27)
4. Select the specific song, press
(picture 24)
5. Press
"I"
"I"
pressElbufton to show playlist; press
6. Press
7.
E
one,
button to play the previous
You can choose Photo, Music, lvlovie, Text in the menu(picture 24).
Photo Show
button to play; press "ENTER" button to confim.
fl
press
"X"button
to play next one; press
"I"
button to show music program detail information;
button to set the play period of time
Press "RETURN" button to exit.
Movie Show
1.
Insert USB Port to USB entry.
2.Press "<"r'>"toselectmovieprogram,andthen"ENTER"buttontoentersubmenu.
3. Select
(picture 25)
t7
Cl,
press "ENTER" button to enter submenu(picture 28).
4. Select the specific movie, press
'il"
button to stop or return to the previous menu.
button to play; pross "ENTER" button to confirm.
t8
€na4&w&eu&i&i
presGlbutton to show playlist; press
6. Press
E
I
brno,
,o
,ho*
movie program detail information;
button to set the play period oftime.
Movie
(picture 28)
7.
Resolution
Remark
.DAN.MPG\.MPEG
1920x1080@30p
Max Data Rate:2oMbps
MPEG2
,MPG
1920x1080@30p
Max Data Raie:2oMbps
MPEG4
,AVI\.MP4
DIVX.XVID
1920x1080@30p
l\,lax Data Rate:2oMbps
RI\/l\RMVB
,RM\.RMVB
RV8,RVg,RV1O
1280x720@30p
Max Data Rate:1oMbps
H264
MK\A,MOV
H.264
1920x1080@30p
Max Data Rate:2oMbps
640x480@30p
Max Data Rale:1 oMbps
Media
File Ext.
MPEGl
Codec
Press "RETURN" button to exit.
TEXT Show
1. Insert USB Port to USB entry.
2.Press "<"/'>"toselecttextprogram,andthen"ENTER"buttontoentersubmenu.
3. Select
Cl,
press "ENTER" button to enter submenu.
4. Select the specific text. press
["
butron to play.
MJPEG
5.Press">"buttontoplaythenextone, press"{"buttontoplaypreviousone;press"A'"buttontoplaythepageup,press"V"buttontoplay
the pagedown
.
6.Press "RETURN" button to exit.
Divx
..Dtuo.Avt
MPEG,DIVX,H264
1920x1080@30p
Max Oata Rale:2oMbps
vc1
,WM\A.ASF
vcl
1920x1080@30p
Max Oata Rate:2oMbps
FLV
FLV
H264
1920x1080@30p
Max Data Rate:2oMbps
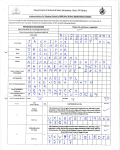
The file format of UsB,lcard reader can Supporl:
USB
Function
Media
file Extension
PICTURE
JPEG. BMP. PNG
1. Userts maintenance
jpg\ .bmp\ .png
MPEGl, MPEG2. MPEG4. H264, RIVl. RMVB.
.avi\.mpg\.dat\.vob\.div\.mov\,mkv\.rm\.mvb\.mp4\.mj
MOV. MJPEG. VC1, DIVX. FLV
peg\.ts\.trp\.wmv\.asfl
MOVIE
IUUSIC
WMA. MP3, M4A (AAC)
.fl v
wma\.mp3\.m4a
The projector needs proper maintenance. You should keep the lens clean as dust, dirt or spots will project on the screen and diminish image
quality. lf any other parts need replacing, contact your dealer or qualified service personnel.
Cleaning the Lens
Use a standard lens-cleaning brush or a piece of lens tissue dampened with lens cleaning fluid. The lens surface is fragile. Use only
Photo parameter
recommended, nonabrasive lenscleaning materials. Do not touch the lens with your tingers.
File type \ the
relevant parameters
Resolutioh
Compression option
Support
boundaries
Resolution Only support
Cleaning the Projector Housing
Gently wipe with a soft cloth- lf dirt and stains ars not easily removed, use a soft cloth damped with water, or water and neutral detergent, and
Prcgressive JPEG
1024.768
JPEG
15360X8640
Baseline("standard")
supporl
Baseline optimized
suppon
homochrcmafism
suppon
wipe dry wilh a soft, dry cloth.
Warning
Never ogen any of the covers on the prolector. Dangorou8 oloctrlcal voltagss inside the projector can cause severe injury Do not attempt to
BIUP
9600x6400
1
6 color
256 @lor
seruice this product youBelf. Refor all sorvlclng to quelltled sorvlco porsonnel.
!
Turn off the projector and romovo the AC powor cord from tho power outlet bsforo beginnlng meintonance work.
I Make sure the lens is cool before cleanlng,
I Do not use detergents or chemlcals other lhen
16 bit
Ll Do not use chemical sprays.
lho$
not6d above. Do not u8€ benzene or thlnners.
Op q
&&i&&ii&&&a{it&d&&
a6m if. LEA
iid l<,rot
D Use a soff cloth or lens paper only.
. This mark is displayed when an invalid operation is executed (for examplo, when
Simple repair and solution
the COIIPUTER or VIDEO button is pressed whil€ the menu is displayed). This is
The New small LED p/o/iector is a high-tech product integrating optical, mechanical, and electronic components, with CPU and several
protection circuits installed. ln case of violating the operation procedure or improper setting, the protection chcuit of it will start to work. Then
some abnormal symptoms will occur to it. However, as long as you make the correct setting or follow the operation procedure, the failures may
not failure.
Remote
control
does nol work
be resolved-
PROBLEMS
The power is off
The batteries in the remote conlrol used up
. Change new batteries
the battery is installed not correctly
. lnslall the battery correctly
obstacle between the prcjector singal recoiver ?
. Remove the object
.
ls the remote control out of operating distance?
CAUSE
.
POSSIBLE SOLUTIONS
Ihe air jnlet grille, outlet grille
or
airfilter is clogged with dust or some objects.
Close the remote control to prcjector (max
distance: 7M)
. Remove the object.
POWER indicator doss not light up.
. Pow€r @rd is unplugged lrom the outlet.
.Plug thspower cord inlo the outlet.
.
. lnsrt the powBr cord into the pojector.
PMr
cord is dis@nnected from the projeclor.
Specifications
POlt/ER indicator blink3 red.
. The prcjector has been turned on again too soon afrer having been tumed off.
. Wait for the lighting sequene.
. Lamp is no longer working.
. Replae the lamp wilh a new one.
Technical specilications
Model No.
€p.
No picture appeaE
Lens is @vered by lens
on the sqeen.
The equipmenl @nnec.ted to {his prcjector is not turned on.
. Turn on the connecled equipment.
Hmkup is not made @rectly wjlh other €quipment.
. Conlim the hookup.
The input source is not
. Take the lens
slected mrectly.
€p
off.
. Select the coreci source
The image is
. The air inlel grille, outlet grille or air filter is clogged wtth dust or some objects
. Remove the object and tum offthe main
porer switch. Afrer about 1 0 minutes, Turn lhe
prcjectorcn.
The image is
. The prcjector is not at a right angle to the screen.
. Adjusl the angle of th€ prcjector to make a
distorted
fhe image is dark
The image is
blurred.
right angle to the
. Brightness, tint and @lor are not adjusted correclly.
sreen.
. Adjust brightness. tint and @lor @rectly,
The prcjec{ing distance is beyond the focused area.
. Adjust the projecting distance.
. Clean lens.
Lens is dirly.
PAL
5.8 inch LCD
Physical resolution:native 1280*768, support 1280-800,1280X1024 and 1366x768
amrding to the
equipment @nnected to this prcjector.
turned off.
IV System
Display Technology
Brightness
3000ansi(max)
Contmst ratio
2000:'l
Lamp power
120W led bulb
Focus adjustments
Manual Focusing,SupportVertical
Picture Rotation function
Horizontall/ertiml rotation
Compatibility
HDIIl: Support
Aspect Etio
4r3l16:9 (supportAll input 16:9)
Builtin Speaker
2W
OSD Languages
Englishi Franais/Espaol/Portugues/Arabic.ichinese
lnput Socket
AVDryS-video,Audio-out,Audio-in,VGA,YPbPr,HDlvll*3,USB,SD
30 de-interlace,Zoom,'16:9,video supporl H.264 lor USB/SD input, HD digital Tv(dvb{),MPEG4
-2
1
080P1 1080i1720P 1576P 1480Pi576i/480i
Audio output (8O)
(Gn add languages)
card reader
. Redu@ scrsn size to within 35'lo 150'.
Screen size exeeds screen size specm@tions.
Brightne$ and @ntEst are not adjusted @rectly.
. Adjusl brightness, contmst.
Advancd Feature
The projector is not at a righl angle to the screen
. Adjusi the angle of the prcjector to make a
Lamp life
50000 hours
Dimensions(LxWxH)
L:330 x W:245 x H: 115
right angle to lhe
$reen
The image remains
. When you see the stationary image for a long time, it may remain on the screen if you change the
Weight
N,W:3.65 KG; GW;4.5KG
blured.
image. lt is not a breakdown. The bluned image will disappear in a few minutes.
Voltage
AC100-240V 50/60H2;
R6d, blue or green
It is
Noise
30dB
nomal.
dots are
Prcjection distance
1.0-6.0m
vi€wed on th€ texl ol
Prcjection size
25-250 inch
image.
Supplied Accessories:Remote control, power plug cablo, user manual,warranty card, AV signal cabl€,lens clean cloth,fuse.
The image is
. The
distorted
teminal.
is not plugged secursly into the teminal.
onlhe screen
. The prcjector is installed t@ close to olher equipment.
. The pDj6ctor is installed too close to othBr
€ble for @nnectjon with other equipment is not plugged securBly
and noise is heard.
No sound is heard.
Zoomllmage Zoom/lmage Shrink.
into the
. The
eble for connection wilh other equipmenl
Thank you for reading the User Manual. lf you have any question, please leel free to rcntact us or the dealers. We will provide excellent seryi@ to you. We
sincerely hope that you will enjoy your life with our producb.
6quipment,
. Volume is not tumed up.
. Turn up the volume,
. Connection to other equipment is not made @rectly.
. Check @nnections.
22