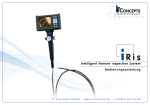
Download iSeries Industrial Videoscope (Technical Borescope) Data Sheet
Transcript
Operating
Operating Manual
OM_iSeries_EN_00
1-12
Content:
Content:
Preamble
3
Warning notices and precautions
3
Scope of delivery
4
Presentation
4
Technical specifications
5
Operation environment
6
Description
7
Operation
8
Care and storage
10
Spare Parts and accessories
11
Product return in case of service
12
Disposal
12
Declaration of compliance with CE
12
2-12
Preamble
We congratulate you on buying your iSeries Videoendoscope, in the following just named iSeries Scope. The
iSeries Scope constitutes the core of the iTool System.
Always keep the Operating Manual with the iSeries Scope. It contains all information for safe and efficient
operation. However, should you have further questions, feel free to contact our service team.
Your IT Concepts Team Germany
IT Concepts GmbH
Gewerbestraße 17
D - 35633 Lahnau
Tel.: +49 (6441) 67 92 99 — 0
Fax.: +49 (6441) 67 92 99 — 99
E-mail: [email protected]
Web: www.itcworld.de
Warning notices
notices and precautions
Read the operating manual carefully before using the iSeries Scope.
The iSeries Scope is designed for a diversified field of applications in industry, building and science.
Caution! The iSeries Scope has not to be used in specially designated or prohibited areas (e.g. explosion
prevention).
Caution! The iSeries Scope has to be employed by skilled and qualified personnel appropriate to the
application.
Electric shock! No unauthorised opening of the casing. There is high danger of electric shock due to parts
being under voltage.
Caution! Never look directly into the light emitting part of the videoscope. There is ultraviolet and infrared as
well as highly intensive visible light coming from the light source. These can cause injuries of eyes and skin.
Always switch off the light source or adjust brightness to a minimum when changing or controlling the
objective or the distal end of the videoscope.
An iSeries Scope should not come into contact with a current or voltage source. Damages on the product or
an electric shock for you may result.
Always switch off the iSeries Scope before connecting an iTool or a video camera.
The housing of the iSeries Scope in opposite to the insertion tube is not watertight. Operate the housing of the
iSeries Scope in dry environment only.
Only use the iSeries Scope as intended.
3-12
Scope of delivery
The iSeries Scope is delivered with the following items, if not negotiated otherwise:
—
—
—
—
—
—
—
Objective Lens with FOV 90° (Colour Code: red)
Objective Lens with FOV 58° (Colour Code: black)
Objective Lens Tool
Exchangeable Light Guide Adapter Plug for IT Concepts Light Guide Adapter
Video Connector Cable Typ II with BNC Adapter
12V DC Adapter 0.42A
System Carrying Case
You will find additional accessories in this operating manual on page 11, in our accessories catalogue or on
our homepage www.itcworld.de.
Presentation
Videoscope has a flexible body allowing easier insertion into spaces to inspect and a wider range of the
Videoscopes´ functional possibilities. This flexible body can be inserted into a pipe or a cavity, or fixed in a
position convenient for an operator with the help of special fittings and facilities. In the latter case the flexible
body can be arranged inside the hollow guides (linear or bent pipes or other facilities) ensuring its definite
location. The articulating section can be bend in 2 directions. The possibility of turning (bending) the
articulating section during insertion greatly facilitates it is passing trough bends. Protective tungsten sheathing
improves flexible body wear resistance during its contact with the metal parts of the objects under
investigation, contributing to Videoscopes longer service life.
Grounding connector available on the Videoscopes housing enables grounding the Videoscope directly on
the object being observed (e.g. a car engine), what eliminates the possibility of a fuel or gas ignition as a
result of a static electric discharge.
The Videoscope is equipped with an integrated light cable with changeable adapter plugs or with a light post
on the Videoscope housing to attach an external light guide for an optional light source.
4-12
Technical
Technical Data
Item -No.
No.
Modell
Modell
Ø
Length
eXtreme Videoscopes
200-24010-0000-X
200-24015-0000-X
200-24020-0000-X
200-24030-0000-X
x2-4-100
x2-4-150
x2-4-200
x2-4-300
4.0mm
4.0mm
4.0mm
4.0mm
1.0m
1.5m
2.0m
3.0m
2-way
2-way
2-way
2-way
iSeries Videoscopes
200-24015-0000-I
200-24020-0000-I
200-24030-0000-I
200-46015-0000-I
200-46020-0000-I
200-46030-0000-I
200-46060-0000-I
200-46075-0000-I
200-06060-0005-I
200-06080-0005-I
200-06120-0005-I
200-06150-0005-I
200-28010-0005-I
200-48015-0000-I
200-48020-0000-I
200-48030-0000-I
200-48060-0000-I
200-48075-0000-I
200-08060-0005-I
200-08080-0005-I
200-08120-0005-I
200-08150-0005-I
i2-4-150
i2-4-200
i2-4-300
i4-6-150
i4-6-200
i4-6-300
i4-6-600
i4-6-750
i-6-600
i-6-800
i-6-1200
i-6-1500
i2-8-100-K
i4-8-150
i4-8-200
i4-8-300
i4-8-600
i4-8-750
i-8-600
i-8-800
i-8-1200
i-8-1500
4.0mm
4.0mm
4.0mm
6.0mm
6.0mm
6.0mm
6.0mm
6.0mm
6.0mm
6.0mm
6.0mm
6.0mm
8.0mm
8.0mm
8.0mm
8.0mm
8.0mm
8.0mm
8.0mm
8.0mm
8.0mm
8,0mm
1.5m
2.0m
3.0m
1.5m
2.0m
3.0m
6.0m
7.5m
6.0m
8.0m
12.0m
15.0m
1.0m
1.5m
2.0m
3.0m
6.0m
7.5m
6.0m
8.0m
12.0m
15.0m
2-way
2-way
2-way
4-way
4-way
4-way
4-way
4-way
non
non
non
non
non
4-way
4-way
4-way
4-way
4-way
Non
non
non
non
Iteml
Iteml-No.
4mm
930-00100-0004-V
930-00100-0005-V
930-00200-0012-V
6mm
930-00100-0002-V
930-00100-0003-V
930-00200-0006-V
930-00200-0007-V
930-00200-0008-V
8mm
930-00100-0001-V
930-00200-0013-V
930-00200-0001-V
930-00200-0002-V
930-00200-0003-V
930-00200-0004-V
930-00200-0009-V
930-00200-0005-V
Tip Adapter
Articulation
FOV
FOV
DOV
Side View Tip
±120° U/D
±120° U/D
±120° U/D
±120° U/D
60°
60°
60°
60°
0°/90°
0°/90°
0°/90°
0°/90°
Yes
Yes
Yes
Yes
±120° U/D
±120° U/D
±120° U/D
±100° L/R 160° U 130° D
±100° L/R 160° U 130° D
±100° L/R 160° U 130° D
±90° L/R 90° U 90° D
±90° L/R 90° U 90° D
0°
0°
0°
0°
±180° U/D
±100° L/R 160° U 130° D
±100° L/R 160° U 130° D
±100° L/R 160° U 130° D
±90° L/R 90° U 90° D
±90° L/R 90° U 90° D
0°
0°
0°
0°
60°
60°
60°
60°/90°
60°/90°
60°/90°
60°/90°
60°/90°
60°/90°
60°/90°
60°/90°
60°/90°
28°/60°/90°
28°/60°/90°
28°/60°/90°
28°/60°/90°
28°/60°/90°
28°/60°/90°
28°/60°/90°
28°/60°/90°
28°/60°/90°
28°/60°/90°
0°/90°
0°/90°
0°/90°
0°/90°
0°/90°
0°/90°
0°/90°
0°/90°
0°/90°
0°/90°
0°/90°
0°/90°
0°/90°
0°/90°
0°/90°
0°/90°
0°/90°
0°/90°
0°/90°
0°/90°
0°/90°
0°/90°
Yes
Yes
Yes
Yes
Yes
Yes
Yes
Yes
Yes
Yes
Yes
Yes
Yes
Yes
Yes
Yes
Yes
Yes
Yes
Yes
Yes
Yes
Colour Code
DOV
FOV
i4 SVTA
x4 SVTA
i4 Adapter Tool
i6 SVTA n
i6 SVTA f
i6 Objective red
i6 Objective black
i6 Lens Tool
i8 SVTA
i8 Lens Tool
i8 Objective red
i8 Objective silver
i8 Objective black
i8 Objective blue
i8 Objective gold
i8 Lens Tool
Working Distance
5.0mm - 15.0mm
5.0mm - 15.0mm
Red
Black
Red
White
Black
Blue
Gold
5-12
90° side
90° side
0° forward
0° forward
58°
58°
90°
58°
5.0mm - 15.0mm
15.0mm - 50.0mm
5.0mm - ∞
5.0mm - ∞
90° Side
58°
adjustable
0° forward
0° forward
0° forward
0° forward
0° forward
90°
90°
58°
28°
63
5.0mm - ∞
5.0mm - ∞
5.0mm - ∞
5.0mm - ∞
5.0mm - ∞
Operation Environment
The iSeries Scopes are intended for use in the following environmental and ambient parameters:
a.)
Flexible Body:
environmental parameters:
air operating temperature:
air pressure range:
b.)
min.
max.
- 10 °C
+ 80°C
1.0 at
The flexible body is resistant to water and 5% water solution of NaCl.
1.3 at
Housing:
environmental parameters:
air operating temperature:
air pressure range:
min.
max.
- 10 °C
+ 50°C
1.0 at
Level of water resistance allows application at water splashes and drops
1.1 at
Please remember these rules when
handling or operating the iSeries Scope !
•
•
•
•
•
•
•
•
•
•
•
6-12
Do not pinch Videoscope’s flexible insertion tube or
light guide cable during operation or storage!
Do not step on the Vidoescope insertion tube or light
guide cable.
Avoid shocks of articulating portion or light guide
end tip against solid objects!
Do not drop Videoscope or its components!
Do not twist or bend flexible insertion tube or light
guide cable to a radius of less than 35 or 45 mm.
Do not look directly into light beam coming from the
light source or from the end tip of Videoscope’s
insertion tube!
Do not immerse Videoscope housing into water, and
do not wash it in water stream.
Do not apply excessive force during insertion or
withdrawal of Videoscope flexible portion.
Do not straighten the articulating section with hands.
Do not allow abrupt movement during insertion or
withdrawal of Videoscope’s flexible insertion tube,
during control handle movement and during
packing of Videoscope into the case.
Do not leave the Videoscope unattended while it is
still connected to the activated light source.
Description
Flexible body:
The working body of all iSeries Scopes is flexible and the articulating section is easy to bend. The flexible body
has a multi-layer protective sheath. The outer shell, i.e. a tungsten wire braided sleeve ensuring high flexible
body strength and durability, is fitted over moisture-resistant and oil-resistant plastic tubing intended for
flexible body sealing.
Connector
Connector Cable:
Cable:
Connector Cabel is used to transmit the video signal from the iSeries Scope to a TV monitor or image capture
unit and to supply the iSeries Scope with power from a 12 V power supply. The connector cable is connected
to the corresponding connector plug on the iSeries Scope housing, and to the corresponding jacks on a TV
monitor or on the image capture unit and on the power supply unit.
Light source connection:
connection:
The iSeries Scopes are equipped with an integrated light guide cable with changeable adapter plugs or with
a ACMI Light Post on the housing to attach an external light guide for an optional light source.
Grounding connector:
Grounding connector is intended to ground the iSeries Scope directly on the object being inspected, thus
returning the accumulated static electricity to the housing elements and eliminating the possibility of fuel gas
ignition as a result of a static electricity discharge.
Articulating
Articulating section:
With the straight flexible body, the articulating section can be bend with the help of the control lever on the
Videoscopes housing in the bend plane over the angle of not less than shown in the table “technical data”.
The width of a cavity to be inspected must be 50mm at least to allow head free articulation in one direction. At
the end of the articulating section there is a head (20mm long) with a lens of straight observation.
Control lever:
Control lever serves to move (bend) the articulating section with the head. When the control lever 1 (L/R) is
turned the articulation section is moved in the vertical plane. When control lever 2 (U/P) is turned, the
articulating section is moved in the horizontal plane. When levers 1 (L/R), 2 (U/D) are turned in the directions
indicated on the housing by arrows, the articulating section is moved (bent) in the corresponding planes. Are
both control levers in “Neutral” position, the articulating section is straight. The chosen position (bend) of the
articulating section with head fixed automatically after releasing the control lever (levers).
Image Capture Button:
The capture button is used in cooperation with an image storing device like the iTool or the iCapture smart. If the
iSeries Scope is connected to the storing device, images, audio commentaries and videos can be easily
captured with the help of the Image capture button.
7-12
Operatin
Operating
The iSeries Scope should be checked before use. If a problem is found stop the operating and contact your
authorized dealer.
•
•
•
•
Remove the iSeries Scope from it´’s case and assure you do not bend its flexible body to a radius less
than 50mm. Do not hold the iSeries Scope by its articulating section when removing it from the case!
Inspect the flexible body for the absence of visual external damage.
Check the condition of the optical surfaces on the articulating section head (lens) and light post. If
necessary, wipe them with a soft clean cotton cloth moistened with water. Finally clean the lens
optical surface with a Q-Tip® damped in highly purified alcohol.
Check operability of the control lever as follows:
2- way Articulation:
Straighten the flexible body, press the lever to the housing and turn it slowly along the longitudinal axis from
one extreme position to another one. The articulating section will bend in the bend plane over the angle
±180°. Then bring the lever back into the “neutral” (middle) position and release it.
4- way Articulation:
Press lever 1 (L/R) to the housing and turn it slowly along the longitudinal axis from one extreme position to
another. The articulating section will bend over an angle +160° /-130°. Then bring the lever back into the
“Neutral” position and release it. Similarly, press lever 2 (U/D) to the housing and turn it slowly along the
longitudinal axis from one extreme position to another. In this case the articulating section will bend in the
plane normal to the plane over the angle not less than ±100°. Then bring the lever 2 (U/D) back into the
“Neutral” position and release it.
Operatin
perating
• Place a TV monitor or Image capture device, a light source and a power supply unit beside the
Videoscope. Make sure that the power supply switches of all components are in the OFF position.
• Take Connector cable out of the case and attach its appropriate connectors to the Videoscope at one
end, and to TV monitor or Image capture device and power supply unit at the other end.
• Connect light guide cable or external light guide with the optional light source and turn on the light
source.
• Connect a TV monitor or Image capture device, a light source and a power supply unit to the power
line outlet and turn all the equipments components on.
• Direct the articulating section head to any object. Make sure the image on the TV monitor screen
corresponds to the object being observed. If necessary adjust the TV monitor following the
instructions given in TV monitor user manual.
8-12
•
•
•
•
•
•
•
•
•
•
•
•
•
•
•
Do not allow striking the articulating section by hand!
If you are not going to use the iSeries Scope at this time, remove all equipment components and
store it. If your going to use the scope please go ahead as follows:
Connect the grounding cord to the connector on the iSeries Scope housing at one end and to the
housing of the object to be inspected at the other end. The grounding of the iSeries Scope housing is
obligatory for inspection of objects containing inflammable or explosive materials.
Connect a TV monitor, a light source and a power supply unit to the power line outlet and turn on all
the equipments components.
Make sure that there is an image on the TV monitor screen. If necessary adjust the TV monitor
following the instructions given in TV monitor manual.
Adjust the optical system. Install a test object at an expected operating distance from the articulating
section head (lens). Any object may serve purpose, but preferably it should be of the same material
and finish as the object to be inspected. Move the lens in the axial direction (screw it in or out within ±
one revolution) with the special wrench until you obtain a well-defined test object on the monitor
screen. The lens shall be only screwed in or out using only the special tool incorporated in the
Videoscope kit!
Insert the flexible body into the cavity to be investigated in accordance.
Take the iSeries Scope housing in one and its flexible body in the zone of the articulating section
coupling with the other hand
Set (move) the control lever(s) to the “neutral” position. Then the articulating section will become
straight.
Insert the flexible body into the open hole. Diameter of the hole (or the width of the opening) should
be not less than the outer diameter of the flexible Insertion tube. Watch the insertion on the TV
monitor screen. Do not apply large effort when inserting the flexible body and do not allow flexible
body jamming! Further do not allow catching of the flexible body protective sleeve on the edges of
the inlet hole (opening) and emerging of the elements structure!
If you encounter resistance during the insertion, stop the process. Start withdrawing the flexible body
slowly. In case the flexible body can be withdrawn easily, you may resume inserting it with slightly
effort, observing the process on the TV screen.
Observe the process on the TV monitor screen, move in the articulating section of the flexible body
until it reaches the beginning of the cavity bend.
Check (either visually or from the drawing of the object under investigation) that passing of the
articulating section “rigid” head through the cavity bend is feasible.
Observing the process on the TV monitor screen, use the control lever to bend the articulating section
head in the direction of the cavity bend.
The procedure of passing through every subsequent bends is similar to the one described above. If
you feel back a recoil of the flexible body during the insertion, it means that further insertion is not
possible and should be stopped.
9-12
•
•
•
Before starting articulating section withdrawal, set the control lever into “neutral” position.
Slightly turning the control lever and observing the process on the TV monitor screen, start
withdrawing slowly the iSeries Scope’s flexible body. While withdrawing, never apply large efforts on
the flexible body, control lever or iSeries Scope housing. Observing the process on the monitor
screen, manipulate the control lever to ensure equidistant position of articulating section head from
the cavity walls during the whole process.
If you feel opposition during withdrawal, rotate the iSeries Scope housing slightly along its
longitudinal geometric axis in both direction and continue the withdrawing.
Care and Storage
The procedure described below must be followed every time the Videoscope operation is completed. Failing
to clean the Videoscope right after the work may lead to corrosion and Videoscope damage. Choice of the
required cleaning procedures depends on the type and degree of contamination. Before cleaning any
equipment components must be released.
Cleaning the flexible body contaminated with dust:
Wipe the flexible body with a soft clean cotton cloth. Articulating section should be wiped with a separate
clean cotton cloth moistened with water. Finally, clean the end tip optical surfaces with a Q-Tip® damped in
highly purified alcohol. Do not use harsh or soiled cloth for cleaning!
Cleaning the flexible body
body contaminated with mud:
mud:
Take off mud from the outer layer with a soft cotton cloth. Wash thoroughly the flexible body with the help of a
sponge using mild detergent. After cleaning, dry the flexible probe portion with a soft cotton cloth. End tip butt
should be wiped with a separate clean cotton cloth. Finally, clean the end tip optical surfaces with a Q-Tip®
damped in highly purified alcohol.
Cleaning the housing contaminated with dust or mud:
Wipe the dirty parts with a soft damp (if necessary) cotton cloth using mild detergent. Then dry the Videoscope
thoroughly. Do not wash Videoscope housing under flowing water and do not wipe it with wet cloth!
Detach any equipment components from the Videoscope.
Make sure that the Videoscope is clean and dry. If necessary clean it following the instructions given in the
previous chapter.
Set the control lever in tothe “neutral” position, whereupon the articulating section will get straightened.
Put the Videoscope into its case. Lay the Videoscope housing into the corresponding recess. Then lay
subsequently the Videoscope flexible body, as well as the connection cable, adapter, and wrench into their
respective recessed channels in the case. Do not allow sharp bends (with a radius less than 50mm) of the
flexible body!
1010-12
Spare Parts and Accessoires
Accessoires
Use only IT Concepts original spare parts and accessories for your iSeries Scope.
Accessories Set
900-00001-0002
- AC Adapter 12V DC/0,42A
- Video Cable Typ II with BNC Adapter
- Operating manual
Objective Lenses
Lenses and Accessories
930-00100-0004-V
930-00100-0005-V
930-00200-0012-V
930-00100-0002-V
930-00100-0003-V
930-00200-0006-V
930-00200-0007-V
930-00200-0008-V
930-00100-0001-V
930-00200-0013-V
930-00200-0001-V
930-00200-0002-V
930-00200-0003-V
930-00200-0004-V
930-00200-0009-V
930-00200-0001-V
i4 SVTA
x4 SVTA
i4 / x4 Adapter Tool
i6 SVTA n
i6 SVTA f
i6 Objective red
i6 Objective black
i6 Lens Tool
i8 SVTA
i8 Lens Tool
i8 Objective red
i8 Objective silver
i8 Objective black
i8 Objective blue
i8 Objective gold
i8 Lens Tool
Connector Cables
930-00500-0003-P
930-00500-0019-P
930-00500-0001-P
930-00500-0017-P
- Video cable Typ I0,3 5-Pin to 5-Pin0,3m
- Video cable Typ I1,0 5-Pin to 5-Pin 1,0m
- Video cable Typ I1,8 5-Pin to 5-Pin 1,8m
- Video cable Typ I3,0 5-Pin to 5-Pin3,0m
AC Adapters
900-04003-0004-V
- AC Adapter 12V DC/0.42A
Carrying Cases
900-06000-0008
900-06000-0026
900-06000-0028
- System Carrying Case (standard)
- iCase
- iCaseplus
1111-12
Product
Product return in case of service
To help us to efficiently execute any maintenance or repair of the product, we ask you to download the Service
Form “Product Return” from our homepage www.itcworld.de.
Please fill out the questionnaire as detailed as possible and send it to our address together with the product.
IT Concepts GmbH
Gewerbstrasse 17
D — 35633 Lahnau
Disposal
This device has do be disposed separately from domestic waste. After the end of
its useful service life you have to send it back to the producer or your local dealer.
© 2009 IT Concepts GmbH. All rights reserved. This Operation Manual meets the status at the time of going to
print. IT Concepts accepts no liability for any printing errors contained herein. Design subject to change. We
reserve the right of making technical changes at any time. No sections of this Operation Manual may be
reprinted, photo-mechanically, mechanically or digitally copied or reproduced without the express approval
of IT Concepts GmbH.
CE Declaration of Confirmity
We declare of our own responsibility that the product (iSeries Scope) complies with the following directive or
normative documents: EN61326-1 (2006) Emission and Immunity, according to directive 2004/108/EG
Electromagnetic Compatibility.
Lahnau, 2009-07-15
Frank Schlagenhauf
Manager Product Development
1212-12


