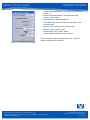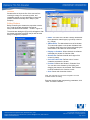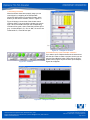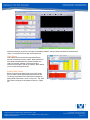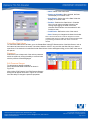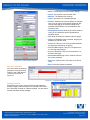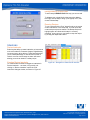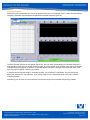
1
Robo Control User’s Manual 7620 Executive Drive | Eden Prairie, MN 55344-3677 | USA Phone: 952-934-2100 | Fax: 952-934-2737 | Email: [email protected] | www.svta.com ROBO Control Manual 4/13 SVT Associates Proprietary Information ©2012 SVT Associates, Inc. All Rights Reserved PROPRIETARY INFORMATION Terms and Conditions SVT Associates, Inc. (SVTA) hereby grants to you a license to use Robo Software, subject to the terms that follow. Your purchase, possession, and/or use of Robo Software will constitute your acceptance of such terms. The Robo Software compilation is the property of SVTA unless otherwise indicated and is protected by copyright law to SVTA and/or other embedded copyright owner(s). You are hereby granted a single-user license for your exclusive use of Robo Software. You may not reproduce, sell, distribute, publish, circulate, or commercially exploit the Software, or any portion thereof, without the written consent of SVTA and the specific copyright owner(s) of any embedded component software included. In the event that Robo Software and/or embedded components include specific license requirements or end-user agreements, statements of condition, disclaimers, limitations or warranties (“End-User License”), those End-User Licenses supersede the terms and conditions herein as to the particular Software component. Your purchase, possession, or use of Robo Software will constitute your acceptance or such End-User Licenses. By purchase, possession, or use of Robo Software you further agree to comply with all existing export laws and regulations of the United States. Disclaimer SVTA makes no warranty or representation, either expressed or implied, with respect to Robo Software or its contents, quality, performance, merchantability, or fitness for a particular purpose. In no event will SVTA, its distributors, or dealers be liable to you or any other party for direct, indirect, special, incidental, consequential, or other damages arising out of the use of or inability to use Robo Software or its contents even if advised of the possibility of such damage. In the event that Robo Software includes an online update feature, SVTA further disclaims any obligation to provide this feature for any specific duration other than the initial posting. The exclusion of implied warranties is not permitted by some states. Therefore, the above exclusion may not apply to you. This warranty provides you with specific legal rights; there may by other rights that you may have that vary from state to state. The pricing of Robo Software by SVTA reflects the allocation of risk and limitations on liability contained in this agreement of Terms and Conditions. Copy Protection The Robo Software in whole or in part may or may not be copy-protected or encrypted. However, in all cases, no part of the Robo Software or the contents of this publication may be stored in a retrieval system, transmitted, or reproduced in any manner, including but not limited to photocopying, photography, magnetic or other manner of record without written prior permission of SVTA. Reselling or redistributing these files without authorization is expressly forbidden except as specifically provided for by SVTA. No Modification or Reverse Engineering. You may not modify, adapt, translate or create derivative works based upon the Software. You will not reverse engineer, decompile, disassemble or otherwise attempt to discover the source code of the Software except to the extent you may be expressly permitted to reverse engineer or decompile under applicable law. PROPRIETARY INFORMATION 7620 Executive Drive | Eden Prairie, MN 55344-3677 | USA Phone: 952-934-2100 | Fax: 952-934-2737 | Email: [email protected] | www.svta.com ROBO Control Manual 4/13 SVT Associates Proprietary Information ©2012 SVT Associates, Inc. All Rights Reserved Page 2 of 44 Contents Installation ................................................................................................................................................................. 5 Logging In.............................................................................................................................................................. 5 Creating New Users .............................................................................................................................................. 5 Edit Users .............................................................................................................................................................. 6 Permissions ........................................................................................................................................................... 7 User Timeout/Auto Log Out................................................................................................................................... 8 Navigation of the Robo Software .............................................................................................................................. 8 Main Screen Layout .............................................................................................................................................. 8 Status Bar............................................................................................................................................................ 10 Eurotherms .......................................................................................................................................................... 10 Edit Eurotherms................................................................................................................................................... 10 Controlling Eurotherms........................................................................................................................................ 12 Edit Eurotherm PID Values ................................................................................................................................. 13 Creating Eurotherm Programs ............................................................................................................................ 13 Edit Program Parameters .................................................................................................................................... 15 Controlling Eurotherm Programs ......................................................................................................................... 15 Eurotherm Charting ................................................................................................................................................. 16 Trend Chart ......................................................................................................................................................... 17 Change Plot Properties ....................................................................................................................................... 18 Shutters ............................................................................................................................................................... 19 Editing Shutters ................................................................................................................................................... 19 Controlling Shutters ............................................................................................................................................. 20 Simultaneously Open Multiple Shutters .............................................................................................................. 20 Gate Valves ......................................................................................................................................................... 21 Editing Gate Valves ............................................................................................................................................. 21 Controlling Gate Valves....................................................................................................................................... 22 Pressures ............................................................................................................................................................ 22 Edit Pressure Gauges ......................................................................................................................................... 22 Monitor Pressures ............................................................................................................................................... 23 Analog Controls ................................................................................................................................................... 23 Editing Analog Controls ....................................................................................................................................... 24 Controlling Analog Devices ................................................................................................................................. 25 Digital Controls .................................................................................................................................................... 25 Editing Digital Controls ........................................................................................................................................ 25 Controlling and Monitoring Digital Control Devices ............................................................................................. 27 Monitoring Device Drivers ................................................................................................................................... 27 Recipes ................................................................................................................................................................... 29 Creating Recipes ................................................................................................................................................. 30 Adding Steps to a Script ...................................................................................................................................... 31 Editing/Deleting a Script Step.............................................................................................................................. 32 Running Recipes ................................................................................................................................................. 32 7620 Executive Drive | Eden Prairie, MN 55344-3677 | USA Phone: 952-934-2100 | Fax: 952-934-2737 | Email: [email protected] | www.svta.com ROBO Control Manual 4/13 SVT Associates Proprietary Information ©2012 SVT Associates, Inc. All Rights Reserved Page 3 of 44 Interlocks ................................................................................................................................................................. 32 Device Interlocks ................................................................................................................................................. 32 Creating Device Interlocks .................................................................................................................................. 32 Interlock Device Names ...................................................................................................................................... 33 Digital Interlocks .................................................................................................................................................. 33 Creating Digital Interlocks ................................................................................................................................... 34 Recipe Control Option ......................................................................................................................................... 36 Chamber View ..................................................................................................................................................... 36 Loading .bmp....................................................................................................................................................... 37 Moving Device Indicators .................................................................................................................................... 37 Saving the Chamber View ................................................................................................................................... 37 Controlling the System via Chamber View .......................................................................................................... 37 Chamber Recipes................................................................................................................................................ 38 Customization of the Device Control Tab ............................................................................................................ 40 Setting the Visibility of Tables ............................................................................................................................. 40 Log File ................................................................................................................................................................... 40 Settings ............................................................................................................................................................... 41 Device Drivers ..................................................................................................................................................... 41 SVT Associates Device Drivers........................................................................................................................... 41 User Created Device Driver ................................................................................................................................ 42 Transfering Values from Robo into LabVIEW created Software ......................................................................... 42 Warranty and Limitations of Remedies ................................................................................................................... 43 Return Policy ........................................................................................................................................................... 43 Returning Equipment for Repair or Servicing .......................................................................................................... 44 7620 Executive Drive | Eden Prairie, MN 55344-3677 | USA Phone: 952-934-2100 | Fax: 952-934-2737 | Email: [email protected] | www.svta.com ROBO Control Manual 4/13 SVT Associates Proprietary Information ©2012 SVT Associates, Inc. All Rights Reserved Page 4 of 44 Installation If an installation was not preconfigured for the intended user a CD/DVD media will be provided. Alternatively a set of Installation discs may be provided pending the terms of agreement. From Disc 1 of the installation CD/DVD execute Setup.exe and follow the instructions on the screen. If multiple network sources are configured this would apply to all configurations (i.e. Main and Load Lock computers). Certain installation requirements may be accompanied by multiple disc sets or a separate set of installation instructions. Users Robo gives the administrator the ability to control access to vital functions of the software such as system setup and permission control for users. Logging In When Robo is opened the Welcome to Robo Control dialog box, Figure 1, will appear prompting you to Log in. The Log in Screen contains two fields: Users Name and Password. The Users Name field is a pull down menu and contains all the users that have been created. In order to be able to log in, the correct combination of user name and password must be entered. Creating New Users Figure 1 – Logging In To create new users go to the Menu bar while running the Robo software and click on FileCreate New Users, as shown in Figure 2. The Create New User dialog box shown in Figure 3 will appear. 7620 Executive Drive | Eden Prairie, MN 55344-3677 | USA Phone: 952-934-2100 | Fax: 952-934-2737 | Email: [email protected] | www.svta.com ROBO Control Manual 4/13 SVT Associates Proprietary Information ©2012 SVT Associates, Inc. All Rights Reserved Page 5 of 44 This dialog box will not appear if you do not have “Create New User” permissions. Only the administrator has the ability to create a new user with the proper permissions and set the date when the new user becomes inactive. It is suggested, after all of the permissions (Eurotherms, Shutters, Gate Valves…) have been properly set up, created users other than the administrator should not be given the ability to edit the permissions of other users. This will ensure that no one can inadvertently change the properties and damage the system. Edit Users Any user that has the “Create New Users” permission can also edit each user. This allows the administrator to change the users name, password, permissions, and valid until date. To edit a user navigate to FileEdit Users. The Edit User window will appear (Figure 4). Figure 3 7620 Executive Drive | Eden Prairie, MN 55344-3677 | USA Phone: 952-934-2100 | Fax: 952-934-2737 | Email: [email protected] | www.svta.com ROBO Control Manual 4/13 SVT Associates Proprietary Information ©2012 SVT Associates, Inc. All Rights Reserved Page 6 of 44 Permissions In order to ensure that each user has access to the appropriate functions, the following permissions have been implemented. • Edit Chamber View – Allows you to move indications and load a .bmp file for a visual view of the system. • Edit Eurotherms – Allows you to edit the properties of the Eurotherms. Disabling this feature removes access to the “Edit Eurotherms” screen described on Page 10 in the “Edit Eurotherms” section. • Control Eurotherms – Allows you to have complete control of the Eurotherms in the software, change Setpoints, Ramp Rates, Modes, Power Output, and more. Disabling this feature removes capabilities described in “Eurotherms” on Page 12. • Edit Shutters – Allows you to edit shutter properties such as the name and physical line output. Once the System is setup no one should have to edit this. Disabling this feature removes capabilities described in “Edit Shutters” on Page 18. • Control Shutters – Allows you to open and close shutters. Disabling this feature removes capabilities described in “Control Shutters” on Page 19. • Edit Pressure – Allows you to edit the properties of the pressure. Disabling this feature removes capabilities described in “Edit Pressure Gauges” on Page 21. • Edit Gate Valves – Allows you to edit Gate Valves. • Control Gate Valves – Allows you to open and close Gate Valves. • Edit Analog Controls – Allows you to edit the analog devices. • Control Analog Controls – Allows you to send different voltages to the devices. • Edit Digital Controls – Allows you to edit the Digital Controls. • Control Digital Controls – Allows you to send 24V logic to the digital devices. Figure 4 • Edit Interlocks – Allows you to edit digital and device interlocks. • Load/Run Recipes – Allows you to load and run previously created recipes. • Create/Edit Recipes – Allows you to create new recipes and edit recipes. This is an advanced function and should be done only by trained users. • Create New Users – This will allow you to create new users. This permission should only be granted to the administrator or other highly trusted users. • Add/Edit Motion – Reserved for future use. • Control Motion – Reserved for future use. • Edit Device Drivers – When checked, allows you to edit driver parameters by making tabs appear at the bottom of each driver. • Valid Until – Sets the date at which the user profile is no longer valid. 7620 Executive Drive | Eden Prairie, MN 55344-3677 | USA Phone: 952-934-2100 | Fax: 952-934-2737 | Email: [email protected] | www.svta.com ROBO Control Manual 4/13 SVT Associates Proprietary Information ©2012 SVT Associates, Inc. All Rights Reserved Page 7 of 44 User Timeout/Auto Log Out Robo has a built in feature that will automatically log out if the software is inactive for a specified length of time. This ensures that even if you forget to log out, the software will not allow an unauthorized user to run it and cause harm to your system. When the specified inactivity time has been reached you will be logged out and a user will be automatically logged in with no permissions. You will need to log off and then log back in with your unique user name and password by going to File MenuLog Off. Navigation of the Robo Software Before you begin using the Robo software you need to gain familiarity with the terminology and layout of the User Interface (UI). Main Screen Layout The Robo software implements various tabs and sections to help the flow of the UI. The UI contains two main sections and two minor sections. The two main sections are: 1. Device/Recipe/Control 2. Charting/Chamber View The two minor sections are: 1. Shutter/Gate Valve/cFP Status section 2. User/Status/Interlocks/Logging section, as shown in Figure 5. 7620 Executive Drive | Eden Prairie, MN 55344-3677 | USA Phone: 952-934-2100 | Fax: 952-934-2737 | Email: [email protected] | www.svta.com ROBO Control Manual 4/13 SVT Associates Proprietary Information ©2012 SVT Associates, Inc. All Rights Reserved Page 8 of 44 Figure 5 – Robo Main Screen Layout Device/Recipe/Control Section: You can control and monitor most devices such as Eurotherms, Pressure Gauges, and Mass Flow Controls in this section. Adding/Removing rows in the Device Section: To add a row to the device table hold the <CTRL> key and left click where you want the row to be added. To remove a row from the device table, hold the <ALT> key and left click the row you want removed. To move a device table up or down in the device tab, hold the <SHIFT> key and left click and drag table to the new location (table will move to new location when mouse is released). Shutter/Gate Valve/cFP Section: You can open and close the Shutters and Gate Valves in this area without going to the Chamber tab in the Charting/Chamber View section. Trend Chart/Chamber View Section: Trend Charts of the devices setup and Chamber View are monitored here. Status Bar: See next section. 7620 Executive Drive | Eden Prairie, MN 55344-3677 | USA Phone: 952-934-2100 | Fax: 952-934-2737 | Email: [email protected] | www.svta.com ROBO Control Manual 4/13 SVT Associates Proprietary Information ©2012 SVT Associates, Inc. All Rights Reserved Page 9 of 44 Status Bar The Status Bar shown in Figure 6 gives a quick overview of the system. Figure 6 – Status Bar At the bottom of the screen you will see the following text boxes: Current User: The user that is logged in. Recipe Status: Displays “Idle…” if no recipe is running, otherwise displays the name of the running recipe. Digital Interlock Status: Tells you if the Digital Interlocks are satisfied. If satisfied the text box will be green. If one of the Interlocks is not satisfied the text box flashes Red and displays the name of the interlock that has failed. Device Interlock Status: Same functionality as Digital Interlock Status except it displays the status of the Device Interlocks. Log File Status: Displays the current log file name and size. Eurotherms Eurotherms are one of the main components in the evaporative system. The Eurotherms monitor the temperatures of the cells, nozzle, annealing stage, substrate, and LN baffle. Along with reading the temperatures they also control the power supplies that feed power to the various heaters. Edit Eurotherms Before controlling each Eurotherm you must edit them so they work correctly and display the correct properties. To edit the Eurotherms navigate to SetupEurothermsEdit Eurotherms… as shown in Figure 7. The Edit Eurotherms dialog box (Figure 8) will appear, allowing you to edit Eurotherm information. 7620 Executive Drive | Eden Prairie, MN 55344-3677 | USA Phone: 952-934-2100 | Fax: 952-934-2737 | Email: [email protected] | www.svta.com ROBO Control Manual 4/13 Figure 7 – Navigation to Edit Eurotherms SVT Associates Proprietary Information ©2012 SVT Associates, Inc. All Rights Reserved Page 10 of 44 Figure 8 – Edit Eurotherms • Name: Name of the Eurotherm that will be displayed in the Device/Recipe/Control Section of the Main Screen. • Comm: Serial Port Number. • Address: Address of the Eurotherm. • Type: Type of Eurotherm. • Serial Config: – Baud Rate: 19200 – Parity: 0 – Break Length: 15 • Poll: When checked allows Robo to poll the Eurotherm. • Display on Plot: When checked the Eurotherm temperature will display on the Trend Charts. • Display on Chamber: When checked the Eurotherm temperature indicator will display in Chamber View. • Display Name: When checked the name of the Eurotherm will display in Chamber View. Warning Range: • Min Temp: The minimum temperature at which the software will indicate whether the Eurotherm temperature enters a Warning State. • Max Temp: The maximum temperature at which the software will indicate whether the Eurotherm temperature enters a Warning State. Alarm Range: • Min Temp: The minimum temperature at which the software will indicate whether the Eurotherm temperature enters an Alarm State. • Max Temp: The maximum temperature at which the software will indicate whether the Eurotherm temperature enters Alarm State. • Comm Ok/Error: Notifies you if there is a Communication Error. • No Warning/Warning: Notifies you if the Eurotherm is in Warning Range. (Orange/Green respectively) • No Alarm/Alarm: Notifies you if the Eurotherm is in Alarm Range. (Red/Green respectively) • Normal Color: Sets the color of the “Temperature °C” of the Table List under Eurotherms when temperature is in between Warning and Alarm Range. • Plot Color: Sets the color of the plot In the Eurotherm Trend Chart. If this color is modified you need to restart the software for changes to take affect. • Warning Color: Sets what color the plot will be on the Trend Chart when in Error limits. • Alarm Color: Tells what color the plot will be on the Trend Chart when in Alarm limits. • Ranges: Measures temperatures while ramping. Software will indicate if rate is within normal, warning or error limits. • Position: Positions the Eurotherms in Chamber View. You can also move Eurotherms by left-clicking and dragging the Eurotherm to be relocated. Edit Chamber must be enabled for this function to work. 7620 Executive Drive | Eden Prairie, MN 55344-3677 | USA Phone: 952-934-2100 | Fax: 952-934-2737 | Email: [email protected] | www.svta.com ROBO Control Manual 4/13 SVT Associates Proprietary Information ©2012 SVT Associates, Inc. All Rights Reserved Page 11 of 44 No Power: • Value: Value is zero when the temperature value falls below the specified value • Color: Color of the text background in the Eurotherm Setup when power is not available. Running Range: • +/- Value: Deviation from expected value that indicates temperature is not ramping as expected. • Color: Text background color in the Eurotherm Setup when ramp rate is within normal range. Warning Range: • +/- Value: Deviation from expected value that indicates temperature is in warning range. • Color: Text background color in the Eurotherm Setup when ramp rate is in warning range. Alarm Range: • +/- Value: Deviation from expected value that indicates temperature is in alarm range. • Color: Text background color in the Eurotherm Setup when ramp rate is in alarm range. Controlling Eurotherms The Robo software allows you to control the Eurotherms. All control of the Eurotherms takes place on the Eurotherm Table found in the “Device/Recipe/Control” Section of the Main Screen. The Eurotherm table consists of eight columns as shown in Figure 9. • Name: The name the Eurotherm is given in the Edit Eurotherm Setup Screen. If there is a communication error the background color will be Red and the Eurotherm will no longer be polled. • Temp: Shows the current temperature. Colors are based on previously defined colors in the Edit Eurotherm dialog box screen. In this scenario, if the temperature is in a Warning state the background color will be Orange. If the Temperature is in an Alarm state the Figure 9 – Eurotherms background color will be Red. • Working SP: This is the current Setpoint as set by the Eurotherm. This is the value the Eurotherm is actively trying to reach. If the current temperature is below the Working SP it will tell the power supply to output more power to reach that Setpoint. • *Setpoint: To change the Setpoint type the desired temperature into the cell and hit “ENTER” or click a different cell. This tells the Eurotherm that you want to reach that Setpoint. The Eurotherm MUST BE IN AUTO MODE (changing Auto/Manual mode is explained in Mode explanation of Controlling Eurotherms). • *Ramp Rate: This tells the Eurotherm how fast you want it to reach the given Setpoint. If you want the temperature to slowly reach the Setpoint enter in a small ramp rate (say .1 degrees per minute). Now the Eurotherm will ramp to the Working Setpoint at .1 deg per minute. • *Power: This tells the Eurotherm what percent of full power you want. The Eurotherm MUST BE IN MANUAL MODE. • *Power RR: Similar to the Ramp Rate except the Eurotherm is now limiting the Power Ramp Rate and units are in percent/sec. • *Mode: You can change the mode of the Eurotherm to either Manual (enter in the letter “M”) mode or Auto (Enter in the Letter “A”) mode. In Auto mode you can change the Setpoint. While in Manual Mode you can change Power. This is case sensitive. *You set this value (Note: When the cells are YELLOW this means that you are able to actively change the values.) 7620 Executive Drive | Eden Prairie, MN 55344-3677 | USA Phone: 952-934-2100 | Fax: 952-934-2737 | Email: [email protected] | www.svta.com ROBO Control Manual 4/13 SVT Associates Proprietary Information ©2012 SVT Associates, Inc. All Rights Reserved Page 12 of 44 Edit Eurotherm PID Values Robo allows you to change the PID settings of the Eurotherm within the software. From the Eurotherm table click on the name of the Eurotherm you want to change, right click on that Eurotherm. Once you right click on the Eurotherm Name, a Menu will appear as shown in Figure 10. Choose “Set [EUROTHERM NAME] PID Values” Figure 10 – Eurotherm Right Click Menu In Figure 10 for example, the user was changing Gallium’s PID values as seen by the popup menu. Once “Set [EUROTHERM NAME] PID Values” is chosen, the Edit Eurotherm PID Values dialog box will appear (Figure 11) and then you can enter the desired values. – Caution – The PID Values are not read back into Robo. To view current Eurotherm PID Values you must navigate to the Eurotherm Table found in the Device/Recipe/Control Section of the Main Screen. Figure 11 – Edit PID Creating Eurotherm Programs Robo allows you to create Eurotherm Programs to control ramp sequences. To create programs for a Eurotherm, click on the Eurotherm name you want to create a program for, right click on Program and select the action you want to do from the available options. The Eurotherm Program Menu will appear as shown in Figure 12. To edit/create a Eurotherm program Choose “Create” The “Create Program for” window will appear, as shown in Figure13. 7620 Executive Drive | Eden Prairie, MN 55344-3677 | USA Phone: 952-934-2100 | Fax: 952-934-2737 | Email: [email protected] | www.svta.com ROBO Control Manual 4/13 Figure 12 – Eurotherm Program Menu SVT Associates Proprietary Information ©2012 SVT Associates, Inc. All Rights Reserved Page 13 of 44 • Selected Program Number: The program you want to edit (usually 1). • Selected Segment Number: The segment within the program you are editing. • Target Setpoint: Wanted temperature. • Ramp Rate: Rate at which to ramp the temperature. Units are defined later. • Segment Type: Pull down menu of option types. • Holdback Type: Typically “None.” • End Segment Type: Typically “Reset.” • Create: Creates program and closes window. Enter the desired programming parameters; click “Create” to send the program to the Eurotherm. Figure 13 – Create Eurotherm Program 7620 Executive Drive | Eden Prairie, MN 55344-3677 | USA Phone: 952-934-2100 | Fax: 952-934-2737 | Email: [email protected] | www.svta.com ROBO Control Manual 4/13 SVT Associates Proprietary Information ©2012 SVT Associates, Inc. All Rights Reserved Page 14 of 44 Edit Program Parameters You can edit the program parameters, such as ramp rate units, for each of the programs. To edit program parameters follow the instructions on how to “Create a Program” but instead of clicking “Create” choose “Edit Prog. Param” (refer to Figure 12). The “Edit Program Parameters” window will appear as shown in Figure 14. • Program Number: The program number being edited. (Usually one) • Program Cycles: Defines the amount of repetitions of the program. • Holdback Value: The range of holdback. • Ramp Time Units: Defines the ramp units. (sec, min, hour) • Dwell Time Units: Defines the dwell (wait) units. (sec, min, hour) Figure 14 – Edit Program Parameters • Edit: Edits program and closes window. Enter the desired programming parameters; click “Edit” to send the program to the Eurotherm. Controlling Eurotherm Programs Run created Eurotherm programs by following the steps to access the Eurotherm Program Menu “Program” function (refer to Figure 12). Select “Start” to run the program. It must be noted that the Ramp Rate and Power Ramp Rate will be set to Zero. After “Start” is clicked the program will begin. At any point you can stop or hold (pause) the program. To “Stop” or “Hold” a program, follow the steps to access the Eurotherm Program Menu “Program” function (refer to Figure 12). Choose “Stop” or “Hold” as desired. 7620 Executive Drive | Eden Prairie, MN 55344-3677 | USA Phone: 952-934-2100 | Fax: 952-934-2737 | Email: [email protected] | www.svta.com ROBO Control Manual 4/13 Figure 15 – Controlling Eurotherm Programs SVT Associates Proprietary Information ©2012 SVT Associates, Inc. All Rights Reserved Page 15 of 44 Eurotherm Charting Charting of the Eurotherm Temperatures is automatically done in the Charting/Chamber View section of the Main Screen as shown in Figure 16. This chart will hold up to 24 hours of data. Figure 16 – Controlling Eurotherm Programs 7620 Executive Drive | Eden Prairie, MN 55344-3677 | USA Phone: 952-934-2100 | Fax: 952-934-2737 | Email: [email protected] | www.svta.com ROBO Control Manual 4/13 SVT Associates Proprietary Information ©2012 SVT Associates, Inc. All Rights Reserved Page 16 of 44 Trend Chart Figure 18 shows the Eurotherm Trend Chart. There is an Auto Scale and Clear History button at the top right corner. In Auto Scale, the trend chart will be automatically scaled in both X and Y directions regardless of the location of the yellow and red warp markers located just below the trend chart. Pressing the Auto Scale button will allow you to switch to Tools mode (Figure 15), which allows you to zoom in on the trend chart with the warp markers. In Tools mode, you can also make use of additional navigation tools that are located right below the list of Eurotherms. These allow you to zoom in on the trend chart as well as the option to click and drag the plot. You also have the option of viewing the plots on either a Linear or a Log scale. The Clear History button will clear all data on the trend chart. To display or hide the plot of any given Eurotherm, click the check box next to the Eurotherm name. Figure 17 – Tools and Auto Scale Figure 18 – Eurotherm Trend Chart 7620 Executive Drive | Eden Prairie, MN 55344-3677 | USA Phone: 952-934-2100 | Fax: 952-934-2737 | Email: [email protected] | www.svta.com ROBO Control Manual 4/13 SVT Associates Proprietary Information ©2012 SVT Associates, Inc. All Rights Reserved Page 17 of 44 Figure 19 – Eurotherm Trend Chart Change Plot Properties To change plot properties right click on the trend chart plot as shown in Figure 19. From View Items you have access to view several Legends. The Plot Legend allows you to choose Color and other properties such as Line Style and Line Width. Right click the Plot Legend as shown on Figure 20 to change plot properties. Figure 20 – Plot Legend 7620 Executive Drive | Eden Prairie, MN 55344-3677 | USA Phone: 952-934-2100 | Fax: 952-934-2737 | Email: [email protected] | www.svta.com ROBO Control Manual 4/13 SVT Associates Proprietary Information ©2012 SVT Associates, Inc. All Rights Reserved Page 18 of 44 Shutters Shutters allow or block the flux of the sources from reaching the stage. For accurate, precise, and repeatable growth you have the ability to control the shutters via Robo manually and in Recipe. (See Recipes) Editing Shutters Before controlling the shutters the properties must be set. To set the shutter properties navigate to SetupShuttersEdit Shutters… shown in Figure 21. The edit shutter dialog box (Figure 22) will appear. After the shutter properties have been set you will have the ability to change the properties. Figure 21 – Navigate to Edit Shutters • Name: The name of the shutter. Usually named after the evaporation material type (e.g Indium) or device (e.g. Stage). • Abbreviation: The abbreviated name of the shutter. This name will appear on the shutter indicators both in Chamber View and on the Device tab; keeping the abbreviation to two letters is recommended. • Display on Chamber: When checked, the software will display this shutter in Chamber View. • Shutter Size: Defines the width and height of the control (in pixels). • On Color & Off Color: Defines color of control created to represent the shutter. • Position: Positions the Shutter in Chamber View. You can also move shutters by left-clicking and dragging the shutter to be relocated. Edit Chamber must be enabled for this function to work. • Save: Saves and closes the window. Figure 22 – Edit Shutters Note: The horizontal scroll is used to navigate to all of the available shutters for editing. Enter the desired shutter programming parameters, click “Save” to close the window. 7620 Executive Drive | Eden Prairie, MN 55344-3677 | USA Phone: 952-934-2100 | Fax: 952-934-2737 | Email: [email protected] | www.svta.com ROBO Control Manual 4/13 SVT Associates Proprietary Information ©2012 SVT Associates, Inc. All Rights Reserved Page 19 of 44 Controlling Shutters After the shutters have been properly setup you can control them by navigating to the Shutter/Gate Valve/cFP Status section on the Main Screen, at the bottom you will see the shutters, shown in Figure 23. Figure 24 shows a closer view of the shutter control. Hold the <SHIFT> key and click the shutter you want to open. When the shutters are open the corresponding indicator will be green, when closed the indicator will be gray. In this example In, Sr, Ga, As, NaF, Se and Fe are closed while Cu, Al and Ni are open. Figure 23 – Navigate to Shutters Simultaneously Open Multiple Shutters Figure 24 – Shutters If you want to open multiple shutters at the exact same time but don’t want to create a recipe to do this you can use the “Open Multiple” option. Right click on the first shutter control (Figure 25) and choose “Open Multiple”, Figure 26 will appear. Figure 25 – Navigate to Multiple 7620 Executive Drive | Eden Prairie, MN 55344-3677 | USA Phone: 952-934-2100 | Fax: 952-934-2737 | Email: [email protected] | www.svta.com ROBO Control Manual 4/13 SVT Associates Proprietary Information ©2012 SVT Associates, Inc. All Rights Reserved Page 20 of 44 Figure 26 – Open Multiple Shutters Select the shutter(s) to open by clicking the associated indicator. After the desired shutters are selected click “Open”, the shutters will now open at the same time. Gate Valves Gate Valves are the barriers that separate different parts of the physical vacuum system. Most systems will have Gate Valves between the growth chamber and load lock chamber, between various pumps and sections of the system, and other locations. Robo allows you to control theses gate valves. Editing Gate Valves Before controlling the Gate Valves you must first edit them to make sure all appropriate parameters are set. To edit the parameters of the Gate Valves navigate to SetupEdit Gate Valves, shown in Figure 27. The “Edit Gate Valves” dialog box will appear as shown in Figure 28. 7620 Executive Drive | Eden Prairie, MN 55344-3677 | USA Phone: 952-934-2100 | Fax: 952-934-2737 | Email: [email protected] | www.svta.com ROBO Control Manual 4/13 Figure 27 – Navigate to Edit Gate Valves SVT Associates Proprietary Information ©2012 SVT Associates, Inc. All Rights Reserved Page 21 of 44 • Name: Name of the Gate Valve. • Display on Chamber: When checked, the Gate Valve displays in Chamber View. • Size (Pixels): Set the size of the Gate Valve that displays in Chamber View. • Position: Positions the Gate Valve in Chamber View. You can also move Gate Valves by leftclicking and dragging the Gate Valve to be relocated. Edit Chamber must be enabled for this function to work. • On/Off Color: Defines the color of the control. • Save: Saves your changes and closes the window. Figure 28 – Edit Gate Valves Note: The horizontal scroll is used to navigate to all of the available Gate Valves for editing. Enter the desired Gate Valve programming parameters and click “Save” to close the window. Controlling Gate Valves To control the Gate Valves via Robo, go to the Shutter/Gate Valve/cFP Status section of the Main Screen, look at the bottom left hand side of the screen. Once there Hold the <SHIFT> key and click the Gate Valve you want to open/close. If the interlock isn’t satisfied for that Gate Valve a window will appear telling you the Gate Valve cannot be opened. Pressures Robo allows you to keep track of the various pressures within the system by having the ability to communicate with the pressure controllers/gauges. Edit Pressure Gauges To edit pressure gauges navigate to SetupPressuresEdit Pressures as shown in Figure 29. Figure 29 – Navigate to Edit Pressures After clicking “Edit Pressure” the Edit Pressure Gauges dialog box will appear as shown in Figure 30. You then have the ability to change the pressure properties. 7620 Executive Drive | Eden Prairie, MN 55344-3677 | USA Phone: 952-934-2100 | Fax: 952-934-2737 | Email: [email protected] | www.svta.com ROBO Control Manual 4/13 SVT Associates Proprietary Information ©2012 SVT Associates, Inc. All Rights Reserved Page 22 of 44 • Name: The name given to that Pressure Gauge. • Comm: The physical Communication Port. • Address: The Address of the Gauge. • Type: A pull down box of available gauges. • Position: Positions the Pressure Gauge in Chamber View. You can also move Pressure Gauges by leftclicking and dragging the Pressure Gauge to be relocated. Edit Chamber must be enabled for this function to work. • Warning/Alarm levels: Warning and Alarm levels to notify you of pressures that have exceeded the specified ranges. • Poll: When checked, the software polls the gauge. • Display on Chamber: When checked, the gauge is displayed in Chamber View. • Comm Ok: Tells you if the communication between the gauge and software is ok (green). • Pressure Warning/Ok: Tells you if the pressure is in a warning state (orange). • Pressure Alarm/Ok: Tells you if the pressure is in an alarm state (red). • Normal/Alarm/Warning Colors: Sets the colors of the control displayed. Figure 30 – Edit Pressure Gauges • Plot Color: Sets the color of the plot on the Trend Chart. • Save: Saves and closes the window. Monitor Pressures You can monitor the pressure gauges by viewing the Value column in the Table labeled “Pressures” as shown in Figure 31. Figure 31 – Pressure Readings Analog Controls Robo allows you to gain control of Devices that implement Analog voltage inputs and outputs. An example of this would be a mass flow controller or a pressure gauge. You are able to set and read these analog voltages. Figure 32 – Navigate to Edit Analog Controls 7620 Executive Drive | Eden Prairie, MN 55344-3677 | USA Phone: 952-934-2100 | Fax: 952-934-2737 | Email: [email protected] | www.svta.com ROBO Control Manual 4/13 SVT Associates Proprietary Information ©2012 SVT Associates, Inc. All Rights Reserved Page 23 of 44 Editing Analog Controls Before you control your analog device you must first edit the settings. To edit the Analog Control Settings, navigate to SetupAnalog ControlEdit Analog Controls as shown in Figure 32. The Edit Analog Controls dialog box will appear as shown in Figure 33 allowing you to edit the analog devices. • Name: Name of the Device. • Analog Input Variable: The physical location of the Analog Signal Input. • Analog Output Variable: The physical location of the Analog voltage out. • Input Voltage Range: The voltage range. • Value Range: The Value range of the device. • Output Voltage Range: The value range of the device output. • Position: Positions the Analog Control in Chamber View. You can also move Analog Controls by left-clicking and dragging the Analog Control to be relocated. Edit Chamber must be enabled for this function to work. • Plot Color: Sets the plot color for the control. Figure 33 • Units: The units of measurements the device can accept (i.e. SCCM, kPa). • Display on Chamber: When checked, the software displays the device in Chamber View. • Save: Saves and closes the window. Note: The horizontal scroll is used to navigate to all of the available analog controls for editing. Enter the desired analog controls programming parameters and click the “Save” button to close the window. 7620 Executive Drive | Eden Prairie, MN 55344-3677 | USA Phone: 952-934-2100 | Fax: 952-934-2737 | Email: [email protected] | www.svta.com ROBO Control Manual 4/13 SVT Associates Proprietary Information ©2012 SVT Associates, Inc. All Rights Reserved Page 24 of 44 Controlling Analog Devices After you setup the analog devices you can now begin to control them. Navigate to the Analog Control Table (Figure 34). This table contains 3 columns: Name, Value, and Setpoint. You are able to change the analog voltage output by editing the SetPoint value. The Value cell automatically changes the voltage to the wanted value based on the Voltage Range and Value Range. Figure 34 – Analog Control Table The image shown is representing MFC’s, this Device control can be used for a wide variety of instruments that utilize Analog Monitoring and Control. Example use of an Analog Device: You have a Mass Flow Control that has an input voltage range of 0 to 5 volts and outputs a Flow range of 0 to 100 SCCM. Say the flow meter is reading 50 SCCM and thus sends an output voltage of 2.5V to the analog channel. The Analog Device Table will display 50 not 2.5. Say you want the mass flow control to maintain 100 SCCM. To do this, enter 100 in the Setpoint cell. The software will automatically change the 100 SCCM to 5V and then send it to the mass flow control. Digital Controls Robo has the capability to monitor and control devices that use 24V TTL logic. These digital controls can be used to take control over rough pumps, turbo pumps, monitor analog pressure devices, and any other device with 24V I/O. Editing Digital Controls Before controlling/monitoring a digital device you must first create and edit them. To do this, navigate to SetupDigital Control. Click Edit Digital Controls as shown in Figure 35. The Edit Digital Controls dialog box will appear as shown in Figure 36, allowing you to add and edit digital devices. 7620 Executive Drive | Eden Prairie, MN 55344-3677 | USA Phone: 952-934-2100 | Fax: 952-934-2737 | Email: [email protected] | www.svta.com ROBO Control Manual 4/13 Figure 35 – Navigate to Digital Devices SVT Associates Proprietary Information ©2012 SVT Associates, Inc. All Rights Reserved Page 25 of 44 • Name: Name of the Digital Device. • Shared Variable In: The physical input of the digital line. • Shared Variable Out: The physical line in which the 24V logic will be sent to the device. • Description when Low: The text you want to have display on the Digital Device Table when the inputted value is low. (0 Vdc) • Description when High: The text you want to have display on the Digital Device Table when the inputted value is high. (24 Vdc) • Button Height: The vertical size of the button in pixels. • Button Width: The horizontal size of the button in pixels. • Off Color: The color of the button when in the OFF position. • On Color: The color of the button when in the ON position. Figure 36 – Edit Digital Devices • Visible on Chamber: When checked, allows the button to be seen on the “Chamber” graphical view. • Save: Saves and closes the window. • Position: Positions the Digital Control in Chamber View. You can also move Digital Controls by leftclicking and dragging the Digital Control to be relocated. Edit Chamber must be enabled for this function to work. Note: The horizontal scroll is used to navigate to all of the available digital controls for editing. Enter the desired digital controls programming parameters, click “Save” to close the window. 7620 Executive Drive | Eden Prairie, MN 55344-3677 | USA Phone: 952-934-2100 | Fax: 952-934-2737 | Email: [email protected] | www.svta.com ROBO Control Manual 4/13 SVT Associates Proprietary Information ©2012 SVT Associates, Inc. All Rights Reserved Page 26 of 44 Controlling and Monitoring Digital Control Devices The Digital Control Device Table shown in Figure 37 is a means of monitoring and controlling instruments and devices whose logic is ON or OFF. The items listed in this table are populated through the SetupDigital ControlEdit Digital Control option (also described in previous section). This table contains 3 columns: Name, Value, and Setpoint. The Value is what shows the current state of the digital input. You can send an output to the Digital Control Device by either typing a ‘1’ or a ‘0’ in the Setpoint column. ‘1’ represents a True Logic or ON and ‘0’ represents a False Logic or OFF command. Figure 37 – Digital Controls Device Table Monitoring Device Drivers Device Drivers are software instruments Interfaced through Robo for monitoring and controlling Add-On instruments. For example “Stage Spinner” is an Add-On Instrument option to the Robo Software. This particular device driver rotates and positions a stage with motor control. To Setup and/or Edit Device Drivers navigate to SetupDevice DriverEdit Device Driver. (Figure 38) The Edit Device Driver dialog box will appear as shown in Figure 39. Figure 38 7620 Executive Drive | Eden Prairie, MN 55344-3677 | USA Phone: 952-934-2100 | Fax: 952-934-2737 | Email: [email protected] | www.svta.com ROBO Control Manual 4/13 SVT Associates Proprietary Information ©2012 SVT Associates, Inc. All Rights Reserved Page 27 of 44 • Driver Name: This is the top folder name of the instrument. To view the folder name browse to c:/Program Files/SVT Associates/Robo Control/Drivers. In here you can view the names of instruments already loaded or the location where drivers can be loaded. • Control Name in Driver: This is the information from the Device Driver you want Robo to log and monitor. • Label: This is the name the Robo Interface will represent the Control in the Driver. Figure 40 Figure 39 • Units: This text field allows you to add notation to the value coming in. • Precision: Sets the value of precision past the decimal point. • Decimal/Scientific Notation: Allows you to switch between Decimal and Scientific Notation • Visible: Enables visibility in Chamber View • Warning/Alarm Levels: Set Warning and Alarm levels to notify you if the Device Driver value has exceeded its specific ranges as demonstrated below in Red and Amber color fields. Figure 41 • Normal/Alarm/Warning colors: Sets the colors of the Device Control displayed. • Plot Color: Sets the color of the plot on the Trend Chart. • Position: Positions the Device Driver in Chamber View. You can also move Device Drivers by left-clicking and dragging the Device Driver to be relocated. Edit Chamber must be enabled for this function to work. • Indicator Width: Sets the displayed width of the indicator in Chamber View. Note: Operators of the system may receive a list of control points for their Device Drivers by contacting SVT Associates. Device Drivers are modified and sometimes specialized for each customer and may need supplementary information to complete. 7620 Executive Drive | Eden Prairie, MN 55344-3677 | USA Phone: 952-934-2100 | Fax: 952-934-2737 | Email: [email protected] | www.svta.com ROBO Control Manual 4/13 SVT Associates Proprietary Information ©2012 SVT Associates, Inc. All Rights Reserved Page 28 of 44 Recipes Listed below are the commands available for writing Robo recipes. Set Eurotherm Temperature – Sets the specified Eurotherms Setpoint (Celsius). Set Eurotherm Ramp Rate – Sets the specified Eurotherms Ramp Rate (degrees Celsius/Sec). Set Eurotherm Power Output – Sets the specified Eurotherms Power Output (0–100%). Set Eurotherm Power Ramp Rate – Sets the specified Eurotherms Power Ramp Rate (%/sec). Set Eurotherm to Manual Mode – Sets the specified Eurotherm to Manual Mode. Set Eurotherm to Auto Mode – Sets the specified Eurotherm to Auto Mode. Set Eurotherms PID Values – Sets the specified Eurotherms PID Values. Set Shutter Status – Sets each shutter to Open or Close based on user option. Use this when writing a growth recipe. Wait – Waits for the specified amount of time (sec). Begin Loop – Sets the beginning of a loop structure End Loop – Sets the end of a loop structure. All steps between “Begin Loop” and “End Loop” will be repeated the amount specified in the “Begin Loop” step. Wait for Eurotherm Temperature – Pauses the recipe until the Eurotherm reaches the targeted temperature. Wait for Eurotherm Temperature Below – Pauses the recipe until the Eurotherm falls below the target temperature Wait for Pressure Above – Pauses the recipe until the Pressure Gauge rises above the target value. Wait for Pressure Below – Pauses the recipe until the Pressure Gauge falls below the target value. Open Gate Valve – Opens the specified Gate Valve. Close Gate Valve – Closes the specified Gate Valve. Set Digital Control Output – Sets the specified digital control output to the target state. Set Analog Control Output – Set the specified analog control output to the target voltage. Prompt User – Displays a message to you in a popup prompt. The recipe will pause until you acknowledge the message. Control Device Driver – Sends the specified Remote Command (RC) to the specified Device Driver. Wait for Digital Control – Pauses the Recipe until the Digital Device is at the target state. Wait for Analog Control – Pauses the Recipe until the Analog Control is less than/greater than the target value. Wait for Device Driver – Pauses the Recipe until the specified Device Driver Value is greater than/less than/equal to the target value. Wait for Clock – Starts the Recipe after the specified time. 7620 Executive Drive | Eden Prairie, MN 55344-3677 | USA Phone: 952-934-2100 | Fax: 952-934-2737 | Email: [email protected] | www.svta.com ROBO Control Manual 4/13 SVT Associates Proprietary Information ©2012 SVT Associates, Inc. All Rights Reserved Page 29 of 44 Robo allows for one level of nested loops. Below is a quick example of nesting loops: Begin Loop for 3 iterations Begin Loop for 3 iterations Set Shutter Status 1 Set Shutter Status 2 End Loop Set Shutter Status 3 Begin Loop for 2 iterations Set Shutter Status 4 End Loop Set Shutter Status 5 End Loop Creating Recipes Before you can create a recipe you must first understand the Recipe tab. The recipe tab is found on the Device/Recipe Control Section of the Main Screen as shown in Figure 42. Valid/Invalid Recipe Save/Load Recipe Recipe Control Recipe Time\Steps Recipe Script Recipe Tab Figure 42 – Recipe Tab This tab contains everything you need to create, run, and monitor recipe execution. There are five sub-sections on this tab: Recipe Control: Contains three buttons Run, Pause, and Stop. Controls the status of the recipe. Valid/Invalid Recipe: This status LED tells you if the recipe script you have created is valid. 7620 Executive Drive | Eden Prairie, MN 55344-3677 | USA Phone: 952-934-2100 | Fax: 952-934-2737 | Email: [email protected] | www.svta.com ROBO Control Manual 4/13 SVT Associates Proprietary Information ©2012 SVT Associates, Inc. All Rights Reserved Page 30 of 44 Save/Load Recipe: These two buttons are what allows you to save and load a recipe script. Recipe Time/Steps: This section tells you how long a script will take, time remaining, steps, and steps remaining. Recipe Script: This is where you create/edit/monitor the recipe script. Each Script is made up of multiple steps. These steps are added/edited/deleted in this section. Adding Steps to a Script To add a step to a recipe script navigate to the Recipe Script section of the Recipe Tab. DOUBLE CLICK the first empty cell in the recipe script, doing this will bring up the “Choose step to add” box (See Figure 43). You then have two ways to enter the command. One way is to use the up/down arrows and choose a step to add. After you have chosen the appropriate step, click Continue. The second way is to click on the Name Field to expand the list of steps, select the step you want to add and the recipe popup menu will appear (Figure 44). Figure 43 – Choose Step to Add You can choose to “Add Step After” or “Add Step Before.” After you choose a step a new dialog box will appear related to the step you chose to add. Figure 45 shows the “Add Set Temperature Step” box. Figure 44 – Adding/Deleting Steps 7620 Executive Drive | Eden Prairie, MN 55344-3677 | USA Phone: 952-934-2100 | Fax: 952-934-2737 | Email: [email protected] | www.svta.com ROBO Control Manual 4/13 SVT Associates Proprietary Information ©2012 SVT Associates, Inc. All Rights Reserved Page 31 of 44 Editing/Deleting a Script Step To edit a step, DOUBLE CLICK the step you want to edit. To delete a step, single left click the step to be deleted then right click the step to bring up the popup menu, then choose “Delete Step”. Running Recipes To run a recipe click the “Run” button found on the recipe control sub-section of the recipe tab. This will cause the current recipe script to be started. The Recipe Script will highlight green to indicate which step it is currently executing. At any point you can pause or stop the recipe by clicking the respective buttons. Figure 45 Interlocks Device Interlocks Robo has the ability to create interlocks on instruments such as Eurotherms, Pressure Gauges, Digital/Analog Inputs and many other devices. These interlocks allow you to create watchdogs on vital devices so when a value is out of its normal range an alarm will sound alerting you and can load/run a safety recipe. Creating Device Interlocks To create a Device Interlock navigate to Interlocks Device Interlocks… as shown in Figure 46. Left clicking on “Device Interlocks” opens the “Edit Interlocks” dialogue window, as shown in Figure 47. Figure 46 – Navigate to Create Device Interlock 7620 Executive Drive | Eden Prairie, MN 55344-3677 | USA Phone: 952-934-2100 | Fax: 952-934-2737 | Email: [email protected] | www.svta.com ROBO Control Manual 4/13 SVT Associates Proprietary Information ©2012 SVT Associates, Inc. All Rights Reserved Page 32 of 44 • Device: The device type you want to create an interlock on. (Eurotherm, Pressure, Analog Controls, Device Drivers) • Device Name: The name of the device to put an interlock on. • Case: Greater than or less than. • Value: The value to trigger the interlock on. • Recipe Control: When checked, if the interlock fails the specified recipe will be loaded and run. • Soft Fault: When checked, if the interlock fails the current recipe will be paused and a dialog box will appear asking user to resume recipe or abort. Recipe Control must be checked for this to be enabled. • Priority: You can set the priority of the Interlock with “0” as highest priority • Recipe Path: Location of recipes that will run upon triggering an interlock. • OK: Displays status of the device. • Error/No Error: Displays error status of the interlock. • Sound: Lit color will sound an alarm. • Digital Output Variable: The output path for the given Interlock is selected here. • Position: Positions the Interlock in Chamber View. You can also move Interlocks by left-clicking and dragging the Interlock to be relocated. Edit Chamber must be enabled for this function to work. • Save: Saves and closes the window. Figure 47 – Edit Interlocks Allowed devices for interlocks: • Eurotherms – Uses thermocouple temperatures as interlock values. • Pressures – Uses pressure readings as interlock values. • Analog Devices – Uses any analog Input as interlock values. • Device Drivers – Uses ANY value in drivers created in LabVIEW as interlock values. Interlock Device Names In order to create valid interlocks you must enter a correct name for an associated Device. If you want to create an interlock on the Pressures or Eurotherms, in the Device Name field enter the appropriate name of the device. Digital Interlocks Robo allows the implementation of Digital Interlocks. Digital Interlocks work on 12–24V logic. You can add these digital interlocks to devices that have a sourcing output of 12–24V, such as a flow meter or pressure gauges. 7620 Executive Drive | Eden Prairie, MN 55344-3677 | USA Phone: 952-934-2100 | Fax: 952-934-2737 | Email: [email protected] | www.svta.com ROBO Control Manual 4/13 SVT Associates Proprietary Information ©2012 SVT Associates, Inc. All Rights Reserved Page 33 of 44 Creating Digital Interlocks To create/edit Digital Interlocks navigate to InterlocksDigital Interlocks… as shown in Figure 48. The Edit Digital Interlocks window will appear (Figure 49). Figure 48 – Navigating to Edit Digital Interlocks 7620 Executive Drive | Eden Prairie, MN 55344-3677 | USA Phone: 952-934-2100 | Fax: 952-934-2737 | Email: [email protected] | www.svta.com ROBO Control Manual 4/13 SVT Associates Proprietary Information ©2012 SVT Associates, Inc. All Rights Reserved Page 34 of 44 • Name: The name of the Interlock. • Digital Variable Input: The digital input line of the interlock. • Fail on High/Low: Logic value in which Interlock will Fail. For Example; The logic will strictly depend on the logic of the instrument, however most Pressure Gauges send a “1” or High Bit value to indicate pressure has been reached or is lower than its intended Setpoint. If the pressure were to rise above its Setpoint the logic would be lost and would typically interlock on a “Fail on Low.” • Recipe Control: When checked, if the interlock fails the specified recipe will be loaded and run. • Soft Fault: When checked, if the interlock fails the current recipe will be paused and a dialog box will appear asking user to resume recipe or abort. Recipe Control must be checked for this to be enabled. • Recipe Path: Location of recipe that will run if an interlock is triggered. • Satisfied: Red indicates there is an interlock triggered. Green indicates interlock has not been triggered. • No Error: Red indicates that Digital Input conditions are unknown. Gray indicates there is “No Error.” • Play Sound: This option is not applicable to all setups but an Interlock trigger has the ability to produce sound through the computers system speakers. • Visible: • Priority: Priority sets the particular interlocks importance level, .0 being the greatest and 99 being the least. If 2 interlock triggers occur the interlock with the higher priority will overtake the lower priority. • Digital Output Variable: This is a Digital Output bit option. Typical setups are wired into a Light tree to indicate an Interlock has occurred. • Save: Saves and closes the window. Figure 49 – Edit Digital Interlocks Once the Digital Interlocks have been created the software will automatically look at the physical line and check the status. If a Digital Interlock fails a dialog box will appear to warn you of the failure. 7620 Executive Drive | Eden Prairie, MN 55344-3677 | USA Phone: 952-934-2100 | Fax: 952-934-2737 | Email: [email protected] | www.svta.com ROBO Control Manual 4/13 SVT Associates Proprietary Information ©2012 SVT Associates, Inc. All Rights Reserved Page 35 of 44 Recipe Control Option If you want an interlock to execute or pause a recipe you must check the “Recipe Control” option in the Edit Digital Interlocks window. By checking this option, anytime the interlock fails it will STOP the current recipe, LOAD the “Safety Recipe” and START it. If you would like the interlock failure to only pause the recipe and display a prompt asking you to ABORT or RESUME the recipe, check the “Soft Fault” option. In order for “Soft Fault” to work “Recipe Control” must be ENABLED. Chamber View Robo allows you to create a graphical representation of the system. This Chamber View is a simplified picture of the system and gives you a general overview and status of the system. Figure 50 – Graphical Representation of the System Figure 51 – Graphical Representation of the System 7620 Executive Drive | Eden Prairie, MN 55344-3677 | USA Phone: 952-934-2100 | Fax: 952-934-2737 | Email: [email protected] | www.svta.com ROBO Control Manual 4/13 SVT Associates Proprietary Information ©2012 SVT Associates, Inc. All Rights Reserved Page 36 of 44 Loading .bmp At any point during the operation of Robo you can load a custom .bmp file of the system. To load a custom .bmp file, navigate to Chamber ViewLoad .bmp. A dialog box will appear prompting you to load the .bmp. This custom .bmp can be 850 x 690 pixels. The images can be larger than 850 x 690 pixels however; Chamber View will only display 850 x 690 pixels. Moving Device Indicators To move the device indicators, click and hold on the indicator you want to move then drag the indicator to the desired final location and release the mouse. The indicator will move to that location. Some of the indicators available on the Chamber View are: Eurotherms, Pressure Gauges, Gate Valves, Valves Sources, Stage Spinner, and many more. Figure 52 After you have loaded the custom .bmp you can move the device indicators around by selecting the Edit Chamber check box (Figure 52). Saving the Chamber View To save the current layout, navigate to Chamber ViewSave layout click Save Layout. Robo will save the locations of the indicators and will load their positions at startup (Figure 53). Figure 53 Controlling the System via Chamber View Robo allows you to take control of the system in Chamber View. In Chamber View you can: • Open/Close Shutters (by holding the <Shift> key and Right Clicking). • Open/Close Gate Valves (by holding the <Shift> key and Right Clicking). • Change Eurotherm Temperature/Ramp Rate. • Control Device Drivers. • Control Digital Controls. • Control Analog Controls. 7620 Executive Drive | Eden Prairie, MN 55344-3677 | USA Phone: 952-934-2100 | Fax: 952-934-2737 | Email: [email protected] | www.svta.com ROBO Control Manual 4/13 SVT Associates Proprietary Information ©2012 SVT Associates, Inc. All Rights Reserved Page 37 of 44 Chamber Recipes Robo allows you to implement one click recipe load and execution from Chamber View. To add a Chamber Recipe navigate to Chamber ViewChamber RecipesEdit Chamber Recipes (Figure 54). Figure 54 – Chamber Recipes The Edit Chamber Recipes box will appear (Figure 55). After you have finished editing the Chamber Recipes it is now possible to have one click control of those recipes. To run the recipes go to Chamber View and the configured Chamber Recipes will appear as buttons. To start the recipes hold SHIFT and right click the wanted recipe, once done a prompt will appear confirming your action. In order to edit the Recipes setup for “Chamber Recipes” you will need to “Load Recipe” from the Recipe tab. Make your changes then “Save Recipe”, when saving make sure you save as the same name that is called in Chamber Recipes. Alternatively you can save as a new name and call the new recipe for the Chamber Recipe being created. 7620 Executive Drive | Eden Prairie, MN 55344-3677 | USA Phone: 952-934-2100 | Fax: 952-934-2737 | Email: [email protected] | www.svta.com ROBO Control Manual 4/13 SVT Associates Proprietary Information ©2012 SVT Associates, Inc. All Rights Reserved Page 38 of 44 • Name: Name of the Recipe, this name will appear on the button. • Recipe Path: The path of the recipe to be loaded and ran. • Visible: When checked, this button will be visible in Chamber view. • Button Size: Size of the button that appears in Chamber View (in pixels). • Position: Positions the Chamber Recipe in Chamber View. You can also move Chamber Recipes by left-clicking and dragging the Chamber Recipe to be relocated. Edit Chamber must be enabled for this function to work. • Remote Start Variable: The digital input line that will load and run a recipe. An external source would be used to set the Digital Input bit high however, this will only be excepted if the system is equipped with Digital Input control to start and stop recipes. • Save: Edits the Recipe and closes the window. Figure 55 7620 Executive Drive | Eden Prairie, MN 55344-3677 | USA Phone: 952-934-2100 | Fax: 952-934-2737 | Email: [email protected] | www.svta.com ROBO Control Manual 4/13 SVT Associates Proprietary Information ©2012 SVT Associates, Inc. All Rights Reserved Page 39 of 44 Customization of the Device Control Tab Robo allows you the ability to customize the layout of the Device Control Tab to fit your needs. The Device Control Tab can be found on the left side of the Robo software and is where the majority of device control and data display occurs. The Device Control tab contains six major tables: Eurotherm, Pressure, Power Supply, Analog Controls, Digital Controls and Devices. Setting the Visibility of Tables If your Robo configuration doesn’t include Pressure communication or Analog Control capability you might want to hide the associated tables. To do this, navigate to FileSet Table Visibility (Figure 56). The Set Table Visibility dialog box will appear. Now you can set the visibility of all the tables. To make a table visible check the box otherwise they will be hidden. Figure 56 – Set Table Visibility Log File The log file saves the systems vital information into a tab delimited text file. This file is automatically created whenever the Robo software is running (Figure 57). The location of this created file is C:\Robo Log Files. The naming of the log file is as follows: MONTH-DAY-YEAR HOUR hrs MINUTE min Say you start the Robo software on June 11, 2009 at 1:20PM the automatic log file will be named: June-11-2009 13 hrs 20 min Items that are logged: Eurotherm Temperature Pressure Gauge Readings Analog Values Logged in User (Log file creates new entry when ever a new user logs in) Interlock Failure (Log file creates new entry whenever an interlock failure occurs) Recipe Start and End Any opening of the edit windows 7620 Executive Drive | Eden Prairie, MN 55344-3677 | USA Phone: 952-934-2100 | Fax: 952-934-2737 | Email: [email protected] | www.svta.com ROBO Control Manual 4/13 Figure 57 – Log File Settings SVT Associates Proprietary Information ©2012 SVT Associates, Inc. All Rights Reserved Page 40 of 44 Settings You have the ability to tell the software the interval between consecutive logs and the maximum size of the log file. Once the size of the current log file is greater than the max size a new log file is automatically created. The log file settings are found by navigating to Log FileSettings. (Figure 57) Device Drivers Robo allows you to add new device drivers to the software. These new device drivers are written in LabVIEW graphical programming language and can be created and added by the end user. This allows Robo to be ever expanding and very flexible to fit your needs. SVT Associates Device Drivers SVT Associates has numerous Device Drivers that can be added to the system allowing for better control, safety and over all greater functionality. Below is a small list of current device drivers • Stage Spinner • Cygnus Rate Controller • Throttle Valve • Substrate Cassette Elevator • Annealing Stage • Substrate Cooling System • Re-circulating Water System • Current Size: Indicates the size (in Kb) of the currently generated Log File • Max Size: This control sets the maximum size (in Kb) of the current Log File. If the Current Size exceeds the Max Size, a new Log File is created. • Idle Log Start: Input for generating Idle Log Start data • Idle Log Speed: The duration of time between generated values for all logged variables (in Idle • Operating Log Start: Input for generating Operating Log Start data • Operating Log Speed: The duration of time between generated values for all logged variables (in Operating Log start mode) • Log File Location: The directory where all Log Files are stored • Current Path: The directory path of the currently generated Log File • ET/Pressure/Analog/Shutter/GV/Device/ Log Speed: These controls allow the user to specify • Create New File: Creates a new Log File Log Start) the digital sampling rate for each of the populated variables. 7620 Executive Drive | Eden Prairie, MN 55344-3677 | USA Phone: 952-934-2100 | Fax: 952-934-2737 | Email: [email protected] | www.svta.com ROBO Control Manual 4/13 SVT Associates Proprietary Information ©2012 SVT Associates, Inc. All Rights Reserved Page 41 of 44 If you are in need of new device drivers for your system contact SVT Associates. User Created Device Driver To add a new device driver you must have three items: 1. Main Virtual Instrument: This is the .vi that Robo will open and run/control. 2. LLB: This is a library of .vis that your Main vi needs to run. Without this LLB Robo can’t open the main vi. 3. Control.txt: This is a text file that contains the names of indicators in the Main vi that you want Robo to monitor and place in the Device table. This file is a single line with entries that are tab separated. Note: There cannot be more than one (1) .vi and one .txt file in this folder! All drivers must be created in LabVIEW 8.6 or earlier! Transfering Values from Robo into LabVIEW created Software Robo allows you to create your own software in LabVIEW to read all values being generated by Robo. Some values that can be read are: • Eurotherm Temperatures • Pressure Readings • Shutter Positions • Mass Flow Readings • Gate Valve Locations • Interlock Errors • Recipe Run Status o Time/Step Remaining A simple .vi can be created to allow you to read the values and do real-time analysis and many other applications. If you would like to learn how to do this please contact SVT Associates. 7620 Executive Drive | Eden Prairie, MN 55344-3677 | USA Phone: 952-934-2100 | Fax: 952-934-2737 | Email: [email protected] | www.svta.com ROBO Control Manual 4/13 SVT Associates Proprietary Information ©2012 SVT Associates, Inc. All Rights Reserved Page 42 of 44 Warranty and Limitations of Remedies SVT Associates warrants that all equipment manufactured by it shall be free from defects in materials and workmanship under normal use and service for a period of twelve (12) months from the date of shipment from SVT Associates manufacturing facility. This warranty is subject to SVT Associates equipment being installed, maintained, and operated in accordance with the operating and maintenance instructions accompanying each item manufactured by SVT Associates. Warranty shall be void if SVT Associates equipment is modified by the CUSTOMER or used in other than the recommended manner or applications. Purchased equipment incorporated into any item supplied by SVT Associates will be covered by said manufacturer’s warranty. SVT Associates warrants that, at the time of delivery, any other products processed or manufactured and sold by it hereunder are free of defects in material and workmanship and conform to COMPANY specifications. No warranty is provided by SVT Associates for products sold hereunder which are not manufactured or processed by SVT Associates, but the manufacturer’s warranty for such products, if any, shall be assigned to the CUSTOMER without recourse to SVT Associates The foregoing warranties are in lieu of and exclude all other warranties not expressly set forth herein, whether expressed or implied by law or otherwise, including without limitation any warranty of merchantability or fitness for a particular purpose. In no event will SVT Associates be liable for any consequential damages. IN THE EVENT OF SVT ASSOCIATES LIABLITY, WHETHER BASED ON CONTRACT, TORT (INCLUDING BUT NOT LIMITED TO NEGLIGENCE AND STRICT LIABLITY) OR OTHERWISE, THE CUSTOMER’S SOLE AND EXCLUSIVE REMEDY WILL BE LIMITED; SVT ASSOCIATES HAS THE FOLLOWING OPTIONS; TO REPAIR OR REPLACEMENT (F.O.B. SVT ASSOCIATES MANUFACTURING PLANT) BY THE COMPANY OF ANY NONCONFORMING ITEM FOR WHICH CLAIM IS MADE BY THE CUSTOMER OR TO REPAYMENT OF THE PORTION OF THE PURCHASE PRICE PAID BY THE CUSTOMER ATTRIBUTABLE TO THE NONCONFORMING ITEM. SVT ASSOCIATES WILL NOT BE LIABLE FOR ANY OTHER DAMAGES, WHETHER DIRECT, INCIDENTAL, CONSEQUENTIAL OR OTHERWISE. Return Policy Any request by the CUSTOMER for return of standard products other than for warranty claims under warranty hereof, for all or any part of purchase order accepted by SVT Associates, shall be subject to the following conditions: I. The CUSTOMER must make notification to SVT Associates within thirty (30) days of original shipping date. II. A “RETURN GOODS AUTHORIZATION” number must be assigned to and accompany all goods or materials being returned by the CUSTOMER to SVT Associates. SVT Associates must assign said number prior to any and all returns. Goods not accompanied by a “RETURN GOODS AUTHORIZATION” number will be refused by SVT Associates and returned at the CUSTOMER’S expense. III. CUSTOMER shall prepay shipping charges for products being returned to SVT Associates. IV. Products being returned to SVT Associates should be properly crated for shipment, and the CUSTOMER shall bear the risk of loss until delivered to SVT Associates. V. Products being returned to SVT Associates must be returned in the condition originally received by the CUSTOMER and free from damage, use, or modification, which would render the product unusable for resale, by SVT Associates. VI. All applicable taxes, duties, insurance, and shipping charges shall be the sole responsibility of the CUSTOMER. VII. Goods being returned for other than warranty repair shall be subject to a restocking charge of twenty (20) percent of the original sales price of the returned item. 7620 Executive Drive | Eden Prairie, MN 55344-3677 | USA Phone: 952-934-2100 | Fax: 952-934-2737 | Email: [email protected] | www.svta.com ROBO Control Manual 4/13 SVT Associates Proprietary Information ©2012 SVT Associates, Inc. All Rights Reserved Page 43 of 44 Returning Equipment for Repair or Servicing Before shipping equipment for repair or servicing, obtain a Return Authorization Number assigned by SVT Associates. Liability Disclaimer SVT Associates, Inc. takes steps to assure that its published specifications and manuals are correct; however, errors do occur. SVT Associates, Inc. reserves the right to correct any such errors and disclaims liability resulting therefrom. No Liability for Consequential Damage In no event shall SVT Associates, Inc. or anyone else involved in the creation, production, or delivery of the accompanying product (including hardware and software) be liable for any damages whatsoever (including, without limitation, damages for loss of business profits, business interruption, loss of business information, or other pecuniary loss) arising out of the use of or the results of use of or inability to use such product, even if SVT Associates, Inc. has been advised of the possibility of such damages. 7620 Executive Drive | Eden Prairie, MN 55344-3677 | USA Phone: 952-934-2100 | Fax: 952-934-2737 | Email: [email protected] | www.svta.com ROBO Control Manual 4/13 SVT Associates Proprietary Information ©2012 SVT Associates, Inc. All Rights Reserved Page 44 of 44