1
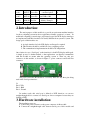
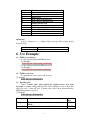
Portwell Linux EZIO-300
User Manual
v1.0.3
CONTENTS
1
1.
REVISION HISTORY:
2
2.
INTRODUCTION:
3
3.
HARDWARE INSTALLATION:
3
4.
EZIO FUNCTION COMMAND
4
5.
COMMAND DESCRIPTION:
5
6.
USE EXAMPLE:
6
6.1.
6.2.
6.3.
6.4.
6.5.
6.6.
6.7.
6.8.
6.9.
6
6
6
7
7
7
7
7
7
EZIO SCREEN DISPLAYS:
EZIO SCREEN CLEAN:
READ KEYPADS:
HOME CURSOR:
MOVE CURSOR 1 CHARACTER LEFT:
MOVE CURSOR 1 CHARACTER RIGHT:
SCROLL 1 CHARACTER LEFT:
SCROLL 1 CHARACTER RIGHT:
SHOW UNDERLINE CURSOR
1. Revision history:
Revision Date
v1.0.0
Author
98/01/23 Jason.Wu
Description
Document Create
2
Affected sec.
v1.0.1
98/07/27 Jason.Wu
v1.0.2
99/07/19 Jason.Wu
v1.0.3
99/09/10 Eva Lin
1. Change
display Ch6.1(page
command option
6)
1. Modify model name
fom G300 to 300
Ch6(page 61. Modify Example
7)
2. Introduction:
The major purpose of this module is to provide an easier man-machine interface
for those computing systems in whose applications friendly operation is a “must.” In
traditional computing system design, proprietary keypad and LCD display interfaces
are implemented and these interfaces are usually different from system to system. The
design goals of this interface are:
A. A single interface for both LCD display and keypad is required.
B. This interface should be available in every computing system.
C. The communication implementation should be OS independent.
Our solution is to use “Serial port” as the interface for both LCD display and keypad.
A simple protocol is further defined so that applications can directly communicate
with this module no matter what the operating system is. There are only two
connectors in this module, as shown in Figure 1: power connector and Serial Port
connector.
The power source into this module is 5 volt only. There are only three pins being
used in the Serial port interface:
J4
Pin 2: TxD
Pin 3 : RxD
Pin 4 : Ground
In another words, this serial port is defined as DCE, therefore, we can use
straight-through cable to connect it to Serial port of most computers because they are
defined as DTE.
3. Hardware installation:
The installation steps are:
A. Connect the power connector to the power connector of this module.
B. Connect the straight-through cable between Serial port of this module and
3
computer.
4. EZIO Function Command
EZIO is an intelligent device, which will display those data received from RS232
port and reply key pressing status to polling command from RS232 port. There are
command and data from RS232 port. To distinguish between data and commands, the
LCD/key-pad Module recognizes a command prefix, 254 (Hex 0FE). The byte
following “254” will be processed as a command. For example, to clear the screen,
send the command prefix (254) followed by the LCD clear-screen code (1). The valid
data range is as following table shows.
Valid data range
Displayed characters
0-7
Customized icon 0-7
48-57 (30-39 Hex)
0-9
65-90 (41-5A Hex)
A-Z
97-122 (61-7A Hex)
a-z
To get the key pressing status, a “read key” command can be issued to these
modules,
which will check the key-pressing status and reply accordingly. The
following are the command and corresponding Decimal/Hex value:
Functions/commands
Decimal/Hex
1.
Start Of HEX
40/28
2.
End Of HEX
55/37
3.
Clear screen
1/01
4.
Home cursor
2/02
5.
Read key
6/06
6.
Blank display (retaining data)
8/08
7.
Hide cursor & display blanked characters
12/0C
8.
Turn on (blinking block cursor)
13/0D
9.
Show underline cursor
14/0E
10.
Move cursor 1 character left
16/10
11.
Move cursor 1 character right
20/14
12.
Scroll 1 character left
24/18
13.
Scroll 1 character right
28/1C
14.
Set display address (position the cursor)
128(Hex080)+ Location
Comment
See note 1
See note 2
location
Note 1:
Upon receiving the “read key” command from host computer, the LCD/key-pad
module will check the status of every key and reply with status command accordingly.
The replied message from LCD/key-pad module consists of a header and a status byte.
The header byte is 253 (Hex0FD). The high nibble (with the most significant bit) of
4
the status byte is always “B” and the low nibble (with the least significant bit) of the
status byte is used to indicate key pressing status of the key-pad module. This nibble
will be “F” (of four 1s), if there is no key being pressed while the “read key” being
received. “0” will be used to indicate key pressing status of corresponding key. There
are four keys in this module –upper arrow, down arrow, enter (ENT), and escape
(ESC). The relationship between the function key, corresponding status bit, and status
byte is as following table.
Function key Corresponding status bit
Escape
Status byte
The fourth bit of lower nibble(the least significant bit)
B7 (H)
(1110)
Up arrow
The third bit of lower nibble (1101)
BE (H)
Enter
The second bit of lower nibble (1011)
BB (H)
Down arrow The first bit of lower nibble (0111)
BD (H)
None
BF(H)
More than one key can be pressed at the same time so that there may be more than
one “0”s in the low nibble of status byte. For example, if Up and Down arrow keys
are pressed at the same time while “read key” command being received, the replied
status will be “Hex045”.
Note 2:
This command can be used to place the cursor at any location. The corresponding
address for each character on the screen is as following:
For 16×2 Display Address
Character
1
2
3
4
5
6
7
8
9
10
11
12
13
14
15
16
Location
00
01
02
03
04
05
06
07
08
09
0A
0B
0C
0D
0E
0F
(Address
40
41
42
43
44
45
46
47
48
49
4A
4B
4C
4D
4E
4F
The addresses of characters at the same row are continuous, so moving cursor commands
can be applied to shift the cursor position back and forth. However, the address of characters
between upper and lower row are discontinuous. To change cursor position between upper
row and lower row, this command will be applied.
There is a built-in watch dog timer in the module. This module will reset itself and
send out “reset packet“(0FDH, 0EH) thereafter.
5. Command Description:
Use Example:
$ ezio_300_api -d [device] –Command options
Device:
Serial port device path.
Ex: /dev/ttyS0
Command list:
Command
Description
5
g
s
c
o
L
R
l
r
i
t
S
h
Read key
Input display message
Clear screen
Home cursor
Move cursor 1 character left
Move cursor 1 character right
Scroll 1 character left
Scroll 1 character right
Hide cursor & display blanked characters
Turn on (blinking block cursor)
Show underline cursor
Show help message
Options list:
If above parameter is a -s (Input display message), Please input display
character string.
options
String
Description
String will only display in Line
6. Use Example:
6.1.
EZIO screen displays:
• If only display modification EZIO the first
Use Example:
$ ezio_300_api –d /dev/ttyS1 –s 1 Message
• If only display modification EZIO the second
Use Example:
$ ezio_300_api –d /dev/ttyS1 –s 2 Message
EZIO screen clean:
If command runs success then clean all screen
Use Example:
$ ezio_300_api –d /dev/ttyS1 -c
6.2.
Read Keypads:
This a sample code, meet polling get keypad returns and show
message in screen, running API will have been reading the value of keyboard,
Until press ctrl + c then will exit. If return value is the content underneath table,
EZIO display that key is pressed.
Use Example:
$ ezio_300_api –d /dev/ttyS1 -g
6.3.
Function key
Corresponding status bit
Escape
The fourth bit of lower nibble(the least significant bit)
(1110)
arrow The third bit of lower nibble (1101)
Up
6
Status
byte
B7 (H)
BE (H)
Enter
Down
None
The second bit of lower nibble (1011)
arrow The first bit of lower nibble (0111)
6.4.
Home cursor:
If command runs successes then cursor return home.
$ ezio_300_api –d /dev/ttyS1 –o
6.5.
Move cursor 1 character left:
If command runs successes then move cursor 1 character left.
$ ezio_300_api –d /dev/ttyS1 –L
6.6.
Move cursor 1 character right:
If command runs successes then move cursor 1 character left.
$ ezio_300_api –d /dev/ttyS1 –R
BB (H)
BD (H)
BF(H)
Scroll 1 character left:
If command runs successes then Scroll 1 character left.
$ ezio_300_api –d /dev/ttyS1 –l
6.8. Scroll 1 character right:
If command runs successes then Scroll 1 character right.
$ ezio_300_api –d /dev/ttyS1 –r
6.7.
6.9.
Show underline cursor
If command runs successes then Show underline cursor
$ ezio_300_api –d /dev/ttyS1 –S
Node:
1.
2.
3.
Above operate to all show again EZIO screen.
Because this is the sample command, so some functions need modify
program just can complete.
We changed the API name from ezio_g300_api to ezio_300_api, this
ezio_g300_api with ezio_300_api function is the same, and change will
also create a software link, the old name will be obsolete in later versions
7