1
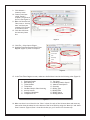
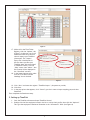
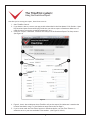
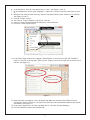
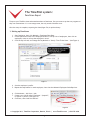
The TimePilot system:
Peachtree Export
To export your TimePilot time and attendance data to Peachtree, first you must set up the two programs so
they can communicate. It’s a two-step process, but only needs to be done once.
After the setup is complete, exporting the data (Pages 5-6) is quick and easy.
1. Setting up Peachtree
1. Start Peachtree, then click Maintain > Employee/Sales Reps.
2. Click dropdown box next to the Employee ID field to call up a list of employees, then click an
employee’s name to call up that employee’s record.
3. Click the Pay Info tab, and change the Pay Method to “Hourly—Time Ticket Hours.” (See Figure 1)
Figure 1
4. Save the employee’s profile.
5. Repeat the steps above for each employee, then close the Maintain Employees/Sales Reps box.
6. Click Maintain > Job Costs > Jobs
7. Create a new Job ID called “Employee.” (Capital E,
no quotes or period.) (See Figure 2)
8. Click Save, then close the Jobs box.
Figure 2
© Copyright 2011, TimePilot Corporation, Batavia, Illinois | www.TimePilot.com | 630-879-6400
1
9. Click Maintain >
Inventory Items
10. Create a new item
called “Payroll.”
(Capital P, no quotes or
period.) (See Figure 3)
11. Make sure that the Item
Class is set to “Activity
Item” and that your
company’s GL Account
is accurately listed.
12. Click Save and close
the Inventory Items
box.
Figure 3
13. Click File > Select Import/Export.
14. Highlight Time/Expense and Time Ticket
Register (Figure 4), then click Import.
Figure 4
15. In the Time Ticket Register screen, make sure the fields are listed in the following order (Figure 5):
1.
2.
3.
4.
5.
6.
7.
8.
Employee/Vendor
Recorded by ID
Ticket Number
Ticket Date
Has Been Used in Sales/Invoicing
Activity Item ID
Customer/Job/Admin
Completed for ID
9. Pay Level
10. Has Been Used in Payroll
11. Manual Timed Option
12. Duration
13. Billing Type
14. Billing Rate
15. Billing Status
16. Billing Amount
Figure 5
16. Make sure there’s a red check in the “Show” column for each of the 16 items above and move any
items other than the above 16 to the bottom of the list of fields by using the “Move Up” and “Move
Down” buttons. (Figure 6) Don’t close this window yet; you’ll need it for the next step.
2
Figure 6
17. While still in the Time Ticket
Register, click the “Options” tab.
(Figure 7) In this step, you’ll tell
Peachtree which file to look for
when it imports your TimePilot
information. The “Import/
Export File” should point to
the file where you save your
TimePilot data. (Not sure where?
In TimePilot Central, click the
“Help” menu, then “About.” Your
file location will be displayed in
the “Data Path” section.)
18. In the Import Options area, make
sure the “First Row Contains
Headings” box is checked.
Figure 7
19. Click “Save” and name the register “TimePilot Import.” (No quotes or period.)
20. Click Save.
21. In the pop-up box that appears, click “Cancel” (you don’t want to import anything yet) and close
Peachtree.
That completes the Peachtree setup.
2. Setting up TimePilot
1. Start the TimePilot software and open TimePilot Central.
2. Double-click the first employee’s name in the list to call up their profile, then click the “Optional”
Tab. Type the employee’s Peachtree ID number in the “Alternate ID” field. (See Figure 8)
3
Figure 8
3. Click OK.
4. Repeat Steps 2 and 3 for each employee.
That completes the TimePilot setup.
4
The TimePilot system:
Using the Peachtree Export
Now that you’ve set up your export, here’s how to use it:
1. Start TimePilot Central.
2. If you haven’t done so, extract your pay period as described in the User Manual. Click Periods > Open
Pay Period and open the extracted pay period that you wish to export to Peachtree. Make sure it’s
ready for export (correcting erroneous transactions, etc.).
3. Click File > Export > Peachtree. TimePilot will take you to the Peachtree Export File Setup screen.
(See Figure 9)
Figure 9
4. Figure 9, Item 1 above indicates where TimePilot will put the export file. Make sure it matches the
location described in step 17 of the Peachtree setup instructions on Page 3.
5. If you’ve never used the Time Ticket function in Peachtree before, set your Time Ticket to 1;
otherwise set it to your next available Ticket number. (See Figure 9, Item 2)
5
6. In the Job ID box, click the radio button next to “Job.” (See Figure 9, Item 3)
7. In the Completed for ID box, type “Employee.” (Capital E, no quotes or period.) (See Figure 9, Item
4)
8. Make sure the “Used in Sales/Invoicing” and the “Has Been Used in Payroll” boxes are not checked.
(See Figure 9, Item 5)
9. Click the “Export” button.
10. You’ll see an “Export Complete” pop-up box. Click OK.
11. Now you’ll bring the exported file into Peachtree. Start Peachtree.
12. Click File > Select Import/Export.
Figure 10
13. In the Select Import/Export box, highlight “Time/Expense” in the box to the left and “TimePilot
Import” in the box to the top right. Then click the “Import” button in the menu bar across the top of
the box. (See Figure 10)
Figure 11
14. When the Import box appears, click the Options tab. Make sure that the Import/Export File box
contains the correct location for your export file. See Step 18 in the Peachtree setup for the location
information. (See Figure 11)
15. In the Import Options box, click the checkbox next to “First Row Contains Headings.”
16. Click OK. Peachtree imports the TimePilot file.
6