1
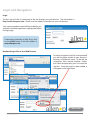
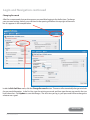
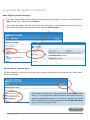
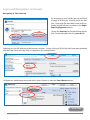
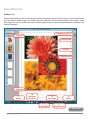
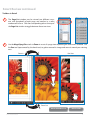
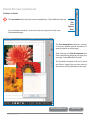
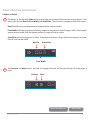
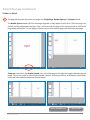
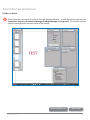
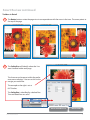
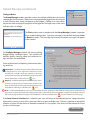
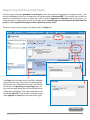
Prepress Portal
Using Kodak InSite™
User Manual
Version 11.25.09
Contents
Introduction to InSite™.. . . . . . . . . . . . . . . . . . . . . . . . . . . . . . . . . . . . . . . . . . . . . 2
Login and Navigation
Login and Bookmarking.. . . . . . . . . . . . . . . . . . . . . . . . . . . . . . . . . . . . . . . . . . . . . . . .
Changing Password.. . . . . . . . . . . . . . . . . . . . . . . . . . . . . . . . . . . . . . . . . . . . . . . . . . . .
Home Page and InSite Help Button. . . . . . . . . . . . . . . . . . . . . . . . . . . . . . . . . . . . .
Uploading Files. . . . . . . . . . . . . . . . . . . . . . . . . . . . . . . . . . . . . . . . . . . . . . . . . . . . . . . . .
Navigating to Smart Review.. . . . . . . . . . . . . . . . . . . . . . . . . . . . . . . . . . . . . . . . . . . .
3
4
5
7
10
Smart Review
Page View and Toolbars List.. . . . . . . . . . . . . . . . . . . . . . . . . . . . . . . . . . . . . . . . . . . .
Toolbars in Detail.. . . . . . . . . . . . . . . . . . . . . . . . . . . . . . . . . . . . . . . . . . . . . . . . . . . . . . .
Dialogue Boxes.. . . . . . . . . . . . . . . . . . . . . . . . . . . . . . . . . . . . . . . . . . . . . . . . . . . . . . . . .
Preview. . . . . . . . . . . . . . . . . . . . . . . . . . . . . . . . . . . . . . . . . . . . . . . . . . . . . . . . . . . . . . . . .
11
12
22
26
Approving and Rejecting Pages.. . . . . . . . . . . . . . . . . . . . . . . . . . . . . . . . . . 27
FAQ.. . . . . . . . . . . . . . . . . . . . . . . . . . . . . . . . . . . . . . . . . . . . . . . . . . . . . . . . . . . . . . . . . . . . . . . 28
Introduction to InSite™
The InSite Prepress Portal system is a web-accessed prepress
environment that lets printers and their customers work with
print jobs over the Internet. InSite helps to manage the proofing,
correction, and approval process so that it is more efficient.
For support or inquiries, please contact your Account
Manager at Allen Press.
InSite™ User Manual
2
Login and Navigation
Login
The first step of InSite is connecting to the site through your web browser. The web address is
http://insite.allenpress.com. Please insert this address manually into your web browser.
Your username and password will be provided to you,
and each should be typed into its appropriate field in
the login page.
If connecting internally at Allen Press, click
on the InSite button in the left sidebar at
www.allenpress.net.
Bookmarking InSite in Your Web Browser
For easier navigation to InSite, we recommend
you add the login window to your browser’s
Favorites or Bookmark menu. To the left are
screenshots from Internet Explorer, Firefox,
and Safari demonstrating how to create the
shortcut. Once the page has been added, it
will appear in the same menu.
Return to TOC
InSite™ User Manual
3
Login and Navigation continued
Changing Password
Allen Press recommends that you change your password after logging in for the first time. To change
your password setting, click on your username in the opening window at the top right of the menu
bar as it appears in the example below.
Inside the Edit Staff User menu, click the Change Password button. The menu will automatically change to include
the password information. In the first line, type the existing password, and then type the new password in the two
lines below that. Click Update to save the changes. The next time you log in, your password will have changed to
whatever was typed.
Return to TOC
InSite™ User Manual
4
Login and Navigation continued
Home Page for Account Managers
The initial screen will give you the choice between searching for jobs by Customers (Journal Name) or
Jobs (Journal Issue). Please select Customers.
The window that follows will show you a list of all of the journals associated with your account. If the list
shows more than that, please change the View setting to My Customers.
Home Page for Customer Users
The Home page for customer users will only show accounts associated with the specific user. Please select
the desired account.
Please note that InSite has an extremely comprehensive Help section
online. It is structured with a table of contents and can also be navigated by searching for key terms. If you have a problem you would
like to troubleshoot with their guide, please click the Question Mark
icon on your home page in InSite.
Return to TOC
InSite™ User Manual
5
Login and Navigation continued
Accessing the link will provide a report indicating your current system configuration and its compatibility with
InSite.
After viewing the report, click on the
Email Results button and Close.
System Maintenance
The Prinergy prepress system is rebooted on a weekly basis. This is a best practice recommended by Kodak
for preventative maintenance and to ensure continued smooth operation and peak functionality. Our currently scheduled weekly reboot is 6:30-7:00 am CST/CDT on Tuesdays. InSite will not be available during that
time.
Return to TOC
InSite™ User Manual
6
Login and Navigation continued
Uploading Files
By navigating to your specific journal, you’ll find
a listing of all the jobs currently active for that
title. For the samples shown, we’ve used The Test
Association of America (TEAA).
This customer has two issues active, and they
are shown here listed in order by their last date
modified.
Selecting an issue will take you to the Summary window. From here, you can see a quick overview of
how many pages have been loaded, how many have been approved or rejected, and there’s even some
recent activity information toward the bottom.
Select the Upload Files... button at the top.
Return to TOC
InSite™ User Manual
7
Login and Navigation continued
Uploading Files
An Upload Files form will appear and take a moment to load. The message may vary between
Internet browsers, but the question will always be
the same. The browser will ask for permission to
perform the upload. Please click the Trust button.
Information about the specifics of the job uploaded can be entered in the Notes field including:
Job completeness (all files uploaded)
Bleed page(s) information
Color page(s) information
All notes entered as an upload note will also be
available in the job notes section of this job in
InSite. The advantage of using upload notes instead of job notes is that the upload notes will be
included in the email notification sent to the Account Manager following a customer upload.
Some browsers will ask this permission only
once, while others will request it every time.
Please note that you may need to click Trust
every time you upload files.
InSite accepts only PDF or Postscript files for
uploading. Drag the desired files into the empty field at the bottom of the Upload Files form.
Once there, the files will be listed out.
Page files can also be added using the Browser
feature. Select the Browser icon and navigate to
the desired files, highlight them, then select OK.
After all of the correct files have been moved,
press the Upload button at the bottom to begin
the transfer.
Return to TOC
InSite™ User Manual
8
Login and Navigation continued
Uploading Files
The following status windows will appear to let you know how far along the upload is. The first window shows the
upload of files to InSite. The second window shows the processing of files through InSite. If there are low-resolution
images or incorrect color values, the second window will list them below the status bar.
The user may close these windows at any
point during the upload and processing
stages without affecting InSite’s actions.
Once the files have been successfully uploaded and processed, they can be previewed in InSite’s Smart Review program. The features of Smart Review are explained in a following section, but first we need to navigate to an active
page from a customer’s Jobs page.
Return to TOC
InSite™ User Manual
9
Login and Navigation continued
Navigating to Smart Review
By navigating to your specific journal, you’ll find
a listing of all the jobs currently active for that
title. Since page files have been successfully uploaded, the job will show a number in the Pages
Requiring Approval column.
To view the Summary for the job, click on the Job
title. For the example we’re using teaa-01-01.
Selecting an issue will take you to the Summary window. To view a listing of all the files that have been uploaded,
click the Pages tab or the Page Total as it appears in the example below.
Navigate to a specific page to activate InSite’s Smart Review or select the Smart Review button.
Return to TOC
InSite™ User Manual
10
Smart Review
Toolbars List
Getting acclimated to InSite’s Smart Review will be an important portion of this training. From Smart Review,
you can check a specific page’s size, bleed, and color separation, measure the lengths of the margins, check
how pages line up in a spread view, and annotate pages for easier communication between customers and
Account Managers.
2 Magnifying Glass
1 Page List
3 Annotation
4 Ruler
5 Densitometer
12 Safety Box
11
Rotate
10
Dialogue
Shortcuts
8
Turn Page
9
View Modes
6
Slider
7
Magnification
Return to TOC
InSite™ User Manual
11
Smart Review continued
Toolbars in Detail
1
The Page List window can be viewed two different ways:
one with thumbnails of each page, and another in a more
condensed list form. Click the corresponding tabs at the top of
the Page List window to toggle between these two views.
2
Use the Magnifying Glass tools to Zoom in or out of a page view depending on which one is selected. Use
the Pan tool (represented by the hand icon) to grab a zoomed-in image and move it around your viewing
area.
Pan View
Zoom In
Zoom Out
Return to Toolbars List
InSite™ User Manual
Return to TOC
12
Smart Review continued
Toolbars in Detail
3
The Annotation tools have five means of application. These different tools are:
Any annotations made by a User can be seen by anyone else who views
the annotated page.
Text
Pen
Line
Square
Oval
The Text Annotation tool leaves messages that can indicate specific mistakes or a
general note for an entire page.
After selecting the Text Annotation tool,
click a location on the page and type your
message. Select OK when finished.
The finished annotation will rest in place
and have a toggle that you can move to
the content or area referred to in the note.
Return to Toolbars List
InSite™ User Manual
Return to TOC
13
Smart Review continued
Toolbars in Detail
3 continued
The Pen Annotation tool lets you draw freehand with your mouse to indicate areas that
need attention.
The Line, Square, and Oval Annotation tools
work similarly to the Pen Annotation tool. These
tools offer cleaner markings with better control
than trying to draw free-hand with your mouse.
Annotations can be deleted or hidden
by right-clicking the annotation mark or
message and selecting Delete or Hide
from the menu that appears.
Return to Toolbars List
InSite™ User Manual
Return to TOC
14
Smart Review continued
Toolbars in Detail
4
The Ruler tools also create annotations on the page. Beginning with the first tool, the Ruler, specific distances can be measured and their record will stay on the page. With the tool selected, click and hold, then
drag the icon and release once the desired length has been measured. The annotation will stay on the page
and will appear in the Annotations Manager window (explained later in this manual).
The Square Ruler works the same way. Click and drag the area you would like measured, and the tool will
create an annotation on the page with the width and height as well as the calculated inches-squared area.
Return to Toolbars List
InSite™ User Manual
Return to TOC
15
Smart Review continued
Toolbars in Detail
4
continued
The Horizontal and Vertical Guides tools will place horizontal or vertical guides on the page. These guides
will also appear in the Annotations Manager window.
5
The Densitometer tool is shaped like an eye-dropper and acts like eye-dropper tools from other programs.
Click on any value on the page and the color values will appear as an annotation, as well as appearing in the
Annotations Manager window.
In the example below, the light green in “TEST” is 72% Cyan and 44% Yellow.
Return to Toolbars List
InSite™ User Manual
Return to TOC
16
Smart Review continued
Toolbars in Detail
6
The Slider at the bottom of the Smart Review page identifies how much magnification you have at any time.
If the Magnification tools have been used to zoom in or out on a page view, the Slider will show you the
percentage at which the page is being viewed.
The Slider can also be used to magnify a page view. Sliding to the left will zoom out of the page view. Sliding
to the right will zoom in on the page view.
When the Slider is set to 100%, Smart Review
will be showing a page’s actual size.
Return to Toolbars List
InSite™ User Manual
Return to TOC
17
Smart Review continued
Toolbars in Detail
7
The buttons to the left of the Slider will snap your page view to one of three common viewing options. From
left to right they are Best Fit, Fit to Width, and Actual Size. Their functions are apparent from their names.
Best Fit will fit every viewable portion of a page into the viewing window.
Fit to Width will fit the page into the viewing window to the maximum size of a page’s width. If the height is
greater than the width, then the bottom portion of a page will not be visible.
Actual Size will set the page view to 100%. If the page’s actual size is larger than the viewing area, then portions of it will not be visible.
Best Fit
Actual Size
Fit to Width
8
The Previous and Next buttons are used to navigate backward and forward through all of the pages in
a job.
Previous
Next
Return to Toolbars List
InSite™ User Manual
Return to TOC
18
Smart Review continued
Toolbars in Detail
9
The page view buttons transition your pages to a Single Page, Reader Spread, or Compare mode.
The Reader Spread mode will show two pages together as they appear in print form. The even page is on
the left, and the odd page on the right. Page 1 will show only one page in this viewing mode, as will the last
page of the publication. To view pages in spread, you must be viewing pages that have a partner page.
Compare mode shows the Reader Spread view with a third page to the right that toggles between the two
pages. This can be useful for ensuring that headers, footers, and margins line up, or for finding subtle differences that were made between two selected pages.
Return to Toolbars List
InSite™ User Manual
Return to TOC
19
Smart Review continued
Toolbars in Detail
10
These five buttons are shortcuts to five of the eight Dialogue Windows. In order from left to right, they are
Separations, Versions, Annotations Manager, Preflight Manager, and Page Info. The functions of these
windows are explained in the next section of the manual.
Return to Toolbars List
InSite™ User Manual
Return to TOC
20
Smart Review continued
Toolbars in Detail
11 The Rotate buttons rotate the page view in correspondence with the arrow in the icon. The arrow points to
the top of the page.
12
The Safety Box will identify where the Live
area is located within each page.
The Live area can be preset within the preference menu selection. You can set this to the
margin you would like.
The example on the right is set at
0.375 inches.
The Safety Box is identified by a dashed line.
Trim and bleed lines are solid.
Return to Toolbars List
InSite™ User Manual
Return to TOC
21
Smart Review continued
Dialogue Boxes
At the top of your Smart Review screen, one of the menu options is Window. From this menu you can select eight
different attribute windows that will help you check your documents more accurately and communicate with customers and associates more thoroughly.
The first option is the Page List
window. It lists all of the pages
in a specific job and will show you
which page is being viewed.
The Navigation window displays a preview of the entire page. Your viewing area is marked by a red box,
which can be moved around the preview by clicking
and dragging. The view in Smart Review will match
where the box is dragged.
Return to Toolbars List
InSite™ User Manual
Return to TOC
22
Smart Review continued
Dialogue Boxes
The Page Info window displays the page and trim
size as well as the file and page name.
The Separations window will tell you what colors are used in the page.
By checking or unchecking any specific color channel and clicking Apply below, you can see the file with or without
that specific color turned on. This is very useful when checking for occurrences of four-color text or for making sure
certain elements that need to be a certain color are correct.
Return to TOC
InSite™ User Manual
23
Smart Review continued
Dialogue Boxes
The Group Manager window provides a means for multiple collaborators to view the
same page at the same time. When two or more people are logged into the same job
in Smart Review, their names will appear in the window. Clicking on a name allows
the person to be in charge of navigation of the page file. The finger next to the name
indicates who is in charge.
The Chat window works in tandem with the Group Manager window. It operates
like a standard dialogue box. Type your message in the top field and press Enter
or Return to send it. That message and a history of previous messages will appear
in the window.
The Preflight Manager window will show anything
flagged during a preflight report. This window will
typically display warnings about low-resolution images and fonts not embedded.
There are three levels of reporting: Information, Warning, and Error.
Information—Feedback about items that could be improved
by bringing files in closer alignment to Allen Press–recommended press-ready file submission standards. In the Pages
Summary tab and in the page thumbnail in Page List in Smart
Review, Information is indicated by the
icon.
Warning—Feedback regarding items that will require user interaction via page approval or rejection status updates. In the
Pages Summary tab and in the page thumbnail in Page List in
Smart Review, a Warning is indicated by the
icon.
Error—Feedback indicating that an error has occurred that will cause significant or fatal problems during prepress production. The
page must be rejected to prevent it from being printed, and a corrected page must be uploaded to replace it. In the Pages Summary
tab and in the page thumbnail in Page List in Smart Review, an Error is indicated by the
icon and a black “X” across the page.
If the Auto Zoom to Selection box is checked, your view will zoom to the indicated spot on a page where the
information, warning, or error exists when you click on a given preflight entry. The box is checked as the default
selection in InSite, but the choice of checked/unchecked is a user option. Your choice will be retained for future
sessions until changed.
Return to TOC
InSite™ User Manual
24
Smart Review continued
Dialogue Boxes
The Annotations Manager window displays all annotations written on a page and breaks them into groups
by who wrote them.
This allows you to manage all the annotations on a page
in a single window. Checking a box next to an entry will
make the annotation visible on a page, and unchecking
the box will hide it. The All Annotations box in the upper left of the window allows you to hide or unhide all
the entries on the page in a single action.
Any written messages, markings drawn with the Pen
tool, and even the shapes and lines you create on the
page will all be listed here.
If the Auto Zoom to Selection box is checked, your view
will zoom into the indicated spot on a page where the
annotation exists when you click on a given annotation
entry. The box is checked as the default selection in
InSite, but the choice of checked/unchecked is a user
option. Your choice will be retained for future sessions
until changed.
Return to TOC
InSite™ User Manual
25
Preview
This section will show you how the Preview feature works in InSite. InSite provides you with a tool to review pages
after they have been assigned their placement in the ImposItion stage. The benefit of this feature is that it gives
you the ability to review pages online with the traditional look and feel of a hard copy blueline without the expense
and time required.
When the button is grayed
out, the Preview button is
not available.
Once the pages have been Imposed,
the Preview button is activated.
Click on the Preview button to enter InSite’s Preview mode. When your pages are imposed, the Preview button
will be activated. If a cover and text pages have been imposed, you will have the option to view either the covers or
the text. Just select which you want to view.
To the left is what your pages will look like
within Preview. They will be able to turn like
a book. Just click the arrows at the bottom of
the page and start your walk through your
publication.
Return to TOC
InSite™ User Manual
26
Approving and Rejecting Pages
Once the pages have been uploaded and reviewed in InSite, they need to be tagged with an approval status. Jobs
that are uploaded by Allen Press composition staff will be tagged as Reviewed-OK. This indicates that the files are
ready for a proofreader (customer or Allen Press staff ) to give an Approved or Rejected status for the page. As a
safeguard against sending incorrect files to the plate room, rejected pages are automatically blocked from the
process, so it is important for pages to be assigned the correct status.
The process starts at the customer’s job page, under the Pages tab.
The Pages tab will display the list of all files uploaded
to that particular job. If you select the blue highlighted file name, you will be directed to the Smart Review
for that file. For approving and rejecting pages, simply select the space where the file is and the entire box
will become highlighted. This is illustrated above with
the file test3.p1.pdf. Once that file is selected, simply
select approve or reject from the panel on the right.
Return to TOC
InSite™ User Manual
27
InSite FAQs
Q:
A:
Can InSite be used for any type of proofing?
No. InSite Prepress Portal is specifically designed for working with post-RIPed files designated for
print.
Q:
A:
Can it be used in any print workflow?
At Allen Press, it is currently available for jobs that are printed offset.
Q:
A:
Is it a stand-alone product?
No. It is a component of our Prinergy prepress system.
Q:
A:
What are the basic requirements to run InSite?
The only requirements are a browser and an internet connection. For optimum performance, a highspeed internet connection is recommended.
Q:
A:
Are there any other requirements?
Yes. JavaScript and cookies must be enabled in the browser.
Q:
A: Can customers upload files to InSite?
Yes.
Q:
A:
Are events notifications customizable?
Yes. Users can choose which notifications they wish to receive and at what stage of production.
Q:
When viewing color on screen or checking the color build, does the user see accurate color, i.e.,
exactly as it will print?
A: No. Accurate color which visually represents how graphic elements will look in print is only possible
with a special, configured monitor. The color build information is completely accurate, however.
Q:
A:
What is the difference between trim lines, the safety box, and the live area?
Trim lines are the lines on the page that indicate where the paper will be cut to produce the
final page size. The live area is a pre-designated area within which all text and images should be
constrained to avoid running into or crowding to close to the edges of the page or gutter. The safety
box is the visual indication of this area.
Q:
A: Can annotations and other SmartReview activity be compiled and saved?
Yes. A report can be generated which logs all annotations, chats, and other activity completed in the
on-screen palettes.
Q:
Can “Set Pages To Reviewed—OK” or “Set Pages To Reviewed—Not OK” be over-ridden by the user
once completed?
A: Yes.
Q:
A:
Can “Give Final Approval For Pages” or “Reject Pages” be over-ridden by the user once completed?
No. A request would need to be made to the Prinergy Admin team to over-ride.
Q:
A:
Can PDFs be downloaded from InSite?
Yes. A low resolution PDF is available for download.
Q:
A:
Can user rights be applied to more than one publication?
Yes.
Return to TOC
InSite™ User Manual
28