1
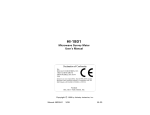
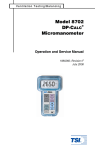
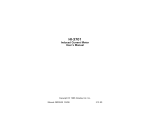
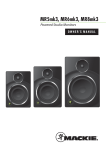
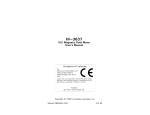
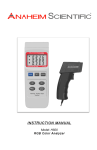
HI-1501
Microwave Survey Meter
User's Manual
Copyright
Manual #600010
© 1999 by Holaday Industries, Inc.
3/99
$5.00
Revision Record
Manual #600010
HIn1501 Microwave Survey Meter
Revision
--A
Description
Release
Revised, Reformatted
Date
2/90
3/99
TABLE OF CONTENTS
1.0 INTRODUCTION . . . . . . . . . . . . . . . . . . . . . 1
2.0 ABOUT THE HIn1501 . . . . . .
Description . . . . . . . . . . . . . .
Unique Features . . . . . . . . . .
Accuracy . . . . . . . . . . . . . . .
Calibration Method . . . . . . . .
Maintenance . . . . . . . . . . . . .
Battery Replacement . . .
Spacer Cone Replacement
Recalibration Service . . . . . . .
Service Centers . . . . . . . . . .
Return Procedures . . . . . . . . .
.
.
.
.
.
.
.
.
.
.
.
.
.
.
.
.
.
.
.
.
.
.
.
.
.
.
.
.
.
.
.
.
.
.
.
.
.
.
.
.
.
.
.
.
.
.
.
.
.
.
.
.
.
.
.
.
.
.
.
.
.
.
.
.
.
.
.
.
.
.
.
.
.
.
.
.
.
.
.
.
.
.
.
.
.
.
.
.
.
.
.
.
.
.
.
.
.
.
.
.
.
.
.
.
.
.
.
.
.
.
.
.
.
.
.
.
.
.
.
.
.
3
3
3
5
6
7
7
7
8
8
8
3.0 HI-1501 SPECIFICATIONS . . . . . . . . . . . . . 11
4.0 ACCEPTANCE . . . . . . . . . . . . . . . . . . . . . 13
Introduction . . . . . . . . . . . . . . . . . . . . . . . 13
Unpacking and Acceptance . . . . . . . . . . . . 13
5.0 GETTING READY .
Introduction . . . . .
Preparing the Oven
Preparing the Meter
.
.
.
.
.
.
.
.
.
.
.
.
.
.
.
.
.
.
.
.
.
.
.
.
.
.
.
.
.
.
.
.
.
.
.
.
.
.
.
.
.
.
.
.
.
.
.
.
.
.
.
.
.
.
.
.
.
.
.
.
.
.
.
.
.
.
.
.
.
.
.
.
15
15
15
16
6.0 MAKING THE MEASUREMENT . . . . . . . . . . 17
Introduction . . . . . . . . . . . . . . . . . . . . . . . 17
7.0 WHAT THE MEASUREMENT MEANS . . . . . . 19
Introduction . . . . . . . . . . . . . . . . . . . . . . . 19
Limited Warranty
Holaday Industries, Inc. warrants each model HIn1501 to be free
from defects in material and workmanship for a period of one
year from the date of shipment to the purchaser. This warranty
extends to the original purchaser only, and does not apply to the
batteries or to any products or parts subject to misuse, neglect,
accident, unauthorized service or abnormal conditions of
operation.
In the event an instrument covered by this warranty fails,
Holaday Industries, Inc. will, without charge, repair and
recalibrate the instrument if returned to their factory within one
year of the original purchase—provided that Holaday Industries'
examination discloses, to its satisfaction, that the product is
defective. Holaday Industries, Inc. may, at its option, replace the
product in lieu of repair. If the defect was caused by misuse,
neglect, accident, unauthorized service or abnormal conditions of
operation, repairs will be billed at a nominal cost. In such cases,
an estimate will be provided before work is started, if requested
by the purchaser.
For warranty service, contact Holaday Industries, Inc. Provide
the serial number of the instrument and complete details
regarding the failure mode. You will then be given either service
information or shipping instructions. Return the instrument to
the factory, transportation prepaid. Repairs will be made at the
factory and the instrument will be returned to you, transportation
prepaid. Holaday Industries, Inc., assumes no responsibility for
loss of, or damage to, products in transit.
Warning!
EXTREME CAUTION IS ADVISED WHEN WORKING IN
ENVIRONMENTS WHERE HIGH-INTENSITY ELECTROMAGNETIC
FIELDS MAY EXIST AND WHERE CONTACT WITH HIGH VOLTAGE
OR HIGH CURRENT CIRCUITS OR APPARATUS IS POSSIBLE.
ACCIDENTAL CONTACT WITH OBJECTS OR CIRCUITS OPERATING
AT HIGH VOLTAGES OR HIGH CURRENTS CAN BE LETHAL!
HOLADAY INDUSTRIES, INC. ASSUMES NO LIABILITY FOR ANY
DAMAGES OR PERSONAL INJURY WHICH MAY RESULT FROM
HIn1501 Manual
1.0
Page — 1
INTRODUCTION
The HI-1501 Microwave Survey Meter is a rugged,
compact, portable instrument that is virtually immune to
failure caused by excessive fields or physical abuse. This
instrument is acceptable to the US Government Center
for Devices and Radiological Health (FDA/CDRH) for
compliance testing of microwave ovens and to all major
microwave oven manufacturers for testing ovens in use
and after repair.
This easy to use meter, and the step-by-step instructions
in this manual will enable you to easily and accurately
measure leakage from your microwave oven.
This manual is divided into six sections:
1.
2.
3.
4.
5.
6.
About the HI-1501
Specifications
Acceptance
Getting Ready
Making the Measurement
What the Measurement Means
Page — 2
HIn1501 Manual
Figure 1
HI-1501 Microwave Survey Meter
HIn1501 Manual
2.0
Page — 3
ABOUT THE HI-1501
Description
Microwave leakage (electromagnetic fields) is detected by
an array of eight hot carrier diodes housed in the large
end of the plastic probe. This antenna array has the
unique feature of being able to sum microwave electric
fields of any polarization in a plane perpendicular to the
axis of the probe. The antenna lobe (effective measuring
area) is also very broad, making the instrument easy to
use when measuring leakage around an oven door. The
spacer cone is designed to provide a 5 cm spacing from
the tip of the probe to the center of the array.
Each detection probe and meter amplifier is calibrated as
a unit and serves all three ranges: 2, 10, and 100
mW/cm2. Only the 2 and 10 mW/cm2 ranges are
considered compliance ranges in terms of compliance
with the DHHS/CDRH standard for microwave survey
instruments contained in CFR 1030.10.
NOTE:
The HI-1501 must not be used without the spacer cone
in place. Using the instrument without the cone will
result in reading errors and may damage the unit.
Page — 4
HIn1501 Manual
Figure 2
HI-1501 Front Panel
HIn1501 Manual
Page — 5
Accuracy
The accuracy of this instrument is within ± 1 db
(+25%, -20%) when used according to these
instructions:
1. Always use a clean Holaday spacer cone.
Accuracy will be affected by wear of the cone and
by dirt and metallic particles which may become
imbedded in the EPS (expanded polystyrene Styrofoam).
2. If the instrument is to be used continuously for an
extended period of time, the condition of the
batteries must be checked by rotating the selector
switch to the BATT TEST position at least once
every 15 minutes.
3. The normal operating temperature range is
between 60/ and 90/ F. If used outside this
range, an additional error will be introduced. This
error can be approximated as -0.14% per
Fahrenheit degree. The negative temperature
coefficient means that the instrument reads high
at lower temperatures and low at higher
temperatures.
4. The parameters which affect the accuracy of this
instrument are listed along with the error
contribution of each in the following table.
Page — 6
HIn1501 Manual
Parameter
Error (dB)
1 mW/cm2
Calibration - Precision
- Accuracy
+0.42, -0.16
±0.09
Nonlinearity and AM response
±0.09
Near Field vs. Far Field
±0.29
Receiving Pattern
-0.11
Temperature Response
±0.17
Frequency Response *
±0.04
Polarization *
±0.21
RFI *
±0.04
Drift *
±0.02
Total
+1.27 / -1.12
* Errors combined in RMS manner
Calibration Method
Each meter is calibrated by placing the probe in a CW
(continuous wave) 2450 MHZ electromagnetic field
generated by a crystal controlled solid state source. The
source feeds an anechoic chamber through a section of
waveguide terminating in a slot radiator. Calibration is
performed at a level of 1 mW/cm2 and a standard
temperature of 75/ F.
The calibration is also checked at 5 mW/cm2. The
accuracy of the field is determined by comparing with an
LCR (local calibration reference) which is traceable to
NIST (National Institute of Standards and Technology
HIn1501 Manual
Page — 7
[formerly NBS]) through FDA/CDRH (Food and Drug
Administration / Center for Devices and Radiological
Health).
Maintenance
The only maintenance that is required is the replacement
of the batteries or the spacer cone, should it become
damaged or worn. Both items may be purchased from
Holaday Industries, Inc.
NOTE:
Do not use the HI-1501 without the spacer in position.
To maintain stated instrument accuracy, use only spacer
cones provided by Holaday.
Battery Replacement
Turn the selector switch OFF. Unsnap the two clips
that hold the cover in place. Always replace both
batteries at the same time. Any nine (9) volt alkaline
(or the optional, rechargeable NiCad) battery may be
used. Replace batteries and reinsert the meter
assembly into the cover being careful to not crimp the
battery wires between the front panel and the cover.
After replacement, turn the selector switch to BATT
TEST. If the meter does not immediately indicate full
scale, check the condition of each battery to assure
that they are in good condition or fully charged.
Spacer Cone Replacement
The spacer cone must be replaced when worn or
contaminated. Simply remove the old cone by pulling
straight off the end of the probe. Slip a new cone on,
being sure the cone is fully seated on the probe. A
polystyrene cone shield is available which provides
protection for the relatively soft material of the cone.
Page — 8
HIn1501 Manual
The following spare parts and options are available from
Holaday:
1. Spacer Cone Kit (Holaday part number 540013)
(Includes two spacer cones and four cone shields)
2. Nine Volt Batteries (Holaday p/n 30MN1604)
(Duracell MN1604 or equivalent)
3. 600 mL Beaker (Holaday p/n 44600MLP)
4. Nine Volt NiCad Batteries (Holaday p/n 30TR78)
(SAFT CS9T or equivalent)
5. NiCad Battery Charger (Holaday p/n 30AC22)
(SAFT WC-4 or equivalent)
Recalibration Service
It is recommended that the HI-1501 be recalibrated every
12 months.
Holaday Industries, Inc. will recalibrate and repair any
damaged instrument for a nominal charge.
The
calibration fee will be quoted on request.
Service Centers
Holaday Industries, Inc. has established factoryauthorized repair and recalibration centers in the US and
the UK. If your microwave survey meter requires service
or recalibration, contact Holaday for the nearest center.
Return Procedures
To return a product, use the following procedure:
Step 1. Briefly describe the problem in writing. Give
details regarding observed symptom(s), and
HIn1501 Manual
Page — 9
whether the problem is constant or intermittent.
If you have already talked to Holaday Customer
Service about the problem, provide the date(s),
the name of the service representative you
spoke with, and the nature of the conversation.
Include the serial number of the item.
Step 2. Package the probe carefully.
Return the
product, using the original boxes and packing
materials, if possible to:
Holaday Industries Inc.
Attn. Service Department
14825 Martin Drive
Eden Prairie, MN USA 55344
Page — 10
HIn1501 Manual
HIn1501 Manual
3.0
Page — 11
HIn1501 SPECIFICATIONS
Frequency:
2450 MHZ (± 50 MHZ)
Power Range:
0 -100 mW/cm2
Accuracy:
± 1 dB
Response Time:
2 - 3 seconds (SLOW)
< 1 second (FAST)
Overload Capacity: Continuous 2000 mW/cm2
Dimensions:
2.09 in. (5.3 cm) x 2.68 in. (6.8
cm) x 4.13 in. (10.5 cm)
Probe Length:
12.00 in. (30.5 cm)
Cable Length:
3.3 ft. (1.0 m)
Spacer:
1.97 in. (5 cm), EPS (Expanded
Polystyrene - Styrofoam)
Page — 12
HIn1501 Manual
HIn1501 Manual
4.0
Page — 13
ACCEPTANCE
Introduction
This section contains information on unpacking and
acceptance of the HIn1501.
Unpacking and Acceptance
Step 1.
Upon delivery of your order, inspect the
shipping container(s) for evidence of
damage. Record any damage on the delivery
receipt before signing. In case of concealed
damage or loss, retain the packing materials
for inspection by the carrier.
Step 2.
Remove the product from its shipping
containers.
Save the boxes and any
protective packing materials for future use.
Step 3.
Check all materials against the packing list to
verify that the equipment received matches
that which was ordered. If you find any
discrepancies, note them and call Holaday
Customer Service for further instructions.
Be sure that you are satisfied with the contents of your
order and the condition of your equipment before using
the HI-1501.
Page — 14
HIn1501 Manual
HIn1501 Manual
5.0
Page — 15
GETTING READY
Introduction
There are certain things that should be taken care of
before testing your microwave oven. It is a good practice
to follow these guidelines when using and testing any
microwave oven:
DO NOT ATTEMPT TO OPERATE A MICROWAVE OVEN
WITH:
1.
2.
3.
Any object caught in the door.
A door that does not close properly.
A damaged door, hinge, latch, or sealing
surface.
Preparing the Oven
1. Make sure that the oven is clean and that there is
no buildup of dirt around the door seal area.
2.
Inspect the door and sealing surfaces, the hinge,
and the latch for damage or a loose fit.
3.
If the oven has a variable power control or a defrost
setting, make sure it is set for full power.
4.
In order to make an accurate leakage measurement
you must use the specified water load. Fill the
beaker to a level of 275 mL with cool tap water and
place it in the center of the oven.
5.
Set your oven timer for approximately three (3)
minutes. If your test takes longer than this, the
water may boil. If it does, pour out the water and
refill using 275 mL of cool tap water.
Page — 16
HIn1501 Manual
Preparing the Meter
1. Remove the meter from the carrying case. Make
sure the EPS (styrofoam) spacer cone is intact and
firmly seated on the probe. Check the cone for
signs of wear or contamination. Replace if worn or
contaminated.
2.
Move the SLOW/FAST switch to the “FAST”
position. Turn the selector switch to “BATT TEST.”
The needle should indicate above the green “Batt
OK” line. If not, replace both batteries (refer back
to page 8).
3.
Turn the selector switch to the “PROBE TEST”
position. The needle should indicate between the
green “OK”, “PROBE TEST” lines. If not, the probe
or meter circuits have been damaged and should not
be used. A defective probe cannot be replaced in
the field and the complete unit should be returned
to the factory for repair.
4.
Turn the selector switch to the desired scale
(usually the 2 mW scale) and let the meter stabilize
for two minutes.
5.
Adjust the indicator needle on the meter to read
zero by turning the ZERO ADJ knob. The probe
must be shielded or removed from the vicinity of
any RF fields when the meter is being zeroed.
HIn1501 Manual
Page — 17
6.0 MAKING THE MEASUREMENT
Introduction
This section outlines the steps that should be taken while
measurements are actually taken with the HI-1501.
1.
Turn the oven on and proceed with the leakage
measurement.
2.
Hold the probe by the red handle in one hand
and hold the meter in the other hand. Place the
tip of the spacer cone against the oven surface,
with the probe handle perpendicular to the
surface. While testing, hold the meter away
from the oven to minimize the possible RF
pickup directly from the oven to the meter case.
3.
Move the probe slowly, about one inch per
second, keeping the cone tip in contact with the
oven and the probe handle straight.
4.
The areas where leakage is likely to occur are
around the door seal, the window, and at
ventilation louvers or vents. A damaged or
improperly installed magnetron mounting gasket
may cause leakage in the control panel area of
the oven.
5.
If the needle goes beyond the end of the scale
(2 mW/cm2), turn the selector switch to the 10
mW scale. Turn the oven off, rezero the meter,
and repeat the measurement.
6.
Once you have checked all around the door
edges, around and across the window, and at
any louvers or vents, move the “SLOW/FAST”
Page — 18
HIn1501 Manual
switch to the “SLOW” position. Return to the
spot where you noticed the highest reading
before.
7.
Hold the probe in place over the spot for at least
five seconds and watch for the highest needle
indication. The needle will move slower and not
go quite as high as it did in the “FAST” position.
The reading you obtain is the maximum leakage
of your oven.
8.
Check the zero after each measurement. If a
shift in the zero is observed, the meter will be
rezeroed and the measurement repeated.
9.
Turn the selector switch to OFF when the meter
is not in use.
Figure 3
Oven Scanning
HIn1501 Manual
7.0
Page — 19
WHAT THE MEASUREMENT MEANS
Introduction
The FDA/CDRH (Food and Drug Administration/Center for
Devices and Radiological Health) has established the
following requirements concerning microwave oven
leakage:
The power density (leakage) emitted by a microwave
oven shall not exceed one milliwatt per square
centimeter (1 mW/cm2) measured prior to acquisition
by a purchaser, and thereafter, five milliwatts per
square centimeter (5 mW/cm2).
Ovens in use today often have leakage values in the 0.1
to 0.4 mW/cm2 range, usually less than 0.6 when
received from the manufacturer.
If the oven leakage exceeds 5 mW/cm2, you should
contact a service agency recommended by the oven
manufacturer, or contact the manufacturer directly. This
oven must be repaired to comply with the CDRH safety
guidelines.
You may wish to write down for future reference the
leakage level, and the model number and serial number of
the meter used to make the measurement. Be sure to
note the calibration due date of the instrument; for
assurance of accurate readings, the microwave survey
meter should have been calibrated within the last 12
months.
Page — 20
HIn1501 Manual
-- NOTES --