1
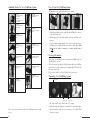
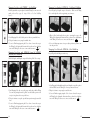
Available Wraps for Your VitalWrap System
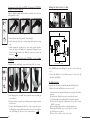
How To Use Your VitalWrap System
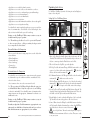
The VitalWrap can be applied on the skin or over clothing.
VIT-00001
Assembly, VitalWrap,
6x60” width
VIT-00118
Assembly, VitalWrap,
8x72” width
VIT-00255
Assembly, VitalWrap,
4x48” width
VIT-00397
Assembly, VitalWrap,
Medium Knee
VIT-00398
Assembly, VitalWrap,
Ankle
VIT-00388
Assembly, VitalWrap,
Back
1
2
3
1. Roll it: Begin with the wrap in a tight roll, with the Tubing Set connector
on the outside of the roll.
2. Start Wrapping: Place the bladder portion of the wrap around the treatment area.
3. Secure it: Finish wrapping using the Velcro closure. Connect the wrap to
the Tubing Set by aligning the Orientation Dots as shown. Press both
buttons on the tubeset connector to connect and disconnect
(
).
VIT-00119
Assembly, VitalWrap,
Shoulder
VIT-00394
Assembly, VitalWrap,
Wrist
VIT-00122
Assembly, VitalWrap,
Cervical
VIT-00395
Assembly, VitalWrap,
Large Shoulder
Priming Information
VIT-00392
Assembly, VitalWrap,
Large Knee
VIT-00396
Assembly, VitalWrap,
Dual Hand
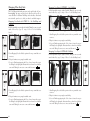
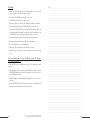
This can be done by operating the VitalWrap System with the new VitalWrap
attached for at least three minutes set to maximum COLD. This will allow
the wrap to properly fill.
When using your VitalWrap System it is important to PRIME or fill your
VitalWrap before each use.
Please contact VitalWear at 1.800.553.4081 if this is not effective.
VIT-00094
Carrying Bag
VIT-00648
Assembly, VitalWrap,
Hip
Operating Your VitalWrap System
on/off switch
1
2
105˚f
(small dots)
40˚f
(big dots)
3
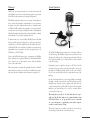
1. Fire it Up: Press the Power Switch to the on “I” position.
2. Chill it Out: Adjust the Temperature Control Knob to a comfortable setting.
Please contact us to find out about the latest VitalWraps that may be right
for you.
12
3. Refill it and Keep Going: Save the remaining ice and refill the Fluid
Canister to continue.
13