1
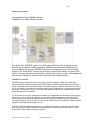
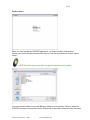
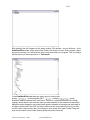
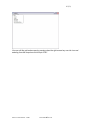
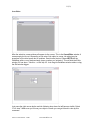
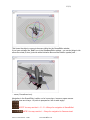
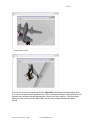
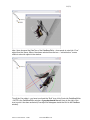
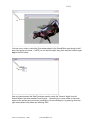
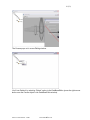
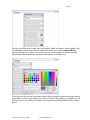
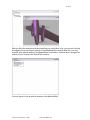
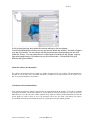
CADPIPE
D19 Technology Transfer in Partners
1.0
SIXTH FRAMEWORK PROGRAMME HORIZONTAL
RESEARCH ACTIVITIES INVOLVING SMES COOPERATIVE RESEARCH
Contract for: CO-OPERATIVE RESEARCH PROJECT
Project acronym: CADPIPE
Project full title: Cad Production Pipeline
Proposal no.: 512897
Contract no.: COOP-CT-2004-512897
D19 Technology Transfer in Partners
Version 1.0
12.12.06
Hannu Kuukkanen / VTT
CADPIPE
D19 Technology Transfer in Partners
Version history
Version
Date
Author(s)
Reviewer
Description
0.1-1
10.12.06
Hannu
Kuukkanen
First draft
1.0
12.12.06
Hannu
Kuukkanen
First version
Contact information
Hannu Kuukkanen
VTT Information Technology
P.O. Box 1000, FIN-02044 VTT, Finland
Street Address: Vuorimiehentie 3, Espoo
Tel. +358 20 722 5948, fax +358 20 722 7066
Email: [email protected]
Web: http://www.vtt.fi/tte/
End of editable fields
1.0
CADPIPE
D19 Technology Transfer in Partners
1.0
UDK
Key Words
Abstract
The technology transfer in partners has been the project long process.
The DOW has described in the first hand the main lines of the product quite
clearly. The requirement specification was written during the WP1 and RTD
partners started the software development by writing the document “CADPIPE
Sysytem Architecture” First demonstrations were seen in the MidTermREview in
Izmir in the beginning of this year 2006. Partners started the test period of the
software modules on summer 2006. The second stage of integrated software
version started in autumn and ended just before the EndTermMeeting 14-1512.2006
The final demonstration of the CADPIPE product is visible in the Meeting in
Switzerland.
During the meeting – one afternoon has been reserved for the training of SME
partners in use of the product and its documentation and in forward development
of the software.
To help partners in developing forward the product a document has been written
about the software code and its functions as a clear guide to software developers.
For SME partners’ use and sale purposes and to teach end user customers, the
User’s Manual has been written for the product.
COOP-CT-2004-CADPIPE - 512897
Last
i modified on 14.03.07
CADPIPE
D19 Technology Transfer in Partners
Preface
The purpose of this document is to describe how the technology transfer in
partners has been made during the project.
COOP-CT-2004-CADPIPE - 512897
iiLast modified on
14.03.07
1.0
CADPIPE
D19 Technology Transfer in Partners
Contents
ABSTRACT I
PREFACE
II
CONTENTS III
LIST OF SYMBOLS
IV
1
INTRODUCTION
5
2
MATERIAL AND METHODS
5
3
RESULTS AND DISCUSSION
6
4
CONCLUSIONS AND RECOMMENDATIONS
5
SUMMARY
21
ACKNOWLEDGEMENTS 21
REFERENCES
21
COOP-CT-2004-CADPIPE - 512897
iiiLast modified on
20
14.03.07
1.0
CADPIPE
D19 Technology Transfer in Partners
1.0
List of symbols
WWW
World Wide Web
extranet
partners)
external, closed network (in this case for project
Doha
Documentum iTeam document controlling system
Symbol Name
3D
Three
Dimensional
XML
eXtensible
Markup
Language
COLL
ADA
COLLAborative
Design Activity
ID
IDentifier
OSG
COOP-CT-2004-CADPIPE - 512897
Explanation
Used as a common name for the whole three
dimensional, digital technology branch. Three
dimensional digital description of an object in XYZ
co-ordinates
Meta language designed to become
able to
format other sub languages. XML is a W3C
standard including a family of languages for
example for: structural data,
transformations and linking. Data
description for Semantic Web technology
COLLADA is a COLLAborative Design Activity
for establishing an open standard Digital Asset
schema for interactive 3D applications. COLLADA
is designed to be the center piece of Digital Asset
toolchains used by the 3D interactive industry.
Alpha numerical or numerical symbol to identify
data or other
Open Scene Graph
OpenGL portable, 3D high performance graphics
toolkit for applications such as flight simulators,
games, virtual reality or scientific visualization.
www.openscenegraph.org/
Last modified on
iv
14.03.07
Introduction
The project has been running from the 1st of October 2004, has been rejected for about three moths
starting again in 1.4.2005.
Even though the problems in start, we have achieved good results out of the project. Loose of some
effective project time has not restrained the RTD partners to fulfil the demands of the DOW and most of
the document Requirements Specification written by partners during the WP1 of this project.
The technology transform has been made in several WP meetings during the working process and in the
Technical Board Meetings four times a year by demonstrations and documents.
Material and methods
The technology transfer in partners has been the project long process. After the requirement
specification the RTD partners started the software development by writing the document
“CADPIPESysytemArchitecture” document where the software was described as the whole system.
First software module demonstrations were seen in the MidTermReview in Izmir in the beginning of this
year 2006. The software modules were visible as separate components and they were demonstrated in
action and the properties of each component were described to partners.
We saw as well a the demonstration of the common UserInterface which gave us the idea how to use the
system over the Windows platform.
Partners started the test period of the software modules on summer 2006. The second stage of integrated
software version started in autumn and ended just before the EndTermMeeting 14-15-12.2006. The test
period will be reported by Ivan Orvieto from Testaluna (as the test co-ordinator) in 14-15.12.06 meeting.
The final demonstration of the CADPIPE product is visible in the Meeting in Switzerland.
During the meeting – one afternoon has been reserved for the training of SME partners in use of the
product and its documentation and in forward development of the software.
To help partners in developing forward the product a document has been written about the software
code and its functions as a clear guide to software. For SME partners’ use and sale purposes and to teach
end user customers, the User’s Manual has been written for the product. The short version of the User’s
Manual has been copied as a part of this document.
Technical Board will accept the product and all the documentation listed in the EndTermMeeting 14-1512-2006.
6 (23)
Results and discussion
User’s Manual for the CADPIPE software
CADPIPE User’s Guide (the short version)
Flow chart of the CADPIPE system. From left to right: CAD Export file containing the best
possible quality needed in further processing, CADPIPE Imports the listed fileformats and
converts them to the common CADPIPE format wich is following the Opens Scene Grapgh
standard. The Visual Editor Toolset gives possibility to edit the 3D modules or content of the
3D files. Several properties will be possible to add and edit inside the system. After building the
final scene for viewing the scene file will be exported to the rendering endine.
CDPIPE in a nut-shell
CADPIPE product includes efficient tools to speed up and to simplify the laborious manual work
sequences between 3D (three Dimensional) CAD (Computer Aided Design) design and visualisation
phases - especially when near photo-realistic visualisation quality is expected in real-time environment
e.g. in virtual reality visualisation. At this moment high quality visualisation is not supporting interactive
3D-design. The reason for this is the time taking and expensive manual work needed after the design
phase and before the visualisation.
The huge amount of visually meaningless tiny details, too complicated representations of many simple
objects (e.g. circle or sphere) and the lack of visual lighting dependent properties of surfaces and
textures are the main causes of problems and poor visual quality. In addition, the files generated by
conventional design tools do not take into account the needs of real-time visualisation software and the
capabilities of accelerated 3D-graphic boards.
CADPIPE software product is targeting to an, as automatic as possible, production chain for at least
three most common CAD file formats. The production pipes end each up to most standard, visually
powerful file format ready to shoot by 3D engines.
COOP-CT-2004-CADPIPE - 512897
6 14.03.07
Last modified on
7 (23)
This problem in real-time rendering is world wide and to solve it's enigmas is not possible with the wide
European co-operation of the domain.
The CADPIPE product includes solutions for:
•
•
•
•
Decreasing the amount of different working environments to CAD, 3D visualisation and real-time
rendering environment. There will be no longer need to use separate format conversion tools
between CAD and 3D visualisation tool as well as visualisation tool and the real-time rendering
system.
Smoother data conversion pipeline that allows more accurate information preservation within the
pipeline.
The possibility to add basic interactive and physical behaviour properties to the models in the 3D
visualisation phase.
More efficient real-time rendering performance for the data as it can be prepared in the modelling or
visualisation tool to suit the needs for real-time rendering.
The final product includes an Export/Import tool for the Visual Editor tool-set for multiple selected open
or standard formats OpenSceneGraph, COLLADA, IGES, STEP, VRML, OpenFlight, 3DS (Kinetix),
STL, Universal 3D, X3D (see the full compatibility list in the end of this document) and communication
with some CAD modelling tools. The product has an option for the XML based description of Collada
standard and the interactivity tool and the spatial database manipulation tool in a form of a hierarchical
tree.
On the following pages you can learn step by step how to use the CADPIPE software. Please follow
orders under each picture captured from the CADPIPE GUI (this document is also available in the
project extranet).
On the following pages you’ll see the Step-by-Sep Guide how to use the CADPIPE software
COOP-CT-2004-CADPIPE - 512897
7 14.03.07
Last modified on
8 (23)
DataBase Editor
When you have started the CADPIPE application, you’ll see an empty white window.
Please press down the right mouse button and you’ll see this drop-down list. Select “Import
scene”
NOTE! Press the right mouse button to get the drop-down menu visible.
You can browse the files from normal Windows folder and file structure. Select a scene file.
CADPIPE can import several file formats. Please refer to the table in the end of this document.
COOP-CT-2004-CADPIPE - 512897
8 14.03.07
Last modified on
9 (23)
After selecting the file it appears to the empty window. This window – as you will learn – is the
DataBaseEditor where all the data will be visible in the shape of a tree. Every module, object
and group, property, ect. will have their own visual outlook easy to recognise. This icon means
that the scene you have imported is in “Grid-mode”.
In the DataBaseEditor tree there are many types of nodes/icons:
groups
, positionattitude (PAT)
, matrices
, geode,
drawable, stateset indicated with small icons. The last is a material definition from outside
cadpipe, which needs to be removed when you add materials for the materials to take effect.
Materials can be dragged to any node downto geode (drawable is below geode) and apply to
all objects below them. Only PAT and matrix nodes can be moved with the tools (if you only
see the rotator rings moving, then you're trying to move some other type of node). Drag and
drop can be used to move nodes downto geode around the hierarchy.
COOP-CT-2004-CADPIPE - 512897
9 14.03.07
Last modified on
10 (23)
You can edit the grid-mode scene by pressing down the right mouse key over the icon and
selecting from the drop-down list the topic “Edit”.
COOP-CT-2004-CADPIPE - 512897
Last modified 10
on 14.03.07
11 (23)
SceneEditor
After the selection a new window will appear to the screen. This is the SceneEditor window. It
seems empty but its not. Depending on the size of the object or scene, the object may be
anywhere in the virtual space but no problem. See the next picture. Please NOTE that the
DataBase editor or any window always jumps up when you activate it. This will hide the Editor
window if it has been – like this – on the top of it. Just drag the DataBase window aside or drag
the Edit window bigger.
Just press the right mouse button and the following drop-down list will become visible. Select
“Fit to view”. When ever you’ll loose your object or scene you can get it back to view by this
command.
COOP-CT-2004-CADPIPE - 512897
Last modified 11
on 14.03.07
12 (23)
This forces the object or scene to become visible into the SceneEditor window.
If you have activated the “Grid” icon in the DataBaseEditor window – you can do things to the
scene like rotate (Q-icon) (note the white Activation Box and the Rotation symbol) and …
… zoom (CrossArrow-icon).
Navigation in the SceneEditor is with a-s-d-w / arrow keys / mouse or space mouse.
Camera views are in keys 1-5 (ortho to perspective / tele to wide angle).
NOTE! You may use the A – S – D – W keys for navigation in SceneEditor!
NOTE! You may use the 1 – 5 keys for navigation for Camera views!
COOP-CT-2004-CADPIPE - 512897
Last modified 12
on 14.03.07
13 (23)
… move (Arrow-icon)
You can also fly around by pressing first the “Space-Bar” and then pressing the letters W, A,
S, D, one at the time and moving the mouse. This is a real trick which you should practice a bit.
Space mouse would be the best equipment for flying if you have used to it. The flying stops
when you press once more the “Space-Bar” and you may continue editing the scene or
objects.
COOP-CT-2004-CADPIPE - 512897
Last modified 13
on 14.03.07
14 (23)
Here I have browsed the DataTree of the DataBaseEditor - down wards to catch the “Cow”
object from the Scene. When it has been selected from the tree – “activation box” comes
visible to show the object in the window.
To edit the Cow object – you have to activate the “Grid” icon of the Cowin the DataBaseEditor.
– NOTE in the DataBaseEditor window. A grey horizontal line will show to the right of the
icon to point it has been activated (Cow object will disappear inside the Grid in the DataBase
window).
COOP-CT-2004-CADPIPE - 512897
Last modified 14
on 14.03.07
15 (23)
You can move, rotate or resize the Cow independently in the SceneEditor even though its still
part of the group and scene. – NOTE you can edit the object size, place and free rotation angle
only in the Grid mode.
Here you have browsed the DataTree down wards to catch the “Cessna” object from the
Scene. When it has been selected from the tree – “activation box” comes visible to show the
object on the window and you have a possibility to do some Editing to it by pressing down the
right mouse button drop-down and selecting “Edit.
COOP-CT-2004-CADPIPE - 512897
Last modified 15
on 14.03.07
16 (23)
The Cessna pops out in a new Editing window.
You’ll now Delete it by selecting “Delete” option in the DataBaseEditor (press the right mouse
button over the Cessna object in the DataBaseEditor window) .
COOP-CT-2004-CADPIPE - 512897
Last modified 16
on 14.03.07
17 (23)
Now you have deleted the Cessna. You are still having the empty Grid of Cessna which you
may delete as well or import some other 3D module into it. You can drag-and-drop files around
the DataTree in the DataBaseEditor window.
MaterialEditor
You may browse an old material or add a new one. If you want to make a new material -press
right mouse button over the DataBaseEditor window. Choose “New material” from the dropdown menu. This will start the MaterialEditor of the CADPIPE.
COOP-CT-2004-CADPIPE - 512897
Last modified 17
on 14.03.07
18 (23)
Here you can follow how to make your own material. When you select a “New material” from
the DataBase browser drop-down (by right mouse button) you’ll see the MaterialEditor
window opening to the screen. You can mix your colours by handles and adjust the other
material parameters like shines, glossiness and opacity (or transparency).
Or you can pick the colours from the pre mixed colours, assign the colour mixture by numeric
parameters or pick the right colour of your favour from the colour pallet. If you please you can
add the colour to your favourite “Custom” colours pallet by selecting “Define custom colours”
button.
COOP-CT-2004-CADPIPE - 512897
Last modified 18
on 14.03.07
19 (23)
After you think the material would be something you would like it to be, you can test it directly
by dragging it over the Cessna module in the DataBaseEditor window. After this, you may
continue your material editing in the MaterialEditor and follow in real-time how it changes the
outlook of your Cessna in the SceneEditor window.
You can import or edit as well the shaders in the MaterialEditor.
COOP-CT-2004-CADPIPE - 512897
Last modified 19
on 14.03.07
20 (23)
In this picture there has been made the real time editing for the new shader.
From the DataBaseEditor window you can see the tree where the “shader1” has been dragged
over the Cow module. You can see as well that there has been demonstrated one new icon
called the “Group”. You can create Groups, collect several modules into big Groups, ungroup
them and change them to Grid when ever you like. Both modes – Groups and Grids give
different editing possibilities.
About the software documentation
The software documentation has been made as a HTML document for the easy usability. This documentation is
available as well in paper form. The HTML document is available for all project partners in the project server.
The site is protected and close for outsiders.
Conclusions and recommendations
In the technology transfer to partners there has been no found problems at the moment. VTT as the co-ordinator
will support the further software development by our side and most of the RTD partners are ready to do the same.
SMEs have the rest of the year time to make questions freely about the software and documentations and after the
project RTDs are ready to help as far as the questions refer to the pre made code (during the project).
As well RTDs will offer later development project or separate projects by any funding possible.
COOP-CT-2004-CADPIPE - 512897
Last modified 20
on 14.03.07
21 (23)
Summary
The software is working at the moment properly by the definition of a Beta-version product. The possible last
found bugs (after the EndTermMeeting) will be prepared till the end of the year.
Acknowledgements
The usability of the product is fine compared to the short software development time. The product has been
designed for professional users so it includes several short-cut properties to fasten the operations and working
with the software.
References
www.cadpipe.vtt.fi
http://dohaota.vtt.fi
VTT Information Technology
Hannu Kuukkanen
Project manager
COOP-CT-2004-CADPIPE - 512897
Last modified 21
on 14.03.07