1
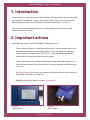
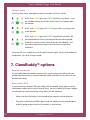
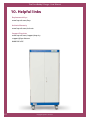
The ClassBuddy™ Range
User Manual
Date: September 2015
Version: 1.1
LPL15_V1_06
The ClassBuddy™ Range - User Manual
2
Copyright LapSafe® Products
The ClassBuddy™ Range - User Manual
Contents
Page No
Section Title
Section No
4
Introduction
1
4
Important actions
2
5
Moving your trolley
3
6
Getting started
4
7
Charge only - set up
5
8 - 10
Charge and sync - set up
6
10 - 11
ClassBuddy™ options
7
11
Warranty
8
11
Care and maintainance
9
12
Helpful links
10
13
Health & Safety
11
14
Safety declaration
12
15
CE conformity
13
Copyright LapSafe® Products
3
The ClassBuddy™ Range - User Manual
1. Introduction
Congratulations and thank you for purchasing a storage and charging trolley from
the LapSafe® ClassBuddy™ range. Your trolley comes with a life time parts and
labour warranty which you will need to activate immediately (Section 8).
This manual has been designed to assist and guide you with the set-up and
correct use of your trolley.
2. Important actions
Upon delivery of your new ClassBuddy™ trolley you must:
•
Take a note and store in a safe place your trolley’s serial number which can
be found located on the back of the trolley. The silver plate will hold your
serial number that begins with CB (Figure 1). You will need to quote this
number for all enquiries relating to your trolley.
•
Take a note of your key number located on the key itself and store this in a
safe and secure place. You will need this if you wish to order additional keys
(Figure 2).
•
Visit lapsafe.com/activate to activate your Lifetime warranty. Your warranty
will not be valid unless you do this.
•
Read the section on ‘Health & Safety’ (Section 11)
Figure 1
Serial plate
4
Figure 2
Key number
Copyright LapSafe® Products
The ClassBuddy™ Range - User Manual
3. Moving your trolley
Your ClassBuddy™ trolley should always be moved with care.
Before moving the trolley the following checks/actions should be carried out,
irrespective of the distance travelled:
•
Check that the power has been turned off at the wall socket.
•
Carefully disconnect the mains power lead from the back of the trolley and
from the wall socket placing the power lead in the cable tidy located on the
rear door of the trolley.
•
Check that any network cable (Cat5) has been disconnected from the back of
the trolley.
•
Ensure that all of the trolley doors are securely closed and locked, and that
all keys have been removed.
•
Disengage wheel brakes using the foot operated pedals before moving the
trolley. (Figure 3)
•
Special care should be taken on inclines.
At the new location
• Ensure that all wheel brakes are applied using foot operated pedals.
• Never position the trolley in front of any fire exit ot fire escape routes
• Never position the trolley in the view of any windows for security
Figure 3
Wheel brake
Copyright LapSafe® Products
5
The ClassBuddy™ Range - User Manual
4. Getting started
There are ventilation holes through the base and on all four sides of the cabinet,
and care must be taken that none of these holes are obstructed. Select a location
where there is sufficient airspace for the cabinet to ventilate. Your ClassBuddy™
should not be left within a cupboard or small closed space when charging,
because the recirculation of its own warm air could lead to unnecessarily high
temperatures for periods of time.
With your ClassBuddy™ in its working position, the mains lead can be fitted into
the mains socket at the rear of the right side of the cabinet and taken to an
available wall socket to be plugged in and switched on.
The front doors of your ClassBuddy™ are unlocked using the key with the white
key cover, and the rear door has a separate key with a black key cover.
The front doors are for everyday working access to the cabinet. The key can be
removed once the door is open, this will prevent the door from closing fully whilst
it is unlocked.
The rear door should not be considered as day-to-day access to the cabinet,
once opened you will see a safety earth lead with a push-on fixing on the rear
door which must be disconnected before the door can be fully removed. Once
the connector has been pulled apart, the door can be lifted out of the slots along
the bottom edge and placed to one side. (For your safety, please ensure that you
reconnect the earth lead when replacing the rear door). (Figure 4)
Figure 4
Rear door
6
Copyright LapSafe® Products
The ClassBuddy™ Range - User Manual
5. Charge only - set up
If you purchased a trolley that uses USB for charging and syncing then this section
is not relevant to you, procceed to Section 6
Please ensure the cabinet is unplugged when you are loading AC adaptors in the
ClassBuddy™
1.
Remove the rear door as described in (Section 4).
2.
You will find power strips for your AC adaptors in the back; plug your AC
adaptor into a plug socket and load the AC adaptor block onto the relevant
shelf.
3.
Pass the device connector through the shelf and use the cable management
clips to hold the cable in place.
Repeat these steps until your trolley is fully loaded with devices.
Copyright LapSafe® Products
7
The ClassBuddy™ Range - User Manual
6. Charge and sync - set up
Loading your devices
The charging and synchronisation unit for your ClassBuddy™ is accessible
through the rear door of the cabinet (Figure 5).
A charging / synchronisation connection must be made between your
ClassBuddy™ (Figure 6) and each supported iPad/tablet.
It is important that a good quality lead is used to make the connection between
your devices and the charging/synchronisation unit, because poor quality leads
can create problems during the synchronisation process.
Plug each connecting lead into an available USB socket in the charge/sync unit
and route them through to the front of the appropriate shelf, where it will not be
in the way of loading the device, but it will be available to plug in once the device
is in position. There are a number of holes at the rear and sides of each shelf
where the cable ties or cable management clips supplied with the cabinet can be
used to retain the charge/sync lead in position, should you wish.
Figure 5
Charge & Sync unit
8
Figure 6
USB B connectors
Copyright LapSafe® Products
The ClassBuddy™ Range - User Manual
Button modes
The lights on the charge and sync unit explains which mode it is in; sync and
charge, charge and sync or auto cycles:
AMBER light off, GREEN light flashing slowly, and BLUE light on
– synchronising will commence once the devices are connected
to host laptop or MacBook. Charging will commence once the
synchronising has finished or timed out.
Note: If no host device is connected when the unit is switched on
charging will commence. (GREEN light off, AMBER light comes on
to indicate charge and will blink to confirm full charge).
‘All Off’ mode
Pressing once after power-up will select ‘All Off’ mode.
AMBER and GREEN lights off, BLUE light blinking briefly = Power
on with no activity.
From the ‘All Off’ mode, pressing the black button again will select ‘All Charge’
mode.
‘All Charge’ mode
Pressing twice after power-up, will also select ‘All Charge’ mode.
BLUE and GREEN lights off, AMBER light flashing slowly - waiting
for iPads/tablets to be connected = charging on standby.
BLUE and GREEN lights off AMBER light solid = One or more
devices are charging.
BLUE and GREEN lights off AMBER light blinking briefly = All
connected devices are fully charged.
Copyright LapSafe® Products
9
The ClassBuddy™ Range - User Manual
‘All Sync’ mode
Pressing three times after power-up will also select ‘All Sync’ mode.
BLUE and AMBER lights off, GREEN light flashing slowly = sync
on standby waiting for devices and a host PC or laptop to be
connected
BLUE and AMBER lights off, GREEN light solid = syncing one or
more devices
BLUE and AMBER lights off, GREEN light blinking briefly = All
connected devices have synchronised for the preset period.
(Default is set to one hour, after which the ClassBuddy™ will
return each device to charge status to maintain optimum
readiness.
From the ‘All Sync’ mode, pressing the black button again, returns the module to
the default ‘Sync then Charge’ mode.
7. ClassBuddy™ options
Network connectivity
If your trolley features network connectivity, you can plug the trolley into your
network by connecting a standard network cable into the auxiliary point on the
back of the trolley.
Data transfer (DTM)
If your purchase includes DTM your trolley will be network ready (these are the
red network cables within your charging bays), you can update all of your laptops
simultaneously inside the trolley using Wake ON LAN software.
10
•
Make sure that the trolley is connected to the network and switched on
•
Plug each individual red DTM cable inside the trolley into the network ports
of each laptop and ensure that the trolley is switched on.
Copyright LapSafe® Products
The ClassBuddy™ Range - User Manual
Docking station
If you have purchased a docking station with your trolley then please refer to the
docking station user guide to fit and dock correctly.
Timer
If your laptop trolley has been fitted to include a timer, you can download the
timer user manual here: lapsafe.com/timer
8. Warranty
All of our products come with a Lifetime Parts & Labour Warranty. To activate your
FREE Lifetime* Parts and Labour Warranty, please go on-line and register at
lapsafe.com/activate
9. Care and maintainance
Dos
• Lock your trolley when not in use
• Keep your keys in a safe place and not in the same room as the trolley
• Read the Health and Safety guidelines in the user guide and share this
information with all users
• Activate your warranty at lapsafe.com/activate
• Unplug charging leads before taking laptops out of the trolley
Don’ts
• Do not move the trolley without disconnecting the mains power
• Do not move the trolley with the mains lead trailing use the cable tidy
• Do not leave keys in the doors locks when moving the trolley
• Do not remove doors
• Do not leave trolleys in the view of a window for security
• Do not try to modify the trolley in anyway without contacting LapSafe® first
to check that it is safe to do so
Copyright LapSafe® Products
11
The ClassBuddy™ Range - User Manual
10. Helpful links
Replacement Keys
www.lapsafe.com/keys
Activate Warranty
www.lapsafe.com/activate
Support Enquiries
www.lapsafe.com/support/enquiry
[email protected]
0800 130 3456
12
Copyright LapSafe® Products
The ClassBuddy™ Range - User Manual
11. Health & Safety
All products manufactured by LapSafe® Products have been thoroughly tested
and certified by an authorised and INDEPENDENT testing house before sale.
Full CE compliance, which includes the requirements of LVD and EMC directives, is
a STANDARD FEATURE of any solution manufactured by LapSafe® Products, as are
many more built in safety features. CE Marking can be found on the product serial
number plate, usually at the lower rear of the cabinet. CE Declaration of
Conformity Certificate is issued with each product in the User Guide Pack.
Please be advised of the following safety advice:
At no time are the rear service door of the trolley to be opened by anyone other
than an authorised person.
At no time should anyone attempt to physically lift the trolley, as this could cause
injury to the persons concerned and even damage to the trolley, which will
invaldate the manufacturer’s warranty. Should the movement of the trolley
require this type of action, you are advised to seek advice from the authorised
person. In such circumstances, the matter should be referred to LapSafe®
Products for consultation and advice.
•
•
•
•
•
•
•
•
•
Always apply the wheel brakes when the trolley is either parked or not in use.
Disconnect the mains supply and stow the mains cable into either the cable
management provided or on top of the unit before moving
Always ensure that the main power lead does not present a trip hazard when
connected to the mains.
Always ensure that the main power lead is fully extended when connected to
the mains.
The trolley should only be moved on horizontal surfaces.
Always ensure that the trolley NEVER impedes full and free pedestrian access
to all fire routes, fire exits and normal access routes.
Only place the approved laptops in the trolley for recharging.
NEVER allow unauthorised access to the service doors at the rear of the unit.
The above is not an exhaustive list. Contact LapSafe® Products should you have
any concerns.
Copyright LapSafe® Products
13
The ClassBuddy™ Range - User Manual
Safety Declaration
Recent guidance from the Health and Safety Executive regarding “Laptop computer charging trolleys safety
alert” requires interpretation from each manufacturer as regards to their product compliance. The HSE
statement can be found at: www.hse.gov.uk/services/education/safety121009.htm
CE Testing, Conformity and Declaration of LapSafe® Products
At LapSafe® Products we are proud to confirm that ALL of our electrical products, going back over ten years, have been thoroughly
tested and certified (by an authorised and INDEPENDENT testing house) and accordingly have been clearly CE marked.
Full CE compliance, which includes the requirements of LVD and EMC directives, is a STANDARD FEATURE of LapSafe® Products, as
are many more “built in” safety features. CE Marking can be found on the product serial number plate, usually at the lower rear of
the cabinet. CE Declaration of Conformity Certificate is issued with each product in the User Guide Pack.
You may obtain further copies of the certificate specific to your product and serial number, or any further information and advice,
upon request to our Customer support– call direct 01787 226147 or FREEPHONE the switchboard on 0800 130
3456 or email [email protected].
Rest assured that your LapSafe® Product has been designed and built with Safety as the highest priority since we first introduced
the concept of the “mobile laptop trolley” into the UK market in the last century. This is, indeed, why we are called “Lap SAFE”.
Residual Voltage
The HSE has raised a concern (having identified at least one particular manufacturer’s trolleys with this “characteristic”) that many
manufacturers’ trolleys (if indeed not the vast majority), may have a momentary residual voltage on the pins of the mains plug and
that this could, if you touched the pins within a second or two of unplugging, result in an electric shock.
LapSafe® Products have been designed from the outset with safety internal circuitry as standard so as NOT to retain or present any
significant residual voltage in this way. In fact, it is virtually impossible to get any such significant electric shock from our cabinets
in normal use.
However, regardless of how safe any particular trolley may be, we endorse the recommendations for employing common sense
practise as a generic rule for any mobile electrical appliance, such as switching off the mains socket before unplugging the power
leads and NOT moving the trolleys without disconnecting and unplugging the power leads at both ends. Two of the wheels are
fitted with locks as standard and should be kept locked as a reminder when power is connected and as a general safety rule as per
the user instructions supplied with each cabinet.
For further information call Lapsafe products on
0800 130 3456 or visit our website at lapsafe.com
*Mentor™ range from January 2010
*
LAPSF076_23052011V2
14
Copyright LapSafe® Products
The ClassBuddy™ Range - User Manual
EU Declaration of CE Conformity
EU Declaration of CE Conformity
to Council Directive 89/336/EEC
Amendment 2004/108/EC
&
to Council Directive 73/23/EEC
Amendment 2006/95/EC
Equipment Description:
Laptop Battery Charging Unit
Device Name:
LapSafe® ClassBuddy™ Range
Manufacture Address:
LapSafe® Products Limited
Unit 3 Wakes Hall Business Centre
Wakes Colne
Colchester
Essex
CO6 2DY
European Standards:
IEC 60950-1:2005
EN 60950-1: 2006 + A1: 2010
Declaration: We hereby declare that the stated equipment complies with the required Emission,
Immunity and Electrical Safety standards stated above.
Issue Date:
4 December 2012
Authorised by LapSafe® Products:
John Hutton
Position:
Director
LAPSF199_04122012V1
Copyright LapSafe® Products
15
The ClassBuddy™ Range - User Manual
Powering
Smart Technologies
16
Copyright LapSafe® Products