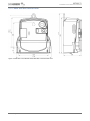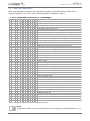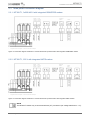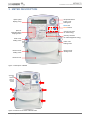
1
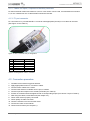
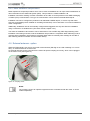
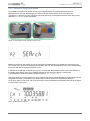
MT382-T1 Installation and maintenance manual MT382-T1 Installation and maintenance manual Document code: EAM 020.615.834 Version: V2.00 Language: English Date: 15.04.2014 COPYRIGHT ©2011 ISKRAEMECO d.d., Merjenje in upravljanje energije. All rights reserved. The Iskraemeco logo, and all related trademarks are registered trademarks or trademarks of Iskraemeco d.d. All other trademarks are the property of their respective owners. All rights reserved. No part of this document can be copied, reproduced, transferred, distributed, presented or stored in any format without the prior written consent of Iskraemeco d.d., except as otherwise provided in your license or as expressly permitted in writing by Iskraemeco, d.d. DISCLAIMER AND LIMITATION OF LIABILITY This manual was written for installation and maintenance of MT382-T1 meter. This manual, including all documentation incorporated by reference herein such as documentation provided or made available at Iskrameco d.d. web site, is provided or made accessible "AS IS" and "AS AVAILABLE" and without condition, endorsement, guarantee, representation, or warranty of any kind by Iskraemeco d.d. and its affiliated companies (hereinafter collectively referred to as »Iskraemeco«). Iskraemeco assumes no responsibility for any typographical, technical, or other inaccuracies, errors, or omissions in this documentation, nor for any loss due to the use of this documentation. Iskraemeco reserves the right to periodically change information that is contained in this documentation; however, Iskraemeco makes no commitment to provide any such changes, updates, enhancements, or other additions to this documentation. Iskraemeco shall not be liable for any type of damages related to this documentation or its use, or performance or non-performance of any software, hardware, service, or any third party products and services. SAVE AS EXPRESSLY PROVIDED IN YOUR CONTRACT WITH ISKRAEMECO, ISKRAEMECO EXPRESSLY DISCLAIMS ALL WARRANTIES, EXPRESS OR IMPLIED, INCLUDING, BUT NOT LIMITED TO THE IMPLIED WARRANTIES OF MERCHANTIBILITY OR FITNESS FOR A PARTICULARE PURPOSE AND AGAINST INFRINGEMENT. ISKRAEMECO DOES NOT WARRANT THAT THE FUNCTIONS CONTAINED IN THE PRODUCT WILL BE UNITERRUPTED OR ERROR-FREE, OR THAT DEFECTS IN THE PRODUCT OR ERRORS IN THE DATA WILL BE CORRECTED. FURTHERMORE, ISKRAEMECO DOES NOT WARRANT OR MAKE ANY REPRESENTATIONS REGARDING THE USE OR THE RESULTS OF THE USE OF THE PRODUCT OR ITS DOCUMENTATION IN TERMS OF THEIR CORRECTNESS, ACCURACY, RELIABILITY, OR OTHERWISE. NO ORAL OR WRITTEN INFORMATION OR ADVICE, GIVEN BY ISKRAEMECO OR AN ISKRAEMECO AUTHORIZED REPRESENTATIVE SHALL CREATE A WARRANTY OR IN ANY WAY INCREASE THE SCOPE OF THIS WARRANTY. SOME JURISDICTIONS DO NOT ALLOW EXCLUSION OF THE IMPLIED WARRANTIES, SO THE ABOVE EXCLUSION MAY NOT APPLY. UNDER NO CIRCUMSTANCES INCLUDING NEGLIGENCE, SHALL ISKRAEMECO, THEIR DIRECTORS, OFFICERS, EMPLOYEES OR AGENTS BE LIABLE FOR ANY INCIDENTAL, SPECIAL OR CONSEQUENTIAL DAMAGES (INCLUDING DAMAGES FOR LOSS OF BUSINESS, LOSS OF PROFITS, BUSINESS INTERRUPTION, LOSS OF BUSINESS INFORMATION, ETC.) ARISING OUT OF THE USE OR INABILITY TO USE THE PRODUCT OR ITS DOCUMENTATION, EVEN IF ISKRAEMECO OR AN ISKRAEMECO AUTHORIZED REPRESENTATIVE HAS BEEN ADVISED OF THE POSSIBILITY OF SUCH DAMAGES. SOME JURISDICTIONS DO NOT ALLOW LIMITATION OR EXCLUSION OF LIABILITY FOR INCIDENTAL OR CONSEQUENTIAL DAMAGES OR ALLOW EXCLUSION OR LIMITATION OF LIABILITY ONLY FOR NEGLIGENCE, BUT NOT FOR GROSS NEGLIGENCE OR ATTEMPT, SO THIS LIMITATION MAY NOT APPLY. IN NO EVENT SHALL ISKRAEMECO'S TOTAL LIABILITY FOR ALL DAMAGES, LOSSES AND CAUSES OF ACTION (WHETHER IN CONTRACT, TORT, INCLUDING NEGLIGENCE, OR OTHERWISE) EXCEED THE AMOUNT PAID FOR THE PRODUCT AND ITS DOCUMENTATION. V2.00 – English i/vi INTRODUCTION MT382-T1 Installation and maintenance manual MT382-T1 3x230/400 V, 5(6) A ELECTRONIC THREE-PHASE SYSTEM METER with integrated GSM/GPRS or UMTS communication interface Meter installation procedure RECOMMENDATION General Consider valid safety regulations; Voltage on a Feed-through and auxiliary terminals can be lethal! Meter installation must be performed according to corresponding legislation and safety directives. Meter installation may be performed by authorized personnel only. In case of any problem, use this Installation and maintenance manual, the MT382 User manual and contact the authorized ISKRAEMECO support. READ CAREFULLY AND STRICTLY FOLLOW THE SAFETY INSTRUCTIONS (SEE CHAPTER 1.). V2.00 – English ii/vi INTRODUCTION MT382-T1 Installation and maintenance manual i. About the Installation and maintenance manual On the Installation and maintenance manual are written installation procedures for MT382-T1 meters, intended for technically qualified personnel, responsible for electrical energy measurements. The Installation and maintenance manual provides you all necessary information for safe installation and maintenance of MT382-T1 meters. ii. Definitions, Acronyms and Abbreviations COSEM Companion Specification for Energy Metering CSQ Cell Signal Quality CT Current Transformer dB Decibel dBm Decibel relative to one milliwatt DIF Data Information Field DIN Deutsches Institut für Normung/German Institute for Standardization EDIS Energie Daten Identifikations System/Energy Data Identification System FF Fatal Fault FME For Mobile Equipment – type of miniature RF antenna connector GPRS General Packet Radio Service GSM Global System for Mobile Communications HES Head End System ID Identification IHD In-House Display IR Infrared kWh Kilo Watt-hours LCD Liquid Crystal Display LED Light Emitting Diode N Neutral NV Non-volatile PPE Personal Protection Equipment RAM Random Access Memory SD Switching device (Disconnector, Load switch) Signal Control Output Service Control Output SIM Subscriber Identification Module – SIM card SMS Short Message Service SQ Signal Quality SSR Solid State Relay TCP Transmission Control Protocol UMTS Universal Mobile Telecommunications System VIF VT Value Information Field Voltage Transformer WEEE Waste Electrical and Electronic Equipment V2.00 – English iii/vi INTRODUCTION MT382-T1 Installation and maintenance manual iii. Reference documents User manual Iskraemeco’s General Terms and Conditions iv. Versioning Date Version Update 26.10.2013 V1.00 First version of document 20.11.2013 V1.10 15.04.2014 V2.00 In this version of document the following content was added: detailed description of the P1 socket (chapter 3.1.2.1. P1 port) additional functionality of terminals 33 and 35 (see NOTE, page 16) Extended content – additional variants of the MT382 meter – was added: MT382 with 3G modem V2.00 – English iv/vi INTRODUCTION MT382-T1 Installation and maintenance manual TABLE OF CONTENTS 1. SAFETY INFORMATION ........................................................................................................................... 1 1.1. Responsibilities ................................................................................................................................... 1 1.2. Safety instructions ............................................................................................................................... 2 1.2.1. Handling and mounting ................................................................................................................ 2 1.2.2. Meter installation procedure......................................................................................................... 3 1.2.3. Meter maintenance ...................................................................................................................... 7 2. METER TECHNICAL INFORMATION....................................................................................................... 8 2.1. Dimensions .......................................................................................................................................... 8 2.1.1. Meter with long terminal cover ..................................................................................................... 9 2.1.2. Meter with short terminal cover .................................................................................................. 10 2.2. Name plate ........................................................................................................................................ 11 2.2.1. Meter type designation ............................................................................................................... 12 2.3. Three phase connection diagram ...................................................................................................... 13 2.3.1. MT382-T1, 3x230/400 V with integrated GSM/GPRS modem .................................................. 13 2.3.2. MT382-T1, 230 V with integrated UMTS modem ...................................................................... 13 3. METER DESCRIPTION ........................................................................................................................... 14 3.1. Meter terminal ................................................................................................................................... 15 3.1.1. Terminal block constituent parts ................................................................................................ 15 3.1.2. Terminal data ............................................................................................................................. 16 3.1.2.1. P1 port ................................................................................................................................ 17 4. METER INSTALLATION ......................................................................................................................... 18 4.1. Preparing of cables ........................................................................................................................... 18 4.1.1. Power (main) cables .................................................................................................................. 18 4.1.2. Cables for Inputs, Outputs and Auxiliary terminals .................................................................... 19 4.1.3. P1 port connector ....................................................................................................................... 19 4.2. Connection procedure ....................................................................................................................... 19 4.3. SIM Card installation ......................................................................................................................... 20 4.3.2. Meter installation call procedure ................................................................................................ 23 4.4. External antenna - option .................................................................................................................. 23 4.5. M-Bus general installation procedures - option ................................................................................. 26 4.5.1. Scan for M-Bus Devices ............................................................................................................ 27 4.5.1.1. Poll for Devices with Address 0 .......................................................................................... 27 4.5.1.2. Poll for Devices with Unregistered Address ....................................................................... 27 4.5.2. Installation using Reset button ................................................................................................... 28 4.5.3. Installation on power-up ............................................................................................................. 29 5. CHECKING METER FUNCTIONS........................................................................................................... 30 5.1. Visually and electrically checking ...................................................................................................... 30 5.2. Meter display after installation ........................................................................................................... 30 5.3. Meter operation monitoring - FF additional description..................................................................... 32 5.3.1. Fatal Error explanation ............................................................................................................... 33 6. METER MAINTENANCE ......................................................................................................................... 36 7. METER DEINSTALLATION .................................................................................................................... 37 V2.00 – English v/vi INTRODUCTION MT382-T1 Installation and maintenance manual INDEX OF FIGURES Figure 1: Fixing points (left) and special hanger (right) ....................................................................................................... 8 Figure 2: Dimensions of an MT382 meter fitted with a long terminal cover ......................................................................... 9 Figure 3: Dimensions of an MT382 meter fitted with a short terminal cover ...................................................................... 10 Figure 4: Name plate ......................................................................................................................................................... 11 Figure 5: Connection diagram of MT382-T1 current transformer operated meter with integrated GSM/GPRS modem .... 13 Figure 6: Connection diagram of MT382-T1 current transformer operated meter with integrated UMTS modem ............. 13 Figure 7: Description of MT382 ......................................................................................................................................... 14 Figure 8: Positions of the seals at MT382 meter ............................................................................................................... 14 Figure 9: Terminal block – MT382-T1 ............................................................................................................................... 15 Figure 10: Diagram for Connecting Device to P1 port ....................................................................................................... 17 Figure 11: Proper prepared cables .................................................................................................................................... 18 Figure 12: Power cables preparation ................................................................................................................................ 18 Figure 13: RJ11 connector and pin designation ................................................................................................................ 19 Figure 14: SIM card holder ................................................................................................................................................ 20 Figure 15: Preparing SIM card holder for inserting SIM card ............................................................................................ 21 Figure 16: Inserting properly oriented SIM card into protective metal shield ..................................................................... 21 Figure 17: Unlocked metal shield with inserted SIM card .................................................................................................. 21 Figure 18: Properly inserted SIM card ............................................................................................................................... 22 Figure 19: Broken SIM card presence detector in the SIM card holder ............................................................................. 22 Figure 20: Incorrectly inserted SIM card............................................................................................................................ 22 Figure 21: Coupling circuit................................................................................................................................................. 23 Figure 22: Example of external antenna installation .......................................................................................................... 24 Figure 23: Example of external antenna (with gain ca. 7 dB) mounted in a cabinet .......................................................... 24 Figure 24: Example of external antenna Yagi with gain ca. 15 dB .................................................................................... 25 Figure 25: M-Bus master – slave connection .................................................................................................................... 26 Figure 26: M-Bus terminals ............................................................................................................................................... 26 Figure 27: Reset button under a meter’s button cover ...................................................................................................... 28 Figure 28: "P2 Search" displayed on LCD ......................................................................................................................... 28 Figure 29: Example for Channel........................................................................................................................................ 28 Figure 30: Example of DIF and VIF combination ............................................................................................................... 29 Figure 31: LCD display of MT382-T1 ................................................................................................................................ 30 Figure 32: Example of display content and explanation of indicators ................................................................................ 30 Figure 33: Fatal Error value 00010000 .............................................................................................................................. 33 Figure 34: Conversion of the hexadecimal number 10000 to a binary number ................................................................. 33 Figure 35: Reading error of 16th bit in the Table 6 ............................................................................................................. 34 Figure 36: Fatal Error value 00001600 .............................................................................................................................. 34 Figure 37: Conversion of the hexadecimal number 1600 to a binary number ................................................................... 35 Figure 38: Reading error of 9th, 10th and 12th bit in the Table 6 ......................................................................................... 35 INDEX OF TABLES Table 1: Explanation of ME382 and MT382 meter type designation ................................................................................. 12 Table 2: Terminal data of MT382-T1, 3x230/400 V meters ............................................................................................... 16 Table 3: RJ11 pins of P1 ................................................................................................................................................... 17 Table 4: Pin designation of RJ11 connector ...................................................................................................................... 19 Table 5: Explanation of indicators ..................................................................................................................................... 31 Table 6: FF additional description ..................................................................................................................................... 32 Table 7: Place of digit 1 in the binary number converted from the hexadecimal number 10000 ....................................... 34 Table 8: Places of digits 1 in the binary number converted from the hexadecimal number 1600 ...................................... 35 V2.00 – English vi/vi INTRODUCTION MT382-T1 Installation and maintenance manual 1. SAFETY INFORMATION Safety information used in this Installation and maintenance manual is described with the following symbols and pictograms: DANGER: for a possibly dangerous situation, which could result in severe physical injury or fatality – attention to a high risk hazards. WARNING: attention to a medium risk hazards. CAUTION: for a possibly dangerous situation, which could result in minor physical injury or material damage - attention to a low risk hazards. Operating instruction: for general details and other useful information. All safety information in this Installation and maintenance manual describes the type and source of danger; it is possible consequences and measures to avoid the danger. 1.1. Responsibilities The owner of the meter is responsible to assure that all authorized persons who work with the meter read and understand the parts of the User manual and Installation and maintenance manual that explains the safe handling with the meter. The personnel must be sufficiently qualified for the work that will be performed. The installation personnel must possess the required electrical knowledge and skills, and must be authorised by the utility to perform the installation procedure. The personnel must strictly follow the safety regulations and operating instructions, written in the individual chapters in this Installation and maintenance manual and the User Manual. The owner of the meter responds specially for the protection of the persons, for prevention of material damage and for training of personnel. V2.00 – English 1/37 1. SAFETY INFORMATION MT382-T1 Installation and maintenance manual 1.2. Safety instructions 1.2.1. Handling and mounting At the beginning of installation at the metering point, the meter should be carefully taken out of the box where it was packed. This should prevent the meter from falling as well as any other external or internal damage to the device and personal injuries. Should such an incident occur despite all precautions the meter may not be installed at the metering point as such damage may result in different hazards. In such case, the meter needs to be sent back to the manufacturer for examination and testing. CAUTION: The edges of the seals, sealing wires as well as some edges under (removed) terminal cover are sharp! CAUTION: The temperature of the terminal block of the connected and operating meter may rise, therefore the temperature of the terminal cover may rise as well. DANGER: In case of any damage inside the meter (fire, explosion...) do not open the meter. CAUTION: The meter may be used only for the purpose of measurement for which it was produced. Any misuse of the meter will lead to potential hazards. WARNING: Safety measures should be observed at all times. Do not break the seals or open the meter at any time! It must be consulted in all cases where symbol is marked in order to find out the nature of the potential hazards and any actions which have to be taken to avoid them. The meter installation procedure is described in this Installation and maintenance manual. For safety reasons the following instructions should be followed. See the complete User manual for detailed technical features of MT382 meter and its intended use. V2.00 – English 2/37 1. SAFETY INFORMATION MT382-T1 Installation and maintenance manual Only a properly connected meter can measure correctly! Every connection error could result in a financial loss for the power company! 1.2.2. Meter installation procedure DANGER: The MT382 electricity meter is a device connected into the electricity network. Any unauthorized manipulation of the device is dangerous for life and prohibited according to the applicable legislation. Any attempt to damage the seals as well as any unauthorized opening of the terminal or meter cover is strictly forbidden. Installation companies shall implement a training policy that ensures that all installers are adequately trained, understand risk and safety issues and possess the relevant skills before they commence operational duties. The installer will need to recognise and understand different metering installations, meter types and various equipments associated with those installations applicable to the successful installation of the electricity meter. The installer must consult and comply with local regulations and read the installation instructions written in this Installation and maintenance manual before installation. This Installation and maintenance manual provides the instructions for installing MT382 meters. The document provides a short overview of the meter, details of device installation and set-up, installation considerations, and health and safety considerations. The installer will be considered as a public face by both the power company and its customers. The installer shall adopt the highest standards of behaviour and be respectful to clients and members of the public. Before the beginning of the installation procedure, check if the metering point is correctly prepared for meter installation. The metering point must always be left clean and in order. The work location shall be defined and clearly marked. Adequate working space as well as means of access and lighting shall be provided at all parts of an electrical installation on, with, or near which any work activity is to be carried out. Where necessary, safe access to the work location shall be clearly marked. The metering point must not be exposed to running water or fire. Meter installation may not be performed by unauthorised and untrained personnel. Such persons are not allowed to cut the seals and open the terminal or meter cover as contact with the live parts of the meter is dangerous for life. Opening the terminal or meter cover is dangerous for life because there are live parts inside. Installation personnel must possess the required electrical knowledge and skills, and must be authorised by the utility to perform the installation procedure. The installer is obligated to perform the installation procedure in accordance with the national legislation and internal norms of the utility. National legislation can set out the minimum age and the competence criteria for installers. In case there are no national requirements defined, the following criteria shall be used by assessing the competence of installers: knowledge of electricity, experiences on electrical work, understanding of the installation V2.00 – English 3/37 1. SAFETY INFORMATION MT382-T1 Installation and maintenance manual procedures, practical experience of that work, understanding the hazards which can arise during the work and the precautions to be observed, ability to recognize at all times whether it is safe to continue working. According to the basic principles, either the nominated person in control of the electrical installation or the nominated person in control of the work activity shall ensure that specific and detailed instructions are given to the personnel carrying out the work before starting and on completion of the work. Before starting work, the nominated person in control of the work activity shall give notification to the nominated person in control of the electrical installation, of the nature, place and consequences to the electrical installation of the intended work. CAUTION: The installer is expected to fully understand the risks and safety issues involved in electrical installations. The installer shall be aware at all times of the potential hazard of electrical shock and shall exercise due caution in completing the task! Tools, equipment and devices shall comply with the requirements of relevant National or International Standards where these exist. Tools, equipment and devices shall be used in accordance with the instructions and/or guidance provided by the manufacturer or supplier. Any tools, equipment and devices provided for the purpose of safe operation of, or work on, with, or near electrical installations shall be suitable for that use, be maintained and be properly used. Personnel shall wear clothing suitable for the locations and conditions where they are working. This could include the use of close-fitting clothing or additional PPE (personal protective equipment). CAUTION: The installer must be correctly equipped with personal protection equipment (PPE) and use the appropriate tools at all times during the installation. Working procedures are divided into three different procedures: dead working, live working, and working in the vicinity of live parts. All these procedures are based on the use of protective measures against electric shock and/or the effects of short-circuits and arcing. The installer must be informed if the national legislation permits the work on the installation under voltage – live work, and must follow the rules of legislation. Depending on the kind of work, the personnel working in such conditions shall be instructed or skilled. Live working requires the use of specific procedures. Instructions shall be given how to maintain tools, equipment and devices in good working order and how to verify them before working. This subclause deals with the essential requirements (“the five safety or golden rules”) for ensuring that the electrical installation at the work location is dead and secure for the duration of the work. This shall require clear identification of the work location. After the respective electrical installations have been identified, the following five essential requirements shall be undertaken in the specified order unless there are essential reasons for doing otherwise: disconnect completely (1.), secure against re-connection (2.), verify that the installation is dead (3.), carry out earthing and short-circuiting (4.) and provide protection against adjacent live parts (5.). V2.00 – English 4/37 1. SAFETY INFORMATION MT382-T1 Installation and maintenance manual CAUTION: Do not attempt to install the meter before you have isolated the installation site from the network! DANGER: The relevant preliminary fuses must be removed before making any modifications to the installation, and kept safe until completing the work to prevent the unnoticed reinsertion. DANGER: Secondary circuit of current transformer must not be opened when current is flowing in the primary circuit. This would produce a dangerous voltage of several thousand volts at the terminals and the insulation of the transformer would be destroyed. DANGER: Connecting the meter into the network under voltage is dangerous for life so the conductors at the metering point must not be connected to any voltage source during the connection procedure. The meter connection procedure may only be performed by well-trained and adequately authorized personnel. CAUTION: Only one wire or ferrule may be connected in one terminal. Otherwise, the terminal could be damaged or the contact could not be made properly. CAUTION: Do not use those types of cable, which are not prescribed for the installation site and the power requirements! DANGER: The insulation of the connecting cable must extend over the whole visible part of the cable. There must be no further bare part of the cable visible above the terminal edge. Touching live parts is dangerous for life. The stripped part of the connecting wire should be shortened if necessary. CAUTION: At the end of installation at the metering point no cable should stay unconnected or hanging freely from the metering point. The meter has to be mounted on a smooth vertical surface and fixed at 2 or 3 points with screws using the proper torque (the meter has two attachment holes and, optionally, a top hanger). V2.00 – English 5/37 1. SAFETY INFORMATION MT382-T1 Installation and maintenance manual The meter is intended to be mounted at an indoor metering point, in a meter cabinet, secured against the undesired access of unauthorized persons. Only scroll push button may be accessible from the outside. Do not expose meter surface to very high temperatures even though the surface is made of non-flammable plastics to prevent fire. Electrical connection: mounting cables must be properly dimensioned and of proper shape. They must be mounted using the proper torque. The meter should be connected according to the meter connection diagram that is attached to the inner side of the meter terminal cover. Screws on the current terminal must be tightened to proper torque. CAUTION: If it is possible to install the meter without isolation from the network, i.e. on live network, then appropriate instructions and safety warnings shall be provided. CAUTION: Specific aspects and safety hazards related to external voltage and current transformers, auxiliary supplies and local generation shall be covered. DANGER: The preliminary fuses and/or voltage arresters must be re-inserted before commissioning and functional check of the meter. Seals on the meter have to be checked at the end of the installation procedure so that the final customer cannot come into contact with live parts of the meter. DANGER: If the terminal cover is not screwed tight, there exists a danger of contact with the connection terminals. Contact with live parts of the meter is dangerous for life. CAUTION: For safety reasons, place the terminal cover immediately after the installation procedure and fix it with fixing screws! DANGER: Switch on the power. Beware of the risk of electric shock at all times! The functional check requires voltage to be applied and load applied to all phases. Determine first the energy flow direction. If no main voltage is present, commissioning and functional check must be performed at a later date. V2.00 – English 6/37 1. SAFETY INFORMATION MT382-T1 Installation and maintenance manual 1.2.3. Meter maintenance No maintenance is required during the meter’s life-time. The implemented metering technique, built-in components and manufacturing procedures ensure high long-term stability of meters. Therefore no recalibration is required during entire meters life-time. In case the service of the meter is needed, the requirements from the meter installation procedure must be observed and followed. Cleaning of the meter is allowed only with a soft dry cloth. Cleaning is allowed only in upper part of the meter – in the region of the LCD. Cleaning is forbidden in the region of terminal cover, where cables are connected to the meter. Cleaning can be performed only by the personnel responsible for meter maintenance. CAUTION: Never clean soiled meters under running water or with high pressure devices. Penetrating water can cause short circuits. A damp cleaning cloth is sufficient to remove normal dirt such as dust. If the meter is more heavily soiled, it should be dismounted and sent to the responsible service or repair centre. Visible signs of fraud attempt (mechanical damages, presence of a liquid, etc.) must be regularly checked. The quality of seals and the state of the terminals and connecting cables must be regularly checked. If there exists a suspicion of incorrect operation of the meter, the local utility must be informed immediately. DANGER: Breaking the seals and removing the terminal cover or meter cover will lead to potential hazards because there are live electrical parts inside. After the end of the meter’s lifetime, the meter should be treated according to the Waste Electric and Electronic (WEEE) Directive! V2.00 – English 7/37 1. SAFETY INFORMATION MT382-T1 Installation and maintenance manual 2. METER TECHNICAL INFORMATION 2.1. Dimensions Meter dimensions comply with the DIN 43859 standard. The meter is equipped with three fixing points (see Figure 1 – left); the bottom two (2a and 2b) comply with above mentioned standard, but the upper one (mark 1 or mark 3 in Figure 1) does not. 1 2a 3 2b Figure 1: Fixing points (left) and special hanger (right) There are two variants of fixing the upper part of the meter. It can be either hanged on the bracket (marked as 1 in Figure 1) or on a special hanger (mark 3), which can be fixed to the meter as it is shown on the right side of Figure 1. The special hanger is a part of the standard delivery – you can find it in a box, where the meter is packed. NOTE The positions of the bracket (mark 1 in Figure 1) and the special hanger (mark 3) do not fit the above mentioned standard, what implies a new fixing point in the cabinet must be made. Three screws with diameter up to 5 mm should be used to fix the meter in the cabinet. IP protection level: IP54 Mass: MT382-T1: approx. 1,30 kg There are two variants of terminal cover available: long terminal cover, short terminal cover. V2.00 – English 8/37 2. METER TECHNICAL INFORMATION MT382-T1 Installation and maintenance manual 2.1.1. Meter with long terminal cover Figure 2: Dimensions of an MT382 meter fitted with a long terminal cover V2.00 – English 9/37 2. METER TECHNICAL INFORMATION MT382-T1 Installation and maintenance manual 2.1.2. Meter with short terminal cover Figure 3: Dimensions of an MT382 meter fitted with a short terminal cover V2.00 – English 10/37 2. METER TECHNICAL INFORMATION MT382-T1 Installation and maintenance manual 2.2. Name plate Basic data and type designation of the meter can be found on a name plate. (See Figure 4.) country of origin year of manufacture meter connection type reference frequency meter type designation transition, reference and max. current reference voltage meter serial number and bar code connection diagrame code CE mark, year of approval and code of approval institute operation temperature range accuracy class (IEC) registers legend DLMS – COSEM compliance - accuracy test LED for active energy - accuracy test LED for reactive/apparent energy M-bus communication bidirectional meter three-phase four-wire connection IDIS certification label protective class accuracy class (MID) Figure 4: Name plate V2.00 – English 11/37 2. METER TECHNICAL INFORMATION MT382-T1 Installation and maintenance manual 2.2.1. Meter type designation Meter Type designation is written on the name plate (see Figure 4) and shows features related to the hardware equipment of the meter. Type of meter designation is explained in Table 1. MT382–T1A42R56S63–I4V12V13B11L11–M2K0agnZ single-phase electronic system meter ME three-phase electronic system meter MT meter w ith mobile communication 382 D1 D2 terminal block: Imax=85A D3 terminal block: Imax=100A; BS type T1 terminal block up to 6 A; CT connection terminal block: Imax=120A accuracy class 1 (IEC), class index B (MID) for active energy measurement A4 accuracy class 2 (IEC), class index A (MID) for active energy measurement A5 1 2 measurement of active energy in one direction (import only) 4 absolute energy measurement measurement of active energy in both directions (import and export) R5 accuracy class 2 for reactive energy measurement, R6 accuracy class 3 for reactive energy measurement 1 measurement of reactive energy in one direction (import only) 2 6 measurement of reactive energy in tw o directions (import and export) measurement of reactive energy in 4 quadrants apparent energy measurement, calibrated to 2% S5 apparent energy measurement, calibrated to 3% S6 apparent energy calculated as SQRT (P^2+Q^2) 3 backup pow er supply for pow er dow n functionalities I4 control inputs V number of inputs 1 2 230V or 120 V input 3 no voltage (potential free) input (for external scroll button) integrated disconnector P 0 three phase external sw itching device 1 single phase internal sw itching device high voltage output – relay type B one relay contact output 1 make contact Relay output 1 Solid State Relay (SSR) type output L one control output 1 make contact Control output 1 internal clock M 2 super capacitor as RTC Back-up pow er supply 3 Li Battery as RTC Back-up pow er supply communication interface K 0 optical interface (IEC62056-21) a u GSM/GPRS modem (2G) g M-Bus communication interface – master n UMTS modem (3G) P1 port Z Load profile Table 1: Explanation of ME382 and MT382 meter type designation NOTE The MT382-T1 allows only a current transformer (CT) connection (not voltage transformer – VT). V2.00 – English 12/37 2. METER TECHNICAL INFORMATION MT382-T1 Installation and maintenance manual 2.3. Three phase connection diagram 2.3.1. MT382-T1, 3x230/400 V with integrated GSM/GPRS modem Signal Load control control output* output * External button input Alarm input Signal Control Output = Service Control Output Figure 5: Connection diagram of MT382-T1 current transformer operated meter with integrated GSM/GPRS modem 2.3.2. MT382-T1, 230 V with integrated UMTS modem Signal Load control control output* output * External button input Alarm input Signal Control Output = Service Control Output Figure 6: Connection diagram of MT382-T1 current transformer operated meter with integrated UMTS modem NOTE The MT382-T1 allows only a current transformer (CT) connection (not voltage transformer – VT). V2.00 – English 13/37 2. METER TECHNICAL INFORMATION MT382-T1 Installation and maintenance manual 3. METER DESCRIPTION IR optical interface liquid crystal display (LCD) button cover sealing door Scroll and Reset buttons place for external antenna coupling device accuracy test LED for active energy accuracy test LED for reactive/apparent energy meter cover sealing screw meter cover sealing screw terminal cover sealing screw terminal cover sealing screw terminal cover Figure 7: Description of MT382 optionally for external antenna coupling device Figure 8: Positions of the seals at MT382 meter V2.00 – English 14/37 3. METER DESCRIPTION MT382-T1 Installation and maintenance manual 3.1. Meter terminal 3.1.1. Terminal block constituent parts socket for P1 port external button input (50, 51) (see explanation in Table 2) SIM card holder alarm input (85, 80) (see explanation in Table 2) meter cover sealing screw (0,2-0,4Nm) terminal cover fixing point terminal cover fixing point meter cover sealing screw (0,2-0,4Nm) terminal cover opening detector UL2 aux UL1 aux IL1 in UL1 IL1 out auxiliary terminals: - left: load control – 33, 35, 34 - right: M-bus – 91, 90 (see explanation in Table 2) IL2 in UL2 UL3 aux IL2 out IL3 in UL3 N aux IL3 out N Figure 9: Terminal block – MT382-T1 V2.00 – English 15/37 3. METER DESCRIPTION MT382-T1 Installation and maintenance manual 3.1.2. Terminal data Terminal Number Function Reference Max. Voltage Current Diam mm Note Wire mm2 Screw head Type and size Torque Nm 1 IL1 – in - 5(6) A 5,0 current 1,5-6 Combi Pozidriv + Slot (1) 1,0 2 UL1 230 V - 5,0 voltage 1,5-6 Combi Pozidriv + Slot (1) 1,0 2 UL1 – aux 230 V - 3,2 voltage 0,5-2,5 Regular (0,6x3,5) 3 IL1 – out - 5(6) A 5,0 current 1,5-6 Combi Pozidriv + Slot (1) 1,0 4 IL2 – in - 5(6) A 5,0 current 1,5-6 Combi Pozidriv + Slot (1) 1,0 5 UL2 230 V - 5,0 voltage 1,5-6 Combi Pozidriv + Slot (1) 1,0 5 UL2 – aux 230 V - 3,2 voltage 0,5-2,5 Regular (0,6x3,5) 6 IL2 – out - 5(6) A 5,0 current 1,5-6 Combi Pozidriv + Slot (1) 1,0 7 IL3 – in - 5(6) A 5,0 current 1,5-6 Combi Pozidriv + Slot (1) 1,0 8 UL3 230 V - 5,0 voltage 1,5-6 Combi Pozidriv + Slot (1) 1,0 8 UL3 – aux 230 V - 3,2 voltage 0,5-2,5 Regular (0,6x3,5) 9 IL3 – out - 5(6) A 5,0 current 1,5-6 Combi Pozidriv + Slot (1) 1,0 11 N - - 5,0 neutral 1,5-6 Combi Pozidriv + Slot (1) 1,0 12 N - aux - - 3,2 neutral 0,5-2,5 Regular (0,6x3,5) 33 Signal control output * 230 V 100 mA 2,5 (SSR) Solid State Relay 0,5-2,5 Combi Pozidriv + Slot (1) 0,6 - - 2,5 neutral 0,5-2,5 Combi Pozidriv + Slot (1) 0,6 230 V 6A 2,5 relay 0,5-2,5 Combi Pozidriv + Slot (1) 0,6 External button input - - 2,5 0,5-2,5 Regular (0,6x3,5) 0,6 - - 2,5 0,5-2,5 Regular (0,6x3,5) 0,6 Alarm input 230 V - 2,5 phase 0,5-2,5 Regular (0,6x3,5) 0,6 - - 2,5 neutral 0,5-2,5 Regular (0,6x3,5) 0,6 2,5 M-Bus 0,5-2,5 Combi Pozidriv + Slot (1) 0,6 M-Bus 36 V 12 mA ** 2,5 M-Bus 0,5-2,5 Combi Pozidriv + Slot (1) 0,6 35 34 50 51 80 85 Load control output * ** 0,6 0,6 1,0 input 90 91 0,6 Signal Control Output = Service Control Output The maximum number of wired M-Bus devices associated to one electricity meter is four (each with current consumption of 1 unit load = 1,5 mA; in total 6 mA). Maximum current consumption of all connected M-Bus devices is 8 unit loads. Table 2: Terminal data of MT382-T1, 3x230/400 V meters NOTE For more information about Signal Control Output (terminals 33 and 35) see User manual, chapter 5.2.2. Solid state relay output - signal control. NOTE The MT382-T1 allows only a current transformer (CT) connection (not voltage transformer – VT). V2.00 – English 16/37 3. METER DESCRIPTION MT382-T1 Installation and maintenance manual 3.1.2.1. P1 port P1 port is a read-only interface for connecting of external devices (e.g. In-house displays - IHD) of Smart House system. Meter is equipped with only one P1 port - more Other Service Module (OSM) devices can be connected via splitter (see Figure 10). Figure 10: Diagram for Connecting Device to P1 port Meter is equipped with RJ11 female type of connector for P1 port (see Figure 9). Pin designation is shown in Table 3. Pin # 1 2 3 4 5 6 Signal name Description Request GND Input Ground Data Output Table 3: RJ11 pins of P1 V2.00 – English 17/37 3. METER DESCRIPTION MT382-T1 Installation and maintenance manual 4. METER INSTALLATION The meter should be installed regarding to enclosed connection diagram (see chapter 2.3). Connection diagram can be found on the terminal cover. 4.1. Preparing of cables NOTE! Stranded cables can be used with appropriate ferrules only! Figure 11: Proper prepared cables 4.1.1. Power (main) cables NOTE! Do not use cables smaller than 1,5 mm2. Remove approx.18 mm of isolation. Cables from 1,5 mm2 up to 6 mm2 cross section (5 mm of diameter) can be used. (See Figure 12.) Figure 12: Power cables preparation V2.00 – English 18/37 4. METER INSTALLATION MT382-T1 Installation and maintenance manual 4.1.2. Cables for Inputs, Outputs and Auxiliary terminals For these terminals cables with maximum 2,5 mm 2 cross section can be used, recommended cross section is 1,5 mm2. Maximum 8 mm of cable isolation should be removed. 4.1.3. P1 port connector For connection to P1 port standard RJ11 connector with appropriate (at least) 3 core cable can be used. (See Figure 13 and Table 4.) Figure 13: RJ11 connector and pin designation Pin # 1 2 3 4 5 6 Signal name Description Request GND Input Ground Data Output Table 4: Pin designation of RJ11 connector 4.2. Connection procedure 1. 2. 3. 4. 5. 6. 7. 8. 9. 10. 11. 12. Consider the accurate energy flow direction. Apply appropriate ferrules on connection cables. Connect Power cables to the meter. Connect other devices via M-Bus and P1 port, if needed. Connect input and outputs on the auxiliary terminals (see Table 2). Screws on terminals should be tightened with a corresponding torque (see column Torque in Table 2). After fixing the cables, install SIM card (see chapter 4.3.). Check if the meter is properly connected. Check quality of cable connection. Close the terminal cover and seal the meter. Connect the meter to the network. Check meter functions (see chapter 5.). V2.00 – English 19/37 4. METER INSTALLATION MT382-T1 Installation and maintenance manual 4.3. SIM Card installation 1. If meter is already connected to electricity network, disconnect the voltage and remove terminal cover. 2. Unlock protective metal shield of SIM card holder (see Figure 14) with moving sliding padlock towards the meter name plate, then lift the metal shield for about 30° (see Figure 15). 3. Orientate and insert SIM card into protective metal shield. 4. Put down the metal shield with inserted SIM card. 5. Lock protective metal shield (move sliding padlock back to the original position). 6. Put the terminal cover on the meter and reconnect the voltage. ATTENTION! To avoid making any sort of damage (e.g. broken SIM card holder) or communication network connection error, carefully read chapter 4.3.1. After successful installation of SIM card, REG and SQ flag should appear on the display (for explanation of flags see chapter 5.2. If flags don't appear see explanation in Table 5. Figure 14: SIM card holder NOTE SIM cards delivered from the mobile operator can be of "IMEI SIM lock" type. Once the SIM card is inserted in the meter and the meter is powered up, the SIM card is locked to this particular meter. In case someone would try to remove this SIM card and use it in another meter/modem or even in a mobile phone, the authentication will not pass due to the security measure. 4.3.1. Properly inserting SIM card Inserting of SIM card into a device looks like a simple process. Nevertheless, when inserting a SIM card into the SIM card holder of the meter, please follow the procedure described in this chapter. It can happen very quickly that we accidentally break the lifting metal shield, a SIM card presence detector or we don’t properly insert the SIM card into the shield or properly locked it and consequently the communication network connection cannot be established. NOTE If the defect is caused by accident, improper use, negligent or improper handling, unusual physical or electronic stress, excessive strain, abuse, misuse, neglect, use of unsuitable appurtenance, improper installation or packaging, or the product was not used according to its purpose, the Supplier makes no warranty or representations. (For more information see Iskraemeco’s General Terms and Conditions or specific contract if applicable.) V2.00 – English 20/37 4. METER INSTALLATION MT382-T1 Installation and maintenance manual For properly inserting SIM card follow procedure described below, and recommendations. 1. Slide protective metal shield towards to the name plate to unlock it, then lift it for about 30° (see Figure 15). 1. UNLOCK (SLIDE) 2. LIFT Figure 15: Preparing SIM card holder for inserting SIM card 2. Gently insert faced up (golden contact area has to be turned down) SIM card into protective metal shield. Make sure that it is properly inserted to the end of the shield and its cut-off corner part is on the down right side of the shield (see Figure 16). 2. inserting properly oriented SIM card SIM card SIM card contact area protective metal shield 1. lifting for about 30° contacts Figure 16: Inserting properly oriented SIM card into protective metal shield 3. Gently put down the metal shield with inserted SIM card (see Figure 17). put down Figure 17: Unlocked metal shield with inserted SIM card V2.00 – English 21/37 4. METER INSTALLATION MT382-T1 Installation and maintenance manual 4. At the end of the metal shield press it down, then lock it – move sliding padlock in direction toward the terminal block (see Figure 18). LOCK (MOVE PADLOCK) 2. lock the 1. press down metal shield Figure 18: Properly inserted SIM card CAUTION! Do not insert a SIM card without lifting the protective metal shield. When you lift it do not insert the SIM card under it. It can easily happen that we break the SIM card presence detector. (See Figure 19.) A SIM card should be inserted into a slot of the lifted protective metal shield. Do not insert incorrectly oriented SIM card into protective metal shield! Do not leave not enough inserted SIM card! (See Figure 20.) Figure 19: Broken SIM card presence detector in the SIM card holder SIM card is not correctly oriented. SIM card is not correctly oriented. SIM card is not inserted enough. Figure 20: Incorrectly inserted SIM card V2.00 – English 22/37 4. METER INSTALLATION MT382-T1 Installation and maintenance manual 4.3.2. Meter installation call procedure Meter implements a special procedure which can be used at installation time to report meter identification or other information to the Head End System (HES). This procedure is called installation call. Installation call means sending of certain information to the HES. It can be performed over SMS messaging or GPRS (TCP) communication. The type of communication can be selected via dedicated objects. Installation call can be configured in production via dedicated COSEM objects, in such a way that meter executes it immediately when installed on the field (powered ON). In this case there is no need for additional meter configuration. Additionally, installation call can be manually configured and triggered also any time after the installation using a notebook or a handheld unit. (See User manual, chapter 5.5.4.) The status of installation call execution can be observed on LCD via REG flag. REG flag is blinking when installation call is being executed, until the installation call procedure is completed. When REG flag is ON, it means that the installation call procedure is finished (either after successfully sent message to the HES or after reaching maximum number of unsuccessful retries). 4.4. External antenna - option When the GSM signal is too low for successful communication (SQ flag on the LCD is blinking or it is even OFF), an external antenna must be used. An external antenna can be connected to the meter via special coupling circuit only, which can be plugged on the meter cover (see Figure 21). Figure 21: Coupling circuit NOTE The coupling circuit is an optional equipment and is not delivered with the meter. It can be ordered separately. V2.00 – English 23/37 4. METER INSTALLATION MT382-T1 Installation and maintenance manual External antenna is connected to coax FME connector at the end of cable on coupling module. (See Figure 22.) Figure 22: Example of external antenna installation After confirming that sufficient signal level is present (SQ flag is ON) with the use of an external antenna, the antenna is preferably mounted on the cabinet door, as close between to both hinges as possible. If the antenna cannot be mounted on the door of the cabinet it can be mounted on one of the cabinet’s sides. The antenna cable should run over the top of the meter so it does not come in contact with the voltage cables connecting the meter to low voltage network. A hole of appropriate diameter should be drilled into cabinet door through which the antenna cable is then connected to the FME connector. The antenna cable hole should then be sealed using appropriate silicon materials. The remaining cable should be rolled together and fastened with a cable binder. If this additional external antenna does not provide sufficient signal level a different type of external antenna should be used (see Figure 23 and Figure 24). When installing please adhere to installation instructions of the chosen product (antenna). Mounting and installing within the cabinet are performed in the same manner as external installation. NOTE Pay attention to the radiation pattern of the antenna. NOTE We strongly advise to check level of GSM signal. Read "GSM signal quality" register via optical port using notebook or handheld unit. For successful communication value of "GSM signal quality" should be greater than 12. Figure 23: Example of external antenna (with gain ca. 7 dB) mounted in a cabinet V2.00 – English 24/37 4. METER INSTALLATION MT382-T1 Installation and maintenance manual Figure 24: Example of external antenna Yagi with gain ca. 15 dB V2.00 – English 25/37 4. METER INSTALLATION MT382-T1 Installation and maintenance manual 4.5. M-Bus general installation procedures - option M-Bus is interface for connecting sub-meters (gas, gas valve, thermal (heat/cold) and water) and other devices designed according to M-Bus standard. M-Bus enables communication between several types of meter and an electricity meter, to which they are connected. The communication bus is based on the M-Bus standard. The MT382 is the master device, meaning that all communication is initiated from it. The maximum number of slaves in a master-slave configuration is four wired slave devices or one wireless dongle and one wired slave device (see Figure 25). Figure 25: M-Bus master – slave connection M-Bus devices are connected to terminals 90/91, which are placed on the terminal block of the meter (see Figure 26). Polarity is not important. Figure 26: M-Bus terminals During installation the M-Bus addresses of M-Bus devices will be registered in the electricity meter. Note that there are two possibilities that M-Bus device addresses is by default set to 0 before installation or M-Bus device has already an address pre-set to the value different from 0. To start installation procedure the appropriate M-Bus method must be invoked over optical communication port or some another way (by pressing reset button, power up, etc.). When an installation procedure is started (locally or remotely), the e-meter scans for physically connected M-Bus devices. After the M-Bus devices are registered in the e-meter, regular communications can begin. V2.00 – English 26/37 4. METER INSTALLATION MT382-T1 Installation and maintenance manual 4.5.1. Scan for M-Bus Devices The electricity meter manages a list of device addresses connected to it. The list can hold four M-Bus devices. During installation, the e-meter will scan for devices on the wired M-Bus. All responding devices will be registered in the list. At the moment when the list contains four M-Bus devices, scanning stops no matter if there are more M-Bus devices physically connected and responding in the scanning process but not yet included in the list of connected devices. If, for some reason, communication is required between electricity meter and an M-Bus device registered in the list, a request for the reading will be pushed to the queue and executed after scanning stops. There are two methods available to discover M-Bus devices connected to e-meter: Poll for device with address 0 Poll for devices with unregistered address 4.5.1.1. Poll for Devices with Address 0 Address 0 is reserved for unconfigured M-Bus devices. Each unconfigured M-Bus device shall accept and answer on all communication request to this address ([5] EN 13757-2 section 5.7.5). The e-meter will select an unused device address and set M-Bus device address to it. Following this procedure the e-meter will request M-Bus data, set event “New M-Bus device installed ch x” and raise alarm "M-Bus device installed". NOTE Scanning starts with primary address 1, 2, 3, 4, 5, 6 and then scan also Primary address 0. Only one M-Bus device can be connected to M-Bus interface in case using devices with primary addresses 0! NOTE Unregistered M-Bus devices must be connected sequentially one by one - only one unregistered device at the same time. The next device may be connected after successful registration of the previous-one. 4.5.1.2. Poll for Devices with Unregistered Address Poll method is based on the procedure outlined in EN 13757-3 section 11.5. All addresses are scanned, no matter if the address of the M-Bus device connected is included in the list of managed M-Bus devices or not. Secondary address searching is not used. Following this procedure the e-meter will poll for the device specific data. While scanning, if a device answers on an address, the electricity meter checks if the used address is in the list or not. If the used address is already in the list and answering M-Bus device is already in the list of managed M-Bus no action will follow. If the used address is already in the list and the answering M-Bus device is not the same to device already stored in the list of managed M-Bus devices, old M-Bus device is replaced with answering M-Bus device, event “New M-Bus device installed ch x” and alarm "M-Bus device installed" is set. If the used address is available and the answering M-Bus device is not in the list, a device is added to the list of managed M-Bus devices, event “New M-Bus device installed ch x” and alarm "M-Bus device installed" is set. If the used address is available and the answering M-Bus device is already in the list, a device is set to new available address, event “New M-Bus device installed ch x” and alarm "M-Bus device installed" is set. V2.00 – English 27/37 4. METER INSTALLATION MT382-T1 Installation and maintenance manual 4.5.2. Installation using Reset button An installation procedure for M-Bus devices can be triggered also by pressing of Reset button for approximately 5 seconds. Reset button is located under the meter’s button cover (see Figure 27). "P2 SEArch" is displayed on the LCD (Figure 28) and searching of unregistered devices starts with primary addresses 1, 2, 3, 4, 5, 6 and ends with 0. Figure 27: Reset button under a meter’s button cover Figure 28: "P2 Search" displayed on LCD MB flag is present on the display as long as if at least one M-Bus device is installed and connected to the bus. If none of the devices are physically connected to the bus, but still installed in the e-meter, then MB flag turns OFF after first unsuccessful capture occurs. In addition to the MB flag on display will pop-up a scroll list with identification numbers (the sixth attribute of the M-Bus Client Setup class 72) of registered M-Bus devices which are able to communicate. The identification numbers are listed in following format: CH x 12345678 The first 5 digits are used to display a number of the M-Bus channel and 8 last digits to display M-Bus device identification number. The display of the identification numbers will be exchanged with a period of 10 seconds. After an interval of 120 seconds the pop-up list will disappear and display mode will be changed to normal auto scroll mode. Figure 29: Example for Channel V2.00 – English 28/37 4. METER INSTALLATION MT382-T1 Installation and maintenance manual 4.5.3. Installation on power-up An installation procedure for connected M-Bus devices is triggered also by power-up procedure on electricity meter when meter is connected to the power supply. The procedure works in same way as the procedure “installation using Reset button”. The only difference is that there is no "P2 Search" displayed on LCD of the meter. Installer can see whether connection has been established also over MB flag on LCD of the meter and by reading corresponding object(s) over communication interfaces (P0, P3). NOTE! M-Bus device should be connected only one at a time and then run installation script. Install script is using a primary address as a parameter. Also before E-meter can read and present result values from M-Bus devices, we must manually – locally, remotely or already pre-configured – defined corresponding DIF/VIF parameters (Data Information Filed/Value Information Filed) in each of the used M-Bus channels (in M-Bus client object). Parameters DIF and VIF are part of technical documentation of used M-Bus device or can be readout from the device as data frame and manually parsed. For location and an example of DIF and VIF combination see Figure 30 . Figure 30: Example of DIF and VIF combination V2.00 – English 29/37 4. METER INSTALLATION MT382-T1 Installation and maintenance manual 5. CHECKING METER FUNCTIONS 5.1. Visually and electrically checking 1. Check the quality of cable connection. 2. Inspect the connection in the MT382 display (LCD displays meter correct connection; see Figure 31): Indicators L1, L2, L3 must be turned on; (applies only when corresponding phase is present). The register (e.g. 1.8.1) and its value need to be present on the LCD. Flag ▼ over inscription T1-T4 is switched according to tariff program (depending on time). In case of energy consumption arrow presenting energy flow direction should be in position +P. In the case that the arrow shows -P (applies only when load is present), change cables between clamps 1 ► 3, or/and 4 ► 6, or/and 7 ► 9. In case of energy production (higher than consumption) arrow presenting energy flow direction should be in position -P. Figure 31: LCD display of MT382-T1 3. SQ flag should be blinking (low GSM network signal) or constantly displayed (high GSM network signal). 5.2. Meter display after installation Connection phase's indication Energy flow direction indication Register (EDIS code) Active tariff indication M-Bus device status Switching device status GSM signal level indication GSM registration indication Indicator of meter communication Meter operation monitoring (self-test) – Failure indication Emergency credit Data of register (energy consumption) in kWh Figure 32: Example of display content and explanation of indicators V2.00 – English 30/37 5. CHECKING METER FUNCTIONS MT382-T1 Installation and maintenance manual Flag ON Blinking T1 Active first rate Active fifth rate T2 Active second rate Active sixth rate T3 Active third rate Active seventh rate T4 Active fourth rate Active eighth rate MB At least one M-Bus installed SD Switching device in disconnected state SQ GSM network – high signal GSM network – low signal no GSM signal Indication of GSM signal REG Meter registered on GSM/GPRS network, installation call done * Meter registered to GSM/GPRS network, installation call in progress Meter is not registered on GSM/GPRS network Indication of GSM/GPRS network registration and installation call DRO Meter communication session active FF "Fatal" fault EC Emergency Credit active +P Import (consumption) of active energy -P Export (production) of active energy ↑+Q Import of reactive energy ↓-Q Export of reactive energy L1 Phase voltage present All three (L1, L2, L3) are Phase voltage not present L2 Phase voltage present blinking together: Phase voltage not present L3 Phase voltage present OFF NOTE Switching device in connected state Meter communication session not active For diagnosis consider the FF additional description (see Table 6). Emergency Credit threshold limit expired Wrong phase sequence Phase voltage not present * REG flag is also ON in case when meter is registered to GSM network, but not to GPRS. Table 5: Explanation of indicators V2.00 – English 31/37 5. CHECKING METER FUNCTIONS MT382-T1 Installation and maintenance manual 5.3. Meter operation monitoring - FF additional description During operation, the meter performs tests of individual functions. When an error occurs, the FF flag on the LCD is displayed and type of error is written into the Error Object register. Types of possible errors are divided in 4 groups: Clock errors, Memory errors, Control errors, Communication errors. Error Object register is ‘bit organized’ – each bit of 32 bits long register represents certain error, for explanation see Table 6. Bit Error Description Recommended action 0 Clock invalid Clock is invalid. Set the clock. Set the clock, if meter is equipped with backup capacitor. Replace the meter, if meter is equipped with Li battery. 1 Replace battery (discharged) Clock battery or backup capacitor is discharged. 2-7 Unused / 8 Program memory error Indicates error in the meters program space (internal flash memory) when the behaviour of meter is unpredictable and the meter should be replaced. The results stored in the meter should be inspected and validated. Replace the meter. 9 RAM error Error detected in RAM (data) memory. The meter can operate irregularly. Replace the meter. 10 NV memory error Error detected in non-volatile memory. The meter can operate irregularly. Replace the meter. 11 Measurement system error Error detected in measurement system. The measurement could be inaccurate. Replace the meter. 12 Watchdog error Meter has been restarted by watch-dog circuitry. Replace the meter. 13-15 Unused / 16 Communication error M-Bus channel 1 Communication with M-Bus device on channel 1 failed. Check connection with M-Bus device. 17 Communication error M-Bus channel 2 Communication with M-Bus device on channel 2 failed. Check connection with M-Bus device. 18 Communication error M-Bus channel 3 Communication with M-Bus device on channel 3 failed. Check connection with M-Bus device. 19 Communication error M-Bus channel 4 Communication with M-Bus device on channel 4 failed. Check connection with M-Bus device. 20-31 Unused / Table 6: FF additional description NOTE! FF error significance may vary. Corresponding action depends on specific settings for different countries or customers. In case of FF error always contact local distributer for further instructions! V2.00 – English 32/37 5. CHECKING METER FUNCTIONS MT382-T1 Installation and maintenance manual 5.3.1. Fatal Error explanation The LCD displays the code F.F.0, which represents Fatal Error. To determine the error: 1. 2. 3. 4. read out its value (hexadecimal number), convert the hexadecimal number into binary one, write out places of digit 1 (bits), read the description in Table 6. Example No. 1 Figure 33: Fatal Error value 00010000 1. In this case (see Figure 33) error value is 00010000. 2. We convert hexadecimal number 10000 into binary number. A conversion we can do with calculator, which converts from hexadecimal to binary number (e.g. MS Windows Calculator / Programmer View). (See Figure 34.) a. In the Calculator, first of all we have to switch into hexadecimal mode – choose option Hex. b. Type number 10000. c. Choose option Bin. When we click on option Bin, the conversion is performed. Conversion result is 10000000000000000. Figure 34: Conversion of the hexadecimal number 10000 to a binary number V2.00 – English 33/37 5. CHECKING METER FUNCTIONS MT382-T1 Installation and maintenance manual 3. Find out places of digit 1. Binary number has 32 digits (our calculator doesn’t display leading zeroes, so we will write them to get 32 digits number). In Table 7 we can see place of digit 1. It stands on the 16th place (places of binary numbers we always count from right to left, starting with 0). 31 30 29 28 27 26 25 24 23 22 21 20 19 18 17 16 15 14 13 12 11 10 9 8 7 6 5 4 3 2 1 0 0 0 0 0 0 0 0 0 0 0 0 0 0 0 0 1 0 0 0 0 0 0 0 0 0 0 0 0 0 0 0 0 Table 7: Place of digit 1 in the binary number converted from the hexadecimal number 10000 In the 1st column of Table 6 we can find an error description of the 16th bit. (See Figure 35.) Figure 35: Reading error of 16th bit in the Table 6 We figured out that communication with M-Bus device on M-Bus channel 1 failed and we have to check M-Bus device, installed on M-Bus channel 1. Example No. 2 Figure 36: Fatal Error value 00001600 1. In this case (see Figure 36) error value is 00001600. 2. We convert hexadecimal number 1600 into binary number (see Figure 37). Conversion result is 1011000000000. V2.00 – English 34/37 5. CHECKING METER FUNCTIONS MT382-T1 Installation and maintenance manual Figure 37: Conversion of the hexadecimal number 1600 to a binary number 3. Find out places of digit 1, similar as it is described in Example No. 1. In Table 8 we can see places of digit 1. They stand on the 9th, 10th and 12th places. 31 30 29 28 27 26 25 24 23 22 21 20 19 18 17 16 15 14 13 12 11 10 9 8 7 6 5 4 3 2 1 0 0 0 0 0 0 0 0 0 0 0 0 0 0 0 0 0 0 0 0 1 0 1 1 0 0 0 0 0 0 0 0 0 Table 8: Places of digits 1 in the binary number converted from the hexadecimal number 1600 In the 1st column of Table 6 we can find error descriptions of the 9th, 10th and 12th bit. Figure 38: Reading error of 9th, 10th and 12th bit in the Table 6 We figured out that combination of errors occurred and we should replace the meter (see Figure 38). V2.00 – English 35/37 5. CHECKING METER FUNCTIONS MT382-T1 Installation and maintenance manual 6. METER MAINTENANCE No maintenance is required during the meter’s life-time. The implemented metering technique, built-in components and manufacturing procedures ensure high long-term stability of meters, so that there is no need for their recalibration during their life-time. V2.00 – English 36/37 6. METER MAINTENANCE MT382-T1 Installation and maintenance manual 7. METER DEINSTALLATION 1. 2. 3. 4. 5. 6. 7. Disconnect meter from the network. Remove terminal cover. Unscrew all connected wires. Unscrew fixing screws and remove the meter. After the deinstallation protect all disconnected wires against electricity shock. Close or make short connection of secondary circuit on current transformers. Remove SIM card from the meter, if need it. V2.00 – English 37/37 7. METER DEINSTALLATION MT382-T1 Installation and maintenance manual Owing to periodically improvements of our products the supplied products can differ in some details from data stated in this manual. Iskraemeco d.d., Energy Measurement and Management 4000 Kranj, Savska loka 4, Slovenia Telephone (+386 4) 206 40 00, Fax: (+386 4) 206 43 76 http://www.iskraemeco.si, E-mail: [email protected] Published: Iskraemeco, Data subjected to alteration without notice. V2.00 – English