1
VR2W Quick Guide
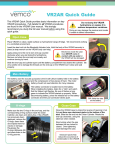
This VR2W Quick Guide provides information on key VR2W
procedures. Full details for all VR2W procedures are found
in the VR2W User manual and at www.vemco.com. We
strongly recommend you study the full user manual before
using this quick guide.
Do not bump the VR2W
hydrophone or expose it to
extreme temperature variations.
Doing so may damage the receiver and render
it unable to detect transmitters.
Open Case
Place VR2W on clean, stable surface so hydrophone hangs off edge. We
recommend working in a controlled environment.
Insert one steel rod into the Attachment hole and other one in the Comm Key
Hole on the end-cap and hold on to the rods.
Apply pressure to the rod in the COMM Key hole to turn end-cap counterclockwise when you are facing the hydrophone. Remove rod when end-cap
turns easily and continue turning by hand.
Slide end-cap and cylinder apart until the battery
compartment has cleared the cylinder. Be very
careful not to damage the threads on the end-cap
or the VR2W won’t close and seal properly.
Electronics inside the case
must NEVER come in
contact with any water or
the VR2W will be damaged.
Battery
The battery is held in the battery compartment by a plastic pin spanning the opening. Remove
the thin O-ring before removing the pin (O-ring holds pin in place). Downward force on battery
may be needed to allow pin to move.
The battery is connected to VR2W on the side of the case. When
installing the battery, listen for a “click” and watch that light flashes
four times and then twice quickly every 5 seconds. When
disconnecting battery, press the release tab on the
battery connector and then
TIP: Write the date on the battery.
pull connector halves apart.
O-rings
Make sure the two O-rings in the end-cap, and the
corresponding O-ring surface inside the Outer
Cylinder, are clean and debris-free. If the VR2W
has previously
been deployed,
replace the
O-rings.
Close Case
Close the VR2W case by doing the reverse of opening it, but
first put a new desiccant pack in the bottom of the tube.
Slide the battery end into the Outer Cylinder. Rotate the endcap clockwise, using
the steel bars when
needed.
Stop turning when the
gap between the two
halves is closed.
Over tightening could
damage the case.
A desiccant pack helps
reduce the occurrence of
condensation in the VR2W
Communicate
Activate
Slide the smaller end of the
Comm Key in the Comm Key
Hole on the VR2W, near the
hydrophone.
Open VUE and wait while software
scans for the activated VR2W. If it
doesn’t scan, then click the “Device
Scan” button.
Wait until the VR2W’s LED
begins flashing a bright, long,
steady flash once a second.
The wait time is less than five
seconds.
After VR2W is located, double-click
on the receiver icon with the correct
serial number to open communication
and display receiver information.
Remove the Comm key.
VR2W Status Light is continuously on
during communication.
One bright flash
every second
Having trouble? Try a new battery.
VUE Actions
Actions such as starting a study, offloading data, and ending communication are performed from the Receiver Tab and
are started by selecting the correct icon in the tab’s ribbon. Details are found in the VR2W user manual.
Close View – ends
communication with VR2W
and closes receiver tab.
Receiver resumes recording
(does not initialize).
Start Recording – setup and
begin a study; also erases
VR2W memory
Offload data – choose to offload all data or just new data.
Update firmware – only when instructed by VEMCO.
Attachment
Suggested minimum: 3/8" diameter nylon rope
The common method used to attach a VR2W
receiver to a mooring line is to use five cable ties
(zip tie or tie-wrap) with the following characteristics:
• 388 mm (15.25") long
• 7.5 mm (0.3") wide
• UV protected
• 120 lb tensile strength
Open the “wrap in the rope” to
pass the cable tie through the rope.
Through Rope
Around Rope
Around Rope
Through Rope
Avoid shadowing or blocking the receiver with your mooring equipment. Line of sight is a must!
Status Light
Flash Meanings:
No flashes = no power
2 quick flashes every 5 sec = in Recording Mode
2 quick flashes every 10 sec = memory is full
1 quick flash = acoustic ping received
1 bright, long flash = detection written to memory
1 long flash per sec = ready for Bluetooth communication
On (solid) = communicating with VUE
Operating temperature: -5 °C to 40 °C; Water in which
the VR2W is deployed must not freeze.
Static depth rating: 500 meters (730 psi)
www.vemco.com
+1-902-450-1700
DOC-5433-01