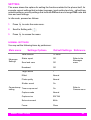
1
USER
GUID
J6 User Manual
STING 6
H LLO
STING 6
USER GUIDE
Don’t hang around, get started
right now with your new STING 6.
Everything you need to know is in
this little book. So read on!
Catalog Number:
Release date:
© Emblaze Mobile Ltd. All rights reserved.
The information contained in this document, or in any of its annexes, is subject to change without
advance notice. Emblaze Mobile Ltd. and its affiliates assume no responsibility for any damage or
loss resulting from the use of this manual.
No part of this publication may be reproduced, stored in a retrieval system, or transmitted in any
form or by any means, electronic, mechanical, photocopying, recording or otherwise, for purpose
other than the user’s manual, without prior permission of Emblaze Mobile Ltd.
The availability of some of the services described in this guide may differ in your phone, depending
on your service provider or the SIM card you are using.
Contents
Safety information ................................................................... 1
Care and maintenance .................................................................... 3
Battery information .......................................................................... 3
Charging and Discharging ................................................................3
General information ......................................................................... 4
Driving safety ...................................................................................4
Operating environment .....................................................................4
Electronic devices ............................................................................5
Vehicles ............................................................................................6
Emergency calls ...............................................................................6
FCC compliance ............................................................................. 7
Specific Absorption Rate Data ........................................................ 7
FCC RF Exposure Information ........................................................ 8
Body-worn operation ....................................................................... 8
WEEE Compliance ......................................................................... 8
Before you begin ..................................................................... 9
How to use this guide ..................................................................... 9
Phone layout and icons .................................................................. 9
Screen indicators ........................................................................... 10
Key description .............................................................................. 11
Function keys .................................................................................11
Alphanumeric keys .........................................................................12
Screens in idle mode ..................................................................... 13
Status indicators on secondary display ..........................................13
Backlight .........................................................................................13
Getting started ....................................................................... 14
How to attach the SIM card and the battery ................................. 14
How to remove the SIM card and the battery ............................... 15
How to charge the battery ............................................................ 15
Notice on battery charging and discharging ...................................16
Low battery indicator ......................................................................16
I
Use of battery ................................................................................ 16
Battery disposal ............................................................................. 16
Security codes .............................................................................. 17
Quick & Easy ......................................................................... 18
Before use ..................................................................................... 18
Call functions ................................................................................ 18
Making a call ................................................................................. 18
Answering a call ............................................................................ 18
Hands free talk .............................................................................. 18
Terminating a call .......................................................................... 18
Rejecting a call .............................................................................. 19
Emergency calls ............................................................................ 19
Phonebook functions .................................................................... 19
Adding new numbers and names to the handset or SIM card. ..... 19
Other functions .............................................................................. 20
Clearing the screen ....................................................................... 20
Adjusting the earpiece volume ...................................................... 20
Backlight ....................................................................................... 20
Basic functions ..................................................................... 21
Switching your phone on and off .................................................. 21
Unlocking a blocked SIM card ...................................................... 21
Making and receiving a call .......................................................... 22
Making a call ................................................................................. 22
Domestic call ................................................................................. 22
International call ............................................................................ 22
Quick dialing from the Phone Book ............................................... 22
Redialing missed, received and dialed calls .................................. 23
Speed dial ..................................................................................... 23
Calling your voice mailbox ............................................................. 23
Answering a call ............................................................................ 24
Call waiting .................................................................................... 24
In-call options ................................................................................ 25
Multiparty ....................................................................................... 27
Other operations ........................................................................... 28
Adjusting the earpiece volume ...................................................... 28
II
Text editing .................................................................................... 28
Input text ........................................................................................28
Predictive Text input mode .............................................................29
Capitalize input mode .....................................................................29
The menu map ....................................................................... 30
Menu functions ...................................................................... 39
Camera ......................................................................................... 40
Preview .......................................................................................... 40
Capture Movie ............................................................................... 41
Photo Manager .............................................................................. 42
Movie Manager .............................................................................. 42
Snap Setting .................................................................................. 42
Manual ........................................................................................... 43
PhoneBook ................................................................................... 43
View ............................................................................................... 44
Add New ........................................................................................ 44
Group Setting ................................................................................ 46
Copy .............................................................................................. 47
Delete ............................................................................................ 47
Fixed Dial List ................................................................................ 48
One Touch Key ............................................................................. 48
Phone Status ................................................................................. 48
Message ....................................................................................... 49
SMS ............................................................................................... 49
Create ............................................................................................49
Inbox ..............................................................................................50
Outbox ............................................................................................51
Draftbox ..........................................................................................51
Delete .............................................................................................51
Voice Mailbox .................................................................................52
Broadcast .......................................................................................52
Phone Status ..................................................................................52
MMS .............................................................................................. 52
Create Message .............................................................................53
Inbox ..............................................................................................54
III
Outbox ........................................................................................... 55
Report ............................................................................................ 55
Delete ............................................................................................ 55
Message Settings ......................................................................... 56
SMS Settings ................................................................................. 56
MMS Settings ................................................................................ 56
Records ........................................................................................ 57
Missed Calls .................................................................................. 57
Received Calls .............................................................................. 57
Dialled calls ................................................................................... 58
Delete All ....................................................................................... 58
Call Register ................................................................................. 58
Profile ............................................................................................ 59
Activate ......................................................................................... 59
Preference .................................................................................... 60
Clock ............................................................................................. 60
Alarm ............................................................................................. 61
Date Setting .................................................................................. 61
Time Setting .................................................................................. 61
Display Mode ................................................................................ 61
Time Zone ..................................................................................... 62
Auto Power Off .............................................................................. 62
Auto Power On .............................................................................. 62
Calendar ....................................................................................... 62
Setting ........................................................................................... 63
Normal Settings ............................................................................ 63
LCD ............................................................................................... 68
Wallpapers .................................................................................... 68
Background Color .......................................................................... 68
Brightness ..................................................................................... 68
Backlight ........................................................................................ 69
Call Settings .................................................................................. 69
Own Number Sending ................................................................... 69
Call Divert ...................................................................................... 69
Call Barring .................................................................................... 70
Call Waiting ................................................................................... 70
IV
Network Settings ........................................................................... 70
NCK code .......................................................................................70
Preferred ........................................................................................71
Select Mode ...................................................................................71
Security Settings ........................................................................... 71
PIN Code ........................................................................................72
Change PIN2 ..................................................................................72
Change Barring Code ....................................................................73
Time & Cost Settings ..................................................................... 73
Short Cut Key ................................................................................ 73
IrDA Settings ................................................................................. 73
Extras ........................................................................................... 74
My Collections ............................................................................... 74
My Pictures ....................................................................................74
My Melodies ...................................................................................75
Record ............................................................................................75
JAVA™ .......................................................................................... 75
Game ............................................................................................. 75
Tank War ........................................................................................76
RedCap ..........................................................................................76
Blackjack ........................................................................................76
Gobang ..........................................................................................76
Elf ...................................................................................................77
Setting ............................................................................................77
Notebook ....................................................................................... 77
Calculator ...................................................................................... 77
Virgin Extra .................................................................................... 78
WAP ............................................................................................. 78
Basic steps for activating and accessing WAP service ................. 78
Activation of WAP service ..............................................................78
Accessing the WAP service ...........................................................78
Homepage ..................................................................................... 79
Bookmarks .................................................................................... 80
Last Page ...................................................................................... 80
Navigation ..................................................................................... 80
Push Msg ...................................................................................... 80
V
WAP Settings ................................................................................ 81
History ........................................................................................... 81
GSM Link ....................................................................................... 81
GPRS Data Flow ........................................................................... 82
Clear Cache .................................................................................. 82
Reference Information .......................................................... 83
EFR encoding decoder function ................................................... 83
Accessories ................................................................................. 83
Battery ........................................................................................... 84
Charger ......................................................................................... 84
Troubleshooting .................................................................... 85
Index ....................................................................................... 87
VI
Safety information
Note: Read this information carefully before using your phone.
To be as efficient and safe as possible while using the phone, observe the following
guidelines.
Check that your phone switches on and connects to the
service. If you have any problems, call your service
provider.
While driving, use hands-free mode (insert your phone to a
hands-free car kit).
All wireless phones may experience interference
occasionally. Changing location may improve performance.
In hospitals and medical clinics, follow all rules and
regulations. Switch off the phone near medical equipment.
In airplanes, wireless devices may cause interference.
Switch off the phone when instructed to do so by the flight
attendants.
Do not use the phone at a gas station refueling point. Do
not use near fuel or chemicals.
Follow safety regulations at building sites. Do not use the
phone when blasting is in progress.
Do not switch phone on in places where wireless phone use
is not permitted (e.g., when it causes interference to other
devices).
SAFETY INFORMATION
1
Only qualified personnel may install or repair phone
equipment.
Only approved accessories and batteries should be used.
Do not connect incompatible products.
Do not immerse phone in water. If the phone gets wet, dry
it immediately.
It is recommended to regularly backup any important data
stored on your phone.
When connecting to any other device, follow all
instructions for that device.
2
SAFETY INFORMATION
CARE AND MAINTENANCE
Your phone should be treated with care. Please follow the instructions below to
comply with any warranty obligations related to the use of this phone.
•
•
•
•
Keep the phone and all parts and accessories out of reach of small children.
•
Do not knock, drop or shake the phone. Rough handling can damage internal
circuit boards.
•
Do not use harsh chemical, cleaning solvents or strong detergents to clean the
phone.
•
•
Painting the phone can damage it.
Keep your phone away from any liquid, moisture or humidity.
Protect your phone from extreme high or low temperatures.
Do not open and disassemble the phone. Handling by an unauthorized person
may damage it.
Only use the antenna supplied, or an approved replacement. Unauthorized
antennas can damage the phone and could violate regulations governing radio
devices.
Note: The above suggestions apply to your phone, battery, charger or any
accessory. If the phone ceases to work properly, contact your nearest qualified
service facility.
BATTERY INFORMATION
Charging and Discharging
•
•
The rechargeable battery powers your phone.
•
The battery is designed to be charged and discharged hundreds of times. It will
wear out eventually. When you notice that the operating time (standby and talk
time) becomes shorter than normal, buy a new battery.
•
Only use batteries and chargers approved by the manufacturer. Avoid leaving
the battery connected to the charger longer than a week, because overcharging
We recommend that you charge your battery to full capacity before you use the
phone for the first time. Only after two or three charge and discharge cycles
does a new battery reach its full performance.
SAFETY INFORMATION
3
can shorten the battery life. A fully charged battery left unused discharges itself
over time.
•
The ability of your battery to charge can be negatively affected by temperature
extremes.
•
•
•
Use the battery for its intended purpose only.
•
Temperature extremes can reduce the capacity and lifetime of the battery.
Always try to keep the battery between 15C and 25C (59F and 77F). A phone
with a hot or cold battery can temporarily malfunction, even when the battery is
fully charged. Battery performance can be seriously reduced if the temperature
is well below freezing.
•
Do not throw old batteries in a fire! Dispose of batteries according to the
required local regulations (e.g., recycling). Do not dispose of batteries as
household waste.
Never use a damaged or worn out charger or battery.
Be careful not to short-circuit the battery. If a metal object causes a direct
connection between the + and - poles of the battery, you can accidentally cause
the battery to short circuit. Be careful not to carry a spare battery in your
pocket, where it can come in contact with coins, ink pens and other metal
objects. A short circuit may damage the battery poles or connectors.
GENERAL INFORMATION
Driving safety
Do not hold the phone in your hand while driving a vehicle. Always use the handsfree
earpeace to ensure that the phone is secured properly during a journey.
Operating environment
Abide by local regulations governing the correct use of the phone. Always switch off
your phone whenever you enter an area where its use is forbidden.
The phone contains magnetic parts. People wearing a hearing aid should not hold
the phone to the ear that has the hearing aid. Metallic materials could be attracted to
the phone and cause damage to the hearing aid.
Sometimes digital mobile phones interfere with some types of hearing aids. If
interference occurs, please consult your service provider for assistance.
4
SAFETY INFORMATION
Do not place credit cards or other magnetic storage media near the phone. It can
cause the information stored on them to be erased.
Electronic devices
Most modern electronic equipment is protected from radio frequency (RF) signals.
Nevertheless, certain electronic equipment may not be protected against the RF
signals from your cellular phone.
•
Pacemakers
Pacemaker manufacturers recommend that a minimum separation of 20 cm (6
inches) be maintained between a handheld cellular phone and a pacemaker, to
avoid potential interference with the pacemaker. These recommendations are
consistent with the research carried out by the Wireless Technology Research
Institute, and its recommendations.
If you use a pacemaker:
•
•
Always keep the phone more than 20 cm (6 inches) from your pacemaker
when the phone is switched on.
•
•
Do not carry the phone in your breast pocket.
•
Switch off your phone immediately if you suspect there is interference.
Hold the phone close to your ear, on the opposite side of your body from the
pacemaker, to minimize potential interference.
Other medical devices
Operation of any radio transmitting equipment, including cellular phones, can
interfere with the performance of medical devices that are insufficiently
protected. Consult your physician or the manufacturer of the medical device to
determine if they are adequately protected from external RF energy. When
inside health facilities that post regulations restricting phone use, switch off your
phone. Hospitals or health care facilities use equipment that may be sensitive to
external RF energy.
•
Vehicles
RF signals can affect improperly installed or inadequately protected electronic
systems in motor vehicles (e.g., air bag systems, electronic speed control
systems, electronic anti-skid (anti-lock) braking systems, electronic fuel
injection systems). Check with the vehicle’s manufacturer or his representative
concerning your vehicle. You should also contact the manufacturer of any
equipment that has been added to your vehicle.
SAFETY INFORMATION
5
Vehicles
Only qualified service technicians should install the phone in a vehicle. Faulty
installation or service may be dangerous and could invalidate any warranty applying
to the phone.
Check regularly that all wireless phone equipment in your vehicle is secured and
functioning properly.
Do not store your phone, its parts or accessories in the same place as flammable
liquids or other dangerous materials.
In vehicles equipped with an airbag system, be careful not to install or place your
phone equipment where it may interfere with airbag deployment. Airbags inflate with
tremendous force. Improperly installed or placed phone equipment can cause
serious injury when the airbag inflates.
•
Aircraft
Using your phone during flight is prohibited. Turn off your phone before
boarding an aircraft. The use of cellular phones in an aircraft can endanger the
safe operation of the aircraft, and can interfere with the control and navigation
equipment. Always act in accordance with the instructions of the aircraft crew.
Failure to comply with these instructions can lead to suspension/ denial of
telephone services to the offender, or legal action, or both.
Emergency calls
Note: Connections in all conditions cannot be guaranteed, because this phone
operates using radio signals, landline and wireless networks, as well as userprogrammed functions. We recommend that you never rely solely on a cellular
phone for urgent communications (e.g., medical emergencies).
Emergency calls may not be possible on all cellular phone networks, or when certain
network services and/or phone features are in use. When you are using certain
features, you may need to turn these features off before you can make an emergency
call. Consult this guide, as well as that of your local cellular service provider.
To make an emergency phone call:
1.
If the phone is switched off, switch phone on.
2.
From Stand-by screen, press 112 or 999 on the keypad, and Send.
6
SAFETY INFORMATION
FCC COMPLIANCE
SPECIFIC ABSORPTION RATE DATA
This phone meets governmental requirements for exposure to radio waves.
Your wireless phone is a radio transmitter and receiver. It is designed and
manufactured to not exceed the emission limits for exposure to radio frequency (RF)
energy, as set by the Federal Communications Commission (FCC) of the U.S.
Government. These limits are part of comprehensive guidelines and establish the
permitted levels of RF energy for the general population. The guidelines are based
on standards that were developed by independent scientific organizations through
evaluation of scientific studies. The standards include a substantial safety margin,
designed to assure the safety of all persons, regardless of age and health.
The exposure standard for wireless mobile phones employs a unit of measurement
known as the Specific Absorption Rate, or SAR. The SAR limit set by the FCC is
1.6 W/kg. Tests for SAR are conducted using standard operating positions specified
by the FCC with the phone transmitting at its highest certified power level in all tested
frequency bands. Although SAR is determined at the highest certified power level,
the actual SAR level of the phone while operating can be well below the maximum
value. Because the phone is designed to operate at multiple power levels and uses
only as much power as is required to reach the network, in general, the closer you
are to a wireless base station antenna, the lower the power output.
Before a phone model is made available to the public, it must be tested and certified
by the FCC that it does not exceed the limit established by the government-adopted
requirement for safe exposure. The tests are performed in positions and locations
(e.g. at the ear and worn on the body) as required by the FCC for each model. The
highest SAR value for this model phone was tested for use at the ear is 1.410 W/kg
and when worn on the body, as described in the user’s manual, is 0.570 W/kg. (bodyworn measurements differ among phone models, depending upon available
accessories and FCC requirements). While there may be differences between SAR
levels of various phones and at various positions, they all meet the government
requirement for safe exposure.
The FCC has granted an Equipment Authorization for this model phone with all
reported SAR levels evaluated in compliance with the FCC RF emission guidelines.
SAR information for this phone is on file with the FCC and can be found under the
Display Grant section in http://www.fcc.gov/oet/fccid after searching for
“FCC ID RJAINNO55”.
Additional information on SAR can be found on the Cellular Telecommunications
Industry Association (CTIA) website at http://www.wow-com.com.
SAFETY INFORMATION
7
In the United States and Canada, the SAR limit for mobile phones used by the public
is 1.6 W/kg in average per one gram of tissue. The standard incorporates a
substantial margin of safety, to provide additional protection for the public and to
account for any vibrations in measurements.
FCC RF EXPOSURE INFORMATION
In August 1996 the Federal Communications Commission (FCC) of the United
States, with its Report and Order FCC 96-326 adopted an updated safety standard
for human exposure to radio frequency electromagnetic energy emitted by FCC
regulated transmitters. These guidelines are consistent with the safety standards
previously set by both U.S. and international standards parties. The design of this
phone complies both with the FCC guidelines and the international standards.
BODY-WORN OPERATION
This device was tested for typical body-worn operation with the back of the phone
kept 1.5 centimeters away from the body. To comply with FCC RF exposure
requirements, a minimum separation distance of 1.5 centimeters must be maintained
between the user’s body and the back of the phone, including the antenna, whether
extended or retracted. All belt-clips, holsters and similar accessories used by this
device must not contain any metallic components. Body-worn accessories that do
not meet these requirements might not comply with FCC RF exposure limits and their
use should be avoided.
Note: For more information about FCC RF exposure, please visit the FCC
website at www.fcc.gov.
WEEE COMPLIANCE
The cell phone Sting 6 accords with directive of Waste Electrical and Electronic
Equipment (WEEE) [Reference article: BS EN 50419-2005].
The wheel bin label and recycling bar code are qualified with the requirements of
Marking of electrical and electronic equipment in accordance with Article 11(2) of
Directive 2002/96/EC (WEEE) [Reference article: EN 26601].
8
SAFETY INFORMATION
Before you begin
HOW TO USE THIS GUIDE
This guide opens with an introduction of your phone features, and then provides
basic usage instructions. If you want in-depth information regarding a specific feature
or setting, refer to the appropriate section under “Menu functions” on page 39. To
locate a specific feature, you can use section “The menu map” on page 30.
PHONE LAYOUT AND ICONS
The following illustration shows the main elements of your phone.
No. Description
1
Side soft key
2
Main display
3
Clear/phonebook access key
4
Secondary display
5
Call key
6
Power/End call key
7
4-way navigation key
8
Irda port
9
Earphone jack/ Charger port/
Data download port
Specification
•
10
Antenna
11
Built-in camera
12
Battery pack
Dimensions (with battery pack)
99 (L) × 43 (W) × 21 (D) mm
•
Weight (with battery pack)
91 g
BEFORE YOU BEGIN
9
SCREEN INDICATORS
Status indicators at the top of the screen show you the relevant settings of your
phone.
Indicator
Description
Idle display (secondary display).
The phone is not in use.
Idle display (main display).
The phone is not in use.
Battery status. The more bars, the more power the battery has left
Received signal strength. The larger the number of bars, the better
the signal strength.
The phone is out of your home network area and it is registered to
a network other than its home service (i.e. when traveling in other
countries with GSM service).
.A new text message has arrived. The icon flashes when the
memory is full.
There was a missed call.
An alarm clock is enabled.
The divert call feature is activated.
The phone is registered to a GPRS network.
10
BEFORE YOU BEGIN
Indicator
Description
An MMS message has been received and not yet downloaded.
An MMS message has been received and downloaded.
KEY DESCRIPTION
Function keys
Key
Description
Soft key
•
Follow the prompt on the screen, press to access the options Menu,
Option, Ok, etc.·
•
Press to access the In-call menu during calls.
Clear/Phone Book access key
•
Follow the prompt on the screen, press to access the options Names,
Cancel, Back, etc.
4-way navigation key
•
•
•
Press to scroll through lists when accessing menus.
Press to move the cursor left and right during the editing of words.
When in idle mode, press to access the corresponding functions that
have been assigned as a short cut key.
Call key
•
•
Press to place a call or answer an incoming call.
When in idle mode, press to view the latest dialed, received and missed
call lists. Press
BEFORE YOU BEGIN
to call the selected number.
11
Key
Description
Power key/End call key
•
•
•
Press and hold to turn the phone on and off.
During a call, press to end the active call.
Press to return to idle mode from menu mode.
Side soft keys
and
•
Press to adjust the volume of the earpiece or headset both in Stand-by
mode and during a call.
•
Press and hold to reject an incoming call with the handset cover opened
or closed.
•
During the incoming call, press once to switch off the ring tone, press
second time to terminate this call.
•
Press and hold
to activate the backlight of the secondary display.
Alphanumeric keys
Key
Uppercase (ABC)
Lowercase (abc)
Space 1 ( ) & £ $ ¥ _€
12
ABC2AÄÅÆÇ
abc2àäåæç
DEF3ÉE∆Φ
def3éè∆Φ
GHI4ΓÌ
ghi4Γì
JKL5Λ
jkl5Λ
BEFORE YOU BEGIN
Key
Uppercase (ABC)
Lowercase (abc)
MNO6ÑÒÖØ
mno6ñòöø
P Q R S 7 ß Π Θ Σ;
pqrs7ßΠΘΣ
TUV8ÜÙ
tuv8üù
WXYZ9ΩΞΨ
wxyz9ΩΞψ
.,?!0"':;¡¿
*+@/%#=<>-§
Press to change the style of input
SCREENS IN IDLE MODE
Status indicators on secondary display
When the handset cover is closed, the external display will show status indicators
such as date, time, signal strength, battery level, caller ID, new message, missed
call, alarm etc. Some of the icons listed may not be available at a given time.
Backlight
When pressing a key or answering an incoming call, the backlight will automatically
turn on for a few seconds. You may define the backlight duration with the Backlight
option under LCD in Settings.
BEFORE YOU BEGIN
13
Getting started
Note: Never detach the battery from the phone while it is switched on. Use
only approved batteries and chargers. Keep the SIM card and batteries out of
the reach of small children.
HOW TO ATTACH THE SIM CARD AND THE BATTERY
1.
Pull the battery cover catch on the back of the phone upwards with one hand
and lift the battery cover with the other hand.
2.
Insert the SIM card into the SIM card holder, ensuring that the angled corner is
on the lower left-hand side with the gold metallic contact surface facing
downward.
14
GETTING STARTED
3.
Push the SIM card fasten tab to secure it into place.
4.
Replace the battery with its catch pins inserted into the catch slots, and push it
down until it clicks into place.
HOW TO REMOVE THE SIM CARD AND THE BATTERY
Repeat the procedure described in the section “How to attach the SIM card and the
battery” on page 14 to remove the SIM card and the battery.
Note: You can only access the following functions if a SIM card is not inserted:
Alarm, Date Setting, Calculator, Game, Camera, Calendar, and Wallpaper
Setting.
HOW TO CHARGE THE BATTERY
Note: Before using the phone for the first time, you must
charge it for at least 12 hours.
1.
Plug the connector of the travel charger into the charger port
at the bottom of the phone. Be sure that the charger is firmly
connected to the charger port.
2.
Plug the charger into the AC power supply socket, and the
battery indicator will start scrolling.
3.
If the battery is completely flat, it will take a few minutes to
charge after it is connected to the power supply.
4.
Once the battery is fully charged, the battery indicator will
stop scrolling. For optimum battery performance, 5 hours of
battery charging is recommended.
GETTING STARTED
15
Note: Do not charge your phone while the battery is not connected. Do not
detach the battery during the charging process. You can use the phone, if
switched on, while it is charging.
Notice on battery charging and discharging
1.
Your phone is powered by a rechargeable battery.
New batteries reach optimal performance only after being fully charged and
discharged 2 or 3 times.
2.
When the charger is not in use, disconnect it from the power supply. Do not
leave the battery on continuous charge for more than one week, as overcharging
will shorten the battery life. If a fully charged battery is left unused, it will slowly
discharge itself over time.
3.
An environment with extremely high or low temperatures will affect the battery
charging. Optimum charging will be achieved in moderate temperatures.
Low battery indicator
When the battery is low, with only a few minutes of calling time left, the handset will
warn you with an alert tone.
Use of battery
1.
Never use a damaged or non-recommended charger or battery.
2.
Keep the battery at a temperature range of 10º C to 40º C (50º F to 104º F).
3.
The effectiveness of your battery is particularly affected in temperatures below
0º C (32º F).
Battery disposal
1.
Do not dispose of the battery in a fire. This may cause a serious risk of explosion
and/or release of highly toxic chemicals.
2.
Ensure that the battery is disposed of or recycled properly.
3.
The battery must not be disposed of in municipal waste.
16
GETTING STARTED
SECURITY CODES
The security codes are used to protect your phone and SIM card from being used by
others, and to control access to sensitive settings and information.
Code
Usage
PIN
PIN stands for Personal Identification Number, and is used to safeguard
your SIM card. The PIN code should be provided to you with the SIM
card. If you enter the PIN code incorrectly three times in succession, the
PIN will be blocked, and your SIM card will automatically lock-up. You will
then have to enter the unblock code (PUK) to use the phone again.
PUK
PUK stands for Personal Unblocking Key, and is used to unblock a SIM
card that has been blocked due to incorrect entry of the PIN code. The
PUK code should be provided to you with your SIM card. If you enter the
PUK code incorrectly ten times in succession, the PUK will be blocked,
and the SIM card will automatically lock-up. In such case you must
contact your service provider and receive a new SIM card.
PIN2
PIN2 stands for Personal Identification Number 2, and is used to access
specific functions of the SIM card. The PIN2 code is only available if the
SIM card supports such functions. If you enter the PIN2 code incorrectly
three times in succession, it will be blocked and you will be asked for the
unblock code PUK2.
PUK2
PUK2 stands for Personal Unblocking Key 2, and is used to unblock a
PIN2 code that has been blocked due to incorrect entry. The PUK2 code
is only used if the PIN2 functions mentioned above are available. If you
enter the PUK2 code incorrectly ten times in succession, the functions
that require PIN2 code in order to be activated will no longer be valid.
Contact your network service provider to replace the SIM card.
GETTING STARTED
17
Quick & Easy
BEFORE USE
1.
Remove the battery and insert your SIM card, then re-install and charge the
battery. For more details, please refer to “How to attach the SIM card and the
battery” on page 14.
2.
Press and hold
to turn on your phone. Wait until the name of the network
operator appears on the screen.
CALL FUNCTIONS
Making a call
1.
Enter the area code and the phone number while in idle mode.
2.
Press
to make a call.
Answering a call
Press
to answer a call. If the Flip Answer option is activated, you can open the
phone cover to answer the call.
Hands free talk
Press and hold
to use the hands free function for conversation.
Terminating a call
Press
18
or simply close the phone cover to end an active call.
QUICK & EASY
Rejecting a call
Press
or simply close the handset cover to reject the incoming call. Alternatively,
press and hold
or
to reject the incoming call without opening the handset cover.
Emergency calls
In idle mode, enter the emergency call number, and press
emergency services center.
to contact the local
PHONEBOOK FUNCTIONS
Adding new numbers and names to the handset or SIM card.
1.
In idle mode, enter the phone number and press
.
2.
Select Add Name, Quick Save or Add to existing name, and press
3.
If Quick Save is selected, the entry will be stored in the handset without editing.
4.
If Add Name is selected, perform the following steps:
•
Enter the name, and press
•
•
Select Save To SIM or Save To Handset, and press
5.
.
.
If Save To SIM is selected, enter the number to which the entry is to be saved,
and press
•
•
.
.
If Save To Handset is selected, select the desired group and press
.
Select Handset, Office or Home to define the attributes of the entry.
If Add to existing name is selected, perform the following steps:
•
•
Select the location of the new number and press
.
If the selected location already has a number, it will be replaced; if the selected
location is blank, the new number will be saved there.
QUICK & EASY
19
Note: If the selected entry exists in the SIM card, the old number will be
replaced.
OTHER FUNCTIONS
Clearing the screen
Press and hold
to clear an entry that you are editing.
Adjusting the earpiece volume
Use or
mode.
to increase or decrease the earpiece volume during a call or in Stand-by
BACKLIGHT
When pressing a key or answering an incoming call, the backlight will automatically
turn on for a few seconds.
20
QUICK & EASY
Basic functions
SWITCHING YOUR PHONE ON AND OFF
Make sure that the battery is attached.
Note: Always switch off your phone whenever it is forbidden for use or when it
may cause interference or danger.
1.
Press and hold down
2.
Some SIM cards may be protected with a PIN code. If you are prompted to
for 3 seconds, and then release it.
Enter PIN, enter the PIN code and then press
3.
If you entered a wrong number, press
hold
4.
.
to remove the last digit. Press and
to clear the entire entry.
If you entered the PIN code incorrectly, a warning message will be displayed to
notify you of the remaining time for entering the PIN code.
Note: If you entered the PIN code incorrectly more than three times in
succession, the PIN will become blocked, your SIM card will automatically lockup, and a message will be displayed to inform you that the SIM card is blocked.
UNLOCKING A BLOCKED SIM CARD
Perform the following steps to unlock the blocked SIM card:
1.
Enter the PUK code, press
.
2.
Enter a new PIN code, press
3.
Enter the new PIN code again, and press
.
.
Note: PUK stands for Personal Unblocking Key, and is used to unblock a SIM
card that has been blocked due to incorrect entry of the PIN code. If you enter
the PUK code incorrectly ten times in succession, the PUK will be blocked, the
SIM card will be blocked permanently.
BASIC FUNCTIONS
21
MAKING AND RECEIVING A CALL
MAKING A CALL
1.
To make a call from your phone, enter the area code and the phone number
while in idle mode. Press
to delete the last digit. Press and hold
seconds to clear the whole number.
2.
Press
3.
To end the call or stop dialing, press
for 3
to dial the number.
.
Domestic call
When in idle mode, enter the area code and phone number. For example, dial
02154422999, and press
to make the phone call.
International call
1.
When in idle mode, press and hold
until a + sign appears, then enter the
country code, the area code and the phone number accordingly.
2.
Press
to start the call.
3.
Press
to end the call or stop dialing.
Example: When in idle mode, key in +886222682081, and press
phone call.
to make the
Quick dialing from the Phone Book
1.
Press
2.
Scroll to the desired entry with
3.
Press
22
to access the Phone Book directly.
.
to call the selected number.
BASIC FUNCTIONS
Redialing missed, received and dialed calls
The last 10 phone calls dialed, answered or missed are stored in the phone's
memory.
Fast and easy redialing
1.
When in idle mode, press
2.
Scroll through the list for the desired number with
Press
to view the last dialed, answered and missed calls.
.
to dial the selected number.
Redialing via the menu
1.
Press
, scroll to Records, and press
.
2.
Select Missed Calls, Received Calls or Dialled calls, and press
3.
Scroll to the desired name or phone number with
4.
Press
to place the call or press
5.
Press
again to continue the next operation with the available sub options.
.
.
to check the necessary information.
Speed dial
When in idle mode, press and hold the alphanumeric keys (
to
) to dial
the preset speed dial numbers. Ensure that you have entered the settings in One
Touch Key.
Calling your voice mailbox
When in idle mode, dial the voice mailbox number provided by the network operator
or press and hold
to access the voice mailbox directly.
Note: Obtain your voice mailbox number from your network operator, and
ensure that the number has been entered in the Voice Mailbox Number
option.
BASIC FUNCTIONS
23
ANSWERING A CALL
1.
Press
to answer an incoming call. Alternatively, simply open the phone cover
to answer a call if the handset cover is closed (if Flip Answer is activated).
2.
Press
to end the call.
3.
Press
to reject an incoming call.
Note: If the When Busy function in Call Divert is activated, each incoming call
will be diverted to the specified number while you are on a call. For example,
you may divert incoming calls to your voice mailbox. If you have rejected an
incoming call, the call will be diverted too.
Call waiting
If the call waiting function is activated, you may answer a new incoming call while
already on line.
1.
If there is an incoming call while you are already on line, a tone will be heard and
a notification message and the caller information will be displayed on the screen.
2.
Press
hold.
to answer the call. The active call will be automatically switched to
3.
Press
to reject the new call.
Note: The call waiting function allows you to manage up to two calls
simultaneously (1 active, 1 on hold). To answer the third incoming call, end one
of the active calls, or establish a multiparty call for the two online calls before
answering the third call.
24
BASIC FUNCTIONS
In-call options
Your phone provides a number of call functions that you can use during a call. To
access these functions press
during a call. The following options are available:
Normal mode
Option
Description
Mute
Mute the mobile phone, The party on the phone will not hear you. If
the phone is in call waiting mode, the party on the phone will not
hear you and the call on hold will remain on hold.
Unmute
Cancel the mute function.
Hands Free
Enable users to talk without holding the phone.
Hold
Place an active call on hold.
Send SMS
Send short messages to another party during calls. For more
information see the section “Message” on page 49.
Phone Book
Enable users to check or edit the data in the phone book during a
call. For more information see the section “PhoneBook” on
page 43.
Fixed Dial List
Enable users to check or edit the data in the phone book during a
call. For more information see the section “PhoneBook” on
page 43.
Call Records
View the call records of the answered, dialed and missed calls.
Send DTMF
Activate or deactivate the DTMF tone.
Call waiting mode
Option
Description
Mute
See the above description of the function.
Unmute
See the above description of the function.
Hands Free
See the above description of the function.
Swap
Switch between the active call and the call on hold when in call
waiting mode.
Call Divert
Transfer the call to another phone number.
BASIC FUNCTIONS
25
Option
Description
Send SMS
See the above description of the function.
Build Multiparty Call
Starts a multiparty conference call for up to 7 participants. For
more information see the section “Multiparty” on page 27.
Phone Book
See the above description of the function
Fixed Dial List
See the above description of the function
Call Records
See the above description of the function
Send DTMF
End active call
See the above description of the function
See the above description of the function.
End All Calls
Terminate all calls, both on line and on hold.
End Held Call
End the call on hold.
Multiparty conference call mode
Option
Description
Mute
See the above description of the function.
Unmute
See the above description of the function.
Hands Free
See the above description of the function.
Hold Multiparty Calls
Place the current multiparty conference calls on hold.
Send SMS
See the above description of the function.
Split MPTY
Choose a participant from the multiparty conference call for a
private conversation.
Phone Book
See the above description of the function
Fixed Dial List
See the above description of the function
Call Records
See the above description of the function
Send DTMF
See the above description of the function
End component
Terminate the connection with one of the participants from the
multiparty conference call.
End Active MPTY
Terminate the connection with the active conference call.
26
BASIC FUNCTIONS
Option
Description
Add To Multiparty Call
Add a new incoming call to the multiparty calls already on line.
End Held MPTY
End the multiparty conference calls on hold.
Multiparty
This option allows a conference call for up to 7 parties. Please check with your
network operator for the availability of multiparty conference calls.
Before activating a multiparty conference call, make sure that you have established
two on-line calls (1 active, 1 on hold).
1.
Make sure that you have established two online calls (1 active, 1 on hold), before
activating a multiparty conference call.
2.
If the existing calling parties agree to participate in the conference call, press
to enter the In-call menu, and select Build Multiparty Calls to start a multiparty
conference call.
3.
To add a new participant to the multiparty conference call, perform the following
steps:
4.
5.
•
Press
to answer the new incoming call.
•
Press
to enter the In-call menu, and select Build Multiparty Call.
To release a participant from the conference call, perform the following steps:
•
Press
•
Scroll to the desired party, and press
•
Press
to enter the In-call menu and select End component.
.
again to release the selected participant.
To have a private conversation with one of the participants, perform the following
steps:
•
Press
•
Scroll to the desired party, and press
to enter the In-call menu and select Split MPTY.
BASIC FUNCTIONS
.
27
•
6.
Press
again to start your private conversation with the selected
participant. The existing multiparty conference call will then be
automatically placed on hold.
Press
to end an active conference call.
OTHER OPERATIONS
ADJUSTING THE EARPIECE VOLUME
You can increase or decrease the volume during a call or in Stand-by mode by using
the side soft keys
or .
TEXT EDITING
Input text
The Sting 6 phone provides a number of input modes for you to organize your phone
book or write messages.
You may switch between different input modes by pressing
•
.
When in idle mode, use only numbers, the international dialing prefix code +
(press and hold
), the pause codes W (press and hold
) and P (press
twice and hold
), and characters that are allowed for dialing. Other letters
or symbols are not allowed.
•
To enter a specific letter or symbol, after selecting the desired input style, press
the corresponding key repeatedly until the required letter or symbol appears.
For example: to input A, press
so on.
•
twice, and
To enter the same character in sequence, wait for a second between each key
press, or press
28
once; to enter B, press
to move the cursor to the right and input the character.
BASIC FUNCTIONS
•
If you make a mistake, press
press and hold
to delete the character to the left of the cursor;
to delete all characters on the screen.
Predictive Text input mode
Predictive Text mode is a much easier way to input a text message in English. For
each letter to be entered, you only need to press the corresponding alphanumeric
key once. In Predictive Text mode, the alphanumeric keys enter words with a single
key press instead of multiple key presses. When the first (or second) element is
entered, the display shows the most probable word in the suggestion area The word
you select from the suggestion area will move to the text area.
1.
Switch to Predictive Text input mode by pressing
repeatedly until the
desired input style appears. For example, to enter “Telephone”, key in the
following:
->
->
->
->
.
2.
Press
vertically to select the desired word and press
3.
Press
repeatedly to enter a needed punctuation mark.
4.
Press
.
when you have completed writing the message.
Note: In Predictive mode, you can insert a space by pressing key
writing a TEXT message.
while
Capitalize input mode
The first letter of each sentence is shown in capital letter automatically. For example,
to enter “go home”, press the associated keys accordingly. The sentence “Go home”
will be shown on the LCD display.
BASIC FUNCTIONS
29
The menu map
Note: Depending on the contents of your SIM card, some menu items may not
be available.
The following list demonstrates the way the phone’s menus are structured. You can
use it for assistance in navigating the menus.
Camera
Preview
Capture Movie
Photo Manager
Edit
Delete
Rename Album
Memory Manager
Movie Manager
30
Album1
Album2
Album3
Album4
Delete By Album
Empty all albums?
Album1
Album2
Album3
Album4
Memory Info
Free Memory
Replay
Delete
Detail
Send via Infrared
THE MENU MAP
Camera
Snap Setting
Target Album
Effect
Photo Quality
Shutter Sound
Timer Snap Sound
Capture Mode
Set Capture Size
Set Environment
Frame
Album1
Album2
Album3
Album4
Normal
Negative
Exposure
Grey
Brown
Emboss
Double Value
Low
Normal
High
Off
On
Off
On
Normal
Night Mode
160*120
320*240
640*480
1280*960
50HZ
60HZ
Close
Frame1
Frame2
Frame3
Manual
THE MENU MAP
31
PhoneBook
View
Add New
Group Setting
Copy
Delete
Fixed Dial List
One Touch Key
Search Name
Group
Add Name
Quick Save
Add to existing name
Melody
Add New
Delete
Copy All
Select Copy
Select Delete
SIM All
Handset All
Activate
Add New
View
Memory Info
Change
Delete
View
Phone Status
32
THE MENU MAP
Message
SMS
MMS
Message settings
Create
Inbox
Outbox
Draftbox
Delete
Broadcast
Phone Status
Create Message
Inbox
Outbox
Report
Delete
SMS Settings
MMS Settings
Voice Mailbox
Records
Missed Calls
THE MENU MAP
Add Name
Quick Save
Add to existing name
Delete
Send SMS
33
WAP
Homepage
Bookmarks
Last Page
Navigation
Push Msg
WAP Settings
History
Bookmark1 -10
Service Inbox
OTA Setting
Virgin
Profile2-Profile5
GSM Link
GPRS Data Flow
Clear Cache
38
THE MENU MAP
Profile
Customized
Activate
Edit
Rename
Incoming Call Alert
Ringing Tone
Ringer Volume
SMS Alert
Key Tones
Keytone Volume
LCM Open/Close Alert
Power On/Off Alert
* Refer to “Normal” for the available submenus.
Clock
Alarm
Date Setting
Time Setting
Display Mode
Time Zone
Auto Power Off
Auto Power On
Off
On
12 Hour
24 Hour
Off
On
Off
On
Calendar
THE MENU MAP
35
Setting
Normal Settings
Languages
Input Method
Earpiece Volume
Headset
Hands Free
Auto Answer
Flip Answer
Charging LED
Factory Settings
LCD
Wallpapers
Background Color
Brightness
Backlight
LED Alert
Call Settings
Own Number Sending
Call Divert
Call Barring
Call Waiting
Network Settings
Preferred
Select Mode
GPRS Connection
Security Settings
PIN Code
Change PIN2
Change Barring Code
Time & Cost Settings Calling Display
Charge Rate
Cost Limit
Short Cut Key
Up Key
Down Key
Irda Settings
36
THE MENU MAP
Extras
My Collections
Java™
Games
Notebook
Calculator
Virgin Extra
THE MENU MAP
My Pictures
My Melodies
Records
Incoming Portrait
Java ™ List
Download Settings
Memory Status
About Java ™
Tank War
RedCap
Blackjack
Gobang
Elf
Setting
New Notepad
Select Date
Read All Notebook
Delete
Alarm Melody
Top-up
Help
Shop
Offers
Travel
Music
Going out
Staying in
37
WAP
Homepage
Bookmarks
Last Page
Navigation
Push Msg
WAP Settings
History
Bookmark1 -10
Service Inbox
OTA Setting
Virgin
Profile2-Profile5
GSM Link
GPRS Data Flow
Clear Cache
38
THE MENU MAP
Menu functions
This section provides descriptions for each of the phone's menu screens. Use the
menu map (previous section) to locate the menu you want information about.
Accessing the menu function
1.
In idle mode, press
to go to the menu facility.
2.
Scroll to the desired menu with
3.
Press
4.
Scroll to the desired submenu with
5.
Press
6.
Press
7.
Press
.
to enter the desired submenu.
.
to access the submenu.
up or down to access the next menu of the selected submenu.
to confirm the setting.
Returning from menu function
1.
Press
to return to the previous menu level.
2.
Press
to exit the menu and return to idle mode without changing the menu
settings.
MENU FUNCTIONS
39
CAMERA
This function provides access to the built-in digital camera. It allows you to take
pictures (both still and moving images), and change certain settings on the pictures.
You can also send images in a multimedia message, as an e-mail attachment or via
infrared connection. The camera produces JPEG images.
In idle mode, proceed as follows:
1.
Press
2.
Scroll to Camera with
to enter the main menu.
3.
Press
.
to access the submenu.
PREVIEW
This option allows you to view the image that you want to take and save.
1.
Press
to preview the photo subject.
2.
Point the viewfinder toward the photo subject and press
or
to take the
picture.
Note: When previewing, press
left or right to adjust the brightness, press
up or down to adjust the focus, press
to switch between camera mode
for still image and video mode for moving image. You can still preview the
image on the secondary display even if the handset cover is closed.
Hold the handset when capturing the image.
3.
Press
to save the picture in Photo Manager.
Caution! Many jurisdictions have laws and regulations about taking pictures in
public or private areas and regarding the processing and further use of such
pictures. Check with your network service provider for the restrictions that apply
to you.
40
MENU FUNCTIONS
To adjust some certain settings before capturing, perform the following steps:
1.
Press
to enter Preview.
2.
Press
to access the submenu before capturing the image. You can make
changes to the settings by pressing
achieve the best effect for the picture.
for each available option in order to
CAPTURE MOVIE
This option allows you to capture moving images and make some certain settings
when recording.
1.
Press
to access the Capture Movie mode.
2.
Press
to start recording. While recording,
left corner of the display.
3.
Press
to stop recording.
4.
Press
to save the video clip in Movie Manager.
will appear on the upper-
To adjust some certain settings before capturing, perform the following steps:
1.
Press
to enter Capture Movie menu.
2.
Press
to access the submenu before capturing the image. You can make
changes to the settings by pressing
achieve the best effect of the picture.
MENU FUNCTIONS
for each available option in order to
41
PHOTO MANAGER
This function allows you to view and edit, delete, rename, and check the memory
status of the pictures you have taken. The following options are available:
Option
Description
Edit
View and edit the pictures that are stored in the photo albums.
Delete the pictures that are stored in the photo albums.
Delete
•
Delete By Album: Delete the pictures that are stored album
by album.
•
Empty all albums?: Clear all the pictures that are stored in
all albums. This will take time to perform the clearance if there
are a lot of pictures stored in the memory.
Rename Album
Change the name of the default albums.
Memory Manager
Check the status of the free space for taking a photo.
MOVIE MANAGER
This option allows you to organize moving images that are stored in the handset
memory.
Option
Description
Replay
Play the recorded video clip.
Delete
Delete the video clip
Detail
You may check the relevant information of the video clip such as
format, file size and so on.
Send via Infrared
Send the video clip to another device that is compatible with the
handset.
SNAP SETTING
This menu provides the options for optimizing the effect of the picture capturing.
Option
Description
Target Album
Select the album to store the captured picture.
Effect
Select the desired effect of the picture.
Photo Quality
Select the quality of the picture taken.
42
MENU FUNCTIONS
Option
Description
Shutter Sound
Enable or disable the handset sound when the self-timer has been
activated.
Timer Snap Sound
Enable or disable the Timer Snap Sound.
Capture Mode
Select the desired mode according to the light condition of the area.
Set Capture Size
Select the pixel size for capturing a picture.
Set Environment
You can set the lighting frequency so as to reduce the flickering and
get excellent photo quality. The default setting of the frequency may
vary from country to country.
Frame
You can set the picture taken with photo frames selected from this
menu.
MANUAL
This option provides brief help text, that guides you through the operation of the
camera function.
PHONEBOOK
This menu is used to save phone numbers and names in the handset or SIM card.
You can save up to 500 entries in the handset. The SIM card capacity may vary
depending on the network service provider.
In idle mode, proceed as follows:
1.
Press
2.
Scroll to PhoneBook with
to enter the main menu.
3.
Press
.
to access the menu.
MENU FUNCTIONS
43
VIEW
You may view the names and phone numbers that have been stored in the handset
or the SIM card. The following options are available:
Option
Description
1.
Press
2.
Enter the name you want to find or key in the letter that
corresponds to the first letter of the name required in the phone
to access the menu.
book and press
Search Name
Group
.
Note: Icons for easy identification will be shown on the screen
when the entry is stored in the handset memory. For example,
icons that indicate the place where the data is stored, the type
of number it is (handset, office, home or etc.) and which group
the data has been assigned to (family, friend, workmate or
VIP).
3.
Scroll to the desired name or phone number and press
dial the number.
1.
Scroll to the desired group and press
2.
Select the desired phone number or name and press
make a phone call.
to
.
Note: You may access the submenus by pressing
continue with the further operation if necessary.
to
to
ADD NEW
You may add a new entry to the handset or the SIM card.
1.
Press
2.
Key in the phone number and press
3.
Select Add Name, Quick Save, or Add to existing name and press
4.
If Add Name is selected, perform the following steps:
•
44
to access the menu.
Key in the name and press
.
.
.
MENU FUNCTIONS
•
•
Select either Save To SIM or Save To Handset and press
to be saved or save it to the default location and press
•
•
.
If Save To SIM is selected, key in the location number to where the entry is
.
If Save To Handset is selected, select the desired group and press
.
Select Handset, Office or Home to define the attributes of the entry.
5.
If Quick Save is selected, the entry will be stored in the handset without editing.
6.
If Add to existing name is selected, perform the following steps:
•
Select the desired name or phone number and press
•
•
Scroll to the field that is allowed for a new number and press
.
.
If the selected field has a phone number already, you will be asked whether
or not to overwrite the old number.
Note: To enter the country code, press and hold
until the international
dialing code + is displayed then key in the appropriate country code. The steps
for dialing from abroad are the same as above.
To enter an extension number, enter the pause codes W or P (press and hold
, once for W, twice for P) before entering the extension number. This feature
requires the private branch exchange with the DTMF function.
MENU FUNCTIONS
45
GROUP SETTING
You may organize your phone book data into groups and set a specific ring tone for
Delete each group.
Option
Description
Set the specific melody for the groups in order to identify the caller
efficiently.
Melody
1.
Scroll to the desired group and press
.
2.
Select the favorite melody and press
.
Add a new group for good organization.
Add New
1.
Press
to access the menu
2.
Key in the name of the new group and press
setting.
to save the
Delete a group to free up more memory.
1.
Press
to access the menu.
2.
Scroll to the desired entry and press
Delete
to delete the entry.
Note: Only the non-embedded groups can be deleted.
46
MENU FUNCTIONS
COPY
This option allows you to copy entries from the SIM card to the handset or vice versa.
Option
Description
•
SIM To Handset: Press
card to the handset.
to copy all the entries in the SIM
•
Handset To SIM: Press
handset to the SIM card.
SIM To Handset:
to copy all the entries in the
Copy All
•
a.
Scroll to the desired entry and press
or
to
select the entry that is to be copied.
Select Copy
•
b
Press
or
again to deselect the selected entry.
c
Press
to confirm the selection and begin to copy the
entry/entries you have selected.
Handset To SIM: Perform the procedure described above to
continue with the copying operation.
DELETE
Delete one entry or several entries at a time.
Option
Description
1.
Press
to access the option.
2.
Press
or
to select the entry that is to be deleted.
3.
Press
or
again to deselect the selected entry.
4.
Press
Select Delete
MENU FUNCTIONS
to confirm the deletion.
47
Option
Description
1.
Press
to access the option.
2.
Press
to confirm the deletion.
1.
Press
to access the option.
2.
Press
to confirm the deletion.
SIM All
Handset All
FIXED DIAL LIST
The fixed dial list restricts the use of the SIM card. If activated, it is only possible to
make calls with phone numbers that have been set in the list and the emergency call.
The PIN2 code is required to adjust this setting.
ONE TOUCH KEY
You may set the phone number for up to 8 entries for speed dialing. When in idle
mode, press and hold the corresponding alphanumeric key, you can call the
designated number.
1.
Scroll to a specific key number and press
.
2.
Scroll to the desired name in the phone book and press
3.
Scroll to the speed dialing entry and press
operation with Change, Delete or View.
.
if you want to continue the next
PHONE STATUS
You can check the memory capacity of the handset and the SIM card. For example:
50/500 means that there are a total of 500 entries; 50 entries have been saved with
memory still available for 450 more memories. The status of the SIM card may vary
depending upon the memory capacity of the SIM card.
48
MENU FUNCTIONS
MESSAGE
This menu allows you to send, read and write text messages, listen to the voice
message and access relevant features that are provided by your network service
provider.
In idle mode, proceed as follows:
1.
Press
2.
Scroll to Message with
to enter the main menu.
3.
Press
.
to access the menu.
SMS
This option allows you to read, send and write the text messages.
Create
You may write messages of up to 160 characters in English.
1.
After you have written your message, press
2.
Enter his/her phone number manually or press
to select the required name or number.
3.
Press
.
to access the Phone Book
to access the following options:
Option
Description
Send
Send the written message to one person.
Save
Save the written message.
Send the written message to more than one person. Select the
Send To Many
4.
Press
required persons/numbers by pressing
.
to send the message.
Note: Before sending any message, you have to save the message center
number in the Service Centre Number. Please check with your network
service provider for the number.
MENU FUNCTIONS
49
Inbox
Store the message sent to you and you may read it by accessing this option. If a new
message has been received, the
notification tones will be heard.
icon will be shown at the top of the screen and
1.
Scroll to the message that is to be read.
2.
Press
to read the message.
3.
Press
to access the following options:
Option
Description
Delete
Delete the message.
Reply
Reply to the message by writing text.
Call Back
Press
Get Number
Extract the phone number that appeared in the message or phone
number of the sender and save it to the memory.
Send SMS
Forward the received message to others.
Send To Many
Forward the received message to more than one person at a time.
Move
Move the selected message to the lower part, indicating that the
message has been read.
to return a call to the sender.
Note: The message will be stored in the SIM card. If a new message has been
received, the
icon will be shown at the top of the screen and notification
tones will be heard.
If the
icon flashes, it means that there is insufficient memory for new
messages. Select Delete in SMS to delete old messages to free up memory for
new messages.
If there is no
icon shown on the screen, it means all received messages
have been read and there is sufficient memory for new messages.
50
MENU FUNCTIONS
Outbox
This option stores the messages you have sent to others if you have saved the
written message while sending. You may access the following options by pressing
after reading:
Option
Description
Edit
View and edit the SMS that is stored in the Outbox.
Send
Forward the received message to another person.
Delete
Delete the message.
Send To Many
Forward the received message to more than one person at a time.
Move
Move the selected message to the lower part indicating that the
message has been read.
Note: The SMS will be stored in the Outbox if you select Send and Save in the
Message Settings.
Draftbox
Store the messages that you have written but have not yet sent to others. You may
access the available submenu by pressing
after reading:
Option
Description
Edit
View and edit the SMS that is stored in the Draftbox.
Send
Forward the received message to others.
Delete
Delete the message.
Send To Many
Forward the received message to more than one person at a time.
Move
Move the selected message to the lower part indicating that the
message has been read.
Delete
Delete the message in mailbox.
Option
Description
Delete Inbox
Delete all the messages in Inbox
Delete Outbox
Delete all the messages in Outbox.
MENU FUNCTIONS
51
Option
Description
Delete Draftbox
Delete all the messages in Draftbox.
Select Delete
Delete the selected message.
Delete All
Delete all the messages in all the message boxes.
Voice Mailbox
This option allows you to enter the voice mailbox number and listen to the voice
messages that you have received.
Note: Please contact your network operator for the voice mailbox number
before using this service. The voice mailbox number will remain unchanged
until you modify it.
Broadcast
This option allows you to enter the voice mailbox number and listen to the voice
messages that you have received.
Note: Please check with your network operator for the broadcasting topics and
its corresponding index.
Phone Status
You can check the memory capacity for text messages of the handset and the SIM
card. For example: 2/200 means that there are a total of 200 entries; 2 entries have
been saved with memory still available for 198 more memories. The status of the SIM
card may vary depending on the memory capacity of the SIM card, the capacity of
the handset is 200 entries.
MMS
This function allows you to send, read and edit multimedia messages that include
text, pictures and sounds.
Note: The availability of MMS message depends on your network operator.
Only devices that support MMS message can receive and display MMS
message.
52
MENU FUNCTIONS
Create Message
You may write messages up to 512 characters in English manually or press
to
add in text message from data center.
Option
Description
Add Text From Data Add written text up to 512 characters in English that has been saved
centre
in the Data center.
Add Image
Add the embedded icon/image into the MMS message.
Add Audio
Add a sound file into the MMS message.
Record a voice memo and add it to the slide currently being edited.
New Audio
Follow the prompt on the screen to record a voice memo. Press
to save the voice memo and attach it into the slide currently being
edited.
New Slide
Insert a new slide. This will appear only when you have composed a
slide.
Preview Slide
Preview the slide you have composed.
Another Slide
Edit additional slides for an MMS message that is more than 1 slide.
You may go through the previous or next slide for editing by pressing
.
Slide duration
Set the interval between two slides for playing the slides. The range
of interval you may set is 5-50 seconds.
After you have finished editing the MMS message, press
to continue the next
operation with the following options:
Option
Description
Send
Enter the destination addresses from the phonebook or input
manually up to 5 entries and send the MMS message
Preview
Preview the MMS message.
Subject
Input the title of the MMS message.
Save
Save the MMS message to the MMS Draft in Outbox.
MENU FUNCTIONS
53
Inbox
Store the MMS messages sent to you. Press
Option
to enter the following submenu:
Description
Fetch your MMS messages from the local MMS center if the Auto
Download function is not activated.
Note: The MMS message will be retrieved automatically after a
fixed interval if you have activated the Auto Download function in
MMS Settings.
You may access the following submenu after downloading the MMS
message:
Retrieve
•
•
Play: View the received MMS message right away.
•
Forward: Send the received MMS message to other
phones that offer compatible multimedia message
features. You may edit it before sending.
•
Reply: Reply to the sender via MMS, SMS or by calling
without retrieving the MMS message.
•
Save Content: Save the image, audio clip, text or URL
that was attached in the received MMS message from the
handset into the corresponding folder respectively.
•
Save Sender Address: Save the phone number of the
sender in handset or SIM card.
Delete Message: Delete the received MMS message
from the handset.
Reject
Reject the MMS message sent to you.
Reply
Reply to the sender via MMS, SMS or by calling without retrieving
the MMS message.
Note: If a new MMS message has been received and not yet been
downloaded,
will appear at the top of display with a notification tone. If the
MMS has already been downloaded,
54
will appear at the top of the display.
MENU FUNCTIONS
Outbox
This option stores MMS messages that have failed to be sent, saved for sending later
and sent successfully.
Option
Description
MMS Pending
Stores the MMS message that has failed to be sent. Press
continue with the next operation.
to
Stores the MMS message that has been saved for sending later.
MMS Draft
MMS Sent
Press
to continue with the next operation.
Stores the MMS message that was sent successfully.
Report
The delivery report of the MMS message sent when the recipient has downloaded it.
Delete
Delete the MMS message.
Option
Description
Delete Inbox
Delete all the MMS messages in Inbox.
Delete Outbox
Delete all the MMS messages in Outbox.
Delete Report
Delete all the reports.
Delete Pending
Delete all the MMS messages in MMS Pending.
Delete Draft
Delete all the MMS messages in MMS Draft.
Delete Sent
Delete all the MMS messages in MMS Sent.
Select Delete
Delete the selected MMS messages in each box.
Delete All
Delete all the MMS messages in all the message boxes as well as
the reports.
MENU FUNCTIONS
55
MESSAGE SETTINGS
SMS Settings
You may set the following options for SMS:
Option
Service Centre
Number
Validity Period
Description
This option stores the required service center number for sending
the text messages.
Note: Please check with your network operator for the number.
Messages sent to you will not be saved if you do not switch on your
phone within a certain time limit. This option allows you to set the
period the service center keeps the unreachable message for you.
Note: This function depends on your network operator.
When activated, the service center will send you the status report
for the sent messages.
Status Report
Note: The availability depends on your network operator. The
function will not be available when you send the message to more
than one person.
Send And Save
Set whether or not to save the MMS message while sending.
MMS Settings
This option allows you to make certain settings for MMS messages. You have to set
the WAP data transmission settings first, before using MMS.
Note: The availability of this function depends on your network operator.
Option
Description
Msg Priority
Set the priority level of the MMS message. You may choose from
High, Normal or Low.
Sender Visibility
This option allows you to set whether or not the receivers can read
your number or identity.
Delivery Report
Set whether or not the service center sends you a report when the
MMS message is delivered.
Auto Download
Set whether or not the handset downloads the MMS message
automatically. If not, the MMS message will be stored in MMS
center.
Reject Ads
Set whether or not to bar any advertisements.
56
MENU FUNCTIONS
Option
Description
Append Signature
Set whether or not to add your signature into the MMS message. If
so, choose Yes and start editing your signature.
Validity Period
Set whether or not to set the period the service center keeps the
unreachable MMS message for you. If so, choose Yes and set the
period.
Network Settings
Input the IP address and MMS URL of a network operator in order
to receive an MMS message.
Save After Send
Set whether or not to save the MMS message automatically after
you sent it.
RECORDS
This option provides a record of call duration, call cost, recent calls and relevant
settings. Some of the functions require the PIN2 code in order to access them. For
information on the PIN2 code, please refer to “Security Settings” on page 71.
In idle mode, proceed as follows:
1.
Press
to enter the main menu.
2.
Scroll to Records with
3.
Press
.
to access the submenu.
MISSED CALLS
The last 10 phone calls that you have not answered are stored in the phone's
memory.
1.
Press
to dial the selected number.
2.
Press
to access the submenu, which includes Add Name, Quick Save, Add
to existing name, Delete and Send SMS.
RECEIVED CALLS
The last 10 phone calls that you have answered are stored in the phone's memory.
Perform the procedures described above if necessary.
MENU FUNCTIONS
57
DIALLED CALLS
The last 10 outgoing phone calls, including the successful or unsuccessful calls that
you have made, are stored in the phone's memory. Perform the procedures
described above if necessary.
Note: If a number appears several times, only the last entry will be shown on
the list.
DELETE ALL
Clear the call records from the handset memory.
CALL REGISTER
This option will provide the information on the talk durations, call charges and the
balance of your call limitation.
Option
Description
Provide the information on the total talk time of the outgoing and
incoming calls and the accumulated talk times. You may reset the
Call Timer
timer by pressing
.
Note: You are unable to reset the accumulated talk times.
Call Cost
Show Balance
Display the call cost of the accumulated calls. You may reset the call
cost to restart a call charge. The PIN2 code is required to set the
charge rate.
Display the balance of your call cost. The PIN2 code is required to
access this function.
Note: An emergency call is still possible even if the balance
reaches zero.
Last Call
58
Show you the talk time of the last call.
MENU FUNCTIONS
PROFILE
This menu allows you to customize your handset settings for different occasions.
In idle mode, proceed as follows:
1.
Press
2.
Scroll to Profile with
to enter the main menu.
3.
Press
.
to access the submenu.
You may have different settings for a particular environment that is provided as
below:
Option
Description
Normal
Default setting of the handset.
Mute
The alert tone of the incoming call is set to not ring and vibrate for
any incoming call.
Meeting
The alert tone of the incoming call is set to vibrate alert.
Outdoor
The ring tone of the handset is set to maximum level.
Customized
You may customize your own profile for a special occasion and
change the name of the profile.
ACTIVATE
Perform the following to activate the profile settings:
1.
Scroll to the desired profile and press
2.
Scroll to Activate and press
MENU FUNCTIONS
.
.
59
PREFERENCE
You may change the setting of the parameters by preference for each profile by
accessing the following options:
Option
Description
Set the incoming alert type for your handset:
Incoming Call Alert
1.
Scroll to the desired profile and press
.
2.
Scroll to Preference and press
3.
Scroll to Incoming Call Alert and press
4.
Select one of the desired alert types and press
.
.
.
Ringing Tone
Set the ring tone for the incoming calls.
Ringer Volume
Set the volume level of the ring tone.
SMS Alert
Set the tone for notifying you of the incoming message.
Key Tones
Set whether or not the keypad tone makes sounds when pressed.
Keytone Volume
Set the volume level at key pressed.
LCM Open/Close
Alert
Set whether or not to activate the alert when opening or closing the
handset cover.
Power On/Off Alert
Set whether or not to activate or deactivate the music when
switching the handset on or off.
CLOCK
This menu shows the options for setting the alarm, date and time, display mode
(display the date and time on the screen), time zone, auto power off and calendar.
In idle mode, proceed as follows:
1.
Press
2.
Scroll to Clock with
3.
Press
60
to enter the main menu.
.
to access the menu.
MENU FUNCTIONS
ALARM
Sets the handset to ring at a specific time with the desired ring tone.
Scroll to On and press
Option
. Scroll to either of the following options to continue setting:
Description
1.
Key in the time for the alarm using the HH:MM format, where
HH is for hour and MM is for minute.
Time Setting
2.
Press
3.
Scroll to either Once, Everyday or Workday and press
Alarm Ringer
Set the ring tone for alarm.
.
.
Set the volume level of the alarm.
Note: When the alarm goes off, press any key to turn off the alarm.
If no action is taken, the alarm will turn into snooze mode and ring
every 3 minutes 3 times.
Alarm Volume
DATE SETTING
Sets the appropriate date for the phone using the following format DD /MM/ YYYY;
where DD is for day, MM is for month and YYYY is for year.
1.
Key in the appropriate day, month and year to replace the factory set date.
2.
Press
to save the setting.
Note: You will be asked to reset the date if the battery has been detached for
an extended period upon you switch on your handset.
TIME SETTING
Perform the procedures described above for time setting using the format HH:MM,
where HH is for hour and MM is for minutes.
Note: You will be asked to reset the time if the battery has been detached for
an extended period upon you switch on your handset.
DISPLAY MODE
You may set the time format for the display.
MENU FUNCTIONS
61
TIME ZONE
You may check the current local times of the cities all over the world.
AUTO POWER OFF
You may set the phone to switch off automatically at a specific time.
1.
Scroll to On and press
2.
Key in the time for shutting down using the HH:MM format, where HH is for
hours and MM is for minutes.
.
3.
Press
4.
Scroll to either Once or Everyday and press
.
.
AUTO POWER ON
You may set the phone to switch on automatically at a specific time.
1.
Scroll to On and press
2.
Key in the time for switching on using the HH:MM format, where HH is for hours
and MM is for minutes.
.
3.
Press
4.
Scroll to either Once or Everyday and press
.
.
CALENDAR
This option can be used to look up a date.
1.
Key in the year and month you would like to check or simply press
2.
Browse with
62
.
to check the date of the previous month or next month.
MENU FUNCTIONS
SETTING
This menu shows the options for setting the functions related to the phone itself, for
example normal settings that includes language, input method and etc., call settings,
network settings, security settings that includes PIN code and change PIN2 code and
time and cost settings.
In idle mode, proceed as follows:
1.
Press
2.
Scroll to Setting with
to enter the main menu.
3.
Press
.
to access the menu.
NORMAL SETTINGS
You may set the following items by preference:
Main menu
Messages
Settings
Settings Options
Default Settings Reference
Valid duration
12 hours
Status report
Off
Send and save
Off
Broadcast
Off
Target album
1
Effect
Normal
Photo quality
Normal
Shutter sound
On
Camera/snap
Timer snap sound
setting
On
Capture mode
Normal
Capture size
320*240
Set environment
50Hz
Frame
Close
MENU FUNCTIONS
Refer to the
Messages
menu
Refer to
Camera menu
63
Main menu
Settings Options
Default Settings Reference
Msg Priority
Normal
Sender visibility
Show
Delivery report
No
Auto download
Yes
Reject ads
No
Append signature
No
Validity period
No limit
Save after send
Yes
MMS
64
Refer to the
MMS menu
Network setting
Virgin
IP Address
193.30.166.1
IP Port
9201
URL
http://mms.virgin.mobile.co.uk.8002
MENU FUNCTIONS
Main menu
Settings Options
Volume
Default Settings Reference
Level 4
Any call
Melody 1
Phonebook calls
Melody 1
Group
calls
Family
Melody 1
Friend
Melody 1
Workmate Melody 1
Ringer type
Ringer
VIP
Melody 1
Alarm
Melody 1
Message
Melody 1
Power on music
OFF
Power off music
OFF
Call alert
Ringer only
LCM Open/Close Alert
OFF
Time Zone
London
Alarm
Off
Display Mode
Date & time/24 hour
Auto power on
Off
Auto power off
Off
Clock
Date Setting
JAN 1
Time Setting
00:00
Calendar
2000/01
MENU FUNCTIONS
Refer to the
flowing menus
respectively:
Phonebook,
Clock,
Message, and
Setting.
Refer to the
Clock menu
65
Main menu
Settings Options
Normal
Settings
LCD
Language
English
Input method
Lower case
Backlight
(15 Sec.)
Voice volume
Level 5
Contrast
Level 5
Headset
Level 5
Hands free
Level 5
Key tones
Off
Auto answer
Off
Flip answer
On
Charging LED
On
Main Wallpaper
Wallpaper 1
Sub wall paper
Wall paper 2
Foreground display
Text display
Background color
Lilac purple
Brightness
Level 5
Backlight / power
save
Off
Backlight/duration
15 sec.
Call setting Own No. send
Network
Settings
Security
Settings
66
Default Settings Reference
Refer to the
Settings menu
On
Search mode
Auto search
GPRS Connection
When needed
PIN Code
PIN Off
MENU FUNCTIONS
Main menu
Settings Options
Time cost
Calling display
Default Settings Reference
Time
Settings
Irda Settings
Extras
Games
Settings
Off
Music
On
Volume
Level 4
Refer to the
Settings menu
Refer to the
Extras menu
Homepage www.virgin.com/mobile/wap
IP address 149.254.1.10
GSM
settings
WAP
WAP> WAP
settings
IP port
9201
Data call
type
ISDN
Phone
number
+447953968988
User name User
Password
No
Refer to the
WAP menu
IP address 193.30.166.3
IP port
GPRS
Up key
9201
User name User
Password
No
APN
Setting
Goto.virginmobile.uk
Virgin Website
Down key
Calendar
right key
Camera
left key
SMS
Short cut
MENU FUNCTIONS
67
LCD
This function shows you the options for setting the wallpapers, background colors,
contrast and backlight duration.
Wallpapers
You may change the embedded background pictures for the internal and external
display by preference.
Option
Description
Main Wallpaper
Setting
Set the background pictures for the main display.
Sub Wallpaper
Setting
Set the background pictures for the secondary display.
Foreground display
Show the main display's wallpaper when the handset is in idle
mode.
The following display options are available:
Option
Description
Text Display
Display only the date and time when the phone is idle.
Simulate Clock
Display not only the date but also a simulated clock in the
foreground when the phone is idle.
Calendar
Display not only the date and time but also a calendar in the
foreground when the phone is idle.
No Display
Neither the date and time nor foreground wallpaper is displayed
when the phone is idle.
Background Color
You may change the background color by preference.
Brightness
You may adjust the contrast of the main display and secondary display at 5 levels.
68
MENU FUNCTIONS
Backlight
You may set the duration time for the backlight and keypad illumination.
Option
Description
Power Save
Set the backlight illumination into power saving mode. If activated,
the display will become dark when the time has reached the
selected backlight duration.
Backlight Duration
Set the duration of the illumination by preference.
CALL SETTINGS
You may set the functions related to the network service. The availability of the
functions depends on your network service provider.
Note: For further information, please check with your network operator.
Own Number Sending
Chooses whether or not your phone number is sent to the called party. The
availability depends on your network operator.
Call Divert
This option is set to divert incoming calls to the voice mailbox (only for voice
messages) or another phone number, so as not to miss any important calls. There
are four divert modes available which you can activate and cancel. You can check its
current status at any time.
If activated, follow the prompt on the screen and key in the phone number to which
you wish the incoming calls to be diverted.
Option
Description
Unconditional Automatically divert all incoming calls.
When Busy
Divert all incoming calls when the line is busy (when you are on a call) or
you have rejected the call.
Note: Call waiting must be disabled to use this divert function.
No Reply
Divert all incoming calls if there is no reply (i.e. missed call).
MENU FUNCTIONS
69
Option
Description
No Response
Divert all incoming calls when your phone is turned off or out of coverage.
Cancel All
Cancel all the divert functions.
Call Barring
This option provides SIM card restrictions when making or answering calls. A
network access code is required to set all the barring functions (you must contact
your network service provider).
Option
Description
All Outgoing Calls
All outgoing calls are barred; only incoming calls can be accepted.
Outgoing Int'l
All outgoing international calls are barred. Incoming calls can still be
accepted.
When abroad, you can only call the numbers within that country or
Outgoing Int'l. Except
call to your home country (i.e., the country where the phone is
Home
registered).
All Incoming Calls
All incoming calls are barred.
All Incoming When
Roaming
No incoming calls will be permitted when registered with a system
other than the original one.
Cancel All
Cancel all the call restriction functions.
Call Waiting
This option alerts you of an incoming call while on line. If activated, a tone and a
notification message and the caller number will notify you of a new incoming call
when you are on the phone. The availability depends on your network service
provider.
NETWORK Settings
This is a network-related option. It allows you to register with, search, or select the
available network and some of the relevant settings.
NCK Code
NCK code is Network lock code, as this handset is locked to Virgin network, for endusers, this code will be provided by network operator.
70
MENU FUNCTIONS
Preferred
Allows you to browse, delete or edit the current network list, you can add the
available network also.
Option
Description
View the name list of the available network. Scroll to the desired
Show List
network, press
, and continue the further operation with
Register, Delete or Move.
Delete Available
Network
Delete the available network from the name list.
Add Available
Network
Add the available network to the name list.
Add Known Network Add the known and existed network to the name list.
Select Mode
Register with the network using the following modes:
Option
Description
Auto Search
It is the default mode for network registering. It usually searches for
the network operators using the priority network list in Preferred.
Network Register
Automatically register with the network system the SIM card
originally registered.
Manual Search
Select the network operator that has a roaming agreement with your
network operator in your region/country. Once the Manual Search
mode is selected, the register mode will not change until you modify
it or replace a new SIM card.
Note: If you are not familiar with the network operator, it is strongly
recommended that you select Auto Search mode.
SECURITY SETTINGS
A number of security features are provided to protect against any unauthorized use
of your SIM card and certain other features. You are able to change the PIN and
PIN2 code or decide whether a PIN is requested while the phone is switched on.
MENU FUNCTIONS
71
PIN Code
The PIN (Personal Identification Number) protects the SIM card against unauthorized
use. Normally, the PIN code comes with your SIM card.
Note: If an incorrect PIN code is entered 3 times in succession, the SIM card
will be blocked automatically. For detailed information, please refer to “Unlocking
a blocked SIM card” on page 21.
Option
PIN On
Description
If activated, you will be asked for the PIN every time you switch on
the handset.
Note: Please consult your service provider for the PIN code when
you are using it for the first time.
PIN Off
Deactivate the PIN request when switching on the handset.
Perform the following steps to change the password:
1.
Key in the old code, press
.
2.
Key in a new code, press
3.
Key in the new code again and press
Change PIN
.
.
Change PIN2
You may change the PIN2 code in this option. The PIN2 code is provided together
with the SIM card and is only used when accessing some specific options (such as
Charge Rate). It will only be available if SIM cards and the network service provider
propose this facility. Perform the procedures described in “Security codes” on
page 17 to change the PIN2 code.
Note: If an incorrect PIN2 code is entered 3 times in succession, the SIM card
will be blocked automatically. Perform the procedure described in “Unlocking a
blocked SIM card” on page 21, but enter the PUK2 code instead of the PUK
code. The PUK2 code is used to release and change the blocked PIN2 code. If
an incorrect PUK code is entered 10 times in succession, the SIM card will be
blocked permanently. If the PUK2 code does not come with your SIM card or
you have lost it, please check with your network service provider for the code.
72
MENU FUNCTIONS
Change Barring Code
Change the network access code (password) for call barring. Check with your
network service provider for the password.
TIME & COST SETTINGS
You may set the handset to provide some certain calling information.
Option
Description
Calling Display
This option provides information on call durations, costs, or both,
during calls.
Charge Rate
Cost Limit
Your handset will display the call cost according to the number of
units, the charge rate per unit, the currency, and the exchange rate.
Please check with your network service provider for the current rate
and currency. The PIN2 code is required for setting.
You may set the limit of your call cost. The PIN2 code is required for
setting.
SHORT CUT KEY
You may set the quick access function to the four-ways navigation key for effective
operation.
1.
Scroll to the desired navigation key and press
.
2.
Scroll to the required option and press
3.
Return to idle mode, press the key assigned, the handset will lead you to the
required menu directly.
.
IRDA SETTINGS
This option allows you to transfer the data to your PC via infrared light. Press
activate the IrDA function.
to
Note: Don't point at eyes with infrared ray or interfere with other infrared
equipment. The device is the 1st class laser light.
MENU FUNCTIONS
73
1.
Ensure that the two infrared devices are put port to port without barrier between
them. The interval between the two infrared devices is limited to one meter.
2.
The receiver must startup the infrared port.
3.
The IrDA port will be closed if no other infrared devices are detected in 2
minutes.
4.
The IR connection will be closed if you haven't begun transmitting data within 2
minutes of the IR port being opened.
5.
The IrDA will be closed if the handset is moved away from the detectable area in
2 minutes when the IrDA link has begun.
6.
The IrDA will be closed if the handset is moved away from the detectable area in
16 seconds during data transmitting.
7.
PC download cable or other types of series cable will be invalid when the IrDA
connection is activated.
EXTRAS
This menu provides additional options to enable the user to personalize the phone. It
may be used to simplify the handset and includes a calculator and even offers the
possibility of downloading your favorite melody or wallpaper and playing games.
In idle mode, proceed as follows:
1.
Press
to enter the main menu.
2.
Scroll to Extras with
3.
Press
.
to access the menu.
MY COLLECTIONS
You may download any favorite picture or melody from the web or record audio by
yourself.
My Pictures
This menu stores the pictures transmitted via IrDA or downloaded via WAP. Scroll to
the desired picture and press
to make the necessary setting with Set Wallpaper,
Delete, Send MMS or Send via Infrared.
74
MENU FUNCTIONS
My Melodies
This menu stores the melody transmitted via IrDA or downloaded via WAP. Scroll to
the desired melody and press
to make the necessary setting using Change
music name, Delete, Send MMS or Send via Infrared.
Record
Option
Description
Store all audio files that have been recorded and received. Press
All Records
to listen or delete the voice recording.
This menu allows you to record a new voice memo. Follow the
prompt on the screen to perform the recording procedures.
New Records
•
Incoming Portrait: Show the phone lists that have been set
as Incoming Portrait.
JAVA™
This menu offers you some 3 interesting games: Air Force, Magic Bubble, and West
Craft.
Scroll to the desired game and press
to carry on next operations.
Option
Description
Run
Start the game.
Suites info
View the information about the game.
Remove
You can remove the JAVA™ games downloaded via WAP except
the 3 embedded JAVA™ games in your handset.
Memory status
You can check the amount of memory available for JAVA™
applications.
Exit
Exit the menu.
GAME
This menu offers you some interesting games.
MENU FUNCTIONS
75
Tank War
1.
Press
2.
Select Start Game to start the game, select Game Level to choose the level of
the game, select Help to read the brief help text of the game.
to enter the submenu.
3.
Press
,
,
and
to go up, down, left and right. Press
to fire.
RedCap
1.
Press
2.
Select Start Game to start the game, select Game Level to choose the level of
the game, select Help to read the brief help text of the game.
to enter the submenu.
3.
Press
,
,
and
confirm the placement and press
to go up, down, left and right. Press
to
to undo the previous step.
Blackjack
1.
Press
2.
Select Start Game to start the game, select Game Level to choose the number
of decks of cards, select Help to read the brief help text of the game.
to enter the submenu.
3.
Chip in a wager with
.
Note: In this game, you will play against the handset (i.e. Dealer). The party
who first gains all the chips wins the game.
Gobang
1.
Press
2.
Select Start Game to start the game, select Game Level to choose the level of
the game, select Help to read the brief help text of the game.
76
to enter the submenu.
MENU FUNCTIONS
3.
Press
,
,
right. Press
and
to move the chessman up, down, left and
to place the chessman and press
to undo the previous
step.
Elf
1.
Press
2.
Select Start Game to start the game, select Game Level to choose the level of
the game, select Help to read the guide of the game, and select Highest Score
to check the highest score of the game.
to enter the submenu.
3.
Press
,
,
and
to move the elf up, down, left and right.
Setting
For more enjoyment, you can activate the Game Music and Volume Setting
function.
NOTEBOOK
This option allows you to manage your schedule with your mobile phone. You may
view the information of a scheduled event, add new events, edit or delete the event
after selecting the specific date.
Option
Description
New Notepad
Add a new event.
Select Time
Select the remind time of the event.
Read All Notebook
Check all the events in the notebook.
Delete
Delete the notebook you have selected or all of the notebooks.
Alarm Melody
Select the ring tone of the reminder.
CALCULATOR
You may make simple calculations. Due to the limitation of accuracy, rounding-off
errors may occur during division. Follow the prompt on the screen to make a
calculation.
MENU FUNCTIONS
77
VIRGIN EXTRA
This menu enables you to get some other services from Virgin through the handset,
services included are: Top up, Help, Shop, Offers, Travel, Music and Gong Out,
etc.
WAP
WAP (Wireless Application Protocol) is a global wireless protocol specification for
mobile wireless terminals. WAP enables you to subscribe to certain Internet
services, for example: banking services, news, weather forecast, flight schedules etc.
Note: You need to subscribe to the data transmission and WAP browsing
services via your service provider in order to access WAP services.
In idle mode, proceed as follows:
1.
Press
to enter the main menu.
2.
Scroll to WAP with
3.
Press
.
to access the menu.
BASIC STEPS FOR ACTIVATING AND ACCESSING WAP SERVICE
Activation of WAP service
Before using the WAP service, you need to activate the WAP connection profile first.
1.
Scroll to WAP Settings with
2.
Select the desired profile with
3.
Scroll to Activate and press
and press
and press
.
.
.
Accessing the WAP service
You may connect to the Web in either of the following ways:
78
MENU FUNCTIONS
Accessing via the homepage
1.
Scroll to the WAP menu and press
2.
Scroll to Homepage and press
.
.
Accessing via bookmarks
Note: If the selected bookmark is not available as desired, select another
profile and perform the procedures described in “Activation of WAP service” on
page 78 again.
1.
Scroll to the WAP menu and press
2.
Scroll to Bookmarks and press
3.
Scroll to the desired bookmark
4.
Scroll to Go and press
.
.
and press
.
to start connection.
Accessing via navigation
1.
Scroll to the WAP menu and press
2.
Scroll to Navigation and press
3.
Enter the URL of the Website (Use
.
.
,
or
to enter the special
character).
4.
Press
to link to the web page.
Note: You may skip over the prefix of the URL (i.e. http://).
Press and hold
to return to the idle mode while browsing the WAP website.
Please check with your network operator for the WAP settings.
HOMEPAGE
This option has connectivity with WAP. It connects to the home page that you have
set.
MENU FUNCTIONS
79
BOOKMARKS
This option allows you to store up to 10 WAP URLs as bookmarks in your handset
memory.
1.
Press
to access the menu (check with your network operator for the
availability).
2.
Scroll to the desired bookmark and press
Edit Bookmark and Edit URL.
to continue the operation with Go,
LAST PAGE
This takes you directly to the WAP URL that you connected to last time.
NAVIGATION
You may enter the URL that you want to connect to.
PUSH MSG
Your handset is able to receive service messages (pushed messages) from your
service provider. Service messages are notifications of, for example, news headlines,
and they may contain a text message or an address of a service.
Option
Description
Stores the service message sent by the network service provider.
To access a service message right away when you have received it
Service Inbox
in standby mode, press
press
OTA Setting
80
. To access the service message later,
to move the service message to the Service Inbox.
When the handset has received a service message and if you want
to set the phone with received service message, you can select
OTA Setting and activate the browser.
MENU FUNCTIONS
WAP SETTINGS
This menu allows you to activate the connection profile you want. Scroll to the
required profile and press
to enter the submenu.
Option
Description
Activate
Activate the connection to the WAP service.
Name Edit
Change the name of the connection profile.
Setting Homepage
Enter a URL and set it as a homepage for WAP connecting.
Security Setting
Avoid the WAP browsing from an unsafe content.
Image Download
Set the display option to image download or text only while browsing
on the web.
Bearer Select
Set the type of data transmission.
Parameter Setting
Set the parameters for WAP browsing for both the GSM and GPRS
such as IP address, IP port, data call type, APN setting, phone
number, user name and password.
HISTORY
You may check the time of the GSM linkage and the throughput of the GPRS data
flow.
GSM Link
Press
to access the following options:
Option
Description
Last Record
Check the visiting time of the last connection.
Total Record
Check the total time of the connection.
Clear Record
Clear the timer record of the connection time.
MENU FUNCTIONS
81
GPRS Data Flow
Press
to access the following options:
Option
Description
Last Record
Check the data flow of the last connection.
Total Record
Check the total data flow of the connection.
Clear Record
Clear the record of the data flow of the GPRS.
CLEAR CACHE
You may clear the buffer memory of the web page that you have visited before.
82
MENU FUNCTIONS
Reference Information
EFR ENCODING DECODER FUNCTION
The Sting 6 GSM/DCS is equipped with the latest encoding decoder and audio
frequency technology, to achieve superior audio quality.
At present, there are 3 types of encoding decoder compatible with GSM/DCS:
•
•
•
Enhance full rate EFR
Full rate FR
Half rate HR
The Sting 6 GSM/DCS mobile phone supports the normally-used EFR and FR
encoding decoder.
All GSM and DCS cellular networks and phones support FR encoding decoder.
If supported by the network operator, the network operator will automatically select
the relevant encoding decoder, which will be either EFR or FR.
The Sting 6 model is programmed to automatically select the EFR where this is
supported by the network, allowing you to enjoy the superior audio quality provided
by EFR. Otherwise the phone will select FR.
At present, only some networks support both the FR and EFR encoding decoder.
If the network operator cannot support EFR, the Sting 6 (GSM/DCS) mobile phone
will automatically adopt the FR encoding decoder.
ACCESSORIES
The accessories for the Sting 6 model (GSM/DCS) mobile phone include battery,
charger, headset and data cable etc. Please refer to “How to charge the battery” on
page15 for the battery charging method.
REFERENCE INFORMATION
83
BATTERY
At present, the rechargeable battery approved by the manufacturer is the lithium
battery (LI-ION).
The talk time and standby time for a new battery is about 2-3 hours and 50-150 hours
respectively. When the battery is fully charged, you can have a continuous talk time
for a few hours and standby time for a few days. The capacity of a battery may vary
depending on the environment, networks, SIM card or options available.
CHARGER
This is a lightweight charger compatible with a multi-voltage supply. Do not connect it
to an incompatible product. It charges the phone battery rapidly. To start charging,
plug the charger into a power supply and insert the other end into the charge port at
the bottom of your phone.
The required charging time is approximately 5 hours. The battery charging status can
be checked on the mobile phone display.
HEADSET
Inset the headset into the earpiece jack, a KA-TA sound will alert you if connection is
successful, users can then answer or terminate a call through keys on the headset.
DATA CABLE
Inset one end of the Data cable into the data download port, a KA-TA sound will alert
you if connection is successful, then connect the other end to computer, for operation
details, please refer to SYNCTOOL user guide. When data upload or download is in
process, users cannot pull out the data cable to answer a call, otherwise, data will not
be successfully downloaded/ uploaded.
84
REFERENCE INFORMATION
Troubleshooting
If you encounter any problems when operating your phone, consult the following list
of commonly raised issues:
Problem
Step
1) Check that the SIM card is correctly installed.
The Insert SIM message
appears during power-up.
2) Ensure that the gold chip is not damaged or scratched.
3) Check the SIM card contact. If they are dirty, clean
them with an antistatic cloth.
The PIN, PIN2, PUK, PUK2 or
Enter the appropriate code you received with your SIM
Barring code messages
card.
appears during power-up.
No connection to network.
1) Check the signal strength meter in the display. If the
signal is weak, move to an open space or move closer to
a window and try again.
2) Contact your network service provider for further
details.
The other party cannot hear
you.
1) Check that the network signal strength is normal and
try again.
2) Check that the microphone is unmuted.
3) Hold the phone closer to your mouth.
1) Check that the charger is properly connected.
The battery won't charge.
It is impossible to make
outgoing calls.
2) The message Charging will only be shown when you
charge the battery with the handset switched off.
1) Check the signal strength meter in the display. If the
signal is weak, move to an open space or, if you are in a
building, move closer to a window.
2) The network is busy, please try again later.
3) Check whether the call charge limit has been reached.
TROUBLESHOOTING
85
Problem
The battery drains faster than
normal.
Step
1) Check whether you are in an area of variable coverage.
This uses extra battery power.
2) Ensure that the using environment is not in extreme
temperatures. At extreme hot or cold temperatures,
battery performance is significantly reduced.
The LI-ION battery was being
charged overnight.
It is strongly recommended not to charge the battery for
more than 24 hours. It may reduce the battery
performance or cause damage to the battery.
The headset starts beeping.
The signal is weak or out of coverage.
86
TROUBLESHOOTING
Index
A
F
FCC 7
FCC compliance 7
Fixed Dial List 48
G
Add New 44
B
Background Color 68
Backlight 69
Battery
attaching 14
charging 15
performance 4
removing 15
Game 75
GPRS Data Flow 82
Group Setting 46
GSM Link 81
I
Icons
Body-worn operation 8
Brightness 68
Broadcast 52
C
new text message 10
out of home network 10
signal strength 10
voicemail message 11
Idle mode 13
Inbox 50 54
,
Calculator 77
Calendar 62
Call Barring 70
Call Divert 69
Call Waiting 70
Camera 40
Capture Movie 41
Change Barring Code 73
Change PIN2 72
Clock 60
Create 49
Create Message 53
K
D
Movie Manager 42
Delete 55
Display
network status
Keys
description 11
soft keys 11 12
,
M
Manual 43
Menu map 30
Menus 30
Message
MMS 52
Settings 56
SMS 49
N
13
Draftbox 51
Notebook 77
O
E
One Touch Key 48
Emergency calls 6
Event images 11
P
Phone
main elements
INDEX
9
87
Phone Status 48
PhoneBook 43
Photo Manager 42
PIN code 17
PIN2 code 17
Profile 59
PUK code 17
PUK2 code 17
R
Records 57
RF energy 7
S
Safety
battery 3
body-worn operation 8
building site 1
electronic devices 5
FCC RF Exposure 8
gas station 1
hands-free mode 1
maintenance 3
medical 1
operating environment 4
SAR value 7
temperature extremes 4
vehicles 6
while driving 1
SAR 7
Snap Setting 42
T
Troubleshooting 85
W
WAP 78
Accessing 78
Activation 78
Bookmarks 80
History 81
Settings 81
88
INDEX
STING 6
Capture your life. The Sting 6
packs a 1.3 Megapixel zoom
camera and colour screen into
this compact, super-stylish flip
phone. So share your best
and worst moments in an instant
through built-in picture messaging.