1
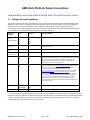
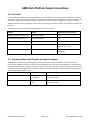
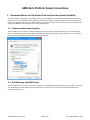
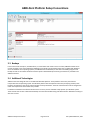
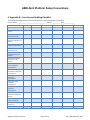
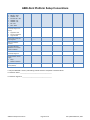
ABELDent Platform Setup Conventions Introduction 1.1 Purpose of this document The purpose of this document is to provide prospective ABELDent licensees and their hardware vendors with the information that they will require to prepare for the installation and operation of ABELDent. It will start with a brief overview of typical platforms, and then provide specific information that will be required to configure an ABELDent ready platform. The sections on configuration are moderately technical and intended primarily for the use of the hardware vendor or IT professional that will be configuring the system. They are not detailed instructions, it is expected that a competent IT professional will be familiar with these ubiquitous platforms, and understand the conventions. If your hardware vendor needs clarification on any of the points, please have them call (1-800-267-2235) or email ABEL at [email protected] . We are happy to co-operate and work with your hardware vendor to ensure that they get all the information required to get your system setup for ABELDent. 1.2 General Platform Overview ABELDent runs on Microsoft Windows operating systems and the Microsoft SQL Server 2008 R2 database. ABELDent is also available using the Microsoft Jet (Access) database. ABELDent is designed to scale from small peer to peer networks with few workstations, to larger networks in busy clinics with dedicated servers serving administrative and clinical workstations in operatories. The smaller networks, with less than six workstations, can be served by a workgroup consisting entirely of computers running the Microsoft Windows client operating systems such as (Windows 8 Pro, 7 Pro, or Vista Business). In this environment the file server is typically used as a workstation. On larger networks with half a dozen or more workstations, a file/SQL server with the Microsoft Windows Server operating system is required. ABELDent recommends Microsoft Windows Server 2012 R2 or Microsoft Windows Server 2008 R2. The Windows Server operating system supports larger networks and advanced features such as Active Directory security domains, disk mirroring, remote desktop services, and many other features and tools. Some small practices with less than 6 workstations still opt for a dedicated server with the server version of the operating system in order use active directory, disk mirroring, or other such features. 1.3 How to proceed ABEL recommends that when looking into purchasing your hardware, operating system, and other software for ABELDent that you get at least three quotes. Please make sure that you provide the ABELDent recommended hardware requirements, and these setup conventions, so that the hardware vendor can include setup to these conventions in the price that you are quoted. Current System Requirements are always available on the ABEL website http://www.ABELDent.com . Some customers opt to purchase their own hardware from vendors that do not provide setup and installation services. In such cases you are likely to require the services of an experienced IT person who can understand these setup conventions and configure the system(s) in conformance with the conventions. If you are dealing with a hardware vendor that you have not worked with in the past, ABEL recommends checking references. In many areas ABEL can provide the names of hardware vendors who have prepared ABELDent systems in the past. ABELDent Setup Conventions Page 1 of 25 Last updated March 6, 2014 ABELDent Platform Setup Conventions Server Setup Conventions 1.4 Operating system 1.4.1 Windows Server 2012 R2/Windows Server 2008 R2 1.4.1.1 Setup Please conform to the following conventions when setting up a server with Microsoft Windows Server 2012 R2/Microsoft Windows Server 2008 R2. We recommend that an Active directory domain be set up. We recommend using the NTFS file system. Setup TCP/IP as the network protocol. Set static IP addressing for the server. ABEL recommends a router with a firewall on all high-speed Internet connections. The DC is usually configured for DHCP & DNS. In smaller practices without a DC the router usually fills the DHCP/DNS roles. Name the computer with the customer’s ABEL client ID number. For example if the ABEL customer ID number is C09999-ODS, name the server C09999. You can get the customer ID number by calling ABEL’s production department and asking for it. An Active directory domain is normally set up if using the Windows Server operating system. With AD, user accounts only have to be set up on the server, not on each workstation. Create an account for each user. Ensure that each account has a password. The users should change their password the first time they log in. Disable the guest account. Use a strong password for the administrator account. Make sure that the appropriate person at the office or clinic has this password. Normally the dentist, office manager, or IT person. A high speed Internet connection is required for remote support. ABEL provides the required software via a browser plug in at the time support is provided. Modem connections such as RRAS and PC-Anywhere are no longer recommended for remote support connections. Set the display resolution to at least 1280 x 1024. Install the most recent operating system service pack, and all critical patches and hotfixes from Microsoft. Turn off any CPU power savers. Display power savers should be fine, but refrain from using third party screensavers. Turn off Hibernation. Install the latest drivers for all printer(s) and any other devices or peripherals. Install and configure any required backup hardware drivers and programs. ABEL recommends the backup program that comes with Windows Server. Shortcuts should be setup on the desktop for all users, or appropriate users, to: o Encryption is strongly recommended for backups to removable media. Make sure more than 1 person knows any required passwords, and that encryption keys or certificates are stored safely on-site and off (and that at least 2 people know where these are). o Perform a Full System backup with System State, ABELDent Setup Conventions Page 2 of 25 Last updated March 6, 2014 ABELDent Platform Setup Conventions o Data only backups. This will have to be setup after ABELDent is installed. ABEL recommends that the ABELDent folder and its sub-folders be backed up. Note: A regular user will not have appropriate privileges to perform full system backups; any users that perform backups will have to be added to the Backup Operator’s group. o A backup schedule can also be set. Most customers will have enough space available on their backup media to perform a full backup with system state on a daily basis. This is recommended for small offices without an on-site IT person to ensure that all data from all applications is backed up. More sophisticated backup rotations can be set up if and when space becomes an issue. If the customer has a high speed always on Internet connection it is recommended that Automatic Updates be turned on. Setup the group policy to: Note: This is an optional step to enhance security logs. o Audit successful and unsuccessful account login events, o Audit successful and unsuccessful account management events, o Account lockout to 3 invalid lockout attempts, and the lockout duration to 15 minutes, and the reset account lockout counter to 15 minutes. Turn off unnecessary Services such as Messenger, IIS (If it will not be needed) and FTP. If using these services do not allow anonymous access. Note that some practices use ABEL’s kiosk and case presentation software & will need IIS. Install and configure a reputable Anti-Virus Product. Set it up to automatically get updates regularly. It should be configured for Real-time scanning and for at least 1 full disk scan per week. Some products require that ABELDent be added to exceptions. 1.4.1.2 Testing Test Windows printing from all workstations, to all printers to which they will need to print. 1.4.2 Windows 8 or Windows 7 File Server 1.4.2.1 Setup Please conform to the following conventions when setting up a small practice file server based on a client OS like Windows 8 or Windows 7. We recommend the NTFS file system. Setup TCP/IP as the network protocol. Set static IP addressing for the server. ABEL recommends a router with a firewall on all high-speed Internet connections. Name the computer with the customer’s ABEL client ID number. For example if the ABEL customer ID number is C09999-ODS, name the server C09999. You can get the customer ID number by calling ABEL’s production department and asking for it. TURN OFF sharing wizard/simple file sharing. Open My computer > Tools >Folder Options >Go to the view Tab>Uncheck simple file sharing. ABELDent Setup Conventions Page 3 of 25 Last updated March 6, 2014 ABELDent Platform Setup Conventions While you are here also uncheck “Hide extensions for known file types”. Create an account for ABELDent users. An account can be set up for each user, but you should be aware that this account would have to be set up on all client machines from which the user will be running ABELDent. This will require a little more ongoing maintenance to administer the accounts when you have staff changes. It is up to individual customers to decide what is best for their practice. o The ABELDent users should not be part of the administrator group; they should be part of the users group. o Ensure that each account has a password. The users should change their password the first time they log in. Disable the guest account. Put a strong password on the administrator account. Make sure that the appropriate person at the office or clinic has this password. Normally the dentist, office manager, or IT person. If the customer will be doing EDI over a modem rather than by iTrans then setup a modem with the appropriate drivers. An external modem is recommended. A high speed Internet connection is required for remote support. ABEL provides the required software via a browser plug in at the time support is provided. Modem connections such as RRAS and PC-Anywhere are no longer recommended for remote support connections. Create an account for ABEL to use if they have to log in to provide support for the product. Please contact ABEL directly to provide the username and password. Make sure that the ABEL user has dial-in permissions and is part of the users group. Set the display resolution to at least 1280 x 1024. Install the most recent operating system service pack, and all critical patches and hotfixes from Microsoft. Turn off any CPU power savers. Display power savers should be fine, but refrain from using third party screensavers. Turn off Hibernation. Install the latest drivers for all printer(s) and any other devices or peripherals. Install and configure any required agents, drivers and programs to facilitate the backup. ABEL recommends Internet based backups or backups to removable hard disks. o Encryption is strongly recommended for backups to removable media. Make sure more than 1 person knows any required passwords, and that encryption keys or certificates are stored safely on-site and off (and that at least 2 people know where these are). o If backing up to a local disk Perform a Full System backup with System State. o Data only backups. This will have to be setup after ABELDent is installed. ABEL recommends that the ABELDent folder and its sub-folders be backed up. SQL backup files will also need to be backed up unless you are using an online backup agent with an SQL plug-in. o A backup schedule can also be set. Most customers will have enough space available on disk to perform a full backup with system state on a daily basis. This is recommended for small offices without an on-site IT person to ensure that all data from all applications is backed up. More sophisticated backup rotations can be set up if and when space becomes an issue. Note: A regular user may not have appropriate privileges to perform full system backups; any users that perform backups will have to be added to the Backup Operator’s group. ABELDent Setup Conventions Page 4 of 25 Last updated March 6, 2014 ABELDent Platform Setup Conventions If the customer has a high speed always on Internet connection it is recommended that Automatic Updates be turned on. Turn off unnecessary Services such as Messenger, IIS (If it will not be needed) and FTP. If using these services do not allow anonymous access. Note that some practices use ABEL’s case presentation software & will need IIS. Install and configure a reputable Antivirus Product. Set it up to automatically get updates regularly. It should be configured for Real-time scanning and for at least 1 full disk scan per week. Some products require that ABELDent be added to exceptions. 1.4.2.2 Testing Test any login accounts created so that user profiles are made. Make sure users that will require support have appropriate Internet access. Test any other applications that the customer may have purchased such as Word etc. Test Windows printing from each workstation and with each user account. 1.5 Database 1.5.1 Microsoft Jet Database Although the SQL database is now our standard platform, the Microsoft Access database/JET database will continue to be supported for existing customers. The JET database engine is installed along with older versions of ABELDent. 1.5.2 SQL Server 2012 R2/SQL Server 2008 R2 For the SQL version of ABELDent, install SQL Server 2012 R2 or SQL Server 2008 R2 and prerequisites (.NET Framework 3.5) before installing ABELDent. Remember to install all Service packs and hotfixes for SQL Server. ABELDent uses Windows authentication to authenticate with SQL Server. The ABELDent installation will create the required databases and apply the required permissions for client workstations to access the data. It also creates a shortcut under Start>Programs>ABELDent Administration to facilitate the creation of typical maintenance schedules and backup jobs. Client Machine Setup 1.6 Windows 8/7 client machine 1.6.1 Setup Please conform to the following conventions when setting up Windows 8/7 client machines: We recommend using the NTFS file system. Setup TCP/IP as the network protocol. We normally configure TCP/IP to obtain an IP automatically. ABEL recommends a router with a firewall on all high-speed internet connections. If there is not a router, Windows 7 will use Automatic Private IP Addressing (APIPA). ABELDent Setup Conventions Page 5 of 25 Last updated March 6, 2014 ABELDent Platform Setup Conventions Name the computer with the customer’s ABEL client ID number followed by a hyphen and a numeric extension. For example if the ABEL customer ID number is C09999-ODS, name the first client machine C09999-1, the second client machine C09999-2, and so on… Add the IP address of the ABELDent server to each client’s hosts file (C:\Windows\System32\drivers\etc\hosts) to facilitate faster name resolution on the network. This is especially important on networks that are not running DNS services. Turn off sharing wizard/simple file sharing. Open My computer > Tools >Folder Options >Go to the view Tab>Uncheck “Use file sharing wizard”. While you are here also uncheck “Hide extensions for known file types”. Create account(s) for ABELDent users. The Account names and passwords must exactly match the account(s) created on the server if in a workgroup environment. o The users should not be part of the administrators group; they should be part of the Users group. o You can create a group for ABELDent users but on most systems, all regular users will be ABELDent users so the regular users group can be used instead. o Ensure that each account has a password. The users should change their password the first time they log in. (this will have to be done for each user on all machines). Disable the guest account. Put a password on the administrator account. Make sure that the appropriate person at the office or clinic has this password. Normally the dentist, office manager, or IT person. Set the display resolution to at least 1280x1024. Install the most recent operating system service pack, and all critical patches and hotfixes from Microsoft. Turn off any CPU power saving features and disable hibernation. Screensavers are not an issue. Install the latest drivers for all printer(s) and any other devices or peripherals. If the customer has a high-speed Internet connection, it is recommended that Automatic Updates be turned on. Turn off unnecessary Services such as Messenger, IIS (If it will not be needed) and FTP. If using these services do not allow anonymous access. Note that some practices use ABEL’s kiosk and case presentation software and will need IIS. Install and configure a reputable Anti-Virus Product. Set it up to automatically obtain updates regularly. It should be configured for real-time scanning and for at least 1 full disk scan per week. Some products require that ABELDent be added to exceptions. 1.6.2 Testing Test Windows printing from all workstations. Make sure that the client machine can connect to the server and access shares created on the server. If you create test shares, please remember to remove them when you are through. ABELDent Setup Conventions Page 6 of 25 Last updated March 6, 2014 ABELDent Platform Setup Conventions Compatibility and setup with Firewalls, Anti-Virus and Security Suites 1.7 Setting up Firewall Appliances The specific instructions for setting up Firewalls vary with make and model and often require certified specialists. Most ABELDent communication is internal on the LAN with some exceptions for electronic claims. In multi-site installations additional ports may have to be opened up to allow ABELDent communication. Specific requirements on such communication vary widely depending on the specific architecture of your setup. The following table details the types of communication used by ABELDent and what ports may have to be opened up. Service or Function Port Protocol Reason required File and Printer sharing 139 TCP To save data to and retrieve data from the file share 445 TCP Windows NetBIOS 137 UDP 138 UDP ABELDent licensing 5093 UDP Only when thick clients with floating licenses are operating through the firewall without a VPN. ABELDent Portal 1504 TCP If customer has subscribed to ABELDent patient portal Thin Client / Terminal Services1 3389 TCP To run the Remote Desktop Client control HTTP/HTTPS 80 TCP 443 TCP If the physicians require Internet access for clinical research then the physician would typically access information by visiting web sites with a browser. The articles would typically be in html, pdf, or word format. Occasionally the information would be delivered as a chargeable or restricted service over an SSL secured web site. 80 TCP 443 TCP 9650 outgoing TCP 9650 outgoing UDP 123 UDP HTTP/HTTPS iTrans NTP/SNTP For remote support (to customers with an Internet connection) ABELSoft uses a tool called GoToAssist ( http://www.gotoassist.com ).No ports need be kept open to allow incoming traffic on the firewall as the session is initiated inside by the customer going to ABELSoft’s web site ( http://www.abeldent.com ) and following the link to the remote support server website ( http://www.gotoassist.com/sb/abelsoft ) to enter the appropriate session code. Many firewalls only block incoming traffic, and allow outgoing connections on all ports. In cases where outgoing traffic is also restricted the customer will require outgoing access on ports 80 (TCP) & 443 (TCP) to connect to the remote support session. The full session from the form where the session code is entered is encrypted using 128 bit SSL encryption. Electronic claims submission Client/server workstation time synchronization 1 – This port is optional. Terminal Services communication is on port 3389/TCP. In the event that Terminal Services/ Remote Desktop is used to run ABELDent remotely then these ports must be opened on the firewall. However if the Remote Desktop session is run within a VPN connection this is not necessary. ABELSoft recommends the VPN approach to any customers operating ABELDent over a high-speed Internet connection. ABELDent Setup Conventions Page 7 of 25 Last updated March 6, 2014 ABELDent Platform Setup Conventions 1.8 Anti-Virus It is not practical for ABELSoft to test large numbers of Antivirus programs, as there are many such programs on the market. We routinely check several of the more popular AV utilities with the latest version of ABELDent. We post our findings in the table below. Always check the online version of this document to ensure that you are reading our most recent findings. ABELSoft does NOT exclude our program or data areas from scanning on production systems. Such exclusions should not be necessary. The following products have been tested with ABELDent version 11.x and 12.x Product Results Workaround steps if required Symantec Endpoint Protection 12.1 No Known Problems n/a Kaspersky Small Office Security No Known Problems n/a ESET NOD32 No Known Problems n/a Microsoft Security Essentials (Free) No Known Problems Does not install properly Windows Server 2012. Avast anti-virus Reported problems with file scanner Add exclusions executables. for on ABELDent Table last Updated March 6th, 2014 – check website for most recent version. 1.9 Known problems with Firewalls and steps to mitigate ABELSoft does not perform regular testing with the various software firewalls included with many consumer Internet security suites. ABELSoft recommends routers or firewall appliances at the perimeter. Some people prefer software-based firewalls as well. Such devices might be desirable on larger networks where threats from within the perimeter protection are more likely. In such cases ABELSoft recommends the Windows Firewall included with all recent Microsoft operating systems. The following has been found to work. Product Results Workaround required Microsoft Windows Firewall Tested. Client unable to get license. Must open port 5093 UDP on server to subnet to allow clients to get license. Norton Internet Security Limited testing in the field. Must open port 5093 UDP on server to subnet to allow clients to get license. ABELDent Setup Conventions Page 8 of 25 Last updated March 6, 2014 ABELDent Platform Setup Conventions 2 Recommendations to help Protect Data and Increase System Reliability One of the strongest advantages of operating on industry standard platforms such as Microsoft Windows based operating system on Intel (or compatible) hardware platforms is that there are many technologies available that can be leveraged to increase the reliability of your system, reduce downtime, and protect your data. This section briefly discusses a few of these options that ABELSoft recommends that you consider implementing. 2.1 Uninterruptable Power Supplies The risk of data loss in the event of a power outage that extends beyond the capacity of the battery, to provide adequate power, is mitigated by Windows’ built in ability to monitor power status & UPS battery state. Windows can be configured to notify users and perform an orderly shutdown, preventing data loss. 2.2 Disk Mirroring and RAID Arrays The risk of data loss in the event of a server hard disk failure is mitigated by Windows ability to mirror the disks. In the event of a disk failure the remaining disk continues to work until such a time as it is convenient to replace the failed disk and reestablish the mirror set. ABELDent Setup Conventions Page 9 of 25 Last updated March 6, 2014 ABELDent Platform Setup Conventions 2.3 Backups In the event of data corruption, hard disk failure, or other failure that results in the loss of data, ABELSoft would have to recover the client’s most recent backup(s). ABELSoft users typically use the Backup Utility that is supplied with Windows Server or Windows client operating systems, but ABELDent has the flexibility to work with most backup programs and backup services on the market should the customer prefer. Detailed backup & recovery procedures are provided in the ABELDent manual. 2.4 Additional Technologies ABELDent has been designed work on the Microsoft Windows platform. These platforms have many such features incorporated into the operating system. The Windows platform also interoperates with many third party products, both hardware and software, that can be used to mitigate risk and protect data. The level of fault tolerance can be configured to match the requirements of the health care provider. In addition to hardware and software solutions there are many services available to help protect your Windows system. These include such services as Online Data Backups as well as Remote Monitoring and Administration. ABELSoft can help you with such services. ABELDent Setup Conventions Page 10 of 25 Last updated March 6, 2014 ABELDent Platform Setup Conventions 3 Detailed Steps on the security settings described above This section provides detailed steps for configuration of the security settings and group policy settings mentioned above for technicians or customers who may not be familiar with them. 3.1 Creating ABELDent Users Group and User Accounts This section covers the initial user setup that would normally be performed by the hardware vendor or IT department before ABELSoft comes out to do the installation. The ABELDent administrator will set these users up as members in ABELDent and configure the appropriate levels of privilege in ABELDent. Ongoing administration including deletion and modification of user accounts is covered in the ABELDent user’s manual. Initially we recommend that an ABELDent Users Group be setup. 1. Log in on the server. 2. Select Start>Administrative Tools>Active Directory Users & Computers 3. Right click on users and selects New > Group from the pop out menus 4. Fill in the group name ABELDent Users 5. The Scope of the Group is normally the Domain local 6. The Type of Group is Security Each user is set up in Windows with a username matching the member’s username in the ABELDent Authentication Manager. The typical steps on a Windows 2012 R2 Server would be as follows: 1. Log in on the server. 2. Select Start>Active Directory Users and Computers 3. The Administrator right clicks on the ABELDent Users OU and selects New > User from the pop out menus ABELDent Setup Conventions Page 11 of 25 Last updated March 6, 2014 ABELDent Platform Setup Conventions 4. Fills in the user’s first name, last name and username then click on next. 5. The initial password would be entered by the administrator twice, checking the option to force the user to change it on next logon, before clicking on next, and then Finish to create the user. 6. The user would then be added to the ABELDent Users OU. To add them to the ABELDent Users group, start by double clicking on the new username, clicking on the Member Of tab, clicking in the Add button, typing in the group name, clicking on the Check Names button, and OK ABELDent Setup Conventions Page 12 of 25 Last updated March 6, 2014 ABELDent Platform Setup Conventions On a small standalone or peer-peer network with a Windows 7 or Windows 8-based file server, the steps would be similar only they will be performed under computer Management. Right click on My Computer, select Manage, expand System Tools, Local Users & Groups, right click on Groups, select New Group and then add the group and user in the same way as described above. Add the user to the appropriate ABELDent Users group when finished. On a small network such as this the user must be created identically on each workstation. ABELDent Setup Conventions Page 13 of 25 Last updated March 6, 2014 ABELDent Platform Setup Conventions 3.2 Password Policies The following steps describe how to set the group policy to ensure password length & complexity rules are enabled in Windows Server 2012 R2. 1. Click on the Windows Start button. 2. Search for Group Policy Management. 3. In Group Policy Management, expand the tree view in the left column so you can see the Default Domain Policy directly below the domain name 4. Right-click on Default Domain Policy and select Edit from the drop down menu. 5. 6. 7. 8. 9. 10. 11. In the Group Policy Window, click the “+” to expand Computer Configuration. Click the “+” to expand Policies. Click the “+” to expand Windows Settings. Click the “+” to expand Security Settings. Click the “+” to expand Account Policy Click on Password Policy. ABELSoft recommends that several Policies be set here: a. Minimum Password length should be set at 8 or more characters b. Password must meet complexity requirements should be defined and enabled. This will mandate additional criteria beyond the standard Windows case sensitive password c. Enforce password history should be set to help prevent passwords from being reused. We suggest the maximum value of 24 be used. d. The above Policy would be ineffective if users could quickly cycle through passwords until they can reuse them. A Minimum password age of 30 days will prevent such abuse. e. A password age of 90 Days will ensure quarterly password changes. This would be the longest ABELSoft would recommend. Some offices like a Maximum password age of 42 days to ensure password changes at lease every 6 weeks. ABELDent Setup Conventions Page 14 of 25 Last updated March 6, 2014 ABELDent Platform Setup Conventions ABELDent Setup Conventions Page 15 of 25 Last updated March 6, 2014 ABELDent Platform Setup Conventions Similar Policies can be applied to Standalone or small peer-peer networks using the Local Computer Policy provided by Windows 8 and Windows 7. The Administrator can achieve access to the policy by clicking on Start > Typing in GPEdit.msc > and clicking on OK. The diagram below shows that the same settings are available there. 3.3 Account Lockout Policies ABELDent relies on Microsoft Windows to provide the authentication, and on Microsoft Windows Group Policy to control the behavior of the system on failures to authenticate. The following steps show how to configure a typical account lockout policy. This example shows how to set a lockout after 3 invalid login attempts, set the lockout duration to 3 days, and reset the lockout counter daily (So that 3 failed login attempts in a day would lock the user account for 3 days, unless an administrator manually unlocked the account. Manual unlocking can be performed by the administrator as shown at the end of this section. 1. 2. 3. 4. 5. Click on the Windows Start button. Select Administrative Tools. Click Group Policy Management. In Group Policy Management, expand the tree view in the left column so you can see the Default Domain Policy directly below the domain name Right-click on Default Domain Policy and select Edit ABELDent Setup Conventions Page 16 of 25 Last updated March 6, 2014 ABELDent Platform Setup Conventions 6. 7. 8. 9. 10. Click the “+” to expand Windows Settings. Click the “+” to expand Security Settings. Click the “+” to expand Account Policies. Select Account Policy Lockout Double-click Account lockout threshold 11. Change the value of “Account will lock out after:” to 3 invalid logon attempts. 12. Click OK. ABELDent Setup Conventions Page 17 of 25 Last updated March 6, 2014 ABELDent Platform Setup Conventions 13. Double-click Account lockout duration. 14. Type in the value 15 minutes. 15. Click OK. 16. Double-click on Reset account lockout counter after. 17. Type in the value 15 minutes. 18. Click on OK. 19. Click the X in the upper right of the Group Policy window. ABELDent Setup Conventions Page 18 of 25 Last updated March 6, 2014 ABELDent Platform Setup Conventions 3.4 Inactivity timeout and lock ABELDent leverages Microsoft Windows technologies that lock a system upon detection of inactivity. The procedure is described below. ABELSoft recommends Windows 8 for secure use workstations. In these cases ABELDent and operating system logon security is integrated (i.e., Single sign-on methodology). These workstations can be set in Windows to automatically lock after a defined period of inactivity at the workstation by specifying the screen-saver to be the native Windows 8 password “logon” screen-saver. These settings can be enforced and “locked-down” with an enforced group policy for groups of stations or users or individual stations or users. Like the Password and Account Lockout Policies these settings are best made in Group Policy. Follow the Steps in the previous two steps to enter group Policy. The screen saver timeout Policies are set at User Configuration>Administrative Templates>Control Panel>Personalization>Screen Saver Timeout Suggested value is 180 seconds (3 minutes). Some users find this hard to tolerate. We suggest trying 3 minutes, and if it causes too many problems this value can always be increased later (with permission from the appropriate physicians or other authorities). 3.5 Make sure that user can change their own password On a Windows 2012 R2 domain when the administrator creates the user account, the administrator determines whether the user will have the appropriate level of privilege to change their own password. The screen capture below shows the default ABELDent Setup Conventions Page 19 of 25 Last updated March 6, 2014 ABELDent Platform Setup Conventions setting where User cannot change password is UNCHECKED. This setting cannot be selected when User must change password at next logon is selected, therefore the setting is already correct for new accounts with User must change password at next logon selected. For existing accounts you should manually check to make sure that User cannot change password is unchecked. you can get to this setting by clicking on Start>Administrative Tools>Active Directory Users & Computers >double click on users> double click on the appropriate user > Click on the account tab checkboxes will be in the account options area. Similarly if a Windows 2012 domain does not exist, when the administrator creates the user account in Windows 8, the administrator determines whether the user will have the appropriate level of privilege to change their own password. 3.6 Setup NTP/SNTP Time Synchronization Explanation of NTP time synchronization can be found on the Microsoft website http://support.microsoft.com/kb/816042 We are including excerpts on the specific setup steps required here. We strongly recommend an external time source as documented here, rather than the internal time source that is also mentioned in the same Microsoft article. Configuring the Windows Time service to use an external time source To configure an internal time server to synchronize with an external time source, follow these steps: 1. Change the server type to NTP. To do this, follow these steps: a. Click the Start button, type regedit, and then click OK. ABELDent Setup Conventions Page 20 of 25 Last updated March 6, 2014 ABELDent Platform Setup Conventions b. Locate and then click the following registry subkey: HKEY_LOCAL_MACHINE\SYSTEM\CurrentControlSet\Services\W32Time\Parameters\Type c. In the right pane, right-click Type, and then click Modify. d. In Edit Value, type NTP in the Value data box, and then click OK. Set AnnounceFlags to 5. To do this, follow these steps: . Locate and then click the following registry subkey: HKEY_LOCAL_MACHINE\SYSTEM\CurrentControlSet\Services\W32Time\Config\AnnounceFlags a. b. In the right pane, right-click AnnounceFlags, and then click Modify. In Edit DWORD Value, type 5 in the Value data box, and then click OK. Enable NTPServer. To do this, follow these steps: . Locate and then click the following registry subkey: HKEY_LOCAL_MACHINE\SYSTEM\CurrentControlSet\Services\W32Time\TimeProviders\NtpServer a. b. In the right pane, right-click Enabled, and then click Modify. In Edit DWORD Value, type 1 in the Value data box, and then click OK. Specify the time sources. To do this, follow these steps: . Locate and then click the following registry subkey: HKEY_LOCAL_MACHINE\SYSTEM\CurrentControlSet\Services\W32Time\Parameters a. b. In the right pane, right-click NtpServer, and then click Modify. In Edit Value, type Peers in the Value data box, and then click OK. Note Peers is a placeholder for a space-delimited list of peers from which your computer obtains time stamps. Each DNS name that is listed must be unique. You must append ,0x1 to the end of each DNS name. If you do not append ,0x1 to the end of each DNS name, the changes made in step 5 will not take effect. Select the poll interval. To do this, follow these steps: . Locate and then click the following registry subkey: ABELDent Setup Conventions Page 21 of 25 Last updated March 6, 2014 ABELDent Platform Setup Conventions HKEY_LOCAL_MACHINE\SYSTEM\CurrentControlSet\Services\W32Time\TimeProviders\NtpClient\SpecialPollInterval a. In the right pane, right-click SpecialPollInterval, and then click Modify. b. In Edit DWORD Value, type TimeInSeconds in the Value data box, and then click OK. Note TimeInSeconds is a placeholder for the number of seconds that you want between each poll. A recommended value is 900 Decimal. This value configures the Time Server to poll every 15 minutes. Configure the time correction settings. To do this, follow these steps: . Locate and then click the following registry subkey: HKEY_LOCAL_MACHINE\SYSTEM\CurrentControlSet\Services\W32Time\Config\MaxPosPhaseCorrection a. In the right pane, right-click MaxPosPhaseCorrection, and then click Modify. b. In Edit DWORD Value, click to select Decimal in the Base box. c. In Edit DWORD Value, type TimeInSeconds in the Value data box, and then click OK. Note TimeInSeconds is a placeholder for a reasonable value, such as 1 hour (3600) or 30 minutes (1800). The value that you select will depend upon the poll interval, network condition, and external time source. d. Locate and then click the following registry subkey: HKEY_LOCAL_MACHINE\SYSTEM\CurrentControlSet\Services\W32Time\Config\MaxNegPhaseCorrection e. In the right pane, right-click MaxNegPhaseCorrection, and then click Modify. f. In Edit DWORD Value, click to select Decimal in the Base box. g. In Edit DWORD Value, type TimeInSeconds in the Value data box, and then click OK. Note TimeInSeconds is a placeholder for a reasonable value, such as 1 hour (3600) or 30 minutes (1800). The value that you select will depend upon the poll interval, network condition, and external time source. Quit Registry Editor. At the command prompt, type the following command to restart the Windows Time service, and then press ENTER: net stop w32time && net start w32time ABELDent Setup Conventions Page 22 of 25 Last updated March 6, 2014 ABELDent Platform Setup Conventions 3.7 Disable LMHash Modern Windows systems use a very secure system called Kerberos for secure authentication. Passwords are not directly stored or transmitted. Standards based hashes(MD4) are stored in encrypted databases, and only hashes of passwords are ever transmitted. Windows systems also have components that support backward compatibility to older less secure authentication systems, specifically one component called LANManager. ABELSoft recommends that you turn off such compatibility so that password hashes are not stored or transmitted using these older vulnerable standards. The following instructions tell how to disable the LMHash Implement the NoLMHash Policy by Using Group Policy To disable the storage of LM hashes of a user's passwords in the local computer's SAM database by using Local Group Policy (Windows 8 or Windows Server 2012) or in a Windows Server 2012 Active Directory environment by using Group Policy in Active Directory, follow these steps: 1. In Group Policy, expand Computer Configuration, expand Policies, expand Windows Settings, expand Security Settings, expand Local Policies, and then click Security Options. 2. In the list of available policies, double-click Network security: Do not store LAN Manager hash value on next password change. 3. Click Enabled, and then click OK. ABELDent Setup Conventions Page 23 of 25 Last updated March 6, 2014 ABELDent Platform Setup Conventions 4 Appendix B – Security and Auditing Checklist This checklist is provided to help you systematically perform the recommended security setup Practice Name: ________________________________________ ABEL ID:____________ Date:______________ Security Requirements Server Workstation 1 Workstation 2 Workstation3 Workstation 4 Workstation 5 Machine Name Enforce password history enabled Maximum password age enabled for 90 days Minimum password length set to 8 characters enabled Password must meet complexity requirements Account lockout duration set to 15 minutes Account lockout threshold enabled for 3 attempts Reset account lockout counter set to 15 minutes Audit account logon events enabled for success/failure Audit account management enabled for success/failure Audit logon events enabled for success/failure Audit object access enabled for success/failure Audit policy change enabled for success/failure Screen saver password protected enabled for 3 minutes Remote Access enabled/configured Time synchronization configured Firewall rules created ABELDent Setup Conventions Page 24 of 25 Last updated March 6, 2014 ABELDent Platform Setup Conventions 1. 2. 3. 4. 5. 6. 7. 8. MS SQL – 1433 MS SQL – 1434 NetBIOS – 139 Microsoft DS – 445 NetBIOS – 137 NetBIOS – 138 SSL – 443 RDP – 3389 Backup software installed/configured to backup 1. Application data 2. Security credentials 3. Log/audit files Backup and archive files are encrypted Anti-Virus software installed No conflict between ABELDent and installed antivirus software VPN software installed/configured Uninterruptable Power Supply 1. Setup 2. Software installed Physical security of server/desktop I verify that ABELSoft’s security and auditing checklist has been completed as indicated above. IT Technician Name: ___________________________________________ IT Technician Signature: ________________________________________ ABELDent Setup Conventions Page 25 of 25 Last updated March 6, 2014