1
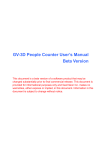
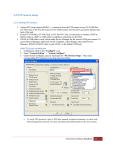
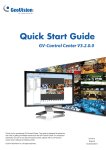
Quick Start Guide GV-3D People Counter V1.02 Before attempting to connect or operate this product, please read these instructions carefully and save this manual for future use. 3DPCV102-QG-A © 2013 GeoVision, Inc. All rights reserved. Under the copyright laws, this manual may not be copied, in whole or in part, without the written consent of GeoVision. Every effort has been made to ensure that the information in this manual is accurate. GeoVision, Inc. makes no expressed or implied warranty of any kind and assumes no responsibility for errors or omissions. No liability is assumed for incidental or consequential damages arising from the use of the information or products contained herein. Features and specifications are subject to change without notice. GeoVision, Inc. 9F, No. 246, Sec. 1, Neihu Rd., Neihu District, Taipei, Taiwan Tel: +886-2-8797-8377 Fax: +886-2-8797-8335 http://www.geovision.com.tw Trademarks used in this manual: GeoVision, the GeoVision logo and GV series products are trademarks of GeoVision, Inc. Windows and Windows XP are registered trademarks of Microsoft Corporation. October 2013 Contents 1. 2. Introduction....................................................................................................................2 1.1 Packing List............................................................................................................................. 2 1.2 Options.................................................................................................................................... 2 Overview.........................................................................................................................3 2.1 Front View ............................................................................................................................... 3 2.2 Rear View................................................................................................................................ 4 2.3 The IR Remote Control ........................................................................................................... 5 3. Connection.....................................................................................................................6 4. Basic Configurations on OSD.......................................................................................8 5. 6. 7. 4.1 Setting Up the Network ........................................................................................................... 9 4.2 Setting the ID, Password and Display Options ..................................................................... 10 Accessing the Web Interface ......................................................................................11 5.1 Setting the GV-3D People Counter ....................................................................................... 12 5.2 Accessing Counting Results ................................................................................................. 14 Content Designer.........................................................................................................15 6.1 Creating a Screen Layout ..................................................................................................... 15 6.2 Exporting the Screen Layout to GV-3D People Counter ...................................................... 17 Upgrading the Firmware..............................................................................................18 1 1. Introduction Welcome to the GV-3D People Counter Quick Start Guide. In the following sections, you will learn about the basic installations and configurations of the GV-3D People Counter. For the detailed user’s manual, see GV-3D People Counter User’s Manual. 1.1 Packing List 1. GV-3D People Counter × 1 2. IR remote control × 1 3. AC / DC adapter × 1 (12 V / 3 A, 36 W) 4. Power cord x 1 5. Software CD x 1 6. SD Card x 1 1.2 Options Optional devices can expand your GV-3D People Counter’s capabilities and versatility. Contact your dealer for more information. Options Wall Mount Kit VESA Monitor Mount Kit Description The Wall Mount Kit is used to mount the GV-3D People Counter to the wall. The VESA Monitor Mount Kit is used to mount the GV-3D People Counter to the back of a VESA monitor. The Asus Xtion Pro Live is a motion sensor used to detect Asus Xtion Pro Live the number of people who have walked through the detection area. The operating temperature is from 0°C ~ 40°C / 40°F ~ 104°F. Asus Xtion Pro / Asus Xtion The In-Ceiling Mount is used to mount Asus Xtion Pro / Pro Live In-Ceiling Mount Asus Xtion Pro Live on the ceiling. The 1.8 meters (6 feet) USB extension cable can extend USB Extension Cable the distance between the Asus Xtion Pro / Asus Xtion Pro Live and the GV-3D People Counter. 2 2. Overview 2.1 Front View 1 No. Name 2 3 4 5 Function The green LED indicates the Asus Xtion Pro / Asus Xtion Pro Live is 1 LED Indicators 2 USB Connect to an Asus Xtion Pro / Asus Xtion Pro Live. 3 IR Built-in IR receiver to receive the IR signals from the IR remote control. 4 Default Reset the GV-3D People Counter to the default factory settings. 5 SD Card Slot Connect to a SD card for local storage and firmware upgrade. connected. The red LED indicates the power is supplied. 3 2.2 Rear View No. Name Function 1 Ethernet Connect to an Ethernet. 2 SPDIF Reserved (not functional). 3 HDMI Connect to an HDMI supported display device. 4 VGA Connect to a VGA monitor. 5 L/R Connect to a speaker. 6 Power OFF/ON Switch the power on or off. 7 DC 12V Connect to power by using the supplied power adapter. 4 2.3 The IR Remote Control No. Name Function 1 Reboot the device. 2 Reboot Numbers / Alphabets / Punctuation Marks Enter the numbers, alphabets or punctuation marks. 3 Back Exit the Setup Menu and return to the counting page. 4 Direction Arrows Move up, down, right and left in the Setup Menu. 5 Rec Save the settings in the Setup Menu. 6 Menu Switch to the setup menu. 7 OK Enter the setup options in the Setup Menu. Press Shift and 0~7 to switch to one of the 8 resolutions below. 8 Shift Shift + 0 : VGA_640 x 480 Shift + 4 : HDMI_480p Shift + 1 : VGA_1024 x 768 Shift + 5 : HDMI_720p Shift + 2 : VGA_1280 x 768 Shift + 6 : HDMI_1080i Shift + 3 : VGA_1366 x 768 Shift + 7 : HDMI_1080p Note the resolution switch will cause the GV-3D People Counter to automatically reboot. 5 3. Connection Before connecting the GV-3D People Counter, read the following notes: GV-3D People Counter is compatible with the following firmware versions: GV-3D People Counter V1.01: Asus Xtion Pro / Asus Xtion Pro Live V5.3.26 / V5.7.9 GV-3D People Counter V1.02: Asus Xtion Pro / Asus Xtion Pro Live V5.7.9 / V5.8.22 For better results, avoid exposing the Asus Xtion Pro / Asus Xtion Pro Live to direct sunlight or IR LED. You can only connect GV-3D People Counter to one display device through HDMI or VGA connector. The video signal will be unstable if multiple display devices are connected. 6 1. Connect a display device to VGA video connector or HDMI connector for video and audio alarm combined outputs. 2. Connect to a standard network cable. 3. If you use a VGA monitor, connect a speaker to L/R port for audio alarm. 4. Insert an SD card. 5. Connect the Asus Xtion Pro / Asus Xtion Pro Live to the USB port of the GV-3D People Counter. The recommended installation height for Asus Xtion Pro / Asus Xtion Pro Live is between 1.8 – 5 meters. 6. Connect to power using the supplied power adapter. 7. Switch the Power button to ON. 7 4. Basic Configurations on OSD After connecting the necessary devices and turning on the power, the window below appears. The GV-3D People Counter starts counting people passing under Asus Xtion Pro / Asus Xtion Pro Live. To access the OSD (On-Screen Display) menu, press Menu on the remote control. Note: By default, the video output is set to VGA with 1024 x 768 resolutions. If you have connected an HDMI display device, use the IR remote control to press Shift + 0~7 to switch to the corresponding resolution. 8 4.1 Setting Up the Network In the OSD menu, select the Network tab to configure the IP address of the GV-3D People Counter. If installed in a LAN with the DHCP server, the GV-3D People Counter will use a dynamic IP address by default. If installed in a LAN without the DHCP server, the default IP address 192.168.0.100 will be applied. 1. To assign a static IP address for the GV-3D People Counter, select Static IP and enter a fixed IP address, subnet mask, DNS and gateway. 2. To use a dynamic IP assigned by the DHCP Server, select DHCP. Once connected, the current IP address will be displayed next to Connected IP. 3. Press [REC] to save the settings. The GV-3D People Counter will reboot to apply the settings. 9 4.2 Setting the ID, Password and Display Options 1. Select the Info tab. 2. Set the User Login ID and User Login Password to access the GV-3D People Counter. 3. In the Output field, select VGA or HDMI according to the video output of the display monitor. 4. In the Resolution field, select one of the screen resolutions below. HDMI at 60 Hz 480p 720p 1080i 1080p VGA at 60 Hz 640 x 480 1024 x 768 1280 x 768 1366 x 768 10 5. Accessing the Web Interface After installing the GV-3D People Counter on the network, you can access GV-Web Report Lite to set up the Asus Xtion Pro / Asus Xtion Pro Live and look up counting data. The GV-Web Report Lite is a Web server built in the GV-3D People Counter. System Requirements To access GV-3D People Counter through Web browser, ensure your PC is in good network connection, and use one of the following web browsers: Mozilla Firefox V16.0.2 or later Google Chrome V.22.0.1.1229.94 or later Logging In 1. In your Web browser, type the IP address or the domain name of the GV-3D People Counter in the Location / Address field. 2. Type the ID and password. The default ID and password are admin. 3. Type the characters shown in the image and click Login. 11 5.1 Setting the GV-3D People Counter 1. To set the GV-3D People Counter, click the Setup tab on the top. 2. Draw a line on the live view to mark the boundary of the detection zone. To change the direction of the In / Out arrows, click the Change button after Direction Change on the right. 12 3. For more precise counting results, specify the height of the Asus Xtion Pro / Asus Xtion Pro Live in the Xtion Device Height field and the minimum people height in the Minimum People Height field. Click the Detail button to see an illustration of the detectable height range and the dimensions of the detection area based on the height you specified. 4. To send People Counting data to other GV-Web Report Lite Server and / or GV-Web Report, select Report to Server and type the IP address, port, name and password of the GV-Web Report Lite or GV-Web Report. For details, see Chapter 4 The Web Interface in the GV-3D People Counter User’s Manual. Note: GV-3D People Counter is only compatible with GV-Web Report V2.2.3.0 or later. 13 5.2 Accessing Counting Results After setting up the GV-3D People Counter to start collecting data, you can access the people counts, tables and charts. Use one of the tabs below in GV-Web Report Lite to look up the data. Device: Displays the counted data and graphs from all connected GV-3D People Counter. The data is updated every minute. Group: You can group the connected GV-3D People Counter and see the data of the set group. Log: Allows you to look up the data of a specified time period from the selected GV-3D People Counter. Query: Provides the daily, weekly, monthly and yearly people counting graphs and tables. For details, see Chapter 4 The Web Interface in the GV-3D People Counter User’s Manual. 14 6. Content Designer Using the Content Designer, you can customize the screen layout for display monitor to show the in counts, out counts, stay counts and the current time. Follow the steps below to install the Content Designer: 1. Insert the Software CD to your computer. It runs automatically and a window pops up. 2. Select Install DirectX 9.0c and follow the on-screen instructions. 3. Select Install Microsoft .NET Framework 3.5 and follow the on-screen instructions. 4. Select GeoVision Content Designer and follow the on-screen instructions. 6.1 Creating a Screen Layout 1. To create a project, click File on the menu bar and select New Scenario. 2. Select GV-3D People Counter and a screen resolution. The screen resolution must match the resolution you set for the display monitor. Note: The following resolutions for HDMI and VGA video outputs are available: HDMI at 60 Hz 480p 720p 1080i 1080p VGA at 60 Hz 640 x 480 1024 x 768 1280 x 768 1366 x 768 For HDMI 480p, select 720 x 480; for HDMI 720p, select 1280 x 720; for HDMI 1080p and 1080i, select 1920 x 1080. 15 3. On the top-left corner, click the Background Image icon and click Browse to select a picture in PNG, JPEG or BMP format to be the background image. Note: The In Count, Out Count, Stay Count and Current Time will be shown on the display monitor as numbers only. If you wish to label the counting data, you will need to add a background picture with text added where the data will be shown. For example: 16 4. On the left side, click the In Count, Out Count, Stay Count and Current Time icons to add these objects to the main screen. 5. You can adjust the size and position of the objects using the Size and Position fields in the bottom-left corner or drag and drop the object boxes. To resize the box for Current Time, double-click the object and select from a list of pre-defined resolutions. 6.2 Exporting the Screen Layout to GV-3D People Counter 1. To preview the created screen layout, click Preview screen. on the main 2. To save the screen layout, click File and select Output Scenario. 3. Click to browse the location to save the screen layout. The screen layout will be saved in a folder named 3DPeopleCounter. 4. In a SD card, create a folder named Scenario and copy the 3DPeopleCounter folder to the Scenario folder. 5. Turn off the GV-3D People Counter, insert the SD card, and restart the GV-3D People Counter to apply the new screen layout. 17 7. Upgrading the Firmware We will periodically release the updated firmware on the website. Follow the steps below to update firmware using an SD card. 1. Copy the firmware file to the root folder of an SD card and insert the SD card to the GV-3D People Counter. Make sure there is only one firmware file in the SD card. 2. Press Menu on the remote control to enter the OSD (On-Screen Display) menu. 3. Select the Info tab. 4. In the Firmware Update field, select Yes and press OK to begin updating firmware. The device will restart after the firmware upgrade is complete. Note: To upgrade the firmware remotely through GV IP Device Utility, see Chapter 6 GV-IP Device Utility in the GV-3D People Counter User’s Manual. To upgrade the firmware through GV-Web Report Lite, see Chapter 4 The Web Interface in the GV-3D People Counter User’s Manual. 18