1
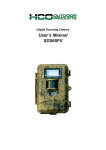
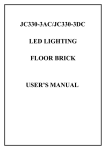
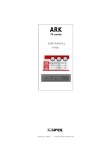
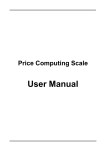
Color Edit_DMX Software User’s Manual Color Edit_DMX system requirement 1、Operation System: Windows2000 or XP or above 2、Display resolution: 1024*768 pixels or above Color Edit Software Setup 1、Color Edit_DMX software: to edit lighting programs Double click Color Edit software English version -> click Color Edit Setup →click Next →click Select dick →click Next →click Complete. Color Edit_DMX software user guide After completion of Color Edit.DMX software, double click create new program, please click programs, please click icon, it appears . To to set new characters. To open or download existing to select desired display file. See figure 1.1 below. Parameter Setup Interface 1、Fill in required pixel value in the box, based on actual light source and light alignment. COL: “Column” means column quantity, ROW: “Row” means row quantity. For example, for a row of 10 and a column of 10, it will display 100 pixels totally. When you complete setting up for the rows and columns, please click .It will display the quantity and alignment of the pixels. If you want to reset or change the pixels, please click and columns that you want, and then click right-bottom of the interface. , and fill in the new rows You can preview what has been set on the 第 1 页 共 9 页 Figure 1.1 parameter setup 2、Click to asign all lighting devices (how many JC-3 controllers are needed) Fill in required JC-3 controller quantities, and click Enter on your PC keyboard, then the system will assign display boxes to related JC-3 controllers. 第 2 页 共 9 页 It is the select box of JC-3 controllers, numbers in the grid mean related controller. Select number first then click the grid, you can change related controllers. (This function is only usable for connection synchronization of multiply JC-3 controllers). For one single JC-3 controller, this function is not available. , comes into the connection method of lighting devices, Click numbers on the upper of gird mean location of grid, numbers on the bottom of grid mean JC-3 number. Change link method of each grid manually, click any two grids randomly to change the location of these two grids. User can definite link method easily. 3、Click enter into edit interface, see Figure1.2 Edit Interface. Function Area Edit Area Color Area 第 3 页 共 9 页 Figure1.2 Edit Interface Color Edit_DMX basic operation Color Edit_DMX includes three areas of Function Area, Color Area and Edit Area, see figure 1.2. Function Area 、Color Area and Edit Area. 1、Function Area: 【Fill All】:to fill whole screen with selected color. 【Left】:to move figure to left 【Right】:to move figure to right 【Up】:to move figure up 【Down】:to move figure down 【Flip V】:to flip figure up and down vertically 【Flip H】:to flip figure left and right horizontally 【X】:the original row location of letters, symbols, numbers, and Chinese characters 【Y】:the original column location of letters, symbols, numbers and Chinese characters :input texts and numbers, and click “Text” to display input contents. 5*7、12*12、16 * 16 、20 * 20 、24 *24 、32 * 32, 6 selectable types of the pixel size of English letters or Chinese characters :Frame characters :lock current screen and cannot edit. :the period of time from current edited screen to next screen, unit is a second. The fastest is 0.1 second; and the slowest is 5 seconds. User can set and adjust the period of time for each frame. :Slow means figures change continuously and gradually, selected by user. Skip means figures change quickly, selected by user. 第 4 页 共 9 页 【Goto 1】:Jump to required frame. User can return to certain screen by inputting the frame number, and then click【Goto】. 【Back】:click it and display the last frame. 【Next】:display the next frame. If current screen is finished editing, click Next and Yes to edit the next screen. 【Insert】:insert a frame. For example, to insert a frame between the fifth screen and the sixth screen, click the Insert icon on the sixth screen, then a new frame is inserted between the fifth and the sixth screen. 【Delete】:delete current frame. 【Copy】:copy current frame. 【Paste】:paste copied frame into current frame, and replace current frame. If you want to paste copied frame before current screen, please Insert a new frame before current screen and Paste it on the inserted screen. 【Undo】:to cancel the last operation :show current file info. :When it is red, JC-3 is not connected; when it is green, JC-3 is connected. 【PreView】:To preview currently edited files. (note: to inspect each screen carefully, preview display speed is slow (set purposely), as each frame change period is very short.) 【Play】:Display frames on-line (PC controls JC-3 controller, JC-3 controller controls the change mode of JC330-3 lighting dance bricks. click【Play】it appears a new interface 第 5 页 共 9 页 ,click【Send】button to send currently edited file. :set music effect of each grid, click it appears , click each grid and setup desired music effect and then click【Send】, when you step onto each lighting dance brick it play music accordingly. 【Effect Set】:set effect for each grid, click to set the color and sense function of JC330-3 when it connects with JC-3, when JC-3 displays PC. , 【Default Colors】:when power up and without outer controller, it displays built-in programs with full color of rainbow change. 【Display Color】:when power up and without outer controller, it displays an assigned color. 【Response Color】:assign color responded from pressure sense. 【No Change】:display no color change after being pressed. 【Contrast Color】:display a contrast color after being pressed. 【Address Reset】:reset lighting dance brick address, and set address by actual connection sequence after being sensed. 【Upload Data】:upload sensed address and data to support interaction effect. 【No Upload】:do not upload sensed address and data. 第 6 页 共 9 页 【Open】:open .cor file. 【Save】:save .cor file to edit ColorEdit_DMX software. 【Save DMX】:save DMX file to control JC-3 controller. 2、Basic Operation Steps: (1)Select your desired color in the Color Area, and select relative buttons on the Function Area, and then edit data in the Edit Area. 图 1.3 (2)As each program has multiply frames, when you complete editing of one frame, click 【Next】 button in Function Area to edit next frame, and so on. (3)Save current file after completing one lighting program.( The software can then be saved before the call. Cor format, then save. Dmx format, otherwise the software can not call. Dmx format). (4)Download a DMX file into JC-3 through USB connector. Operation Tips 1. When in the interface of Edit Color, select one color and click the Row / Column icon in the Function Area, the selected color will fill in that row or column automatically. No need to fill color for each row or column one by one. 2. When edit the period change time between each frame, if the change time is within one second, like 0.2 second, inputting two numbers of “.” and “2” are enough, no need to 第 7 页 共 9 页 input “0” and “.” and “2” three numbers. 3. If one frame is completed, you must click【Next】button to program the next frame, and click Yes, otherwise it still edits current frame. Also, remember to click Save icon to save edited program. Warmly welcome any feedback to us! If you have any experience, skills and problems when you use our Color Edit_DMX software, please let us know so we can serve you better. Manufacturer: United East Electronic Industrial (HK) Co., Ltd. Address: No.17 Qilin East Road, Da'ning Industrial Zone, Humen Town, Dongguan City, Guangdong Province, China TEL:0769-86237138; FAX:0769-85707559 第 8 页 共 9 页 E-mail:[email protected]; http://www.ueele.com 第 9 页 共 9 页