1
CD-ROM Studio for iSeries
with CD-ROM Developer’s Toolkit
User’s Guide and Reference
Version 6.1
Centerfield Technology, Incorporated
http://www.centerfieldtechnology.com
2
©1997-2008 Centerfield Technology, Inc.
All rights reserved. No part of the contents of this book may be reproduced or transmitted in any form or
by any means without the written permission of Centerfield Technology, Inc.
Notice: The information contained in this document is subject to change without notice. Centerfield
Technology, Inc., shall not be liable for errors contained herein or consequential damages in connection
with the furnishing, performance, or use of this material.
The sample source and resulting programs are provided for your use only. You may repackage any source
or resulting program or portion of source or resulting program provided within this document for the
purpose of product distribution, installation, or system archiving. Any other use requires the written
permission of Centerfield Technology, Inc.
Centerfield Technology, CD-ROM Studio for iSeries, and CD-ROM Developer’s Toolkit are trademarks of
Centerfield Technology, Inc.
All other product and brand names are trademarks and registered trademarks of their respective companies.
Use of this book and the information within implies an understanding and agreement with the above
statements.
Centerfield Technology, Inc.
3131 Superior Dr NW, Suite C
Rochester, MN 55901
3
INTRODUCTION .................................................................................................. 9
PRODUCT CONTENTS ..................................................................................... 10
CD-ROM Contents ............................................................................................................10
PRODUCT REQUIREMENTS ............................................................................ 11
iSeries.................................................................................................................................11
Windows (minimum requirements) ...................................................................................11
CD-Recordable drive .........................................................................................................11
PRODUCT INSTALLATION ............................................................................... 12
iSeries Installation..............................................................................................................12
Windows Client Installation ..............................................................................................14
CREATING YOUR FIRST CD-ROM IMAGE FILES ........................................... 15
ISERIES CD-ROM CREATION PROCESS ........................................................ 19
Choosing the type of installation .......................................................................................19
CD-Installer, save file based installation ........................................................................................19
LODRUN based installation ...........................................................................................................19
SAVLICPGM method ......................................................................................................................20
Save/Restore ..................................................................................................................................21
LODRUN BASED INSTALLATION .................................................................... 22
LODRUN and CD-ROM ...................................................................................................22
Typical LODRUN creation scenario .................................................................................22
Additional scenarios ..........................................................................................................25
LICENSED PROGRAM PRODUCTS (SAVLICPGM) ........................................ 26
Typical SAVLICPGM creation scenario ...........................................................................26
Additional Information ......................................................................................................27
SAVE/RESTORE ................................................................................................ 28
USING THE CD-INSTALLER/SAVE FILES ON CD-ROM ................................. 28
CD-Installer Save File Installation ....................................................................................29
Packaging multiple products on a CD-ROM .....................................................................29
Additional Information ......................................................................................................30
CD-Installer runtime code ...............................................................................................................30
CD-Installer Base and Index files ...................................................................................................30
Save files ........................................................................................................................................30
CD-Installer CD layout map ............................................................................................................31
Mixed format CD-ROMs .................................................................................................................31
Naming conventions .......................................................................................................................31
4
MULTI-VOLUME CD-ROMS (ADVANCED EDITION) ....................................... 32
Span Multiple CD-ROMs (SPANCDS).............................................................................33
Restrictions .....................................................................................................................................34
Typical SPANCDS scenario ..............................................................................................38
Deliverables .......................................................................................................................39
Save data........................................................................................................................................39
Save data output file .......................................................................................................................39
CD-ROM layout file .........................................................................................................................39
Source code and programs ............................................................................................................40
Other installation objects ................................................................................................................41
Using Exit Programs ..........................................................................................................43
Common considerations .................................................................................................................43
General pre-processing exit point ..................................................................................................44
General post-processing exit point .................................................................................................44
Library pre-processing exit point ....................................................................................................44
Library post-processing exit point ...................................................................................................45
Using the Generated Image Files .......................................................................................46
Using the CD-ROM Studio for iSeries—Advanced Edition Windows Client with SPANCDS ... 46
Using the CD-ROM Studio for iSeries commands with SPANCDS .............................................46
Recording the Image Files..............................................................................................................47
Installing the Distribution ..................................................................................................49
Recovery phase ..............................................................................................................................50
Using iSeries image catalogs .........................................................................................................52
Recommendations ..............................................................................................................56
AUTOMATING THE CD-ROM CREATION PROCESS ...................................... 57
Creating an image packaging program for use with the CD-ROM Studio for iSeries
Windows client ..................................................................................................................57
Example .............................................................................................................................58
Using dynamic selection to pick save files ........................................................................59
ISERIES COMMAND REFERENCE ................................................................... 60
iSeries Save Commands for CD-ROM ..............................................................................60
Restore Commands for CD-ROM .....................................................................................62
Restore Examples ..........................................................................................................................63
Root directory, image name same as library name ........................................................................63
Subdirectory, image name same as library name ..........................................................................63
Subdirectory, image name different than library name ..................................................................63
Data preparation commands ..............................................................................................63
Start CD-ROM Premastering Mode (STRCDP) .............................................................................63
End CD-ROM Premastering Mode (ENDCDP) ..............................................................................63
CD-ROM image creation commands.................................................................................65
Create CD Image from Tape (RTVCDIMG) ...................................................................................65
Create CD Image from Save File (CRTCDIMG) ............................................................................66
Add save file to CD-ROM (ADDCDF).............................................................................................66
Centerfield CD-ROM Server Commands ..........................................................................67
Start CD-ROM Server (STRBSCSVR) ...........................................................................................67
End CD-ROM Server (ENDBSCSVR) ............................................................................................67
WINDOWS CLIENT ............................................................................................ 68
Using the CD-ROM image creation wizard ......................................................................68
5
Creating a new definition ...................................................................................................68
Opening an existing definition ...........................................................................................68
Selecting an iSeries system ................................................................................................70
Selecting an iSeries system ................................................................................................70
Selecting the CD-ROM image type ...................................................................................71
Selecting the CD-ROM source data...................................................................................73
Saving objects using an iSeries program ...........................................................................74
Tape device ........................................................................................................................75
Product profile ...................................................................................................................76
Save file list .......................................................................................................................77
Select save files ..................................................................................................................78
Installation program ...........................................................................................................79
Target directory..................................................................................................................80
Create CD-ROM image .....................................................................................................81
APPENDIX 1—UNDERSTANDING CD-ROM ON THE ISERIES ...................... 82
Base support .......................................................................................................................82
CD-ROM image files .........................................................................................................83
A quick look at the CD-ROM creation process .................................................................83
Creating native save/restore format CD-ROMs.................................................................85
Overview .........................................................................................................................................85
Image file creation process ...........................................................................................................85
Image file creation process ............................................................................................................86
Creating CD-Installer format CD-ROMs ..........................................................................86
Creating CD-Installer format CD-ROMs ..........................................................................87
Overview .........................................................................................................................................87
Saving objects for CD-ROM .............................................................................................87
Saving objects for CD-ROM .............................................................................................88
Windows client ................................................................................................................................88
iSeries commands ..........................................................................................................................88
Understanding ISO-9660 naming ......................................................................................88
Tape requirement ...............................................................................................................88
APPENDIX 2—PACKAGING STRATEGIES ..................................................... 90
PC-iSeries on the same media............................................................................................90
Handling multiple releases of OS/400 ...............................................................................91
Multiple products on the same CD-ROM ..........................................................................91
Creating a tape from CD-ROM..........................................................................................92
Renaming the iSeries CD-ROM image files ......................................................................92
Burning a CD-ROM ...........................................................................................................93
Sending media to a duplication service .............................................................................94
APPENDIX 3—NLS SUPPORT.......................................................................... 95
CD-Installer .......................................................................................................................95
Product descriptions .......................................................................................................................96
CD-Installer display file ...................................................................................................................96
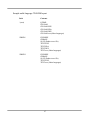
Sample multi-language CD-ROM layout ........................................................................................97
6
APPENDIX 4—SAMPLES .................................................................................. 98
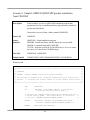
Scenario 1. Simple LODRUN-QINSTAPP product installation from CD-ROM .............99
Source code ...................................................................................................................................99
Scenario 2. Dual media LODRUN-QINSTAPP product installation ..............................103
Source code .................................................................................................................................103
Scenario 3. Dual media LODRUN-QINSTAPP product installation using save files ....109
Source code .................................................................................................................................109
Scenario 4. CD-Installer save file installation .................................................................115
Source code .................................................................................................................................115
Scenario 5. CD-Installer save file installation with parameters ......................................117
Source code .................................................................................................................................117
APPENDIX 5—MULTI-VOLUME CD-ROMS (STANDARD EDITION) ............. 119
Save 650 utilities ..............................................................................................................120
SAV650 usage .................................................................................................................120
RST650 usage ..................................................................................................................121
Creating the CD-ROMs ...................................................................................................121
Modifying the source .......................................................................................................121
Assumptions/Restrictions ................................................................................................121
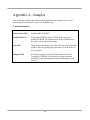
APPENDIX 6—TECHNICAL SUPPORT .......................................................... 122
Contact Information .........................................................................................................122
Support Checklist .............................................................................................................122
7
8
Introduction
CD-ROM Studio for iSeries and CD-ROM Developer's Toolkit allow you to create native
iSeries CD-ROM images for product distribution and system archiving purposes as an
alternative to using tape.
This reference is intended to help you get started with the CD-ROM Studio for iSeries
package you received from Centerfield Technology, Inc.
The information in this reference applies to CD-ROM Studio for iSeries Version 6.1. The
information should only be applied to this version of the product.
9
Product Contents
The product you received from Centerfield Technology, Inc., contains the following
items.
CD-ROM Studio for iSeries and CD-ROM Developer’s Toolkit installation
CD-ROM
The CD-ROM contains the software for both your iSeries and your Windows
client workstation. Refer to Product Installation for instructions on installing the
software.
User’s Guide and Reference
This reference is intended to help you get started with the CD-ROM Studio for
iSeries package you received from Centerfield Technology, Inc.
CD-ROM Studio for iSeries License Information
This is the license key assigned to your iSeries system.
CD-ROM Contents
Item
CD-ROM location
iSeries Product Installation
‘\’
Windows client installation
‘\’
Softcopy version of the
documentation
‘\DOC\’
Toolkit ASCII source files
‘\SAMPLE\SOURCE\’
Toolkit sample installs
‘\SAMPLE\INSTALL\’
10
Product Requirements
iSeries
9 OS/400 V5R2 or later
9 A tape drive available to be used during the CD-ROM packaging process. If
creating CD-Installer format CD-ROM images, no tape drive is required.
9 TCP/IP
Windows (minimum requirements)
9 Windows 95/98/ME/NT/2000/XP/Vista
9 2x CD-ROM drive
9 80486 @ 66Mhz, 16 MB RAM
9 10 MB hard drive for product
9 Additional hard drive space required to store CD-ROM image, 700 (or
650) MB per image
9 TCP/IP
CD-Recordable drive
9 2x (or greater) write speed
9 Software/hardware support for ISO-9660 Mode 1 format
9 Software/hardware support for Windows
11
Product Installation
iSeries Installation
1)
Before beginning the installation on the iSeries, check the following
prerequisite conditions.
9 This product requires V5R2 or later version of OS/400.
9 This product uses TCP/IP to communicate between the iSeries and the
personal computer. TCP/IP needs to be configured before the server
will function. Before continuing, make sure your Windows client can
ping the iSeries system. See one of the following IBM iSeries
references for information on configuring TCP/IP—TCP/IP Fastpath
Setup, SC41-3430-01, or TCP/IP Configuration and Reference,
SC41-3420-04.
9 The installation uses TCP/IP port number 9494 by default. If that port
is in use, the installation will search for unused port numbers, starting
at 9495, until one is found. To determine which one was chosen, use
the following command:
WRKSRVTBLE SERVICE(*ALL)
9 The product installs into a library named BSCCDROM10. The
installation process will rename this library to BSCCDROM1_ if it
already exists.
9 The toolkit installs into the library BSCTOOLKIT. The installation
process will rename this library to BSCTOOLKI_ if it already exists.
9 The server requires an active subsystem for proper operation.
Determine the subsystem you wish to use. It will be needed later in the
installation process. If this is an upgrade, the previous setting will be
preserved.
9 Have the license key available for entry during the installation process.
If this is an upgrade, the license key will be preserved.
2)
Sign on to an interactive session with QSECOFR or a user profile that has
*SECOFR user class. This user profile must have *IOSYSCFG, *JOBCTL,
*SECADM, and *SAVSYS special authorities.
12
3)
The system value QALWOBJRST must be set to *ALL. The system value
QALWUSRDMN must be *ALL or contain the libraries BSCCDROM10 and
BSCTOOLKIT.
You can verify and change both of these system values using the following
command.
WRKSYSVAL SYSVAL(*ALL)
4)
Place the CD-ROM containing the CD-ROM Studio for iSeries product into
your primary CD-ROM drive and issue the following command.
LODRUN *OPT
5)
When prompted, enter the active subsystem where you want the server to
reside.
6)
When prompted, enter the license password that was provided with your
product.
Press Enter to continue the installation.
7)
Installation is now complete. You are ready to start the server.
8)
To start the server, ensure TCP/IP is active on your system. If it is not active,
issue the following command using the “Start application servers” and “Start
TCP/IP interfaces” options that are correct for your system.
STRTCP *YES/*NO *YES/*NO
9)
Issue the following command to start the CD-ROM Studio for iSeries server.
BSCCDROM10/STRBSCSVR
10) Verify the server is active in the subsystem you specified. The job name will
be BSCSERVER. The following command can be used to check for the
active job.
WRKACTJOB
11) The server will have to be restarted every time the subsystem is ended or the
system is IPLed. You may add this command to your system startup routine.
However, the OS/400 command STRTCP must be issued and TCP must be
completely started before the server will start.
12) You are now ready to begin the Windows client installation.
13
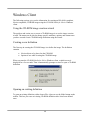
Windows Client Installation
1) Place the CD-ROM containing the CD-ROM Studio for iSeries product into
your CD-ROM drive.
2) If installation does not start automatically, enter the following from the
Start->Run... window:
d:\SETUP.EXE
where d is the CD-ROM drive letter
3) Follow the online instructions to complete the installation.
4) You may now use CD-ROM Studio for iSeries.
5) Continue with the chapter called Creating your first CD-ROM image files.
14
Creating your first CD-ROM image files
You are now ready to create your first CD-ROM image files. The following paragraphs
will walk you through a sample scenario to introduce the process of creating CD-ROM
image files. It will also help you configure a connection to your iSeries system.
You may fast-path through this sample by completing the actions in bold text.
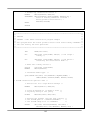
1)
In this scenario, we are going to build a sample installation CD-ROM that
can be installed using the LODRUN command.
Background for the scenario:
The product we will install is currently saved in the save file LODRUNS1 in
library BSCTOOLKIT. This save file contains a library named LODRUNL1
that was saved with the SAVLIB CL command.
The save file LODRUNS2 (also in the BSCTOOLKIT library) contains the
program QTEMP/QINSTAPP and other install programs. The QINSTAPP
program will be called by LODRUN.
The source file with the entire source for this sample is
BSCTOOLKIT/LODRUN1.
Note on example scenario:
Other methods of installation or save/restore can be used with CD-ROM.
Even if you do not plan to use LODRUN with your CD-ROM, it is useful to
go through this example to understand the basic method of CD-ROM
creation.
2)
Start the CD-ROM Studio for iSeries Windows client by double clicking
the icon in the CD-ROM Studio for iSeries program group.
3)
Once the client is started, it will automatically guide you through the
process of creating an iSeries CD ROM image. This is done through the
CD-ROM Studio for iSeries “wizard”.
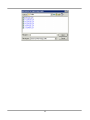
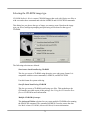
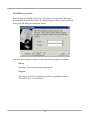
4)
The first dialog lets you create a new CD-ROM profile or open an existing
profile. Choose Create a new CD-ROM image profile.
15
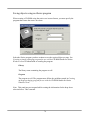
5)
The next dialog prompts for an iSeries system. This system is where the
CD-ROM image will be created.
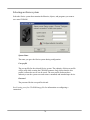
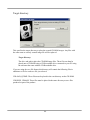
6)
To configure a connection, click on the Configure Network Connection
button.
7)
Type the name of the iSeries system. Press Next.
8)
Enter the IP address of the remote system. If you have a name server or a
name defined in your HOSTS table, you may use that name instead of the IP
address.
9)
For the port enter 9494 (if this port was already used by another
application when CD-ROM Studio for iSeries was installed, another port
was chosen; to determine if another port was chosen use the
WRKSRVTBLE command). Press Save. Configuration is now complete.
10) Before continuing, make sure the server is started on the iSeries. If it is not
started, use the BSCCDROM10/STRBSCSVR command to start the server.
11) Select the system you configured and enter a user ID and password that
is authorized to the library BSCTOOLKIT and has authority to the system
save and restore commands. Press Next.
12) You should see a message in the lower (left side) status bar of the main
CD-ROM Studio for iSeries window saying Successfully connected to
server.
13) The next dialog lets you select the type of CD-ROM format you would like
to create. You will be prompted appropriately for the selected type of
CD-ROM format.
Choose Save/restore based install using CD-ROM from the dialog for this
scenario, since we are building an install CD to be used with the LODRUN
command. Press Next.
14) Now you must specify the source for the CD-ROM image. In this scenario,
we are going to call a program on the iSeries that will save the product to be
installed.
Select Call an iSeries program to save the data to tape. Press Next.
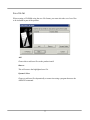
15) Select the iSeries program to create the CD-ROM contents. The program
name is CUTCD in library BSCTOOLKIT. You can use the drop downs to
select the program. Press Next.
16
The program accepts one parameter as input, namely, the tape device to
which the CD-ROM image will be saved.
To create a CD-ROM image, the objects must go through a tape save
operation. This is required to prepare the objects so they can be successfully
restored via normal restore CL commands on the iSeries. In this scenario,
the SAVSAVFDTA command is used to save the application to tape.
16) Select the iSeries tape device you want to use while creating the CD-ROM
image. Make sure there is a tape in the drive that can be initialized. The
premastering process will initialize the tape when you create the CD-ROM
image. Press Next.
17) Enter the Windows directory (folder) where you want to put the resulting
CD-ROM image files. The image files placed in this directory can be
written to a CD-Recordable device. Press Next.
18) Press Next when prompted to enter the CD-ROM volume label. It is not
used in this scenario.
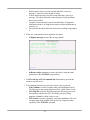
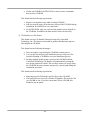
19) You are now ready to create the CD-ROM image files. The following things
will happen while creating the image files.
9 The server will prepare the tape and CD-ROM creation environment.
9 The program you specified will be called to do an iSeries save operation
to the tape device you specified.
9 The CD-ROM image files will be created from the save data and
transferred to the target directory you specified.
20) Press Create Image. This will create the native iSeries CD-ROM image
files. You will see status messages during this phase. This may take a while.
21) You will get a message saying that CD-ROM premastering is complete.
Press OK to close the message box. Press Cancel to close the create dialog.
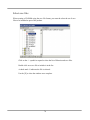
22) A child window now contains information about the CD-ROM image files
you created. Maximize the child window if it is not fully visible. You are
now ready to create a CD-ROM using a CD-Recordable device.
23) The tape in the drive also contains the CD-ROM image. This tape is suitable
to send to a CD-ROM duplication company that accepts iSeries tapes with
CD-ROM images. This can be used as an alternative method to using a
CD-Recordable device.
17
24) See the Burning a CD-ROM section of the chapter called Windows Client to
create a CD-ROM.
18
iSeries CD-ROM Creation Process
When planning your CD-ROM distribution or archiving strategy, there are several
components that need to be considered. This chapter will describe these components and
give you the options. Once you have chosen your strategy, you can use CD-ROM Studio
for iSeries and CD-ROM Developer's Toolkit to create your CD-ROM and CD-ROM
installation program.
This chapter assumes you are already familiar with the overall process presented in the
previous chapters and Appendix 1—Understanding CD-ROM on the iSeries.
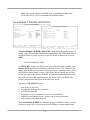
Choosing the type of installation
You must choose the type of installation procedure you want for your CD-ROM. This
choice determines how your install will restore the contents from the CD-ROM.
CD-Installer, save file based installation
The CD-Installer method lets you package one or more products or versions on a
single CD-ROM.
The CD-Installer method requires that you package your product into one or more
save files and for it to have a callable install program that initiates the installation.
If the following statements apply, you should use the CD-Installer save file based
method for your CD-ROM based product installation.
•
•
•
You are using save files as part of your installation process today.
You want to ship multiple versions or multiple products on a single
CD-ROM.
You do not have a CD-ROM based install already that uses one of the
other methods.
LODRUN based installation
The LODRUN command lets a user insert the CD-ROM or tape media in their
system and simply enter the LODRUN CL command. The system then loads and
runs your installation program (QINSTAPP). Your installation program can then
restore your product from the CD-ROM or tape media, prompt the user for
installation specific information, and do any other needed system configuration or
object creation.
19
If you are not familiar with the LODRUN command, see the IBM iSeries system
manual CL Programming, SC41-4721-00, for more information.
The LODRUN command lets you specify a path on the CD-ROM. This is useful
if
•
•
You want several versions of your product on the same CD-ROM.
You want to organize your CD-ROM such that the iSeries install is not
in the root directory.
If the following statements apply, you should use the LODRUN command for
your CD-ROM based product installation.
•
•
•
•
•
You are using LODRUN today for your tape installation
You want or need an install method other than a simple RSTLIB or
RSTOBJ command.
You want to ship your product in a subdirectory on the CD-ROM, not
in the root directory.
You have multiple iSeries versions or product installation programs on
a single CD-ROM.
You are shipping multiple iSeries products on a single CD-ROM
media.
SAVLICPGM method
The RSTLICPGM command lets you install your product as a licensed program.
If you are not familiar with the RSTLICPGM command, see the IBM iSeries
system manual System Manager Use, SC41-3321-02, for more information.
This command does not support subdirectories on the CD-ROM. This means your
product must reside in the root directory of the CD-ROM and the CD-ROM can
only contain one installation, product, or version.
If you need to use the RSTLICPGM command and also need to use subdirectories
on the CD-ROM or ship multiple product installs on a single CD-ROM, you
should
•
•
•
•
Put your RSTLICPGM product in save files.
Ship the save files in subdirectories on the CD-ROM
Use either the CD-Installer or LODRUN or RSTOBJ method to
retrieve the save file from CD-ROM into QTEMP during install
RSTLICPGM from the save file in QTEMP
20
If the following statements apply, you should use the RSTLICPGM command for
your CD-ROM based product installation.
•
•
You can ship your iSeries in the root directory and have a single
product install on the CD-ROM
You are using RSTLICPGM today for product installation from tape
Save/Restore
The save/restore method is simply using one of the restore commands to retrieve
the CD-ROM contents.
This is the method of choice for system archiving or doing object save and restore
operations.
If you are not familiar with the save and restore commands on the iSeries, see the
IBM iSeries system manual Backup and Recovery - Basic, SC41-4304-01, for
more information.
The following commonly used restore commands have full support for
subdirectories on the CD-ROM.
•
•
•
•
RST (Restore Object)
RSTOBJ
RSTLIB
RSTDLO
If the following statements apply, you should use the save and restore method for
your CD-ROM based product installation or system archiving.
•
•
•
You are using the CD-ROM for system archiving purposes
You are distributing a library or objects that simply need to be restored
onto the target system.
You have no need for the LODRUN or RSTLICPGM method.
21
LODRUN Based Installation
Before creating a LODRUN based installation program, you should be familiar with the
LODRUN command on the iSeries. See the IBM iSeries system manual, CL
Programming, SC41-4721-00, if you need more information.
LODRUN and CD-ROM
When you issue the LODRUN command on the iSeries and specify an optical device
(CD-ROM drive), OS/400 will look for a CD-ROM image file named QTEMP in the
path you specified on the CD-ROM.
The QTEMP image file must contain the program QINSTAPP that was saved from
library QTEMP. It can also contain other iSeries objects saved from QTEMP as well.
Typical LODRUN creation scenario
This outlines the typical approach used to create a LODRUN based CD-ROM. The
example is used throughout the steps to show one way it can be done.
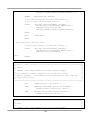
1) Identify the save data you are going to place on CD-ROM. To help automate
the process, it is a good idea to write a CL program that contains the save
operations. Here is an example.
PGM PARM(&DEV)
DCL &DEV *CHAR 10
SAVLIB LIB(PRODLIB) DEV(&DEV) LABEL(&DEV)
DTACMP(*NO) COMPACT(*NO) /* Save product library */
SAVOBJ OBJ(*ALL) LIB(SAMPLES) DEV(&DEV)
LABEL(SAMPLES) DTACMP(*NO) COMPACT(*NO)
/* Save sample library */
ENDPGM
22
2) Decide on the layout of the CD-ROM so you know the path to specify on the
restore operations.
For this example, we are going to place the CD-ROM image files in the
root directory of the CD-ROM.
/PRODLIB
/SAMPLES
3) Create the install program(s) QINSTAPP.
QINSTAPP
PGM PARM(&DEV)
DCL &DEV *CHAR 10
/* Make sure sample library exists */
CRTLIB SAMPLES
MONMSG(CPF0000) /* Ignore errors */
/* Restore the product and samples from the root directory of the
CD-ROM */
/* No OPTFILE path is needed since the files are in the root of the
CD-ROM and the image file names are the same as the libraries the
data was saved from */
RSTLIB LIB(PRODLIB) DEV(&DEV)
RSTOBJ OBJ(*ALL) LIB(SAMPLES)
ENDPGM
23
4) Add logic to the packaging program to package the install program also.
PGM PARM(&DEV)
DCL &DEV *CHAR 10
SAVLIB LIB(PRODLIB) DEV(&DEV) LABEL(&DEV)
DTACMP(*NO) COMPACT(*NO) /* Save product library */
SAVOBJ OBJ(*ALL) LIB(SAMPLES) DEV(&DEV)
LABEL(SAMPLES) DTACMP(*NO) COMPACT(*NO)
/* Save sample library */
CRTDUPOBJ OBJ(QINSTAPP) FROMLIB(MYLIB)
OBJTYPE(*PGM) TOLIB(QTEMP) NEWOBJ(*OBJ)
/* Put install program into QTEMP */
SAVOBJ OBJ(QINSTAPP) LIB(QTEMP) DEV(&DEV)
DTACMP(*NO) COMPACT(*NO)
/* Save install program from QTEMP */
/* It must be save from QTEMP since that is
where the LODRUN commands expects it to
be restored from */
ENDPGM
5) Compile the QINSTAPP program. Compile the packaging program.
6) Insert a tape into the iSeries tape drive. This is used during the CD-ROM
creation process.
7) Use either the CD-ROM Studio for iSeries Windows client or iSeries
commands to prepare the data for CD-ROM. Use the packaging program you
created above to package the save data.
8) Create the CD-ROM using the CD-ROM layout decided upon in step 2. In our
example, the CD-ROM layout will be as follows.
/PRODLIB
/SAMPLES
/QTEMP
24
Additional scenarios
See the following samples found in Appendix 5 for more for more information on using
LODRUN based CD-ROM installations.
Scenario 1. Simple LODRUN-QINSTAPP product installation from CD-ROM
Scenario 2. Dual media LODRUN-QINSTAPP product installation
Scenario 3. Dual media LODRUN-QINSTAPP product installation using save
files
25
Licensed program products (SAVLICPGM)
With SAVLICPGM, you can save one or more products onto CD-ROM. If the products
exceed 700 (or 650) MB, you will need to create separate CD-ROMs, each less than 700
(or 650) MB.
Typical SAVLICPGM creation scenario
1) Create a packaging program.
PGM PARM(&DEV)
DCL &DEV *CHAR 10
SAVLICPGM LICPGM(5716PM1) DEV(&DEV) OPTION(*BASE)
RLS(*ONLY) LNG(*PRIMARY) OBJTYPE(*ALL)
/* Save product */
ENDPGM
2) Compile the packaging program.
3) Insert a tape into the iSeries tape drive. This is used during the CD-ROM
creation process.
4) Use either the CD-ROM Studio for iSeries Windows client or iSeries
commands to prepare the data for CD-ROM. Use the packaging program you
created above to package the save data.
5) Volume Id. The Volume ID is important for licensed program product
CD-ROMs. Enter a Volume ID you would like to use on the CD-ROM.
CD-ROM Studio for iSeries will append a 01 to the volume ID you specify to
indicate that this is the first CD-ROM for this product.
26
6) Create the CD-ROM. It is recommended you use the CD-ROM Studio for
iSeries Windows client for this step, as it will automatically create the correct
directory structure for the CD-ROM layout. It will also report the Volume ID
or Volume Label to use when creating the CD-ROM.
If you do not use the CD-ROM Studio for iSeries Windows client, the
description on the CD-ROM images will specify the path into which you
should place the file on the CD-ROM.
Additional Information
For more information about packaging your product with the use of SAVLICPGM, see
the IBM publication System Manager Use, SC41-3321-02.
27
Save/Restore
To save information to CD-ROM using basic save commands, follow these steps.
1) On the iSeries, initialize a tape large enough to hold your save data.
2) Issue the command BSCCDROM10/STRCDP to begin the save process.
3) Save your information to tape using one or more save commands. If you have
any library names that are 9-10 characters long, specify a shorter name on the
LABEL() keyword of the save command.
If you do more than one save operation from the same library, only the last
save operation will be included on the CD-ROM. You can change the
command default for the HNDDUP() keyword on command
BSCCDROM10/RTVCDIMG to allow multiple saves from the same library.
4) Issue the command ENDCDP DEV(TAP0x) VOLUME(‘MYCDROM’)
CDSIZE(700) to complete the save process. (Use CDSIZE(650) for older
CD-ROM disks. You can also use larger values for creating images for
DVD-ROMs.)
5) On the PC, choose to create a save/restore based CD-ROM. Select to use an
existing tape when prompted. Follow the additional prompts to complete the
process.
Using the CD-Installer/Save files on
CD-ROM
Using the CD-Installer and CD-Installer save format, you can distribute a save
file based product install on CD-ROM.
It also has built-in support to assist with shipping multiple products and multiple
versions on a single CD-ROM.
If you are not using the CD-Installer save file method for product distribution, this
information does not apply.
The CD-Installer is also referred to as the CD-ROM Installation and Disc
Manager in some documentation.
28
When the user enters LODRUN DEV(*OPT), the CD-Installer program is
initiated. It scans the current CD-ROM to determine its contents. It then builds a
list of products (one product or many) that can be installed on the current release
of OS/400.
Once a product has been selected for installation, it creates save files in QTEMP
that contain your product. It then restores your installation program into QTEMP
and calls it to do the install.
CD-Installer Save File Installation
If you are using the save file based installation approach, you must create an
installation program and a set of save files. This section gives you the guidelines
to use when developing your installation.
1) Develop your installation to run out of library QTEMP. During
installation, the CD-Installer will place your install program and
associated save files into library QTEMP.
2) You can use any number of save files as part of your installation.
3) Do not use save files with any of the following names: CDLOAD,
QTEMP, CDINDEX, CDBASE
4) Name your save files using 8 characters or less. Names with 9 or 10
characters are not supported.
5) Test your installation out of QTEMP manually before burning a
CD-ROM.
6) You may name your install program with any name you want.
Packaging multiple products on a CD-ROM
With the CD-ROM Installation and Disk Manager, you can package multiple
products or versions on a single CD-ROM.
To do this, you need to package each product individually as if it were the only
product on the CD-ROM. When you burn the CD-ROM, you can then create a
subdirectory for each product. The Installation and Disk Manager will
automatically search the CD-ROM and find all of the products on the CD-ROM.
29
Additional Information
Sample 4.—CD-Installer save file installation.
CD-Installer runtime code
Two files, QTEMP and CDLOAD, must be shipped in the root directory of the
CD-ROM as part of the CD-Installer. These files contain the CD-Installer
executables and will be invoked automatically by the command LODRUN
DEV(*OPT). When using the CD-Installer, this should be the documented
method you provide your user’s for installing from CD-ROM.
These files will be automatically created by the CD-ROM Studio for iSeries
Windows client. They will be placed into the same directory as your product
specific files. When creating the CD-ROM, move one copy of these files into the
root directory of the CD-ROM.
If you have multiple products on a single CD-ROM, you may use the QTEMP
and CDLOAD files produced by any of the products and discard the duplicate
files.
These files are also available on the iSeries in library BSCCDROM10.
CD-Installer Base and Index files
Two other files are also produced which must be shipped in the same directory as
your product save files: CDBASE and CDINDEX. These files contain
information and data specific to a single version of your product. These files are
used by the CD-Installer to identify and list the products currently on the
CD-ROM and to convert the CD-ROM files into save files during the installation
process.
Save files
The save files that are part of your product will be saved as CD-ROM files with
the same name. Place all of these files in the same directory as the CDINDEX and
CDBASE files.
30
CD-Installer CD layout map
The map of a CD-ROM using the save file CD-Installer with two separate
products might look like the following:
Path
/ (root)
/PROD1/
/PROD2/
Contents
QTEMP, CDLOAD
CDINDEX, CDBASE, your files, …
CDINDEX, CDBASE, your files, …
Mixed format CD-ROMs
You can use the CD-Installer on the same CD-ROM containing save/restore
format based data.
The QTEMP file in the root directory must be the one provided as part of the
CD-ROM Studio for iSeries package.
Naming conventions
Your product installation cannot have any save files with the following names.
QTEMP, CDLOAD, CDINDEX, CDBASE
Your save files must have 8 characters or less in their name. Save files with
names of 9 or 10 characters in the name are not supported.
The installation program used to install from the save files cannot be named
QINSTAPP. Any other iSeries program name is allowed.
31
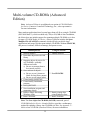
Multi-volume CD-ROMs (Advanced
Edition)
Note: Advanced Edition is an additional cost option of CD-ROM Studio
for iSeries. Contact a Centerfield Technology, Inc., sales representative
for more information.
Many modern applications have become larger than will fit on a single CD-ROM
(ISO-9660 Mode 1), which can hold only 700 (or 650) MB of data. In addition,
the iSeries does not include support for spanning multiple CD-ROMs, as it does
for tapes. CD-ROM Studio for iSeries—Advanced Edition includes the Span
Multiple CDs (SPANCDS) command, which will help you divide large
applications into image files that span multiple CD-ROMs. Without SPANCDS,
this process is tedious, difficult to manage, and prone to error.
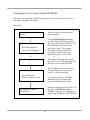
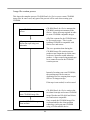
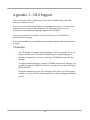
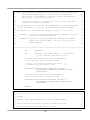
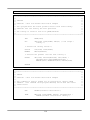
Manual process
Using SPANCDS
, Identify libraries
Determine object sizes in each
library
Organize objects by size to fit
on CD-ROMs—probably
different each time
L Be sure to arrange them to
be restored correctly
Save each set of objects
L Be sure to use 8-character
labels for long library names
L Be sure to use unique labels
Create/modify QINSTAPP
Create/modify installation
program
Save QINSTAPP
Save installation program and
supporting objects
, Retrieve image files using
Windows client
, Burn CD-ROMs
, Identify libraries
, Run SPANCDS
, Retrieve image files
using Windows client
, Burn CD-ROMs
Note: The Save object for CD-ROM (SAV650) command, part of
CD-ROM Studio for iSeries—Standard Edition, provides a rudimentary
method for splitting a library into CD-ROM size files. See Appendix 5—
Multi-volume CD-ROMs (Standard Edition) for more information.
32
Note: This section assumes and builds upon a working knowledge of the
CD-ROM Studio for iSeries commands and Windows client.
Span Multiple CD-ROMs (SPANCDS)
The Span Multiple CD-ROMs (SPANCDS) command facilitates the process of
saving a large distribution for installation using multiple CD-ROM image files. In
its simplest form, it is only necessary to specify the list of libraries to be saved
(LIB).
SPANCDS LIB(LIB1 LIB2)
As SPANCDS is running, the libraries are processed in the order specified in the
Library (LIB) parameter. Each library is checked for size. If the contents of the
library, plus the library object itself, will fit in the space remaining on the current
CD-ROM, the entire library is saved. If the library and its contents are too large
for the space left on the current CD-ROM, its contents are partitioned into sets of
objects that will fit in the remaining space and on successive CD-ROMs. This
process continues until all objects in the library are saved.
The output of SPANCDS includes:
9
9
9
9
9
9
a set of tape or save files
an output file from the save operations
a CD-ROM layout file
programs & a service program to restore the saved libraries
display file used during recovery (in the event of restore problems)
source for the main install program
The Load and Run (LODRUN) command, using a CD-ROM set that is created
from these image files, will restore the specified libraries without modification.
33
Restrictions
1. No single object can be larger than CD-ROM size bytes.
2. This command should not be run in a program that is called from the
CD-ROM Studio for iSeries Windows client.
3. Complete libraries only can be specified. At this time there is no provision for
selecting or omitting individual objects in a library.
4. The system on which objects are restored must be at V5R2M0 or greater. This
is because the installation objects that come with CD-ROM Studio for
iSeries—Advanced Edition were created at target release V5R2M0.
Libraries (LIB)
Specifies a list of a maximum of 100 libraries to be saved.
This is a required parameter.
Save library
Specifies the name of a library to be saved. It must exist at the time the
command is run.
Restore library
Specifies whether the library contents are restored to the same library in
which they were saved, or to a different library.
The possible values are:
*SAVLIB
The library contents are restored to the same library in which they
were saved.
library-name
Specify the name of the library where the saved library contents
are restored.
Device (DEV)
Specifies the name of the device used for the save operation. The device name
must already be known on the system by a device description.
This is a required parameter.
The possible values are:
34
TAP01
The save operation is done using tape device TAP01. The tape is suitable
for use with the Create CD Image from Tape (RTVCDIMG) command,
or with the Multiple CD-ROMs from tape method of the CD-ROM
Studio for iSeries—Advanced Edition Windows client, using an existing
tape.
Note: The Start CD-ROM Premastering Mode (STRCDP) and End
CD-ROM Premastering Mode (STRCDP) commands are run by
SPANCDS when a tape device is used.
*SAVF
The save operation is done using save files in the intermediate output
library. The save files are suitable for use with the Create CD Image
from Save File (CRTCDIMG) command, or with the Multiple
CD-ROMs from save files method of the CD-ROM Studio for iSeries—
Advanced Edition Windows client.
An advantage of using save files is that a tape device is not required. A
disadvantage is that more disk space is needed than when using a tape
device.
tape-device-name
Specify the name of the tape device used for the save operation.
Target release (TGTRLS)
Specifies the release of the operating system on which you intend to restore and
use the object.
Note: Service program XCINSTALL, which is used by the generated INSTALL
program, was created at target release V5R2M0. Therefore, you will not be able
to use the generated program on a system with a release of OS/400 earlier than
V5R2M0. Contact Centerfield Technology, Inc., support for assistance.
The possible values are:
*CURRENT
The object is to be restored to, and used on, the release of the operating
system currently running on your system. The object can also be restored
to a system with any subsequent release of the operating system installed.
*PRV
The object is to be restored to the previous release with modification
level 0 of the operating system. The object can also be restored to a system
with any subsequent release of the operating system installed.
35
target-release
Specify the release in the format VxRxMx. The object can be restored to a
system with the specified release or with any subsequent release of the
operating system installed.
Valid values depend on the current version, release, and modification
level, and they change with each new release. Press F4 to see a list of
valid target release values.
Intermediate output library (OUTLIB)
Specifies the intermediate output library for the deliverables. It must not be in the
list of libraries to be saved, nor be the current library for the user who executes
the command. The default is XCINTERMED.
If the library does not exist, it will be created. If it does exist, it will be cleared.
An inquiry message is sent to make sure that the library should be cleared.
CD-ROM volume ID prefix (CDVOLID)
Specifies the prefix used to generate CD-ROM volume IDs. The prefix can be up
to 14 characters long. The default is PRODUCT_CD_. A 2-digit sequence
number is appended to the ID for each new volume. The first character must be
alphabetic. The remaining characters can be alphanumeric or an underscore.
File ID prefix (FILEID)
Specifies the prefix used to generate image file names. The prefix can be up to 4
characters long. The default is SAVE. A 4-digit sequence number is appended to
the prefix to generate the tape label or save file name for each save operation.
CD-ROM size (CDSIZE)
This is the maximum space on a CD-ROM, in millions of bytes (not megabytes).
Typical values are 700 and 650, but it could be higher (up to 4700) for
installations that use DVDs.
The possible values are:
700
The maximum space on each CD-ROM is 700,000,000 bytes.
cd-rom-size
The maximum space on each CD-ROM is cd-rom-size million bytes.
36
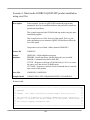
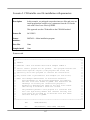
Exit programs (EXITPGM)
Specifies qualified names of up to 4 programs that the installation program will
call. The programs and any objects they use directly will be packaged with
program INSTALL, file XCCDLAYOUT, service program XCINSTALL, and
display file RECOVER.
The exit points are:
General pre-processing
General post-processing
Library pre-processing
Library post-processing
Before any libraries are processed
After all libraries have been processed
Before each library is processed for the first time
After each library is processed for the last time
The possible values are:
*NONE
The exit point is not used.
program-name
Specify the name and library of the program.
The only possible library value is:
library-name
Specify the name of the library where the program is located.
All programs, and objects to which they refer, must exist at the time the command
is run.
37
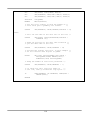
Typical SPANCDS scenario
This outlines the approach used to archive a set of libraries on 1 or more
CD-ROMs. The tape drive is used to save the data. The resulting set can be used
to restore the libraries on the same or another system.
1) Identify the libraries you want to put on CD-ROM. This example will use
SAVLIB01 and SAVLIB02.
2) Insert a suitable tape into device TAP01.
3) Run the Span Multiple CD-ROMs (SPANCDS) command:
SPANCDS (SAVLIB01 SAVLIB02)
4) Use the Multiple CD-ROMs from tape method of the CD-ROM Studio for
iSeries—Advanced Edition Windows client to retrieve the image files to your
PC.
5) Using the CD-ROM Layout report for reference, burn the CD-ROMs. Use the
volume IDs listed in the report and put the image files on their respective CDROMs.
If both SAVLIB01 and SAVLIB02 are 300 MB in size, there will be one
CD-ROM.
CD-ROM volume ID
PRODUCT_CD_01
Image files
SAVE0001
SAVE0002
Library
SAVLIB01
SAVLIB02
Size
300 MB
300 MB
If both SAVLIB01 and SAVLIB02 are 600 MB in size, there will be two
CD-ROMs.
CD-ROM volume ID
PRODUCT_CD_01
PRODUCT_CD_02
Image files
SAVE0001
SAVE0002
SAVE0003
38
Library
SAVLIB01
SAVLIB02
SAVLIB02
Size
600 MB
100 MB
500 MB
Deliverables
The Span Multiple CDs (SPANCDS) command generates a number of objects
on the iSeries system. These include the saved library data, 2 data files and
reports, a source file, a QINSTAPP program, an installation program, a service
program, and a display file. With the exception of data saved to tape, they are all
located in the intermediate output library (OUTLIB).
Save data
When a tape device is specified on the Device (DEV) parameter, the
libraries specified in the Library (LIB) parameter are saved to a tape that
is suitable for use with the Create CD Image from Tape (RTVCDIMG)
command, or with the Multiple CD-ROMs from tape method of the
CD-ROM Studio for iSeries—Advanced Edition Windows client, using an
existing tape.
When save files are specified, the libraries are saved to save files that are
suitable for use with the Create CD Image from Save File
(CRTCDIMG) command, or with the Multiple CD-ROMs from save
files method of the CD-ROM Studio for iSeries—Advanced Edition
Windows client.
The file labels or save file names are constructed from the File ID prefix
(FILEID) followed by a 4-digit sequence number.
Save data output file
The save operations output file, XCSAVOUTF, is the database file to
which member-level information from the save operations is directed. A
report is created from this file. This can be used by developers as they see
fit, perhaps to ensure that everything was saved as intended. SPANCDS
does not use it once it has finished.
CD-ROM layout file
The CD-ROM layout file, XCCDLAYOUT, specifies the CD-ROM
volume IDs and the image files that should be placed on each. It is used
during installation to check that certain system values are set
appropriately. A report is created from this file that is useful when
recording the CD-ROMs.
39
Source code and programs
A CLLE source file, QCLSRC, is created. There is only one member, for
the module from which the program, INSTALL, is created.
Note: The generated source code can be modified by the customer.
Centerfield Technology, Inc., does suggest, however, that it should be left
as is. It is easier and more reliable to customize the process using the exit
programs. See Using Exit Programs for details.
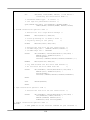
Program: INSTALL
This is the main installation program, restored and called by
QINSTAPP. INSTALL performs the following actions:
9 Calls the CHECKAUTH procedure
9 Calls the general pre-processing exit program
9 For each image file:
9 Calls the library pre-processing exit program (only when
first image file for the library)
9 Checks whether to skip the library (exit program
parameter)
9 Calls the CHECKCD procedure
9 Checks whether user cancelled installation
9 Calls the RESTORELIB procedure
9 Calls the library post-processing exit program (only when
last image file for the library)
9 Calls the general post-processing exit program
The program is created from this main module and uses procedures
in the XCINSTALL service program (see below).
Program: QINSTAPP
This program is restored and called when LODRUN is executed.
Note: When save files are used, the image file SAVFINSTAP,
installed as a part of CD-ROM Studio for iSeries, contains
QINSTAPP. It is copied and renamed to QTEMP by the Create
CD Image from Save File (CRTCDIMG) command. When tape
is used, the program TAPEINSTAP is copied to QTEMP as
QINSTAPP and saved to tape from there.
40
Other installation objects
Service program XCINSTALL and display file RECOVER, installed as
a part of CD-ROM Studio for iSeries—Advanced Edition, are copied to the
intermediate output library by SPANCDS.
Service program: XCINSTALL—Routines provided by Centerfield
Technology, Inc.
This service program contains the routines called directly by the
program INSTALL, as well as other supporting routines.
Procedure: CHECKAUTH—Check authority system values
This procedure checks the values of system values that
affect installation:
9 QALWUSRDMN (Allow user domain objects in
libraries)
9 QALWOBJRST (Allow object restore option)
9 QUSEADPAUT (Use adopted authority)
Procedure: CHECKCD—Check that correct CD is mounted
This procedure checks whether the correct CD-ROM is
loaded. If not, it prompts the user to load the next volume.
The user can also skip to the next library or cancel the
installation from here.
Note: If the installation is using image catalogs, the Work
with Catalog Entries (WRKIMGCLGE) is run.
Procedure: DEC9TOCHAR—Convert 9-digit packed to 9-byte
character
This procedure converts packed numeric values to
left-adjusted, blank-padded character values, primarily for
use in message data.
Procedure: GETMSGTXT—Get message and help text
This procedure gets message and second-level text during
the recovery phase.
Procedure: RECOVER—Recover from objects not restored
This procedure is called when there are problems and/or
security changes during the restore of a library. See
Installing the Distribution for more information about this
phase.
41
Procedure: RESTORELIB—Restore a library
This procedure restores the save data. If the save command
was SAVOBJ, the restore library is created first. If save
files were used, the image file is copied to QTEMP from
the current volume. Then the appropriate restore command
is run, based on which save command was used.
Procedure: RESTOREOBJ—Restore an object
This procedure is used during the recovery phase to restore
an object that did not get restored.
Procedure: XCSETDLVRY—Set message queue delivery
mode
This procedure sets the delivery mode of the workstation
message queue. It sets the mode to *BREAK at the start
and resets it at the end.
Display file: RECOVER—Recover from objects not restored
This display file is used during the recovery phase.
These objects are saved for use in a LODRUN installation.
42
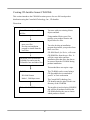
Using Exit Programs
The general-purpose installation programs generated by SPANCDS will restore
the specified libraries from a set of CD-ROMs using the Load and Run
(LODRUN) command. Basic authority checks are made to insure successful
installation, and the user is prompted to load or mount successive CD-ROM
volumes.
However, you may have special considerations for your installations. Therefore,
exit points have been provided that let you customize the installation.
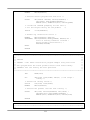
Common considerations
Example shells for the exit programs can be found in source file
BSCTOOLKIT/SPANCDS. They show which parameters must be
passed, if any. They also demonstrate the minimum necessary error
handling.
Errors must be handled by the exit program. If the error is severe enough
to stop the installation, the exit program can send any CPF0000 escape
message to the *PRV program queue, since the INSTALL program has a
general monitor for those messages, as well as MCH0000 messages.
INSTALL specifically monitors for CPF9898 after each exit program
call, but other CPF0000 messages will have the same outcome.
The exit programs and the objects they use are packaged together in image
file QTEMP (when tape was used) or XCINST (when save files were
used). The Display Program References (DSPPGMREF) command is
used to discover which objects are used. Note: These objects must reside
in the same library as the respective exit program. Move or copy these
objects to the respective library before running SPANCDS.
Caution: Only objects used by the exit programs themselves will be
discovered. Therefore, ensure that programs or service programs do not
use objects that are not referred to by the exit program.
At most 4 object types can be discovered by SPANCDS:
9
9
9
9
*PGM
*FILE (DSPF & PRTF only)
*DTAARA
*SRVPGM
43
In addition, not all program types will report all these object types:
3C
no information is provided for C-language programs except
for ILE C-language programs (CLE)
3 CBLLE *FILE, *PGM, and *SRVPGM
3 CL
*FILE, *PGM, and *DTAARA
3 CLE
*SRVPGM
3 CLLE
*FILE, *PGM, *DTAARA, and *SRVPGM
3 COBOL *FILE and *PGM (literal names on CALL command)
3 RPG
*FILE, *DTAARA, and *PGM
3 RPGLE *FILE, *PGM, *DTAARA, and *SRVPGM
There are at least 2 ways to use other object types. The first might be to
have the general exit program create the objects themselves. The other
might be for the first library to contain the objects in question. Of course,
this would not be able to help the general pre-processing exit program, or
the library pre-processing exit program when called for the first library.
General pre-processing exit point
Use this exit point to perform one-time processing at the start of the
installation. This could include authority checks, user validations, and
other setup operations that apply to the entire installation.
No parameters are passed to this program. Send a CPF0000 escape
message back to the *PRV program queue to halt the installation.
General post-processing exit point
Use this exit point to perform one-time processing at the end of the
installation. This could include data conversions and cleanup operations.
No parameters are passed to this program. Send a CPF0000 escape
message back to the *PRV program queue to halt the installation.
Library pre-processing exit point
Use this exit point to perform processing before restoring a library. It is
also used to set whether to skip processing for a library, based, perhaps, on
user input or local conditions. It is called before processing the first or
only image file for the library.
Both the save library and restore library names are passed to the exit
program, as well as a “skip this library” parameter, set to False (‘0’). Set
this parameter to True (‘1’) in order not to process the library. Send a
CPF0000 escape message back to the *PRV program queue to halt the
installation.
44
Library post-processing exit point
Use this exit point to perform processing after restoring a library. It is
called after processing the last or only image file for the library.
Both the save library and restore library names are passed to the exit
program. Send a CPF0000 escape message back to the *PRV program
queue to halt the installation.
45
Using the Generated Image Files
You must first execute the Span Multiple CDs (SPANCDS) command on the
iSeries in order to generate the save data and other output. You can then use the
CD-ROM Studio for iSeries—Advanced Edition Windows client, or one of the
CD-ROM Studio for iSeries commands, to create the image files.
Using the CD-ROM Studio for iSeries—Advanced Edition Windows
Client with SPANCDS
The easiest way to bring the image files to your Windows PC for
recording on CD-ROMs is to use one of the Advanced Edition methods
in the Windows client. You will be prompted only for settings that you
can change. Other settings that you see in the Standard Edition methods
are preset and unchangeable for these methods. You will still see them in
the client window and on the client reports.
When creating a new profile using one of the Advanced Edition methods,
merely follow the wizard to create the image files on your Windows PC.
Tape
When you used a tape device to save the specified libraries, use the
Multiple CD-ROMs from tape method. Note: Since the data was already
saved by the SPANCDS command, you must use an existing tape.
Save files
When you used save files to save the specified libraries, use the Multiple
CD-ROMs from save files method. The product description and
installation program are given the hidden value, *SPANCDS.
Add the save files from the intermediate output library (OUTLIB). Be
sure to include XCINST, which contains the program, INSTALL, the
CD-ROM layout file, XCCDLAYOUT, the service program
XCINSTALL, the display file, RECOVER, and any exit programs and
objects they will use.
You can also use dynamic selection. This specified program needs to add
all the save files in the intermediate output library (OUTLIB) to the list of
save files. It is not generated by the Span Multiple CDs (SPANCDS)
command.
Using the CD-ROM Studio for iSeries commands with SPANCDS
You can use CD-ROM Studio for iSeries commands in order to create
image files from the output of SPANCDS. The image files can then be
46
downloaded to a PC where they can be recorded to CD-ROMs or to ISO
images on the hard drive.
Tape
When you used a tape device to save the specified libraries, use the
Create CD Image from Tape (RTVCDIMG) command.
1. At the OS/400 command line, enter the command RTVCDIMG and
press F4.
2. From the Create CD Image from Tape display, provide the following
information and press Enter:
9 Tape device (required)
9 Target library (optional)
Use the defaults for the remaining parameters.
Save files
When you used save files to save the specified libraries, use the Create
CD Image from Save File (CRTCDIMG) command. Set both the
Product description (PRODDESC) and the Installation program
(INSLIB) parameters to the special value, *SPANCDS.
1. At the OS/400 command line, enter the command CRTCDIMG and
press F4.
2. From the Create CD Image from Save File display, provide the
following information and press Enter:
9
9
9
9
Product description (must be set to the special value *SPANCDS)
Save files (be sure to include XCINST)
Installation program (must be set to the single value *SPANCDS)
Target library (optional)
Use the defaults for the remaining parameters. The release information
cannot be set when PRODDESC and INSPGM are set to
*SPANCDS.
Recording the Image Files
Developers must be sure to use the CD-ROM volume IDs as listed in the
CD-ROM layout report. They must also put the image files on their
respective CD-ROM volumes. This is most likely a manual process, so it
47
is important to be careful, since the installation program depends on these
being the same as they are in the CD-ROM layout file.
Starting with V5R2 of OS/400, support for virtual optical drives has been
added to the iSeries. CD-ROM images are added to an image catalog
directly from CD-ROMs or from ISO images stored in the IFS. The image
catalog is then loaded to the virtual optical device.
CD Recording software usually has an option to create CD-ROM images
on the hard drive. These images are suitable for use in image catalogs on
the iSeries. Note: Be sure to use the standard ISO format for recording
these images. Some software (Roxio, e.g.) has a proprietary format that
cannot be used for this purpose.
48
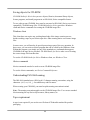
Installing the Distribution
The LODRUN command is used to install the distribution. The QINSTAPP
program, which is restored to QTEMP, restores the installation objects and calls
the INSTALL program. The user is notified that the workstation message queue
will be changed to *BREAK mode. Authority checks are performed, and, if no
problems are found, installation continues. The CD-ROM layout file,
XCCDLAYOUT, is used during authority checks.
Then the (optional) general pre-processing exit program is called, before any
libraries are processed. If no problems are found, installation goes on to process
each library in the order specified on the SPANCDS command.
For each library, the (optional) library pre-processing exit program is called. The
parameters are the save library name, the restore library name, and a logical value
that controls whether to skip the library. In the event that a library has been split
into multiple image files, this exit program is called only the first time the library
is being processed.
If no problems are found and the library should not be skipped, a check is
performed to be sure that the correct CD-ROM volume is loaded. If not, the user
is prompted for the correct volume, until either the correct volume is found or the
user cancels the whole operation. If image catalogs are used, the Work with
Catalog Entries (WRKIMGCLGE) is run.
NOTE: Beginning with V5R3M0 of i5/OS (OS/400), mounting the next
CD-ROM volume will take place automatically, so long as the image
catalog entries are in order, with no gaps in the image entry indexes.
This is best accomplished by using *AVAIL for the IMGCLGIDX
parameter on the ADDIMGCLGE command.
When the expected volume is found, the actual restore process begins. If the
images are based on save files, the save file is copied to QTEMP. The restore
library is created, if necessary, when objects were save, not the entire library.
Then the appropriate save command is executed.
NOTE: Because restore errors and security changes can occur, there is a
recovery procedure that is called at this time. It checks to see whether
there are any problems and then brings up a display, where the user can
take corrective action. See Recovery phase below for more information.
Other errors will cause the installation to end. It is possible to restart the
installation where it left off, once the cause of the error has been
corrected. See Recovery phase below for more information.
49
The (optional) library post-processing exit program is now called with the save
library name and the restore library name as the parameters. In the event that a
library has been split into multiple image files, this exit program is called only the
last time the library has been processed.
Finally, the (optional) general post-processing exit program is called, after all
libraries are processed. The workstation message queue is restored to its original
delivery mode.
Recovery phase
After every restore command, the recovery procedure is called. If it finds
any errors or security changes, it displays a list of the affected objects. The
user can then take corrective action and/or proceed with the installation.
9 The header displays information about the file on the CD-ROM that is
being processed, including the number of objects restored and not
restored.
9 The header then gives brief instructions for the various actions that the
user can take.
9 Then follows the list of objects that were not restored or that had
security changes. The user can
à display message details, if any;
à restore an object that has not been restored.
9 Colors distinguish the kinds of problem encountered.
50
à
à
à
à
Red means the object was not restored and there is an error
message. Corrective action should be taken.
Yellow means the object was not restored but there is no error
message. The object should be restored (option 8) after problems
have been rectified.
Turquoise means the object was restored but there is diagnostic
information about it. It might be necessary to make adjustments in
security, etc.
Green means the object has been restored successfully using option
8.
9 There are 2 options that can be applied to an object:
à 5=Display message presents the message details:
à
8=Restore object attempts to restore the object, using the same
parameters as the INSTALL program does.
9 The F8=Job log and F9=Command line function keys provide the
means to correct errors.
9 The remaining function keys provide various ways to proceed:
à F10=Continue is used to continue where the installation left off.
The library post-processing program will be called, if there is one.
à F11=Skip file is used to stop processing the file being processed
and continue with the next file. The library post-processing
program will not be called, if there is one.
à F12=Cancel is used to completely cancel the installation. The user
can start again in the middle of the process by using the reentry
capability of the INSTALL program.
51
In order to resume installation from the beginning using a physical
CD-ROM drive, enter the following command:
CALL QTEMP/INSTALL (OPT01 '0' ' ')
In order to resume installation with file SAVE0005 using a
physical CD-ROM drive, enter the following command:
CALL QTEMP/INSTALL (OPT01 '0' 'SAVE0005')
In order to resume installation from the beginning using an image
catalog, enter the following command:
CALL QTEMP/INSTALL (OPTVRT01 '1' ' ')
In order to resume installation with file SAVE0005 using an image
catalog, enter the following command:
CALL QTEMP/INSTALL (OPTVRT01 '1' 'SAVE0005')
NOTES: Use the device names on your system.
Be sure to load the CD-ROM volume that contains the
file with which you want to begin. If you are using an
image catalog, use the Work with Image Catalog
Entries (WRKIMGCLGE) command to mount the
correct volume.
Using iSeries image catalogs
Beginning with V5R2 of OS/400, IBM has added support for virtual
optical drives. When installing IBM PTFs and licensed programs from a
virtual drive, you only need to add all the CD-ROM images to an image
catalog, and the installation can proceed without your involvement. With
3rd-party installations at V5R2, you need to mount each image manually.
Fortunately, you can do this remotely—you do not need to be on-site to do
this. Beginning with V5R3, CHECKCD will automatically mount each
image, if the image catalog entries were added in order, with consecutive
indexes that start at 1.
The installation program detects that the CD-ROM drive is a virtual
optical device. After CHECKCD has prompted the user to load the next
image file, it runs the Work with Image Catalog Entries
(WRKIMGCLGE) command when it finds that the next image file is not
on the currently mounted volume, or if image catalog entries are out of
sequence.
52
Install your product from CD-ROM images in the integrated file system
You can provide ISO CD-ROM images that can be downloaded from your
website. These images are a convenient way to install from a directory on
your iSeries server. Alternatively, your customers can add images from
multiple physical CDs to an image catalog.
The following options can be taken against images in an image catalog:
9 Unload: This option lets you unload an optical image from the virtual
optical device. Only images that have a status of Loaded can be
unloaded.
9 Load: This option lets you load an optical image into the virtual
optical device. Images that have a status of unloaded or mounted can
be loaded. The effect of loading a mounted optical image is to
unmount it and leave it in loaded status.
9 Mount: This option lets you mount an optical image into the virtual
optical device and activate it. Only images that have a status of loaded
can be mounted.
Create the optical device
Note: These commands are usually performed once.
3. At the OS/400 command line, enter the command CRTDEVOPT and
press F4.
4. From the Create Device Description (Optical) display, provide the
following information and press Enter:
9 Device description (Provide a name for the new device
description.)
9 Resource name (*VRT)
9 Device type(*RSRCNAME)
Create an image catalog
1. At the command line, enter the command CRTIMGCLG and press
F4.
2. From the Create Image Catalog display, provide the following
information and press Enter:
53
9 Image catalog name
9 Directory name
Add image catalog entries
1. At the command line, enter the command WRKIMGCLGE and press
F4.
2. From the Work with Catalog Entries display, provide the following
information and press Enter:
9 Image catalog name
3. From the Work with Image Catalog Entries display, select Add
(option 1) to add an optical image to the image catalog and press
Enter.
4. Continue adding the remaining optical images. Add the images in the
order shown in the CD-ROM layout report.
Load the virtual optical device
1. At the command line, enter the command LODIMGCLG and press
F4.
2. From the Load or Unload Image Catalog display, provide the
following information and press Enter:
9 Image catalog name
9 Device name (the name of the virtual optical device)
The first image catalog entry will be set to mounted and the rest will
be in loaded status.
Start the installation
1. At the command line, enter the command LODRUN and press F4.
2. From the Load and Run display, provide the following information
and press Enter:
9 Device name (the name of the virtual optical device)
3. Installation will begin. When installation asks for the next CD-ROM,
follow the procedure outlined below.
54
Mount the next volume
1. At the command line of a second interactive session, enter the
command WRKIMGCLGE and press F4.
2. From the Work with Catalog Entries display, provide the following
information and press Enter:
9 Image catalog name
3. From the Work with Image Catalog Entries display, take the
following steps:
9 Press F11 to see the volume names
9 Load (option 8) the mounted volume (might not be needed)
9 Mount (option 6) the next volume
55
Recommendations
This section contains tips and suggestions that could help make your installation
smoother.
1) Because the INSTALL program tries to restore over any objects that are
already there, you might want to restore objects to an empty library on the
target system, then copy objects into the actual product library. This will
minimize several kinds of problems that you may encounter in the restore
process.
2) Be very careful with regard to physical and logical file relationships.
SPANCDS does not verify the order in which libraries are to be saved, with
respect to logical files that reside in different libraries than their parent
physical files.
3) Feel free to use the information in the Installing the Distribution section in
your installation instructions, especially about the recovery phase and using
image catalogs.
4) It is important to tell the final user, the person running the installation, to
contact technical support before leaving an installation in an unfinished state.
5) Remember, the INSTALL program is essentially a “restore” engine. Its sole
purpose is to restore saved data to a target system.
Therefore, customization is in the hands of the exit programs. E.g.,
environmental checks are probably best done in the general pre-processing
exit program, where you can check for object locks, take care of things like
subsystem descriptions and other system objects, etc. You could also set flags
to condition the subsequent processing of each library. The sky’s the limit.
56
Automating the CD-ROM creation process
Creating an image packaging program for use with the CD-ROM
Studio for iSeries Windows client
You can write a program on the iSeries to create the save data for the CD-ROM that is
called by the Windows client.
This section does not apply when using the CD-Installer save file format.
The program will be passed a ten character device name is input. To create the necessary
data, simply use the appropriate save command to save the objects you want to tape. You
may do as many save operations as necessary.
The program can be written in any iSeries language. Your program can do any
preparation necessary for packaging your product. The program can call additional
programs as necessary.
Once the call to your program is complete, CD-ROM Studio for iSeries will read the save
data from tape and create files for your product that can be placed on CD-ROM.
For a LODRUN-QINSTAPP installation, your program must save the program
QINSTAPP from the library QTEMP.
Notes: 1) You cannot use the following API calls within your iSeries program. CD-ROM
Studio for iSeries is already managing the CD-ROM save environment on the
iSeries. The use of these API calls will cause either your program or CD-ROM
Studio for iSeries to fail.
QLPCDRST, QlpHandleCdState
QLPCDINF, QlpGenCdPremasteringInfo
2) Any save operations performed to tape will result in data that can be used to
create CD-ROM image files.
57
Example
This example is a packaging program for a LODRUN based CD-ROM.
PGM PARM(&DEV)
DCL &DEV *CHAR 10
SAVLIB LIB(PRODLIB) DEV(&DEV) LABEL(&DEV)
DTACMP(*NO) COMPACT(*NO) /* Save product library */
SAVOBJ OBJ(*ALL) LIB(SAMPLES) DEV(&DEV)
LABEL(SAMPLES) DTACMP(*NO) COMPACT(*NO)
/* Save sample library */
CRTDUPOBJ OBJ(QINSTAPP) FROMLIB(MYLIB) OBJTYPE(*PGM)
TOLIB(QTEMP) NEWOBJ(*OBJ)
/* Put install program into QTEMP */
SAVOBJ OBJ(QINSTAPP) LIB(QTEMP) DEV(&DEV) DTACMP(*NO)
COMPACT(*NO)
/* Save install program from QTEMP */
/* It must be save from QTEMP since that is where
the LODRUN commands expects it to be
restored from */
ENDPGM
58
Using dynamic selection to pick save files
When creating a save file based CD-ROM, you can create a program to
dynamically select the save files to include based on a value selected by the user
when using the Windows client.
The following is an example program, which dynamically selects the save file
specified by the user.
PGM
PARM(&VALUE)
DCL
VAR(&VALUE) TYPE(*CHAR) LEN(10)
BSCCDROM10/ADDCDF SAVF(DANLIB/&VALUE)
ENDPGM
59
iSeries Command Reference
iSeries Save Commands for CD-ROM
This information applies to the system save commands that you use for save and
restore operations. See the IBM iSeries system manual Backup and Recovery Basic, SC41-4304-01, for complete information on save/restore based and restore.
Note: To save objects onto CD-ROM, they must be converted to CD-ROM
format using CD-ROM Studio for iSeries. If you do not use the CD-ROM Studio
for iSeries Windows client or the STRCDP/ENDCDP commands provided as part
of this product, the result of the save operation will not produce save data that is
compatible with CD-ROM.
The following save/restore commands support CD-ROM.
SAVLIB/RSTLIB
SAVOBJ/RSTOBJ
SAVDLO/RSTDLO
SAV/RST
Save/Restore library
Save/Restore object
Save/Restore document library object
Save/Restore object
It is important to understand how these commands are used to create an iSeries
CD-ROM image file. Before creating your program for CD-ROM Studio for
iSeries or when using the save commands with the iSeries product commands,
look at the example programs in this manual.
60
Most of the parameters on the save commands are the same for CD-ROM as they
are for tape. The following parameters have special meaning for CD-ROM.
File label (LABEL)
The LABEL keyword can be used to name the resulting CD-ROM image
file. By default, the label will be the library you are saving.
ISO-9660 requires the CD-ROM image file to be a maximum of 8
characters in length. You can use the LABEL keyword to specify a file
name for libraries that are 9 or 10 characters long to adhere to the
ISO-9660 standard as an alternative to renaming the file using the
CD-ROM Studio for iSeries Windows client.
Data compression (DTACPR)/ Data compaction (COMPACT)
CD-ROM on the iSeries does not support data compression and
compaction options that can be specified for tape drives. Both of these
keywords should be set to *NO when doing save operations for CD-ROM.
61
Restore Commands for CD-ROM
This information applies to the system restore commands that you use for save
and restore operations. See the IBM iSeries system manual Backup and
Recovery - Basic, SC41-4304-01, for complete information on save and restore.
It is important to understand how to restore from a CD-ROM before creating your
installation program. The following save/restore commands support CD-ROM.
SAVLIB/RSTLIB
SAVOBJ/RRSTOBJ
SAVDLO/RSTDLO
Save/Restore library
Save/Restore object
Save/Restore document library object
Optical File (OPTFILE)
When restoring from CD-ROM using the restore commands that support
CD-ROM, the parameter Optical file (OPTFILE) is valid.
The OPTFILE keyword needs to contain the path of the CD-ROM image
file from which you are going to restore objects. If the library name is
different from the image file name on the CD-ROM, the image file name
must also be specified.
The following shows the valid values that can be used with the OPTFILE
keyword.
Value
Description
OPTFILE(‘/’) default value
Restore from an image file that matches the
specified file label (LABEL) from the root
path on the CD-ROM.
OPTFILE(‘/SUBDIR/’)
Restore from an image file that matches the
file label (LABEL) from the path /SUBDIR/
on the CD-ROM.
OPTFILE(‘/SUBDIR/FILE.;1’)
Restore from the image file FILE located in
the path /SUBDIR on the CD-ROM.
62
Restore Examples
In all of these examples, we have done a SAVLIB of QTEMP. We now want to
restore the object from CD-ROM.
Root directory, image name same as library name
CD-ROM path\image: \QTEMP
Restore command: RSTLIB SAVLIB(QTEMP) DEV(*OPT)
Alternative 1: RSTLIB SAVLIB(QTEMP) DEV(*OPT) OPTFILE(‘/’)
Alternative 2: RSTLIB SAVLIB(QTEMP) DEV(*OPT) OPTFILE(‘/QTEMP.;1’)
Subdirectory, image name same as library name
CD-ROM path\image: \AS400\QTEMP
Restore command: RSTLIB SAVLIB(QTEMP) DEV(*OPT)
OPTFILE(‘/AS400/’)
Alternative 1: RSTLIB SAVLIB(QTEMP) DEV(*OPT)
OPTFILE(‘/AS400/QTEMP.;1’)
Subdirectory, image name different than library name
CD-ROM path\image: \AS400\QTEMPV37
Restore command: RSTLIB SAVLIB(QTEMP) DEV(*OPT)
OPTFILE(‘/AS400/QTEMPV37.;1’)
Data preparation commands
For a save-restore based CD-ROM, the iSeries save data must be prepared in a special
unformatted format that can be converted to ISO-9660.
You can use these commands to prepare a tape for CD-ROM and use the CD-ROM
Studio for iSeries Windows client to create the actual ISO-9660 images.
Start CD-ROM Premastering Mode (STRCDP)
Prepares the current iSeries job for creating unformatted save/restore data. Once
this command is issued, all subsequent SAVxxx operations will produce
unformatted save/restore data when writing to tape.
End CD-ROM Premastering Mode (ENDCDP)
63
Ends the special premastering mode for SAVxxx operations. Once issued,
SAVxxx operations will once again produce normal save data to tape on save
operations.
If a SAVLICPGM save operation was performed, this command also adds
additional information about the save operation to the end of the tape to be used
while generating the CD-ROM ISO-9660 image.
Tape Device (DEV)
The tape device used for the save operations.
Volume Id (VOLUME)
The Volume Label you will use when creating the CD-ROM. This
parameter is ignored except for SAVLICPGM.
CD-ROM Size (CDSIZE)
The maximum size in MB of the file labels on tape. A premastering API
will end the operation if this size is exceeded. Note: Use a large value for
preparing to put image files on DVD-ROM.
64
CD-ROM image creation commands
These commands take your prepared data and convert the data into a format that is
ISO-9660 compliant.
Create CD Image from Tape (RTVCDIMG)
Converts unformatted tape data to ISO-9660 compliant CD-ROM images.
Device (DEV)
Device containing tape with prepared save data.
Target library (TGTLIB)
The library to place the ISO-9660 compliant CD-ROM image files.
Volume label (VOLUME)
The Volume Label you will use when creating the CD-ROM. This
parameter is ignored except for SAVLICPGM.
65
Create CD Image from Save File (CRTCDIMG)
Converts save file data to Centerfield Technology CD-ROM Installation and Disk
Manager compliant CD-ROM images.
Product description (PRODDESC)
A description to be displayed when displaying this set of save files.
Save files (SAVF)
The save files to be shipped as part of the product.
Installation program (INSPGM)
The installation program that restores the data from the save files.
Target library (TGTLIB)
The library to place the resulting CD-ROM image files.
Base release level (OSRELEASE)
The minimum release to allow the restore operation.
Only release (ONLYRLS)
Specifies whether this product should only be displayed when at the base
release specified or at the base release and all future releases.
Add save file to CD-ROM (ADDCDF)
The ADDCDF command can be used within an iSeries program to
dynamically register a save file to be included on a CD-ROM. This
command can be issued multiple times within a program. If a save file
with the same name is included multiple times, even if from different
libraries, only the last save file with that name will be included on the
CD-ROM.
66
Centerfield CD-ROM Server Commands
Start CD-ROM Server (STRBSCSVR)
This command starts the CD-ROM Server on the iSeries. It is required so that the
Windows client can communicate with your iSeries system.
End CD-ROM Server (ENDBSCSVR)
This command ends the CD-ROM Server job on your iSeries system.
67
Windows Client
The following sections give you the information for creating an ISO-9660 compliant,
iSeries compatible, CD-ROM image using the CD-ROM Studio for iSeries Windows
client.
Using the CD-ROM image creation wizard
The quickest and easiest way to create a CD-ROM image is to use the image creation
wizard. The menus can be used to change specific attributes, options, and content once
you have created a basic CD-ROM image definition using the wizard.
Creating a new definition
The first step in creating the CD-ROM image is to define the image. The definition
contains
•
•
iSeries objects to be placed on the CD-ROM
Options to use while creating the CD-ROM image
When you start the CD-ROM Studio for iSeries Windows client, a splash screen is
displayed for a few seconds. Then it automatically prompts to create or open a CD-ROM
definition
Opening an existing definition
To open an existing definition, either choose File->Open or use the folder button on the
toolbar. This lets you reuse an existing CD-ROM definition after it has been defined
once.
68
69
Selecting an iSeries system
Select the iSeries system that contains the libraries, objects, and programs you want to
save onto CD-ROM.
System Name
The name you gave the iSeries system during configuration.
User profile
The user profile for the selected iSeries system. The authority of this user profile
will be used while creating the CD-ROM contents. Only objects that the user
profile is allowed to access can be saved. The user profile used must have
authority to use the system save and restore commands and attached tape device.
Password
The password for the user profile selected.
See Creating your first CD-ROM image files for information on configuring a
connection.
70
Selecting the CD-ROM image type
CD-ROM Studio for iSeries creates CD-ROM images that work with iSeries save files or
with save and restore commands and with the LODRUN and SAVLICPGM commands.
This dialog lets you choose the type of image you want to create. Based on the image
type you select, intelligent prompting and processing will be done for that type of
CD-ROM.
The following selections are allowed.
Save/restore based install using CD-ROM
This lets you create a CD-ROM using the native save and restore format. It is
compatible with the restore commands, LODRUN, and RSTLICPGM.
Use this format for system archiving.
Save file based install using CD-ROM
This lets you create a CD-ROM install using save files. This method uses the
CD-Installer provided as part of this package. See Using the CD-Installer/Save
files on CD-ROM for more information.
Multiple CD-ROMs from tape
This Advanced Edition selection lets you create multiple CD-ROMs after running
the SPANCDS command. The command LODRUN is used to restore the data.
See Multi-volume CD-ROMs (Advanced Edition) for more information.
71
Multiple CD-ROMs from save files
This Advanced Edition selection lets you create multiple CD-ROMs after running
the SPANCDS command. The command LODRUN is used to restore the data.
See Multi-volume CD-ROMs (Advanced Edition) for more information.
72
Selecting the CD-ROM source data
When creating a CD-ROM using the native save/restore format, you must specify the
source of the save data.
There are two ways to select the contents for the CD-ROM.
Call an iSeries program to save the data to tape
This lets you call a program on the iSeries. The program can use normal save
commands to save the data to be included on the CD-ROM to tape.
Use an existing tape containing the CD-ROM contents
If you have an existing tape that contains the save data for creating the CD-ROM
images, you can use that data as the source for a CD-ROM. The tape must contain
data for CD-ROM creation. A normal save tape will not contain the correct data.
73
Saving objects using an iSeries program
When creating a CD-ROM using the native save/restore format, you must specify the
program that creates the source save data.
Select the iSeries program you have written to save the required objects to tape. See
Creating an image packaging program for use with the CD-ROM Studio for iSeries
Windows client for information on creating the program.
Library
The library name containing the program to call.
Program
The program to call. The program must follow the guidelines stated in Creating
an image packaging program for use with the CD-ROM Studio for iSeries
Windows client.
Note: This panel may not respond while creating the information for the drop down
selection boxes. This is normal.
74
Tape device
When creating a CD-ROM using the native save/restore format, you must specify the
tape drive to contain the save data.
This is the tape drive to use while creating the CD-ROM contents. The raw save and
restore data on tape is used to create the ISO-9660 CD-ROM files.
If you selected Use an existing tape containing the CD-ROM contents on the previous
dialog, the CD-ROM image will be created from save data on the existing tape.
Otherwise, the tape will be used during the CD-ROM creation process. A tape large
enough to hold the CD-ROM contents must be in the drive. The tape will be initialized as
part of the premastering process.
Once complete, the tape will contain the save data to be converted to CD-ROM format.
You can save this tape, send it to a duplication service if they prefer receiving iSeries
save data on tape, or you can reuse the tape for other purposes.
Tape device
The tape device to use during the premastering process.
75
Product profile
When creating a CD-ROM using the save file format, you must provide details about the
product that can be used during the installation process.
Enter the required product information.
Product description
This is the name of the product and an associated description. It can be up to 70
characters. The description is displayed by the CD-Installer during the iSeries
installation. To translate this description into other languages, see Appendix 3—
NLS Support.
Base release
This is the base OS/400 release supported by this product or version.
Only allow installation for this release
Check this option if you only want this product installed for the release specified.
If you do not check this option, the product will be made available on any release
of OS/400 that is newer than the base release specified.
76
Save file list
When creating a CD-ROM using the save file format, you must select the set of save files
to be included as part of the product.
Add
Choose this to add save files to the product install.
Remove
This will remove the highlighted save file.
Dynamic Select
Choose to add save files dynamically at create time using a program that uses the
ADDCDF command.
77
Select save files
When creating a CD-ROM using the save file format, you must the select the set of save
files to be included as part of the product.
Click on the +/- symbol to expand or close the list of libraries and save files.
Double click on a save file to include it in the list.
A check mark 9 indicates the file is selected.
Use the [X] to close the window once complete.
78
Installation program
When creating a CD-ROM using the save file format, you must specify the install
program that will install the product. The install program and the save files will be in
library QTEMP during the installation process.
Select the iSeries program you have written to perform the product installation.
Library
The library name containing the program to call.
Program
The program to call. The program must follow the guidelines stated in
CD-Installer Save File Installation.
79
Target directory
This specifies the target directory to place the created CD-ROM images. Any files with
the same name as a newly created image file will be replaced.
Target Directory
The drive and path to place the CD-ROM image files. These files can then be
placed onto a CD-ROM using a CD-Recordable drive connected to your PC using
the software that came with the CD-Recordable drive.
If you are using the save file format, this directory will contain the following files in
addition to a file for each save file you selected.
CDLOAD, QTEMP. These files must be placed in the root directory on the CD-ROM.
CDINDEX, CDBASE. These files must be placed in the same directory as save files
produced as part of the product.
80
Create CD-ROM image
Press the Create Image button to create the CD-ROM image files.
You must have a tape in the tape drive that can be used during the pre-mastering process
if using the save/restore format.
81
Appendix 1—Understanding CD-ROM on
the iSeries
Base support
CD-ROM support on the iSeries is built around the ISO-9660 Mode 1 CD-ROM standard
and either:
1) Save and restore support. CD-ROM Studio for iSeries lets you create
CD-ROMs that take advantage of this support.
2) Integrated file system. You can write your application to access information
stored on a CD-ROM through the QOPT directory structure
This support is built into OS/400 releases V3R6 and later.
CD-ROM Studio for iSeries uses your save/restore data to create CD-ROM data files that
are compatible with the iSeries and ISO-9660.
There are two approaches you may use to do this.
1) Native iSeries save and restore compatible format.
This format is the native iSeries format supported by OS/400. IBM uses this
format for shipping the operating system and IBM software products.
This format has the following advantages.
•
Works with LODRUN, RSTLICPGM, or native restore commands
directly from CD-ROM
This format has the following requirements.
•
•
•
Requires saving data to tape while creating CD-ROM.
End user must be aware of the directory layout of the CD-ROM during
installation for LODRUN or save and restore.
For RSTLICPGM, only one version of the product can be shipped on
the CD-ROM and the data must be in the root directory.
82
2) Save file format using the Centerfield Technology CD-Installer.
This format uses the CD-Installer format developed by Centerfield
Technology, Inc. This format is intended for product distribution using save
files shipped on CD-ROM.
This format is compliant with OS/400 release V3R6 and later.
This format has the following advantages.
•
•
•
Does not require a tape during the CD-ROM creation process.
Lets you develop and test your installation process using save files
instead of burning a CD-ROM to test your installation process.
Package multiple products and versions on the CD-ROM and the
Centerfield Technology CD-Installer will automatically prompt the
user for the products to install. The user does not have to worry about
the CD-ROM directory structure and specify a special path during the
installation procedure.
This format has the following requirements.
•
•
CD-Installer files must be shipped on the CD-ROM to facilitate the
automated install
The total size of all files must be less than 700 (or 650) MB. If you
have more than 700 (or 650) MB of data, you must use the
save-restore format or one of the Advanced Edition options.
CD-ROM image files
CD-ROM Studio for iSeries refers to the saved iSeries objects that were saved for
CD-ROM as CD-ROM image files. These image files follow the ISO-9660 standard and
iSeries save/restore formats.
A quick look at the CD-ROM creation process
CD-ROM Studio for iSeries currently supports 2 types of CD-ROM formats. Both
formats are ISO-9660 Mode 1 compliant.
1) Native iSeries save and restore compatible format.
This format is the native iSeries format supported by OS/400. IBM uses this
format for shipping the operating system and IBM software products.
This format has the following advantages.
83
•
Works with LODRUN, RSTLICPGM, or native restore commands
directly from CD-ROM
This format has the following requirements.
•
•
•
Requires saving data to tape while creating CD-ROM.
End user must be aware of the directory layout of the CD-ROM during
installation for LODRUN or save and restore.
For RSTLICPGM, only one version of the product can be shipped on
the CD-ROM. In addition, the data must be in the root directory.
2) CD-Installer save file format.
This format uses the CD-Installer format developed by Centerfield
Technology, Inc. This format is intended for product distribution using save
files shipped on CD-ROM.
This format has the following advantages.
•
•
•
Does not require a tape during the CD-ROM creation process.
Lets you develop and test your installation process using save files
instead of burning a CD-ROM to test your installation process.
Package multiple products and versions on the CD-ROM and the
Centerfield Technology CD-Installer will automatically prompt the
user for the products to install. The user does not have to worry about
the CD-ROM directory structure and specify a special path during the
installation procedure.
This format has the following requirements.
•
•
Must ship special CD-Installer specific files on the CD-ROM
The total of all saved save files and the CD-Installer files must be 700
(or 650) MB or less. If you have more than 700 (or 650) MB, this
method is not an option.
84
Creating native save/restore format CD-ROMs
This section introduces the CD-ROM creation process for creating native iSeries save
and restore compatible CD-ROMs.
Overview
You start with your existing iSeries
objects and data.
iSeries libraries, objects, folders,
and files.
Using CD-ROM Studio for iSeries,
you can create CD-ROM image files
that can be placed onto CD-ROM. The
CD-ROM image files contain your
saved iSeries data. The resulting
CD-ROM can then be used in the
iSeries drive and accessed using
standard iSeries save and restore
d
The output of the image file creation
process is a set of CD-ROM image files
that can be placed onto CD-ROM.
CD-ROM image file creation.
•
•
ISO-9660 compatible
Save-restore compatible
CD-ROM images.
The CD-ROM can be created using a
CD-Recordable device attached to
your PC or Unix workstation
CD-ROM.
•
•
ISO-9660 format
Mode-1, 2048 byte sector
Or it can be created by a CD-ROM
duplication service company that
accepts CD-ROM images on tape.
Restore the objects from CD-ROM. Use
the iSeries CD-ROM Developer’s
Toolkit to create your own automated
install using LODRUN or RSTLICPGM.
Save-Restore, LODRUN,
RSTLICPGM
85
Image file creation process
This shows the complete process CD-ROM Studio for iSeries uses to create CD-ROM
image files. In some cases, only part of the process will be used when creating your
CD-ROM.
CD-ROM Studio for iSeries manages the
CD-ROM creation environment on the
iSeries. It does all setup required in order
to create CD-ROM compatible images.
Begin CD-ROM creation
process.
All of the contents for the CD-ROM must
be first saved to tape. This is so the
resulting CD-ROM is compatible with
iSeries save and restore.
Call program to put selected
objects onto tape using save
commands.
The save operations done during the
CD-ROM image file creation process
produces tape output that is not the same
as the save operation would otherwise
produce. A tape created using normal tape
saves cannot be used in the CD-ROM
creation process.
Instead of creating your own CD-ROMs,
the resulting tape can be sent to a
duplication service company that accepts
iSeries CD-images on tape.
If the tape is not needed, it can be reused.
CD-ROM Studio for iSeries retrieves the
save data from tape and creates CD-ROM
image files that are ISO-9660 and iSeries
save and restore compatible.
Retrieve data from tape and
create CD-ROM image files.
Once created, the CD-ROM image files
are downloaded to the client machine
where they can be put onto CD-ROM
using a CD-Recordable device.
Download CD-ROM images to
client machine.
86
Creating CD-Installer format CD-ROMs
This section introduces the CD-ROM creation process for save file based product
distribution using the Centerfield Technology, Inc., CD-Installer.
Overview
You start with your existing iSeries
objects and data.
iSeries libraries, objects, folders,
and files.
•
•
Using standard iSeries save files,
package your product libraries and
objects into save files.
Save the data into one or
more save files.
Develop an installation
program to install from the
save files.
You also develop an installation
program that installs your product from
these save files.
CD-ROM Studio for iSeries, will create
CD-ROM files from the save files. It
will also create index and base
installation files that allow the data to
be restored from the CD-ROM during
product installation.
Convert the save file data into
CD-ROM files and create the
CD-Installer base and index files.
This method does not require a tape.
The CD-ROM can be created using a
CD-Recordable device attached to
your PC or Unix workstation
CD-ROM.
•
•
ISO-9660 format
Mode 1, 2048 byte sector
The Centerfield Technology, Inc.,
CD-Installer must be placed in the root
directory of the CD-ROM.
The installer is invoked using LODRUN
and will list all products found on the
CD-ROM allowing the user to choose
which product to install.
CD-Installer LODRUN interface
87
Saving objects for CD-ROM
CD-ROM Studio for iSeries lets you save objects, libraries, document library objects,
license programs, and install programs in an ISO-9660, iSeries compatible format.
To save objects onto CD-ROM, they must be converted to ISO-9660, iSeries save/restore
compatible, CD-ROM image files. CD-ROM Studio for iSeries provides a Windows
client and iSeries commands for creating the CD-ROM image files.
Windows client
This client does not require any working knowledge of the image creation process,
besides needing a tape in your iSeries tape drive when creating native save/restore image
files.
In some cases, you will need to do special processing as part of the save operation. In
these cases, you can write an iSeries program that can be called by the Windows client.
Within this program, you simply use any of the standard save commands that support
CD-ROM to the tape device provided. CD-ROM Studio for iSeries takes care of creating
the correct image file from that data.
To use the CD-ROM Studio for iSeries Windows client, see Windows Client.
iSeries commands
iSeries commands can also be used to create CD-ROM image files.
To use the iSeries commands, see iSeries Command Reference.
Understanding ISO-9660 naming
The ISO-9660 standard uses a DOS style 8.3 character naming convention, using the
characters {A-Z, a-z, 0-9, _} for subdirectory and file names.
When creating your CD-ROM, you must keep this naming convention in mind.
Note: The naming convention applies to the CD-ROM image files. You can use standard
iSeries naming for any iSeries object names, library names, etc.
Tape requirement
A tape is not required if you use the save file based CD-Installer method for product
packaging.
88
To create native iSeries save and restore CD-ROMs, a tape drive is required to create an
iSeries CD-ROM. CD-ROM Studio for iSeries uses the save data from the tape to create
the CD-ROM image files. Without the tape, it is not possible to create a CD-ROM image
file that is compatible with iSeries save and restore.
This tape can be saved and be used later to retrieve the save data (to recreate a CD-ROM
for a particular release or version of your product), or it can be sent to your CD-ROM
duplication service company, if they prefer using save data on tape for creating the
CD-ROM.
If you do not need the tape after you have your CD-ROM images, you may reuse the tape
for other save and restore operations by simply using the INZTAP CL command.
89
Appendix 2—Packaging Strategies
This section describes several different alternatives for software distribution and the
advantages of each.
PC-iSeries on the same media
Since CD-ROM Studio for iSeries produces images that are ISO-9660 compliant, the
CD-ROM can be placed in a PC CD-ROM drive and viewed. This lets you place PC and
iSeries programs and data on the same CD. If you have a client/server application, this
will allow you to ship a single media type to iSeries customers with RISC hardware.
Normally, PC applications are installed through a SETUP.EXE program in the root
directory of the CD. If you so choose, the iSeries programs and data can be placed in the
root directory without affecting the PC installation. In addition, the iSeries programs can
be placed in a subdirectory on the CD to isolate them from the client code.
90
Handling multiple releases of OS/400
If your software product has dependencies on specific iSeries releases, you can use
several different approaches to package your code on CD-ROMs. The simplest method is
to package each iSeries release on a separate CD-ROM. This has the advantage that you
can label each one and there will be no confusion about the CD-ROM contents. The
disadvantage is that if the customer upgrades to a new release they may require a new
CD-ROM to be shipped to them.
Another approach is to use a subdirectory naming convention to isolate release-specific
code and ship all releases on the same CD-ROM. Your install programs can then
automatically detect the installed version of the operating system and restore the
appropriate version of the code on the customer’s machine. For example, if your
application supports V4R5 and V5R1, you could package your software in the following
way:
•
•
•
root directory contains all code not dependent on a specific release
each release-dependent section of code is stored in a subdirectory. For
example:
◊ /V4R5/V4R5SAV.DAT for V4R5
◊ /V5R1/V5R1SAV.DAT for V5R1
QINSTAPP (if using the LODRUN install method) would be restored and
invoked by the LODRUN command. The release would be determined and
subsequent restores would use the associated subdirectory’s save file.
The CD-Installer makes this easier when using the built-in release specific features.
Multiple products on the same CD-ROM
As with multiple releases, multiple products could be saved on a single CD-ROM. Your
install program (e.g., LODRUN and QINSTAPP program) could list the products that can
be installed and let the user choose which products to restore. This technique is used by
IBM when doing a RSTLICPGM. If your product requires them, the key or password
could be required to install the product successfully.
The CD-Installer is created to handle multiple products on a single CD-ROM. The
CD-Installer scans the CD-ROM for available products. This lets you create the
CD-ROM using the directory structure you choose for handling multiple products or
versions but does not require the end customer to understand the CD-ROM layout.
91
Creating a tape from CD-ROM
If you have customers with a mixture of pre-RISC and RISC hardware, they will need a
tape to install your product. If done with this scenario in mind, it is easy to create install
tapes from the CD-ROM such that either you or your customers can create them.
The most straightforward approach is to restore the QINSTAPP program and an
associated save file from the CD. Once restored, they can simply be saved back to the
desired tape drive.
Renaming the iSeries CD-ROM image files
Save/restore based CD-ROM format
As long as your programs which restore objects from the CD-ROM are aware of
the CD-ROM image file’s new ISO-9660, 8.3 name (eight character name and 3
character extension such as autoexec.bat), you can rename the CD-ROM image
produced by CD-ROM Studio for iSeries before copying them to the CD-ROM. In
the case where you have a library or object with a name greater than ten
characters, it must be renamed to conform to the maximum of 8.3 in the ISO
format.
CD-Installer based CD-ROM format
You cannot rename the objects. This information is recorded in the CDINDEX
file when the save file data was converted for the CD-ROM.
92
Burning a CD-ROM
To burn the CD-ROM image files you have created onto a CD-Recordable disk, you need
a CD-Recordable device attached to your PC and a software package that supports the
creation of ISO-9660 Mode 1 format CD-ROMs.
To create the CD-ROM, you simply need to add the CD-ROM image files created by
CD-ROM Studio for iSeries to the CD-ROM. These files can be placed in the root
directory or any subdirectory you choose.
The following chart gives you the information you will need when using your
CD-Recordable software package.
Attribute
File system
Data sector format
Data sector size
Disc type
# of tracks
Track #
Long file names
DOS extended file names
Volume label
Publisher Name
Prepared by
Rename files
Directory structure
Recording speeds
Value
ISO-9660
Mode 1 or CD-ROM
2048 bytes
Data
1
1
No
No
Your choice
Your company
Your company
Yes
Your choice
2x or greater
Joliet
Not applicable
Not applicable
Note: We recommend the Joliet format if you want to put both iSeries and Windows
installations on the same CD-ROM.
Note: The iSeries image files should be treated as data files when working with the
CD-Recordable software. They are not CD-ROM disc images. They are iSeries
save/restore images in a CD-ROM format.
Note: ISO-9660 Mode 2 with a single track also works with the iSeries. We have found
that some PC based CD-ROM drives do not support ISO-9660 Mode 1. This can be used
as an alternative. The iSeries does not support ISO-9660 Mode 2 extensions or
multi-track or multi-session CD-ROMs.
93
Sending media to a duplication service
This section applies if you are using another company to mass-produce your CD-ROMs.
You can send your duplication service either:
•
•
the CD-ROM you created using a CD-Recordable device attached to your PC
or
the tape with the CD-ROM image that was used while creating the CD-ROM
image
The duplication service company can tell you their preferred format.
94
Appendix 3—NLS Support
There are no special NLS considerations when using CD-ROM as long as the ISO
naming conventions are used.
However, since the CD-Installer displays text descriptions to the user, you may want to
translate these text strings to other languages. The following section gives you
information on adding multiple language support to the CD-ROM.
If you are not using the CD-Installer, save-file method for your CD-ROM, this
information does not apply.
If you are not translating your installation into multiple languages, this information does
not apply.
CD-Installer
The CD-Installer can support multiple languages. This section applies if you are
going to translate your CD-Installer install package to multiple languages. It
should be consulted after you have created your CD-ROM package in the base
language.
To support multiple languages, create the CD-ROM using the base language. We
recommend Upper Case English (ENP) since it works on every iSeries including
DBCS machines.
During the installation process, the job language ID is used to pick the language
to display. If no specific files for the language exist, the base language description
is used.
95
Product descriptions
The CDINDEX file contains a text description for your product in the base
language. You can add translated product descriptions by adding TEXT.xxx files
(where xxx is the language ID) to the same subdirectory on the CD-ROM.
The TEXT.xxx file is a 75-byte text file with the following format.
5-byte character CCSID value followed by a 70-byte description string.
The following file (TEXT.ENU) contains a lower case English description
(ASCII CCSID 437) padded with blanks to 70 characters.
00437Centerfield Technology, Inc. - Sample product description example!!
The file can be created with a simple text editor in either ASCII or EBCDIC. The
CCSID should be the CCSID used to create the file. Make sure you choose a
CCSID that is supported on all releases of OS/400 your product supports.
CD-Installer display file
The CD-Installer display file can be translated and repackaged as well. The
source file CDDSPSRC in library BSCTOOLKIT contains the DDS. You can
translate this file and rebuild the display file for each language you want to
support. The program MAKECDDSP can be used to recompile the display file.
The program creates a file CDLOAD1 in library BSCCDROM10 by default. You
can modify the program with the source provided. The CDLOAD1 file will
contain the translated version of the display file. It should be added to the root
directory of the CD-ROM with the following name – CDLOAD.xxx where xxx is
the language.
You can retrieve the file from the iSeries using either Client Access or FTP.
96
Sample multi-language CD-ROM layout
Path
Contents
/ (root)
QTEMP
CDLOAD
CDLOAD.ENU
CDLOAD.FRA
CDLOAD.DEU
CDLOAD.xxx (Other languages)
/PROD1/
CDINDEX
CDBASE
SAVF (Product save file)
TEXT.ENU
TEXT.FRA
TEXT.DEU
TEXT.xxx (Other languages)
/PROD2/
CDINDEX
CDBASE
SAVF (Product save file)
TEXT.ENU
TEXT.xxx (Other languages)
97
Appendix 4—Samples
This section has examples that illustrate the information in this manual. You can use
these scenarios as a model for your own CD-ROM usage.
Common information
iSeries Source Files
In library BSCTOOLKIT.
CD-ROM Source
In the path \SOURCE on the CD-ROM Studio for iSeries
product CD-ROM. The subdirectories on the CD-ROM have
the iSeries source physical file name.
Save Files
Many of the examples have save files. The save files contain the
product. These are packaged as part of the CD-ROM Studio for
iSeries product.
Sample install
All of these examples are already built on the Centerfield
Technology CD-ROM. You can run the example from the
CD-ROM we provided with the command indicated for each
scenario.
98
Scenario 1. Simple LODRUN-QINSTAPP product installation
from CD-ROM
Description
In this example, we have a QINSTAPP installation program that
prompts the user for an installation library and proceeds to install our
product into that library.
Our product was saved from a library named LODRUNL1.
Source file
LODRUN1
Source
members
QINSTAPP—Main installation program
INSLIBP—Installs the library into the library the user specified
INSLIB—Command front end for INSLIBP
CUTCD—Program to call from CD-ROM Studio for iSeries to create
the source save data for the CD-ROM image
Save files
LODRUNS1, LODRUNS2
Sample install
LODRUN DEV(*OPT) DIR(SAMPLE/INSTALL/LODRUN1)
Source code
/****************************************************************************/
/*
*/
/* QINSTAPP
*/
/*
*/
/* LODRUN1 - Simple LODRUN installation program example
*/
/*
*/
/* This program is automatically loaded by LODRUN during the installation
*/
/* process. It restores and invokes INSLIB to do the product installation. */
/*
*/
/****************************************************************************/
PGM
PARM(&DEV)
DCL
VAR(&DEV) TYPE(*CHAR) LEN(10) /* The device +
containing the installation media */
/* Restore the command INSLIB and program INSLIBP from the */
/* saved library QTEMP. The saved library is located in
*/
/* the file '/SAMPLE/INSTALL/LODRUN1/QTEMP.'
*/
RSTOBJ
OBJ(INSLIB INSLIBP) SAVLIB(QTEMP) DEV(&DEV) +
OPTFILE('/SAMPLE/INSTALL/LODRUN1/QTEMP.;1')
MONMSG
MSGID(CPF3780) EXEC(DO)
99
/* Try name without the dot since some burners */
/* do not write the file names with one
*/
RSTOBJ
OBJ(INSLIB INSLIBP) SAVLIB(QTEMP) DEV(&DEV) +
OPTFILE('/SAMPLE/INSTALL/LODRUN1/QTEMP')
ENDDO
/* Add QTEMP so we can find the command we just restored */
ADDLIBLE QTEMP
MONMSG
MSGID(CPF0000)
/* Invoke the command prompting for the user for the target */
/* library for the product
*/
INSLIB
??LIB(LODRUNL1) DEV(&DEV)
/* Handle any installation errors */
MONMSG
MSGID(CPF0000) EXEC(DO)
SNDPGMMSG MSGID(CPF9898) MSGF(QCPFMSG) MSGDTA('An +
error or warning condition occurred +
during product installation') +
MSGTYPE(*ESCAPE)
ENDDO
ENDPGM
/****************************************************************************/
/*
*/
/* INSLIBP
*/
/*
*/
/* LODRUN1 - Simple LODRUN installation program example
*/
/*
*/
/* This program does the actual product install from saved library LODRUNL1 */
/* into the library the user specified.
*/
/*
*/
/****************************************************************************/
PGM
PARM(&LIB &DEV)
DCL
VAR(&LIB) TYPE(*CHAR) LEN(10) /* The target +
library */
DCL
VAR(&DEV) TYPE(*CHAR) LEN(10) /* The device +
containing the installation media */
/* Make sure target library exists */
CRTLIB
MONMSG
LIB(&LIB) TYPE(*PROD)
MSGID(CPF0000)
/* Restore the product into the user library.
*/
/* The CD-ROM path is '/SAMPLE/INSTALL/LODRUN1/' */
/* The CD-ROM image file is 'LODRUNL1'
*/
RSTOBJ
OBJ(*ALL) SAVLIB(LODRUNL1) DEV(&DEV) +
100
OBJTYPE(*ALL) VOL(*MOUNTED) MBROPT(*ALL) +
ALWOBJDIF(*ALL) RSTLIB(&LIB) +
OPTFILE('/SAMPLE/INSTALL/LODRUN1/LODRUNL1.;1')
MONMSG
MSGID(CPF3780) EXEC(DO)
/* Try name without the dot since some burners */
/* do not write the file names with one
*/
RSTOBJ
OBJ(*ALL) SAVLIB(LODRUNL1) DEV(&DEV) +
OBJTYPE(*ALL) VOL(*MOUNTED) MBROPT(*ALL) +
ALWOBJDIF(*ALL) RSTLIB(&LIB) +
OPTFILE('/SAMPLE/INSTALL/LODRUN1/LODRUNL1')
ENDDO
ENDPGM
/****************************************************************************/
/*
*/
/* INSLIB
*/
/*
*/
/* LODRUN1 - Simple LODRUN installation program example
*/
/*
*/
/* This command is used by QINSTAPP to prompt for an installation library
*/
/* name. This command calls program INSLIBP, which does the actual
*/
/* installation.
*/
/*
*/
/****************************************************************************/
CMD
PROMPT('Product Installation')
PARM
KWD(LIB) TYPE(*NAME) LEN(10) DFT(LODRUNL1) +
PROMPT('Product installation library')
PARM
KWD(DEV) TYPE(*CHAR) LEN(10) DFT(*OPT) +
PROMPT('Installation device')
/****************************************************************************/
/*
*/
/* CUTCD
*/
/*
*/
/* LODRUN1 - Simple LODRUN installation program example
*/
/*
*/
/* NOTE: This program is intended to be called only by the CD-ROM Studio
*/
/*
for iSeries Windows client, or in the proper sequence on
*/
/*
the iSeries, as documented in the User's Guide and Reference
*/
/*
manual that is part of this product.
*/
/*
*/
/*
Using this program in any other way will not create save data
*/
/*
suitable for creating a CD-ROM.
*/
/*
*/
/* This program can be called from the CD-ROM Studio for iSeries Windows
*/
/* client, to create save data for this product installation example.
*/
/*
*/
101
/* The contents for the CD-ROM are currently saved in 2 save files.
*/
/*
*/
/*
LODRUNS1 - Contains the sample product library LODRUNL1. This was
*/
/*
saved using the SAVLIB command.
*/
/*
*/
/*
LODRUNS2 - Contains the programs QINSTAPP, INSLIBP, and command
*/
/*
INSLIB from library QTEMP. This was saved using the
*/
/*
SAVOBJ command.
*/
/*
*/
/****************************************************************************/
PGM
PARM(&DEV)
DCL
VAR(&DEV) TYPE(*CHAR) LEN(10) /* Tape device +
on which to save libraries and objects */
/* Create save data for the library LODRUNL1 */
/* by saving the save file data to tape
*/
/* Note: You could also execute any other
/* commands that save data to tape
*/
*/
SAVSAVFDTA SAVF(BSCTOOLKIT/LODRUNS1) DEV(&DEV) +
VOL(*MOUNTED) SEQNBR(*END) ENDOPT(*LEAVE) +
CLEAR(*NONE)
/* Create save data for the library QTEMP
/* by saving the save file data to tape
*/
*/
SAVSAVFDTA SAVF(BSCTOOLKIT/LODRUNS2) DEV(&DEV) +
VOL(*MOUNTED) SEQNBR(*END) ENDOPT(*LEAVE) +
CLEAR(*NONE)
ENDPGM
102
Scenario 2. Dual media LODRUN-QINSTAPP product installation
Description
In this example, we have a QINSTAPP installation program that
prompts the user for an installation library and proceeds to install our
product into that library.
This example supports both CD-ROM and tape media using the same
installation program.
Our product was saved from a library named LODRUNL2.
Source file
LODRUN2
Source
members
QINSTAPP—Main installation program
INSLIBP—Installs the library into the library the user specified
INSLIB—Command front end for INSLIBP
CUTCD—Program to call from CD-ROM Studio for iSeries to create
the source save data for the CD-ROM image
CUTTAPE—Program to call from iSeries command line to create the
tape version of the product
Save files
LODRUNS3, LODRUNS4
Sample install
LODRUN DEV(*OPT) DIR(SAMPLE/INSTALL/LODRUN2)
Source code
/****************************************************************************/
/*
*/
/* QINSTAPP
*/
/*
*/
/* LODRUN2 - Dual media installation program example
*/
/*
*/
/* This program is automatically loaded by LODRUN during the installation
*/
/* process. It restores and invokes INSLIB to do the product installation. */
/*
*/
/* This version supports CD-ROM and tape.
*/
/*
*/
/****************************************************************************/
PGM
PARM(&DEV)
DCL
VAR(&DEV) TYPE(*CHAR) LEN(10) /* The device +
containing the installation media */
/* Determine media type. Also, this rewinds */
/* the tape if it is a tape so we can restore */
103
/* the additional objects from QTEMP.
*/
QSYS/CHKTAP DEV(&DEV) VOL(*MOUNTED) SEQNBR(*NONE) +
LABEL(*NONE) CRTDATE(*NONE) ENDOPT(*REWIND)
/* CD-ROM installation specific code */
/* Monitor for not a tape device message */
MONMSG
MSGID(CPF6721) EXEC(DO)
/* Clean up message so it doesn't scare */
/* anyone by being in the joblog
*/
RCVMSG
MSGTYPE(*LAST) RMV(*YES)
/* Restore the command INSLIB and program INSLIBP from the */
/* saved library QTEMP. The saved library is located in
*/
/* the file '/INSTALL/LODRUN1/QTEMP.'
*/
RSTOBJ
OBJ(INSLIB INSLIBP) SAVLIB(QTEMP) DEV(&DEV) +
OPTFILE('/SAMPLE/INSTALL/LODRUN2/QTEMP.;1')
MONMSG
MSGID(CPF3780) EXEC(DO)
/* Try name without the dot since some burners */
/* do not write the file names with one
*/
RSTOBJ
OBJ(INSLIB INSLIBP) SAVLIB(QTEMP) DEV(&DEV) +
OPTFILE('/SAMPLE/INSTALL/LODRUN2/QTEMP')
ENDDO
GOTO
CMDLBL(NOTAPE)
ENDDO
/* Tape installation specific code */
/* Restore the command INSLIB and program INSLIBP from the */
/* saved library QTEMP. The saved library is located in
*/
/* sequence one on the tape.
*/
/* We leave the tape for performance reasons.
RSTOBJ
*/
OBJ(INSLIB INSLIBP) SAVLIB(QTEMP) DEV(&DEV) +
ENDOPT(*LEAVE)
/* Common installation specific code */
NOTAPE:
/* Add QTEMP so we can find the command we just restored */
ADDLIBLE
MONMSG
LIB(QTEMP)
MSGID(CPF0000)
/* Invoke the command prompting for the user */
/* for the target library for the product
*/
INSLIB
??LIB(LODRUNL2) DEV(&DEV)
104
/* Handle any installation errors */
MONMSG
MSGID(CPF0000) EXEC(DO)
SNDPGMMSG MSGID(CPF9898) MSGF(QCPFMSG) MSGDTA('An +
error or warning condition occurred +
during product installation') +
MSGTYPE(*ESCAPE)
ENDDO
ENDPGM
/****************************************************************************/
/*
*/
/* INSLIBP
*/
/*
*/
/* LODRUN2 - Dual media installation program example
*/
/*
*/
/* This program does the actual product install from saved library LODRUNL2 */
/* into the library the user specified.
*/
/*
*/
/****************************************************************************/
PGM
PARM(&LIB &DEV)
DCL
VAR(&LIB) TYPE(*CHAR) LEN(10) /* The target +
library */
DCL
VAR(&DEV) TYPE(*CHAR) LEN(10) /* The device +
containing the installation media */
/* Make sure library exists */
CRTLIB
MONMSG
LIB(&LIB) TYPE(*PROD)
MSGID(CPF0000)
/* Determine media type. */
QSYS/CHKTAP DEV(&DEV) VOL(*MOUNTED) SEQNBR(*NONE) +
LABEL(*NONE) CRTDATE(*NONE) ENDOPT(*LEAVE)
/* CD-ROM installation specific code */
/* Monitor for not a tape device message */
MONMSG
MSGID(CPF6721) EXEC(DO)
/* Clean up message so it doesn't scare */
/* anyone by being in the joblog
*/
RCVMSG
MSGTYPE(*LAST) RMV(*YES)
/* Restore the product into the user library. */
/* The CD-ROM path is '/INSTALL/LODRUN2/'
*/
/* The CD-ROM image file is 'LODRUNL2'
*/
RSTOBJ
OBJ(*ALL) SAVLIB(LODRUNL2) DEV(&DEV) +
OBJTYPE(*ALL) VOL(*MOUNTED) MBROPT(*ALL) +
105
ALWOBJDIF(*ALL) RSTLIB(&LIB) +
OPTFILE('/SAMPLE/INSTALL/LODRUN2/LODRUNL2.;1')
MONMSG
MSGID(CPF3780) EXEC(DO)
/* Try name without the dot since some burners */
/* do not write the file names with one
*/
RSTOBJ
OBJ(*ALL) SAVLIB(LODRUNL2) DEV(&DEV) +
OBJTYPE(*ALL) VOL(*MOUNTED) MBROPT(*ALL) +
ALWOBJDIF(*ALL) RSTLIB(&LIB) +
OPTFILE('/SAMPLE/INSTALL/LODRUN2/LODRUNL2')
ENDDO
GOTO
CMDLBL(EXIT)
ENDDO
/* Tape installation specific code */
/* Restore the product into the user library. */
RSTOBJ
OBJ(*ALL) SAVLIB(LODRUNL2) DEV(&DEV) +
OBJTYPE(*ALL) VOL(*MOUNTED) MBROPT(*ALL) +
ALWOBJDIF(*ALL) RSTLIB(&LIB)
EXIT:
ENDPGM
/****************************************************************************/
/*
*/
/* INSLIB
*/
/*
*/
/* LODRUN2 - Dual media LODRUN installation program example
*/
/*
*/
/* This command is used to prompt for an installation library
*/
/* name by QINSTAPP. This command calls program INSLIBP, which does the
*/
/* actual installation.
*/
/*
*/
/****************************************************************************/
CMD
PROMPT('Product Installation')
PARM
KWD(LIB) TYPE(*NAME) LEN(10) DFT(LODRUNL1) +
PROMPT('Product installation library')
PARM
KWD(DEV) TYPE(*CHAR) LEN(10) DFT(*OPT) +
PROMPT('Installation device')
/*****************************************************************************/
/*
*/
/* CUTCD
*/
/*
*/
/* LODRUN2 - Dual media LODRUN installation program example
*/
106
/*
/*
/*
/*
/*
/*
/*
/*
/*
/*
/*
/*
/*
/*
/*
/*
/*
/*
/*
/*
/*
NOTE: This program is intended to be called only by the CD-ROM Studio
for iSeries Windows client, or in the proper sequence on
the iSeries, as documented in the User's Guide and Reference
manual that is part of this product.
Using this program in any other way will not create save data
suitable for creating a CD-ROM.
This program can be called from the CD-ROM Studio for iSeries Windows
client, to create save data for this product installation example.
The contents for the CD-ROM are currently saved in 2 save files.
LODRUNS3 - Contains the sample product library LODRUNL2.
saved using the SAVLIB command.
This was
LODRUNS4 - Contains the programs QINSTAPP, INSLIBP, and command
INSLIB from library QTEMP. This was saved using the
SAVOBJ command.
*/
*/
*/
*/
*/
*/
*/
*/
*/
*/
*/
*/
*/
*/
*/
*/
*/
*/
*/
*/
*/
/*****************************************************************************/
PGM
PARM(&DEV)
DCL
VAR(&DEV) TYPE(*CHAR) LEN(10) /* Tape device +
to save libraries and objects onto */
/* Create save data for the library LODRUNL2 */
/* by saving the save file data to tape
*/
/* Note: You could also execute any other
/* commands that save data to tape
*/
*/
SAVSAVFDTA SAVF(BSCTOOLKIT/LODRUNS3) DEV(&DEV) +
VOL(*MOUNTED) SEQNBR(*END) ENDOPT(*LEAVE) +
CLEAR(*NONE)
/* Create save data for the library QTEMP */
/* by saving the save file data to tape
*/
SAVSAVFDTA SAVF(BSCTOOLKIT/LODRUNS4) DEV(&DEV) +
VOL(*MOUNTED) SEQNBR(*END) ENDOPT(*LEAVE) +
CLEAR(*NONE)
ENDPGM
/****************************************************************************/
/*
*/
/* CUTTAPE
*/
/*
*/
/* LODRUN2 - Dual media LODRUN installation program example
*/
/*
*/
/* This program can be called to create a installation tape.
*/
/*
*/
/* The program requires the tape device as input.
*/
107
/*
*/
/* The contents for the tape are currently saved in 2 save files.
*/
/*
*/
/*
LODRUNS3 - Contains the sample product library LODRUNL2. This was
*/
/*
saved using the SAVLIB command.
*/
/*
*/
/*
LODRUNS4 - Contains the programs QINSTAPP, INSLIBP, and command
*/
/*
INSLIB from library QTEMP. This was saved using the
*/
/*
SAVOBJ command.
*/
/*
*/
/****************************************************************************/
PGM
PARM(&DEV)
DCL
VAR(&DEV) TYPE(*CHAR) LEN(10) /* Tape device +
to create install tape */
/* Initialize tape */
INZTAP
DEV(&DEV) NEWVOL(AS400) CHECK(*NO) +
DENSITY(*CTGTYPE) ENDOPT(*REWIND) CLEAR(*NO)
/* Save library QTEMP to tape by
*/
/* saving the save file data to tape */
SAVSAVFDTA SAVF(BSCTOOLKIT/LODRUNS4) DEV(&DEV) +
VOL(*MOUNTED) SEQNBR(*END) ENDOPT(*LEAVE) +
CLEAR(*NONE)
/* Add library LODRUNL2 to tape by
*/
/* saving the save file data to tape */
SAVSAVFDTA SAVF(BSCTOOLKIT/LODRUNS3) DEV(&DEV) +
VOL(*MOUNTED) SEQNBR(*END) ENDOPT(*LEAVE) +
CLEAR(*NONE)
ENDPGM
108
Scenario 3. Dual media LODRUN-QINSTAPP product installation
using save files
Description
In this example, we have a QINSTAPP installation program that
prompts the user for an installation library and proceeds to install our
product into that library.
This example supports both CD-ROM and tape media using the same
installation program.
This example uses save files for most of the install. This way, the
media dependencies are isolated to QINSTAPP and do not affect the
rest of the install.
Our product was saved from a library named LODRUNL3.
Source file
LODRUN3
Source
members
QINSTAPP—Main installation program
INSLIBP—Installs the library into the library the user specified
INSLIB—Command front end for INSLIBP
CUTCD—Program to call from CD-ROM Studio for iSeries to create
the source save data for the CD-ROM image
CUTTAPE—Program to call from iSeries command line to create the
tape version of the product
Save files
LODRUNS5, LODRUNS6
Sample install
LODRUN DEV(*OPT) DIR(SAMPLE/INSTALL/LODRUN3)
Source code
/****************************************************************************/
/*
*/
/* QINSTAPP
*/
/*
*/
/* LODRUN3 - Dual media installation program example using save files
*/
/*
*/
/* This program is automatically loaded by LODRUN during the installation
*/
/* process. It restores and invokes INSLIB to do the product installation. */
/*
*/
/* This version supports CD-ROM and tape.
*/
/*
*/
/****************************************************************************/
109
PGM
PARM(&DEV)
DCL
VAR(&DEV) TYPE(*CHAR) LEN(10) /* The device +
containing the installation media */
/* Determine media type. It leaves */
/* the tape for performance reasons. */
QSYS/CHKTAP DEV(&DEV) VOL(*MOUNTED) SEQNBR(*NONE) +
LABEL(*NONE) CRTDATE(*NONE) ENDOPT(*LEAVE)
/* CD-ROM installation specific code */
/* Monitor for not a tape device message */
MONMSG
MSGID(CPF6721) EXEC(DO)
/* Clean up message so it doesn't scare */
/* anyone by being in the joblog
*/
RCVMSG
MSGTYPE(*LAST) RMV(*YES)
/* Restore the save file for the installation. */
/* CD-ROM image path : /SAMPLE/INSTALL/LODRUN3 */
/* CD-ROM image file : LODRUNS5
*/
RSTOBJ
OBJ(LODRUNS5) SAVLIB(BSCTOOLKIT) DEV(&DEV) +
MBROPT(*ALL) ALWOBJDIF(*ALL) +
RSTLIB(QTEMP) +
OPTFILE('/SAMPLE/INSTALL/LODRUN3/LODRUNS5.;1')
MONMSG
MSGID(CPF3780) EXEC(DO)
/* Try name without the dot since some burners */
/* do not write the file names with one
*/
RSTOBJ
OBJ(LODRUNS5) SAVLIB(BSCTOOLKIT) DEV(&DEV) +
MBROPT(*ALL) ALWOBJDIF(*ALL) +
RSTLIB(QTEMP) +
OPTFILE('/SAMPLE/INSTALL/LODRUN3/LODRUNS5')
ENDDO
GOTO
CMDLBL(NOTAPE)
ENDDO
/* Tape installation specific code */
/* Restore the save file for the installation. */
RSTOBJ
OBJ(LODRUNS5) SAVLIB(BSCTOOLKIT) DEV(&DEV) +
VOL(*MOUNTED) LABEL(*SAVLIB) +
ENDOPT(*REWIND) MBROPT(*ALL) +
ALWOBJDIF(*ALL) RSTLIB(QTEMP)
/* Common installation specific code */
NOTAPE:
/* Add QTEMP so we can find the command we just restored */
110
ADDLIBLE
MONMSG
LIB(QTEMP)
MSGID(CPF0000)
/* Restore install program from save file */
RSTOBJ
OBJ(INSLIB INSLIBP) SAVLIB(LODRUNL3) +
DEV(*SAVF) SAVF(QTEMP/LODRUNS5) +
MBROPT(*ALL) ALWOBJDIF(*ALL) RSTLIB(QTEMP)
/* Invoke the command prompting for the user */
/* for the target library for the product
*/
INSLIB
??LIB(LODRUNL3)
/* Handle any installation errors */
MONMSG
SNDPGMMSG
MSGID(CPF0000) EXEC(DO)
MSGID(CPF9898) MSGF(QCPFMSG) MSGDTA('An +
error or warning condition occurred +
during product installation') +
MSGTYPE(*ESCAPE)
ENDDO
ENDPGM
/****************************************************************************/
/*
*/
/* INSLIBP
*/
/*
*/
/* LODRUN3 - Dual media installation program example using save files
*/
/*
*/
/* This program does the actual product install from saved library
*/
/* LODRUNL3 into the library the user specified.
*/
/*
*/
/****************************************************************************/
PGM
PARM(&LIB)
DCL
VAR(&LIB) TYPE(*CHAR) LEN(10) /* The target +
library */
/* Ensure the library exists */
CRTLIB
LIB(&LIB) TYPE(*PROD)
MONMSG
MSGID(CPF0000)
/* Restore the product into the user library. */
RSTOBJ
OBJ(*ALL) SAVLIB(LODRUNL3) DEV(*SAVF) +
OBJTYPE(*ALL) SAVF(QTEMP/LODRUNS5) +
MBROPT(*ALL) ALWOBJDIF(*ALL) RSTLIB(&LIB)
ENDPGM
/****************************************************************************/
/*
*/
111
/* INSLIB
*/
/*
*/
/* LODRUN3 - Dual media save file based install example
*/
/*
*/
/* This command is used to prompt for an installation library
*/
/* name by QINSTAPP. This command calls program INSLIBP, which does the
*/
/* actual installation.
*/
/*
*/
/****************************************************************************/
CMD
PROMPT('Product Installation')
PARM
KWD(LIB) TYPE(*NAME) LEN(10) DFT(LODRUNL1) +
PROMPT('Product installation library')
/****************************************************************************/
/*
*/
/* CUTCD
*/
/*
*/
/* LODRUN3 - Dual media LODRUN installation program example
*/
/*
using save files.
*/
/*
*/
/* NOTE: This program is intended to be called only by the CD-ROM Studio
*/
/*
for iSeries Windows client, or in the proper sequence on
*/
/*
the iSeries, as documented in the User's Guide and Reference
*/
/*
manual that is part of this product.
*/
/*
*/
/*
Using this program in any other way will not create save data
*/
/*
suitable for creating a CD-ROM.
*/
/*
*/
/* This program can be called from the CD-ROM Studio for iSeries Windows
*/
/* client, to create save data for this product installation example.
*/
/*
*/
/* The contents for the CD-ROM will be a save file and QINSTAPP in
*/
/* library QTEMP.
*/
/*
*/
/*
LODRUNS5 - Contains the sample product library LODRUNL3, program
*/
/*
INSLIBP, and command INSLIB.
*/
/*
*/
/*
LODRUNS6 - Contains the program QINSTAPP from library QTEMP.
*/
/*
*/
/****************************************************************************/
PGM
PARM(&DEV)
DCL
VAR(&DEV) TYPE(*CHAR) LEN(10) /* Tape device +
to save libraries and objects onto */
/* Create save data for the save file LODRUNS5 */
/* by saving it to tape
*/
/* Note: You could also execute any other
/* commands that save data to tape
*/
*/
/* Notice how we use the label to control the name
*/
/* of the CD-ROM image file. CD-ROM Studio uses this */
/* label when creating the CD-ROM image. ISO9660
*/
112
/* states the name must follow the 8.3 naming
/* convention. The library name BSCTOOLKIT would be
/* too long and violate the naming convention.
SAVOBJ
*/
*/
*/
OBJ(LODRUNS5) LIB(BSCTOOLKIT) DEV(&DEV) +
VOL(*MOUNTED) SEQNBR(*END) +
LABEL(LODRUNS5) ENDOPT(*LEAVE) CLEAR(*NONE)
/* Create save data for program QINSTAPP */
/* by saving the save file data to tape */
SAVSAVFDTA SAVF(BSCTOOLKIT/LODRUNS6) DEV(&DEV) +
VOL(*MOUNTED) SEQNBR(*END) ENDOPT(*LEAVE) +
CLEAR(*NONE)
ENDPGM
/****************************************************************************/
/*
*/
/* CUTTAPE
*/
/*
*/
/* LODRUN3 - Dual media LODRUN installation program example
*/
/*
using save files.
*/
/*
*/
/* This program can be called to create an installation tape.
*/
/*
*/
/* The program requires the tape device as input.
*/
/*
*/
/* The contents for the tape will be a save file and QINSTAPP in
*/
/* library QTEMP.
*/
/*
*/
/*
LODRUNS5 - Contains the sample product library LODRUNL3, program
*/
/*
INSLIBP, and command INSLIB.
*/
/*
*/
/*
LODRUNS6 - Contains the program QINSTAPP from library QTEMP.
*/
/*
*/
/****************************************************************************/
PGM
PARM(&DEV)
DCL
VAR(&DEV) TYPE(*CHAR) LEN(10) /* Tape device +
to save CD-ROM image onto */
/* Initialize tape */
INZTAP
DEV(&DEV) NEWVOL(AS400) CHECK(*NO) +
DENSITY(*CTGTYPE) ENDOPT(*REWIND) CLEAR(*NO)
/* Save program QTEMP/QINSTAPP to tape */
/* by saving the save file data to tape */
SAVSAVFDTA SAVF(BSCTOOLKIT/LODRUNS6) DEV(&DEV) +
VOL(*MOUNTED) SEQNBR(*END) ENDOPT(*LEAVE) +
CLEAR(*NONE)
/* Put the save file onto tape */
113
SAVOBJ
OBJ(LODRUNS5) LIB(BSCTOOLKIT) DEV(&DEV) +
VOL(*MOUNTED) SEQNBR(*END) +
ENDOPT(*REWIND) CLEAR(*NONE)
ENDPGM
114
Scenario 4. CD-Installer save file installation
Description
In this example, we packaged our product into save files and wrote an
install program.
This approach uses the CD-Installer as the CD-ROM method.
Source file
SAVFILE1
Source
members
INSTALL—Main installation program
INSLIBP—Installs the library into the library the user specified
INSLIB—Command front end for INSLIBP
Save files
SAVFILS1—Contains the product library SAVLIB LIB(SAVFILE1)
INSPGMS1—Contains INSLIBP and INSLIB objects used during
install
Sample install
LODRUN DEV(*OPT) DIR(SAMPLE/INSTALL/SAVFILE1)
Source code
/****************************************************************************/
/*
*/
/* INSTALL
*/
/*
*/
/* SAVFILE1 - Save file based installation example
*/
/*
*/
/* Initial install program for our product. This program restores the
*/
/* installation specific programs and calls those programs to do the
*/
/* install.
*/
/*
*/
/* The install programs are in save file QTEMP/INSPGMS1
*/
/*
*/
/****************************************************************************/
PGM
ADDLIBLE
MONMSG
LIB(QTEMP)
MSGID(CPF0000)
RSTOBJ
OBJ(INSLIB INSLIBP) SAVLIB(SAVFILE1) +
DEV(*SAVF) SAVF(QTEMP/INSPGMS1) +
MBROPT(*ALL) ALWOBJDIF(*ALL) RSTLIB(QTEMP)
?INSLIB
ENDPGM
115
/****************************************************************************/
/*
*/
/* INSLIBP
*/
/*
*/
/* SAVFILE1 - Save file based installation example
*/
/*
*/
/* This program does the actual product install from saved library
*/
/* SAVFILE1 into the library the user specified.
*/
/*
*/
/* The library is saved in save file QTEMP/SAVFILS1
*/
/*
*/
/****************************************************************************/
PGM
PARM(&LIB)
DCL
VAR(&LIB) TYPE(*CHAR) LEN(10) /* The target +
library */
/* Ensure the library exists */
CRTLIB
MONMSG
LIB(&LIB) TYPE(*PROD)
MSGID(CPF0000)
/* Restore the product into the user library */
RSTOBJ
OBJ(*ALL) SAVLIB(SAVFILE1) DEV(*SAVF) +
OBJTYPE(*ALL) SAVF(QTEMP/SAVFILS1) +
MBROPT(*ALL) ALWOBJDIF(*ALL) RSTLIB(&LIB)
ENDPGM
/****************************************************************************/
/*
*/
/* INSLIB
*/
/*
*/
/* SAVFILE1 - Save file based installation example
*/
/*
*/
/* This command is used to prompt for an installation library named
*/
/* INSTALL. This command calls program INSLIBP, which does the actual
*/
/* installation.
*/
/*
*/
/****************************************************************************/
CMD
PROMPT('Product Installation')
PARM
KWD(LIB) TYPE(*NAME) LEN(10) DFT(SAVFILE1) +
PROMPT('Product installation library')
116
Scenario 5. CD-Installer save file installation with parameters
Description
In this example, we packaged our product into save files and wrote an
install program that would receive a parameter from the CD Loader
code with a list of save files in QTEMP.
This approach uses the CD-Installer as the CD-ROM method.
Source file
SAVFILE2
Source
members
INSTALL—Main installation program
Save files
None
Sample install
None
Source code
/****************************************************************************/
/*
*/
/* INSTALL
*/
/*
*/
/* SAVFILE2 - Save file based installation example number 2
*/
/*
*/
/* Initial install program for our product. This program restores the
*/
/* installation specific objects (like programs and files) and
*/
/* optionally calls more programs to continue the installation.
*/
/*
*/
/* Only source code is provided for this example (no save files).
*/
/*
*/
/* NOTE: This example demonstrates an alternative method to
*/
/*
pass parameters to the program responsible for handling
*/
/*
the save files that reside in QTEMP. This method has the
*/
/*
advantage of allowing the installation program to
*/
/*
dynamically determine the names of the save files rather
*/
/*
than having to hardcode a known set of them.
*/
/*
*/
/*
The parameter passed to this program is a structure that
*/
/*
has a two byte binary number that indiates how many save
*/
/*
files there are followed by 10 character save file names
*/
/*
that have been put in QTEMP.
*/
/*
*/
/*
*/
/****************************************************************************/
PGM
PARM(&SAVFLST)
DCL
VAR(&SAVFLST) TYPE(*CHAR) LEN(4000)
117
DCL
DCL
DCL
DCL
VAR(&NUMSAVF) TYPE(*DEC) LEN(5)
VAR(&SAVF) TYPE(*CHAR) LEN(10)
VAR(&CHARPOS) TYPE(*DEC) LEN(5) VALUE(3)
VAR(&NUMPROC) TYPE(*DEC) LEN(5) VALUE(0)
ADDLIBLE
MONMSG
LIB(QTEMP)
MSGID(CPF0000)
/* Set the local counter to hold the number of */
/* save files put in QTEMP by our invoker.
*/
CHGVAR
VAR(&NUMSAVF) VALUE(%BINARY(&SAVFLST 1 2))
LOOP:
/* Pull out the name of the save file in the list */
CHGVAR
VAR(&SAVF) VALUE(%SUBSTRING(&SAVFLST +
&CHARPOS 10))
/* Bump out position so the next time around we */
/* get the next name in the list.
*/
CHGVAR
VAR(&CHARPOS) VALUE(&CHARPOS + 10)
/* Process the current save file. In this example */
/* we will restore some objects to QTEMP.
*/
RSTOBJ
OBJ(*ALL) SAVLIB(QTEMP) DEV(*SAVF) +
SAVF(QTEMP/&SAVF) MBROPT(*ALL) +
ALWOBJDIF(*ALL) RSTLIB(QTEMP)
/* Bump the number of save files processed. */
CHGVAR
VAR(&NUMPROC) VALUE(&NUMPROC + 1)
/* If there are still save file names in
*/
/* the list, then go around the loop again. */
IF
COND(&NUMPROC *LT &NUMSAVF) THEN(GOTO +
CMDLBL(LOOP))
ENDPGM
118
Appendix 5—Multi-volume CD-ROMs
(Standard Edition)
A single CD-ROM (ISO-9660 Mode 1) can hold 650 MB of data. The following
section contains information for spanning CD-ROMs that can be accessed using
save and restore commands.
Preparing the data
The first step is to prepare your save data for multiple CD-ROMs. You must
break the save data into multiple chunks that are 650 MB or less. You can do this
manually with multiple save operations or you can use the SAV650 command
that is provided as part of the product.
The SAV650 command will take a library and do multiple save operations. Each
save operation will contain the contents for a single CD-ROM. The save
operations will use a tape label of SAV0000x where x is 1 for the first CD-ROM,
2 for the second CD-ROM, etc.
You can also save your data using standard iSeries save commands. Each save
should contain 650 MB of data or less. You can use the LABEL keyword on the
save command to identify each save operation.
Creating the CD-ROM image files
When creating the CD-ROM image files, you can let the CD-ROM Studio for
iSeries Windows client automatically distribute the contents across multiple disks.
However, in most cases it is best to manage the layout yourself.
Creating the CD-ROMs
When you create the actual CD-ROMs, place the appropriate file on each
CD-ROM. You can use any CD-ROM label you want, but it is good idea to
include which CD-ROM this is in the label. Example: CDROM01, CDROM02,
etc.
Restoring from CD-ROM
Your installation program will need to restore the product from multiple
CD-ROMs. A RST650 installation example is provided to give you a starting
template and reference for restoring data saved onto multiple CD-ROMs with the
SAV650 command.
119
Restrictions
The following methods do not support multi-volume CD-ROM sets.
•
•
SAVLICPGM
Save files and the CD-ROM Installation and Disk Manager
The SAV650 command package contains a set of source code and utilities to assist you
when saving iSeries objects for CD-ROM. The tool will automatically break libraries into
650 MB chunks.
The command assumes no single object in the library is larger than 650 MB. It will not
work with an object of 650 MB or larger.
Save 650 utilities
BSCCDROM10/
SAV650
SAV650
RST650
BSCTOOLKIT/
SAV650
Command
Program
Program
Source file
SAV650 source
SAV650CMD source
RST650 source
SAV650 usage
To use SAV650 the command, simply type BSCCDROM10/SAV650 <F4>.
Library—This is the library you want to save for CD-ROM.
Object—This is the object or set of objects you would like to save. You can
specify a single object, a generic object name such as A*, or *ALL to save all of
the objects in the library.
Device—This is the device to which to save the object. It can be a tape device or
*SAVF to save the objects to a save file to later be transferred to tape or added to
CD-ROM using the save-file method.
Target release—Specify the target release.
Library—If you choose *SAVF, this is the library the save files are created in.
120
The output of the command is one or more SAVOBJ operations. The save operations will
produce files with the names SAV00001, SAV00002 ... SAV0000n. Each file will be
650 MB or less.
RST650 usage
The source file BSCTOOLKIT/SAV650(RST650) gives you example source code for
restoring objects saved with the SAV650 command. The sample includes the restore
commands and examples of how to prompt for the correct CD-ROM in the set of
CD-ROMs you produce.
Creating the CD-ROMs
6) Initialize tape.
7) BSCCDROM10/STRCDP—Start premastering
8) BSCCDROM10/SAV650—Save library
9) SAVOBJ QTEMP/QINSTAPP—Save your install program if you have one
10) BSCCDROM10/ENDCDP—End premastering
11) From the Windows client, choose Save-restore based install using CD-ROM
followed by Use an existing tape. Choose to create the CD-ROM images. This
will convert the save data on tape to the correct format and download to the
PC.
12) Put each SAV0000x file on a separate CD-ROM. You can specify the
CD-ROM sequence number in the CD-ROM label if you want. Add the
QTEMP file to the first CD-ROM if you have an install program.
Modifying the source
The source file BSCTOOLKIT/SAV650 contains the source code for the SAV650
command. You can modify the base code to fit your environment better.
Assumptions/Restrictions
•
No singe object in a library can be larger than 650 MB
121
Appendix 6—Technical Support
Centerfield Technology, Inc. is committed to providing our customers with support as
problems or questions arise. All customers receive 90 days of free support. For those
customers who choose to purchase extended support contracts, the following support
options are available in one-year increments from the date of purchase. Support also
includes minor enhancement releases and upgrades that might become necessary as
OS/400 releases become available.
Contact Information
Internet
Web support pages are maintained at http://www.centerfieldtechnology.com.
Updated documentation, how-to’s, FAQs, and a list of known problems will
become available as needed.
E-mail
To contact technical support by email, send email requests to
[email protected].
Fax
To contact technical support by fax, send your request to (507) 536-0474.
Phone
You can call (507) 287-8119 for technical support. Telephone support is available
from 9:00 AM to 5:00 PM CST.
Support Checklist
Before contacting Centerfield Technology, Inc., concerning problems, please collect the
following information and answer the associated questions. This will speed up the
diagnosis of the problem.
Step 1: Clearly identify where you are having a problem. Some possibilities:
9 Install of the iSeries code
9 Install of the Windows client code
9 Setting up TCP/IP communications
9 Starting the iSeries servers
122
9 During the actual CD image creation step
9 When you are “burning” the CD image using the CD-ROM software from the
vendor
9 During a subsequent install using the CD
Step 2: Ensure the appropriate servers and subsystems are active on the iSeries:
9 Issue a STRTCP command and verify you get a message saying TCP/IP is
currently active.
9 Issue WRKACTJOB command and look for a job with a name of
BSCSERVER. If one does not exist issue, the following commands.
• ADDLIBLE BSCCDROM10
• STRBSCSVR
9 If a job by the name of BSCSERVER does not exist look for a subsystem with
routing data of 'BSCTCP' and a job queue entry which references a job queue
with a name of BSCTCP in library BSCCDROM10. To find all subsystem
descriptions and associated routing data do the following:
• WRKSBSD *ALL/*ALL
• Choose option 5 (Display)
• Choose option 7 (Routing entries)
• Choose option 6 (Job queue entries)
9 Ensure the subsystem with the appropriate routing entry and job queue entry
has been started. If you do not want that subsystem started, add the job queue
entry and routing entry to the subsystem you want to use.
9 Start the subsystem if it is not active (STRSBS).
Step 3: Document the message or symptom you are encountering:
9 Failure message on the PC
9 Failure message indicating an iSeries problem
9 Hang condition
Step 4: Document the series of steps that occurred leading up to the failure:
9 The type of CD-ROM being built (e.g. LODRUN or save/restore)
9 User profile being used
9 List of objects specified or the name of the program to call
9 Name and type of tape device being used to create the image
9 Path name on the PC to put the image
Step 5: Collect other pertinent information:
9 Version of the software (available in Help->|About dialog)
9 Amount of disk space on the drive specified to place the CD-ROM image
9 The job log of the iSeries server job (the name of the job will be
BSCCLIENT). To ensure a job log is produced, change the BSCTCP job
description in the BSCCDROM10 library to log messages to the job log. To
ensure a job log is produced issue the following command:
CHGJOBD JOBD(BSCCDROM10/BSCTCP) LOG(4 00 *SECLVL)
123
9 The settings specified in the software used to burn the CD-ROM.
124