1
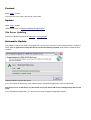
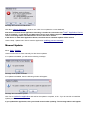
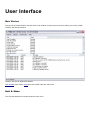
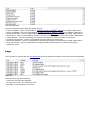
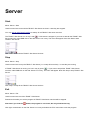
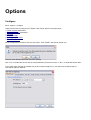
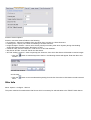
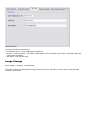
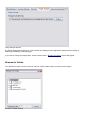
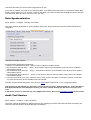
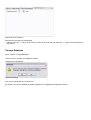
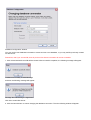
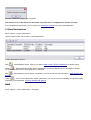
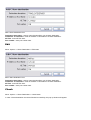
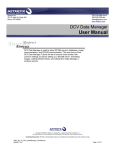
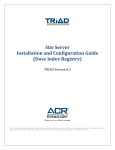
ACR© Triad™ Site Server
Click Once Software System
Version 3.0
8 July 2009
User’s Guide
American College of Radiology © 2009 All rights reserved.
Contents
Introduction.................................................................................................................................................................5
About Triad.............................................................................................................................................................5
Definitions..............................................................................................................................................................6
Help........................................................................................................................................................................7
About.................................................................................................................................................................7
Content..............................................................................................................................................................8
Update...............................................................................................................................................................8
Site Server Updating...............................................................................................................................................8
Automatic Update.............................................................................................................................................8
Manual Update..................................................................................................................................................9
User Interface............................................................................................................................................................10
Main Window.......................................................................................................................................................10
Unit & State.....................................................................................................................................................10
Logs..................................................................................................................................................................11
Server.........................................................................................................................................................................12
Start......................................................................................................................................................................12
Stop.......................................................................................................................................................................12
Exit........................................................................................................................................................................12
Options......................................................................................................................................................................14
Configure..............................................................................................................................................................14
Client Listener..................................................................................................................................................15
Scanner Listener..............................................................................................................................................15
Site Info............................................................................................................................................................16
Image Storage..................................................................................................................................................17
Browse for Folder.......................................................................................................................................18
Data Synchronization.......................................................................................................................................19
Audit Trail Service............................................................................................................................................19
Change Database..................................................................................................................................................20
C-Store Destinations.............................................................................................................................................22
Add..................................................................................................................................................................22
Edit...................................................................................................................................................................23
Check...............................................................................................................................................................23
Synchronize................................................................................................................................................................25
Site Users..............................................................................................................................................................25
Site Studies...........................................................................................................................................................25
Introduction
About Triad
The main purpose of ACR© TRIAD™-OA
system is to automate and facilitate
DICOM exchange processes between
ACR© and other interested institutions.
This schema describes TRIAD™ components interaction:
ACR© TRIAD™-OA Components Interaction Schema
Thus the TRIAD™ system includes the following modules:
• TRIAD™-OA Main Application Server - with Web server, Database Server and File Server included - for DICOM
images storing and administrative tasks.
• Web-based Client intended for administrative tasks and search for the images.
• TRIAD™ Site Server - for receiving of the DICOM files from C-Store scanners and storing them before
submitting to the TRIAD™ Main Server. TRIAD™ Site Server allows connection of TRIAD™ Rich Clients for
viewing and loading the DICOM series.
• TRIAD™ Rich GUI Client is implemented full ACR© TRIAD™-OA system functionality including P2P networking
(connection with TRIAD™ Application Server and Site Server), search for the images by different criterias,
uploading, submitting the DICOM image series from Client machine and the series from Site Server to the TRIAD™
Main Server, and image manipulation operations (viewing, editing, filtering).
This guide is addressed to TRIAD™ Site Server users only. For information on TRIAD™ Web-based client, please
refer to ACR© TRIAD™-OA Web Client Help or User's Guide. For information on TRIAD™ Rich GUI Client, please
refer to the TRIAD™ Rich GUI Client Help or User's Guide.
Definitions
• Anonymization – Personal data removing from DICOM file headers.
• Case – research on some subject of single patient. One Case contains multiple Series of DICOM images. Each
Case belongs to some Study.
• CTDW – Clinical Trials Data Warehouse. Uses TRIAD™ and CTMS as data sources.
• CTMS – Clinical Trials Management System. This system accumulates information about Studies from hospitals.
• C-Store – protocol for DICOM files interchange.
• C-Store scanner – radiological scanner device with C-Store protocol compliant interfaces or C-Store film digitizer.
• DICOMDIR file – file containing paths to Single-slice DICOM files constituting single Series.
• DICOM file header – part of DICOM file containing DICOM image metadata.
• DICOM metadata – associated with DICOM Image set of tags with values populated and interpreted according
DICOM standard.
• DICOM Series – Image (slice) or set of Images (slices) combined by special Series ID.
• DICOM standard - Digital Imaging and Communications in Medicine - a global Information-Technology standard that
is used in virtually all hospitals worldwide. The term "DICOM" is used for designation of special image with DICOM
standard. It can include one frame or a set of frames (multislice DICOM) and metadata.
• DICOM Study – Series or set of Series combined by special Study ID.
• Exam – research on some subject of single patient made simultaneously. Each Exam contains multiple DICOM
Series.
• IDX – software serves for Patient scheduling at Sites.
• Image - an Ordinary Image or a Slice.
• LMB - left mouse button.
• Multislice DICOM file - an image of DICOM standard composed of a set of frames (slices).
• Non-study Series – Series which does not belong to any Case or Study.
• Ordinary Image - Image of BMP, GIF,JPG, PNG or TIFF formats.
• Patient ID – identifier of a patient in single Site. Different Sites can have different patients with equal Patient IDs
assigned. Patient ID field is used in CTMS and set as Patient ID DICOM file header tag.
• Personal data – patient’s personal data existing in DICOM file headers.
• RMB - right mouse button.
• Series – ordered set of Slices. Most Series belongs to some Case.
• Series Metadata – common part of DICOM metadata of images included by Series, in TRIAD™ associated with
Series, can be added with additional TRIAD™ specific metadata.
• Site – hospital.
• Site user – user belonging to Site.
• Single-slice DICOM file - single file containing single Slice plus DICOM header.
• Slice - single image (frame) made in course of Study. Each Slice belongs to some Series.
• Study – research on some subject containing multiple Cases of patients.
• XML – extensible Markup Language.
• XSD – XML Scheme Document.
Help
Menu: Help
This menu contains items About (to view information about product version), Content (link to content help) and
Update (item for manual update the application).
About
Menu: Help - About
Click this menu item to view product version information:
ACR© TRIAD™-OA Application Information
Content
Menu: Help - Content
This menu item runs Triad™ Site Server content help..
Update
Menu: Help - Update
Use this menu item for manual updating the application.
Site Server Updating
Site Server Updating is performed manually or automatically.
Automatic Update
If the TRIAD™ Site Server setup was updated with a newer version than the current installed version of TRIAD™
Client, then on application startup Site Server will be automatically updated. Wait while the update is been
installed:
Updating TRIAD™-OA 3.0 Site Server
If you click Cancel in this window, then updating will be cancelled and application will not be launched.
Note that services of Site Server can be started only if Site Server DB version and Application Version are
equal.
If you reinstalled the Application, you can receive the error message on application startup:
Message about Unknown DB Version
Click No to change database to another one. Click Yes to update the current database.
Note that on the Site Server application launching it checks the connection with Triad™ Application Server,
and, for example - if Site Server and Application Server have different application versions, then you will
receive a message about it and Site Server services will not be started.
If Site Server is older than Application Server, then Site Server automatic update will be started.
Use the Help - Update menu item to start the Application updating process manually.
Manual Update
Menu: Help – Update.
Use this menu item to check manually for Site Server updates.
If no update is available, you will see the following message:
Message If No Update Available
If an update is available, then the following window will appear:
Message about Available Update
Click Yes to update the application and wait for the update to complete, or No - if you do not wish to install the
update just now.
If you updated the application, then you should restart it after updating. The message about it will appear.
User Interface
Main Window
The top part of ACR© TRIAD™-OA Site Server main window contains main menu which allows you running ACR©
TRIAD™ Site Server functions.
TRIAD™ Site Server Application Window
Unit & State pane and the Logs pane are located under the main menu.
Unit & State
The Unit and State pane is located under the main menu:
Unit and State Pane
This pane shows the state of eight Site Server services:
• User List Updater - service is responsible for updating the list of TRIAD™ Users from TRIAD™ Main Server
• Study List Updater - service is responsible for updating the list of TRIAD™ Studies from TRIAD™ Main Server
• Project List Updater - service is responsible for updating the list of TRIAD™ Projects from TRIAD™ Main Server
• Server Proxy - service is responsible for remote connections with TRIAD™ Rich Clients and TRIAD™ Main Server
• CStore Receiver - service is responsible for receiving the images from CStore scanners to Site Server
• Incoming File Processor - service is responsible for the processing of incoming files
• Submission Manager - service is responsible for submitting the images from Site Server to TRIAD™ Main Server
• Audit Trail Service - service is responsible for sending off audit trail information to a collection and logging
application events
Logs
The Logs pane is located under the Unit and State pane and contains information for STS (Site Technical Specialist):
Logs Pane
The structure of Logs is the following:
• Time when this event has happened
• Severity of the event - Info, Warning or Error
• Message - a shot description of the event
Server
Start
Menu: Server - Start
Use this menu item to start all the TRIAD™ Site Server services in case they are stopped.
You may set an auto launch option on startup for all TRIAD™ Site server services.
The TRIAD™ Site Server icon in tray is red (
), if Site server is stopped. If you want to start all the TRIAD™ Site
Server services, make RMB click on the Site Server icon in tray. The menu will appear. Now click Start to start
TRIAD™ Site Server:
Click "Start" to start all the TRIAD™ Site Server Services
Stop
Menu: Server - Stop
Use this menu item to stop the TRIAD™ Site Server (i.e. to stop all its services) - in case they are running.
If TRIAD™ Site Server is running, its icon in tray is green (
). If you want to stop all the TRIAD™ Site Server
services, make RMB click on the Site Server icon in tray. The menu will appear. Now click Stop to stop TRIAD™ Site
Server:
Click "Stop" to stop all the TRIAD™ Site Server Services
Exit
Menu: Server - Exit
Use this menu item to exit the TRIAD™ Site Server.
Remember that after you exit the program all TRIAD™ Site Server services will be stopped.
Note that if you click the
button, the program is not closed, but only minimized to tray.
Click right mouse button on the Site Server icon in tray and select the "Exit" menu item to exit the program:
Click "Exit" to exit the TRIAD™ Site Server
Double click the Site Server icon in tray (
,
or
- depending of application state) to bring the application to front.
Options
Configure
Menu: Options - Configure
Use this menu item to configure your TRIAD™ Site Server options for properly work:
• Client Listener Parameters
• Scanner Listener Parameters
• Site Info
• Image Storage
• Data Synchronization
• Audit Trail Service
When configuration is finished, click the "Ok" button. Then TRIAD™ Site server will ask you:
Question about Restart Application with New Settings
Click "Yes" to restart Site Server with the new parameters just at the moment, or "No" - to restart Site Server later.
If you made some changes by mistake and you don't want to apply them, click Cancel in the bottom part of
"Site Server Options" window:
Scanner Listener Options
Scanner connection listener fields are the following:
• IP to listen at - select an IP address from drop-down list to connect to C-Store Scanners.
• Listening Port - enter a port number for listening of C-Store Scanners.
• Image Reception Timeout - enter a value of time period (in seconds), after which System (during downloading
series) will change its status from "Receiving" to "Idle".
• Check AE Title - tick this checkbox in order to turn on AE Title validation.
• Site Server AE Title - enter AE Title for the Site Server.
• AE Title "Calling" keyword - enter a keyword(s) for Scanners, from which Site Server will be able to receive images.
• Click the
window:
button to add the keyword to the list - the following window will appear. Enter the title to this
Add AE Title Window
and click Ok.
• Click the
items.
button to remove selected keyword(s) from the list. Press Ctrl or Shift button to select several
Site Info
Menu: Options - Configure - Site Info
This pane contains information about Site Server which is necessary for authentication to the TRIAD™ Main Server.
Site Info Options
The Site Info fields are the following:
• ACR Master Inst. ID - enter ACR Master Institution ID.
• Site Key - enter the site key - ask TRIAD™ administrator for this information (see Triad™ Web Client Help and
User's Guide for details)
• Site Name - enter the site name
Image Storage
Menu: Options - Configure - Image Storage
This pane contains information about storage root directory on the Site Server, which is used for files that were
received from scanners.
Image Storage Options
By default Storage Root Directory is C:\Documents and Settings\<User>\Application Data\American College of
Radiology\TRIAD\Site [version]\Images.
If you want to change the Image folder, click the Select button. "Browse for folder" window will appear.
Browse for Folder
The "Browse for folder" window is used to select or create a folder where you want to store images.
Browse for Folder Window
Just select the folder you want to place images and click "Ok".
If you want to create a new folder (in the selected folder), click "Make New Folder" button. A new folder named "New
Folder" will be created. You can rename it. Click on the folder you want to rename with the RMB and select "Rename"
from the menu. Enter the name you want. Then click "Ok".
Data Synchronization
Menu: Options - Configure - Data Synchronization
This pane contains parameters for synchronization of the User, Study and Project lists with TRIAD™ Main Server
information.
Data Synchronization Options
Synchronization settings are the following:
• TRIAD™ OA Central Server URL - enter the URL of TRIAD™-OA Main Server.
• Synchronization user list every ... day(s) - enter period in days for synchronization of the user list from TRIAD™
Central (Main) Server.
• Synchronization study list every ... day(s) - enter period in days for synchronization of the study list from TRIAD™
Central (Main) Server.
• Synchronization project list every ... day(s) - enter period in days for synchronization of the project from TRIAD™
Central (Main) Server.
• Use a proxy server for your LAN - select this item in case you are using proxy to connect to Internet. In this case
you must provide proxy server IP address and port number.
Note that synchronization takes place every time you start TRIAD™ Site server - if it is configured properly.
Note that during start Site Server application checks version of Triad™ Application Server, and, if Site Server
and Application Server have different versions, you will be notified about it and Site Server services won't
start.
If Site Server version is older than the one of Application Server, Site server automatic update will be started.
Audit Trail Service
Menu: Options - Configure - Audit Trail Service
This pane contains parameters for audit trail service (log messages from Rich Client about its state and activity are
sent to the Site Server DB to be analyzed later if necessary):
Audit Trail Service Options
Audit trail service setting is the following:
• Cleanup log every <..> days - enter number of days. Then audit trail logs older then <..> days will be removed from
Site Server.
Change Database
Menu: Options - Change Database
Use this menu to change your database settings.
The dialog box will appear:
Attention Message
Click Yes to change DB or to view DB info.
By default, your current database information appears in the Database Configuration window:
Database Configuration Window
You may set the new database information to create and use a new database, or you may set DB, previously created
for Site Server.
Remember, that if you set new DB, then all previous Site Server information will not be accessible.
1. Click Ok and wait while new DB will be created. After successful completion, the following message will appear:
Database Successfully Created Message
and then the following message will appear:
Message about Restarting the Application
Click Ok to restart Site Server.
2. Click the Cancel button to cancel changing the database connection. Then the following window will appear:
Message "Database changing was cancelled"
Note that services of Site Server can be started only if DB version and Application Version are equal.
If you reinstalled the Application, you can receive the warning message at the start of the application.
C-Store Destinations
Menu: Options - C-Store Destinations
Use this option to add, edit or check C-Store Destinations.
C-Store Destinations window
Add (
) - add destination button. Click it if you want to add a new C-Store Destination. It's always active.
Delete (
) - delete destination button. Select a destination you want to delete and click this button to delete it.
It's active only when some C-Store destination is selected.
Edit (
) - edit destination button. Select a destination you want to edit and click this button. A new window will
appear.
Check (
) - check C-Store destination. Select a destination you want to check for availability and click this button.
Depending on its availability, a pop-up window will appear.
Add
Menu: Options - C-Store Destinations - Add button
Add C-Store destination form
Destination description - enter a name that describes your C-Store destination.
IP Address or Host Name - enter IP Address or Host Name of C-Store destination.
AE Title - enter AE Title here.
Port number - enter port number here.
Edit
Menu: Options - C-Store Destinations - Edit button
Edit C-Store destination form
Destination description - enter a name that describes your C-Store destination.
IP Address or Host Name - enter IP Address or Host Name of C-Store destination.
AE Title - enter AE Title here.
Port number - enter port number here.
Check
Menu: Options - C-Store Destinations - Check button
In case C-Store destination check has finished successfully, this pop-up window will appear:
C-Store destination check successful
In case the check didn't succeed other pop-up windows will appear describing the problem occurred.
Synchronize
Menu: Synchronize
The TRIAD™ Site Server application synchronizes the lists of Site Users, Site Studies and Site Projects from
TRIAD™ Main Server as often as it specified in the Options - Configure - Data Synchronization item.
But if you need to synchronize one of these lists or both just now - use menu item Synchronize - Site Users / Site
Studies
Site Users
Menu: Synchronize - Site Users
This menu item is to synchronize the Site Users information from TRIAD™ Main Server just now.
Site Studies
Menu: Synchronize - Site Studies
This menu item is to synchronize the Site Studies information from TRIAD™ Main Server just now.